Air AH-157 - Vacuum Cleaner RoboJet - Free user manual and instructions
Find the device manual for free Air AH-157 RoboJet in PDF.


User questions about Air AH-157 RoboJet
0 question about this device. Answer the ones you know or ask your own.
Ask a new question about this device
Download the instructions for your Vacuum Cleaner in PDF format for free! Find your manual Air AH-157 - RoboJet and take your electronic device back in hand. On this page are published all the documents necessary for the use of your device. Air AH-157 by RoboJet.
USER MANUAL Air AH-157 RoboJet
Thank you for purchasing our products. Please read all the instructions before attempting to operate this product.
Copyright© 2015 by RoboJet® All rights reserved. No part of this publication may be reproduced, transmitted, transcribed, stored in a retrieval system or translated into any language or computer language, in any form or by any means, electronic, mechanical, magnetic, optical, chemical, manual or otherwise, without the prior written permission of this company.
Trademarks:
All other logos, products, or company names mentioned in this manual may be the registered trademarks or copyrights of their respective companies, and are used for informational purposes only.
Technical support:
If any problems occur and this manual cannot provide the solution you need, please contact a local retailer or local authorized dealer.
Disclaimer:
RoboJet makes no claims or warranties, either expressed or implied, with respect to the contents hereof and specifically disclaims any warranties, tradability or suitability for any particular purpose. Furthermore, RoboJet reserves the right to revise this publication and to make changes from time to time in the contents hereof without obligation of this company to provide notification of such revisions or changes.
The user should follow the instructions provided in this user manual, but is ultimately responsible for assessing placement and safety when using this product.
General Safety Instructions:
THE USER OT THIS APPLIANCE SHOULD HAVE FULL KNOWLEDGE OF THE SAFETY INSTRUCTIONS AND UNDERSTAND THE POSSIBLE RELATED HAZARDS. THIS IS NOT A TOY. CHILDREN SHOULD NOT USE THIS WITHOUT SUPERVISION OF PARENTS OR ADULTS.
TO REDUCE THE RISK OF FIRE OR ELECTRIC SHOCK, DO NOT EXPOSE THIS ROBOT AND ALL OTHER PARTS TO RAIN OR MOISTURE.

Safety Precautions
| Please read the following safety and operation instructions thoroughly before you use this robot. |  | Please follow all safety operations and processes stated in this manual. |  |
| Please retain this manual for future reference. |  | Please make sure you have full understanding about the safe use of this robot and related parts. |  |
| Heed all warnings on the product to prevent any possible hazards or damages such as fire, short-circuiting or injury. |  | Don't use corrosive cleansers or chemical solvents to clean the product. |  |

Instructions
| This robot is for indoors use only. |  | When the robot is working, please pay additional attention to children or pets nearby. It's highly suggested to keep them away from the robot. |  |
| This robot is NOT a toy. Sitting or standing on this robot is strictly prohibited. |  | This robot is not designed to pick up debris that is still burning, smoking, or wet. It is also strictly prohibited to use this robot to clean up chemical particles or volatile liquids such like gasoline. |  |
| This robot is NOT a moving carrier. Please do NOT put any items on the top of the robot. |  | In case this robot is not used for a long period of time, please recharge the battery at least once every other month and store it in a cool and dry place after it is fully charged. |  |
| Since this robot is an electronic product, never immerse it in water or use it in a moist or wet environment. |  | Use only attachments, accessories and spare parts specified by the manufacturer. |  |
| Before the robot starts the cleaning process, please tidy up small items, such as clothing, power cords, cables, and loose fringes of rugs, to prevent any possible jam of the robot's rolling brush or suction nozzle. |  | Remove the battery from the robot and make sure all power is off before you start cleaning the robot. |  |
| Never touch the robot and any other parts, including the battery charger, power plug and power cord, when your hands are wet. | |||

Warning
Do not look directly into the UV light and do not touch the UV light bulb with bare hands or any sharp or conductive tools.  | The UV light is permanent fixture.Do not attempt to remove or replace the UV light. This replacement can only be performed by professional personnel authorized by the manufacturer. |  |
The product, mainly applicable to home, hotel rooms and small office and is good for cleaning various short-haired carpet, wood floor, hard floor, ceramic tile, etc.
Components of the cleaner:
- Main Unit
- Battery
- Adaptor
- Remote Control
- Side Brush
- Filter
- User Manual
- Home Base
- Hair Removal Tool
- Cleaning Brush
- Air Purifier Module (optional)
- Virtual Wall
- Wet Mopping Base
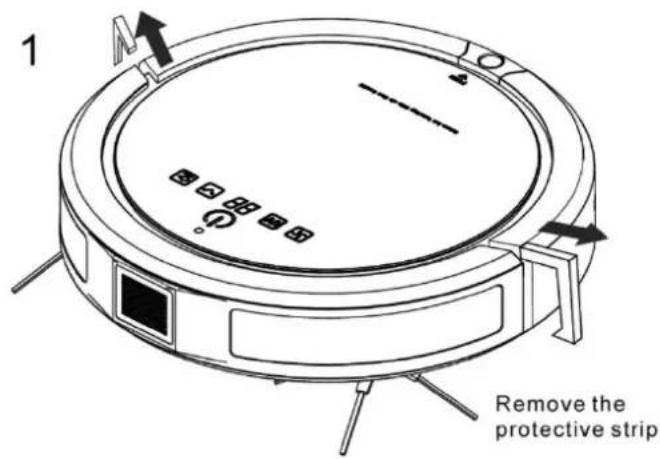
text_image
1 Remove the protective strip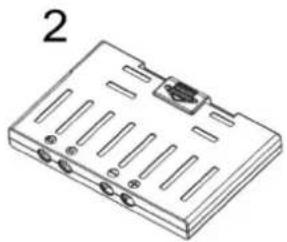
natural_image
Isometric line drawing of a rectangular electronic component with slots and a small protrusion (no text or symbols)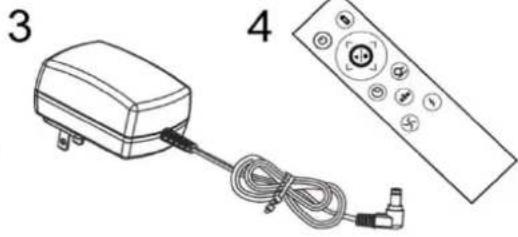
natural_image
Illustration of a remote control device with cable and connector, labeled 3 and 4 (no text or symbols on the device itself)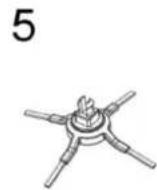


text_image
Robotic Vacuum Cleaner with Air Purifier Made in the first 10% of the product. The product is designed to be used to ensure that the product is not closed or closed. The product is not closed or closed.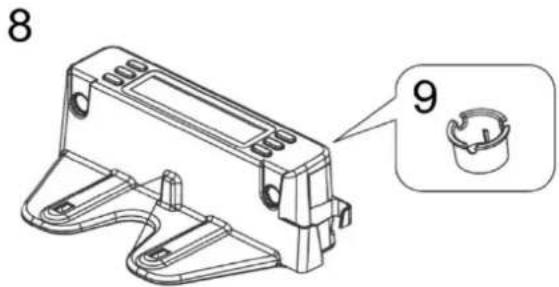
text_image
8 9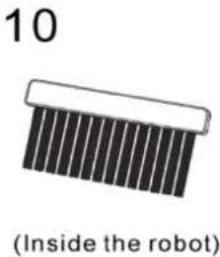
text_image
10 (Inside the robot)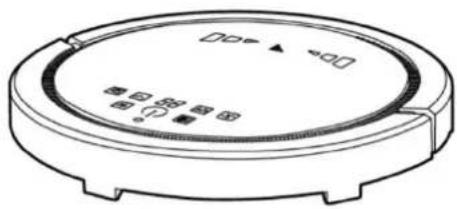
text_image
Technical diagram of a circular device with control buttons and indicator labels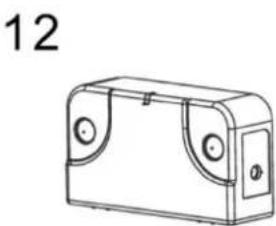
natural_image
Line drawing of a rectangular device with circular ports and a handle, labeled with number 12 (no text or symbols on the device itself)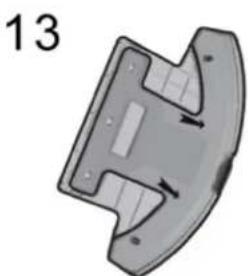
natural_image
3D rendered mechanical part with arrows indicating direction (no text or symbols)TOP
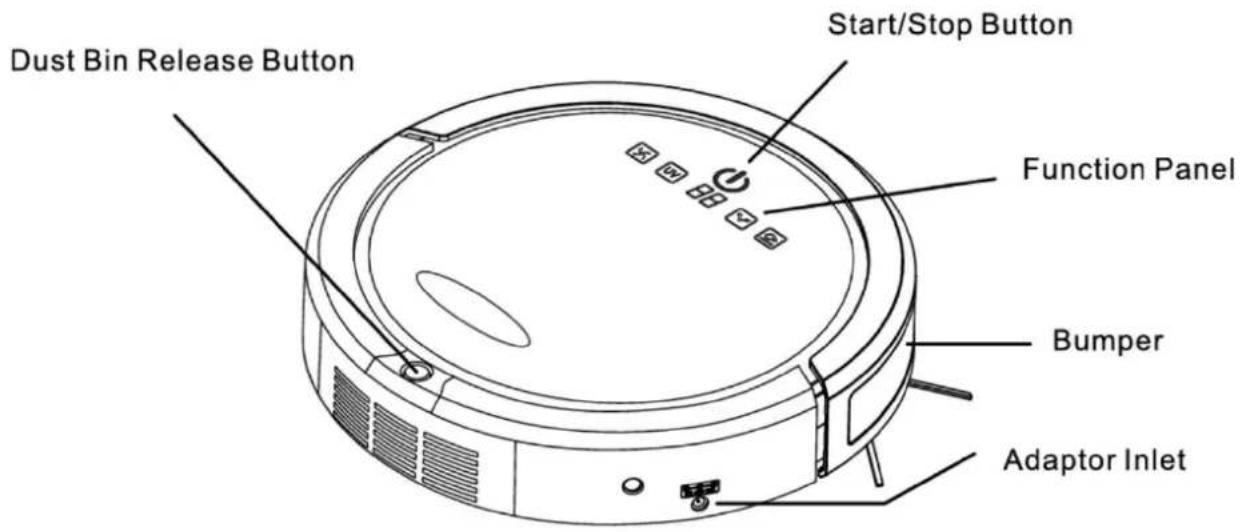
text_image
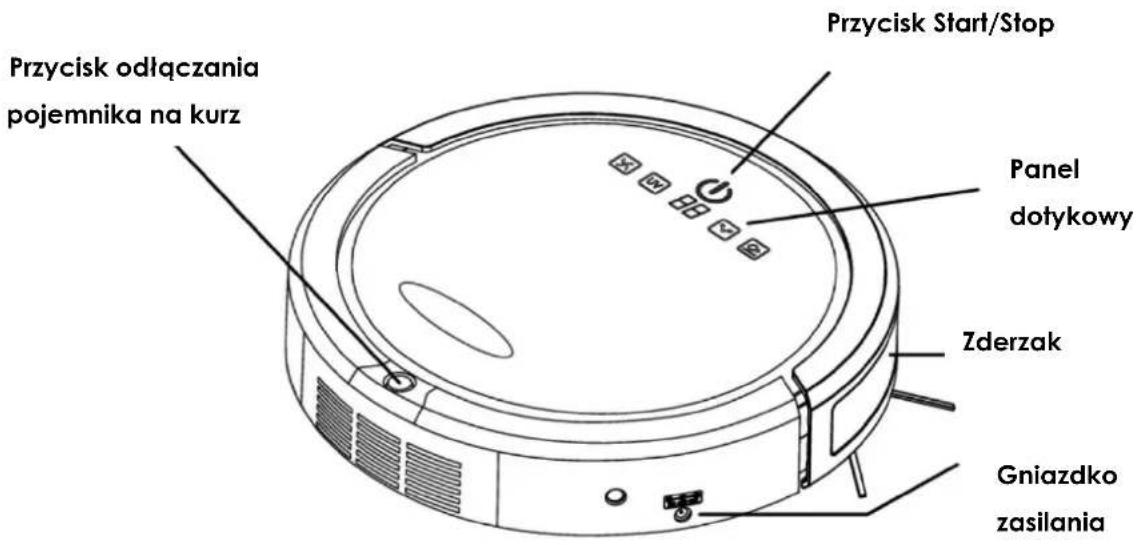
Dust Bin Release Button Start/Stop Button Function Panel Bumper Adaptor InletBOTTOM
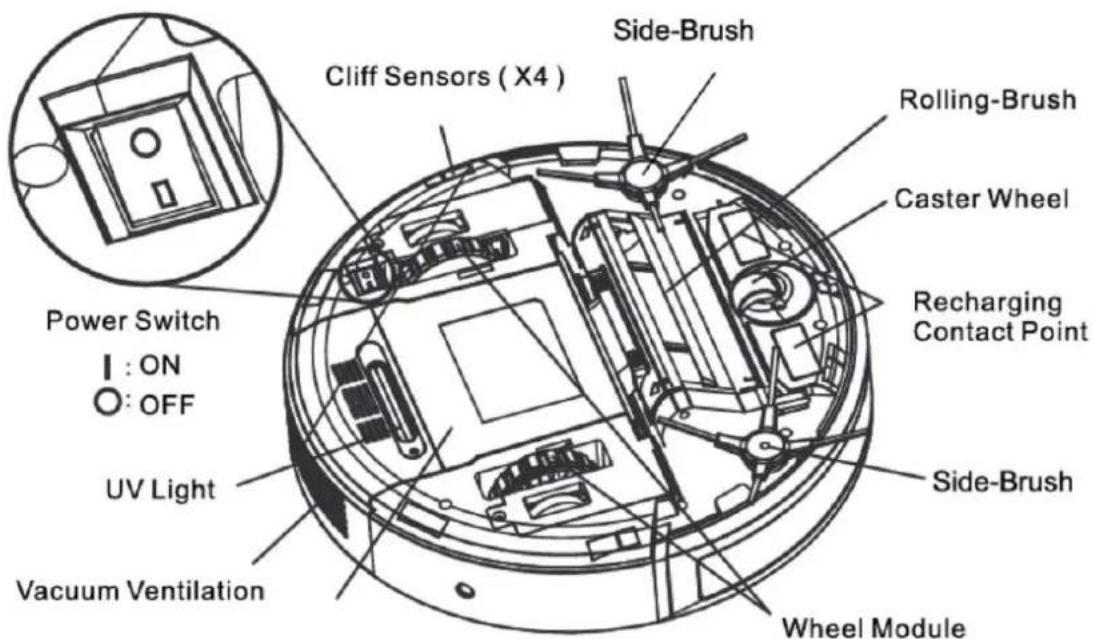
text_image
Power Switch I : ON O : OFF UV Light Vacuum Ventilation Cliff Sensors ( X4 ) Side-Brush Rolling-Brush Caster Wheel Recharging Contact Point Side-Brush Wheel ModuleDust Bin Module
Robotic Features
- Scheduler / Recharging Home Base – Auto cleaning with scheduler & auto recharge when battery charge level is 10%.
- Ultrasonic Obstacle Detection
- Collision Obstacle Detection
- Anti-falling Sensors
- Remote Control
| Cleaning Features | Function Description |
| Side Brushes and Suction Inlet | Powerful suction and full coverage of cleaning |
| Floating Rolling Brush | Allow the roller brush and suction to stay close to the ground, covers all the dead spot while remain full suction power. |
| Debris Filter & HEPA Filter | Debris filter holds normal debris and extends HEPA filter life span. High efficiency particulate air filter traps the fine particles which trigger allergy and asthma symptoms. |
| Ultrasonic Virtual Wall | When needed, use virtual wall to limit the vacuum machine's path. |
| Ultrasonic Dust Sensors | When dirty area is detected, perform detail cleaning with spiral mode. |
| Mop Track | Fully use every part of the mop instead of just the edge of the mop. |
| UV Light | Exterminate bacteria and mites |
1. Auto Mode
Once the robot is activated without specific cleaning instructions, it will automatically execute the auto function by repeating 5 different modes. The combination of different cleaning patterns will ensure the robot finishes the cleaning of any given space or area.
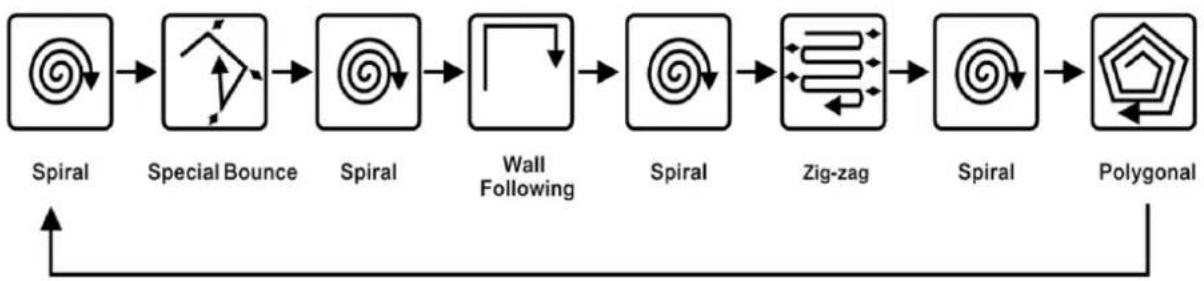
flowchart
graph LR
    A["Spiral"] --> B["Special Bounce"]
    B --> C["Spiral"]
    C --> D["Wall Following"]
    D --> E["Spiral"]
    E --> F["Zig-zag"]
    F --> G["Spiral"]
    G --> H["Polygonal"]
2. Manual Mode
Users can manually instruct the robot to perform any specific cleaning pattern depending on different conditions or spaces.
1. Battery Installation and Removal
Battery Installation
- Push the dust-bin release button and pull out the dust-bin.
- Flip the robot over, and push the battery into the slot.
- Push the battery until the hook is completely locked.
-
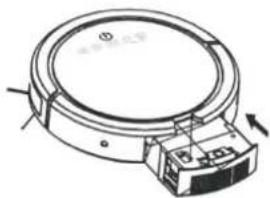
Flip the robot over again, and insert the dust-bin back.
-
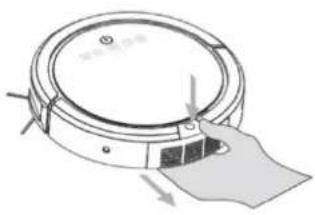
natural_image
Diagram of a robotic vacuum cleaner with a paper clip, showing airflow direction (no text or symbols)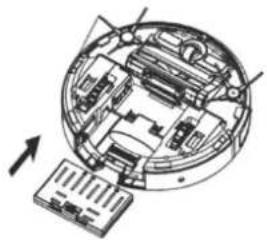
natural_image
Technical diagram of a circular mechanical assembly with internal components and a directional arrow (no text or labels)
natural_image
Technical diagram of a mechanical assembly with internal components and mounting brackets (no text or labels)4.
natural_image
Technical line drawing of a circular mechanical component with a separate connector (no text or symbols)Battery Removal
- Remove the dust-bin first and flip the robot over.
- Push the two battery hook buttons simultaneously. The battery will pop out automatically.
-
Remove the battery.
-
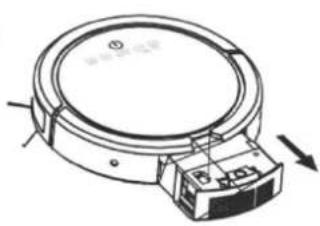
natural_image
Technical line drawing of a circular mechanical device with internal components and an arrow indicating motion (no text or symbols)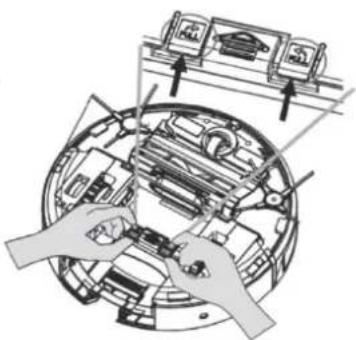
natural_image
Mechanical assembly diagram showing hands operating a circular component with internal parts and mounting brackets (no text or labels)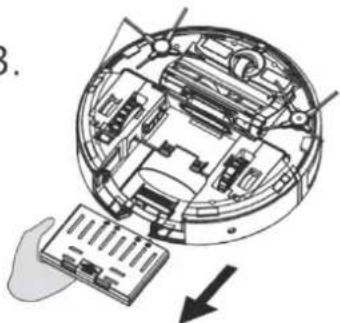
natural_image
Cross-sectional diagram of a mechanical device showing internal components and a hand inserting a component (no text or symbols)When the robot completes its cleaning cycle or the battery charge level is 10%, the robot will return to the Recharging Home Base automatically.
Installation
-
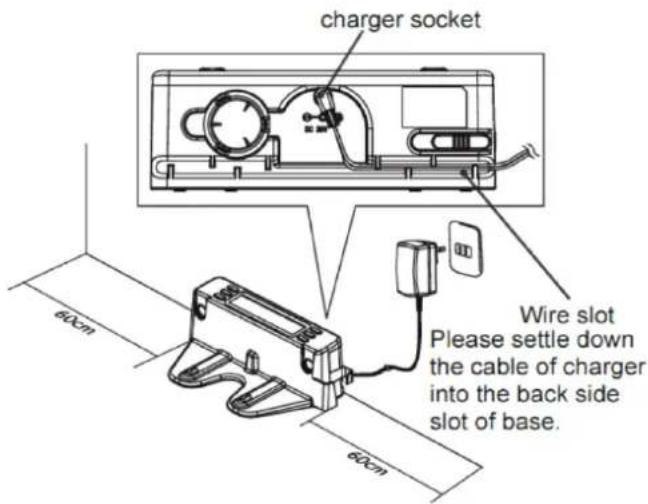
Position Home-base on an even floor surface against wall
-
Position it at location with at least a 0,6 m (2 ft.) clearance ground.
-
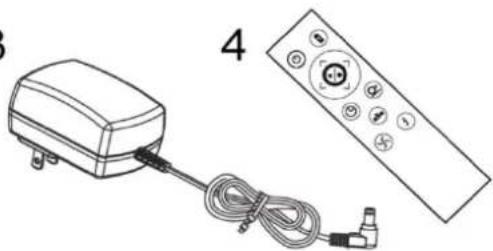
Connect the AC adaptor to the power socket on the rear side. Only use the AC adaptor provided
-
Always keep the Recharging Home Base power plugged in.
text_image
charger socket Wire slot Please settle down the cable of charger into the back side slot of base.Docking Test
-
Leave the robot on the floor somewhere near the Recharging Home Base.
-
Press the "Home" button on the remote control.
-
The robot will return to the Recharging Home Base automatically.
-
If the robot fails to dock, check the installation process to make the necessary adjustments to the Recharging Home Base until the robot can dock properly.
Pairing the Robot with Recharging Home Base
-
Keep press UV button until display show Cd.
-
Press Time button on Recharging Home Base, you will hear signal twice and the VAC button will blinks. Pairing completed with success.
Robot Battery Recharge
- When The Power Button on the robot blinks red, this indicates that the battery level is low.
• The robot will shut down the vacuum engine and go back to the Recharging Home Base.
- Users can also use the AC adaptor to plug into the robot directly to recharge the battery.
- When the battery is fully recharged, the Power Button will light up a solid blue. The recharging process is about 3 hours.
Robot Battery Care
- Rechargeable batteries are used in this robot. The batteries can last for hundreds of recharging cycles if it is properly cared for.
- Recharge the battery as soon as the robot is used.
- Keep the robot charged when not in use.
- If the robot will not be used for a longer period of time, remove the battery form the robot and store it in a cool and dry place.

- Robot may not find the Docking Station if it encounters an obstacle, the battery runs out or if the path to it is complicated. The Docking Station should be placed in the possibly open space.
- The battery temperature is high after cleaning. Charging may take longer.
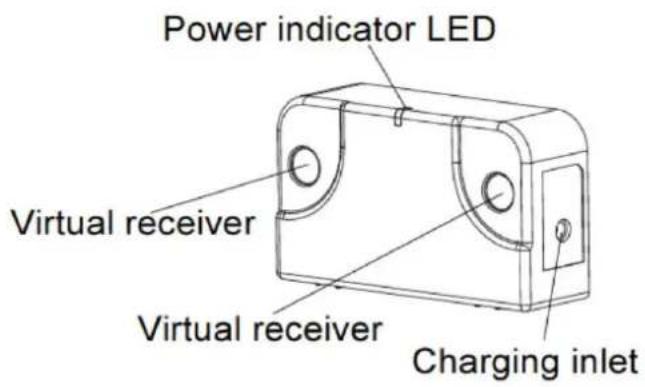
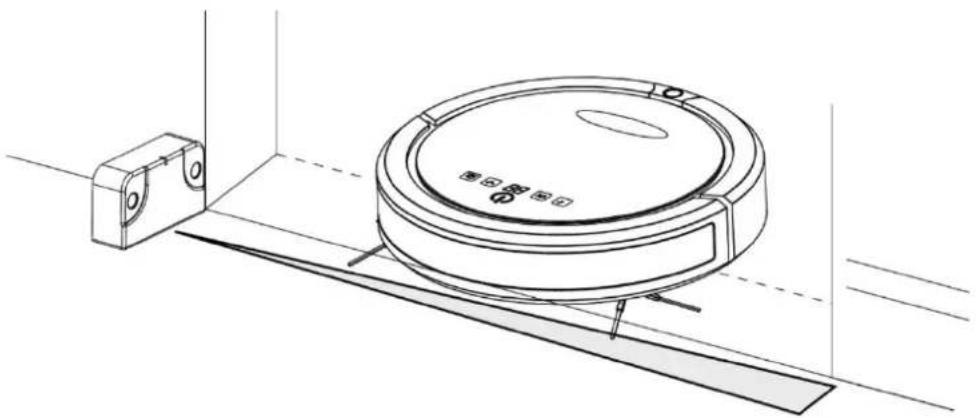
The Virtual wall create an invisible barrier that the robot will not cross.
text_image
Power indicator LED Virtual receiver Virtual receiver Charging inlet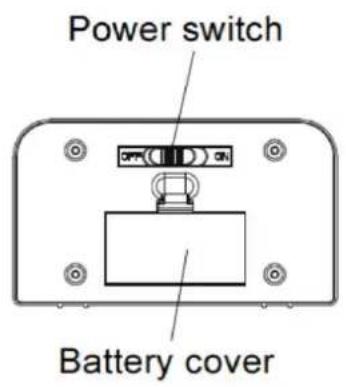
text_image
Power switch Battery coverInstructions:
- This Virtual Wall is powered by 2 batteries (included).
- To turn on the Virtual Wall, slide the power switch to "ON" position.
- When turned on, the blue LED light glows, then the Virtual Wall turns into waiting mode.
- The best effective distance of Virtual Wall barrier is about 3m (10 ft.)
- The LED light will blink when the Virtual Wall is low on battery.
text_image
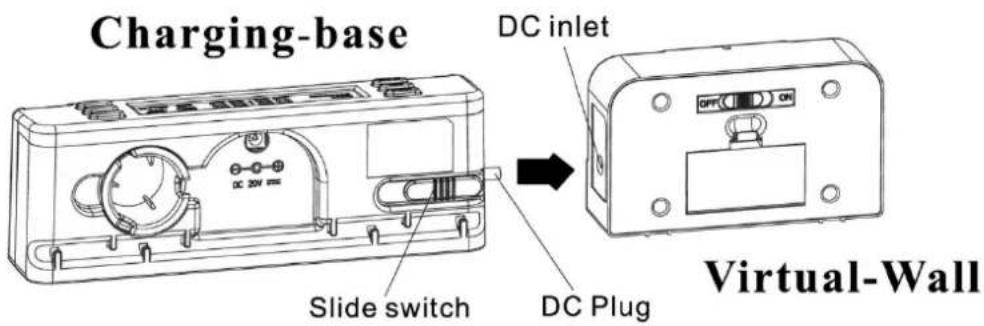
Charging-base DC inlet Slide switch DC Plug Virtual-WallYou can charge battery by plugging into charging base, please see the figure above.
Step 1: The power switch of Virtual Wall must set to "ON" position.
Step 2: Press and slide out the DC Plug from charging base.
Step 3: Plug the DC Plug into DC Inlet, the LED light will blink.
Step 4: When recharge is complete, LED will glow continuously.
- When the robot is cleaning, the Virtual Wall must position at least 3m (10 ft.) away from Charging Base, and avoid facing towards Charging Base.
- When the robot completes cleaning, you can power off the Virtual Wall by sliding the power switch to "OFF" position.
natural_image
Line drawing of a robotic vacuum cleaner mounted on a wall-mounted base, with no visible text or symbols.The robot detects the invisible barrier,
it will turn around and head to another direction.
Pairing Robot with ultrasonic virtual wall:
-
turn on the robot /it should be pushed away from the docking station/,
-
turn on the virtual wall,
-
touch and hold the UV button until the robot emits a double beep,
-
narrow the object by pressing and holding the button on the back of the virtual wall until the robot beeps.
Accessories Installation and Removal
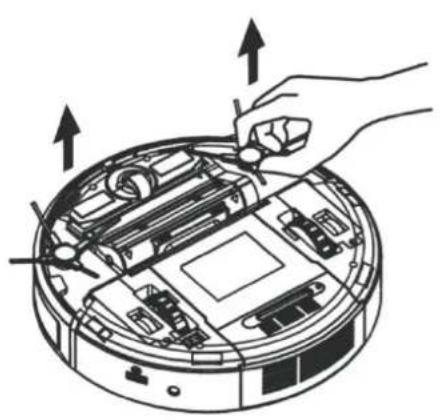
Side Brushes
Installation: Insert the side brushes into the socket. Press it firmly until it is properly locked.
Removal: Pull the side brushes from the bottom.
natural_image
Diagram of a robotic vacuum cleaner with hand operating the housing (no text or symbols)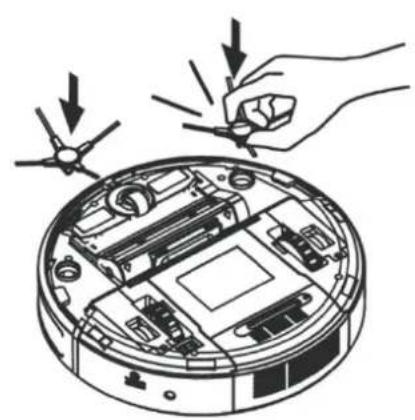
natural_image
Illustration of a robotic vacuum cleaner with hand and screwdriver, showing internal components (no text or symbols)Installation: Insert the main brush, then press the "Push" button and close the cover.
Removal: Press the "Pull" button, then pull out the main brush directly.
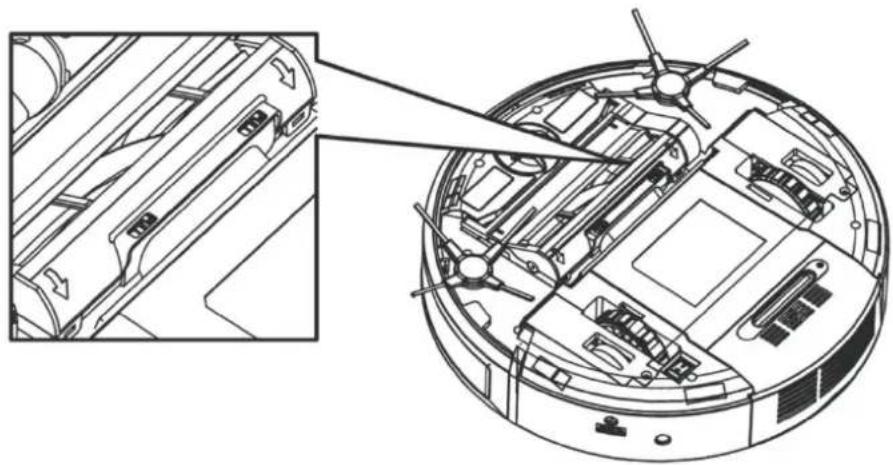
natural_image
Technical line drawing of a robotic vacuum cleaner internal components, showing internal wiring and housing (no text or symbols)Fragrance Installation
- Press the Dust Bin Release Button and remove the dust bin.
- Insert the fragrance particle into the compartment.
- Insert the Dust Bin back into the robot.

Caution
Do NOT use any liquid or oil aroma products in the Robot. This may cause possible damage to the robot.
1. Robot Panel Function
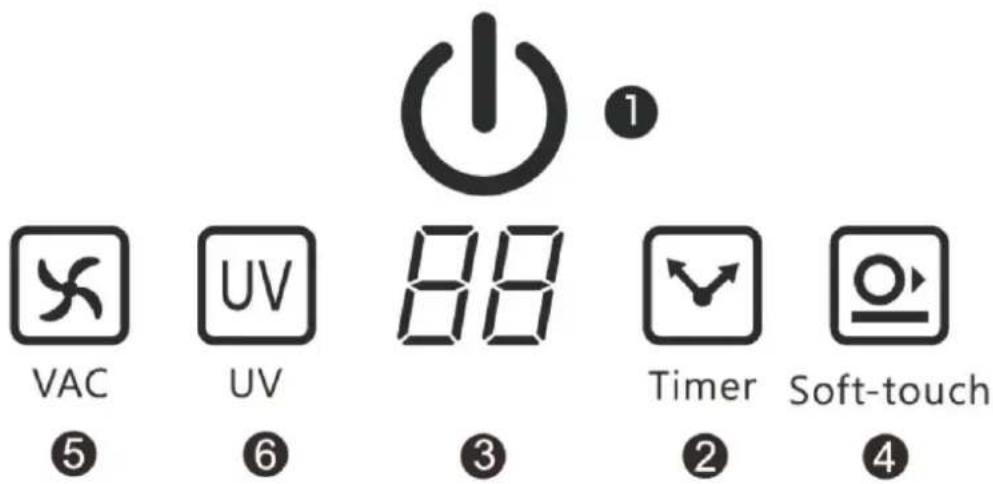
text_image
VAC UV 88 Timer Soft-touchPower Button
Press the Power Button to activate the robot. The button will light up blue.
The Power Button Light indicates the status of the robot and its system.
| Power Button Light | System Status |
| Red Pulse | Battery Level is low |
| Blue Pulse | The battery is recharging |
| Solid Blue | The battery is fully recharged |
1. Start/Stop Button:
Press this button and it will light up blue. The robot activate to perform the cleaning cycle. Press the button again to stop the cleaning cycle.
2. Timer
12 different cleaning time setting options are available. Users may use their remote control to enter specific cleaning time settings (10 mins, 20 mins, 30 mins ... 120 mins), the selected setting will be shown on the display. When the robot is activated, the default cleaning time setting is the last previous time setting.
3. Display of Timer/Cleaning Mode/Error Message
- There are 6 different cleaning patterns that the robot uses during the cleaning process.
- Spiral
- Special Bounce
- Wall Following
- Zig-zag
- Polygonal
A. Automatic (the combination of patterns 1-5)
Users may use their remote control to select a specific cleaning pattern. The number or letter "A" will be shown on the display.
Users may also interrupt the cleaning cycle by pressing the "Home" button on the remote control. When the command is entered, the robot will stop cleaning and go back to the Recharging Home Base.
- Error Messages:
If there is something wrong, the robot will stop working immediately and show an error message on the display. Description of error messages are shown below.
| Error Code | Suggested Actions |
| E1 Front drop sensor overtime/Robot lifted up | The robot might be trapped in a specific area where there are stairs or a floor edge. |
| E2 Charging error | Please refer the correct installation process of the Recharging Home Base and try it again. |
| E3 Bumper touch over time | The robots front bumper is stuck. Check the front bumper. |
| E4 Battery Overheating | Stop using the robot for at least 60 min and then restart it again. If this message still shows up, please contact your local warranty service provider. |
| E5 Left wheel overloaded | Check the left wheel, and remove any objects stuck in it. |
| E6 Right wheel overloaded | Check the right wheel, and remove any objects stuck in it. |
| E7 Side brush overloaded | Check both side brushes to remove any jammed objects. |
| E8 Main brush overloaded | Check the rolling brush to remove any jammed objects. |
| E9 Vacuum motor overloaded | Stop using the robot for at least 60 min and then restart it again. If this message still shows up, please contact your local warranty service provider. |

Caution
When dust bin is full, the error message display will show "00".
Please clean up the dust bin prior to the use of the robot again.
2. Remote Control Function
All function buttons on the robot's front panel ale available on the remote control. There are some additional unique buttons on the remote control shown below.
Power Button: Press this button to activate or to shut down the robot.

Start/Stop Button: Press this button to activate the robot perform or to stop the cleaning process.
Direction Buttons: Directional buttons (Left/Right/Reverse/Forward) for users to control the movement manually.

Timer Button: To set up the cleaning time.
Home Button: This function is to interrupt the robot's cleaning process and to command it to go back to the Recharging Home Base directly.
Mode Button: To manually set up the cleaning mode of the robot. Each press will command the robot to change its cleaning mode in the sequence of the following patterns. Users may also find the current pattern code on the robot's display panel.
1: Spot
2: Special Bounce
3: Wall Following
4: Zig-zag
5: Polygonal
A: Automatic (the combination of patterns)

UV Button: Press this button to activate or to shut down the UV light.

VAC Button: Press this button to activate or to shut down the vacuuming motor.

Soft-Touch Button: Press this button to activate or to shut down the soft-touch function.
3. Cleaning Operation
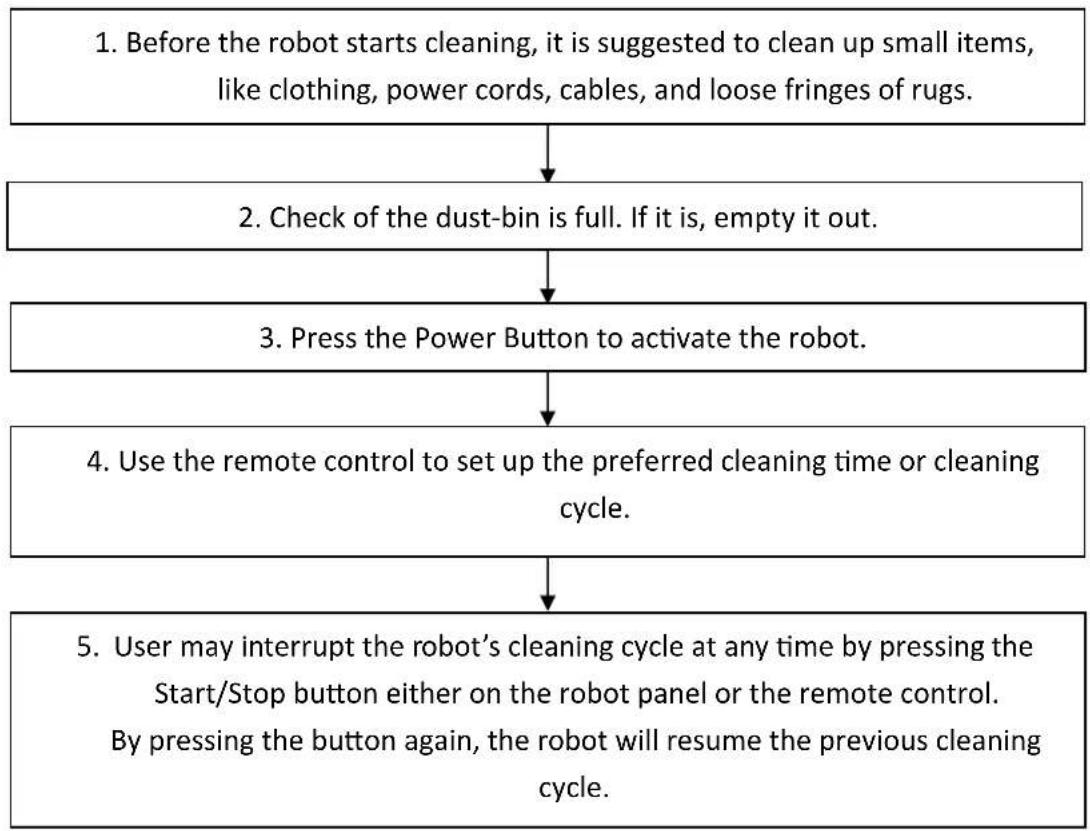
flowchart
graph TD
    A["1. Before the robot starts cleaning, it is suggested to clean up small items, like clothing, power cords, cables, and loose fringes of rugs."] --> B["2. Check of the dust-bin is full. If it is, empty it out."]
    B --> C["3. Press the Power Button to activate the robot."]
    C --> D["4. Use the remote control to set up the preferred cleaning time or cleaning cycle."]
    D --> E["5. User may interrupt the robot's cleaning cycle at any time by pressing the Start/Stop button either on the robot panel or the remote control. By pressing the button again, the robot will resume the previous cleaning cycle."]
4. Schedule Setting
EN
Users may program the robot to perform the cleaning cycle on any preferred day and time. This scheduling function is built-into the Recharging Home Base with the LCD display and several setting buttons. In order to perform this function, the Recharging Home Base needs to be plugged in at all times.
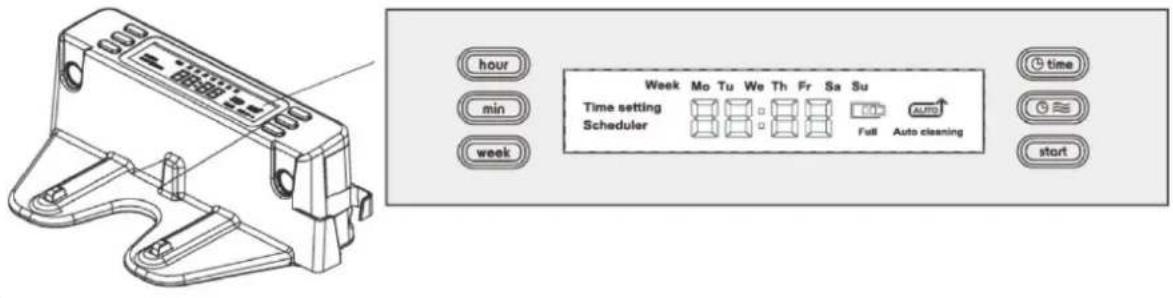
text_image
hour min week Time setting Scheduler Week Mo Tu We Th Fr Sa Su Full Auto cleaning time startSetting Your Local Time
- Press the button "Time" first. The LCD display will show "Time Setting".
- Press the "Week" button to choose the correct weekday.
- Once the chosen weekday appears on the display, press the button again.
- Follow the previous steps to complete the settings of "Hour" and "Min".
Scheduling The Robot
- Press the "Schedule" button first. The LCD display will show "Scheduler".
- Press the "Week" button. The LCD display will show "Mo" (Monday) blinking.
- If Monday is the chosen day, press the "Week" button again. Then Monday will be programmed in.
- The setting function will automatically change to the next following weekday every 8 seconds. Press "Week" when the chosen day appears on the LCD display to complete the settings.
- Follow the previous steps until you have finished all cleaning day settings.
- Press the "Hour" button to complete the hour settings.
- Press the "Min" button to complete the minute setting.
- The schedule setting function will automatically quit if there is no input for more than 60 seconds.
- When all settings are finished, the selected cleaning date and time will be shown on the LCD display.
- After 10 seconds, the LCD display will go back to the clock display mode. Local current time will be shown on the display.
- The selected cleaning date will remain on the LCD display while the selected time is NOT.
- To check the programmed cleaning time, press and hold the "Schedule" button.
- For changing or deleting the set schedule, repeat the previous setting process.
When the robot is docked in the Recharging Home Base and is under the recharging process.
-
Press the "Start" button. The LCD display will show "AUTO". The robot will start one cleaning cycle as soon as the battery is fully charged.
-
Press the "Start" button and hold it for 3 seconds. The robot will stop its recharging process and leave the Recharging Home Base immediately for one cleaning cycle.
In order to keep the robot in the best condition and for the best cleaning performance, it is suggested to perform the following maintenance.
Dust bin and filter
Basic Cleaning
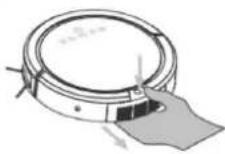
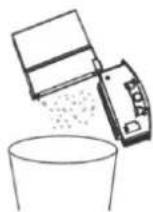
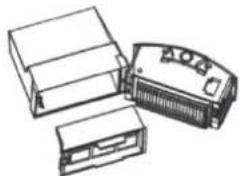
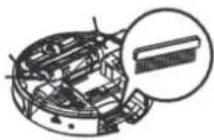
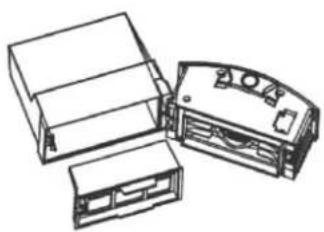
- Press the Dust Bin Release Button to remove the dust-bin.
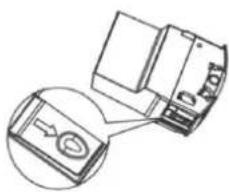
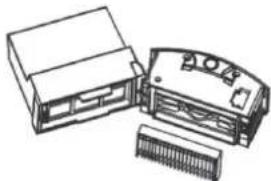
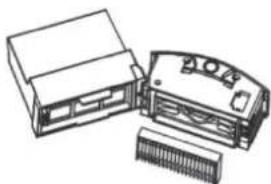
- Press the side button to release the dust compartment.
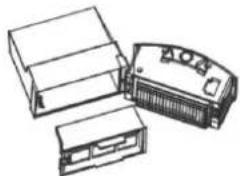
- Remove the debris filter.
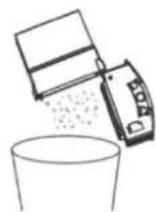
- Empty all dust and shake off all debris.
- Remove the dust filter.
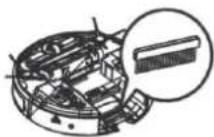
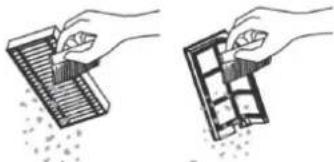
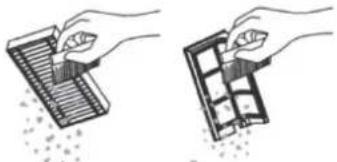
- Use the included brush to wipe out the dust filter and debris filter.
1.
2.
natural_image
Technical line drawing of a mechanical component with an inset close-up view (no text or symbols)3.
natural_image
Line drawing of three electronic device modules (no text or symbols)4.
5.
natural_image
Technical line drawing of a device housing with internal components (no text or symbols)6.
natural_image
Illustration of two hand-drawn diagrams showing a brush applying paint to a grid, with no text or symbols present.
Caution
To keep the robot working properly, the HEPA filter should be replaced at least every 2 months.
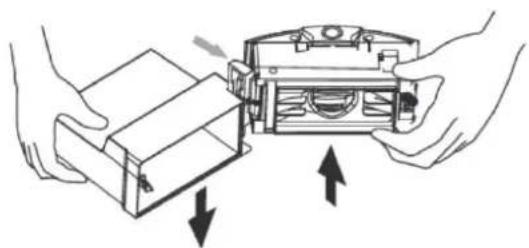
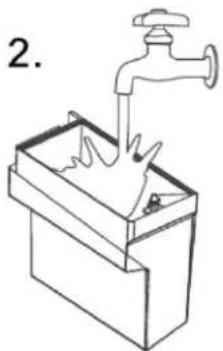
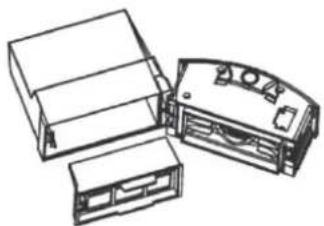
Deep Cleaning
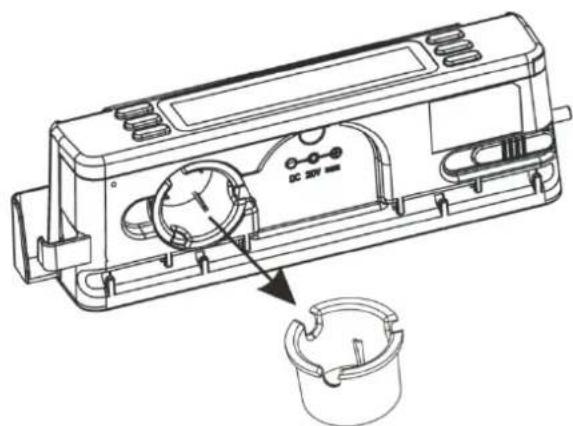
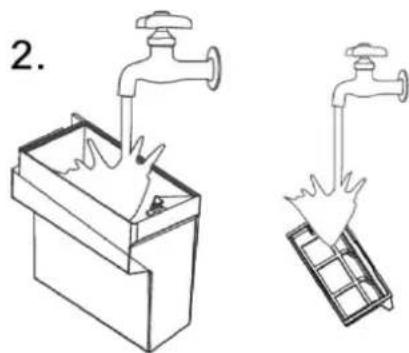
- Carefully separate the dust compartment from the vacuum motor unit.
- Gently wash the dust compartment and debris filter.
- Dry them thoroughly with a cloth.
It should be done at least once a month.
1.
natural_image
Illustration of hands assembling a mechanical component with arrows indicating assembly direction (no text or symbols)2.
natural_image
Line drawing of a hand washing inside a water bottle with a faucet above (no text or symbols)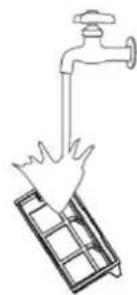
natural_image
Simple line drawing of a faucet above a tray with a hand holding the cup (no text or symbols)3.
natural_image
Technical line drawing of a device housing with two compartments and a central control panel (no text or symbols)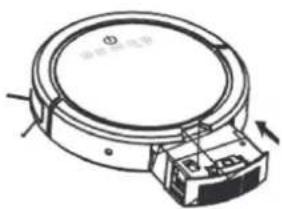
natural_image
Technical line drawing of a circular mechanical component with a base and mounting bracket (no text or symbols)Main Brush
- Remove the Main Brush from the module.
- Take out the cleaning tool included on the rear side of the Recharging Home Base.
- Slide the cleaning tool through the Main Brush.
It should be done at least once a month.
natural_image
Technical line drawing of a mechanical device housing with internal components and a close-up view of a cylindrical component (no text or symbols)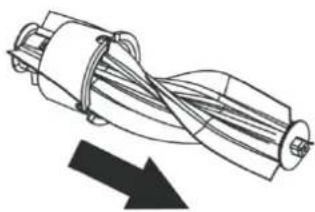
natural_image
Diagram of a mechanical or electrical component with intersecting wires and a downward arrow (no text or symbols)Side Brushes
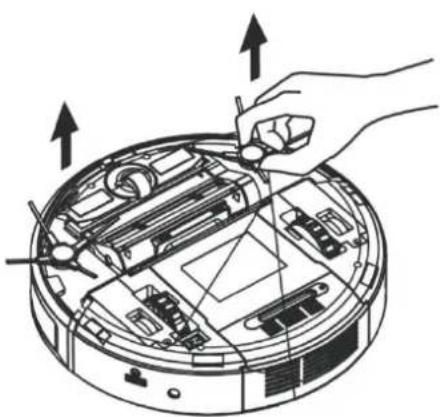
- Remove the side brushes from the module.
- Clean the side brushes and install it back on the module.
It should be done at least once a month.
natural_image
Diagram of a robotic vacuum cleaner with hand operating the housing (no text or symbols)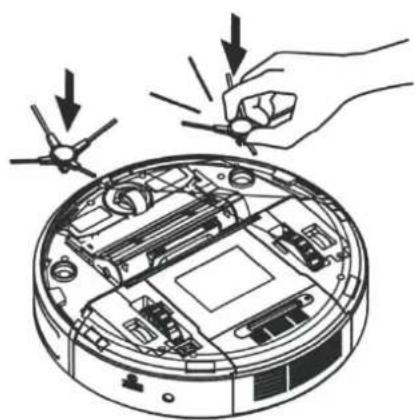
natural_image
Diagram of a robotic vacuum cleaner with hand and screwdriver, showing internal components and airflow direction (no text or symbols)Wheels and Sensor
- Check and remove all debris and dirt.
-
Wipe all sensors gently with a dry cloth. It should be done at least once a month.
-
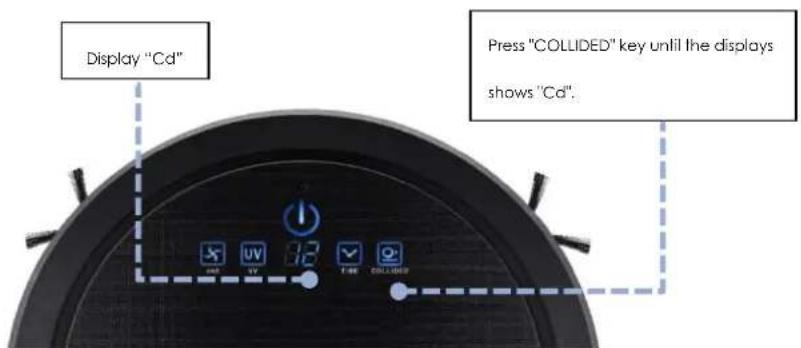
Turn on the unit and make sure it enters the standby mode, press "Collided" until the unit beeps twice and LED displays shows CD. This will enable the Wifi function and you can control the unit via APP. Once successfully connected to the network via APP the robot will beep and the blue light will turn on. If not further connection within 5 seconds the Wifi will go back to suspended mode.
1. Access to wifi
text_image
Display "Cd" Press "COLLIDED" key until the displays shows "Cd".2. Log out the wifi
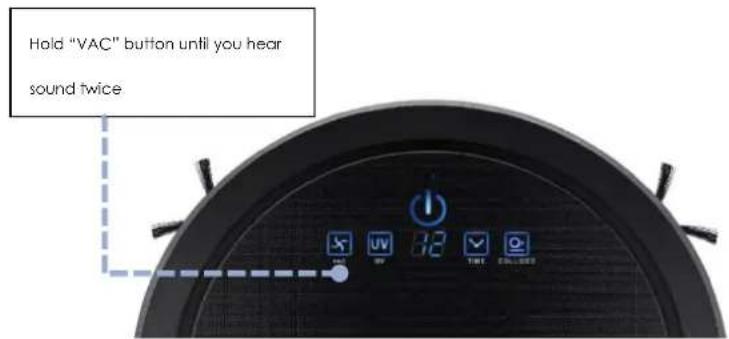
text_image
Hold "VAC" button until you hear sound twice- To disable / log out of Wifi mode once connected press the "Vac" key until the robot beeps twice. To enable Wifi mode you will need to perform operation from 1. Again.
- If Wifi networks changes you will need to perform operation from 1. again and also reconnect via APP.
Programming is available when the robot is not connected to the docking station. Connect your mobile device to the same Wifi network on which the robot will run.
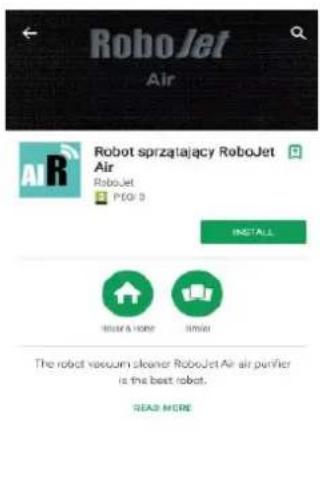
Please download the App "Robot sprzatający RoboJet Air" from Apple Store or Google Play then install it to your mobile or tablet.
text_image
RoboJet Air Robot sprzatający RoboJet Air RoboJet P001 9 INSTALL Show A Home Show The robot vacuum cleaner RoboJet Air air purifier is the best robot. SEAS MODE- Install the program and open the App
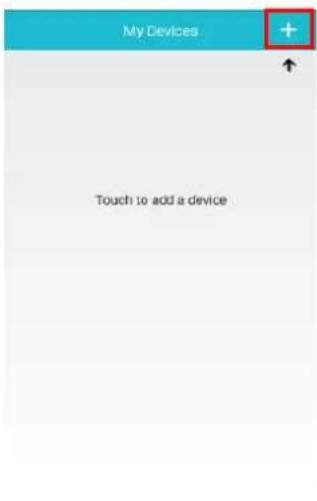
text_image
My Devices + ↑ Touch to add a device- Click the "+" at the top right of screen
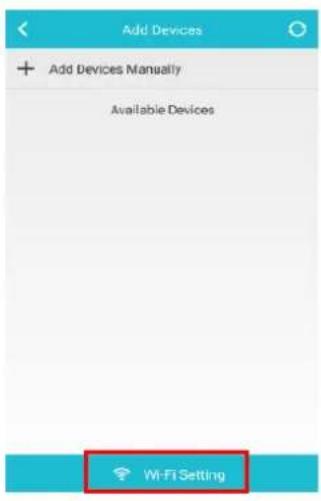
text_image
Add Devices + Add Devices Manually Available Devices Wi-Fi Setting- Click on the WIFI setting
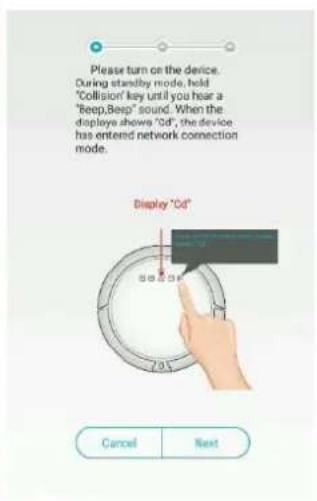
text_image
Please turn on the device. During standby mode, hold "Collision" key until you hear a "Reep,Beep" sound. When the display shows "Od", the device has entered network connection mode. Display "Od" Cancel Next- The robot's display should show "Cd"
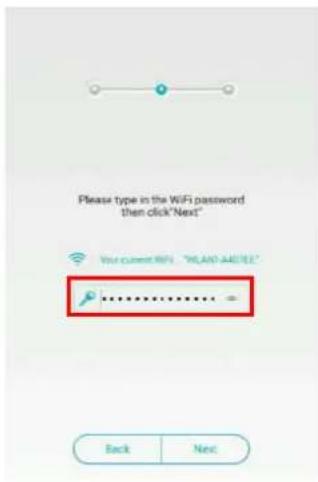
text_image
Please type in the WiFi password then click "Next" Your current WiFi "WLAND-AUGUEE" Back Next- Check if Wifi is correct and enter the password
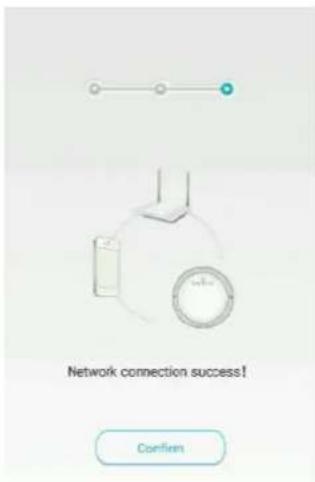
text_image
Network connection success! Confirm- Confirm connection
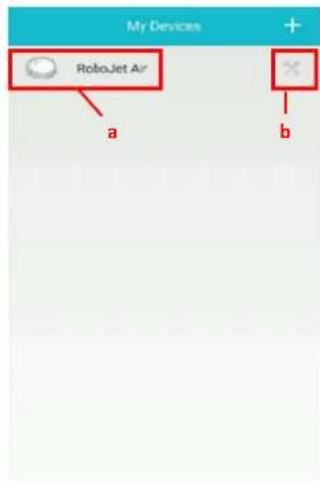
text_image
My Devices RoboJet Air a b- Click the connected device to move to user interface (a). To check the software version or delete the device click on (b)
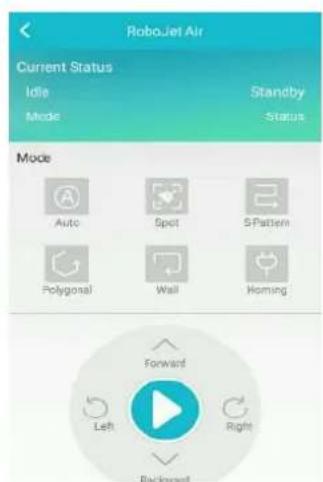
text_image
RoboJet Air Current Status Idle Mode Standby Status Mode Auto Spot S Pattern Polygonal Wall Homing Forward Left Right Backward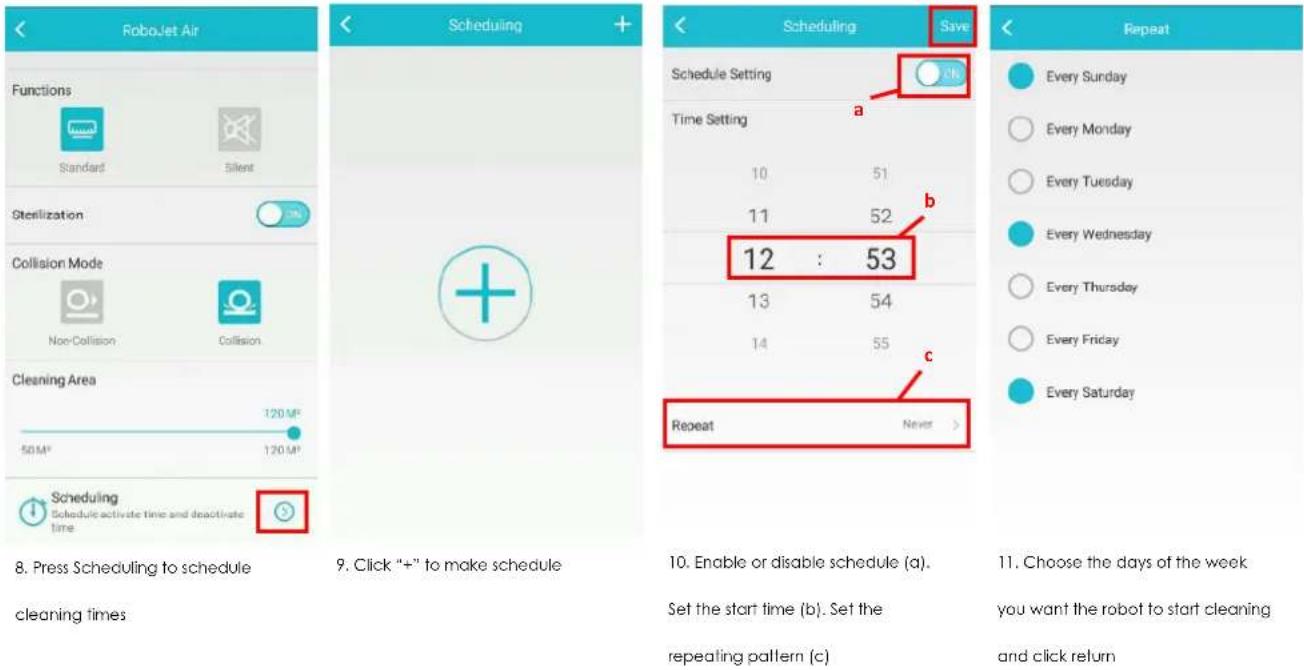
text_image
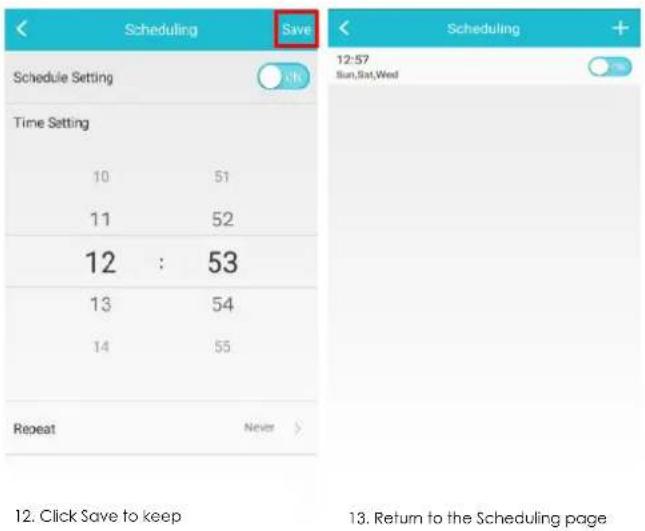
Scheduling Save Schedule Setting Time Setting 10 51 11 52 12 : 53 13 54 14 55 Repeat Never 12:57 Sun,Sat,Wed Scheduling + 13. Return to the Scheduling pageYou can add more than one mobile device under the same WIFI network to control the robot by installing the app and repeating the setup above.

natural_image
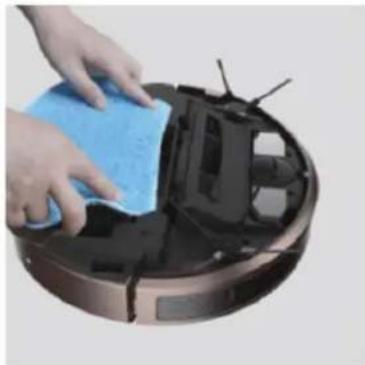
Close-up of hands holding a blue textured surface, possibly a sponge or towel, against a white background (no text or symbols visible)- Please align the cloth on the top of the water tank
natural_image
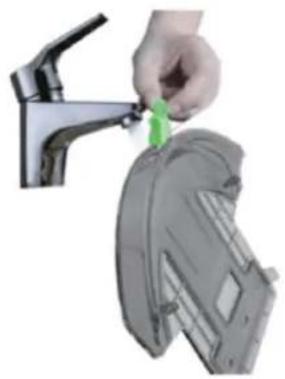
Hand placing a green tool into a gray garment sleeve on a faucet (no text or symbols visible)- Open the rubber stopper and fill the tank
natural_image
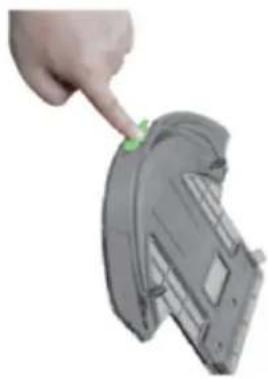
Hand pointing to a gray mechanical component with a green indicator finger (no text or symbols visible)- Reinsert the rubber stopper back into tank ensuring there is no water spill
natural_image
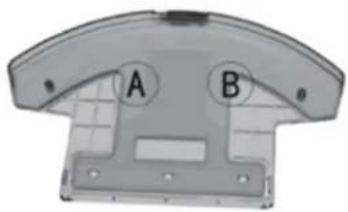
Top-down view of a mechanical component with labeled parts A and B (no text or symbols beyond labels)- It is normal for air bubbles to appear at the bottom of tank in the areas marked A and B
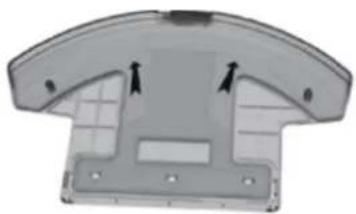
natural_image
3D rendering of a mechanical component with internal channels and mounting holes (no text or symbols)- Stand the tank vertically until the air bubbles are eliminated
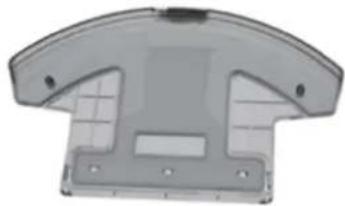
natural_image
3D rendering of a gray plastic mechanical component with cutouts and mounting holes (no text or symbols)- Make sure the cloth stars absorbing water from the tank after the air bubbles disappeared
Tips:
natural_image
Close-up of hands cleaning a robotic vacuum cleaner's air mask with a blue cloth (no text or symbols visible)-
Align the tank with the fixing holes at bottom of the robot then push the tank in
-
Hold the machine upside down to discharge the air from the water tank.
- Lay the machine carefully and don't flip it after injected water.

Caution
After finishing the wet cleaning, remove the water container immediately.
Do not save the water container in the robot if it's not working. This may cause damage the robot.
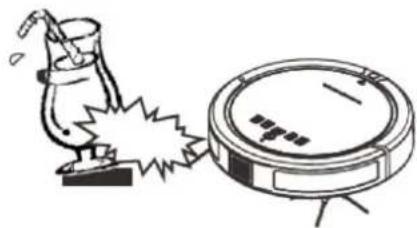
Tip#1: Prepare the cleaning area and remover large debries, loose cables, wires, and items that can be easily tangles with brush or knocked over.
natural_image
Illustration of a cartoon bomb on a fire next to a vacuum cleaner (no text or symbols)Remove vases, glasses, or small lamps, etc.
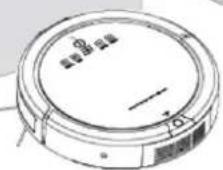
Remove small items that might obstruct Haier operation for faster and better cleaning
Tip#2: Leave enough clearance space(15" or more) for robot to operate.
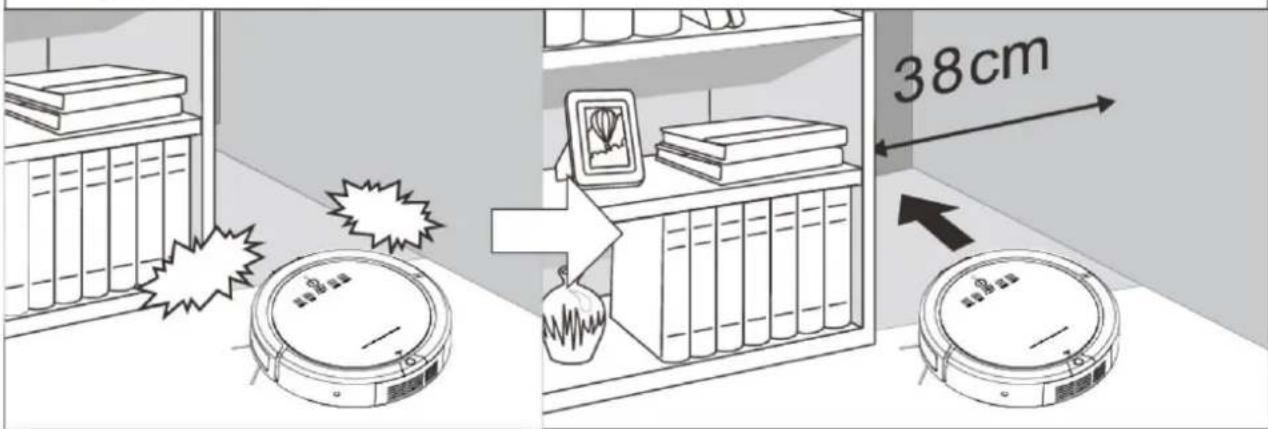
text_image
38cmTip#3: Do not let loose edges of rugs, drapes, table cloths, etc. to get caught by robot brushes. Roll the loose edges of rugs underneath.
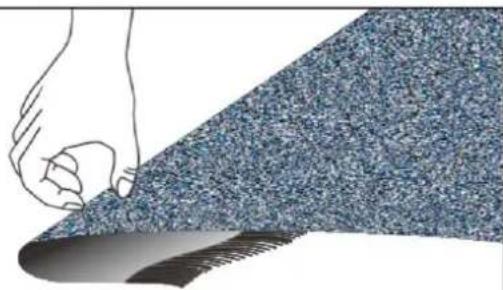
natural_image
Illustration of a hand pressing down on a textured blue surface with a dark base (no text or symbols)Fold the rug edges that have loose ends under it.
Remove plastic bags and long string or loose wires from the floor.
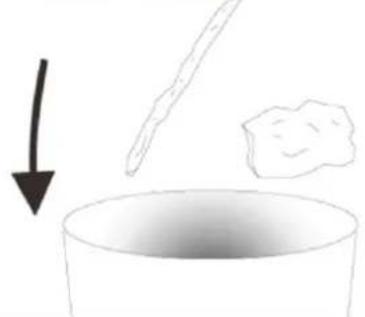
natural_image
Simple line drawing of a bowl with a spoon and a small object above it, no text or symbols present.| Tip#4: Fixing jams: If some object gets caught roller brush or side brush, turn the robot power off immediately. Remove anything thatcaused the jam before using the cleaner again. | ||
The robot will make a beeping sound when jammed. Power off the unit 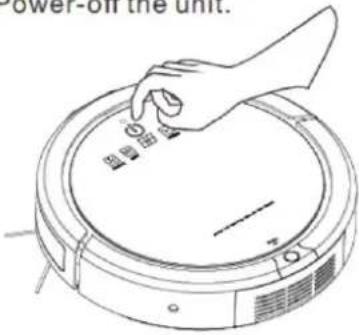 | Turn it upside down, and remover the objects. 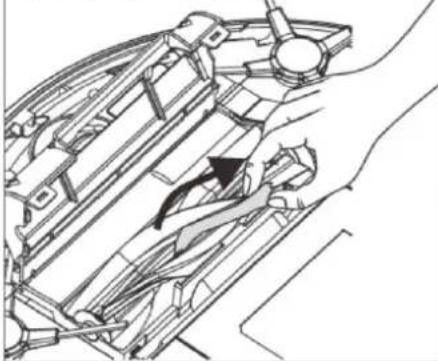 | Clean the vacuum entry. 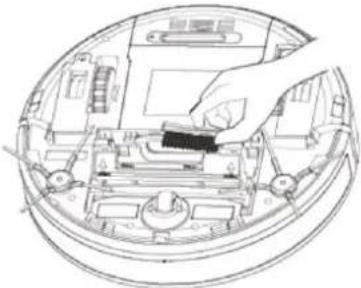 |
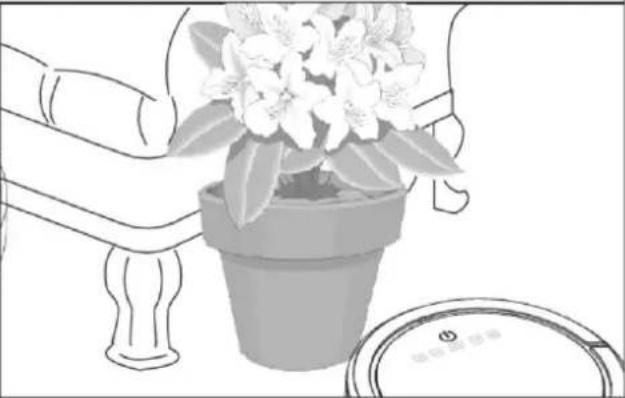
| Tip#5 Block off certain areas with Virtual Wall (or other objects) to get better cleaning result. | |
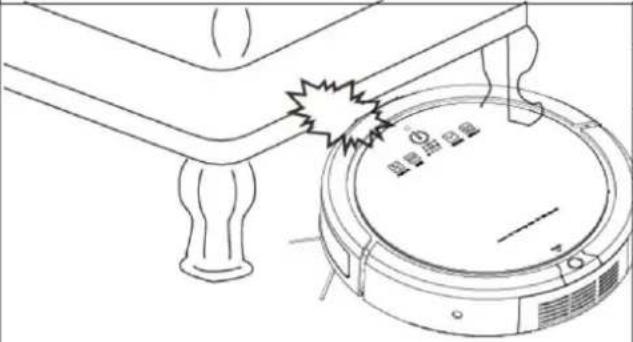 |  |
 | |
| The space under some furniture may not be high enough for the robot to get underneath. | Use potted plant to block the robot and prevent it from going these places. |
| Symptom | Cause | Solution |
| Error message | Sensor malfunction or system jammed | Check the previous error message section for correct action. |
| The Robot cannot power on | The battery is not installed or installed incorrectly | Check if the battery is still in good condition and installed correctly |
| Remote control malfunction | 1. The transparent film is not to taken off2. The battery is not correctly installed or the battery strength is too low | 1. Tear off the transparent film2. Check the installation of the battery or replace the battery |
| The Robot fails to return to the Recharging Home Base | 1. The Recharging Home Base isn't properly placed2. There are obstacles between the Recharging Home Base and the Robot3. The Robot is stuck or jammed | 1. Place the Recharging Home Base at a proper location and leave the Recharging Home Base with sufficient clearance space for the Robot to return.2. Remove any obstacles in front of the Recharging Home Base.3. Check and clean the Robot's wheel system. |
| The Robot cannot be recharged | 1. AC power isn't plugged.2. The Robot isn't correctly docked at the Recharging Home Base.3. The battery is over-heated. | 1. Plug the AC jacket onto the Recharging Home Base firmly.2. When the Robot is docked at the Recharging Home Base, manually make sure the Robot is properly placed.3. Don't use the battery fo at least 60 minutes until it's completely cooled down. |
| Rolling brush or side brush don't work | Brushes get stuck by debris or hair. | Clean brushes completely. |
| The Robot doesn't start cleaning after it's fully recharged | 1. The "Auto" function isn't set correctly.2. The battery is over-heated. | 1. Check the schedule setting section and reset the "Auto" function correctly.2. Don't use the battery for at least 60 minutes until it's completely cooled down. |
| The Robot keeps moving backward or turning around | Cliff sensors are blocked or covered by dust. | Wipe all sensors with a dry, clean cloth. |
| Recharging Time | ≤3 hours |
| Input/Output | Input: AC 100~240V 50~60HzOutput: DC 20V 1000mA |
| Dimension | Robot: 330x330x80mm; |
| Weight | Robot: 2.9kg(including Battery); |
Prawa autorskie:
natural_image
Isometric line drawing of a rectangular electronic component with slots and a small protrusion (no text or symbols)3
natural_image
Illustration of a remote control device connected to a cable and a remote control panel (no text or symbols visible)5
6

7
text_image
Rotated Vacuum Cleaner with Air Purifier Rotated vacuum cleaner with Air Purifier Rotated vacuum cleaner with Air Purifier8

natural_image
Technical line drawing of a mechanical housing component with a small inset showing a circular component labeled '9' (no text or symbols on the main diagram)natural_image
3D rendered mechanical part with curved surfaces and directional arrows indicating motion (no text or symbols)URZĄDZENIE OD GÓRY
natural_image
Diagram of a robotic vacuum cleaner with a hand holding the paper, showing no text or symbols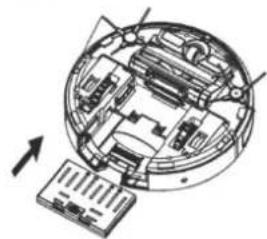
natural_image
Technical diagram of a circular mechanical device with internal components and an arrow indicating direction (no text or symbols)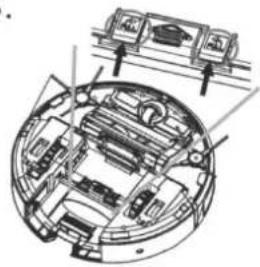
natural_image
Technical line drawing of a mechanical assembly with internal components (no text or symbols)4.

natural_image
Technical line drawing of a circular mechanical component with a base and mounting bracket (no text or symbols)natural_image
Mechanical assembly diagram showing hands operating a circular component with internal components (no text or labels visible)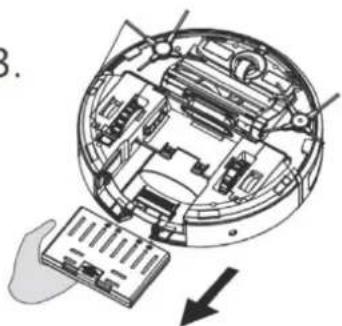
natural_image
Diagram of a mechanical assembly inside a circular housing, showing internal components and a hand holding a component (no text or symbols present)natural_image
Line drawing of a circular vacuum cleaner mounted on a platform, with a small bracket nearby (no text or symbols)natural_image
Diagram of a robotic vacuum cleaner with hand operating the internal components (no text or symbols)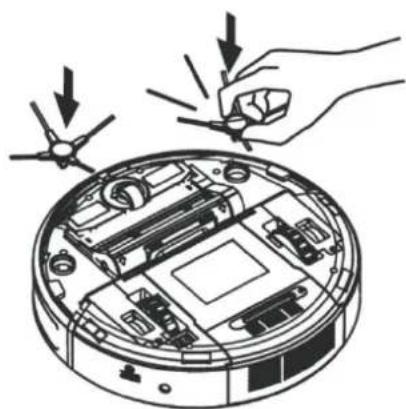
natural_image
Diagram of a robotic vacuum cleaner with hand and screwdriver, showing internal components and wiring (no text or symbols)Szczotka główna
natural_image
Technical line drawing of a circular mechanical device with internal components and a close-up inset showing internal structure (no text or symbols)natural_image
Technical line drawing of a mechanical device with no visible text or symbols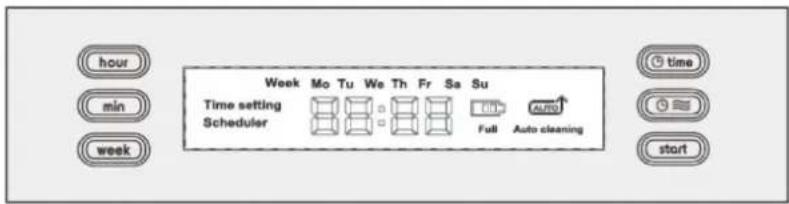
text_image
hour min week Week Mo Tu We Th Fr Sa Su Time setting Scheduler Full Auto cleaning time startnatural_image
Diagram of a device with a magnified inset showing a circular component (no text or symbols)3.
natural_image
Line drawing of three electronic device modules (no text or symbols)4.
5.
natural_image
Technical line drawing of a device housing and connector (no text or symbols)6.
natural_image
Illustration of two hand positioning a griddle and a grid device (no text or symbols)
Uwaga
natural_image
Illustration of hands assembling a mechanical component with arrows indicating assembly or movement (no text or symbols)2.
text_image
2.3.
natural_image
Technical line drawing of a device housing with internal components (no text or symbols)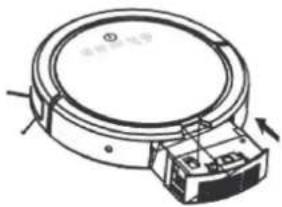
natural_image
Technical line drawing of a circular mechanical device with a base and mounting bracket (no text or symbols)Szczotka główna
natural_image
Technical line drawing of a device housing and motor assembly (no text or symbols)Szczotki Boczne
natural_image
Diagram of a robotic vacuum cleaner with hand operating the housing (no text or symbols)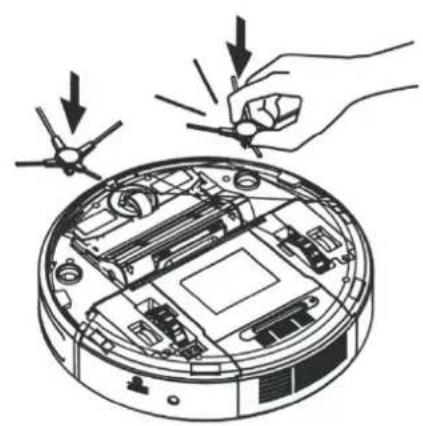
natural_image
Diagram of a robotic vacuum cleaner with hand and screwdriver, showing internal components and wiring (no text or symbols)Koła i czujniki
natural_image
Close-up of hands holding a blue textured object, possibly a cloth or paper piece (no text or symbols visible)natural_image
Hand placing a green clip into a gray plastic bag attached to a faucet (no text or symbols visible)natural_image
Hand pointing to a 3D-printed mechanical component with green marking (no text or symbols visible)natural_image
Transparent plastic mechanical component with labeled points A and B, showing internal structure (no text or symbols beyond labels)natural_image
3D rendering of a mechanical component with two directional arrows indicating movement or force (no text or symbols)natural_image
3D rendering of a mechanical component with cutouts and mounting holes (no text or symbols)natural_image
Close-up of hands cleaning a blue cloth on a robotic vacuum cleaner (no text or symbols visible)natural_image
Illustration of a cartoon-style bottle emitting a smoke next to a vacuum cleaner (no text or symbols)natural_image
Illustration of a hand pressing down on a textured blue fabric or material surface (no text or symbols)natural_image
Simple line drawing of a bowl with an arrow pointing downward and a stick above it, next to a cloud-like shape (no text or symbols)natural_image
Technical line drawing of a mechanical component with internal parts and directional arrows (no text or symbols)natural_image
Line drawing of a hand placing a component into a circular device (no text or symbols)natural_image
Line drawing of a potted flower placed on a chair with legs, next to a circular object (no text or symbols)-
This guarantee applies to all RoboJet products.
-
This guarantee applies only to products used for purposes unrelated to professional or commercial activity on the territory of Europe, and is valid only with the proof of purchase.
-
This guarantee can only be used through service points authorized by RoboJet. A list of authorized service points can be found on the official RoboJet website.
-
For natural persons, the guarantee is valid for:
• 24 months from the date of purchase of the main unit.
• 12 months for batteries.
- For businesses (purchase using a Tax ID), the guarantee is valid for:
• 12 months from the date of purchase of the main unit.
- 6 months for batteries.
- The guarantee includes free repair of purchased products aimed at removing physical defects that have appeared during the guarantee period, subject to point 13.
- Product defects must be claimed through the appropriate contact form ("Claim-notification") on the RoboJet website.
- The claim notification should contain:
• Name, surname, telephone number(s), email address, and User address (city, postal code, and street address).
-
Date of purchase, model.
• Description of defects. -
Properly submitted claim forms will be confirmed at the email address provided thereon by the User.
-
Repairs will be made as soon as possible, no later than 21 business days from the date on which the product was received by the service. In case replacement parts must be imported from abroad, the above deadline may be extended.
- The product(s) should be delivered to the address of the Guarantor in the original packaging (box with all accessories and filling material - otherwise the customer shall be responsible for all mechanical damage).
- If the claim is justified, natural persons - not businesses - have the right to a refund of shipping costs equal the lowest amount required for safe shipping of the goods. For refunds of shipping costs, please contact us through the contact form on www.robojet.tech. Refund payments are made by bank transfer to the bank account of the customer.
-
In case a claim is not justified (a claim against goods in proper condition or goods damaged by fault of the customer), the person filing the claim will be charged the costs of shipping and inspection of the goods.
-
The Guarantee does not cover:
• Consumables such as filters, brushes, wheels, cleaning pads, security cables, etc.
- Any unintended use of the goods.
- Claims against technical parameters, if they comply with those provided by the manufacturer in the user instructions or other legislative documents.
- Damage occurring as a result of external factors, such as mechanical factors, atmospheric phenomena, pollution, water damage, overvoltage, etc.
• Faulty operation due to installation of unauthorized software on the device.
-
In case a repair covered by the guarantee requires replacement of parts, the replaced part shall become the property of the Guarantor. Replacement parts may be of another brand with equivalent technical parameters.
-
The Buyer shall loose his or her right to the guarantee in case of seals that have been broken, serial numbers that have been tampered with, or in case the service of the manufacturer notices unauthorized repairs or changes to the construction of the device.
- The Guarantor may decline to honor the timely provision of warranty services in the case of unforeseen circumstances of force majeure, such as natural disasters, civil unrest, etc.
- The Guarantor shall not be responsible for damage or loss occurring as a result of the user's inability to use the device while being serviced.
- Customers are responsible for saving and storing backup copies of computer programs and data, as well as their re-installment after repair.
- RoboJet shall bear no liability for claims not listed in this guarantee (including loss of data storage devices, data, etc.).
- This guarantee does not cover the right of the Buyer to claim reimbursement for losses related to defects of the device.
- The legal relationship between the Buyer and the Guarantor shall be regulated solely by the provisions of this guarantee. Further claims for compensation shall be dismissed unless they result from mandatory provisions of the law.
- This guarantee is a supplement to the rights of the Buyer towards the Seller. This guarantee does not exclude, limit, or suspend the rights of the Buyer resulting from the laws in a given country.
In case of any questions, please use the contact form available on the RoboJet website.
This warranty does not require a seller's signature, stamp and its terms are binding upon proof of purchase