GGK1 - Oven AsVIVA - Free user manual and instructions
Find the device manual for free GGK1 AsVIVA in PDF.


User questions about GGK1 AsVIVA
0 question about this device. Answer the ones you know or ask your own.
Ask a new question about this device
Download the instructions for your Oven in PDF format for free! Find your manual GGK1 - AsVIVA and take your electronic device back in hand. On this page are published all the documents necessary for the use of your device. GGK1 by AsVIVA.
USER MANUAL GGK1 AsVIVA
natural_image
Black and white photo of a large K Thai-style grill with wooden legs and decorative panels (no text or symbols visible)CE
INHALTSVERZEICHNIS / TABLE OF CONTENTS
DEUTSCH:
ASSEMBLY INSTRUCTIONS 22
INSTRUCTIONS FOR CARE AND USE 30
WARRANTY DEVICE 32
Wichtig!
text_image
Technical diagram showing exploded view of a mechanical device with numbered parts and labeled componentsZUSAMMENBAU
WARNUNG!:
natural_image
Close-up of two black metal beams forming an X shape with a central bolt (no text or symbols visible)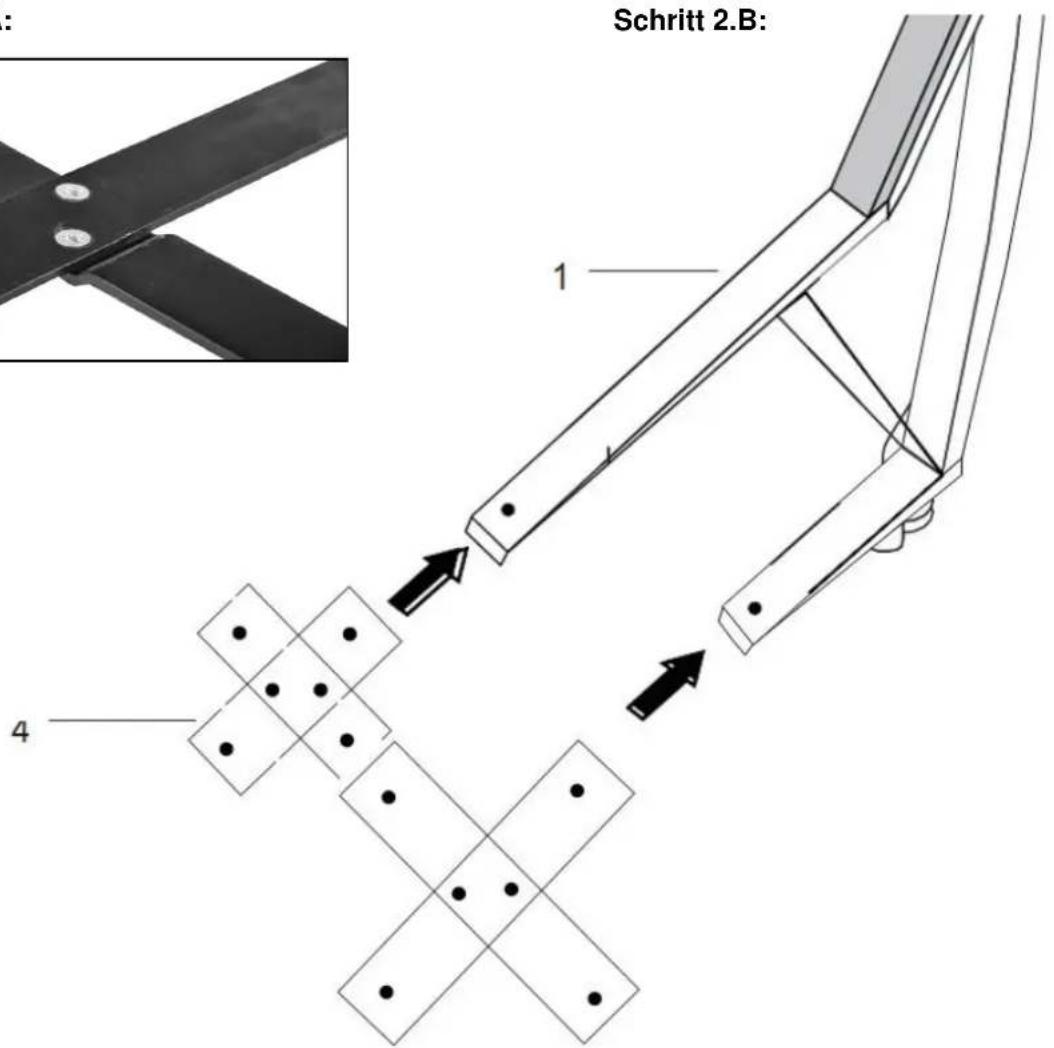
text_image
Schritt 2.B: 1 4Schritt 2.A :
text_image
Technical diagram of a circular mechanical component with numbered parts and labeled reference linesSchritt 7 :
Only the original packaging ensures adequate transport protection of the device and should therefore be kept at least in the statutory return period.
For our equipment we provide the legal warranty of 2 years.
For spare parts orders and repair orders, please contact your dealer or directly to AsVIVA by e-mail, indicating the customer number or invoice number. Our Service is available 24 hours by E-Mail.
Please note that in most cases the written contact with the detailed description will lead to success more quickly than the tel. In this case, we can send you additional documents for checking or correcting the fault directly.
To ensure that our service staff can help you optimally, please consider the following procedure:
3. Is a specific part damaged?
Please tell us the exact part number using the parts list.
4. Is there a fault with the unit?
Should you have the possibility of a video recording e.g. Mobile phone camera, pick up the error and send us the video or picture material.

text_image
As VIVA FITNESS | WELLNESS | E-BIKED- 41542 Dormagen
We would like to thank you for purchasing a device from AsVIVA and the trust you have shown us. We wish you a lot of pleasure and "good taste"!
Read all safety warnings and instructions carefully before assembling and operating your Kamado ceramic grill
This product is intended FOR OUTDOOR USE ONLY.
⚠️ Never leave a burning fire unattended.
DANGER of carbon monoxide poisoning. NEVER light this product or let it smolder or cool down in confined spaces.
DO NOT overload the unit with fuel
FIRE HAZARD – Hot embers may emit while in use.
CAUTION - DO NOT use petrol, white spirit, lighter fluid, alcohol or other similar chemicals for lighting or relighting.
It is highly recommended that you use lump charcoal in your Kamado. It burns for longer and produces less ash. Build up of ash can restrict airflow.
IMPORTANT: When opening the lid at high temperatures, it is essential to lift the lid only slightly, allowing air to enter slowly and safely, preventing any backdraft or flare-ups that may cause injury.
ALWAYS follow the FOOD COOKING INFORMATION stated on page 4 of this instruction manual.
DO NOT use the Kamado on decking or any other flammable surfaces such as dry grass, wood chips, leaves or decorative bark.
⚠ Ensure that the Kamado is positioned at least 2 metres away from flammable items. DO NOT use this Kamado as a furnace.
DO NOT handle or move the Kamado whilst alight as it will be hot. ALWAYS USE heat resistant gloves when handling hot ceramics or cooking surfaces. Allow the unit to cool down completely before moving or storing.
ALWAYS keep children and pets at a safe distance from the Kamado when in use. Always inspect the unit prior to use for fatigue and damage and replace as and when necessary.
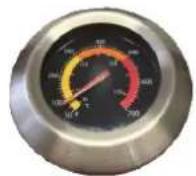
Thermometer
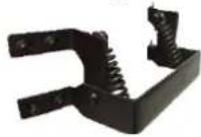
Dome Hinge
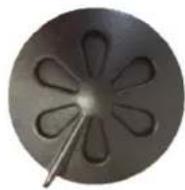
Adjustable Flue Control
Dome Handle
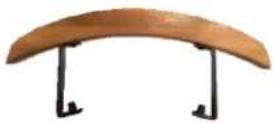
Weatherproof Cover

natural_image
Black fabric garment with folded edges and a small zipper (no text or symbols visible)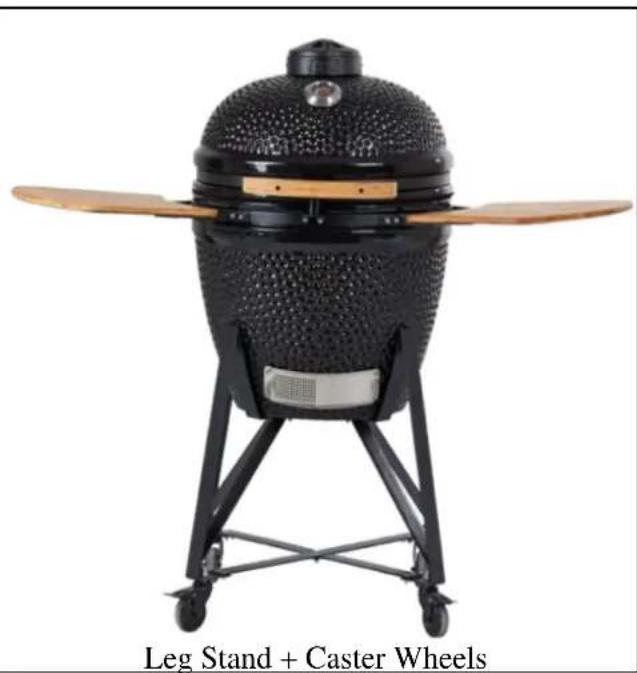
natural_image
Black Leg Stand + Caster Wheels with wooden blades and a textured body (no visible text or symbols on the device itself)Side Shelves
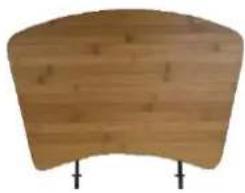
natural_image
Wooden curved object with two vertical supports at the bottom (no text or symbols visible)Primary Air Intake
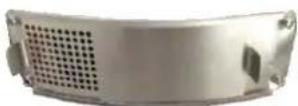
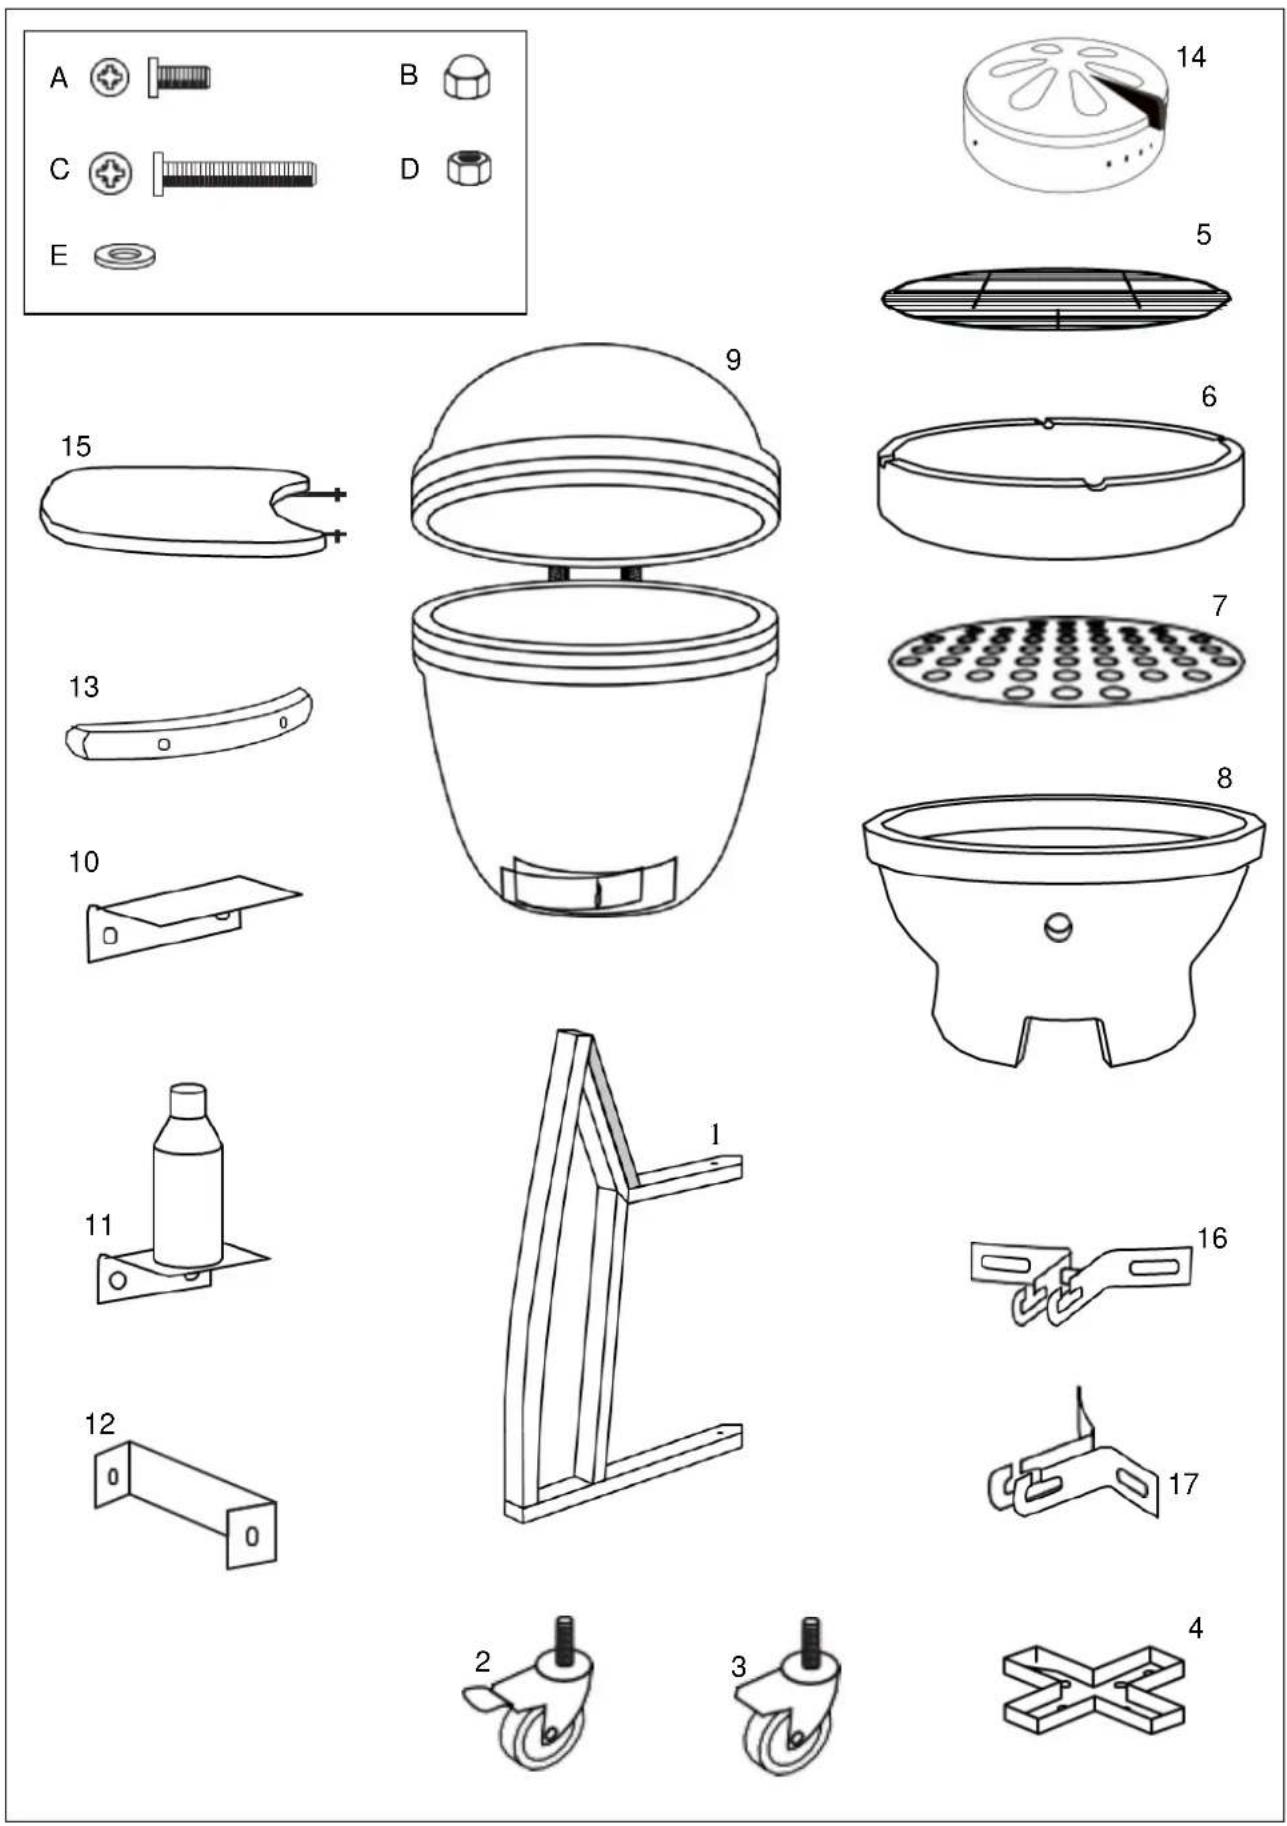
| Nr. | Designation | Qty. |
| 1 | Brackets | 4 |
| 2 | Castor Wheels w. brake | 2 |
| 3 | Castor Wheels | 2 |
| 4 | Cross pieces | 2 |
| 5 | Cooking grill | 1 |
| 6 | Upper ring | 1 |
| 7 | Charcoal plate | 1 |
| 8 | Firebox | 1 |
| 9 | Kamado | 1 |
| 10 | Lid Buffer Top Plate | 1 |
| 11 | Lid Buffer | 1 |
| Nr. | Designation | Qty. |
| 12 | Handle Brackets | 2 |
| 13 | Dome Handle | 1 |
| 14 | Adjustable Flue Control | 1 |
| 15 | Side Shelves | 2 |
| 16 | Table Brackets | 2 |
| 17 | Table Brackets | 2 |
| A | Screws small | 16 |
| B | Nut | 4 |
| C | Screws long | 4 |
| D | Nut | 4 |
| E | Washer | 8 |
text_image
Technical diagram showing exploded view of a mechanical device with numbered parts and labeled componentsSTEP 1
text_image
1 2 BStep1 :
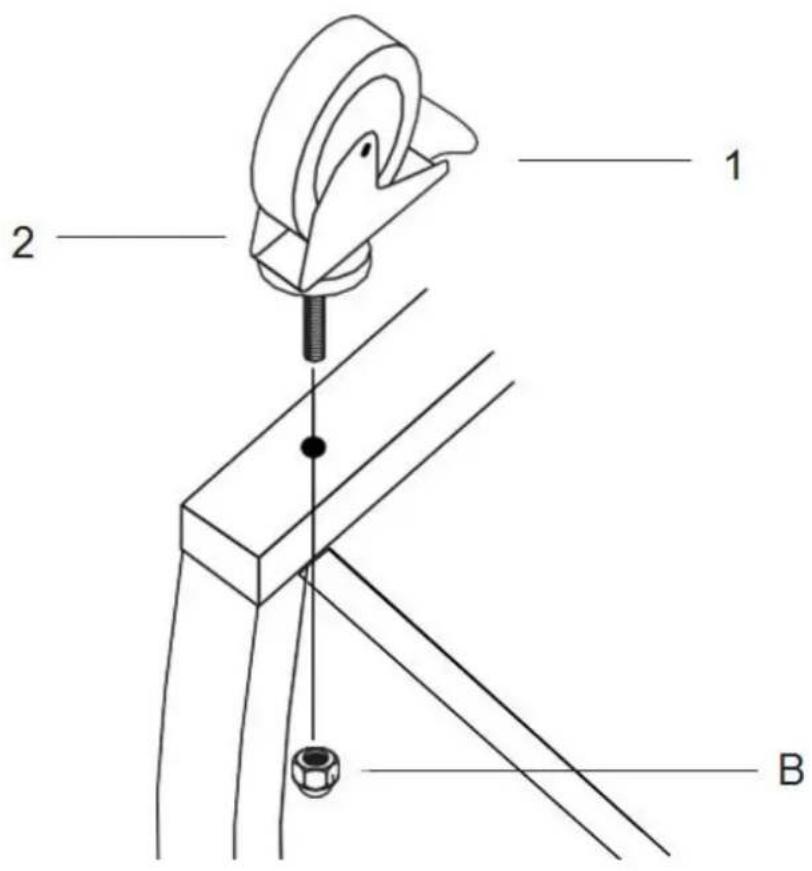
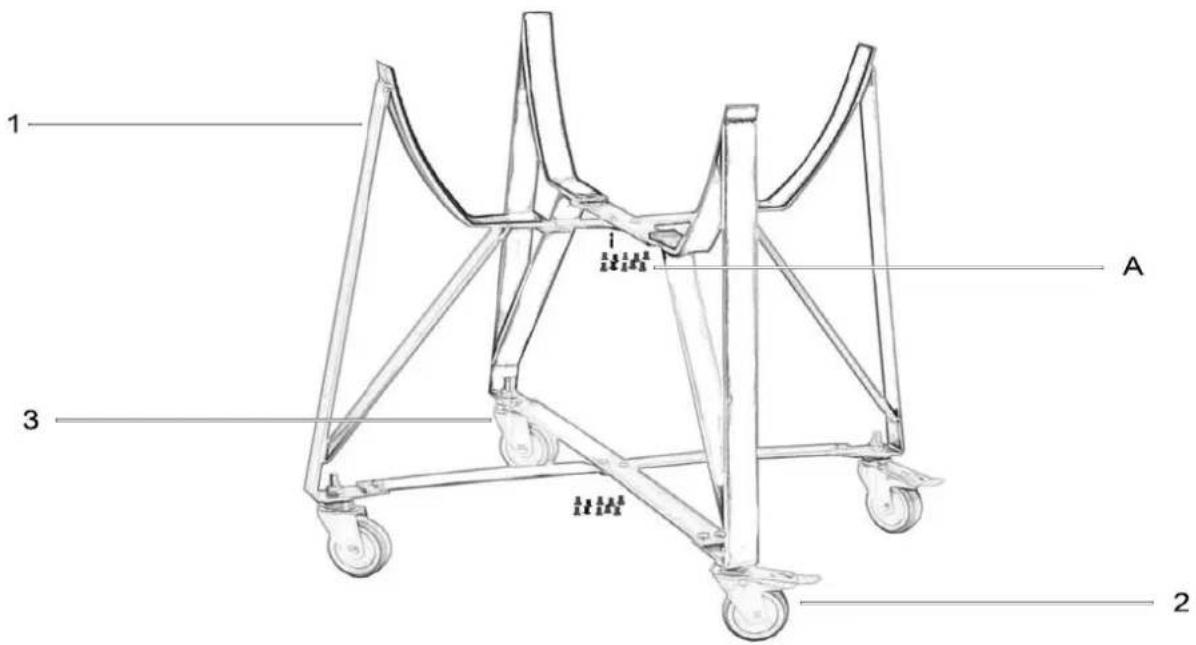
Attach the four per-threaded castor wheels (2 & 3) to each of the four brackets (1) by pushing them through the hole.
Using an adjustable spanner secure each castor wheel with 1x nut (B).
IMPORTANT!:
Remove any packaging before use, but retain the safety instructions and store them with this product. Ensure that the lid is closed prior to assembly.
TAKE CARE:
Before starting the assembly, read and understand all instructions.
STEP 2
Step 2.A:
natural_image
Close-up of two black metal X-bracing beams with circular fasteners (no text or symbols)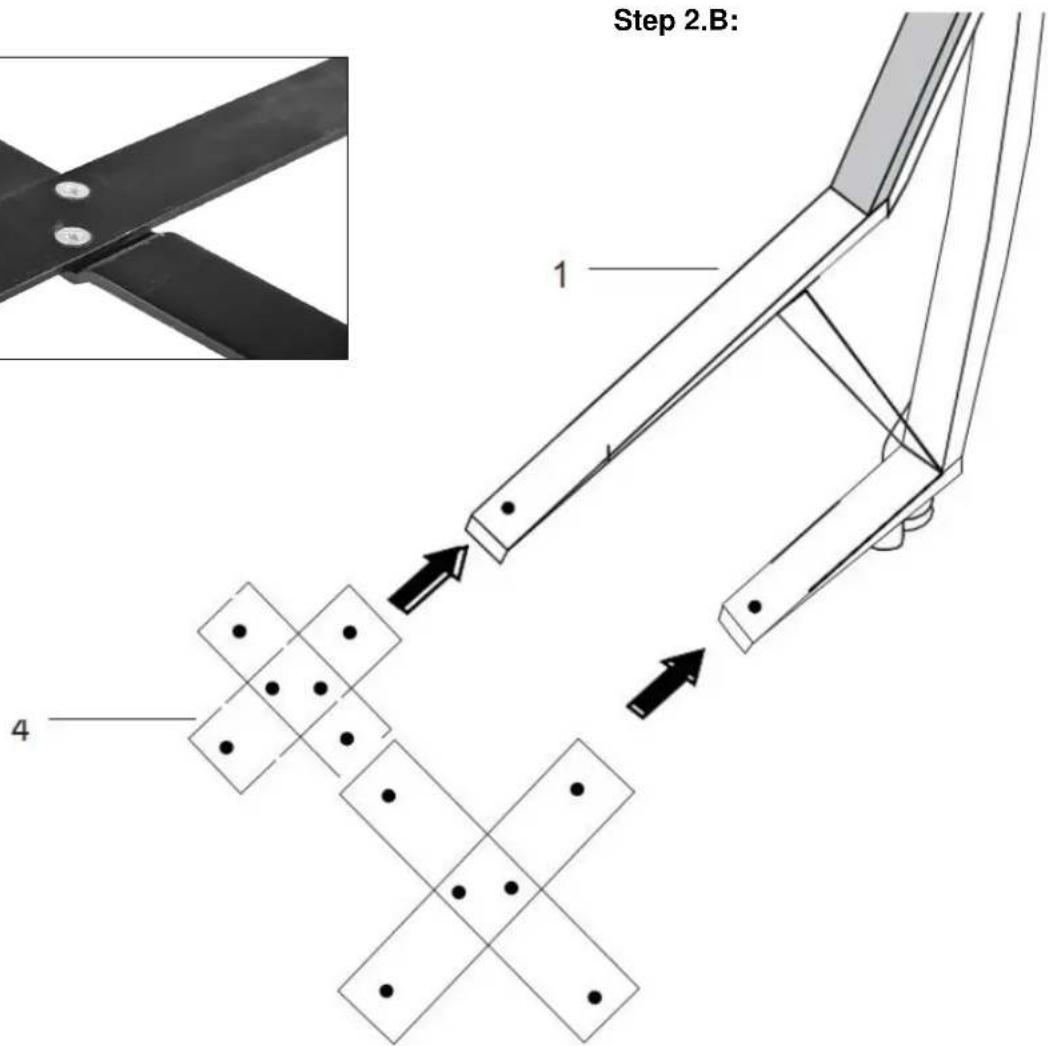
text_image
Step 2.B:Step 2.A:
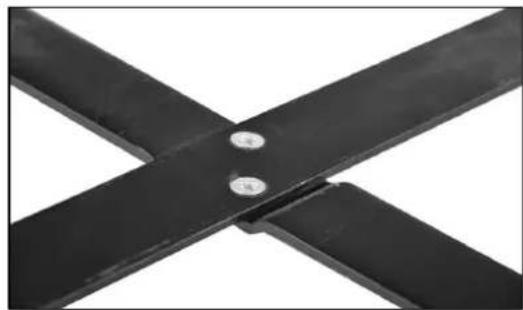
Assemble the two cross peaces as picture by screws. The small cross will be installed at the top of the cart and the big cross will be installed at the bottom.
Step 2.B:
To assemble the cart, put the small cross pieces (4) into one of the four brackets (1) from the top and tighten it up by screws. Continue to put the small cross pieces (4) into the top of other three brackets (1). Then the big cross pieces (4) into the bottom of the four brackets.
STEP 3
text_image
1 3 A 2Step 3.1 :
Secure the brackets (1) to the cross pieces (4) by using the 16x screws (A). Make sure the cart is secure and all of the screws are tight before placing the Kamado (9) into it.
Step 3.2 :
Use a minimum of two people when lifting the Kamado onto the cart. Place one of your hands in the bottom vent of the Kamado and the other under the grill. Lifting by the hinge or the side tables could result in injury and damage to the product.
Step 3.3 :
Place the Kamado Grill on the cart with the bottom vent facing to the front of the cart allowing the vent to open and close without any interruption.
STEP 4
text_image
5 6 7 8Step 4 :
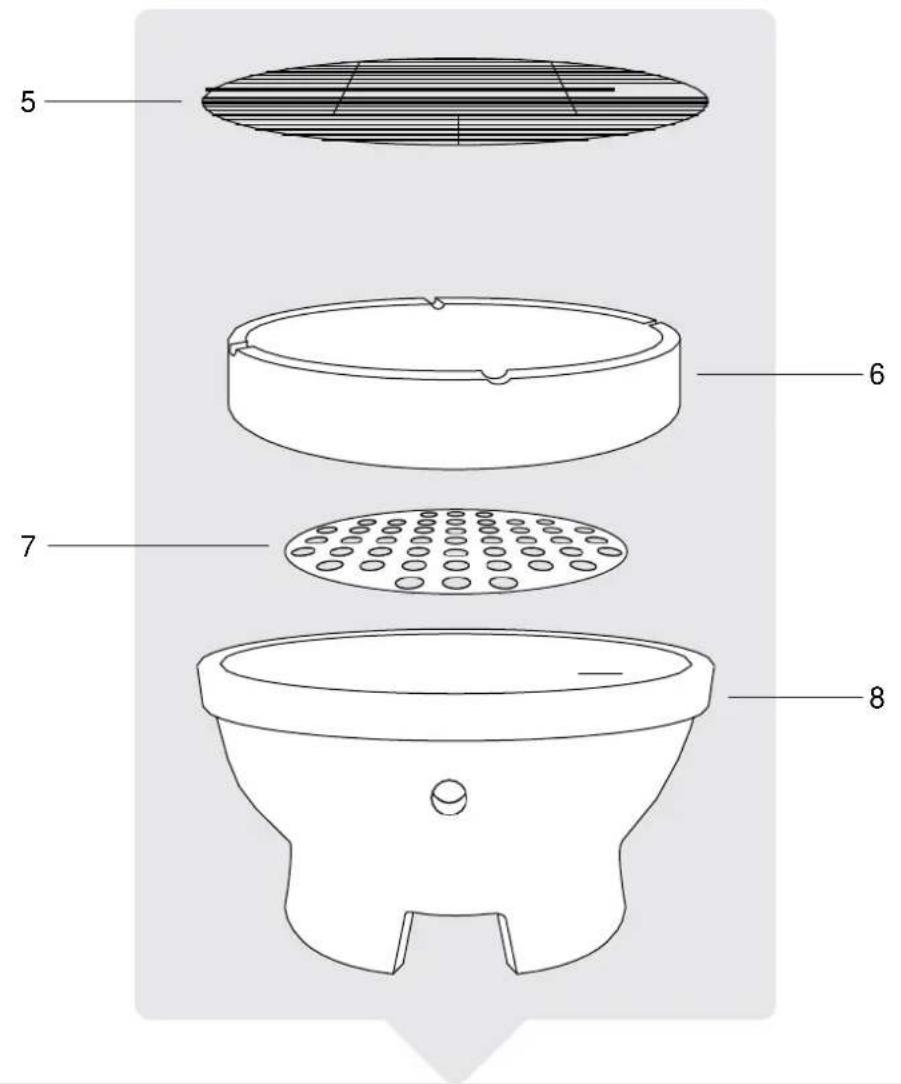
When the grill is securely placed on the cart add the firebox (8), charcoal plate (7), upper ring (6) and cooking grill (5) inside of the Kamado as displayed in the assembly diagram.
Step 4.1 :
Press down on the castor levers (2) to lock the castor wheels to ensure the Kamado can not move when in use.
STEP 5
text_image
9 10 11 12 D 13 CStep 5.1 :
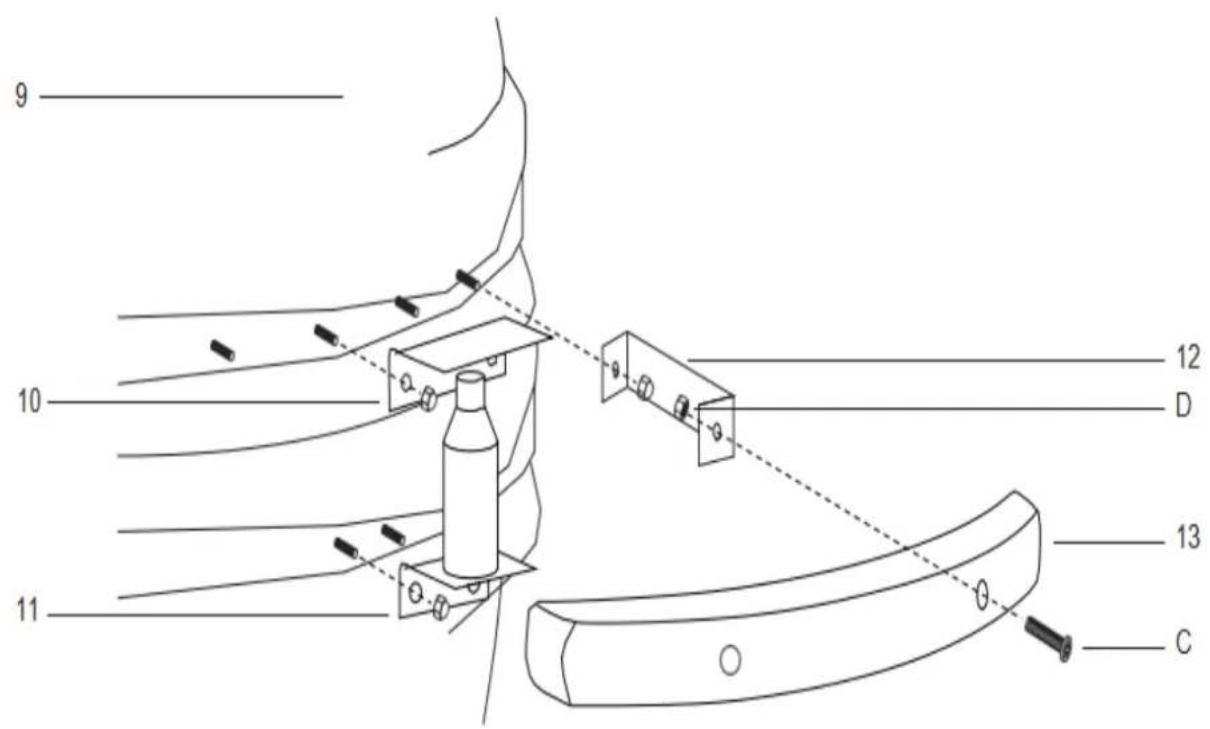
Attach the lid buffer top plate (10) to the lid of the Kamado (9) by using the 2x per-attached bolts and dome headed nuts.
Step 5.2:
Attach the lid buffer (11) to the Kamado (9) by using the 2x pr-attached bolts and dome headed nuts.
Step 5.3:
To attach the handle (13) to the lid of the Kamado (9) start by attaching 2x handle brackets (12) using the 2x pr-attached bolts and dome headed nuts. Attach the handle (13) to the brackets (12) using 2x bolts (C) and nuts (D).
STEP 6
text_image
14 C D 9Step 6 :
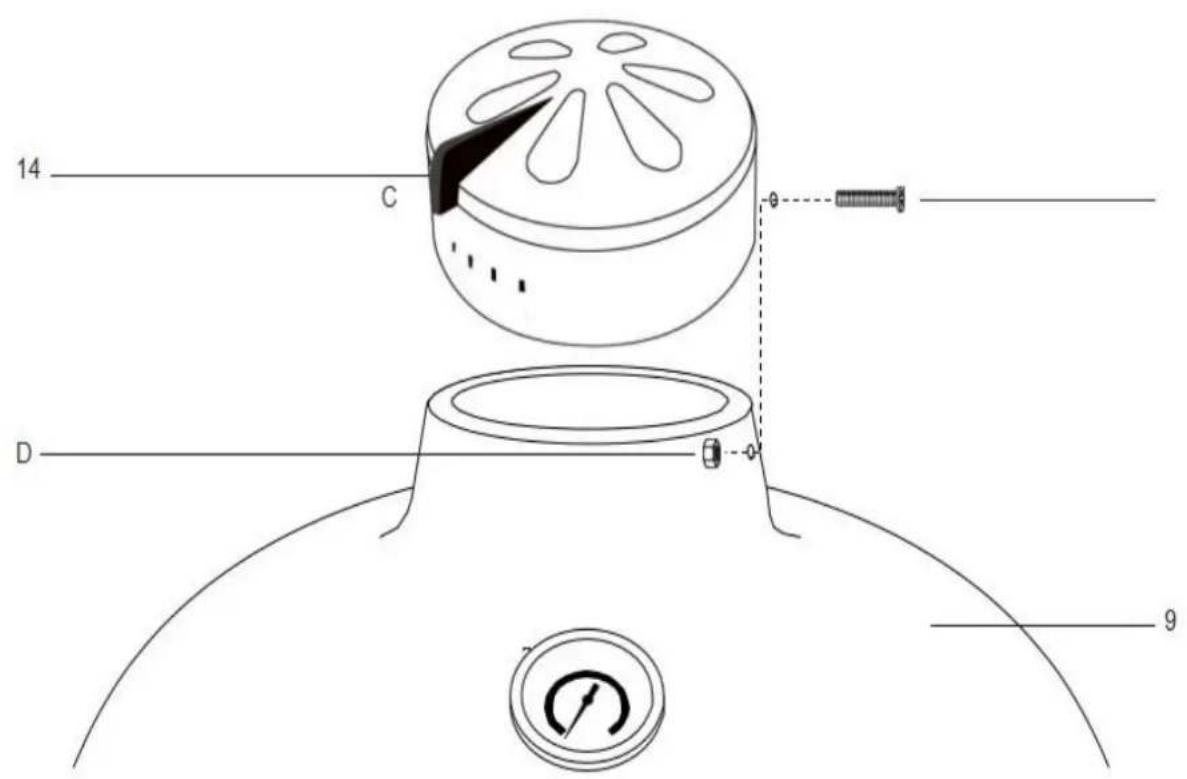
To attach the top vent (14) to the Kamado (9) place it on top and align both the bolt holes. Secure using 2x bolts (C) and nuts (D). Ensure that the top vent bolt is on the left hand side when assembling it.
STEP 7
text_image
Technical diagram of a circular mechanical component with numbered parts and labeled featuresStep 7 :
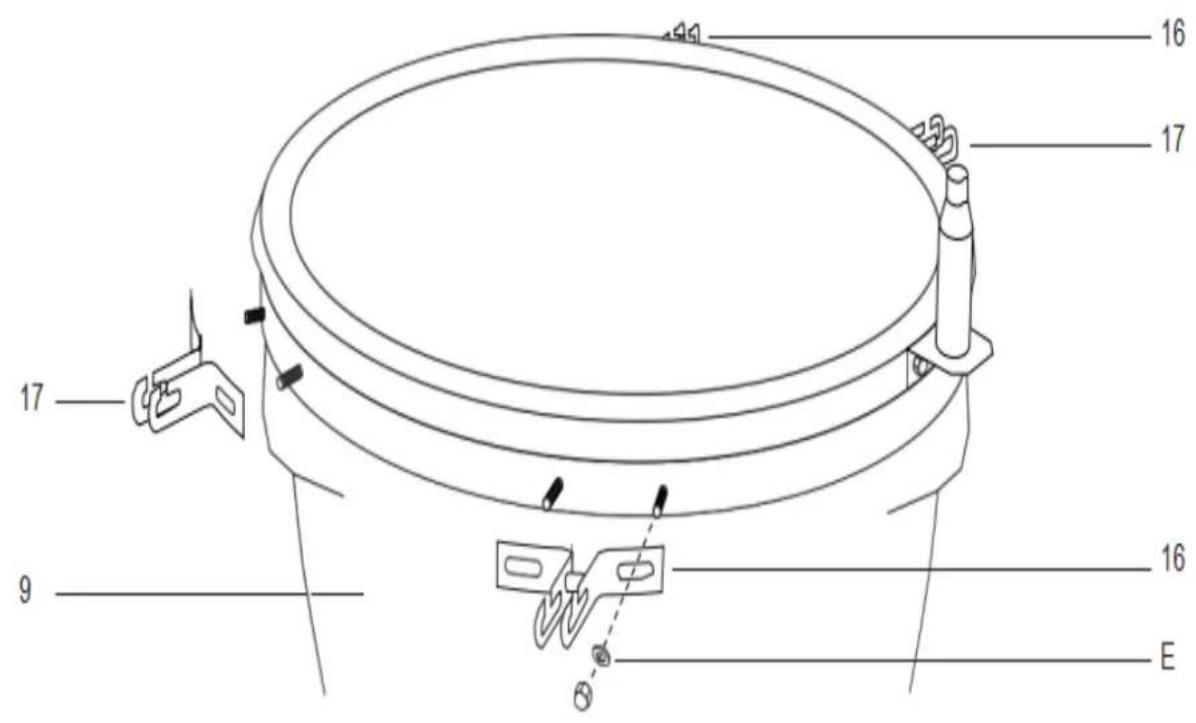
Attach the 2x table brackets (16) to the Kamado (9) using the 2x pr-attached bolts and dome headed nuts and washer (E) per bracket. Please note the position shown in the above diagram.
Step 7.1 :
Attach the 2x table brackets (17) to the Kamado (9) using the 2x pr-attached bolts and dome headed nuts and washer (E) per bracket. Please note the position shown in the above diagram.
STEP 8
text_image
17 15 16 9Step 8:
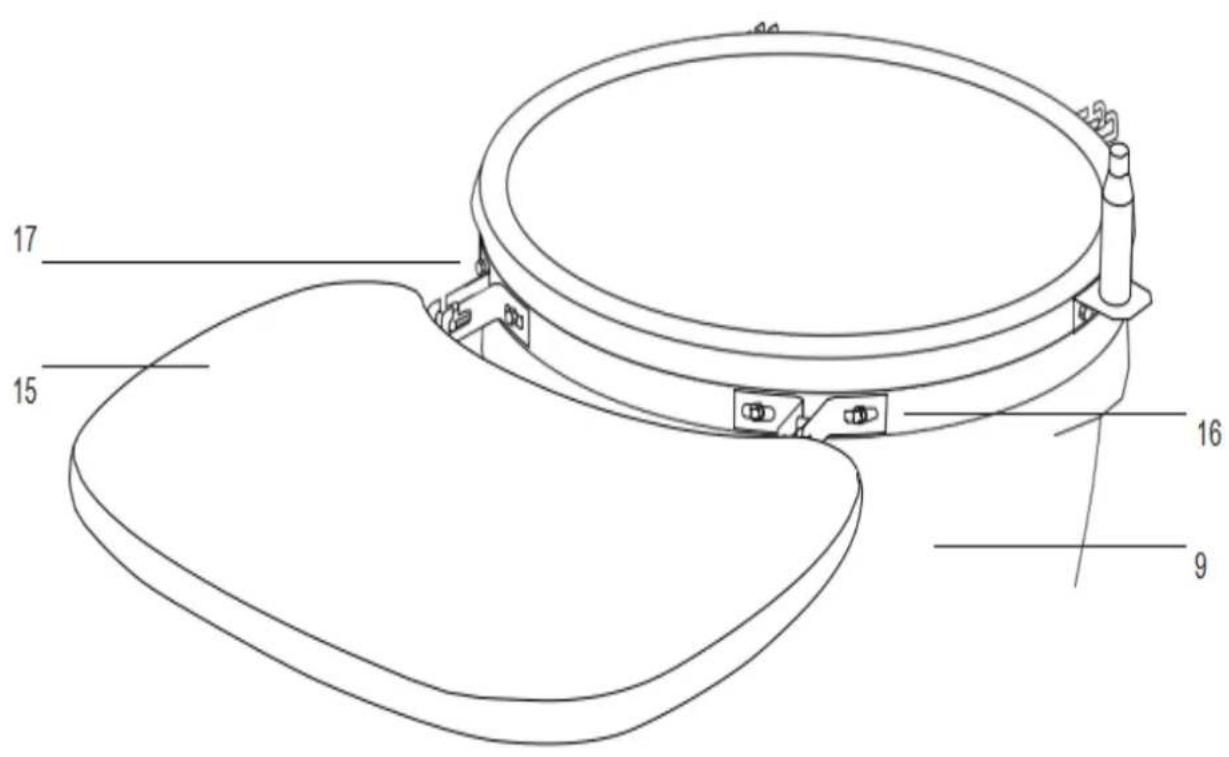
Insert the 2x table hinge into each of the table brackets (16 & 17).
TIP :
If your Kamado does not fit snugly into the leg-set, with Kamado in place, slightly loosen all nuts and bolts on the Leg-set, with exception to caster wheels. And allow Kamado to settle into place. Re-tighten all nuts and bolts.
INSTRUCTIONS FOR CARE AND USE
STORAGE
- When not in use, and if stored outside, cover the Kamado once completely cooled with the weatherproof cover.
- When using the Kamado push down on both of the locking wheels to stop the unit moving about during use.
- It is recommended the Kamado be stored under cover in a garage or shed over winter for complete protection.
CLEANING
- The Kamado is self-cleaning. Heat it up to 260^ C for 30 minutes and it will scorch off all of the food and debris.
- DO NOT use water or any other type of cleaning product to clean the inside of your Kamado. The walls are porous and will absorb any fluids used, this could cause the Kamado to crack. If the soot becomes excessive then use a wire brush to scrape off the carbon remnants before the next use.
- To clean the grates use a non-abrasive cleaner once the unit has fully cooled.
- To clean the outer surface wait until the Kamado is cool and use a damp cloth with a mild detergent.
MAINTENANCE
- Tighten the bands and oil the hinge twice a year or more if needed.
- Tighten the screws and nuts on bands and hinge once every month.
- To soak the side shelves in brine for 10 min and oil the side shelves before using to prevent mold and split.
LIGHTING, USAGE & CARE INFORMATION
- Ensure the Kamado is positioned on a stable, flat, level, heat resistant, non-flammable surface away from flammable items.
- Ensure the Kamado has a minimum of 2m overhead clearance and has a minimum of 500mm clearance from other surrounding items.
- To start a fire, place charcoal with an organic firelighter cube on the charcoal plate. (7) in the base of the Kamado. Then place a few lumps of charcoal over the top of the firelighter.
- DO NOT use petrol, white spirits, lighter fluid, alcohol or other similar chemicals for lighting or relighting.
- Open the bottom vent and light the firelighter using a long nosed lighter or safety matches. Once it has caught, leave the bottom vent and lid open for about 10 minutes to build a small bed of hot embers.
- Close the lid and fully open the top and bottom vents.
- It is recommended you don't stoke or turn the coals once they are alight. This allows the charcoals to burn more uniformly and efficiently.
- Once lit ONLY use heat resistant gloves when handling hot ceramics or cooking surfaces.
- See below for cooking instructions depending on temperature and duration.
INSTRUCTIONS FOR CARE AND USE
SMOKING GUIDE
- Follow the instructions above for a slow cook.
- Monitor the Kamado until it has reached the desired temperature. See page 4 for a temperature cooking guide.
- Leave the bottom vent slightly open.
- Close the top vent and continue to check the temperature for a few more minutes.
- Using heat resistant gloves sprinkle the wood chips in a circle over the hot charcoal, or place soaked wood chips in smoker box onto the coals.
- You are now ready to smoke on the Kamado.
- TIP: Soak your wood chips or cooking planks in water for 15 minutes to prolong the smoking process.
- IMPORTANT: When opening the lid at high temperatures, it is essential to lift the lid only slightly, allowing air to enter slowly and safely, preventing any back-draft or flare-ups that may cause injury.
- ALWAYS follow the FOOD COOKING INSTRUCTIONS stated on page 4 of this instruction manual.
- ALWAYS use heat resistant gloves when handling hot ceramics or cooking surfaces.
REFUELING
- With the vents closed, the Kamado stays at a high temperature for several hours. If you require a longer cooking time (e.g whole leg of lamb), it may be necessary to add more charcoal. Just add some additional charcoal and continue as above.
| Slow cook / Smoke (110°C-135°C) | Top vent | Bottom vent | |
| Beef Brisket | 2 Hrs per 500grams. | ||
| Pulled Pork | 2 Hrs per 500grams. | ||
| Whole Chicken | 3-4 Hr. |  |  |
| Ribs | 3-5 Hrs | ||
| Roasts | 9+ Hrs. | ||
| Grill / Roast (160°C-180°C) | Top vent | Bottom vent | |
| Fish | 15-20 Min. | ||
| Pork Tenderloin | 15-30 Min. | ||
| Chicken Pieces | 30-45 Min. | ||
| Whole Chicken | 1-1.5 Hrs. | ||
| Leg of lamb | 3-4 Hrs. | ||
| Turkey | 2-4 Hrs. | ||
| Ham | 2-5 Hrs. | ||
| Sear (260°C-370°C) | Top vent | Bottom vent | |
| Steak | 5-8 Min. | ||
| Pork Chops | 6-10 Min. | ||
| Burgers | 6-10 Min. |  |  |
| Sausages | 6-10 Min. | ||
WARRANTY DEVICE
Congratulations on your decision to purchase a device from AsVIVA.
According to the European guarantee law, amended as of January 1, 2002,
You have a legal warranty period of 2 years.
The guarantee period begins with the handover of the device by the specialist dealer.
In order to prove the date of purchase or handing over, please keep the purchase documents such as the invoice and the cash note for the duration of the warranty period.
In addition to the basic two-year warranty period, there is a statutory
So-called reversal of the burden of proof for a period of 6 months after delivery of the product. This means that the seller is responsible for proving, if an error occurs,
That the defect was not present at the time of handing over and was not caused by improper use, function-related wear or abuse.
1. The warranty does not cover:
⇒ all parts of the device which are subject to wear due to function, in so far as they are not production or material defects.
⇒ Damage caused by improper or faulty maintenance and repairs, alterations or replacement of parts which have not been carried out by a qualified person.
⇒ Damage caused by improper use and force majeure.
2. Authorized warranty claims are provided if:
⇒ The claim or defect at the time of handing over to the customer Already existed.
⇒ No natural or function-related wear Cause of the wear or alteration of the goods (see list of wear parts)!
⇒ The damage or defect is not caused by the fact that the device was not used as intended.
If you have questions about your fitness equipment, our staff will help you Service department (please see the guarantee conditions).
We wish you lots of fun and success with your new device!
Your ASVIVA team