
363 - Heating KERO - Free user manual and instructions
Find the device manual for free 363 KERO in PDF.


| Product Type | Mobile Kerosene Heater |
| Brand | KERO |
| Model | 363 |
| Power Output | 2400 W (or 3000 W depending on variant) |
| Fuel Type | Liquid combustible (kerosene) – Tosaine or Tosaine-plus |
| Ignition System | Automatic (battery powered) |
| Battery Requirement | 2 x 1.5 V batteries (size not specified) |
| Safety Features | Automatic shut-off (knock sensor), CO2 air sensor |
| Flame Adjustment | Adjustable wick height |
| Fuel Gauge | Yes, indicates fuel level |
| Recommended Room Size | Minimum 37 m³ for 2400 W, 46 m³ for 3000 W |
| Clearance | Minimum 1 meter from objects |
| Dimensions (approx.) | 600 x 400 x 400 mm (H x W x D) |
| Weight (approx.) | 10 kg |
| Combustion Cylinder | Removable, with lever positioning |
| Wick Type | Replaceable (recommend original or PETROWICK) |
| Usage Restrictions | Not for sealed rooms, caravans, boats, or below floor level |
| Certification | NF |
| Manual Languages | Multiple (including English) |
| Disposal | Check with local authority |
Frequently Asked Questions - 363 KERO
User questions about 363 KERO
0 question about this device. Answer the ones you know or ask your own.
Ask a new question about this device
Download the instructions for your Heating in PDF format for free! Find your manual 363 - KERO and take your electronic device back in hand. On this page are published all the documents necessary for the use of your device. 363 by KERO.
USER MANUAL 363 KERO
Technical data is subject to change by the LNE without notice.
INSTRUCTIONS FOR USE
Prepare the heater for use by carrying out the instruction in the following order:
1. Unpacking
Remove the heater from the cardboard box.
Remove the sticky tape from the protection grid and open it as described below:
-
Pusch the grid upwards.
-
Pull the bottom of the grid facing you.
-
Pull the grid downwards.
Reverse the process to install the grid.
Remove the packing material from the combustion cylinder.
Open the lid of the fuel tank compartment and remove the material which protected it during transport.
2. Fitting the combustion cylinder
Place the combustion cylinder on the circular wick guide.
Turn the combustion cylinder lever to the left and then half way to the right until the combustion cylinder is correctly positioned in the circular wick guide.
3. Fitting the batteries
Unscrew the batteries case protection, take off the top of the battery case and then place 2 batteries in the battery case at the rear of the heater. Make sure that you respect the polarities +/- as indicated in the drawing. Screw the batteries case protection.
ATTENTION: some batteries strong voltage or power


natural_image
Pure mechanical diagram showing a rotating component with no text or symbolsMove from side to side

natural_image
Diagram of a hand operating a motor or conveyor system with no visible text or symbols
IMPORTANT: DANGER:
- Never remove the batterie while the heater is operating
• Make sure of the quality of your batteries - Never light your heater with matches or a lighter or other fire.

Risk of electric shock. When igniting, the electrodes liberate high voltage. One must keep away from the electrodes. Right after a consumer removes batteries and presses down the ignition lever, high voltage may be discharged. Before cleaning up or repairing the heater, a consumer must remove batteries and discharge electricity by pressing down the ignition lever.
LIQUID COMBUSTIBLE FOR MOBILE HEATER
Type of liquid combustible for mobile heater
We advise you to use the Tosaine or better the Tosaine-plus
More than 95 % of problems are due to using a wrong type of liquid combustible for mobile heater. Those problems are not covered by our warranty.
Only top-quality liquid combustible for mobile heater, according to the law of 08/01/98 and 18/07/02 with the aromatics removed and totally free of impurities (max 1 % of aromatics and a flash-point above 61°).
Never use contaminated liquid combustible for mobile heater, or which has been chemically treated, contains water or petrol.
Your container should be clean and empty when you fill it at a stations-service or to a retailer. No impurities or other liquids (water, diesel, gazoline, etc.) should remain. You ought to keep a container specifically for filling your heater.
Storage of the liquid combustible for mobile heater
Store your liquid combustible for mobile heater away from the sun and from other heat sources.
Liquid combustible for mobile heater which has been stored too long loses its purity and thus its efficiency.
Do not stock your liquid combustible for mobil heater from a season to an other.
Filling with liquid combustible for mobile heater
Filling procedure and precautions:
Do not put your container on or near the heater while filling the tank.
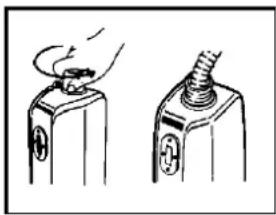
Lift the lid of the tank compartment and open it.
In all the cases, the user must check the good closing of his tank reloaded apart from any naked fire or heat source
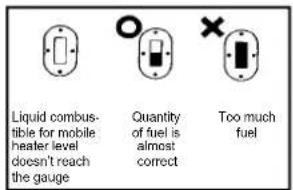
Use a pump to fill the tank with liquid combustible for mobile heater. Keep on filling until the level of fuel reaches the middle of the fuel gauge.
Tank removed, your heater will automatically shut off.
natural_image
Two technical illustrations of a mechanical component with a handle and screw base, no text or symbols present.Reading the fuel gauge
Presence of liquid combustible for mobile heater will make move the reading on the gauge into the black.
Stop filling when the liquid combustible for mobile heater level reaches the middle of the gauge.
Close the tank securely, and wipe away any spills.
Turn the tank over, so that the filler orifice is facing downwards, and carefully put it back into its place.

Obtaining the right quantity of liquid combustible for mobile heater
When the level of fuel in the tank goes down, the fuel gauge will indicate this. The fuel in the tank will be completely used about three hours burning after the fuel gauge reached the halfway level.

PREPARING TO LIGHT THE HEATER
Levelling the heater
Make sure that the heater is standing on a level surface. If the heater is not level, the automatic shut-off device may be prevented from working.
Automatic shut-off device in case of knocks
Push the ignition lever downwards until it stops. The automatic shut-off device (in case of knocks) is ready to work
If the knob does not remain downwards, the automatic shut-off device is working. Do not try again and ventilate the room.
Wick
The first time you use a wick, let it absorb liquid combustible for mobile heater for about one hour.
Only use liquid combustible for mobile heater with the aromatics removed, with a flash-point above 61^ and free of any impurities, in order to ensure that your wick lasts for a long time.
If you find that the wick is abnormally hard, if it is blocked or burning is abnormal, have it replaced by a qualified specialist, for example, the supplier of your heater.
As the wick and replacement of the wick are not covered by the guarantee, follow the instructions for use, in order to obtain optimal performance from your wick.
A non original wick that does not have the original adjustments causes damage to the combustion quality with risk of release of carbone monoxide. Your heater would not be anymore NF
Guarantee is not valid without the use of original or PETROWICK wicks
LIGHTING THE HEATER
Before you light the heater, check the following points:
The combustion cylinder must be properly positioned. Make it rotate pushing the lever from left to right and make sure it is correctly fitted.
When you use the heater for the first time, odours may persist for a certain time after lighting. This is normal, as oil and protective grease in the heater have to be burnt off.
Slowly push the ignition lever downwards until it stops and keep the knob downwards. (To await the “beep”) and maintain to it a few seconds until the flame is visible. The wick will rise and the heater ignites automatically. Check visually that the heater is alight. After having carried out the ignition procedure, there may be some white smoke coming out of the ignition zone, without the heater being lit. In this case, move up the ignition lever part way through its travel and the heater will start to operate. This operation must be done slowly and gently.
Try several times if lighting is not carried out in the 2 or 3 seconds. In the event of insistence, you risk to roast the ligh-

natural_image
Pure mechanical diagram showing a rotating component with no text or symbolsMove from side to side
CAUTION: NEVER LIGHT YOUR HEATER WITH MATCHES OR A LIGHTER OR OTHER FIRES
Adjusting the height of the flamme
Combustion can be optimized within a range of 10% by adjusting the height of the flame (see hereafter).
Go up a little the button of adjustment to decrease the combustion.
Bad combustion Good combustion Bad combustion
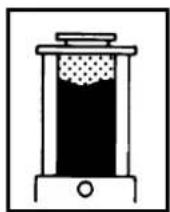
Insufficient heating of the upper part of the system. Check the quality of the fuel and the estate of the wick


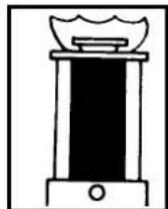
Flame is dangerously high. Go up the lever
If despite the regulation, the flame is too high or if the heater unevenly (its colour is not uniform), take the lever on the combustion cylinder and shake it gently once or twice, go up the lever for the height of the wick. If the problem subsists, stop the heater and contact your retailer.
If you continue using your heater with bad combustion, soot and/or CO emission will result.
Using simultaneously a fan, or a humidifier may cause the flame to become slightly pink. This is normal. Never touch the automatic ignition device when the heater is in use. By lowering it you will make the flame rise if you push it too strongly, you may damage the lighting filament or even break it.
For a shut-off push the "STOP button". The automatic shut-off device against knocks will automatically be activated, it will lower the wick very quickly and also put out the flame.
It is possible that an excess accumulation of carbon and other deposits on the wick will prevent proper operation of the automatic shut-off device. Make always sure to visually check that the automatic shut-off device has operated properly.
When lighting the heater again
Precautions:
After turning off the heater, wait at least five minutes before lighting the heater again. If the combustion cylinder has not had time to cool down, lighting the heater again may result in odours being given off.
Airsensor Detector
This heater has been designed with an Airsensor device based to the direct measure of CO2 in the room.
Abnormal conditions of use of your heater (bad ventilation or too small a room) will automatically provoke the shut-off of your heater.
Do not try to light on again your heater. Wait that the temperature of the room goes down and renewal of air., th heater will light on itself.
IMPORTANT
Any tampering with or modification to the safety system is prohibited. Apart from invalidating the guarantee, this would risk causing a failure of the system which is there for your safety.
RESTRICTION ON USE
This heater may not be used in rooms which are hermetically sealed, such as caravans, boats, passenger compartments of vehicles etc. Do not put something on the heater when it works.
IMPORTANT
- Always preserve a minimum clearance of 1 metre from other objects.
- Use your heater in a room which is properly ventilated and free of inflammable vapours.
- Ensure that the room to be heated has an efficient air outlet (see standard health regulations).
- Do not use your heater in too small a room Heater of 2400 W: Min. 37 m3 Heater of 3000 W: Min. 46 m3
DISPOSING OF THIS PRODUCT
This Product and it's packaging should be disposed of responsibly check with your Retailer or Local Authority as to appropriate methods of disposal.

DO NOT USE YOUR HEATER IN ROOMS SITUATED UNDER THE FLOOR LEVEL.
TROUBLE SHOOTING GUIDE
In case of problems, check here before you take your heater to your dealer.
| Heater will not light |
| Burns with red flame and gives off smoke |
| Flame burns too high |
| Burns with kerosene odour |
| Flame appears only on one side of burner |
| Flame does not appear |
| Wick will not lower |
| Flame spreads too slowly |
| Burner cylinder does not glow red |
| Burner cylinder takes too long to glow red |
| Flame goes out |
| Possible cause | |||||||||||
| Batteries may be flat or weak | ■ | Replace the batteries. | |||||||||
| Ignition electrode filament may be bent or broken | ■ | Replace ignition electrode. | |||||||||
| Wick is too low, too high or incorrectly installed | ■ | ■ | ■ | ■ | ■ | ■ | ■ | ■ | Use wick adjustment knob to adjust wick for proper exposure. If adjusting the wick fails, reinstall wick to proper height. | ||
| Burner is not operly positioned | ■ | ■ | ■ | ■ | ■ | Rotate burner right and left to position properly. | |||||
| Liquid combustible for mobile heater is of poor quality or contaminated with water | ■ | ■ | ■ | ■ | ■ | ■ | ■ | ■ | ■ | Replace contaminated or poor quality liquid combustible for mobile heater supply. | |
| Wick may be dirty | ■ | ■ | ■ | ■ | ■ | ■ | ■ | ■ | Clean wick, replace if necessary. | ||
| Wick guide assembly may be damaged | ■ | ■ | ■ | ■ | ■ | Check wick assembly for proper seating and general condition. Replace if necessary. | |||||
| Wick is not correctly seated in wick assembly | ■ | ■ | ■ | ■ | Reinstall wick correctly in wick assembly. | ||||||
| Detector of CO2 divice | ■ | ■ | ■ | Air your room, the content CO2 is too high | |||||||
- INSTRUCTIONS FOR USE
- Unpacking
- Fitting the combustion cylinder
- Fitting the batteries
- IMPORTANT: DANGER:
- LIQUID COMBUSTIBLE FOR MOBILE HEATER
- We advise you to use the Tosaine or better the Tosaine-plus
- Storage of the liquid combustible for mobile heater
- Filling with liquid combustible for mobile heater
- Reading the fuel gauge
- Obtaining the right quantity of liquid combustible for mobile heater
- PREPARING TO LIGHT THE HEATER
- Levelling the heater
- Automatic shut-off device in case of knocks
- Wick
- LIGHTING THE HEATER
- Before you light the heater, check the following points:
- Adjusting the height of the flamme
- When lighting the heater again
- Precautions:
- Airsensor Detector
- IMPORTANT
- RESTRICTION ON USE
- DISPOSING OF THIS PRODUCT
- TROUBLE SHOOTING GUIDE
Brand : KERO
Model : 363
Category : Heating