CR2 - Alarm clock radio Ditalio - Free user manual and instructions
Find the device manual for free CR2 Ditalio in PDF.


User questions about CR2 Ditalio
0 question about this device. Answer the ones you know or ask your own.
Ask a new question about this device
Download the instructions for your Alarm clock radio in PDF format for free! Find your manual CR2 - Ditalio and take your electronic device back in hand. On this page are published all the documents necessary for the use of your device. CR2 by Ditalio.
USER MANUAL CR2 Ditalio
natural_image
Silhouette of a black leaping animal against an orange background (no text or symbols)klar - klarer - DITALIO
text_image
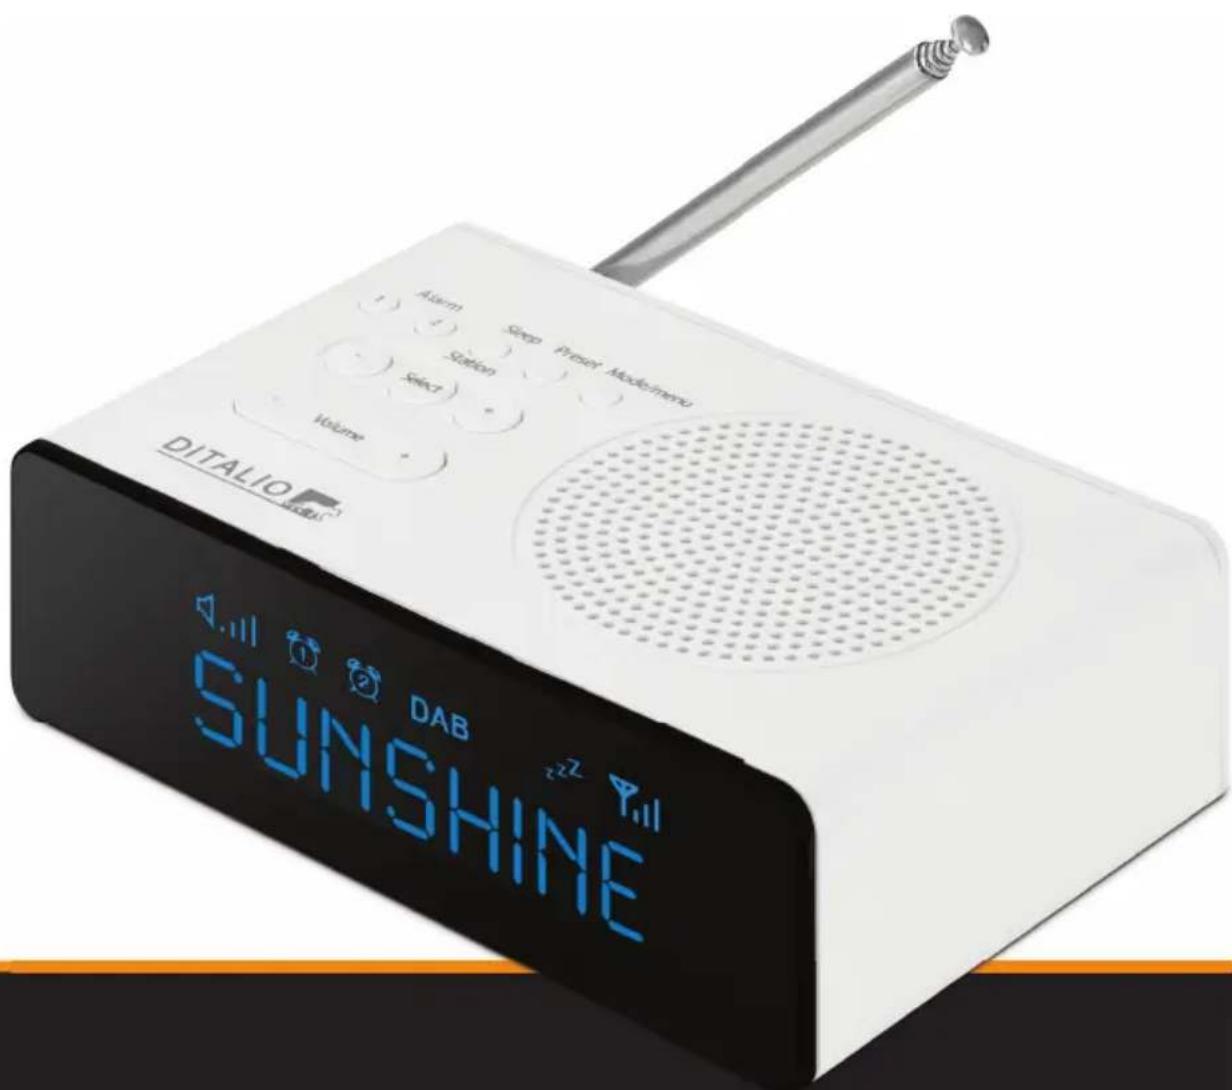
DITALIO DAB SUNSHINEDITALIO CR2
Important safety information 22
Getting Started 24
-
Basic operation 24
-
Alarm Setting 26
-
Scanning 28
-
Sleep 28
-
Preset 28
-
Info 29
-
Dimmer function 29
-
Advance setting 29
-
FM radio mode 32
-
Trouble shooting and error messages 34
Specification 35
Sicherheitshinweise
natural_image
Line drawings of three hands operating a portable electronic device with circular buttons (no text or symbols)3. Suchlauf
Thank you for purchasing the DAB/FM radio. Please read the instructions and warnings carefully before use, to ensure safe and satisfactory operation of this product.
Important safety information
- It is most important that this instruction leaflet be retained with the product for future reference. These warnings have been provided in the interest of safety. You must read them carefully before using the appliance. If you are unsure of the meanings of these warnings contact the store from which you purchased the appliance.
- This appliance is not intended for use by persons (including children) with reduced physical, sensory or mental capabilities, or lack of experience and knowledge, unless they have been given supervision or instruction concerning use of the appliance by a person responsible for their safety.
- Children should be supervised to ensure that they do not play with the appliance.
- To protect against fire, electric shock and injury to persons DO NOT IMMERSE CORD, Plug or base unit in water or other liquids.
- Unplug from the mains when not in use, before putting on or taking off parts and before cleaning.
- Do not operate any appliance with a damaged cord or plug, or after the appliance malfunctions or has been damaged in any manner. Return the appliance to the nearest store.
- Do not let power cord hang over edge of table or counter, or touch hot surfaces.
- In the event of a fault, return the appliance to your nearest store. No repair should be attempted by the consumer.
- Do not use the appliance for anything other than intended use.
- For household use only.
- Put the clock radio in a flat and hard place for use.
- Do not use outdoors.
- Do not give a large, destructive force or weight to the top surface of the radio which will make damage to the sensors and cause permanent damage to the snooze function or even destroy the radio.
- Save these instructions for future reference.
WARNING! Polythene bags over the product or packaging may be dangerous. To avoid danger of suffocation, keep away from babies and children.
text_image
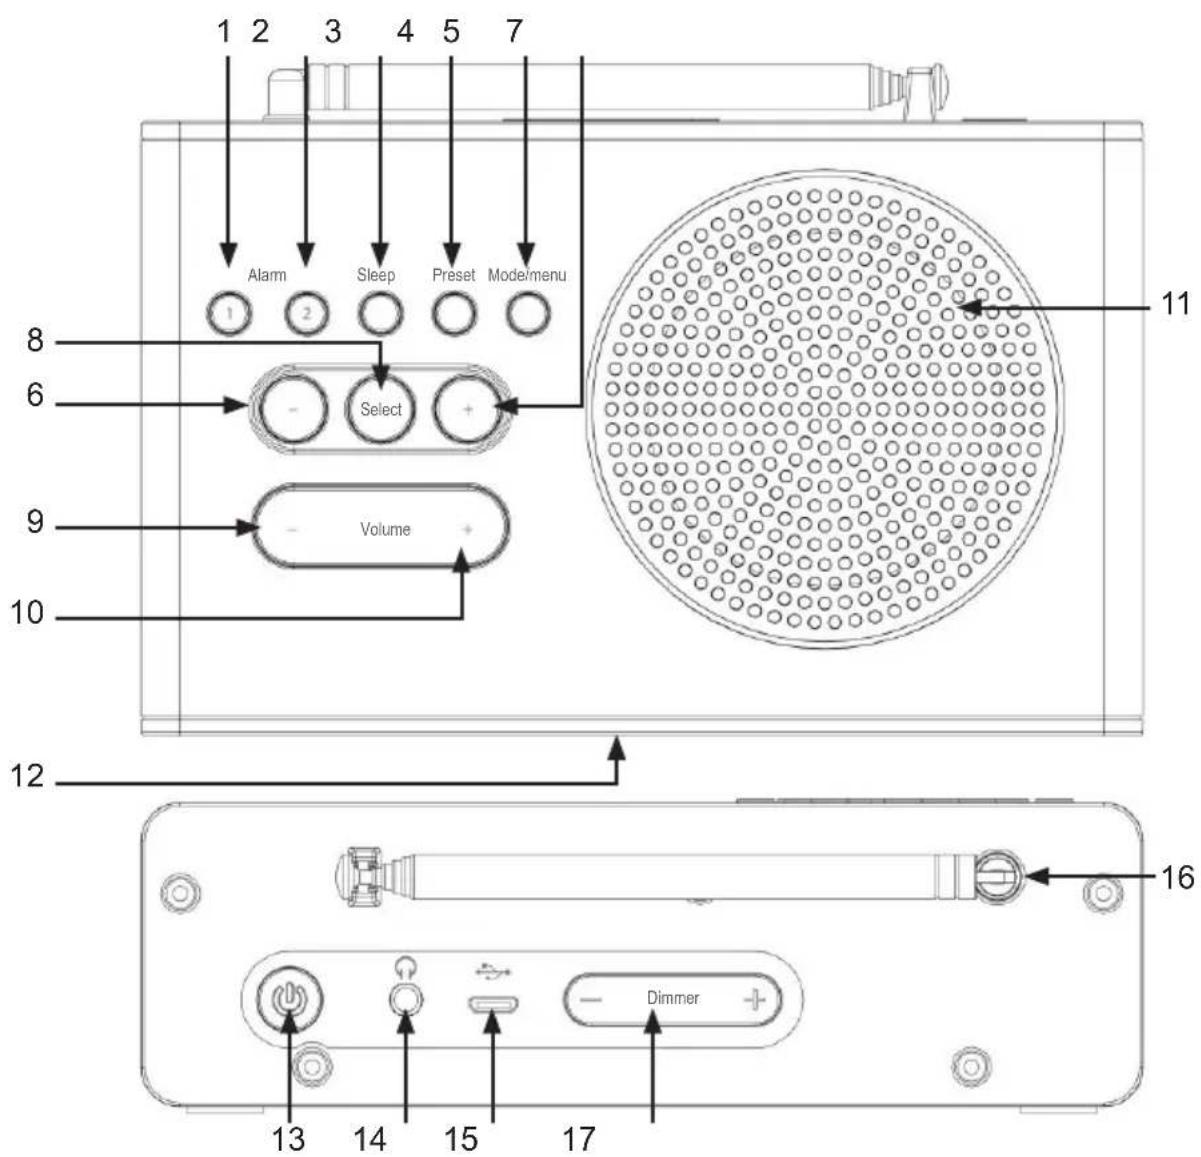
1 2 3 4 5 7 Alarm Sleep Preset Mode/menu 1 2 Select + Volume 8 6 9 10 12 13 14 15 17 Dimmer 11 16Your DAB/FM Alarm Clock radio
1 Alarm 1 button
2 Alarm 2 button
3 Sleep button
4 Preset button
5 Mode/menu button
6 Station down
7 Station up
8 Select
9 Volume down
10 Volume up
11 Speaker
12 LCD Display
13 On/Off
14 3.5mm earphone jack
15 Micro USB socket
16 Rod Antenna
17 LCD dimmer button
Packing List:
- DAB/FM Digital Radio
- USB AC adapter
- USB power cable (no data transmission function)
- Instruction manual
Getting Started
Press "Power" to turn radio on.
For DAB
- Press "Mode/menu" button to select DAB
- If this is first time you use, it will automatically start scanning.
- Press the “−” or “+” button to find desired station and then press “Select” to confirm.
- Your radio will automatically tune.
- Adjust the volume by pressing the “- Volume +” button to decrease or increase volume.
For FM
- Press "Mode/menu" button to select FM
- Scan for station, press and hold “-” or “+” to scan backward or forward station.
- Manual tune station by pressing “-” or “+” button to find desired station.
- Note: In FM mode you can also tune the station manually, turning the “—” or “+” buttons to adjust the FM frequencies with 50kHz up or down respectively.
- Your radio will automatically tune.
- Adjust the volume by pressing the “- Volume +” button to decrease or increase volume.
- Note: During the scanning, operation of the sound level will be muted automatically.
1. Basic operation
1.1 Standby mode
Connect the USB adaptor to the USB port of the radio. Then, it will enter to standby mode.
1.2 Switch between Standby, DAB and FM mode
Press the "Power" button to turn on the radio. It will enter to the radio mode.
Press the "Mode/Menu" button alternatively to enter DAB or FM mode.
Press the "Power" button once will exit to standby mode.
1.3 Clock setting
During the time you power up the unit (or after factory reset), the clock will set to "00:00".
In general, the radio automatically synchronize the clock from DAB station.
To set the clock manually, press “Alarm“1” or “Alarm 2”, the screen will show “NO CLOCK”. Then it will go to a screen to set the time. Follow the steps below to set time and date.
a) The screen will show "00:00" and the "Hour" part is flashing. Press "-" or "+" button to set Hour. Press "Select" to confirm.
b) The "Minute" part is flashing. Press "-" or "+" button to set Minute. Press "Select" to confirm.
c) The screen will show "1--1--13" and the "Day" part is flashing. Press "-" or "+" button to set the Day. Press "Select" to confirm.
d) The "Month" part is flashing. Press "- " or "+" button to set the Month. Press "Select" to confirm
e) The "Year" part is flashing. Press "- " or "+" button to set the Year. Press "Select" to confirm
f) The screen will show "ALRM CHG". Press "Alarm1" to switch on or off the alarm1 function. The alarm1 icon will turn on if it is switched to on status. Then, you can press "-" , "+" or "Alarm1" key to change the status of the alarm1 .
g) For switch on or off the Alarm 2, you also can follow the step showed as f).
h) Once the setup of alarm status is finished, press "Select" to confirm. The screen will show "SAVED" to mean the new alarm status is saved and then exit. The time information and the alarm status are updated.
i) If you do not press "Select" to confirm for set up of the alarm status, it will show "NOT SAVE" and then exit. The time information is updated but the alarm status is keep use the previous setting.
1.4 DAB radio mode
DAB mode receives DAB digital radio and displays information about the station and programme/track as broadcasted.
1.5 FM radio mode
FM mode receives analogue radio from the FM wave band and displays RDS(radio data system) information about the station and show(where broadcast). While FM is playing the screen shows its frequency or if RDS information is available, station name and any further ‘Radio Text’ information. If no information is available, just the frequency and a ‘No Radio Text’ message is shown.
2. Alarm Setting
There are two alarms which can be used for the system. You can set the alarm in the DAB mode or FM mode.
2.1 Alarm setup
- In order to set Alarm 1, press "Alarm1" key. To set Alarm 2, press "Alarm2". The alarm icon will flash. Press "Select" to confirm.
- It will show the time screen and the Hour part will flash. Press the “-” or “+” key to set the hour for the alarm, press “Select” to confirm.
- The Minute part will flash. Press the “-” or “+” key to set the minute for the alarm, press “Select” to confirm.
- The AM/PM part (if time format set to AM/PM) will flash. Press “-” or “+” key to set AM or PM for the alarm. Press “Select” to confirm.
- It will show the sound source screen. Press “-” or “+” key to specify one of the following sound source: “Buzzer”, “DAB”, “FM” and press “Select” to confirm.
- When choosing the DAB in the sound source screen, it will have the option of LAST and the Preset channel you saved in the radio.
- “Last” mean the last DAB radio station you select before you set the alarm.
- When choosing the FM in the sound source screen, it will have the option of LAST and the Preset channel frequency you saved in the radio.
- “Last” mean the last FM channel you select before you set the alarm.
- It will show the screen of alarm frequency option. Press “-” or “+” button to specify one of the following alarm frequency options: “Daily”, “Once”, “Weekends” and “Weekdays” and press “Select” to confirm.
- It will show the volume screen. Press “-” or “+” button to select the alarm volume, press “Select” to confirm.
- It will show the Alarm status screen. Press “-” or “+” button to select the Alarm status, On / Off, press “Select” to confirm.
- After finished all the setting, it will show the word "SAVED" and the Alarm icon will be on.
- During the process of alarm setting, you can press the alarm button once to exit the alarm setting without save.
2.2 Alarm switch on or off
Follow the steps below to switch on or off the alarm
Press “Alarm1” key to switch on the Alarm1. The Alarm1 icon will flash. The screen will show “ALARM 1”. Press “-” or “+” key to select ON or OFF status.
Press "Select" key to save the status.
Press “Alarm2” key to switch on the Alarm2. The Alarm2 icon will flash. The screen will show “ALARM 2”. Press “-” or “+” key to select ON or OFF status. Press “Select” key to save the status.
2.3 Alarm ringing
When the alarm is ringing, it will enter to standby mode when the sound source you selected is Buzzer. If the sound source you selected is FM or DAB station, the radio will go to that station automatically. The sound volume will increase gradually to reach the volume level you set before.
2.4 Stop the alarm
You can stop the alarm by pressing the “Alarm 1”, “Alarm 2” or the “Sleep” key. The screen will show “ALARM OFF”. The radio will go to standby mode.
You also can press top surface of the radio downward to trigger the “snooze” function. The alarm will temporary stop, exit to the standby mode and go to snooze function.
2.5 Snooze function
There are 4 sensors at the four corner of the radio. If the user gives force (use the palm to press) to any place (except the keys) at the top surface of the radio, it will trigger the snooze function. Press on the corner will get the best trigger to the snooze function.
When the alarm is ringing, you can give force (use your palm to press) to any place of the top surface of the radio to trigger the snooze function.
It will show the snooze time. You can set the snooze time to 5, 10, 15 or 30 minutes by pressing (use your palm to press) the radio continuously until you see the correct time.
Then the radio will temporary stop and exit to the standby mode. The alarm icon is still flashing and starts the countdown. You can see the countdown by using your palm to press the radio downward one time.
After the radio start ring again, you can press the “Alarm1”, “Alarm2” or “Sleep” key to stop the ring or you can use your palm to press the radio body to set the snooze time again and the whole process repeat again.
Important notice about the use of snooze function:
- You need to put the clock radio in a flat and hard place for use. This make the four sensors can work normally when there is force pressing from the top surface of the radio to trigger the snooze function.
- You need to provide a suitable force to press top surface of the radio in order to trigger the snooze function. It is suggested to use your palm to give force to press the radio body instead of using the finger to press.
- Do not give a large, destructive force or weight to the top surface of the radio which will make damage to the sensors and cause permanent damage to the snooze function or even destroy the radio.
- Do not use one finger to press on the middle top surface of the radio, as the sensor is locate on four corners, it may not trigger the snooze function.
3. Scanning
Once a scan is complete the radio returns to playing the previously selected station or first station on the station list.
You may need to repeat this occasionally for the following reasons:
- New stations may become available from time to time.
- Stations close or can no longer be received (In the station list, invalid stations are indicated with a question mark in front of their name).
- If reception was not good for the original scan (for example the antenna was not up), this may result in an empty or incomplete list of available stations.
- If you have poor reception of some stations causing the audio to break up, you may wish to list only stations with good signal strength.
4. Sleep
You can set the sleep time of the radio.
Press the “Sleep” button repeatedly to select the sleep time duration, press “Select” to confirm the option. The sleep time is set and sleep icon will be displayed. Then radio will automatically enter to standby mode base on the time you set.
Option - Off / 15 / 30 / 45 / 60 / 90 MIN
After you set the sleep time, you can see the time countdown to reach the sleep time when you press the "Sleep" key.
If you press the "Sleep", "-" or "+" keys again, it will reset the sleep time.
5. Preset
The system can store 10 DAB stations and 10 FM stations to the preset list.
5.1 Store a station to the preset list
To storage a station, selected your desired radio station, then press and hold the "Preset" button for 3 seconds until the LCD display "Preset store #: (Empty)", and the preset number will flash.
Press “-” or “+” buttons to select your desired station preset number, press on the “Select” button to confirm your selection, the display will show “Preset # Stored”
5.2 Recall a station from the Preset list
To recall a preset station, press the "Preset" button once, then press "-" or "+" buttons to select presets station that you have stored. When LCD display shows your desired preset number, press "Select" button to confirm.
Note: If you choose a preset that hasn't been allocated a station, then "Empty" will be displayed.
6. Info
You can view further information under on screen by press “Select” button repeat, the LCD will display Station name (in FM mode, it display frequency), Time and Date.
7. Dimmer function
The brightness of the display can be adjusted by the Dimmer key at the back panel.
There are totally 5 level of light intensity.
- Press once for the “Dimmer –” to decrease the level by 1 step. Press and hold to decrease the level intensity gradually.
- Press once for the "Dimmer+" to increase the level by 1 step. Press and hold to increase the level intensity gradually.
8. Advance setting
The Advance settings allow you to tailor the DAB/FM radio with a variety of options to suit you. In order to access Advance settings from DAB or FM mode, press and hold the “Mode/menu” button for 3 seconds to enter the menu.
8.1 DAB radio mode
Under the Advance setting Menu, press the “-” or “+” button to select option through the list of menu. Then stop at your preferred option and press the “Select” button once to confirm. The advance setting menu options are:
- FULL SCAN
- MANUAL
DRC - PRUNE
- SYSTEM
■ INFO
8.1.1 Full scan
Under advance setting menu, press the “-” or “+” button to select “Full scan” through the list of menu, press “Select” button and full scan starts automatically. Once a scan is complete, the radio returns to play the previously-selected station or first station of the station list.
Note: if no radio station is found, it shows No DAB Station. For a better reception, extend the antenna or do the full scan again in another place.
8.1.2 Manual
As well as the normal method of scanning, you can also manually tune to a particular channel/frequency. This can be useful for adjusting your antenna to achieve the best possible reception and scanning a particular channel to update the station list
Under advance setting menu, press the “-” or “+” button to select "Manual" through the list of menu, then enter the settings by pressing "Select" button. Then press the "-" or "+" button to select a particular channel/frequency and then press "Select" button again to confirm.
The display shows a live indication of the received signal strength on the selected frequency. Adjustments to your antenna will be manifested in the received signal strength displayed.
8.1.3 DRC (Dynamic range compression)
This function reduces the difference between the loudest and quietest audio broadcast. Effectively, this makes quiet sounds comparatively louder and loud sounds comparatively quieter.
- Options: off(default)/high/low
Under advance setting, press "-" or "+" key to select "DRC" through the list of menu, it enters the setting by pressing "Select" key. Then press "-" or "+" key to select a particular setting, it will change to new setting by pressing the "Select" button.
Note: DRC only works if it is enabled by the broadcaster for a specific station.
8.1.4 Prune (remove stations that are listed but unavailable)
This removes all invalid stations indicated in the station list with a ‘?’ in front of the station name.
Under advance setting menu, press “-” or “+” key to select “Prune” through the list of menu, it enters the setting by pressing “Select” key. Then press “-” key to choose
8.1.5 System
The System menu options are:
- TIME
- BACKLIGHT
- RESET
- SW VER
8.1.5.1 TIME
In the time menu, you can set the time, format and source for the time update.
8.1.5.1.1 Set Time
In the Time menu, press "Select" button to Set Time.
- Set the time (Hour) by using the “-” or “+” button and confirm by pressing “Select”.
- Set the time (Minute) by using the “-” or “+” button and confirm by pressing “Select”.
- Set the date by using the “-” or “+” button and confirm by pressing “Select”.
- It will show "SAVED" in the display.
8.1.5.1.2 UPDATE
In the Time menu, press "Select" button to confirm. Then press the "-" or "+" button to select "Update" through the list of menu. Press "Select" button to confirm. Using the "-" or "+" button to select the source for the time update, and then press "Select" to confirm. Source for the time update: ANY/DAB/FM/ANY
8.1.5.1.3 12/24 HR
In the Time menu, press "Select" button to confirm. Then press the "-" or "+" button to select "12/24 HR" through the list of menu. Press "Select" button to confirm. Using the "-" or "+" button to select the time format, and then press "Select" to confirm.
8.1.5.2 Backlight
This radio display has a backlight with adjustable timeout (this is the time delay, in seconds, after which the display switches off) and adjustable brightness level.
8.1.5.2.1 Timeout
Cycle through Backlight menu by pressing the “-” or “+” button, select a particular option and then press “Select” button to confirm the change of new setting.
Timeout options - Light On | 10 | 20 | 30 | 45 | 60 | 90 | 120 | 180
8.1.5.2.2 Level
Cycle through Backlight menu by pressing the “-” or “+” button, select a particular option and then press “Select” button to confirm the change of new setting.
Level options - 1 | 2 | 3 | 4 | 5 (count from the strongest intensity)
You also can use the dimmer key to control the brightness directly.
8.1.5.3 Reset
A factory reset clears all user defined settings, replacing them with the original default values, so time/date, preferences/settings, DAB station list and preset stations are all lost. If you select Factory reset, you are asked to confirm by selecting Yes.
Under advance setting, press the “-” or “+” button to select “Reset” through the list of menu, you are asked to confirm by selecting “Y”. Then, press “Select” to confirm.
8.1.5.4 Software version
This displays the current software version. Cycle through the menu, press the “-” or “+” key to select “SW VER”, and then press the “Select” key to confirm. It will show the software version on the screen.
8.1.6 Info
You can view further information under this menu, options include:
Service Name
DLS (Dynamic Label Segment – short text information broadcast with DAB audio)
- Signal Strength
- PTY (Programme Type)
- Ensemble
- Frequency
- Signal Quality
- Bitrate
- Codec
- Time
- Date
9. FM radio mode
Under the advance setting, press the “-” or “+” button to select through the list of menu, stop at your preferred option, and then press the “Select” button to enter or start the function. The advance setting menu options are:
- Scan
-
Audio
-
SYSTEM (please refer to 8.1.5)
■ INFO
9.1 Scan
By default, FM scans stop at any available station (All stations). This may result in poor quality audio from weak stations.
- Options: Local (strong station) | DX (all stations)
Press the “-” or “+” button to select a particular option in Scan setting, then press the “Select” button to confirm the change to new setting.
9.2 Audio
By default, all stereo stations are reproduced in stereo. For weak stations, this may result in poor quality audio. The audio quality can be improved using mono.
- Options: Stereo | Mono
Press the “-” or “+” button to select a particular option in Audio setting, then press the “Select” button to confirm the change to new setting.
9.3 System
Please refer to 4.1.5
9.4 Info
You can view further information under this menu, options include:
- PTY (Programme Type)
- SERVICE NAME
- RADIO TEXT
- PTY
- PS (Programme Service)
- STEREO/MONO
- Time
- Date
10. Trouble shooting and error messages
10.1 Trouble Shooting
| Problem Cause Solution | ||
| FM: HissDAB: burbling/intermittent cut-out | Low signal strength Check/move antennaMove radioRescan local (high-strength) stations only | |
| DAB: ‘No stations available’ message | Low signal strength As above then rescan stations. | |
10.2 Error messages
| Message Description Example | ||
| DAB mode | ||
| Service not available No DAB | reception station | |
| Signal error The DAB signal has been interrupted. | poor signal | |
| No DAB Station The listed station cannot be found. | ||
| (No Name) The current station does not broadcast an identity name. | other service uses same parameters | |
| No stations found No DAB stations are available – check aerial. | poor signal or outside DAB reception area | |
| FM mode | ||
| No RadioText No RDS text information is available on this station. | ||
| No PTY No RDS programme type information is available. | ||
| No Name | No RDS station name is being broadcast | |
| General messages | ||
| ? | LIST_INVALID | try to scan again |
Specification
| ITEMS SPECIFICATIONS | |
| Description DAB / FM Digital Alarm Clock Radio | |
| Audio Output: 1Wrms | |
| Frequency Ranges: FM: | 87.5–108MHz; DAB+: 174–240MHz |
| LCD Display: High resolution display | |
| Power Supply: Micro USB jack Input: DC 5V / 500mAUSB adapter Power Input: 100-240V, 50-60Hz(please use our provided adapter) | |
| Dimension: 155mm x 95mm x 43mm | |
We reserve the right to make changes in respect of the design, functions and features.
AQISTON and DITALIO are registered Trademarks of
You have purchased this device with a two-year warranty. Should you experience faults or problems, please contact the vendor.
AQISTON
D I G I T A L