TEL 48 Extra Plus - Phone AUDIOLINE - Free user manual and instructions
Find the device manual for free TEL 48 Extra Plus AUDIOLINE in PDF.


User questions about TEL 48 Extra Plus AUDIOLINE
0 question about this device. Answer the ones you know or ask your own.
Ask a new question about this device
Download the instructions for your Phone in PDF format for free! Find your manual TEL 48 Extra Plus - AUDIOLINE and take your electronic device back in hand. On this page are published all the documents necessary for the use of your device. TEL 48 Extra Plus by AUDIOLINE.
USER MANUAL TEL 48 Extra Plus AUDIOLINE
Operating Instructions__17
2.4 WALL MOUNTING 21
2.5 HEARING AID COMPATIBLE 21
2.6 T-NET SET-UP 21
2.7 SETTING THE CLOCK 22
3 OPERATION 23
3.1 USING THE TELEPHONE 23
3.2 RECEIVING CALLS 23
3.3 ADJUSTING THE VOLUME OF THE RECEIVER 23
3.4 REDIAL 24
3.5 CALL DURATION DISPLAY 24
3.6 ADJUSTABLE RINGING TONE 24
3.7 TONE ADJUSTMENT 24
3.8 STORING DIRECT AND SPEED DIAL NUMBERS 25
3.8.1 DIALLING USING THE DIRECT DIAL BUTTONS 25
3.8.2 DIALLING USING THE SPEED DIAL BUTTONS 25
4 THE "R" SIGNAL BUTTON 26
4.1 "R" SIGNAL BUTTON ON PRIVATE EXCHANGES 26
4.2 "R" SIGNAL BUTTON AND THE DEUTSCHE TELEKOM T-NET FUNCTIONS. 26
4.3 DIALLING AND STORING TELEPHONE NUMBERS WHEN USING ON PRIVATE EXCHANGES 27
5 IMPORTANT INFORMATION 28
5.1 FAULT FINDING 28
5.2 REPLACING THE TELEPHONE CABLE 28
5.3 GUARANTEE 29
5.4 DECLARATION OF CONFORMITY 30
6 IMPORTANT NOTES ON THE GUARANTEE 31
SAFETY INFORMATION
Operating Instructions: Please read this operating instruction manual thoroughly. In the case of any questions, please contact our Service Hotline 0180 5 00 13 88 (cost via Telekom at time of going to print: 12 ct/min).
Under no circumstances open the device or complete any repair work yourself. In the case of claims under the terms of guarantee, contact your sales outlet.
Notes on disposal:
The adjacent symbol indicates that old electrical and electronic devices and batteries must be disposed of separately from domestic waste.
Equipment which is old or no longer in service must be disposed of at the collection point provided by the appropriate public waste disposal authority.
Batteries and power packs must be disposed of at the sales outlet or the appropriate pubic waste authority collection point who provide the necessary container.

text_image
Two black-and-white recycling symbols: a trash can with crossed-out lines and a recycling symbol.Care: The surface of the case can be cleaned with a soft, dry, lint-free cloth. Never use cleaning agents or solvents.
The implementation of European law in national laws and directives obliges you to dispose of consumer goods appropriately. This serves to protect persons and the environment.
Temperature and Ambient Conditions: The unit is designed for use in protected rooms with a temperature range of +5 °C to 45 °C. The unit must not be installed in damp rooms such as a bathroom or laundry room. Avoid proximity to sources of heat such as radiators and do not expose the unit to direct sunlight. We therefore recommend that this product should not be used on antique furniture, veneers or other wooden surfaces.
Connection Information: Connect the AUDIOLINE Telephone 48 Extra Plus to a TAE connection socket with F coding. It can be connected together with other units, such as facsimile unit, answering machine or modem, if a TAE connection socket is available with F/N coding.
Approval and CE Marking: The unit is approved for use on the European telephone network. This unit fulfils the requirements of the EU Directives. Conformity of the unit to the directives is confirmed by the CE mark. You will find the Declaration of Conformity at the end of this manual.
1 OPERATIONAL ELEMENTS
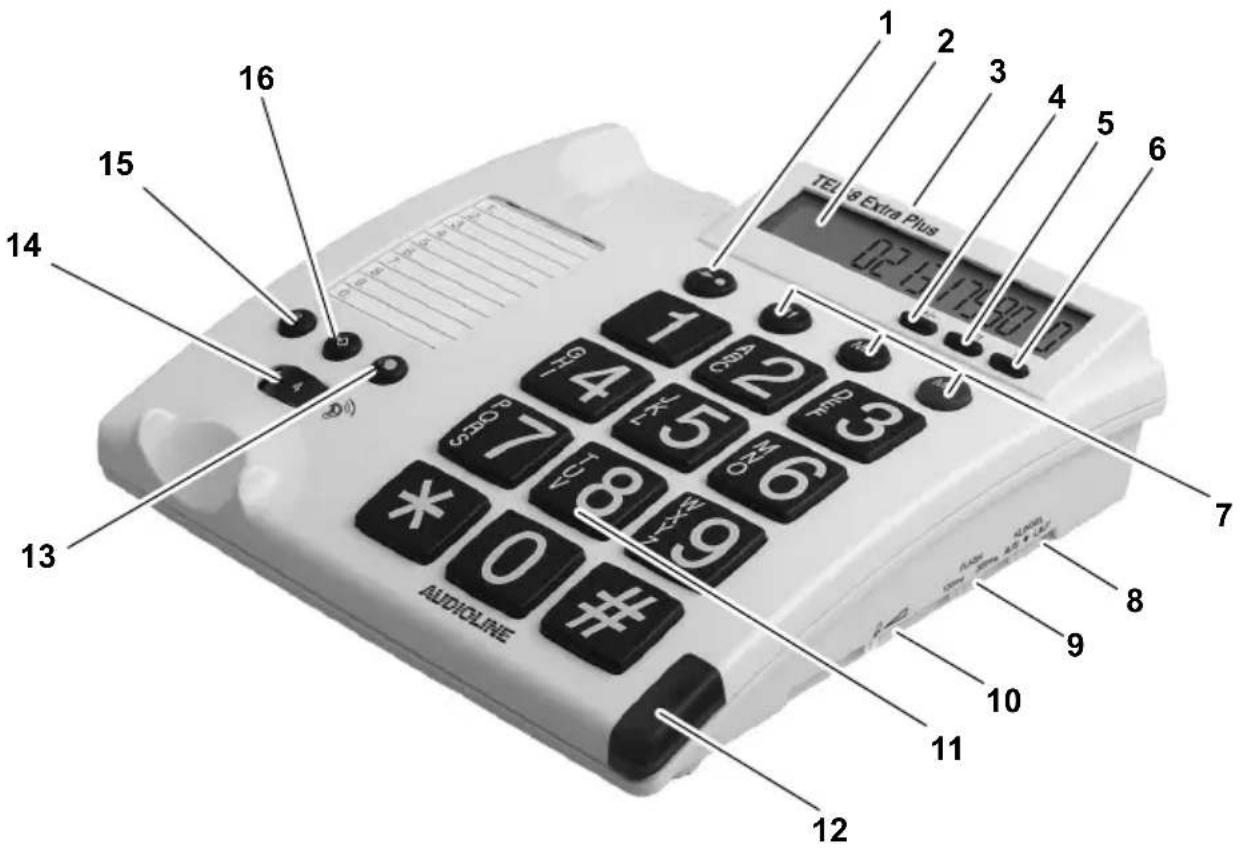
text_image
1 2 3 4 5 6 TEL & Extra Plus 07.6 17:00:7 1 2 3 4 5 6 7 8 9 10 11 12 13 14 15 16 AUDIOLINE- Speed dial button 9. Slide control "Flash"
- Display 10. Slide control "tone control"
- Telephone socket (rear) 11. Number pad, 1-9, 0, * and #
- Set time (+/-) 12. Visual call indicator
- Set time (SET) 13. Redial
- Reset or start the call duration 14 Receiver volume
- Direct call buttons M1, M2, M3 15. "R" Signal button
- Slide control "Ringer" 16 Store button
2 INSTALLATION
2.1 CONNECTING THE RECEIVER
After unpacking your telephone, you must first connect the telephone receiver to the base unit. The spiral cable needed for this has two identical connections. First take one end of the spiral cable and plug it into the socket at the bottom of the receiver. Now plug the other end into the socket on the left-hand side of the base unit.
2.2 INSERT BATTERY
Before connecting your new telephone to the telephone network, install the battery enclosed with the telephone. Please always use type AAA 1.5 V alkaline batteries. The batteries are required for the display and other features of the telephone. Make sure that the telephone is not connected to the telephone network, before installing or changing the batteries. The battery compartment is to be found on the underside of your telephone.
- Open the battery compartment with a small screwdriver or a pointed object.
- Insert the battery. Ensure that the polarity is correct. Push the "-" pole onto the small spring and then press the "+" pole downwards.
- Close the battery compartment
Change the battery when the display is no longer visible.
2.3 CONNECTING THE TELEPHONE
Connect the telephone cable provided to the telephone jack and the telephone socket on the rear of the telephone. The AUDIOLINE Telephone 48 Extra Plus works using the TTD system (Touch-Tone Dialling).
2.4 WALL MOUNTING
Your AUDIOLINE Telephone 48 Extra Plus is also suitable for wall mounting. Use two screws for fixing it to the wall. Drill two holes with a vertical distance of 83 mm between them and leave the screws protruding 5 mm from the wall. Now place the telephone over the screws and push down slightly.
Note: There must be no lines or pipes under the area where the holes are to be drilled.
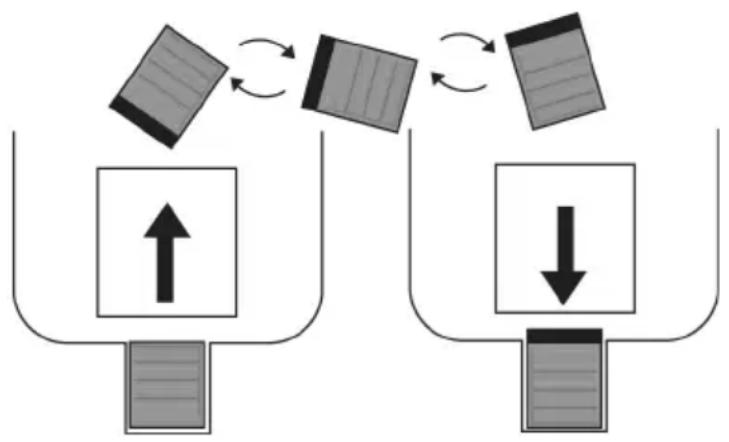
When the telephone is used on a table, the receiver hanging hook must be in the flush position as shown in diagram A (factory setting). When mounting on the wall, the telephone receiver hanging hook is pulled out and rotated. See diagram B.
flowchart
graph TD
    A["Top Unit"] --> B["Left Unit with Up Arrow"]
    B --> C["Right Unit with Down Arrow"]
    C --> D["Bottom Unit with Down Arrow"]
    D --> E["Top Unit with Left Arrow"]
    E --> F["Right Unit with Right Arrow"]
    F --> G["Bottom Unit with Left Arrow"]
    G --> H["Top Unit with Right Arrow"]
2.5 HEARING AID COMPATIBLE
The telephone is compatible with all the most common hearing aids on the market. However, due to the numerous models available, there is no guarantee that the telephone will operate perfectly with all hearing aids.
2.6 T-NET SET-UP
Your AUDIOLINE Telephone 48 Extra Plus supports the most important DEUTSCHE TELEKOM added value functions (e.g. brokering, call waiting, three-way conference, etc.). For these, you will need the "FLASH" setting on your telephone. More information can be found in item 4. Please contact DEUTSCHE TELEKOM to gain access to these functions (some of which are subject to charge).
- INSTALLATION -
2.7 SETTING THE CLOCK
The present time is shown in the display. To set the clock, please proceed as follows:
- Press the SET button beneath the display once. The hours figure in the display starts to flash.
- You can now enter the present time using the +/- button. To do this, press the +/- button until you see the present hour in the display.
- Now press the SET button again and the minutes figure in the display starts to flash.
- You can now enter the present number of minutes by repeatedly pressing the +/- button.
- Press the SET button. The time is set.
3 OPERATION
3.1 USING THE TELEPHONE
The AUDIOLINE Telephone 48 Extra Plus can be used like any conventional telephone.
| PLEASE FOLLOW THE INSTRUCTIONS: |
| Lift the receiver and wait until you hear the dialling tone. |
| Now dial the required telephone number. The number dialled will be shown in the display. The display shows a telephone number with a maximum of 16 digits. If the number dialled is longer, only the last 16 digits will be displayed. |
| To end the call simply replace the receiver. |
3.2 RECEIVING CALLS
Lift the receiver and carry out the conversation.
Replace the receiver to end the call.
3.3 ADJUSTING THE VOLUME OF THE RECEIVER
If the caller's voice should ever be too quiet or too loud, you can increase or reduce the volume of the receiver.
Turn the ^ knob (beneath receiver) during the call.

Warning: Setting the volume to its loudest volume may cause ear damage. Therefore, reset the volume to "0" after each call.
- OPERATION -
3.4 REDIAL
If a connection that you have dialled is engaged or you were unable to get through to anybody, replace the receiver. The last number dialled remains stored in the telephone automatically.
To use the redial facility, proceed as follows:
Lift the receiver and press the redial button Ⓐ. The stored redial number will be dialled again.
3.5 CALL DURATION DISPLAY
After dialling the telephone number, the current call duration in minutes and seconds will be shown in the display after a few seconds.
You can also use the internal clock as a stopwatch. To do this, press the ⏻ button during a call or even with the receiver on the hook. The time measurement can be stopped using the same button ⏻. The measured time will still be shown in the display for a few seconds. The display then jumps back to showing the present time.
3.6 ADJUSTABLE RINGING TONE
By means of the "KLINGEL" slide switch on the right-hand side of your telephone you can choose the settings "LEISE" (◆), or "LAUT" to match the volume of the ringing tone to your requirements. If at any time you do not want to be disturbed, use the "AUS" setting.
3.7 TONE ADJUSTMENT
Use the sliding switch 🎯 on the right-hand side of the telephone to adjust the tone.
Note: The tone adjustment function will not be affective when the reveiver volume has been set to minimum level.
- OPERATION -
3.8 STORING DIRECT AND SPEED DIAL NUMBERS
You can store a telephone number for direct dialling on each of the buttons M1, M2 and M3 with your AUDIOLINE Telephone 48 Extra Plus. The direct dial button M3 is coloured red and is thus suitable for use as an emergency call button. An additional ten numbers can be stored as speed dial numbers.
| PLEASE FOLLOW THE INSTRUCTIONS: |
| Lift the receiver. |
| Press the store button ⇌. |
| Now enter the required telephone number using the number pad.The maximum length is 16 digits. |
| Press the store button ⇌ again. |
| Now press the required direct dial button M1, M2 or M3 or a button on the number pad between 1 to 9 or 0 to save the telephone number as a speed dial number. |
| Replace the receiver. |
Storage locations already used are automatically overwritten when you store a new telephone number in this location.
The numbers stored can be recorded on the index underneath the receiver. Press down firmly on the cover, slide it downwards and remove the note. Write down the phone number. Replace the note and cover.
3.8.1 DIALLING USING THE DIRECT DIAL BUTTONS
| PLEASE FOLLOW THE INSTRUCTIONS: |
| Lift the receiver and press the required direct dial button M1, M2 or M3. |
3.8.2 DIALLING USING THE SPEED DIAL BUTTONS
| PLEASE FOLLOW THE INSTRUCTIONS: |
| Lift the receiver and press the speed dial button →• and the required storage location from 1 to 9 or 0. |
4 THE "R" SIGNAL BUTTON
You can use the "R" signal button on your telephone on private exchanges and when using DEUTSCHE TELEKOM's T-Net functions.
4.1 "R" SIGNAL BUTTON ON PRIVATE EXCHANGES
If you have connected your telephone to a private exchange, you can use all the facilities such as call transfer, automatic recall, etc. The "R" signal button gives you access to these facilities. The FLASH time "100ms" will be required on a private exchange.
For this purpose, set the "FLASH" switch, located on the right side of the telephone, to the "100ms" setting.
You can find out from the dealer from whom the equipment was purchased whether your telephone will work on your private exchange without any problems and what further facilities you will receive from this.
4.2 "R" SIGNAL BUTTON AND THE DEUTSCHE TELEKOM T-NET FUNCTIONS
Your AUDIOLINE Telephone 48 Extra Plus supports the most important DEUTSCHE TELEKOM added value functions (e.g. brokering, call waiting, three-way conference, etc.). The T-NET works using the "FLASH 300ms" setting.
For this purpose, set the "FLASH" switch, located on the right side of the telephone, to the "300ms" setting.
Please contact DEUTSCHE TELEKOM to gain access to the T-NET functions (some of which are subject to charge).
4.3 DIALLING AND STORING TELEPHONE NUMBERS WHEN USING ON PRIVATE EXCHANGES
Note!
The pause function after an outside line code (usually 0 or 9) described in this chapter is only required on older private exchanges.
Some private exchanges use a short pause between the code for the outside line (usually 0 or 9) and the dialling tone. When dialling manually and when dialling using the direct dial and speed dial buttons, this pause can be entered along with the number so that the following digits are not dialled too quickly.
Entering the pause when dialling manually
Press the ⬤ button once between the number for the outside line and the actual telephone number. The pause will be shown by a "P" in the display. After connecting to an outside line your telephone will wait for three seconds before dialling the actual telephone number.
Storing the pause
When storing a number, press the ⬤ button after the number for the outside line and before the actual telephone number. The pause will be shown by a "P" in the display. When dialling using the direct dial or speed dial buttons a pause of three seconds will automatically be inserted after the number for the outside line.
5 IMPORTANT INFORMATION
5.1 FAULT FINDING
You cannot make calls with your phone:
Remove all devices and connect only the telephone directly to the telephone socket.
The fault has not been cleared:
The fault may be due to a defect connection cable or telephone. Please replace.
The fault has not been cleared:
The fault lies in the power supply cable. Please call telephone network provider's service department.
In the case of technical problems you can also contact our Service Department on the Hotline number 0180 5 00 13 88 (cost via Telekom at time of going to print: 12 ct/min)..
5.2 REPLACING THE TELEPHONE CABLE
If you have to replace your telephone cable, you can locate the appropriate cable at your dealer's with the help of the diagram below.
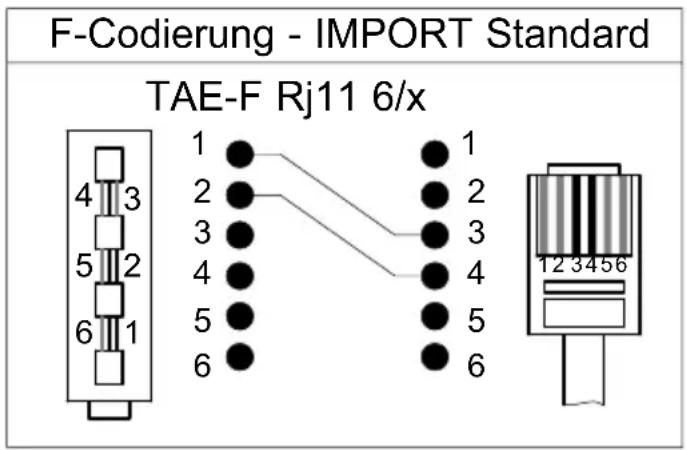
text_image
F-Codierung - IMPORT Standard TAE-F RJ11 6/x 1 2 3 4 5 65.3 GUARANTEE
AUDIOLINE equipment is produced and tested according to the latest production methods. The implementation of carefully chosen materials and highly developed technologies ensure trouble-free functioning and a long service life. The terms of guarantee do not apply where the cause of equipment malfunction is the fault of the telephone network operator or any interposed private branch extension system. The terms of guarantee do not apply to the batteries used in the products. The period of guarantee is 24 months from the date of purchase.
All deficiencies resulting from material or production faults which occur during the period of guarantee will be eliminated free of charge. Rights to claims under the terms of guarantee are annulled following intervention by the purchaser or third parties. Damage caused as a result of improper handling or operation, incorrect positioning or storing, improper connection or installation, Acts of God or other external influence are not covered by the terms of guarantee. In the case of complaints, we reserve the right to repair or replace defect parts or provide a replacement device.
Replacement parts or devices become our property. Rights to compensation in the case of damage are excluded where there is no evidence of intent or gross negligence by the manufacturer.
If your device shows signs of defect during the period of guarantee, please return it to the sales outlet in which you purchased the AUDIOLINE device together with the purchase receipt. All rights to claims under the terms of guarantee in accordance with this agreement must be asserted exclusively with regard to your sales outlet. Two years after the purchase and transfer of our products, claims under the terms of guarantee can no longer be asserted.
- GUARANTEE -
5.4 DECLARATION OF CONFORMITY
This device fulfils the requirements stipulated in the EU directive:
1999/5/EU directive on radio equipment and telecommunications terminal equipment and the mutual recognition of their conformity. Conformity with the above mentioned directive is confirmed by the CE symbol on the device.
To view the complete Declaration of Conformity, please refer to the free download available on our web site www.audioline.de.
CE
6 IMPORTANT NOTES ON THE GUARANTEE
The period of guarantee for the AUDIOLINE product begins on the date of purchase. Rights to claims under the terms of guarantee relate to deficiencies resulting from material or production faults. Rights to claims under the terms of guarantee are annulled following intervention by the purchaser or third parties. Damage caused as a result of improper handling or operation, normal wear and tear, incorrect positioning or storing, improper connection or installation, Acts of God or other external influence are not covered by the terms of guarantee.
CLAIMS UNDER THE TERMS OF GUARANTEE MAY ONLY BE ASSERTED TO THE RETAILER WHERE THE EQUIPMENT WAS PURCHASED, WHEREBY THE PURCHASE RECEIPT MUST ALSO BE SUBMITTED.
TO PREVENT UNNECESSARY LONG DELAYS, PLEASE DO NOT SEND EQUIPMENT UNDER COMPLAINT TO OUR OFFICE ADDRESS.
IN THE CASE OF QUESTIONS CONCERNING OPERATION OR THE TERMS OF GUARANTEE, PLEASE REFER TO THE OPERATING MANUAL OR CONTACT OUR HOTLINE:
0180 500 13 88 (Telekom cost at time of going to print: 12 ct/min)
AUDIOLINE GmbH
Neuss
Service Hotline 0180 500 13 88
(Telekom cost at time of going to print: 12 ct/min)
Internet: www.audioline.de - E-mail: info@audioline.de