TEL4CLIP - Phone AUDIOLINE - Free user manual and instructions
Find the device manual for free TEL4CLIP AUDIOLINE in PDF.


User questions about TEL4CLIP AUDIOLINE
0 question about this device. Answer the ones you know or ask your own.
Ask a new question about this device
Download the instructions for your Phone in PDF format for free! Find your manual TEL4CLIP - AUDIOLINE and take your electronic device back in hand. On this page are published all the documents necessary for the use of your device. TEL4CLIP by AUDIOLINE.
USER MANUAL TEL4CLIP AUDIOLINE
natural_image
Black office phone with coiled cord and digital display (no visible text or symbols)
natural_image
Black office telephone with coiled cord and keypad, no visible text or symbolsOperating Instructions....13
1. BEDIENELEMENTE
Hörer Innenseite
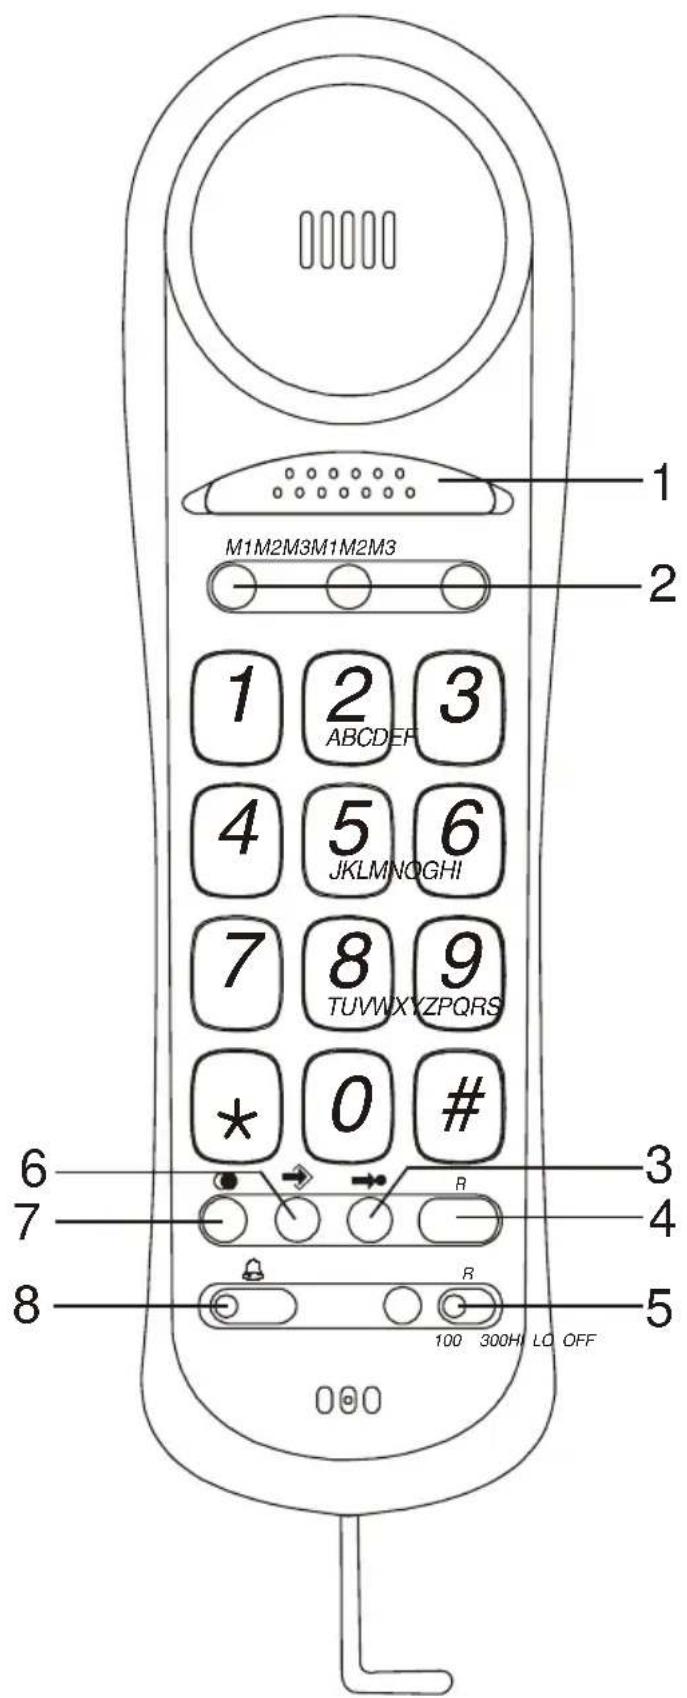
text_image
1 M1M2M3M1M2M3 2 1 2 3 ABCDEF 4 5 6 JKLMNOGHI 7 8 9 TUVWXYZPQRS * 0 # 6 7 8 3 4 R R 5 100 300H LO OFFflowchart
graph TD
    A["Stage A: Square with upward arrow"] --> B["Stage B: Downward arrow"]
    B --> C["Final Stage"]
    style A fill:#f9f,stroke:#333
    style B fill:#bbf,stroke:#333
2.4 HÖRGERÄTE KOMPATIBEL
VOLLVERANTWORTLICH, DASS DAS PRODUKT
MODEL: TEL 4 - clip
Name: MANFRED ZINNOW
2.1 Insert batteries ....15
2.2 Connecting....16
2.3 Wall Mounting 16
2.4 Hearing aid compatible ....16
2.5 T-NET Set-up....16
2.6 Adjusting the display contrast .....16
2.7 Programming standard settings .....17
3. Operation.... 18
3.1 Making a call....18
3.2 Receiver volume ......18
3.3 Redial....18
3.4 Adjustable ringing tone ....18
3.5 Using memory locations....18
3.5.1 Storing numbers in the phone book 18
3.5.2 Dialling using the direct dial buttons.... 19
3.5.3 Dialling from the phone book 19
4. Caller Display (CLIP) 19
4.1 Viewing the Caller List....19
4.2 Dialling a telephone number directly from the Caller List ....20
4.3 Deleting numbers from the caller list....20
4.4 Deleting the entire caller list....20
5. The "R" Signal button - T-NET set-up..... 21
5.1 "R" Button on private exchanges .....21
5.2 "R" Button and the DEUTSCHE TELEKOM T-Net functions....21
6. Important Information 21
6.1 Fault Finding ....21
6.2 Replacing the telephone cable....21
6.3 Guarantee 22
6.4 Declaration of Conformity....23
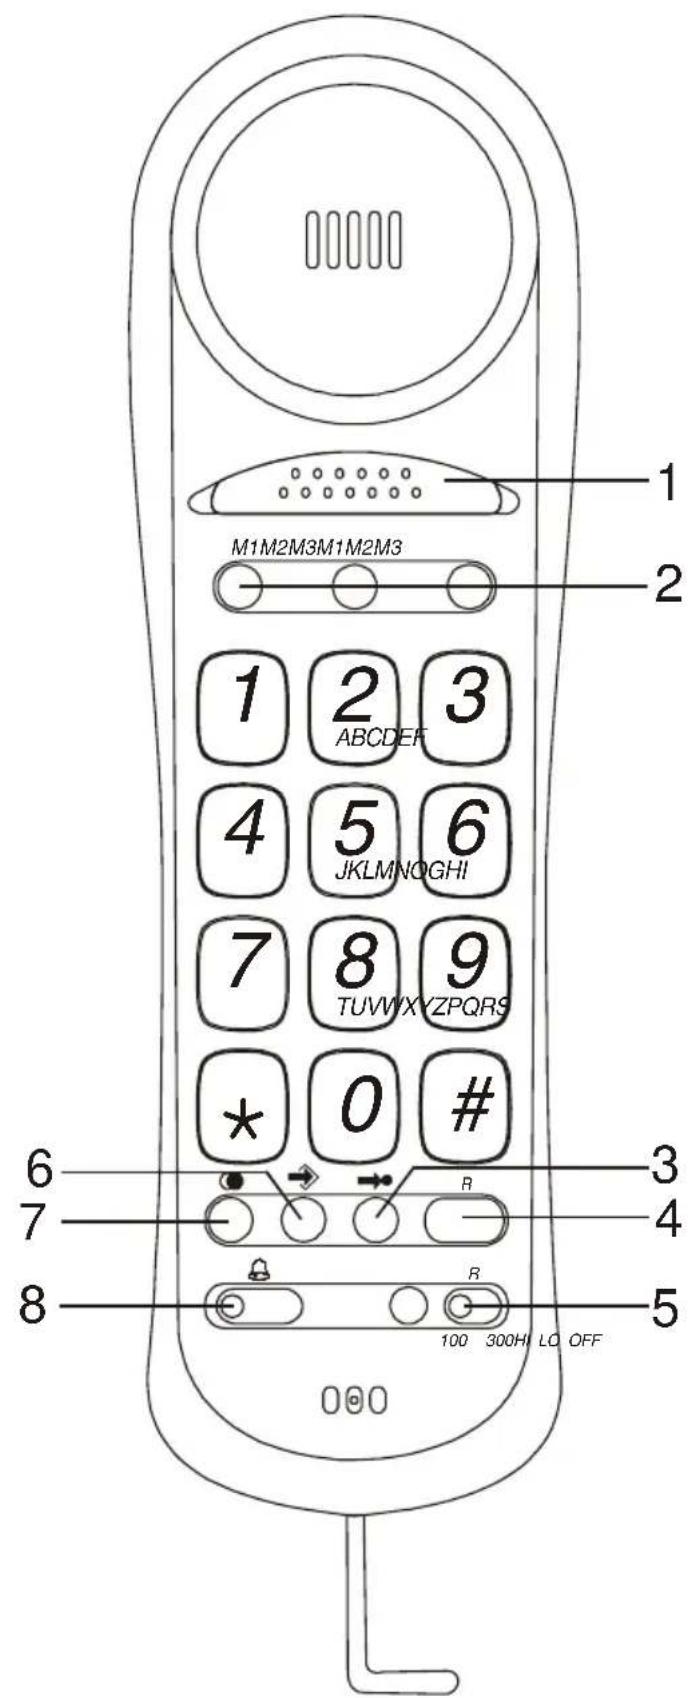
1. OPERATIONAL ELEMENTS
Receiver inside
text_image
1 M1M2M3M1M2M3 2 1 2 3 ABCDEF 4 5 6 JKLMNOGHI 7 8 9 TUVWXYZPQRS * 0 # 6 7 8 3 4 5 100 300H LO OFF1 Recall button 5 FLASH switch
2 Direct dial buttons 6 Save button
3 Speed dial button 7 Redial
4 R signal button 8 Adjustable ringing tone
Receiver outside – left-hand side – right-hand side
text_image
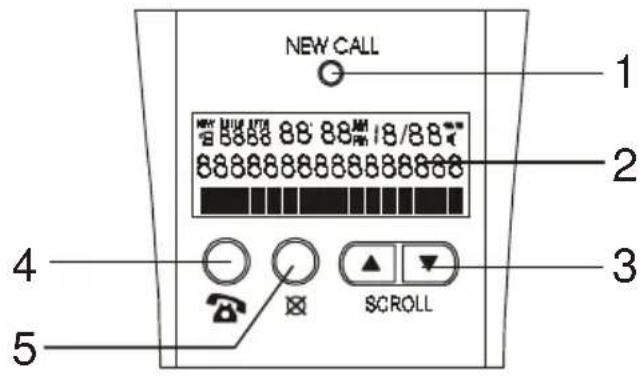
NEW CALL 1 2 3 4 5 8888 88 88 18/88 8888888888888888 SCROLL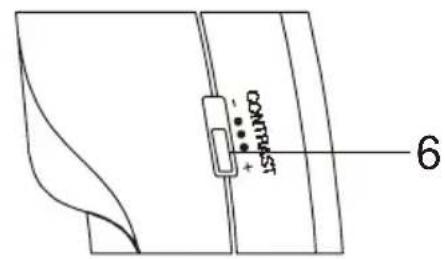
text_image
contrast + - 6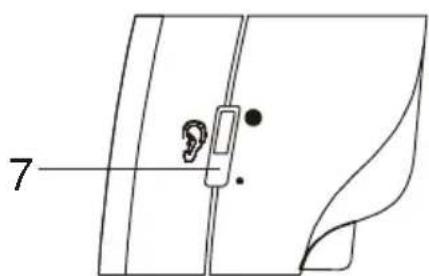
text_image
71 New Call LED 5 Delete button
2 Display 6 Contrast adjustment
3 Scroll buttons 7 Receiver volume
4 Call button
2. INSTALLATION
2.1 INSERT BATTERIES
Before connecting your new telephone to the telephone network, the supplied batteries should be installed. Please always use type AAA alkaline batteries. The batteries are required for the call number display and other features of the telephone. Before installing or changing the batteries make sure that the telephone is not connected to the telephone network.
- Open the battery compartment under the telephone list with a small screwdriver or a pointed object.
- Insert the batteries. Ensure that the polarity is correct.
- Close the battery compartment.
The batteries should be changed when this symbol appears in the display. All four batteries must then be replaced so that the call number display and the stored telephone numbers continue to work correctly. If the display is blank, then the batteries are already fully discharged.
2.2 CONNECTING
Connect the telephone cable provided to the telephone jack and the telephone socket on the underside of the telephone. Then feed the cable through the cable guide and away from the telephone either to the top or to the bottom. The AUDIOLINE TELEFON 4clip works using the TTD system (Touch-Tone Dialling).
2.3 WALL MOUNTING
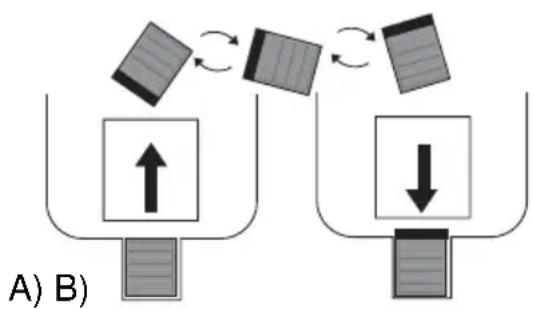
Your AUDIOLINE TELEPHONE 4clip is also suitable for wall mounting. Use two screws for fixing it to the wall. Drill two holes 83 mm apart and leave the screws protruding 5 mm from the wall. Now place the telephone over the screws and push down slightly. When the telephone is used on a table, the receiver hanging hook must be in the flush position as shown in diagram A (factory setting). When mounting on the wall, the telephone receiver hanging hook is pulled out and rotated. This is shown in diagram B.
flowchart
graph TD
    A["↑"] --> B["←"]
    B --> C["↓"]
    C --> D["←"]
    D --> E["→"]
2.4 HEARING AID COMPATIBLE
The telephone has a special circuit working on the basis of induction for transmitting speech to hearing aids. Please set your hearing aid to "T".
2.5 T-NET SET-UP
Your AUDIOLINE TELEPHONE 4clip supports the most important DEUTSCHE TELEKOM added value functions (e.g. brokering, call waiting, three-way conference, etc.). More information can be found in item 5. Please contact DEUTSCHE TELEKOM to gain access to these functions (some of which are subject to charge).
2.6 ADJUSTING THE DISPLAY CONTRAST
The display contrast can be adjusted by means of the "CONTRAST" slide switch on the left-hand side of the receiver.
2.7 PROGRAMMING STANDARD SETTINGS
Telephone numbers are always shown in the display with the local dialling code or, in the case of international calls, also with the appropriate country code. If these numbers are dialled directly from the caller list, the dialling code can of course be omitted with local calls. Therefore, you should enter your local dialling code and the country code for Germany (0049). Moreover, you can also enter the date and time at this point.
- Lift the receiver.
- Press and hold the ▼ and ▲ buttons for 4 seconds.
- The display will show “----, local dialling code”. Now enter your local dialling code with a maximum of 5 digits.
- Press the button as many times as necessary until you see the message "country code" in the display. If a 5 digit local dialling code is entered the display jumps directly to the next entry "country code".
- Now enter the country code 0049 for Germany.
- Press the button as many times as necessary until you see the message "TIME? DATE?" in the display. Now enter the current hour between 00 and 23 using the ▼ and ▲ buttons and confirm with the button.
- Now enter the current minute between 1 and 59 using the ▼ and ▲ buttons and confirm with the button.
- Now enter the current day between 1 and 31 using the ▼ and ▲ buttons and confirm with the button.
- Now enter the current month between 1 and 12 using the ▼ and ▲ buttons and confirm with the button.
Important information!
If you ever have to change the standard settings, start programming as described under item 1. You can now move the flashing cursor to any number using the button and make a change using the ▼ and ▲ buttons. You can automatically go from the local dialling code to the country code and to the time entry by repeatedly pressing the ▼ button. To shorten a local or country dialling code, go to after the end of the numbers you have entered (cursor flashes) and then use the ▼ and ▲ buttons to enter the minus sign “-”.
3. OPERATION
3.1 MAKING A CALL
Lift the receiver and dial the required telephone number. To end the call, replace the receiver on the hook. By using the Recall button, you can terminate the current call and you will immediately get a new outside line. The actual duration of the call is shown in the display while the call is being made.
3.2 RECEIVER VOLUME
You can adjust the receiver volume to suit your requirements in two steps using the 📞 slide switch.
3.3 REDIAL
To recall the last number dialled, lift the receiver and press the button.
3.4 ADJUSTABLE RINGING TONE
By means of the "Ringer" slide switch 🔒 on the receiver you can choose the settings "HI" (LOUD), or "LO" (SOFT) to match the volume of the ringing tone to your requirements. If at any time you do not want to be disturbed, use the "OFF" setting.
3.5 USING MEMORY LOCATIONS
With your AUDIOLINE TELEFON 4clip you can store 18 telephone numbers in the phone book. The first three locations 01, 02, and 03 can be used as direct dial buttons M1, M2 and M3. The other numbers are called up using the speed dial button.
3.5.1 STORING NUMBERS IN THE PHONE BOOK
- To program the numbers, lift the receiver and hold the Recall button pressed with the thumb of one hand while you enter the numbers using the other hand.
- Enter the required telephone number with a maximum of 16 digits using the number pad.
- Press the store button ↗.
- Press the speed dial button Error! Not a valid link.
- The display shows “(--)”. Now enter the required storage location between 01 and 18 using the number pad and the telephone number entered will be stored. Please always enter the store location using two digits (1=01, 2=02, etc). The display shows the message “STORED”.
- When you have finished entering the numbers, release the Recall button and place the receiver on the rest.
If a storage location has already been used, the display shows the message "OVERWRITE". The selected storage location is overwritten with the new telephone number by means of the button. If you do not want to overwrite
the storage location, press one of the buttons ▼ or to cancel the entry.
3.5.2 DIALLING USING THE DIRECT DIAL BUTTONS
- Lift the receiver.
- Press the required direct dial button M1, 2, or 3.
Note: Storage locations 01, 02 and 03 are dialled using the direct dial buttons M1, M2 and M3.
3.5.3 DIALLING FROM THE PHONE BOOK
- Lift the receiver.
- Press the speed dial button →● and the required storage location from 01 to 18 on the number pad.
4. CALLER DISPLAY (CLIP)
Warning!
Caller display is an optional service from your telephone provider. Your telephone will show the number in the display if your telephone provider offers this service. Please ask your telephone provider for further information. If this service is not available, incoming calls will not be shown in the display.
Using caller display, you can see with incoming calls who is calling you. If this function is available on your line, the display shows you the caller's telephone number while the telephone is ringing.
If the call is not accepted, this indication remains in the display for 60 seconds before the current time and date are shown once more.
Furthermore, in your absence, all calls are saved in a caller list with date and time. Up to 99 numbers are saved in the caller list. When the list is full, the oldest number is always deleted from the list.
If calls are registered during your absence, the "NEW CALL" LED flashes and the display shows the number of newly stored numbers (XX NEW). The total number of telephone numbers stored in the caller list is also displayed (XX CALLS). You can find out how to view the list in the next chapter 4.1.
4.1 VIEWING THE CALLER LIST
You can page through the caller list using the ▼ and ▲ buttons. You can see the latest numbers by means of the
▼ button whereas you can view the numbers that have been stored for some time by using the ▲ button. When you reach the last storage location the display shows the message "End of list".
The number of the currently selected storage location between 1 and 99 appears under "CALL #" in the display.
Note!
If a caller has tried to reach you several times, the message "RPT" appears in the display and beneath it the number of calls. The date and time of the last call is always shown.
When all newly recorded numbers have been checked, the "NEW CALL" LED goes off and the "NEW" indicator in the display shows "0".
If no button is pressed within 20 seconds, the caller list is no longer displayed and the display shows the current time and date once more along with the number of telephone numbers stored in the caller list and the number of newly stored telephone numbers.
The display reports the following information when there is no telephone number available.
If the message "Error" appears in the display, the number has only been partially or incorrectly received.
If the message “Not available” appears in the display, the telephone number information is not available. This could have been an international call.
If the message “Private” appears in the display, the caller has suppressed the transmission of his telephone number or it was not possible to transmit the number.
4.2 DIALLING A TELEPHONE NUMBER DIRECTLY FROM THE CALLER LIST
You can dial telephone numbers directly that have been stored in the caller list.
-
Either lift the receiver or leave it on the rest.
-
Select the required telephone number using the ▼ and buttons.
-
Now press the 📄 button and the telephone number will be dialled directly. Lift the receiver if you have not already done so.
4.3 DELETING NUMBERS FROM THE CALLER LIST
-
Select the telephone number that you want to delete from the caller list using the ▼ and buttons.
-
Now press the button twice and the number will be deleted.
4.4 DELETING THE ENTIRE CALLER LIST
Press the button for 3 seconds. The display will show the message "NO CALLS" and the entire caller list will be deleted.
5. THE "R" SIGNAL BUTTON - T-NET SET-UP
You can use the "R" signal button on your telephone on private exchanges and when using DEUTSCHE TELEKOM's T-Net functions.
5.1 "R" BUTTON ON PRIVATE EXCHANGES
If you have connected your telephone to a private exchange, you can use all the facilities such as call transfer, automatic recall, etc. The "R" signal button gives you access to these facilities. The FLASH time "100ms" will be required on a private exchange. For this purpose, set the "R" slide switch to the "100ms" setting. You can find out from the dealer from whom the equipment was purchased whether your telephone will work on your private exchange without any problems and what further facilities you will receive from this.
5.2 "R" BUTTON AND THE DEUTSCHE TELEKOM T-NET FUNCTIONS
Your AUDIOLINE TELEPHONE 4clip supports the most important DEUTSCHE TELEKOM added value functions (e.g. brokering, call waiting, three-way conference, etc.). The T-NET works using the "FLASH 300ms" setting. For this purpose, set the "R" slide switch to the "300ms" setting Please contact DEUTSCHE TELEKOM to gain access to the T-NET functions (some of which are subject to charge).
6. IMPORTANT INFORMATION
6.1 FAULT FINDING
Remove all extra telephone equipment and connect only the telephone directly to the telephone socket. If the fault is still there, connect a different telephone (if available) to the telephone socket. The results will show you whether the fault lies with the unit or with the telephone line. Of course, you can always ring your telephone network provider's service department, which will give you more advice on checking your installation.
6.2 REPLACING THE TELEPHONE CABLE
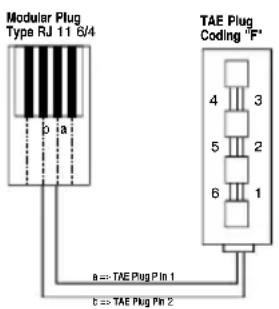
If you have to replace your telephone cable, you can locate the appropriate cable at your dealer's with the help of the diagram below.
text_image
Modular Plug Type RJ 11 8/4 b a TAE Plug Coding °F* 4 3 5 2 6 1 a => TAE Plug Pin 1 b => TAE Plug Pin 26.3 GUARANTEE
AUDIOLINE equipment is manufactured and tested in accordance with the most up to date production methods. Selected materials and highly developed technology ensure trouble-free operation and long life. If your unit should develop a fault within the guarantee period, however, please contact the shop where you bought your AUDIOLINE equipment exclusively and have your purchase receipt available for inspection. The guarantee period is 12 months from the day of purchase under the following conditions: within the guarantee period, all defects due to material or manufacturing faults will be repaired free of charge. The guarantee is invalidated if the equipment has been tampered with by the purchaser or third parties. Any damage caused by improper handling or operation, by incorrect positioning or storage, by improper connection or installation or by excessive force or other external influences is not covered by the guarantee. In the case of complaint, we reserve the right to repair or replace defective parts or to exchange the equipment. Exchanged parts or exchanged equipment become our property. Claims for compensation are excluded insofar as they do not relate to criminal intent or gross negligence on the part of the manufacturer. All guarantee claims according to these conditions must be raised exclusively with your dealer. Rights under the guarantee can no longer be enforced after the expiry of 24 months from purchase and delivery of our products. In the case of unnecessary or unjustified demands on the customer service department, we will levy our usual service charges for materials, time, postage and packing. Any complaints must be reported as soon as a problem is found. The guarantee is valid within the German Federal Republic.
6.4 DECLARATION OF CONFORMITY
WE AUDIOLINE GmbH
OF PROMENADENSTR. 1
D-41460 NEUSS
GERMANY
DECLARE UNDER OUR SOLE RESPONSIBILITY AS EU DISTRIBUTOR THAT THE PRODUCT
MODEL: TEL 4 - clip
DESCRIPTION: CORD CONNECTED TELEPHONE
IS IN CONFORMITY WITH THE BASIC REQUIREMENTS
OF DIRECTIVE: 1999/5/EC
AUTHORISED SIGNATORY:
Signature:
Name:
Position in the company: MANAGING DIRECTOR
Date of issue: 03.07.2001
ZINNOW
A copy of this declaration will be retained for 10 years after cessation of production.

SUPPLIER: AUDIOLINE GmbH, PROMENADENSTR. 1, D-41460 NEUSS
PRODUCT: TEL 4 - clip
This product has been developed for use with an analogue telephone line (PSTN) within Germany. However, no guarantee can be accepted for trouble-free operation on all telecommunications terminal equipment connections due to the differences between the different telecommunications network operators.
AUDIOLINE GmbH
Promenadenstrasse 1
41460 Neuss
Service Hotline 0180 5 00 13 88