
ZI-HS8PT - Log splitter Zipper - Free user manual and instructions
Find the device manual for free ZI-HS8PT Zipper in PDF.

| Product Type | Log Splitter |
| Brand | Zipper |
| Model | ZI-HS8PT |
| Splitting Force | 8 tons |
| Motor Power | 2200 W (3 HP) |
| Power Source | Electric, 230 V / 50 Hz |
| Max Log Length | 520 mm |
| Max Log Diameter | 250 mm |
| Cycle Time | 8 - 10 seconds |
| Hydraulic Oil Capacity | 3.5 L |
| Dimensions (L x W x H) | 1200 x 500 x 800 mm |
| Weight | 95 kg |
| Safety Features | Two-hand operation, safety lock, emergency stop |
| Maintenance | Check hydraulic oil level, clean air filter, lubricate moving parts |
| Accessories Included | Log ramp, wheel kit |
| Certification | CE |
Frequently Asked Questions - ZI-HS8PT Zipper
User questions about ZI-HS8PT Zipper
0 question about this device. Answer the ones you know or ask your own.
Ask a new question about this device
Download the instructions for your Log splitter in PDF format for free! Find your manual ZI-HS8PT - Zipper and take your electronic device back in hand. On this page are published all the documents necessary for the use of your device. ZI-HS8PT by Zipper.
USER MANUAL ZI-HS8PT Zipper
natural_image
Green stylized letter 'Z' on black background, no text or symbols present
natural_image
Green industrial machine with black lever and mechanical components (no visible text or symbols)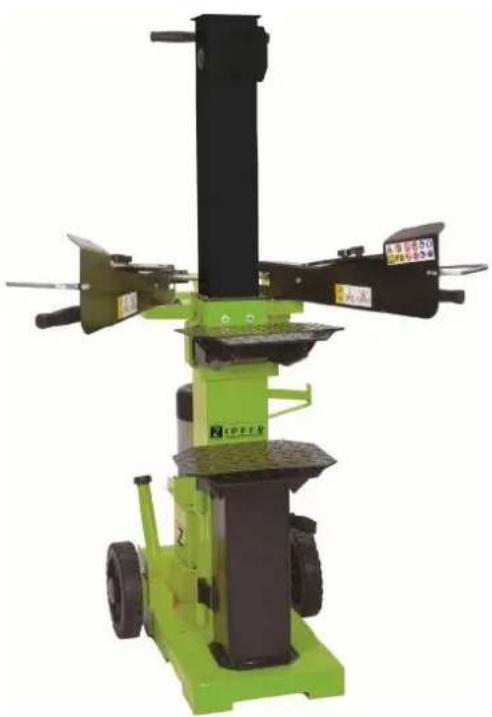
natural_image
Green industrial machine with black blades and a vertical shaft, no visible text or symbolsHOLZSPALTER / LOG SPLITTER
ZI-HS8PT / ZI-HS10T / ZI-HS12T
EAN: 912003923858 6 / 912003923149 5 / 912003923150 1


Read the operation manual carefully before first use.

1 INHALT / INDEX
2 SI CHERHEI TSZEICHEN / SAFETY SIGNS 5
3 VORWORT 7
4 TECHNIK 8
4.1 Komponenten ZI-HS8PT 8
4.1.1 Bedienelemente....8
4.2 Komponenten ZI-HS10T / ZI-HS12T 9
4.2.1 Bedienelemente....9
11.3 Technical Specifications 25
12 SAFETY 26
12.1 Intended Use 26
12.2 Safety 26
12.3 Residual risks.... 27
12.4 Specific risks and dangers involved in working with log splitters ..... 28
13 ASSEMBLY 29
13.1.1 Scope of delivery 29
13.2 Assembly 30
13.2.1 Mounting the control lever guide ZI-HS8PT....30
13.2.2 Mounting the control lever guide ZI-HS10T / ZI-HS12T....30
13.2.3 Mount wheels ZI HS10T / 12T....31
13.2.4 Hydraulic 31
13.2.5 The workplace 32
13.2.6 Transport of the log splitter to the work area....32
13.2.7 Checks before initial start-up....32
14 OPERATING 33
14.1 operating Notes 33
14.2 Operation....33
14.2.1 Stroke height gap wedge ZI-HS8PT / ZI-HS10T / ZI-HS12T....34
15 CARE AND MAINTENANCE 35
15.1 Maintenance and Servicing 35
15.2 Change the hydraulic oil 35
15.3 Storage 36
15.4 Disposal 36
16 TROUBLE SHOOTING 36
17 ELEKTRIK- HYDRAULIK PLÄNE / WIRING- HYDRAULIC DIAGRAMS 37 ZI-HS8PT / ZI-HS10T / ZI-HS12T.... 37
18 ERSATZTEILE / SPARE PARTS 38
EN ATTENTION! Ignoring the safety signs and warnings applied on the machine as well as ignoring the security and operating instructions can cause serious injuries and even lead to death.

EN READ THE MANUAL! Read the user and maintenance manual carefully and get familiar with the controls n order to use the machine correctly and to avoid injuries and machine defects.
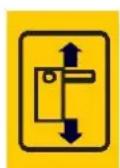
EN Avoid injury from the movement of the splitting blade.

EN Always keep hands out of the path of all moving parts.
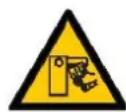
EN Do not remove jammed logs with your hands.

Use proper safety clothing and devices when operating the machine (safety gloves, safety goggles, ear protectors, safety shoes ...)!

Always be focused when working, takecare to maintain a safe posture at every time.

Always disconnect the machine from the power mains before cleaning inspecting, repairing or when it is damaged or tangled.


CE-Conformal! - This product complies with the EC-directives.
3 VORWORT
4.1.1 Bedienelemente
4.2.1 Bedienelemente
natural_image
Close-up of a mechanical component with labeled part A, showing internal parts and a central bolt (no text or symbols beyond label)natural_image
Technical line drawing of a mechanical milling machine with wheels and a cutting board (no text or symbols)6.1.4 Hydraulik
natural_image
Two diagrams showing a mechanical press or clamping device with arrows indicating force direction (no text or symbols present)natural_image
Symbol of a trash bin with crossed lines indicating no waste or restriction, and a solid black rectangle below (no text or labels)9 FEHLERBEHEBUNG
This manual contains Information and important instructions for the installation and correct use of the ZIPPER Log splitter ZI-HS8PT, ZI-H10T und ZI-HS12T. This manual is part of the machine and shall not be stored separately from the machine. Save it for later reference and if you let other persons use the machine, add this instruction manual to the machine.

Please read and obey the security instructions!
Before first use read this manual carefully. It eases the correct use of the machine and prevents misunderstanding and damages of machine and the user's health.
Due to constant advancements in product design construction pictures and content may diverse slightly. However, if you discover any errors, inform us please.
Technical specifications are subject to changes!
Please check the product contents immediately after receipt for any eventual transport damage or missing parts. Claims from transport damage or missing parts must be placed immediately after initial machine receipt and unpacking before putting the machine into operation. Please understand that later claims cannot be accepted anymore.
Copyright
© 2014
This document is protected by international copyright law. Any unauthorized duplication, translation or use of pictures, illustrations or text of this manual will be pursued by law – court of jurisdiction is LINZ, Austria!
CUSTOMER SERVICE CONTACT
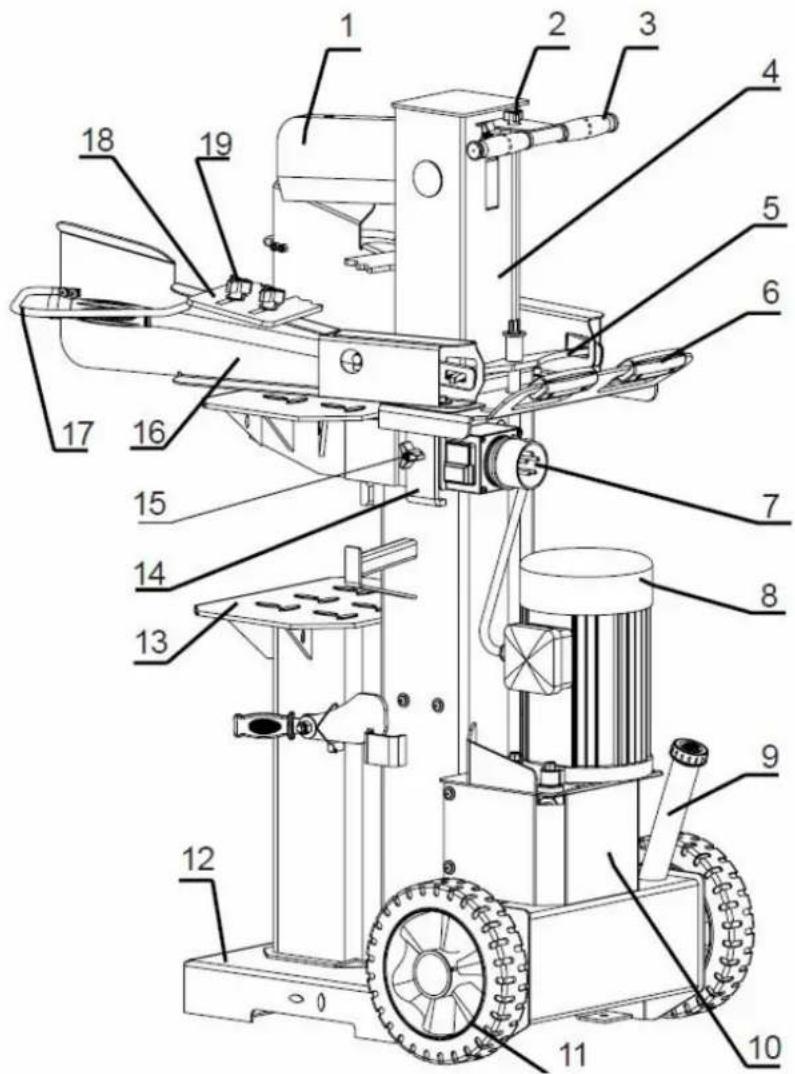
11.1.1 Controls
| 1 | Split Wedge | 11 | Wheels |
| 2 | Ram Travel Adjusting Rod | 12 | Bottom Support Table |
| 3 | Transport Handle | 13 | Rotary Support Table |
| 4 | Ram | 14 | Side Bracket for Support Table |
| 5 | Control Levers Connection Bracket | 15 | Table Lock Down Hook |
| 6 | Plug & switch | 16 | Control Lever Guard |
| 7 | Top Motor Shield | 17 | Control Lever |
| 8 | Motor | 18 | Log Holder Adjusting knob |
| 9 | Base Cover | 19 | Adjustable Log Knob |
| 10 | Oil Tank Cover / Air Bleeder |
11.2 Main Components ZI-HS10T / ZI-HS12T
11.2.1 Controls
| 1 | Split Wedge | 11 | Wheels |
| 2 | Ram Travel Adjusting Rod | 12 | Bottom Support Table |
| 3 | Transport Handle | 13 | Rotary Support Table |
| 4 | Ram | 14 | Side Bracket for Support Table |
| 5 | Control Levers Connection Bracket | 15 | Table Lock Down Hook |
| 6 | Transport Handle | 16 | Control Lever Guard |
| 7 | Plug & switch | 17 | Control Lever |
| 8 | Motor | 18 | Log Holder Adjusting knob |
| 9 | Oil Tank Cover / Air Bleeder | 19 | Adjustable Log Knob |
| 10 | Base Cover | 20 |
11.3 Technical Specifications
| ZI-HS8PT | ZI-HS10T | ZI-HS12T | |
| operating voltage | 400V/50Hz | 400V/50Hz | 400V/50Hz |
| engine power | 3.5 kW | 3.5 kW | 3.5 kW |
| max. Stress / tension force | 8 Tonnen | 10 Tonnen | 12 Tonnen |
| max. splitting stroke | 48 cm | 53 cm | |
| Splitting diameter min. / Max. | 12 – 32 cm | 12 – 40 cm | |
| Splitting length | 55 / 85 / 125 cm | 63 / 89 / 135 cm | |
| Hydraulic oil volume | 6 Liter | 6,5 Liter | |
| Hydraulic pressure | 20,4 MPa | 19.5 MPa | 23.4 MPa |
| Forward speed | 5,4cm/sec. | 4,3 cm/sec | |
| Rewind speed | 19,2cm/sec | 22 cm/sec | |
| net weight | 148kg | 165 kg | 175 kg |
| Sound pressure level L_PA | 75dB(A) | 83.8dB(A) | |
| Sound power lever L_WA | 86dB(A) | 92.6dB(A) | |
APPLICATION CONDITIONS
This log splitter is designed for operating under ambient temperatures between +5°C and 40°C. The surrounding humidity should be less than 50% at 40°C.
ELECTRICAL REQUIREMENTS
With 3 phase 400 Volt / 50Hz motor, the log splitter should be connected to standard 400V+10% / 50Hz+1% Hz. Electrical supply which has protection devices of under-voltage, over-voltage, over current as well as a residual current device (RCD) which maximum residual current rated at 0.03A.
The mains connection and extension cable must have 5 wires = 3P + N + PE (3/N/PE). The mains connection must have maximum 16 A fuse. Electrical connection rubber cables must comply with EN60245 which are always marked with symbol H 07 RN. Cables should be identified, as it is a legal requirement.
12 SAFETY
12.1 Intended Use
The ZIPPER Log splitter ZI-HS8PT / ZI HS10T / ZI HS12T are only authorized to provide the following stated activities in accordance with the procedure described in this manual, safety operating and maintenance instructions and restrictions:
- Splitting firewood logs accordance with the instructions in the technical data restrictions for firewood diameter ∅ and height
■ Operation only by a person. - Only prescribed operating in the manner as described in section
- The operation is permitted only at temperatures between +5° and +40° Celsius, which at +40° Celsius, the humidity should not be higher than 60%.
- Operating at high temperature and high humidity is to be avoided at the same time.
- The operation of the machine is permitted only up to 2000 meters above the sea level.
- The operating mode of the log splitter is permitted only with appropriate hydraulic oil temperature. Refer to the section 13.2.7 Check before initial start-up.
The improper use or failure to comply with the regulations and notices set forth in this manual will void all claims for damages against the ZIPPER GmbH result.
Unauthorized modifications and tampering with the machine also immediately invalidate all warranty and compensation claims.
12.2 Safety
To avoid malfunctions, damage and physical injury MUST be observed:
- Safety must be observed and regularly to ensure completeness!
- Warning labels and / or stickers on the machine that are illegible or removed shall be replaced immediately!


ACHTUNG
Unauthorized modifications and tampering with the machine immediately invalidate all warranty and compensation claims.

Operating the machine only when sufficient light, after dusk, you should not work any more.
In fatigue, lack of concentration or under the influence of drugs, alcohol or drugs work is prohibited with the machine!

The machine may only be operated by qualified personnel enrolled in school. Third persons, especially children, and not enrolled in school are persons must be kept away from the work environment!

Always insure that the machine has a safe, stable stand! Allow extra caution in wet and uneven work surfaces! Provide for a tidy work environment to avoid tripping over firewood.
Slides / tripping / falling is a major cause of serious or fatal injury. Watch out for uneven or slippery work surfaces.
Serious injury by tipping the machine are possible!

The running machine should never be left unattended! Turn off the machine before leaving the work area and wait until the motor has stopped!
Attention! Please read and follow the safety instructions carefully.
- Let the log splitter unattended while it is turned on.
- Turn the log splitter before you leave. Do the same in the event of a power failure.
- Keep children and pets. When you use the log splitter to a safe distance from any people.
- Do not allow children to operate the machine, and no person who has not read these instructions or is unfamiliar with the log splitter.
- The user is responsible for working with the wood splitter for third parties.
- Use the log splitter only for the intended purpose. Be careful when cleaning the wood splitter or maintenance work.
-
It is forbidden to bring any electrical and mechanical safety devices elsewhere or to change.
-
Replace your safety, all worn or damaged parts.
- Use only original spare parts. Parts that were not made by the manufacturer could sit bad and may cause injury.
- Store it in a dry and safe place out of reach of children.
- Use only three-wire earthed extension cord.
- Use only approved for outdoor use extension cord, and check before use if they are in good condition.
- Protect against any damage due to excessive mechanical stress, sharp edges, moving parts and contact with corrosive liquids, etc., the cable.
- Attention! Do not use an extension cord, which shows signs of damage. Connect a completely new cable and remove any permanent or temporary repairs. Let's replace the cable from a qualified professional.
- Before inserting the plug into the mains socket, make sure that the mains voltage corresponds to the specifications on the nameplate of the harvester.
- Turn the log splitter off before disconnecting any plug or extension cord.
12.3 Residual risks
Also in compliance with all safety regulations and when used properly, the following residual risks must be observed:
- Risk of noise: Working without hearing protection can damage hearing over time.
- Hazards of the work environment: Severity of injury to hands or fingers.
- Electric shock: with connected machine, it may cause an electric shock if you touch conductive parts of the machine.
12.4 Specific risks and dangers involved in working with log splitters
Bruises, cuts
Reach with your hands NEVER in the work space. Use your hands to use only the lever! Hands of moving parts, especially from the riving knife while operating away. Keep your hands by columns, caused by the splitting wedge, far. In the reverse mode can be close again and squeezing her fingers.
It is FORBIDDEN to edit more than one Spaltgut per step!
Minimize the risk of crushing her foot by wearing work boots with steel toe caps.
Make sure that the machine and the operator on level ground are both stable when setting up and the machine will not tip over during operation, slipping or falling.
Injury from flying splinters of wood
During the splitting operation, the wood splintering. It can flying splinters hurt your eyes. Therefore, ALWAYS wear a shatter resistant goggles!
Preparation and processing of the gap material
Branches must be cut flush from the tree trunk. Columns NEVER Spaltgut in which wires nails or similar foreign substances are. Make sure that there is always both ends, but especially the support side of the Spaltguts are clean and straight cut. Only this ensures that the log and does not slip from its vertical position.
Fire and Explosion Hazards
NEVER engine oil while the machine is in operation or is hot. No fire / no open flame / no smoke when refilling oil! The operation of the log splitter in the vicinity of a fire or heat source is prohibited! Make sure that the bleed screw are always tightly closed during transport safely.
Risks related to noise
Excessive noise can cause hearing damage and temporary or permanent loss of hearing. Wear a certified according to health and safety regulations hearing protection to limit the noise pollution.
By adhering to all safety regulations such hazards can be reduced to a minimum!
13 ASSEMBLY
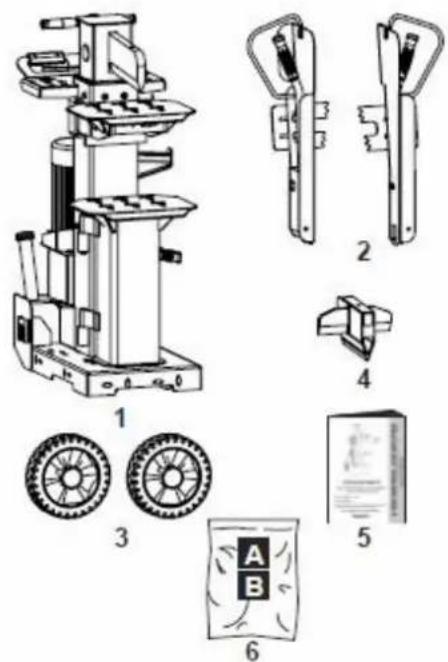
13.1.1 Scope of delivery
After receipt of the delivery, if all parts are in order. Report any damage or missing items immediately to your dealer or the shipping company. Visible damage must also be recorded immediately in accordance with the provisions of the warranty on the delivery note, otherwise the goods shall be accepted as properly.
- Log splitter
- Control lever with hand protective cover
- Wheels
- Cross wedge (not by ZI-HS8PT)
- Instruction manual
- Hardware bag, A, B
On the device there are only few of them serviceable components. It is not allowed to disassemble the machine. Have repairs carried out only by an expert!
Accessories:
Use only by your dealer or ZIPPER recommended accessories!
If you have any questions and problems to our customer service.
13.2 Assembly
All parts unpack, check the log splitter to dust and debris, clean as necessary.
NOTE
The use of paint thinners, gasoline, harsh chemicals or abrasive cleaners leads to damage to the surfaces!
Therefore:
When cleaning, use only mild detergent
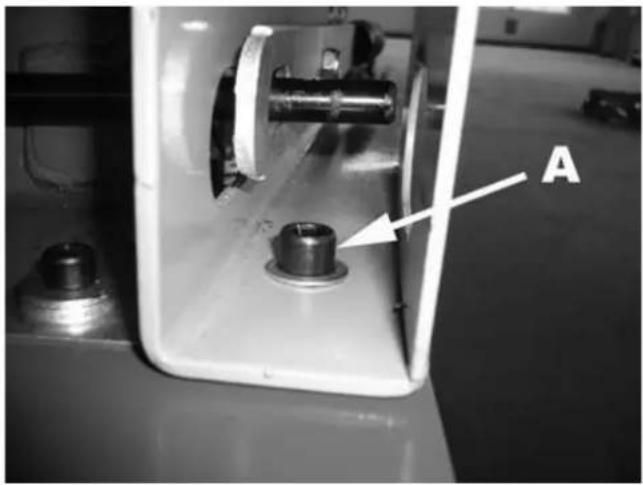
13.2.1 Mounting the control lever guide ZI-HS8PT
For the following installations, a second person is needed for assistance
- Insert the left operating lever guide by a 2nd person to the joint holder.
- Slide the screw and washer (A) through the bore of the control lever guide on the holder.
- Below that, you put the washer and M10 nut on the screw.
- The screw and nut tighten so that the operating lever guide is still moving.
Repeat this process for the right-hand control lever guide
natural_image
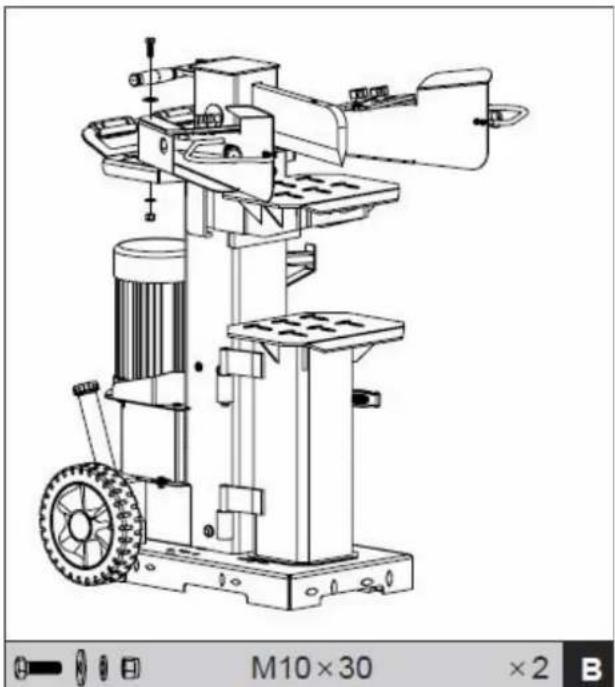
Close-up of a mechanical device with a labeled component 'A' pointing to a bolted part (no readable text or symbols beyond label)13.2.2 Mounting the control lever guide ZI-HS10T / ZI-HS12T
- The large washer on the screw M10x30 hang up.
- Insert the left operating lever guide by a 2nd person to the joint holder.
- Slide the bolt with washer through the hole of the operating lever guide to the bracket.
Below that, you put the washer and M10 nut on the screw. - The screw and nut tighten so that the control lever is still moving.
Repeat this process for the right-hand control lever guide
natural_image
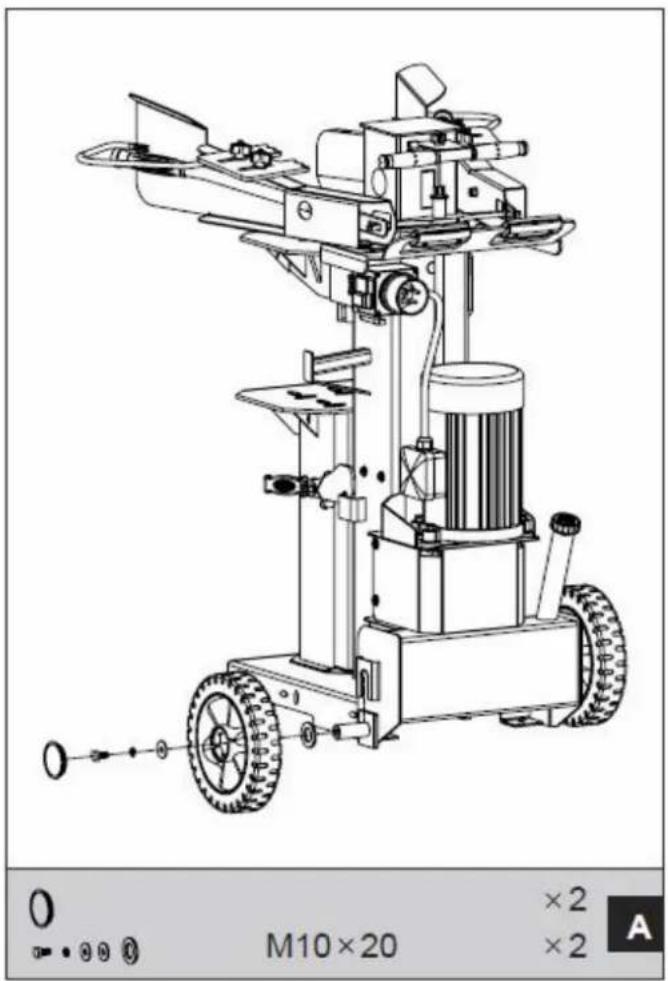
Technical line drawing of a mechanical device with wheels and a shaft, no visible text or symbols13.2.3 Mount wheels ZI HS10T / 12T
- Insert the screw M10x20 the screw retaining ring, washer and put the wheel on.
- Then insert is the small and then the large washer on.
- Let tilt the machine from a second person easily.
- Insert the pre-assembled wheel on the base frame and tighten it with a wrench -17 - so tight that it can still be turned.
natural_image
Technical line drawing of a mechanical device with wheels and a central cylinder, no text or symbols present.13.2.4 Hydraulic
The log splitter is equipped with a hydraulic oil tank in the base plate and is factory filled with oil.
CAUTION: When not upright transfer of the log splitter, oil can escape through the bleed screw. At low ambient temperatures, the hydraulic oil assumes a thick consistency.
THEREFORE: Especially at low ambient temperatures, a minimum idle time of 3 minutes before carefully before EVERY use! Do not burden at this time the log splitter! Lifting and lowering you now about 10 to heat the slit assembly times without stress to the hydraulic oil. Failure to follow this policy may result in damage to the hydraulic system and the warranty is excluded.
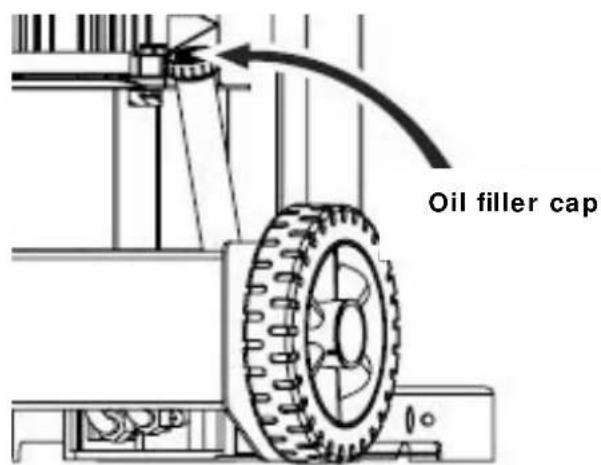
ATTENTION: Slightly open the oil filler cap during operation to compensate for pressure!

ATTENTION!
Low oil level can lead to damage to the engine, thus shortening the life of your machine.
Warranty claims are excluded in deficient carried out repair and maintenance activities!
13.2.5 The workplace
Choose a suitable place for the machine.
Observe the safety requirements of Chapter 12.
Make sure that the floor can support the weight of the machine. The machine must be leveled on all bases simultaneously.
You must also ensure all round a distance of at least 0.8 m around the machine. Before and behind the machine must be made for necessary clearance for the supply of long workpieces.
13.2.6 Transport of the log splitter to the work area
The log splitter is equipped with two wheels for easy transporting. To move the log splitter to take the carrying handle (2 or 3) in the hand and tilt the splitter carefully. Take care that the bleed screw is closed.
If you use a crane for transporting the log splitter, attach a suitable lifting tape on the housing and lift the machine carefully. Never operate the crane hook hook on the handle.
13.2.7 Checks before initial start-up
- Checking the strength of all screw
- Inspect the machine for concealed damage, eg by transport.
■ Verification of the electrical connection. - Make sure that the power is being protected circuit.
- Make sure that will support the power, voltage and frequency of the motor of your power supply.
- It must be a grounding available!
- Electrical work may only be performed by trained specialist!
- Make sure your extension cord does not overload the engine of your log splitter!
- Extension cable must not be longer than 10m and its cross -section must not be less than 2.5 mm ^2 . Only well-insulated, use appropriate extension cord for outdoor activity.
- Search from the work under consideration of the safety regulations. Store the wood to be split logs within reach. Creating the split logs from the work area.
- Order Before you edit the logs from exceeding the maximum length ( information, please refer the technical data ) . If you want to split log with very thick diameter , it is recommended not to exceed the maximum lengths . There are three different splitting length. Always choose the appropriate height for each log length . Secure the table in the desired position always with the locking device.
- The supply cable so set that it can not be damaged ( by working ) .
-
Open the bleed screw. Turn the bleed screw a few turns on whenever you take the log splitter in operation. Turn the bleed screw after operation completely.
-
Check the motor rotation direction. When you turn on the engine, the riving knife is automatically go to the highest position. If the riving knife should already be in the top position, turn by moving the two levers down the gap mechanism. Thus, the splitting wedge will move down.
- If there should not move up after turning on the machine, the riving knife, turn the machine off immediately. Poland it all the engine with a screwdriver in order. If you have this no adequate training, they agree necessarily an electrician.

ATTTENTION!
NEVER START THE ENGINE IN THE WRONG DIRECTION RUN!
THIS INEVITABLY FOR DESTRUCTION OF THE PUMP SYSTEMS AND PURPOSE IS NO GUARANTEE IS CLAIMED.
14 OPERATING
14.1 operating Notes

ATTENTION!
More columns the wood in the direction of the wood grain. Place the wood never against a fibration, because that can lead to significant damage to the mechanical and the hydraulic system.
14.2 Operation
Before you begin working, check the functionality of the log splitter, by performing the following steps.
- Turn the machine on by pressing the on-off switch from "I".
- Press the two levers down. Thereupon, the riving knife must move down.
- If you release one of the two levers is the riving knife in the instantaneous position.
- When you release both levers, the riving knife automatically moves upwards.
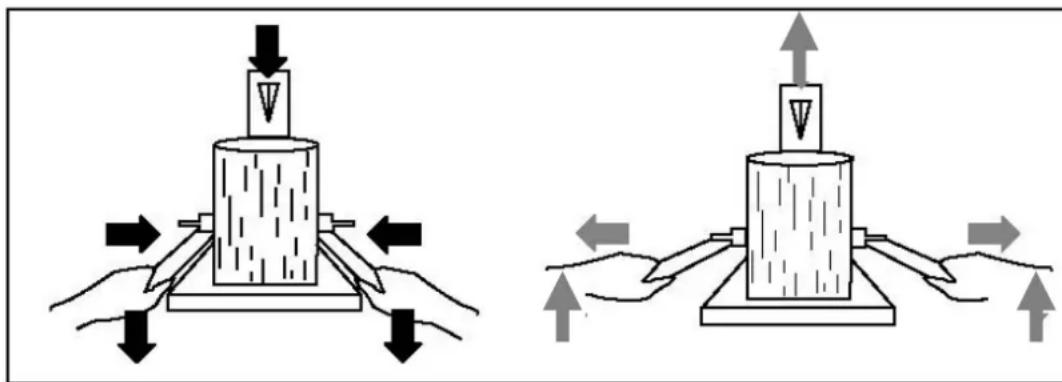
- Keep the log with the two levers, so that a stable state of the wood is guaranteed. Then move the two levers down to split the wood. If you release one of the two levers, stop the splitting wedge. When you release both levers, the riving knife automatically moves to the highest position.
natural_image
Two diagrams showing a mechanical press or clamping device with arrows indicating force direction (no text or symbols present)- Create the split wood parts immediately from the work area and stack them if necessary. This will reduce accidents at work.

ATTENTION!
Piled wood columns, and wood chips are a source of danger. Always keep the environment clean, so you can not slip.
- After completion of work, leave the riving knife and arm in the upper position drive (park position). Then turn off the engine by pressing the on-off switch to "O" and disconnect the machine from the mains.
- Let the machine cool down. Thereafter the machine should be cleaned and lubricated if necessary. The splitter may only be vertically stored in a dry and clean place. Make sure that the cap of the oil tank tightly closed and no oil leakage during storage.
14.2.1 Stroke height gap wedge ZI-HS8PT / ZI-HS10T / ZI-HS12T
For shorter pieces of wood, you can improve performance by shortening the gap diameter retrace.
To adjust the riving knife, perform the following steps:
- Raise the trunk on the splitting table and run the riving knife to the desired position. The top position of the riving knife should then be about 3-5cm above the piece of wood.
- Let go of one control handle, so the splitting blade will stay in that position and turn on the device.
- Pull out the mains plug.
- Let go of the second control handle.
- Shorten the return on the attached adjusting rod (B), by fixing the locking screw (A) at the required height.
- Let go of a lever or turn the log splitter from.
- Let go of both lever or turn the engine back on.
- Check the new positions.
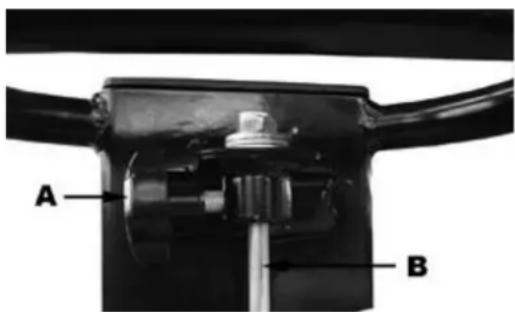
A: Locking screw
B: Ram travel adjusting rod
15 CARE AND MAINTENANCE

ATTENTION

Cleaning and maintenance with a connected machine! Property damage and personal injury due to unintentional switching on the machine! Therefore: Before maintenance work disconnect the machine from the power supply!
The machine is low maintenance and contains little parts that must undergo a maintenance operator.
Faults or defects that may affect the safety of the machine, must be rectified immediately.
Repair work may only be carried out by qualified personnel!
15.1 Maintenance and Servicing
| Controls for the maintenance of the machine | |
| Loose or lost screws | Daily before starting |
| Damage to any part | Daily before starting |
| Function of the control system part | Daily before starting |
| Pay attention to oil spills under the machine! | Daily before starting |
| Check the Hydraulic Oil / refill if necessary | Daily before starting |
| Clean the piston housing | Daily before starting |
| Change the hydraulic oil | After initial start-up after 25 working hours / Every 50 hours, however, / at least once a year! |
15.2 Change the hydraulic oil
The hydraulic system is a closed system consisting of the oil tank, oil pump and control valves. Low oil level can lead to damage to the pump. The oil level should never be lower than 1-2cm below the surface of the oil tank. Oil change frequency see table.
Make sure that no foreign particles from getting into the oil tank!
Dispose of the used oil after an oil change PROPERLY!
After changing the oil, let the log splitter for a few minutes at idle and proceed in accordance with section 13.2.4.
The following oils are suitable for the splitter:
| ZI-HS8PT / ZI-HS10T / ZI-HS12T | |
| DEA HD B46 | ESSO NUTO H46 |
| SHELL TELLUS 10-46 | EROLUB HLP46 |
15.3 Storage
Log splitter never outdoors camps!
Storage permitted only at temperatures between +5 ° and +40 ° Celsius, which at +40 ° Celsius, the humidity should not be higher than 60%. Store in a dry and clean place.
15.4 Disposal
Do not throw away the log splitter in the residual waste. Contact your local authorities for information regarding the available disposal options. When you buy at your local dealer for a replacement unit, the latter is obliged to exchange your old.


16 TROUBLE SHOOTING
Before you begin working for the elimination of defects, disconnect the machine from the power supply.

| Problem | Possible cause | Solution |
| Engine will not start | · ON / OFF switch is not turned on. | · Check the on / off switch and make sure it is switched to "ON". |
| · Extension cable is defective. | · Unplugging, check with the other machine. | |
| · Incorrect power supply (voltage, frequency). | · Power supply adjust to requirements of Specifications Operating voltage. | |
| · ON / OFF switch is defective. | · This please leave control of electrician for replacement if defective. | |
| Incorrect motor rotation direction | · incorrect connection | · Rev. turn (with screwdriver) (electrician)· Reverse polarity (electrician) |
| Cleaver does not move, although the motor is running | · Valve is not open, caused by loose connection | · Fix the loose parts |
| · MUCH TOO LOW OIL LEVEL! | · Add oil to fill bottom lip. Can check whether you have already damaged the hydraulic system (especially pump). Warranty is excluded. | |
| Wood splitter works, but with atypical noise and vibration | · Oil level too low.· FILLER PLUG DURING OPERATION CLOSED | · Öl nachfüllen!· Sofort abstellen, |
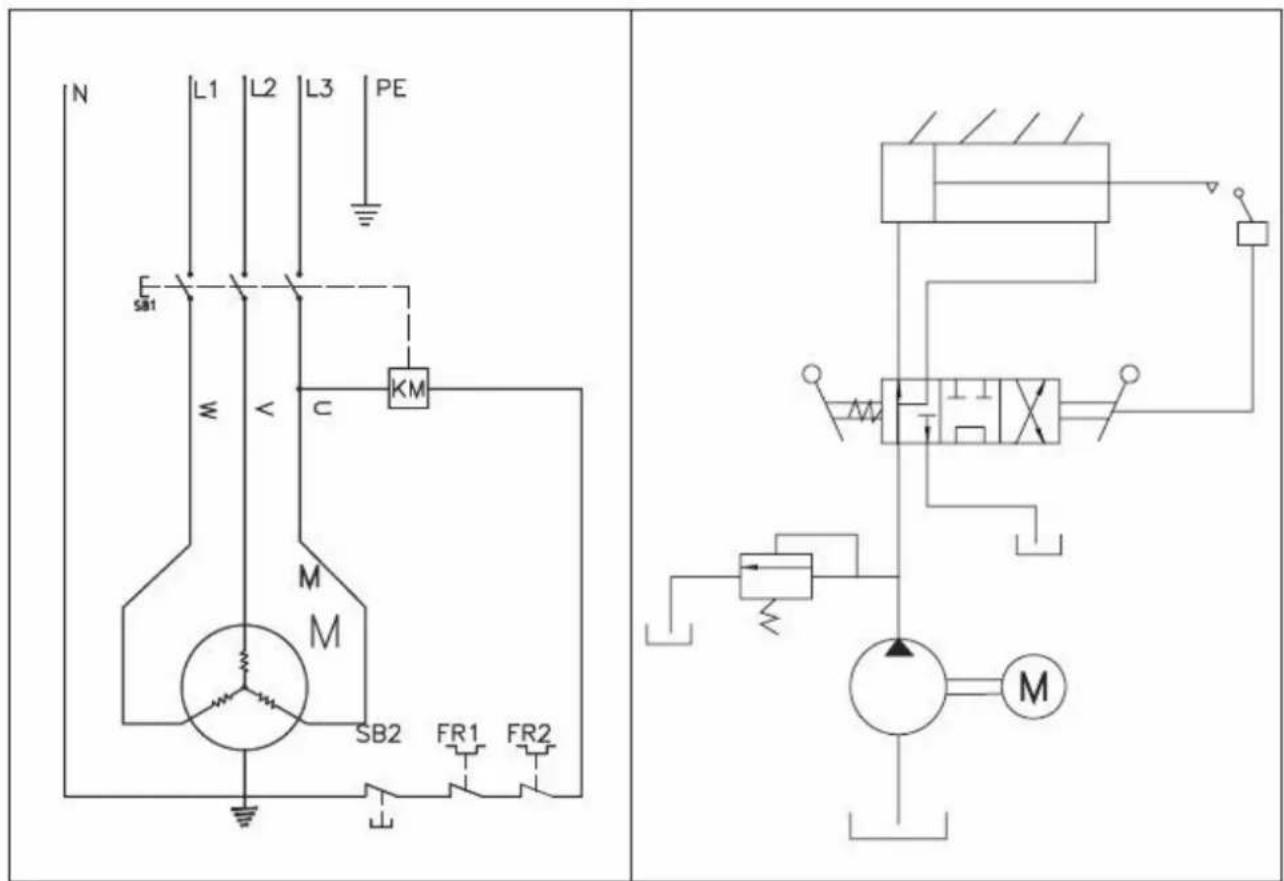
17 ELEKTRIK- HYDRAULIK PLÄNE / WIRING- HYDRAULIC DIAGRAMS ZI-HS8PT / ZI-HS10T / ZI-HS12T
With original Zipper spare parts you use parts that are attuned to each other shorten the installation time and elongate your machines lifespan.
IMPORTANT
The installation of other than original spare parts voids the warranty!
So you always have to use original spare parts
By the order of spare parts use the service formular that you can find at the end of this manual. Make always a note of the type, spare part number and a definition of the machine. That there are no mistakes, we recommend to make a copy of the spare part list where you can mark with a pen the spare parts which you order.
You find the order address in the preface of this operation manual.
ZI-HS8PT
Z.I.P.P.E.R Maschinen Austria www.Zipper-maschinen.at
ZI-HS10T / ZI-HS12T
19 KONFORMITÄTSERKLÄRUNG / CERTIFICATE OF CONFORMITY
| CE | Inverkehrbringer / DistributorZ.I.P.P.E.R® Maschinen GmbHA - 4707 Schlüsslberg, Gewerbepark 8Tel.: +43 7248 61116-700; Fax.: +43 7248 61116-720www.zipper-maschinen.atinfo@zipper-maschinen.at |
| Bezeichnung / name | |
| Holzspalter / Log Splitter | |
| Type / model | |
| ZI-HS8PT, ZI-HS10T, ZI-HS12T | |
| EG-Richtlinie / EC-directive(s) | |
| 2006/42/EG2006/95/EG2006/108/EG | |
| Angewandte Normen / applicable Standards | |
| EN 55014-1:2006EN 55014-2:1997+A1EN 61000-3-2:2006EN 61000-3-11:2000EN 609-1+A2:2009, EN 60204-1:2006+A1, | |
We hereby declare that the above machine meets the essential safety, health and pollutant emission requirements of the listed EC directives. This declaration will become void if changes are made to the machine that were not coordinated with us.
Schlüsslberg, 03.06.2014
Ort / Datum

Responsibility for documentation

Unterschrift / signature
Erich Humer
Company ZIPPER Maschinen GmbH grants for mechanical and electrical components a warranty period of 2 years for amateur use; and warranty period of 1 year for professional use, starting with the purchase of the final consumer. In case of defects during this period, which are not excluded by paragraph 3, ZIPPER will repair or replace the machine at its own discretion.
2.) Report:
In order to check the legitimacy of warranty claims, the final consumer must contact his dealer. The dealer has to report in written form the occurred defect to ZIPPER. If the warranty claim is legitimate, ZIPPER will pick up the defective machine from the dealer. Returned shippings by dealers which have not been coordinated with ZIPPER, will not be accepted and refused.
3.) Regulations:
a) Warranty claims will only be accepted, when a copy of the original invoice or cash voucher from the trading partner of ZIPPER is enclosed to the machine. The warranty claim expires if the accessories belonging to the machine are missing.
b) The warranty does not include free checking, maintenance, inspection or service works on the machine. Defects due to incorrect usage of the final consumer or his dealer will not be accepted as warranty claims either. Some examples: usage of wrong fuel, frost damages in water tanks, leaving fuel in the tank during the winter, etc.
c) Defects on wear parts are excluded, e.g. carbon brushes, collection bags, knives, cylinders, cutting blades, clutches, sealings, wheels, saw blades, splitting crosses, riving knives, riving knife extensions, hydraulic oils, oil/air/fuel filters, chains, spark plugs, sliding blocks, etc.
d) Also excluded are damages on the machine caused by incorrect or inappropriate usage, if it was used for a purpose which the machine is not supposed to, ignoring the user manual, force majeure, repairs or technical manipulations by not authorized workshops or by the customer himself, usage of non-original ZIPPER spare parts or accessories.
e) After inspection by our qualified personnel, resulted costs (like freight charges) and expenses for not legitimated warranty claims will be charged to the final customer or dealer.
f) In case of defective machines outside the warranty period, we will only repair after advance payment or dealer's invoice according to the cost estimate (incl. freight costs) of ZIPPER.
g) Warranty claims can only be granted for customers of an authorized ZIPPER dealer who directly purchased the machine from ZIPPER. These claims are not transferable in case of multiple sales of the machine.
4.) Claims for compensation and other liabilities:
The liability of company ZIPPER is limited to the value of goods in all cases. Claims for compensation because of poor performance, lacks, damages or loss of earnings due to defects during the warranty period will not be accepted. ZIPPER insists on its right to subsequent improvement of the machine.
Produktbeobachtung
Product experience form
We observe the quality of our delivered products in the frame of a Quality Management policy.
Your opinion is essential for further product development and product choice. Please let us know about your:
- Impressions and suggestions for improvement.
- experiences that may be useful for other users and for product design
- Experiences with malfunctions that occur in specific operation modes
We would like to ask you to note down your experiences and observations and send them to us via FAX, E-Mail or by post:
Erworben von / purchased from:
E-Mail/ e-mail:
service inquiry spare part inquiry guarantee claim
natural_image
Empty white rectangle with a thin black border (no text or symbols)3. Bitte beachten
/ Additional information
INCOMPLETELY FILLED SERVICE FORMS CANNOT BE PROCESSED! FOR GUARANTEE CLAIMS PLEASE ADD A COPY OF YOUR ORIGINAL SALES / DELIVERY RECEIPT OTHERWISE IT CANNOT BE ACCEPTED. FOR SPARE PART ORDERS PLEASE ADD TO THIS SERVICE FORM A COPY OF THE RESPECTIVE EXPLODED DRAWING WITH THE REQUIRED SPARE PARTS BEING MARKED CLEARLY AND UNMISTAKABLE. THIS HELPS US TO IDENTIFY THE REQUIRED SPARE PARTS BASTLY AND ACCEL- ERATES THE HANDLING OF YOUR INQUIRY.
- HOLZSPALTER / LOG SPLITTER
- INHALT / INDEX
- SI CHERHEI TSZEICHEN / SAFETY SIGNS 5
- VORWORT 7
- TECHNIK 8
- SAFETY 26
- ASSEMBLY 29
- OPERATING 33
- CARE AND MAINTENANCE 35
- TROUBLE SHOOTING 36
- VORWORT
- Bedienelemente
- Hydraulik
- FEHLERBEHEBUNG
- Please read and obey the security instructions!
- Copyright
- CUSTOMER SERVICE CONTACT
- Main Components ZI-HS10T / ZI-HS12T
- Controls
- APPLICATION CONDITIONS
- ELECTRICAL REQUIREMENTS
- SAFETY
- Intended Use
- Safety
- ACHTUNG
- Attention! Please read and follow the safety instructions carefully.
- Residual risks
- Specific risks and dangers involved in working with log splitters
- Bruises, cuts
- Injury from flying splinters of wood
- Preparation and processing of the gap material
- Fire and Explosion Hazards
- Risks related to noise
- ASSEMBLY
- Scope of delivery
- Assembly
- NOTE
- Mounting the control lever guide ZI-HS8PT
- Mounting the control lever guide ZI-HS10T / ZI-HS12T
- Mount wheels ZI HS10T / 12T
- Hydraulic
- ATTENTION!
- The workplace
- Transport of the log splitter to the work area
- Checks before initial start-up
- ATTTENTION!
- OPERATING
- operating Notes
- Operation
- Stroke height gap wedge ZI-HS8PT / ZI-HS10T / ZI-HS12T
- CARE AND MAINTENANCE
- ATTENTION
- Maintenance and Servicing
- Change the hydraulic oil
- Storage
- Disposal
- TROUBLE SHOOTING
- ELEKTRIK- HYDRAULIK PLÄNE / WIRING- HYDRAULIC DIAGRAMS ZI-HS8PT / ZI-HS10T / ZI-HS12T
- IMPORTANT
- KONFORMITÄTSERKLÄRUNG / CERTIFICATE OF CONFORMITY
- 2.) Report:
- 3.) Regulations:
- 4.) Claims for compensation and other liabilities:
- Produktbeobachtung
- Product experience form
- Bitte beachten
- / Additional information
Brand : Zipper
Model : ZI-HS8PT
Category : Log splitter