
GTM-8222S - Hand blender Ambiano - Free user manual and instructions
Find the device manual for free GTM-8222S Ambiano in PDF.


User questions about GTM-8222S Ambiano
0 question about this device. Answer the ones you know or ask your own.
Ask a new question about this device
Download the instructions for your Hand blender in PDF format for free! Find your manual GTM-8222S - Ambiano and take your electronic device back in hand. On this page are published all the documents necessary for the use of your device. GTM-8222S by Ambiano.
USER MANUAL GTM-8222S Ambiano
natural_image
Product photo of a black and silver blender with whisk, next to a clear glass jar (no visible text or symbols)Four Blade Stick Mixer Set
Model Number GTM-8222S
INSTRUCTION MANUAL
Welcome
Congratulations on choosing to buy an Ambiano Professional ^® product.
All products brought to you by Ambiano Professional ^® are manufactured to the highest standards of performance and safety and, as part of our philosophy of customer service and satisfaction, are backed by our comprehensive 3 Year Warranty. We hope you will enjoy using your purchase for many years to come.
Contents
02 Welcome
04 Warranty Details
05 General Safety Instructions
07 Product Overview
08 Getting Started
09 Instructions
13 FAQs and Troubleshooting Guide
14 Other Useful Information
17 Recipes
23 Repair and Refurbished Goods or Parts Notice

text_image
ALDIAMBIANO
Professional
Warranty Details
Four Blade Stick Mixer Set
The product is guaranteed to be free from defects in workmanship and parts for a period of 36 months from the date of purchase. Defects that occur within this warranty period, under normal use and care, will be repaired, replaced or refunded at our discretion, solely at our option with no charge for parts and labour. The benefits conferred by this warranty are in addition to all rights and remedies in respect of the product that the consumer has under the Competition and Consumer Act 2010 and similar state and territory laws.
Our goods come with guarantees that cannot be excluded under the Australian Consumer Law. You are entitled to a replacement or refund for a major failure and to compensation for any other reasonably foreseeable loss or damage. You are also entitled to have the goods repaired or replaced if the goods fail to be of acceptable quality and the failure does not amount to a major failure.

text_image
3 YEAR WARRANTYGeneral Safety Instructions
IMPORTANT SAFETY INSTRUCTIONS
READ CAREFULLY AND KEEP FOR FUTURE REFERENCE
Read this manual thoroughly before first use, even if you are familiar with this type of product. The safety precautions enclosed herein reduce the risk of fire, electric shock and injury when correctly adhered to. Keep the manual in a safe place for future reference, along with the completed warranty card, purchase receipt and carton. If applicable, pass these instructions on to the next owner of the appliance.
Always follow basic safety precautions and accident prevention measures when using an electrical appliance, including the following:
Electrical safety and cord handling
- Voltage: Make sure that your outlet voltage and circuit frequency correspond to the voltage stated on the appliance rating label.
- Water: Do not place the appliance near a sink or basin so that the device, the mains plug and the power cord cannot accidentally come into contact with water. If the appliance, mains plug or cord falls into water, turn off the power immediately. Do not reach into the water!
- Power cord: Do not kink, bend, squash or damage the power cord, and protect it from sharp edges and heat. Do not let it hang over the edge of a table or benchtop, or touch hot surfaces. Do not put any stress on the power cord where it connects to the product, as the power cord could fray and break.
- No extension cord: Do not use an extension cord. Insert the plug directly into an electrical outlet.
- Assembly: Do not plug the appliance into the power supply until it is fully assembled, and always unplug it before disassembling the appliance or handling the blade.
- Disconnect: Make sure to disconnect the plug from the power supply before cleaning the appliance, before putting on or taking off parts and when it is not in use. Grip by the plug, do not pull by the cord when disconnecting.
- Damage: Do not pick up or operate the appliance if the power supply cord, plug or housing is damaged, or after it malfunctions or has been damaged. A damaged cord or plug must be replaced by the manufacturer or a qualified person in order to avoid a hazard. In case of damage, call our after sales support line for advice.
- RCD: Unless your home is already fitted with a residual current device (safety switch), we recommend installing an RCD with a rated residual operating current not exceeding 30mA to provide additional safety protection when using electrical appliances. See your electrician for professional advice.
General Safety Instructions (Cont.)
Usage conditions and restrictions
- Domestic use only: This appliance is intended for private domestic use only. It is not suitable for commercial use. Do not use it where highly flammable gases are present, or where it is exposed to extreme temperatures, water or high humidity.
- Intended purpose: This appliance is intended for processing domestic quantities of foods and liquids for human consumption. Only use it for its intended purpose, and only use it as described in this manual. Any other use is not recommended, may expose you to danger and void the warranty.
- No outdoor use: Do not use the product outdoors or in wet or damp conditions.
- Work surface: Place the appliance on a stable, level, dry surface. Do not place it on a surface that can become hot, such as on a cooktop or near a gas stove.
- Protect from heat: Do not place the appliance near a hot gas or electric burner, or in a heated oven.
- Accessories: Do not use accessory attachments that are not sold with the appliance or recommended in this manual. Doing so may result in fire, electric shock or injury, and void your warranty. Only use one attachment at a time.
- Usage restrictions: This appliance is not intended for use by persons (including children) with reduced physical, sensory or mental capabilities, or lack of experience and knowledge, unless they have been given supervision or instruction concerning use of the appliance by a person responsible for their safety.
- Children: Supervise children to ensure they do not play with the appliance. Keep children and pets away when the appliance is in use. Close supervision is necessary when any appliance is used by or near children.
- CAUTION: Do not leave unattended! Never leave the appliance unattended during use. Unplug it when you leave the room, even if it is just for a moment.
- CAUTION: Do not touch moving parts! Keep hands, hair, clothing and utensils away from the blades and out of the container during operation to reduce the risk of injury to persons or damage to the appliance. A scraper may be used, if required, but only when the blades have stopped moving.
- CAUTION: SHARP! Take particular care when emptying the bowl and cleaning the appliance. The blades are sharp, handle with care!
- WARNING! Improper assembly and misuse of the appliance can result in severe injury and damage to the product. We accept no liability for any eventual damages caused by misuse or noncompliance with the instructions.
Short-time operation
- Do not blend soft foods continuously for more than 1 minute at a time.
- Do not process hard foods for more than 10 seconds at a time.
Product Overview
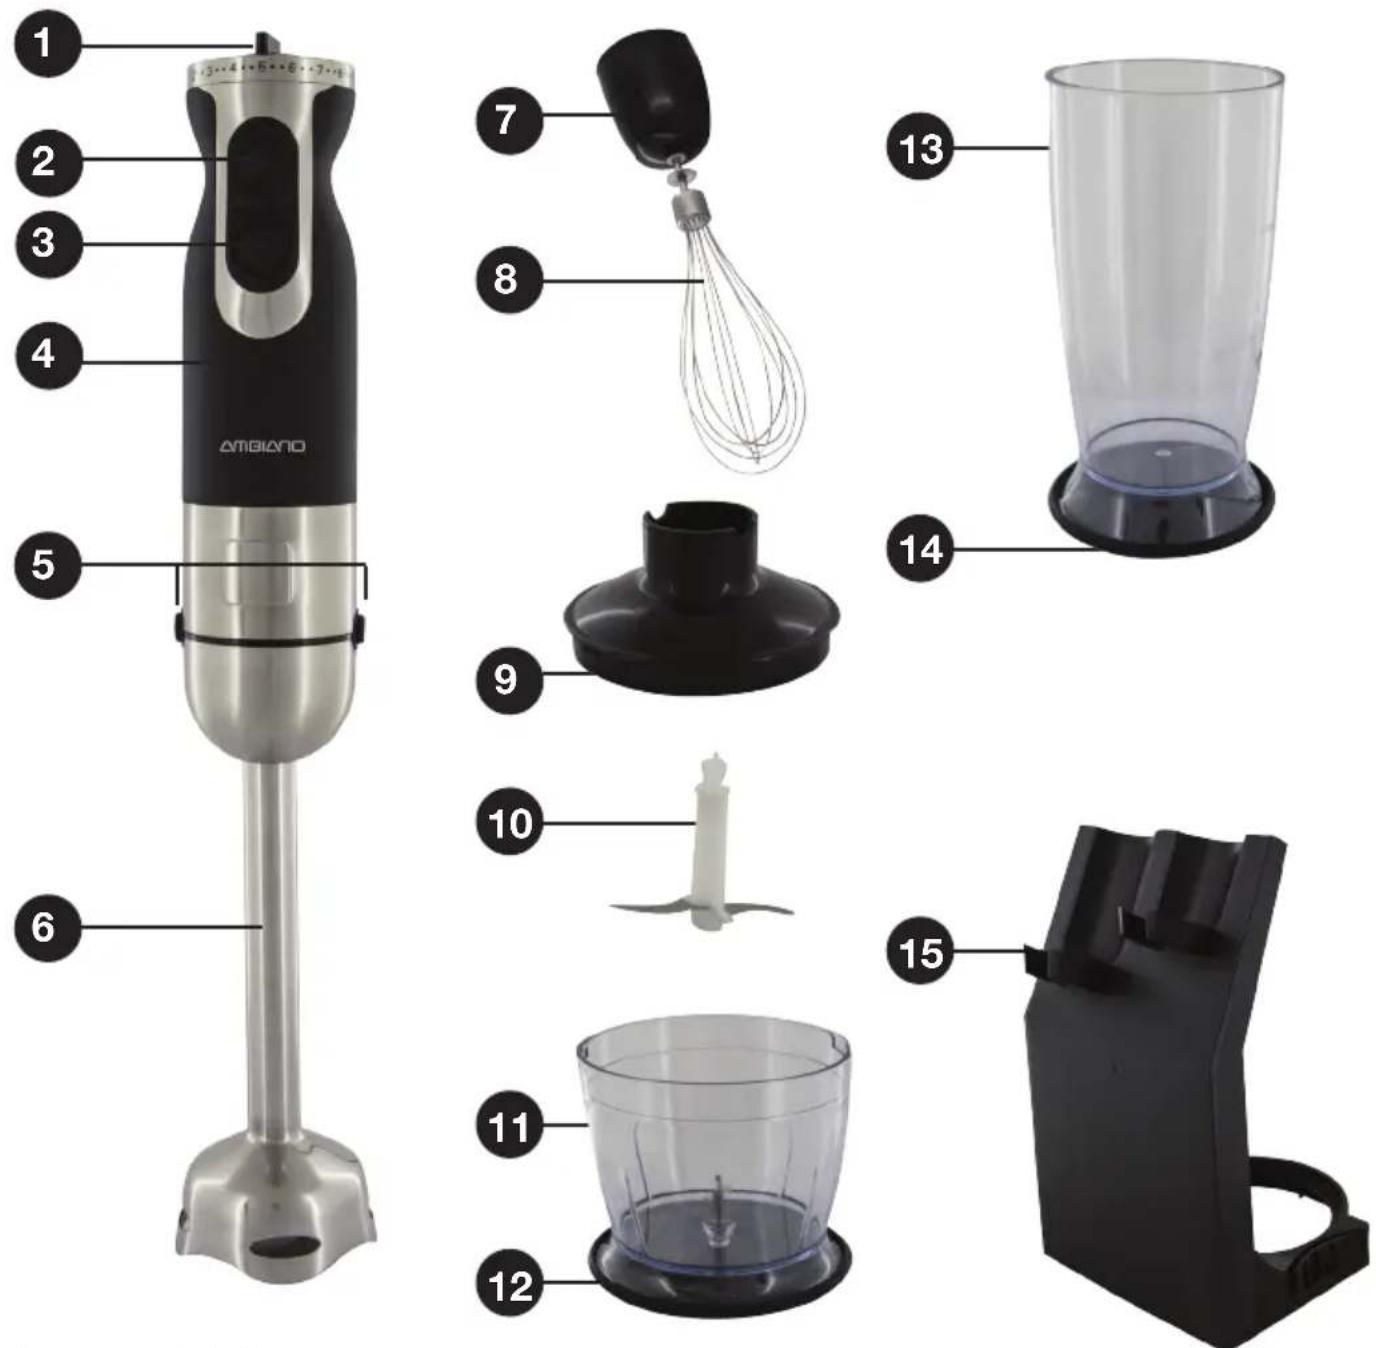
9 Lid for the chopping bowl
10 Chopping ("S") blade
11 Chopping bowl (500mL)
12 Non-slip base (for the chopping bowl)
13 Blending beaker (800mL)
14 Non-slip base (for the beaker)
15 Storage stand
Instruction manual, Quick start guide, Warranty card
A Parts list
1 Variable speed control
2 Speed button (I)
3 Turbo speed button (II)
4 Motor unit
5 Attachment release buttons
6 Blending shaft
7 Whisk holder
8 Whisk
B Documentation (not shown)
Getting Started
Before first use
- This product has been packaged to protect it against transportation damage. Unpack the appliance and keep the original packaging carton and materials in a safe place. It will help prevent any damage if the product needs to be transported in the future, and you can use it to store the appliance when it is not in use. In the event the carton is to be disposed of, please recycle all packaging materials where possible.
- Plastic wrapping can be a suffocation hazard for babies and young children, so ensure all packaging materials are out of their reach and disposed of safely.
- Inspect all parts of the appliance for visual damage. Unwind the power cord to its full length and inspect the cord and plug for damage. Do not use the appliance if the appliance or its cord have been damaged or are not working properly. In case of damage, contact our after sales support line for advice.
- Read this manual to familiarise yourself with all the parts and operating principles of the Four Blade Stick Mixer Set. Pay particular attention to the safety instructions on the previous pages.
- To remove dust from transport and storage, clean the Four Blade Stick Mixer Set as described under 'Cleaning and maintenance' on page 14.
CAUTION!
- Make sure the appliance is disconnected from the power supply before assembly or changing accessories.
- The blades are sharp! Handle the blending shaft and chopping bowl with utmost care.
- Be careful if processing hot liquids as hot liquids can be ejected out of the appliance due to sudden steaming.
TIPS
- To ensure smooth and consistent results, cut food into uniform sizes.
- When pureeing food, it is important to use enough liquid (water, juice, milk, cream, broth etc.) to have a smooth mixture. Add more liquids or soft solids to adjust the consistency of the mixture.
Instructions
Stick mixer
The Four Blade Stick Mixer is perfect for preparing dips, sauces, soups and baby food, as well as for blending milkshakes, smoothies and other drinks.
Assembly
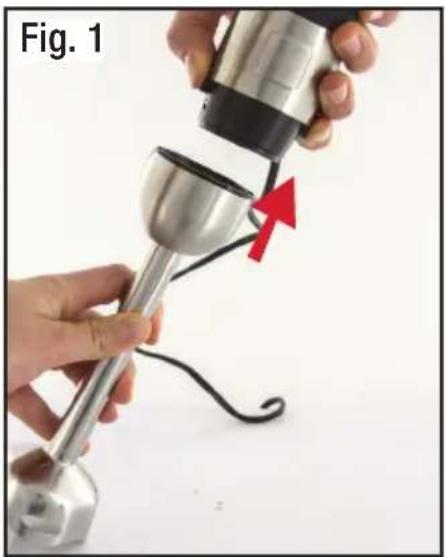
- Attach the blending shaft to the motor unit (Fig. 1) until it locks into place. It will only fit one way.
Usage
- Place the food in the blending beaker. (You can use the blending shaft directly in a saucepan, but take care with non-stick coatings and protect yourself from splashes.)
- Plug the appliance into an electrical outlet.
- Set the variable speed control (Fig. 2) to the appropriate speed: [1] is the lowest speed, [9] is the highest. You can vary the speed during operation while pressing the speed button (l).
- Insert the blending shaft vertically into the beaker and, holding the motor unit firmly in your hand, press and hold the speed button (l).
- Guide the blending shaft through the food using a gentle raising and lowering motion. For an extra boost of power, press the turbo speed button (II). Pressing the turbo button will override the variable speed and operate at maximum speed.
- When you have finished, unplug the motor unit and press the release buttons (Fig. 3) to release the blending shaft for cleaning.
CAUTION!
- Do not blend soft foods continuously for more than 1 minute at a time.
• Take care when using the blending shaft. The blades are very sharp! - Do not attempt to blend solid food without liquid.
natural_image
Close-up of hands using a handheld device to lift a small metallic object, with a red arrow indicating the motion direction (no text or symbols visible)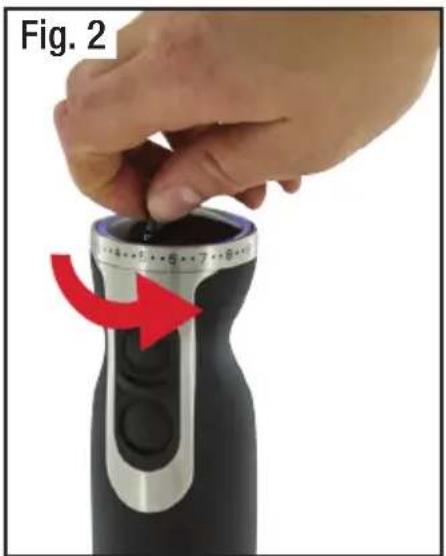
natural_image
Hand holding a black handheld device with a red arrow indicating motion, labeled 'Fig. 2' (no text or symbols on the device itself)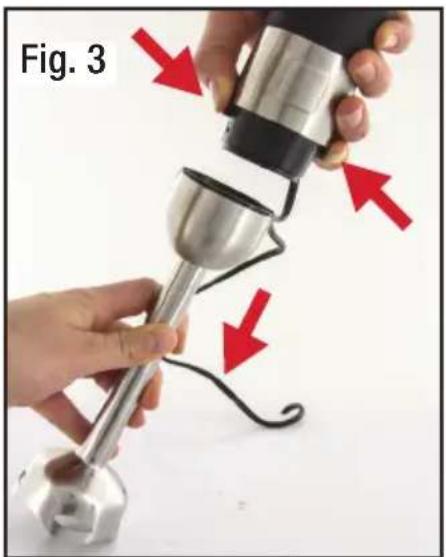
natural_image
Close-up of hands using a handheld device to lift a metallic cylindrical component, with red arrows indicating motion direction (no text or symbols)Instructions (Cont.)
Chopping bowl
The chopping bowl and blade are ideal for chopping cheese, onions, garlic, herbs, vegetables, meat, nuts, etc. Set the speed control to a higher setting for processing hard cheese and to a lower one for softer food (see page 12 for processing times and quantities).
NOTE: Do not use the appliance for chopping extremely hard foods, such as ice cubes, nutmeg, coffee beans or whole grains.
Assembly
- Carefully remove the plastic cover from the blade. CAUTION: Sharp! Always hold the blade by the upper plastic part.
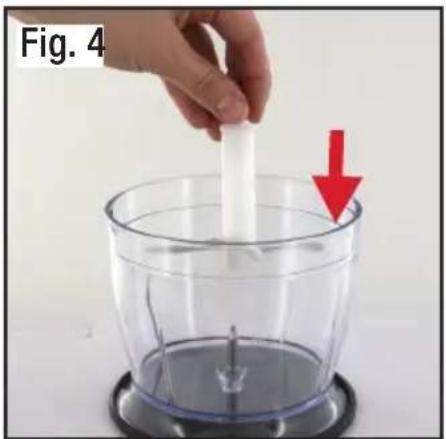
- Place the blade on the centre pin of the chopping bowl (Fig. 4) and press down.
- Place the chopping bowl on the non-slip base.
Usage
- Place cut up pieces of food into the bowl, making sure not to fill past the maximum level (500mL).
- Place the lid on top of the chopping bowl and turn it clockwise to lock (Fig. 5). Then attach the motor unit to the lid; it will only fit one way (Fig. 6).
- Plug the appliance into a wall outlet and set the variable speed control to the appropriate speed.
- Press and hold the speed button (I) to start. During processing, hold the motor unit with one hand and the chopping bowl with the other. Use the turbo speed button (II), if necessary.
- When you have finished, unplug the motor unit and press the release buttons to release the motor unit from the chopping bowl lid.
- Turn the lid to open the bowl, carefully take out the blade, then remove the food from the bowl.
CAUTION!
- Do not chop hard foods continuously for more than 10 seconds at a time.
• Take care when using the chopping bowl. The blades are very sharp!
natural_image
Hand pouring liquid into a clear kitchen blender with a red arrow indicating the process (no text or symbols on the diagram itself)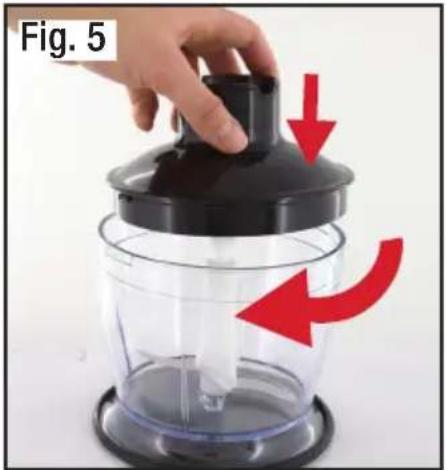
text_image
Fig. 5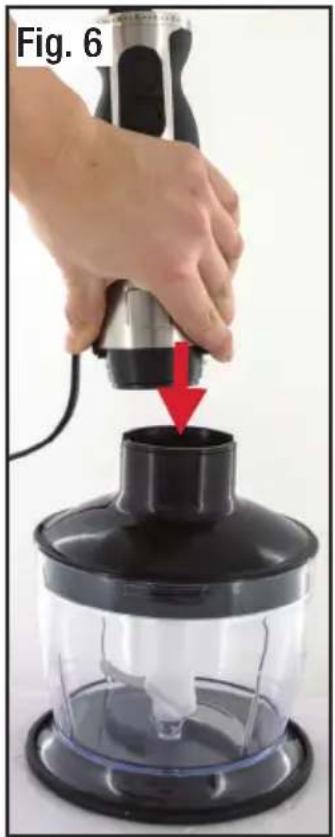
natural_image
Hand using a kitchen blender to press down a black lid, with a red arrow indicating the process (no text or symbols visible)Instructions (Cont.)
Whisk
The whisk is ideal for whipping cream, beating eggs, whisking mayonnaise, dessert mixtures or anything that needs air incorporated.
Assembly
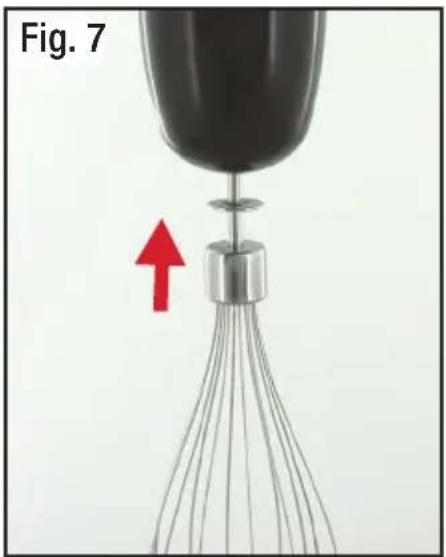
- Inset the whisk into the whisk holder (Fig. 7).
- Attach the whisk and holder to the motor unit (Fig. 8) until it locks. It will only fit one way.
Usage
- Place the food you want to whisk into an appropriately sized bowl.
- Plug the appliance into an electrical outlet and set the variable speed control to the appropriate speed: [1] is the lowest speed, [9] is the highest. You can vary the speed during operation while pressing the speed button (I).
- Place the whisk in the bowl and, holding the motor unit firmly in your hand, press and hold the speed button (I).
- Guide the whisk slowly through the food in small circles until the food has the desired consistency. For an extra boost of power, press the turbo speed button (II).
- When you have finished, unplug the motor unit and press the release buttons (Fig. 9) to release the whisk holder from the motor unit.
- Pull the whisk off the whisk holder for cleaning.
CAUTION!
Do not whisk foods continuously for more than 2 minutes at a time.
natural_image
Close-up of a black balloon with a metallic handle and wire spool, marked with a red arrow (no text or symbols on the object itself)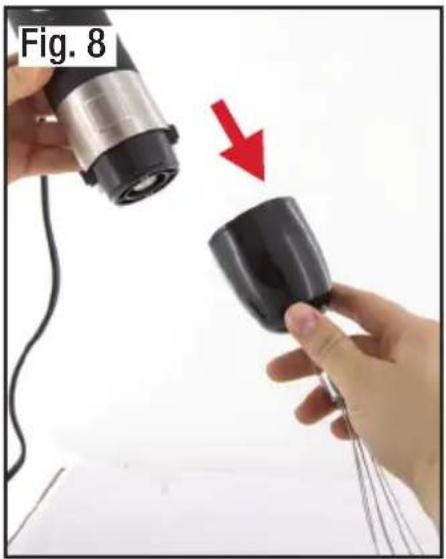
natural_image
Close-up of hands holding a black device with a red arrow indicating compression (no text or symbols)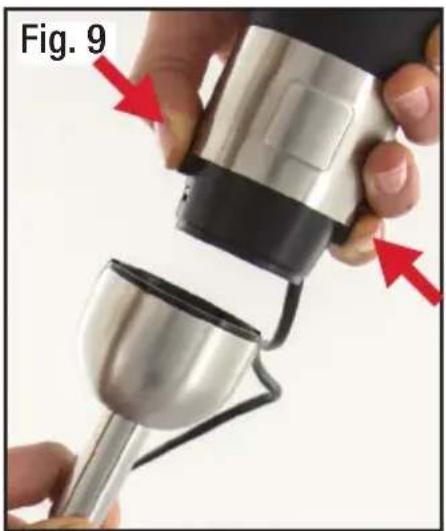
natural_image
Close-up of hands using a thermospan to lift a cup, with red arrows indicating the process (no text or symbols on the diagram itself)Instructions (Cont.)
Processing guide (for the 500mL chopping bowl)
| Food | Maximum quantity | Processing time |
| Meat (cut into 1~2cm cubes) 250g 8 seconds | ||
| Herbs 50g 8 seconds | ||
| Nuts 100g 8 seconds | ||
| Cheese (cut into 1~2cm cubes) 100g 5 seconds | ||
| Bread (cut into 1~2cm cubes) 80g 5 seconds | ||
| Onions (cut into 1~2cm cubes) 150g 8 seconds | ||
| Biscuits (broken into smaller pieces) 150g 6 seconds | ||
| Soft fruit (cut into 1~2cm cubes) 200g 6 seconds | ||
| Flour (for dough preparation) 350g 10 seconds |
FAQs and Troubleshooting Guide
If you encounter problems with your Four Blade Stick Mixer Set, check in the table below for solutions to common problems. If none of the suggested solutions help you solve the problem, or if you experience any other problems with your Four Blade Stick Mixer Set, do not try and manage them by yourself. Contact our after sales support line for advice on repair or replacement.
| Problem Possible cause and solution | |
| The appliance does not work. | Check and ensure that the motor unit is properly connected to the appropriate mixing tool: the blending shaft (if using the stick mixer), the whisk holder (if using the whisk) or the lid (if using the chopping bowl). |
| Check and ensure that the appliance is properly connected to the wall outlet and that power is switched on at the outlet. Also ensure that the power outlet is not defective, check it with another appliance, or use a different outlet. | |
| Check and ensure that the variable speed control is set to an appropriate mixing speed (between 1 and 9). | |
| Can I clean the bowls in the dishwasher? | Yes, the chopping bowl and blending beaker may be washed in a dishwasher. However, never wash the motor unit and chopping bowl lid in a dishwasher or immerse these parts in water. Only wipe them with a damp cloth. |
| To blend soup, can I use the stick mixer in the saucepan? | Yes, you can use the blending shaft directly in a saucepan, but take care with non-stick coatings and protect yourself from splashes. |
| My vegetables are of inconsistent size after chopping. | Make sure to cut vegetables into similar sized chunks before adding them to the chopping bowl for processing. |
Other Useful Information
Cleaning and maintenance
CAUTION!
- Make sure the appliance is disconnected from the power supply before cleaning or changing accessories.
- Never immerse the motor unit in water.
- The blades are sharp! Handle the blending shaft and chopping bowl with utmost care.
Motor unit and chopping bowl
Clean the motor unit and chopping bowl lid only with a damp cloth. Do not immerse the motor unit in water.
Dishwasher cleaning
All other parts can be cleaned in the dishwasher. However, after processing very salty food, make sure to rinse the blades straightaway, and do not to use more than the recommended amount of dishwasher detergent.
Hand-washing
If hand-washing, take care with the sharp blades. Use a mild dish detergent and a soft sponge or dish brush. Do not use abrasive cleaning agents.
Discolouration
When processing food with an intense natural colour, such as carrots, the plastic parts of the appliance may become discoloured. If this happens, wipe these parts with vegetable oil before placing them in the dishwasher.
Storage
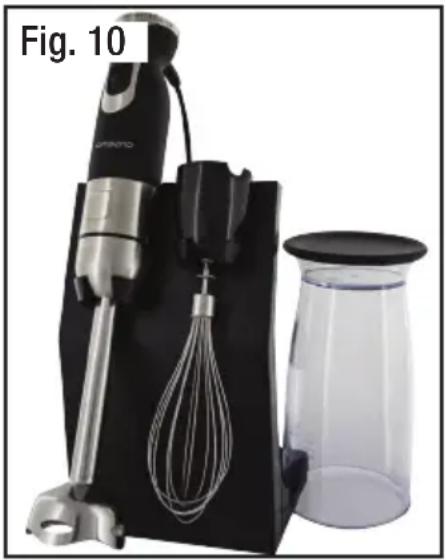
After use, store the unit conveniently on the supplied storage stand (Fig. 10).
natural_image
Product photo of a kitchen blender with whisk, clear glass jar, and stand (no visible text or symbols)Other Useful Information (Cont.)
Repair
- The unit has no user-serviceable parts contained within. Do not attempt to repair, disassemble or modify the appliance. Trying to repair the appliance yourself, undertaking incorrect repairs or making any modifications to the appliance or the power cord will expose you to considerable danger and will void your warranty.
- If your Four Blade Stick Mixer Set requires repair or service, call our after sales support line for advice. A list of available spare parts is provided below.
Spare parts
Our after sales support centre stocks the spare blending shafts and chopping blades for the GTM-8222S Four Blade Stick Mixer Set. To purchase a part, call the centre on 1300 886 649 or email us at info@tempo.org
Technical specifications
| Wattage / Voltage 600W, 220–240V AC | 50Hz |
| Variable Speed Control Settings 1–9 | |
| Speed Buttons 2 (Normal and Turbo) | |
| Processing Attachments | 4-Blade Blending Shaft |
| Whisk & Holder | |
| "S" Chopping Blade, Bowl & Lid | |
| Other Accessories Non-Slip Bases (x2), | Storage Stand |
| Capacity | 800mL Blending Beaker |
| 500mL Chopping Bowl | |
| Power cord length 1.3m | |
| Dimensions 40 x 26.5 x 25cm | |
| Weight 1.86kg |

CLASS II - DOUBLE INSULATED APPLIANCE
This symbol indicates that the appliance has been designed in such a way that it does not require a safety connection to electrical earth (ground).
Compliance
This appliance has been fully tested and meets all requirements as set out by standards AS/NZS 60335.1 and AS/NZS 60335.2.14.
Other Useful Information (Cont.)
Responsible disposal
At the end of its working life, do not throw this appliance out with your household rubbish. Electrical and electronic products contain substances which can have a detrimental effect on the environment and human health if disposed of inappropriately. Observe any local regulations regarding the disposal of electrical consumer goods and dispose of the unit appropriately for recycling. Contact your local authorities for advice about recycling facilities in your area.
Recipes
Roasted pumpkin soup
Ingredients (serves 4)
1kg butternut pumpkin, peeled, deseeded and chopped
1 small onion, quartered
1 clove garlic, peeled
1 tbsp olive oil
1 tsp salt
2 cups chicken or vegetable stock
14 cup sour cream, to serve
Preparation
- Place the pumpkin, onion and garlic on a baking tray, drizzle with olive oil and sprinkle with salt.
- Roast the vegetables in a 200^ oven for 30-35 minutes, or until golden and soft.
- Place the roasted vegetables into a bowl and add the stock.
- Use the blending shaft attached to the motor unit to blend the soup on speed setting 5 until smooth.
- Pour the soup into a saucepan and heat through.
- Serve with sour cream.
Sun-dried tomato & cashew dip
Ingredients
150g sun-dried tomatoes, drained
150g raw cashews
12 red capsicum, deseeded and quartered
1 clove garlic
1 tbsp grated Parmesan cheese
2 tbsp olive oil
1 tbsp white wine vinegar
Preparation
- Place all ingredients into the chopping bowl, cover the bowl and attach the motor unit to the lid.
- Process the ingredients using the turbo speed button (II) for a few short bursts until you have a chunky style dip.
Recipes (Cont.) Recipes (Cont.)
Hommus
Ingredients
1 can (440-540g) chickpeas
1 clove garlic, minced
3 tbsp tahini paste
2 tbsp lemon juice
1 tbsp vegetable oil
1 pinch paprika (optional)
Preparation
- Drain the chickpeas, preserving some of the liquid. Rinse the chickpeas in a colander under running water.
- Place the chickpeas and all other ingredients into the blending beaker.
- With the blending shaft attached to the motor unit, blend the mixture on speed setting 6-8 until very smooth. Use the turbo speed button (II) on occasion for extra power, if required. You may need to stop blending occasionally and push the mixture down the sides of the beaker with a spatula.
- If the hommus is too thick, add some of the preserved liquid from the can of chickpeas until you have your desired texture.
- Serve with flat bread, crackers or carrot and celery sticks.
Guacamole
Ingredients
1 avocado
1 small tomato, chopped
2 tbsp minced onion
1 pinch salt
1 tbsp lemon juice
Preparation
- Scoop out the avocado flesh, place it in the blending beaker and add the onion and lemon juice.
- With the blending shaft attached to the motor unit, blend on speed setting 6-8 for approximately 30 seconds, or until mixed.
- Add the tomato and salt and blend again briefly using the turbo speed button (II) until smooth. Ensure the mixture is neither too thick nor too liquid.
- Serve with corn chips.
Recipes (Cont.)
Scrambled eggs
Ingredients
4 eggs
12 cup full fat milk
Salt and freshly ground pepper, to taste
1 tbsp butter
Preparation
- Crack the eggs into a mixing bowl.
- With the whisk and whisk holder attached to the motor unit, whisk the eggs on speed setting 6 until they have turned a pale yellow.
- Add the milk to the eggs and season with salt and pepper. Then continue whisking on speed setting 6 for another minute.
- Melt the butter in a heated non-stick frypan. Pour in the eggs and let them cook, without stirring, for about one minute, or until the bottom starts to set. Push the mixture gently, with a wooden or silicone spatula, into the middle of the pan so the remaining liquid mixture can cook. Repeat with the other side until there is no liquid left and the eggs are set but still moist and soft.
Meringues
Ingredients
4 egg whites, at room temperature
1 cup caster sugar
2 tsp cornflour
1 tsp white vinegar
Preparation
- Place the egg whites into a bowl.
- With the whisk and whisk holder attached to the motor unit, whisk the egg whites on speed setting 9 until soft peaks form.
- Add the sugar gradually and keep whisking until all sugar is dissolved and the mixture is thick and glossy.
- Add the cornflour and vinegar and whisk briefly until combined.
- Place the mixture into a piping bag. Pipe meringues, about 3cm apart, onto a baking tray lined with baking paper.
- Bake the meringues in a 100°C oven for 2 to 2½ hours, then leave the meringues to cool inside the switched off oven for 3 hours.
Recipes (Cont.)
Caesar salad dressing
Ingredients
2 egg yolks
3 tbsp white wine vinegar
1 tbsp lemon juice
2 tbsp Parmesan cheese
12 tbsp Dijon mustard
12 tsp anchovy, mashed up
14 tsp Worcestershire sauce
14 tsp salt
14 tsp white pepper
3/4 cup olive oil
Preparation
- Place the egg yolks into the chopping bowl, cover, attach the motor unit to the lid and pulse five times using the turbo speed button (II).
- Add the remaining ingredients, except for the oil, and pulse to blend for 20 seconds.
- Add the oil and mix again on speed setting 9 for 30 seconds, or until emulsified and creamy.
- Place in a covered container and refrigerate until ready to serve.
Basil pesto
Ingredients
1 cup fresh basil leaves
1 tbsp olive oil
1 tbsp pine nuts
2 tsp Parmesan cheese
2 garlic cloves, chopped
1/8 tsp salt
Preparation
- Place all ingredients into the chopping bowl.
- Cover the chopping bowl, attach the motor unit to the lid and process using the turbo speed button (II) for a few short bursts until the pesto sauce has a chunky consistency. Do not overprocess.
Recipes (Cont.)
Orange Booster
Ingredients
2 oranges, juiced
1 banana, sliced
4–5 ice cubes
300ml pineapple juice (unsweetened), or 200g pineapple, peeled, trimmed, cubed
3–4 large basil leaves
Preparation
- Place the orange juice, banana, pineapple juice (or pieces) and ice cubes into the blending beaker.
- With the blending shaft attached to the motor unit, blend on speed setting 9 for approximately 30 seconds, or until smooth.
- Tear basil leaves, add to the juice and blend until leaves are chopped.
- Serve immediately.
Strawberry Smoothie
Ingredients
250g strawberries, hulled and washed (or 200g frozen strawberries)
180g yoghurt, plain
250mL milk
1 tbsp honey
Preparation
- Place all ingredients into the blending beaker.
- With the blending shaft attached to the motor unit, blend on speed setting 9 for approximately 30 seconds, or until smooth.
- If the consistency is too thick, you can add a little extra milk or water and blend until the desired consistency is reached. Serve in a chilled glass.
Recipes (Cont.)
Peach Smoothie
Ingredients
2 peaches, stoned and cut into small pieces
1 banana, thickly sliced
150g yoghurt, plain
1 tbsp honey
1½ cups orange juice, freshly squeezed
12 cup mint leaves (optional)
Preparation
- Place all ingredients into the blending beaker.
- With the blending shaft attached to the motor unit, blend on speed setting 9 for approximately 30 seconds, or until smooth.
- Serve in a chilled glass and garnish with fresh mint leaves.
Tropical Smoothie
Ingredients
1 banana, peeled and chopped
12 cup milk
12 cup peeled lychees
1 tbsp honey
12 cup plain yoghurt
Preparation
- Place banana, lychees, yoghurt, milk and honey into the blending beaker.
- With the blending shaft attached to the motor unit, blend on speed setting 9 for approximately 30 seconds, or until smooth.
- Pour into a tall glass and serve immediately.

text_image
ALDIAMBIANO
Professional
Four Blade Stick Mixer Set
Repair and Refurbished Goods or Parts Notice
Unfortunately, from time to time, faulty products are manufactured which need to be returned to the supplier for repair.
Please be aware that if your product is capable of retaining user-generated data (such as files stored on a computer hard drive, telephone numbers stored on a mobile telephone, songs stored on a portable media player, games saved on a games console or files stored on a USB memory stick) during the process of repair, some or all of your stored data may be lost. We recommend you save this data elsewhere prior to sending the product for repair.
You should also be aware that rather than repairing goods, we may replace them with refurbished goods of the same type or use refurbished parts in the repair process.
Please be assured though, refurbished parts or replacements are only used where they meet ALDI's stringent quality specifications.
If at any time you feel your repair is being handled unsatisfactorily, you may escalate your complaint. Please telephone us on 1300 886 649 or write to us at:
Tempo (Aust) Pty Ltd ABN 70 106 100 252
PO BOX 6056 Frenchs Forest, Sydney, Australia NSW 2086
Tempo Help Desk: 1300 886 649 (Aust)
(Operating Hours: Mon-Fri 08:30am to 06:00pm EST)
Email: info@tempo.org
3
YEAR WARRANTY

text_image
STOP BEFORE RETURNING TO STORERead the manual.
It will help you get the best out of your product.
Still have questions?
Call After Sales Support
1300 886 649
Or visit www.tempo.org
Warranty returns
Should you for any reason need to return this product for a warranty claim, make sure to include all accessories with the product.
Product does not work?
If you encounter problems with this product, or if it fails to perform to your expectations, make sure to contact our After Sales Support Centre on 1300 886 649 before returning it to the store for a refund.
Instruction Manual Revision Index
Version No Issue Date Description
V1.0 09 June 2015 Original release
V1.1 29 June 2015 Compliance updates (page 8, 15)
V1.2 01 July 2015 Compliance updates (page 15)
V2.0 20 May 2016 Second release
V2.1 16 June 2016 Minor updates