AB1100 UV - Compteuse de billets AccuBANKER - Free user manual and instructions
Find the device manual for free AB1100 UV AccuBANKER in PDF.


User questions about AB1100 UV AccuBANKER
0 question about this device. Answer the ones you know or ask your own.
Ask a new question about this device
Download the instructions for your Compteuse de billets in PDF format for free! Find your manual AB1100 UV - AccuBANKER and take your electronic device back in hand. On this page are published all the documents necessary for the use of your device. AB1100 UV by AccuBANKER.
USER MANUAL AB1100 UV AccuBANKER
AB1100 series user's guide
AccuBANKER® because your money counts USA
natural_image
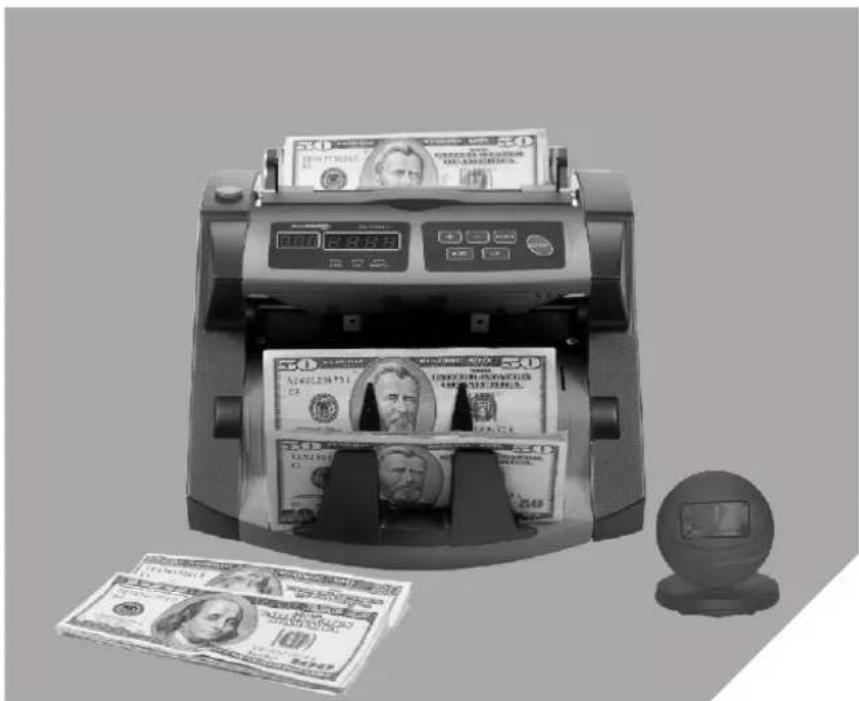
Black-and-white photo of a U.S. bank counting machine with US dollar bills displayed inside, and a small computer mouse nearby (no visible text or symbols)digital bill counter
AB1100
AB1100 UV
AB1100 MG/UV
user's guide pg. 2
Before turning the power on, please make sure that there are no objects obstructing the operation of the rollers and wheels. When operating the models AB-1100 UV and AB-1100 MG/UV, please wait 5 minutes to allow the UV system reach its maximum detection capability
AccuBANKER®
USA
AccuBANKER and its logo are registered trademarks or trademarks of Hilton Trading Corp. All Rights Reserved.
Table of Contents
→ GETTING STARTED:
BASIC INSTRUCTIONS FOR ALL MODELS 5
IMPORTANT SAFETY INSTRUCTIONS 7
OTHER SAFETY CONSIDERATIONS 8
BOX CONTENTS 9
CLEANING OF THE MACHINE 10
→ PART ONE:
1.0 GENERAL CONTROLS AND PARTS 11
1.1 SPECIFIC CONTROLS 13
2.0 FEATURES 15
2.1 Counting Mode 15
2.2 Preset Batching Function 15
2.3 ADD Function 15
2.4 MG and/or UV Detection Functions 15
2.5 Automatic Start 15
2.6 Emergency Stop Feature....16
2.7 Auxiliary Counting Screen 16
3.0 OPERATIONS 17
3.1 Power Up 17
3.2 Mode Selection 17
Table of Contents
Contents
PART ONE (Cont.)
3.3 Counting Function 18
3.4 UV Detection Function 20
3.5 "Double Detection" Function 21
3.6 "ADD" Function 22
3.7 "Batch" Function 22
3.8 Size Detection Function 23
3.9 Bill Density Detection Function 23
3.10 Emergency Stop Feature 24
→ PART TWO:
4.0 TROUBLESHOOTING OPERATIONAL PROBLEMS 25
4.1 Avoiding Problems 25
4.2 Jamming 25
4.3 When Counting Numbers Are Wrong 26
4.4 Additional Recommendation 26
5.0 MAINTENANCE OF THE MACHINE 27
5.1 Verifying the Adjustment of the Hopper Plate 27
5.2 Flipping the Rubber Tongue 28
6.0 ERROR MESSAGES AND THEIR MEANING 30
7.0 SPECIFICATIONS 31
Table of Contents
Basic Instructions for all Models
The AB-1100 Series is the vanguard of our evolution in bill counting technology. Its compact and stylish design is as remarkable as its integrated electronics and multifunction capabilities. But the AB-1100 Series is more than just looks and hi-tech electronics. It is ready to tackle the most demanding tasks, from counting large amounts of cash, to batching custom bill quantities. The power to dramatically reduce labor and counting losses is now at the reach of your hands.
The AB-1100 Series make an invaluable aid in banks, casinos, supermarkets, movie theaters, retail locations and many other environments where moneys are used.
The model numbers and main features relevant to each type of machine, are given below:
→ Model AB-1100: sturdy, well equipped and utterly reliable, this machine counts at a rate of 1000 bills per minute, adds and creates batches. This is the base model in the 1100 Series, and the most cost-effective choice when looking for bill counting equipment.
→ Model AB-1100 UV: In addition to the functions of the AB-1100, this machine has an integrated counterfeit banknote detection device that works by means of UV Fluorescent Detection. The unit alerts the user when a suspicious bill is detected.
→ Model AB-1100 MG/UV: In addition to the functions of AB-1100, this machine has two means of counterfeit banknote detection which are: 1) Magnetic Detection and 2) UV Fluorescent Detection. This is the most advanced unit in the AB-1100 Series.
Basic Instructions
Getting Started
This manual has been compiled to provide complete and clear instructions for operating the machine. It is composed by two major parts:
Part One: Basic instructions for all models in the series.
Part Two: Instructions on how to handle operational problems, specifications, etc.
Before using the machine, read this manual thoroughly. Pay special attention to Part One, in order to familiarize yourself with the functions and operations of the machine.
Getting Started Important Safety Instructions
When using this bill counter, basic safety precautions should always be followed to reduce the risk of fire, electric shock or injury to persons; including the following:
 | |
| Do not use this product in areas where it may be exposed to water or other liquids. | |
| Unplug this product from the wall outlet before cleaning. Do not use liquid or aerosol cleaners. Use a damp cloth for cleaning. | |
| To reduce the risk of electric shock, do not disassemble this product. Take it to qualified service personnel when service or repair work is required. Opening or removing covers -like the rear cover plate- may expose you to dangerous voltages or other risks. Incorrect re-assembly can cause electric shock when the appliance is subsequently used. | |
| Only use the cable provided with the unit. The use of other cables may result in electric shock, fire or cause serious damage to the unit. | |
| Do not operate the unit in areas with high temperature or high humidity since it may prevent it from working correctly. | |
| Caution | |
| When unplugging the power plug, do not pull it by the cord but rather grip the plug to pull it out. Not following these instructions may result in electric shock, fire or damage to the unit. | |
| Do not use the unit if the power cord is damaged or if the plug socket contact is loose. Not following these instructions may result in electric shock, fire or other hazards. | |
| Do not place heavy objects over the cord and do not bend it excessively since it could get damaged. Not following these instructions may result in electric shock, fire or other hazards. | |
| When not using the unit for a long period of time, remove the power plug from the wall outlet. | |
Safety Instructions
Other Safety Considerations
- Read and understand all of the instructions.
■ Follow all warnings and instructions marked on the unit.
■ The slots and openings in the back or bottom of the case, are provided for ventilation, to protect the unit from overheating. These openings should never be blocked or covered by placing the product on the bed, sofa, rug, or similar surfaces. This product should never be placed near or over a radiator or heat register. This product should not be placed in a built-in installation unless proper ventilation is provided.
This product should be operated only from the type of power source indicated in the user's guide. If you are not sure of the type of power supply in your location, consult your dealer or local power company.
This product is equipped with a three-wire grounding type plug, a plug having a third (grounding) pin (110V models, only). This plug will only fit into a grounding type power outlet. This is a safety feature. If you are unable to insert the plug into the outlet, contact your electrician to replace the outlet. Do not try to defeat the safety purpose of the grounding type plug.
■ Never push objects of any kind into the unit through case slots, since they may touch dangerous voltage points or shortcut parts, resulting in a risk of fire or electric shock. Never spill liquids of any kind on the product.
■ Unplug this product from the wall outlet and refer servicing to qualified service personnel under the following conditions:
- When the power supply cord or plug is damaged or frayed.
• If liquid has been spilled into the unit. - If the unit has been exposed to rain or water.
- If the unit does not operate normally by following the operating instructions. Adjust only those controls that are covered by the operating instructions. Improper adjustment of other controls may result in damage and will often require extensive work by a qualified technician to restore the product to normal operation.
- If the product has been dropped or the case has been damaged.
- If the product shows a noticeable change in performance.
Safety Considerations
Getting Started Box Contents
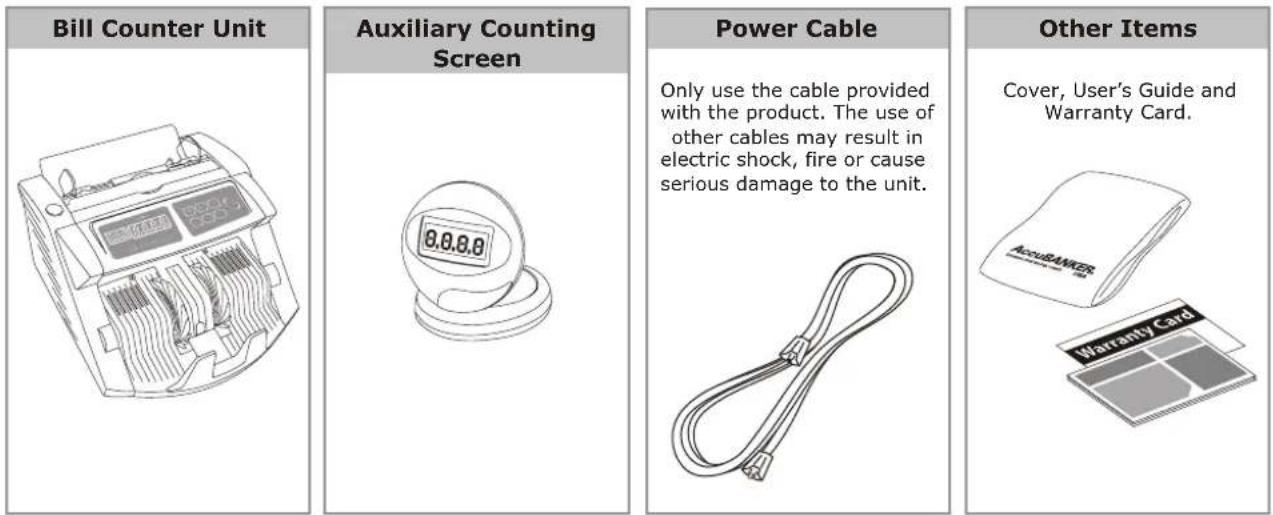
When opening the box, verify that all of the items described below are included. If any item is damaged or missing, contact the dealer where the unit was purchased.
text_image
Bill Counter Unit Auxiliary Counting Screen Power Cable Only use the cable provided with the product. The use of other cables may result in electric shock, fire or cause serious damage to the unit. Other Items Cover, User's Guide and Warranty Card.Box Contents
Cleaning of the Machine

WARNING: BEFORE DOING ANY CLEANING, TURN THE POWER SWITCH OFF AND DISCONNECT THE POWER CORD FROM THE MACHINE. KEEP IN MIND THAT PROBLEMS OR DEFECTS THAT ARISE FROM LACK OF PERIODIC MAINTENANCE ARE NOT COVERED BY THE WARRANTY
A) Cleaning the Optical Sensors
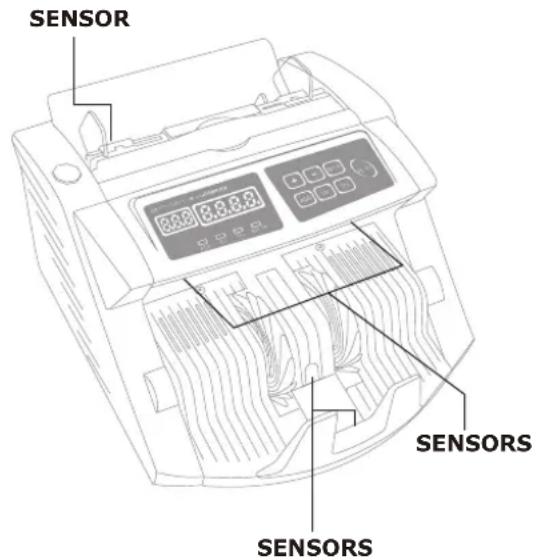
It is important to clean all the sensors in the unit to avoid any paper particles or dust from sticking to the light-transmitter or the light-receiver sensors. This should be done every day, if possible. The glass surfaces of the detectors may also be wiped with a soft cloth soaked with alcohol. The graphic on the right shows the approximate position of the sensors.
B) Cleaning the Inner Side of the Machine Periodically
It is necessary to clean the inside of the machine once a month or when needed. Unplug the machine and lift the top cover (where the handle lays) to gain access to the interior.
C) Additional Recommendations
Avoid operating the machine in a dusty or dirty room. To guard the machine from the elements, always keep it protected with the supplied cover (when not in use).
text_image
SENSOR SENSORS SENSORSCleaning of the Machine
1.0 General Controls and Parts
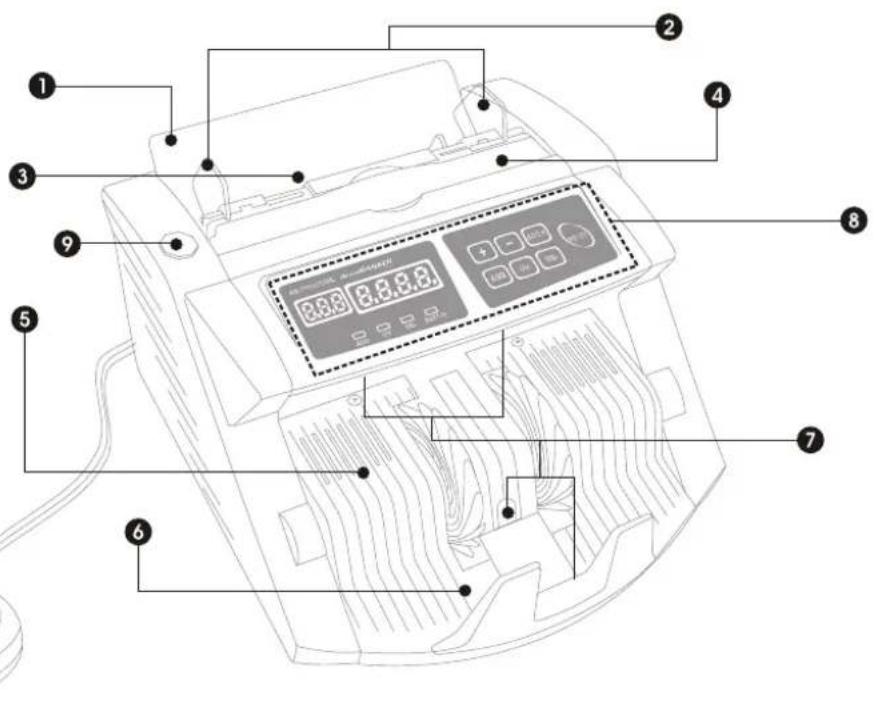
1 Hopper Plate
2 Counting Guides
3 Hopper
4 Retractable Handle
5 Frontal Plastic Platform
6 Stacker
7 Optical Sensors
8 User Interface
9 Emergency Stop Button
10 Auxiliary Counting Screen
text_image
Diagram of a digital printer with labeled parts including front panel, display screen, and control buttonsGeneral Controls and Parts
Part One
11 Fastening Screws
12 Power Switch
13 Power Outlet
14 Bill Thickness Adjustment Screw
15 Rubber Tongue
16 Auxiliary Counting Screen Jack
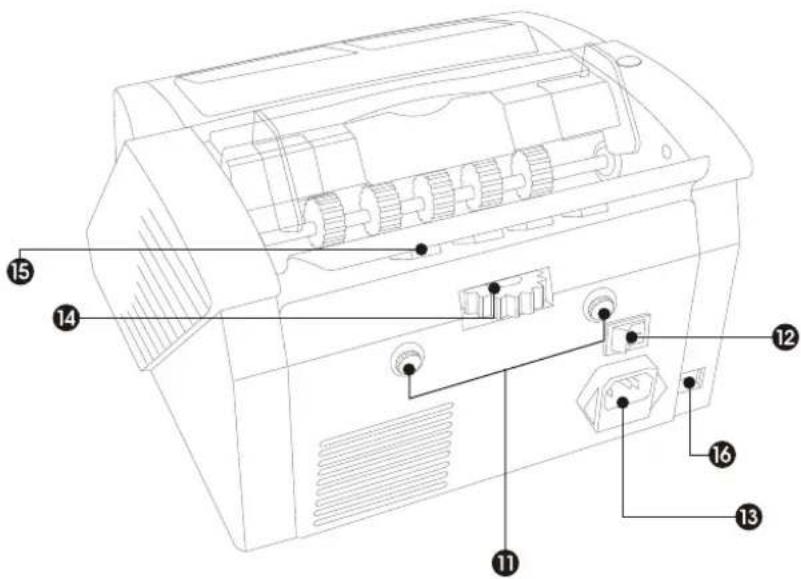
text_image
Technical diagram of a printer with numbered parts labeled 11 to 16 for identification.General Controls and Parts
1.1 Specific Controls
AB1100
1 Preset Number Display (Batch display)
② Counting Number Display (Counter)
③ Batch "+" Button (To add)
④ Batch "-" Button (To subtract)
5 Batch Button (Preset to 100, 50 and 20)
6 Restart Button (For manual restart)
⑦ ADD Button (Addition function)
8 "ADD" LED Indicator
9 "BATCH" LED Indicator
10 UV Button (Ultraviolet detection)
11 "UV" LED Indicator
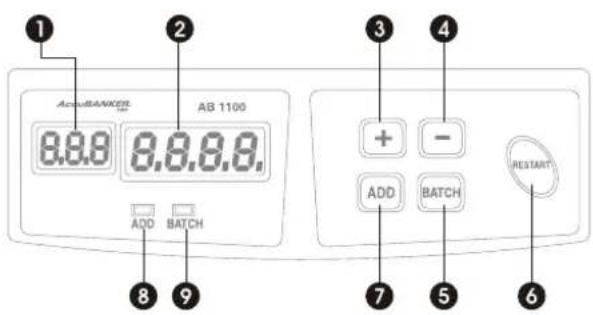
text_image
1 2 AcuobANKER AB 1100 8.8.8 8.8.8.8. ADD BATCH 3 4 + - ADD BATCH RESTART 7 5 6AB1100 UV
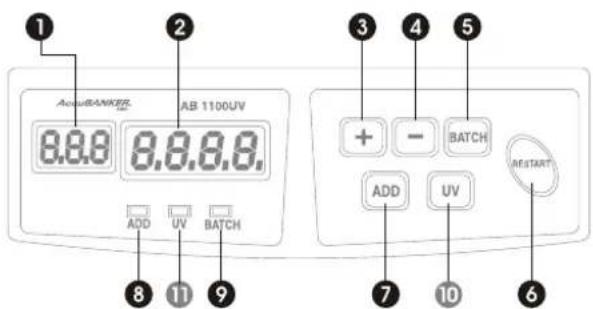
text_image
1 AcuRANKER AB 1100UV 8.8.8 8.8.8.8. ADD UV BATCH 3 4 5 + - BATCH ADD UV 6 7 10Specific Controls
Part One
① Preset Number Display (Batch display)
② Counting Number Display (Counter)
③ Batch "+" Button (To add)
④ Batch "-" Button (To subtract)
5 Batch Button (Preset 100, 50 and 20)
6 Restart Button (For manual restart)
⑦ ADD Button (Addition function)
8 "ADD" LED Indicator
9 "BATCH" LED Indicator
10 UV Button (Ultraviolet detection)
11 "UV" LED Indicator
12 MG Button (Magnetic detection)
13 "MG" LED Indicator
AB1100 MG/UV
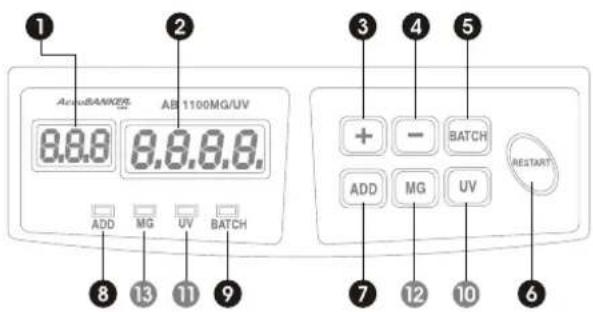
text_image
1 2 AcuobANKER AB 1100MG/UV 8.8.8 8.8.8.8. ADD MG UV BATCH 3 4 5 + - BATCH ADD MG UV 7 12 10 6 RESTARTSpecific Controls
Part One 2.0 Features
2.1 Counting Mode
Once turned on, the machine defaults to this mode, counting the bills placed in the hopper.
2.2 Preset Batching Function
Counts bills per batch up to the numbers preset with the "Batch" and "+" or "-" buttons. In the batch preset mode, the machine is restarted by taking out the batched bills from the stacker. The unit will batch all inserted bills in the preset batch amount.
2.3 ADD Function
Counts all bills placed in the hopper and will add to the total of all consecutive operations up to 9999 units. Removing the counted bills from the stacker will not reset the counting quantity displayed on the screen.
2.4 MG and/or UV Detection Buttons (for AB-1100 UV and/or AB-1100 MG/UV, only)
Counts all bills and will detect counterfeit bills using different detection methods. The AB-1100 UV employs UV fluorescence detection. The AB-1100 MG/UV employs both magnetic and UV detection systems.
2.5 Automatic Start
The machine starts counting when bills are placed in the hopper.
Features
Part One
2.6 Emergency Stop Feature
The unit stops automatically when the resistance in the feeding friction rollers increases abnormally. Moreover, a red octagonal button located on the upper left side of the unit stops all operations when depressed.
2.7 Auxiliary Counting Screen
The AB-1100 Series is equipped with an auxiliary counting screen. This accessory will help the user visualize the quantity of counted bills when the unit is placed out of his range of vision. It also serves the purpose of allowing third parties to visualize the count. The screen is automatically activated by plugging it to the unit (see figure 1).
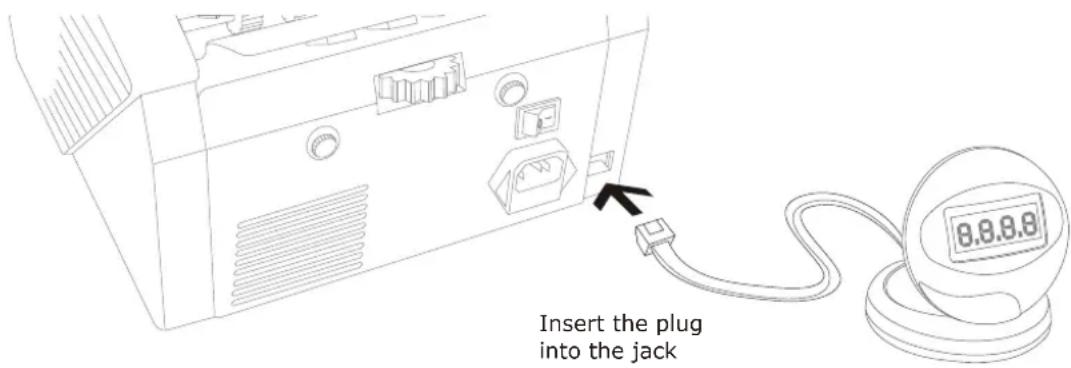
text_image
Insert the plug into the jackPart One 3.0 Operations
3.1 Power Up
Connect the power cord to the unit, then to a power source and turn the POWER switch ON; the unit will conduct a self-check by spinning the counting wheels several times. The counting number display will show "0" when the unit is ready.
3.2 Mode Selection
Select the function you want to use: "ADD" or "BATCH". When turned on, the unit will automatically set the "MG and/or UV" functions to verify for counterfeit banknotes (for AB-1100 UV and/or AB-1100 MG/UV models only).
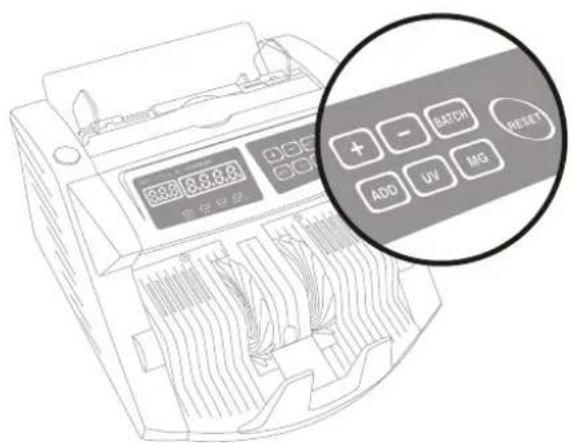
text_image
8:30 8:3:3:0 + - BATCH RESET ADD UV MGOperations
Part One
3.3 Counting Function
Once the bills are correctly placed in the hopper plate, the machine will start counting automatically. The number of counted bills will be shown on the "Counter" display. Moreover, once the bills are removed from the stacker, the "Counter" display will clear and the "Batch" display in turn will show the number of counted bills instead.
→ Place the bills between the counting guides as shown in figure 1 and 1-b. Swiftly, push the bills with a finger (see figure 2) to make them rest on top of the hopper plate, in the correct counting position.
Figure 1 Figure 1-b Figure 2
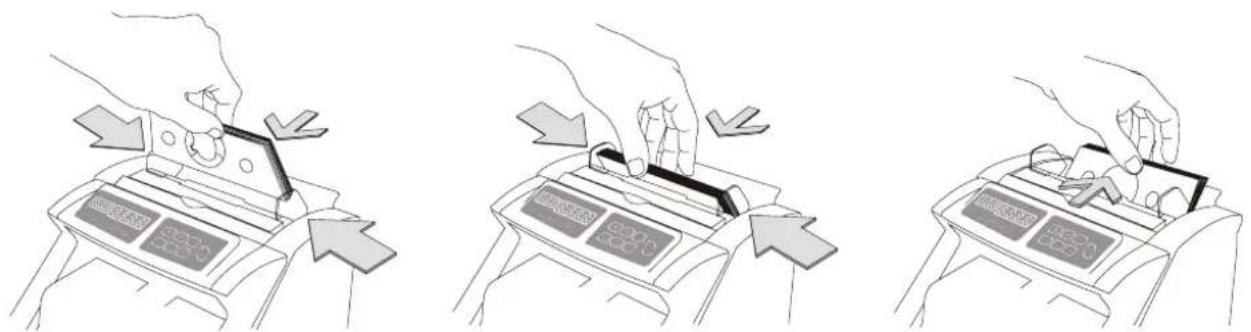
natural_image
Three-step line drawing showing hand positioning of a device on a base, with arrows indicating movement direction (no text or symbols)Operations
Part One
→ The machine will count until the hopper plate is empty or reaches a preset batching number.
→ The number of counted bills is displayed on the counter.
→ The next counting operation will start again- with "0" on the screen.
→ Loading the hopper with additional bills, without removing the previous notes accumulated on the stacker, will start the next counting operation automatically. The newly counted quantity will be added to the previous one.
NOTE: If your machine is an AB-1100, you may start counting operations immediately. Moreover, if your machine is of the type UV or MG/UV, allow it to idle for five minutes to attain optimal operation performance.
NOTE: the unit can be set to "include" or not "include" any suspicious bills in the count (AB-1100 UV and AB-1100 MG/UV only). This is done by pressing the "-" button for 3 seconds. The message "Uxx" will appear in the Batch display. Using the "+" and "-" buttons, the setting can be switched between "U00" (suspicious bills not included in the count) and "U22" (suspicious bills included in the count). Press the RESTART button to confirm your selection.
Operations
Part One
3.4 Ultraviolet Detection Function
(Available for the models AB-1100 UV and/or AB-1100 MG/UV, only)
Ultraviolet Fluorescence Detection Function or UV: The UV detection function is selected or deselected by pressing the UV button in the function console. The UV function is able to check all types of banknotes containing UV features.
Note: The ultraviolet function will work at its best five minutes after the machine has been turned on.
Operation
By default, the UV function is automatically turned on when the unit is powered up. The counting operation proceeds as normal. If the machine detects a counterfeit bill, it will stop counting. The unit will emit triple beeping sound. Moreover, the batch display will show the message "A" and the UV indicator will blink, alerting the user of the presence of a dubious bill. The problematic bill will be the last one on the stacker. If the bills placed in the stacker including the dubious one are not removed from the unit, the UV indicator will keep blinking and the triple beep alarm will cycle every 10 seconds.
To adjust the sensitivity of the UV function, press the UV button for 3 seconds. The batch number display will show the current sensitivity level (increasing sensitivity from 0 to 10). Using the "+" or "-" buttons, choose the desired sensitivity level. To set the desired sensitivity level, press RESTART.
Part One
3.5 "Double Detection" Function (available for the model AB-1100 MG/UV only)
The AB-1100 MG/UV incorporates the Magnetic Detection and Ultraviolet Fluorescence Functions. By default, the MG and UV functions are automatically turned on when the unit is powered up. The chances of detecting a counterfeit bill are multiplied when both MG and UV functions are on.
→ Magnetic Detection Function or MG: The MG detection function is selected or deselected by pressing the MG button in the function console. The magnetic function is able to check all types of banknotes containing magnetic features.
Operation
By default, the MG function is automatically turned on when the unit is powered up. The counting operation proceeds as normal. If the machine detects a counterfeit bill, it will stop counting. The unit will emit a triple beeping noise. Moreover, the batch display will show the signal "b" and the MG indicator will blink, alerting the user of the presence of a dubious bill. The problematic bill will be the last one on the stacker. If the bills placed in the stacker including the dubious one are not removed from the unit, the MG indicator will keep blinking and the triple beep alarm will cycle every 10 seconds.
To adjust the sensitivity of the MG function, press the MG button for 3 seconds. The batch number display will show the current sensitivity level (increasing sensitivity from 0 to 10). Using the "+" or "-" buttons, choose the desired sensitivity level. To set the desired sensitivity level, press RESTART.
→ Ultraviolet Fluorescence Function or UV: For more information about his function, go to section 3.4.
Operations
Part One
NOTE: The ultraviolet and magnetic detection systems integrated in the AB-1100 (models UV and MG/UV only,) are valuable instruments that help the user verify the legitimacy of bills. However, the AB-1100 (models UV and MG/UV only,) like all other counters with integrated detectors found in the market, cannot guarantee the legitimacy of any bill analyzed by it due to the unpredictable techniques or advances that counterfeiters may introduce.
3.6 "ADD" Function
Addition can be performed by pressing the "ADD" button (indicator must light up). In this case, removing the counted bills from the stacker will not clear the quantity counted and shown on the screen. The next bills placed in the hopper will be counted and added to the preceding quantity. The total amount of added bills will be shown on the Counter screen. To clear the count, press the "ADD" button (the indicator must be OFF).
If the machine stops during the addition operation due to an error message, remove the cause of the error. Remove the bills from the stacker and from the feeding rolls, if any. The unit will resume counting after the problem has been solved.
3.7 Size Detection Function
This feature will allow you to detect bills shorter than the first one counted by the unit. Press down the "ADD" button for 3 sec to activate it. You will notice that the batch window will display "C00-C10". To deactivate this feature press the "-" button until "C00" appears on the screen. To activate it press the "+" button in the range of 01 to 10.
Operations
Part One
3.8 Bill Density Detection Function
This feature will allow you to detect bills thinner or older than the first one that is counted by the unit. To activate it, press down the "Batch" button for 3 sec. You will notice that the batch window will display "C00-C10". To deactivate this feature press the "-" button until "C00" appears on the screen. To activate it press the "+" button in the range of 01 to 10.
3.9 "BATCH" Function
The preset batch function can be selected or deselected by pressing the "Batch" button. The batch number is indicated on the "Batch" display. By default, when pressing the "BATCH" button, the batch number is set to "100". By pressing it again, the batch number can be changed (to 50 the first time and to 20 the second time). Custom batching can be set in amounts between 1 and 999. The custom quantity can be set by pressing the "+" or "-" buttons. Pressing the "+" or "-" buttons for more than 0.5 sec. will cause the set number to increase or decrease, 5 units at a time, every 0.25 sec. Pressing the "+" or "-" buttons with single and fast strokes will cause them to increase or decrease 1 by 1. To clear this function, press the "BATCH" button until the indicator is OFF.
Once the hopper is loaded, the machine will start counting and will stop when the counted quantity reaches the preset batch quantity (batch counting only).
To repeat the batch counting operation under the same preset batch quantity, just remove the counted bills from the stacker. The unit will batch the next group of bills under the same settings.
If you wish to keep batching without removing the bills from the stacker, press the RESTART button.
If the counted number does not tally with the preset number, the counter will show the counted quantity with a blinking number.
When counting with the detection modes MG and/or UV enabled (AB-1100 UV and/or AB-1100 MG/UV models, only), the machine will stop automatically when detecting counterfeit currency. The counting
Operations
Part One
function can be resumed by removing the bills from the stacker. The number on the counter display will include the dubious bill.
3.10 Emergency Stop Feature
The AB-1100 Series is equipped with an emergency stop feature which protects the user in the event that unintended objects (e.g. neckties, scarves, etc) reach the feeding friction rollers. This fully automatic feature works by means of a sensor that measures the resistance on the feeding friction rollers. If the resistance increases beyond the parameters of normal bill counting, the counting operation is stopped.
In the event of an emergency, this feature can be activated manually by depressing the red Emergency Stop Button located on the upper left side of the machine. The button has a red LED indicator that blinks when the function is ON. Once ON, the unit will show the message "EA7" on the batch number display. Once the Emergency Stop feature is activated, all operations will be canceled. The machine must be turned OFF; the foreign objects removed, and turned back ON to continue the bill counting operations.
Emergency Stop Button
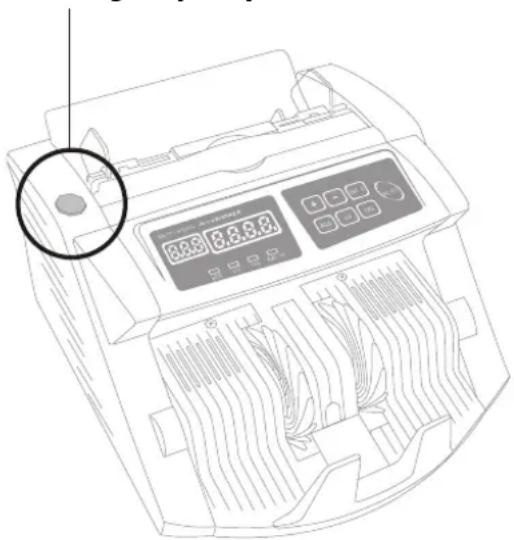
text_image
6.8.8 8.8.8.8 140 170Operations
Part Two
4.0 Troubleshooting Operational Problems
4.1 Avoiding Problems
Pre-select the bills you are going to count in the machine. Do not attempt to count bills:
→ With staples or metal clips
→ Torn or washed
→ Profusely stained
→ Covered with adhesive media (for AB-1100 UV and/or AB-1100 MG/UV models, only)
4.2 Jamming
→ Before you start operating the machine, make sure that there are no foreign elements (such as silica bags) obstructing the moving parts of the unit.
→ To avoid jamming, load the bills as indicated in this manual. The bill facing you (in front) will go in first.
→ If jamming occurs, make sure to turn the machine off. Carefully remove, with a wood piece or a pencil, the bills stuck in the system. Look for any foreign materials -like paper clips, rubber bands, etc. Remove them (if any).
→ Check for proper tightness of the bill thickness adjustment screw (#15) in the back of the unit.
→ Verify proper placement of the bills in the hopper.
→ Resume counting.
Troubleshooting
Part Two
4.3 When Counting Numbers are Wrong
→ Turn the bill thickness adjustment screw (#15) counter-clockwise to reduce friction, and vice versa.
→ Adjust the rubber tongue position until the counting numbers are right.
→ Verify the adjustment of the hopper plate bracket. If loose, tighten it according to the instruction found in the Cleaning and Maintenance of the Machine section
→ Remove the black rubber tongue. Flip it (one side may be worn out). Detailed instructions to complete this procedure can be found in the Maintenance of the Machine section.
4.4 Additional Recommendation
→ The models AB-1100 UV and AB-1100 MG/UV should never be placed under intense light sources. The sensibility of the UV sensors may be affected.
Troubleshooting
5.0 Maintenance of the Machine
5.1 Verifying the Adjustment of the Hopper Plate
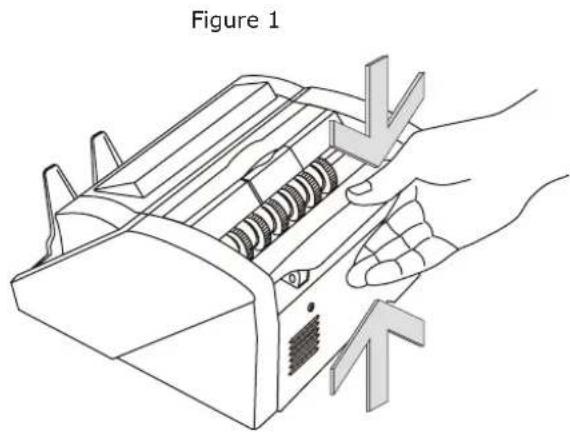
The hopper plate ensures proper feeding of the bills for counting. It is secured to the back of the unit by means of two pivoting points and a magnetic lock. To verify that the Hopper Plate is properly adjusted, press or lift the hopper plate and look for any displacement (see figure 1). If any displacement occurs, press or lift the hopper plate until the magnetic lock holds the piece in place.
text_image
Figure 1Maintenance
Part Two
5.2 Flipping the Rubber Tongue
When should the rubber tongue be flipped?
The rubber tongue should be flipped when the bill thickness adjustment screw does not solve the problem of improper banknote feeding.
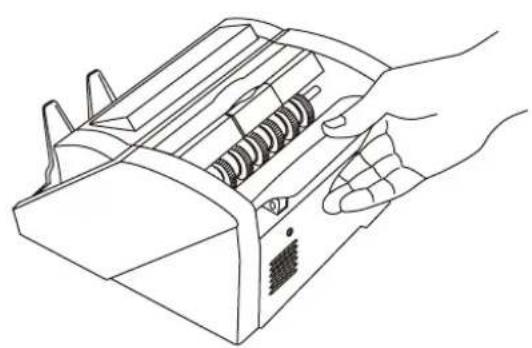
Procedure: press the hopper plate (metal plate) downward (see figure 1). While pressing the hopper plate down, remove the rubber tongue located underneath the hopper plate (see figure 2).
Figure 1 Figure 2
natural_image
Line drawing of a hand holding a computer with a spring and ports (no text or symbols)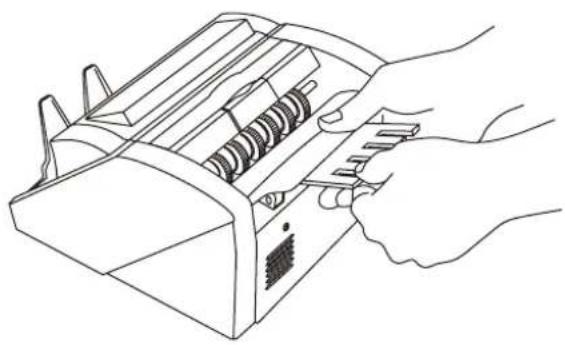
natural_image
Line drawing of a hand using a handheld computer to press or install a spring (no text or symbols present)Maintenance
Part Two
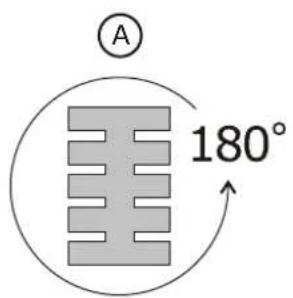
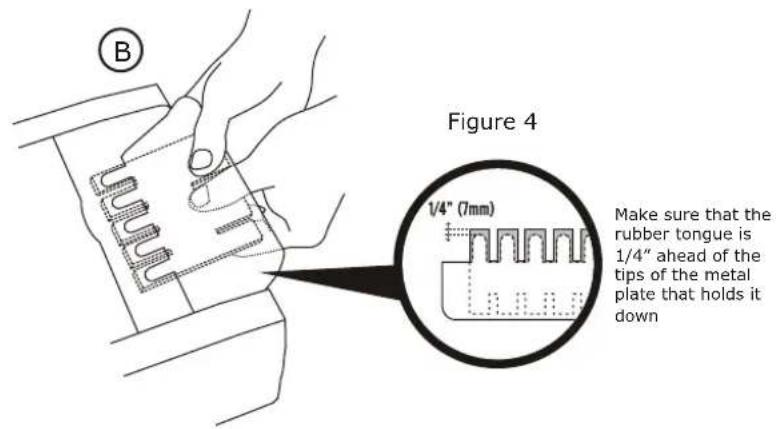
Flip the rubber tongue and place it back in its original position (see figures 3, A and B). Make sure that the rubber tongue is 1/4" ahead of the tips of the metal plate that holds it down (see figure 4). Once both sides of the rubber tongue have been used, contact your local service representative or AccuBanker to get a new one.
text_image
A 180°Make sure to flip the rubber tongue 180 degrees
Figure 3
text_image
Figure 4 1/4" (7mm) Make sure that the rubber tongue is 1/4" ahead of the tips of the metal plate that holds it downMaintenance
6.0 Error Messages and their Meaning
| Message Error Solution | ||
| R | Suspicious bill detected by the UV system (ultraviolet)Problem in the UV system | Remove the suspicious bill from the stacker. Recount the billsLower the sensitivity of the UV detector. Recount the Bills |
| b | Suspicious bill detected by the MG system (magnetic)Problem in the MG system | Remove the suspicious bill from the stacker. Recount the billsLower the sensitivity of the MG detector. Recount the Bills |
| E | Chained bills (2 or more bills fed)Bills jammed inside the unit | Verify that the hopper is not looseAdjust if necessary |
| ERQ | Problem with the left counting sensor | Clean the sensor |
| ER7 | Problem with the right counting sensor | Clean the sensor |
| ER2 | Problem with the stacker sensor Clean the sensor | |
| ER4 | Problem or obstruction of the MG system | Clean the system |
| ERS | Problem with the hopper sensor | Clean the sensor |
| ER7 | Emergency stop function activated | Turn the machine OFF and then back ONto resume bill counting |
| F | Bill size problems (half bill) | Remove the bill from the stacker. Recount all bills |
| 80% of all the Operational Problems may be caused by dust and dirt inside the machine. Keeping the machine clean may avoid malfunctions | ||
7.0 Specifications
→ Ambient Temperature: 32^ F - 104^ F ( 0^ C - 40 C)
→ Ambient Humidity: 25% - 80%
→ Feeding System: Roller Friction System
→ Hopper Capacity: 100 old bills or 200 new bills
→ Stacker Capacity: 100 old bills or 200 new bills
→ Size of Countable Bills: 50mm X 100mm - 100mm X 185mm
→ Thickness of Countable Bills: 0.06mm - 0.12mm
→ Counting Number Display: Four Digits Green LED (large)
→ Batch Preset Number Display: Three Digits Red LED (small)
→ Power Source: Single Phase 110V ± 10% RMS, 60Hz. Also available in 220V ± 10% RMS, 50Hz
→ Power Consumption: < 40 Watts
→ Dimensions: 9 ½" x 11" x 7" (241 mm X 279 mm X 178 mm)
→ Weight: 13.6 lb (6.2 kg) (approx)
→ Counting Speed: 1,000 bills per minute
Specifications
PRECAUCIÓN
text_image
Diagram of a digital printer with labeled parts including front panel, display screen, and control buttonsControles y Partes Generales
Primera Sección
natural_image
Three-step line drawing of a hand using a digital payment terminal, showing hand positioning and adjustment (no text or symbols)Operaciones
Primera Sección
natural_image
Line drawing of a hand inserting a spring into a printer (no text or symbols)Mantenimiento
Segunda Sección
natural_image
Line drawing of a hand holding a handheld electronic device with a spring and ports (no text or symbols)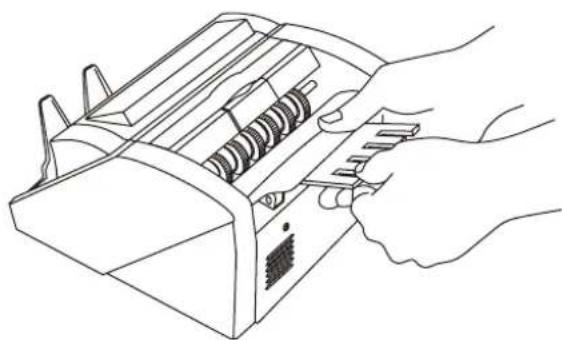
natural_image
Line drawing of a hand holding a computer with a spring-loaded handle (no text or symbols)Mantenimiento
Segunda Sección
because your money counts
USA