RP8242 - Charger Cotech - Free user manual and instructions
Find the device manual for free RP8242 Cotech in PDF.


| Product Type | Portable Jump Starter and Air Compressor |
| Brand | Cotech |
| Model | RP8242 |
| Dimensions | 340 × 280 × 195 mm |
| Weight | 7.5 kg |
| Battery Type | Maintenance-free sealed lead-acid, 12 V, 17 Ah |
| Jump Starting Peak Current | 450 A instantaneous, 300 A after 5 seconds |
| Air Compressor Max Pressure | 120 psi / 8.28 bar |
| USB Output | 5 V DC, 500 mA |
| 12V Socket Output | Max 5 A (60 W) |
| LED Work Light | 1 white LED, adjustable |
| AC Charger Input | 220–240 V, 50 Hz |
| Charging Time (First Use) | 40 hours with included AC charger |
| Maintenance Charging Interval | Every 60 days if not used |
| Safety Protections | Reverse polarity indicator, spark-proof, short-circuit protection |
| Included Accessories | AC charger, 12V car adaptor, battery clamps, air hose with nozzle, 3 valve adaptors |
| Fuse Rating (12V Adaptor) | 8 A / 250 V, 6 × 32 mm |
| Usage Environment | Indoor only, dry, well-ventilated |
| Disposal | Recycle lead-acid battery according to local regulations |
| Warranty | Refer to manual or supplier |
Frequently Asked Questions - RP8242 Cotech
User questions about RP8242 Cotech
0 question about this device. Answer the ones you know or ask your own.
Ask a new question about this device
Download the instructions for your Charger in PDF format for free! Find your manual RP8242 - Cotech and take your electronic device back in hand. On this page are published all the documents necessary for the use of your device. RP8242 by Cotech.
USER MANUAL RP8242 Cotech
Portable Jump Starter and Air Compressor
Mobil starchjälp med kompressor Mobil starchjelp med kompressor Kompressorilla varustettu kannettava apukäynnistin Mobile Starthilfe mit Kompressor

Important!
Read the entire instruction manual carefully and make sure that you fully understand it before you use the equipment. Keep the manual for future reference.
Viktig information:
Original instructions
Bruksanvisning i original
Portable Jump Starter and Air Compressor
ART.NO 36-4023 MODEL RP8242
Please read the entire instruction manual before use and save it for future reference. We reserve the right for any errors in text or images and for making any necessary technical changes to this document. If you should have any questions concerning technical problems please contact our Customer Services.
1. Safety
Precautions before use:
- Read the instruction manual before using the jump starter.
- Disconnect the charger (19) from the ac power supply before connecting or disconnecting the battery clamps.
- Make sure that the cables are correctly connected to the battery before activating the jump starter.
- Use only the provided charger leads and battery clamps.
1.1 Safety instructions
This product may only be used for vehicles which have a 12 V electrical system.
Warning! Be very careful when working on or around lead-acid batteries. Follow all safety recommendations in the instruction manual in order to avoid fires, battery leakage, personal injury or property damage.
- Read through the entire instruction manual before use.
- Use only the supplied accessories and use the jump starter only according to the instructions given in this manual. Any deviations from these instructions can lead to personal injury.
1.2 Precautions during use
- This product must not be used by children or minors without the supervision of an adult who is extremely familiar with this product.
- The jump starter is intended for indoor use and should be protected from direct sunlight, rain or moisture.
• The starter may not be immersed in liquids or exposed to rain or spray. - Never use the starter near flammable liquids or gas. Sparks may be produced when connecting or disconnecting the starter.
- Be very careful when handling lead-acid batteries to avoid sparking at the terminals.
- Never carry the starter by the hose or battery cables. Always use the handle.
1.3 Precautions after use
- Store the jump starter in a dry, well-ventilated place and locked away or out of children's reach when not in use.
- When transporting the jump starter in your vehicle place it on the floor to avoid it from tipping or being thrown forward during hard braking.
• The jump starter must be protected from direct sunlight, rain and moisture.
1.4 Checks and inspection
- Make sure that all components such as power switch, leads, plugs, etc. are undamaged before use. If any functioning parts are damaged, they should be replaced by a qualified tradesman. Use only original replacement parts from the supplier.
- Never modify or disassemble the jump starter yourself. Repairs should always be carried out by qualified a tradesman using original spare parts; using the product otherwise could lead to personal injury.
1.5 Specific safety instructions for jump starter use
- Warning! Lead-acid batteries contain battery acid which is corrosive. If the battery acid comes into contact with skin or eyes, rinse the affected area immediately with water and seek medical attention.
- Wear protective eyewear and turn your face away when connecting the battery clamps.
-
Certain vehicles may have certain regulation regarding the use of a jump starter. Read the instruction manuals for the both the vehicle and battery and be attentive to all instructions highlighted with safety symbols.
-
Be very careful when handling lead-acid batteries to avoid sparking at the terminals. The battery can produce explosive gases during charge or when jump-starting. Therefore, it is important that these activities be carried out in a well-ventilated area.
- The starter may only be connected to vehicles with a 12 V lead-acid battery. Do not use the battery for dry batteries or other non-rechargeable batteries. They can explode and cause serious personal injury or property damage.
- Be careful to keep the red and black battery clamps apart so that they do not come into contact with each other, nor should they touch any metal object at the same time. This may damage the product and/or may cause sparks or an explosion. Always store the battery leads wound up and the battery clamps placed in their holders.
- Check your vehicle's polarity before connecting the jump starter leads. Make sure the battery's polarity markings are legible. Always connect the red, positive (+) clamp first and thereafter the black, negative (-) clamp.
- The jump starter's power switch should be in the OFF position during charging, when not in use, and when connecting the clamps to the battery.
- Make sure the starter is placed on an even surface during charging to prevent it tipping over or falling. Plan out your work before proceeding so that no clothing, hair, cables, etc. can get caught in any of the engines moving parts when it is started.
- This jump starter must not be used instead of a vehicle battery. Do not attempt to operate a vehicle that does not have a battery installed.
- Do not have the charger connected to the jump starter at the same time as the battery clamps are connected to the battery of the vehicle.
- If the battery clamps are connected to the wrong terminals, the red warning light "Rev. Polarity" will come on immediately.
1.6 Specific safety instructions for using the jump starter's air compressor
- Do not use the compressor whilst charging a battery.
• Never point the nozzle towards people or animals. - Never leave the compressor unattended, it can overheat if use for a long time and cause the thermal cut-out to trip. If the thermal cut-out has tripped the compressor must cool down for 30 minutes before it can be used.
- Use only the adapters and accessories that are provided with the product.
- The jump starter is not a toy. Do not let children play with it. The jump starter must only be used by adults who have read the instruction manual.
- The pressure gauge on the compressor is intended as a guide only. For accurate pressures, a separate, more precise pressure meter or tyre gauge should be used.
- Do not over-inflate. Inflate only to the manufacturer's recommendations. Exceeding the pressure rating could cause an item to explode and damage your hearing or frighten pets.
• The air from the compressor is not safe for breathing. - Make sure that the jump starter is placed on a level surface. Vibrations from the compressor can cause the starter to "walk" or tip over.
• High pressure air is dangerous, never direct air from the nozzle towards bare skin, eyes, people or animals.
1.7 Specific safety instructions for charging batteries
• Never attempt to dismantle a battery.
• Do not expose batteries to water.
- Do not store batteries in temperatures above 40 °C or below 0 °C, discharged batteries are damaged by temperatures below zero.
- Charge only at ambient temperatures between 10°C and 40°C .
• Use only the supplied charger to charge the battery in the jump starter.
- Warning! Lead-acid batteries contain battery acid which is corrosive. If the battery acid comes into contact with skin or eyes, rinse the affected area immediately with water and seek medical attention.
1.8 Charger
- The charger provided with the jump starter is designed for use with a specific voltage.
Make sure that the mains voltage supply corresponds to the voltage on the rating plate.
• Never try to recharge non-rechargeable batteries. - Never attempt to replace the charger plug with a regular mains plug.
Use only the supplied charger to charge the battery in the jump starter. - If the plugs or lead of the charger are damaged, they must be replaced by a tradesman using original spare parts.
- Battery charging must only take place in a well-ventilated area.
2. Product description
• Portable Jump Starter and Air Compressor.
- Easily starts cars, boats, vans or tractors with 12 V batteries without the help of another vehicle.
- Connects directly to the battery terminals.
• Sturdy construction with carrying handle.
• Integrated LED work light.
• Battery status indicator.
• Built-in spark, reversed hook-up and short-circuit protection.
• Delivers up to 450 A cranking power. Battery capacity: 17 Ah.
• Built-in air compressor with pressure gauge, for inflating tyres, etc.
• USB outlet for charging digital cameras, MP3 players, etc. (5 V, max. 500 mA).
3. Buttons and functions


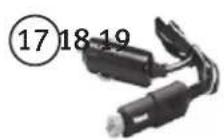


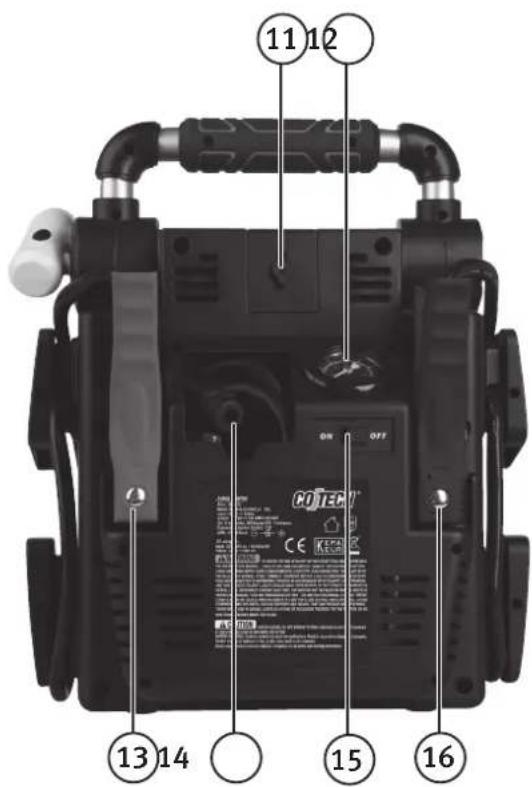
- USB power button
- USB port, 5 V DC (under protective cover)
- 12 V socket (cigarette socket) centre-positive (+) polarity (under protective cover)
- USB outlet power indicator
- Battery status LED indicators (low-high)
- Reverse polarity indicator
- Jump starter on/off switch
- LED work light on/off switch
-
LED work light, pivoting
-
Battery test button
- 12 V charger connection
- Air pressure gauge
- Red positive (+) battery clamp
- Air hose and car valve nozzle
- Air compressor on/off switch
- Black negative (-) battery clamp
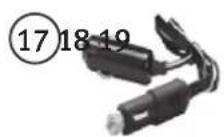
- 12 V adaptor for cigarette lighter socket
- Valve adaptor nozzles (3x)
- Mains charger, output 12 V, 500 mA (centre-positive)
4. Use
4.1 Charging the jump starter's battery
The jump starter has a built-in lead-acid battery (12 V, 17 Ah) that also need to be charged.
- When you buy the jump starter, the battery is not charged.
• The battery needs to be charged for 40 hours before it is used for the first time.
• Recharge the battery after every use, frequent deep discharges and/or over-charging will shorten the battery life. - The battery can be charged using the included AC-DC mains charger or the 12 V DC-12 V DC cigarette outlet adaptor.
- Lead-acid batteries require maintenance in order to function well for a long time. They discharge naturally over time (self-discharge), and must therefore be charged regularly even if the battery is not used. This is called maintenance charging. If the battery is seldom used, it only needs to be recharged every 60 days.
- Check the battery charge by pushing the test button (10); the LEDs indicate the level of charge. If all three LEDs light up the battery is fine, but if only the red LED lights up the battery needs charging.
- Switch off all other functions whilst charging the battery; otherwise it could take longer to charge.
Charging the jump starter battery using the included mains charger
- Plug the DC connector of the mains charger into the 12 V charger connection of the jump starter (11).
- Plug the mains charger into a wall socket. The jump starter battery will now begin to recharge.
-
Charge status indication:
-
One red LED lit: battery charge low (charging in progress).
- Two red LEDs lit: battery semi-charged (still charging).
- Two red LEDs lit and one green LED flashing: battery fully-charged (maintenance charging).
Continue charging for another two hours to ensure that the battery reaches maximum capacity.
- Stop charging by first unplugging the charger from the wall socket and then unplug the DC connector from the jump starter.
- Store the jump starter in a dry and well ventilated place.
This jump starter is double-insulated and does not need to be earthed.
This charger is intended for indoor use only.
Charging the jump starter battery using the included 12 V DC - 12 V DC adaptor
First check the battery status by pressing the battery test button. If the battery needs charging, do as follows:
- Plug the supplied car adaptor plug with the brass contacts into the cigarette lighter socket of your vehicle (the socket must be 12 V centre-positive).
- Plug the other end of the adaptor into the 12 V DC socket (3) under the cover. Leave the battery on charge for about 2 hours.
-
Disconnect the adaptor and press in the test button (10). If all three LEDs light, the battery is fully-charged, if not, continue charging for another two hours and test it again.
Note: The adaptor must be disconnected before the status is tested using the test button otherwise the status of the battery is not tested but rather the charging current of the adaptor. -
Stop charging by first unplugging the 12 V adaptor from the wall socket and then disconnect the other plug from the jump starter.
-
Store the jump starter in a dry and well ventilated place.
Note: Do not use this method of charging for longer than 6hrs at a time and do not leave the charger unattended.
Warning! Make sure that your vehicle is not in gear and that the handbrake is on before connecting the jump starter.
4.2 Before using the jump starter
Warning! Make sure that your vehicle is not in gear and that the handbrake is on before connecting the battery clamps to the battery.
Warning! Make sure that no cables or loose items can become caught in the moving parts of the engine when it starts.
4.3 Using the jump starter
-
Switch off all unnecessary electrical features on your vehicle such as radio, A/C, mobile phone charger, etc. before connecting the battery clamps. Read the section on "jump starting" in your vehicle instruction manual.
-
Check that the jump starter's on/off switch (7) is set to OFF.
-
Check which of the battery terminals is the positive and which is the negative. Some batteries have an insulating cover over the terminals which will need to be lifted so that you have access to the terminals.
Warning! Nowadays, most vehicles are negatively earthed, i.e. the negative terminal of the battery is connected to the chassis. However, certain vehicles may be positively earthed. It is important that you find out which type of earthing your vehicle's battery has. Consult a tradesman if you are uncertain.
- Connect the positive (red) battery clamp to the positive terminal (+) of the battery. Connect the negative (black) battery clamp to the negative terminal (-) of the battery or to a metal part of the vehicle chassis.
N.B. Certain makes of car have special jump start connections in the engine compartment if the battery is difficult to access. Check your vehicle's owner manual if you are unsure.
Warning! If the battery battery clamps are connected incorrectly, i.e. red to negative and black to positive, the reverse polarity indicator will light and a buzzer will sound until the incorrect lead has been removed.
- Turn the on-off switch (7) to ON.
- Turn the ignition key and try to start the vehicle for 3 to 6 seconds.
N.B. If the vehicle does not start, let the jump starter battery cool down for three minutes before the next attempt to start the vehicle is made. - When the vehicle's engine has started, turn the jump starter on/off switch (7) to OFF.
- First disconnect the black, negative clamp (16) from the negative terminal (-) of the battery or from a metal part of the vehicle chassis. Wind up the lead and place it back into the holder.
- Then remove the red positive (+) battery clamp (13) from the positive terminal (+) of the battery. Wind up the lead and return the battery clamp securely into its holder.
- Charge the jump starter's battery again as soon as possible.
5. USB port
- Press the power switch (1) to activate the USB port. The USB indicator light should come on.
- Lift the cover and connect the USB connector of the product you wish to power to the USB port (2).
- The USB port is only intended for charging MP3 players, digital cameras, etc. The outlet is not intended for any form of data communication (i.e. computers). The USB-port outputs 5 V DC, max 500 mA.
N.B. Not all USB products work with this port.
N.B. The USB port must not be activated during charging of the jump starter's battery or when the starter is put away for storage.
6. Using the jump starter as a 12 V power supply via the 12 V socket (cigarette lighter socket)
The jump starter can be used for a power supply for 12 V products with 12 V plugs. The socket produces 5 A max.
- Lift the cover.
- Connect the plug from your 12 V device to the socket (3). N.B. The max output for the device should be 5 A (60 W).
- Switch on the connected device.
- Press the "Test-button" (10) to check the battery's charge every now and then.
7. Integrated LED work light
The jump starter is equipped with an adjustable LED worklight (9). Press the light's power switch to turn the worklight on/off. Make sure the light is turned off when charging or when the starter is put away for storage.
8. Using the compressor
The jump starter has a built-in compressor which can be used for inflating tyres, footballs or small inflatable toys. The air hose (14) is stored in a compartment beside the pressure gauge. The compressor has its own on/off switch (15).
8.1 Inflating tyres or other products with valves
- Take out the hose (14) and press the hose nozzle securely onto the tyre valve as far as possible and press down on the locking mechanism with your thumb.
- Make sure that the hose nozzle is securely in place.
- Set the on/off switch (15) to ON to start the compressor.
- Check the air pressure using the pressure gauge.
- When desired pressure is reached, flip up the locking mechanism and remove the hose nozzle.
- Set the power switch to OFF to turn off the compressor.
- Let the compressor cool before storing the jump starter.
- Replace the hose back in its compartment.
N.B. If the jump starter battery is fully charged it will normally be good for pumping about 3 tyres before completely discharging.
8.2 Inflating items without a valve
3 extra adaptors (18) for the compressor's hose nozzle are included.
These can be used for pumping things like footballs, volleyballs, etc.
- Select the appropriate adaptor.
Take out the hose (14) and insert the valve adaptor as far into the hose nozzle as possible and press down on the locking mechanism with your thumb. - Make sure that the adaptor is securely in place.
- Connect the adaptor to the item to be pumped.
- Set the on/off switch (15) to ON to start the compressor.
- Check the air pressure using the pressure gauge. N.B. Small items such as footballs, volleyballs, etc. inflate very quickly. Be careful when inflating them.
- Flip up the locking mechanism and remove the hose nozzle.
- Set the power switch to OFF to turn off the compressor.
- Let the compressor cool before storing the jump starter.
- Replace the hose back in its compartment.
Warning! Read and follow 1.6 Specific safety instructions for using the jump starter's air compressor to minimise the risk for personal injury or property damage.
9. Care and maintenance
9.1 Cleaning and storage
- Turn off the charge function and close the 12 V DC socket cover. Place the plug securely in the charger connection (11), set the on/off switch (7) to OFF and wipe the product with a soft cloth and a little mild detergent if needed. Never use abrasive cleaning agents or solvents.
- Wipe the battery clamps, making sure that any battery acid or other remnants are removed from the clamps to minimise the risk of corrosion of the metallic parts.
• Make sure that no liquids penetrate the product. Do not use the jump starter if it is wet.
• Make sure the charger leads are loosely coiled during storage. They can be damaged if coiled too tightly.
9.2 Changing the 12 V DC - 12 V DC adaptor fuse
- Unscrew the ridged part of the plug to access the fuse while keeping track of the small components (centre pin, spring and rubber washer). N.B. All the small components must be replaced in exactly the same position otherwise the adaptor will not function.
- Replace the fuse only with one of the same rating (8 A/250 V, 6 × 32 mm).
10. Troubleshooting guide
I cannot jump start my vehicle.
• Make sure the switch (7) is in the ON position
- Press the Test button (10) to make sure that the jump starter is fully charged. Charge it if needed.
• Make sure the cables are correctly connected and with the correct polarity.
The USB port doesn't work.
• Make sure that the power switch (1) is pressed in and that the USB light is on.
- Press the Test button (10) to make sure that the jump starter is fully charged. Charge it if needed.
The LED worklight doesn't work.
- Press the power switch (8).
- Press the Test button (10) to make sure that the jump starter is fully charged. Charge it if needed.
Compressor does not inflate.
• Make sure the compressor power switch (15) is in the ON position.
- Make sure that the jump starter's battery is fully charged, charge it if necessary.
- Make sure that the car valve is pushed as far as possible into the air hose nozzle so that the locking lever can be lowered (when inflating tyres) and that the valve adaptor nozzles are inserted in the air hose nozzle (when inflating products without valves).
11. Disposal
Follow local ordinances when disposing of this product. If you are unsure of how to dispose of this product, please contact your municipality. Lead-acid (Pb) batteries can be recycled. They should not be disposed of like normal household waste.

12. Specifications
Charging current 450 A instantaneously, 300 A after 5 seconds
Battery Maintenance-free 12 V, 17 Ah sealed lead/acid battery
LED worklight 1 white LED with long operating life
USB port 5 V DC, 500 mA
12 V socket For cigarette lighter plug, max 5 A
Air compressor, max pressure 120 psi/8.28 bar
AC charger Power supply 220–240 V, 50 Hz
Size 340 × 280 × 195 mm
Weight 7.5 kg
- Strømbryter for usb-uttak
- Usb-uttak, 5 V DC (under lokket)
- 12 V-uttak (sigarettenneruttak) pluss i sentrum (under lokket)
- Indikatorlampe for aktivert usb-uttak
- Indikatorlampe for batteristatus (Lav til Høy)
- Indikatorlampe for feil polaritet
- Strømbryter for starchjelp
- Bryter for LED-lampe
-
LED-lampe
-
Trykknapp for batterikapasitet
- Tilkoblingspunkt for lader 12 V
- Manometer for kompressor
- Rød (positiv) batteriklemme
- Luftslange med tilkobling for ventil (bildekk)
- Strømbryter for kompressor
- Sort (negativ) batteriklemme
- 12 V ladingsadapter for sigarettenneruttak
- Adapter til pumpenippel (3 stk.)
- Lader12 V, 500 mA, pluss (+) i senter
4. Bruk


POSTAL 10 – 13 Market Place
Kingston Upon Thames
Surrey
KT1 1|Z
DEUTSCHLAND
- Portable jump starter and air compressor
- Safety
- 1.1 Safety instructions
- 1.2 Precautions during use
- 1.3 Precautions after use
- 1.4 Checks and inspection
- 1.5 Specific safety instructions for jump starter use
- 1.6 Specific safety instructions for using the jump starter's air compressor
- 1.7 Specific safety instructions for charging batteries
- 1.8 Charger
- Product description
- Buttons and functions
- Use
- 4.1 Charging the jump starter's battery
- Charging the jump starter battery using the included mains charger
- 4.2 Before using the jump starter
- 4.3 Using the jump starter
- Usb port
- Using the jump starter as a 12 V power supply via the 12 V socket (cigarette lighter socket)
- Integrated led work light
- Using the compressor
- 8.1 Inflating tyres or other products with valves
- 8.2 Inflating items without a valve
- Care and maintenance
- 9.1 Cleaning and storage
- 9.2 Changing the 12 V dc - 12 V dc adaptor fuse
- Troubleshooting guide
- I cannot jump start my vehicle
- The usb port doesn't work
- The led worklight doesn't work
- Compressor does not inflate
- Disposal
- Specifications
- Bruk
- Deutschland
Brand : Cotech
Model : RP8242
Category : Charger