
Nu Force BE6i - Headphones OPTOMA - Free user manual and instructions
Find the device manual for free Nu Force BE6i OPTOMA in PDF.


| Product Type | Bluetooth in-ear headphones |
| Brand | Optoma |
| Model | Nu Force BE6i |
| Connectivity | Bluetooth 4.0+EDR with aptX and AAC support |
| Bluetooth Profiles | HSP 1.2, HFP 1.6, A2DP 1.2, AVRCP 1.4 |
| Driver Type | Dynamic |
| Driver Size | 10 mm |
| Impedance | 20 Ohm |
| Frequency Response | 20 Hz - 20 kHz |
| Sensitivity | 95 dB ±3 dB at 1 kHz |
| Microphone Sensitivity | -42 dB |
| Cable Length | 550 mm (approx. 21.7 inches) |
| Battery Type | Lithium-ion, 3.7V, 120mAh |
| Battery Life | Up to 8 hours |
| Charging Time | Up to 2.5 hours |
| Range | Up to 10 m (33 ft) |
| Weight | 19 g |
| Included Accessories | Silicon ear tips (L/M/S, two types), Comply foam tips, stabilizers, cable loop, carry case, Micro-USB charging cable, manuals |
| Multipoint Connection | Yes (up to 2 devices) |
| Voice Prompts | Yes (English) |
Frequently Asked Questions - Nu Force BE6i OPTOMA
User questions about Nu Force BE6i OPTOMA
0 question about this device. Answer the ones you know or ask your own.
Ask a new question about this device
Download the instructions for your Headphones in PDF format for free! Find your manual Nu Force BE6i - OPTOMA and take your electronic device back in hand. On this page are published all the documents necessary for the use of your device. Nu Force BE6i by OPTOMA.
USER MANUAL Nu Force BE6i OPTOMA
Bluetooth in-ear headphones
natural_image
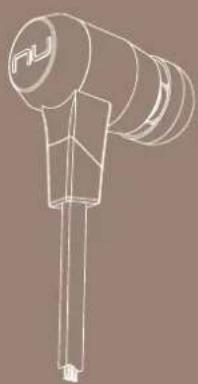
Line drawing of a handheld device with a cylindrical body and a vertical shaft (no text or symbols)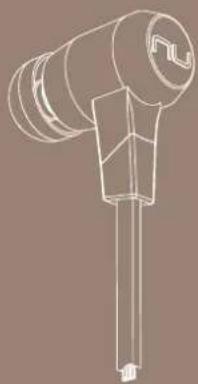
natural_image
Technical line drawing of a mechanical component with no visible text or symbolsContents
WHAT'S IN THE BOX
- BE6I EARPHONES
- THE BASICS
Charging your BE6i
Checking ba ery level
Bluetooth pairing
Power On/ Power O
Wearing your BE6i
Handling phone calls
Listening to music
Pairing with a laptop
Pairing with a Mac
- MISCELLANEOUS
Mul point connec ons
Restoring factory se ngs
Voice prompts list
Disclaimer
FCC Interference statement
Speci ca on
WHAT'S IN THE BOX
| BE6i earphones (with inline controller and microphone) |  |
| Silicon ps (in L/M/S)2 types of silicon psTotal of 12 silicon ear ps |  |
| Comply ps (two pairs in L/M)* |  |
| Stabilizers (1 pair) |  |
| Cable loop for adjus ng the length of cable | [2871] |
| Carry case |  |
| Charging cable (Micro-USB) |  |
| Basic user's manual |  |
| Safety Instruc on |  |
*For replacement or additional ear ps www.complyfoam.com.
BE6i EARPHONES

- Volume Up Bu on
- Power/Func on Bu on
- Volume Down Bu on
- LED Indicator
- Charging port
- Microphone
The BASICS
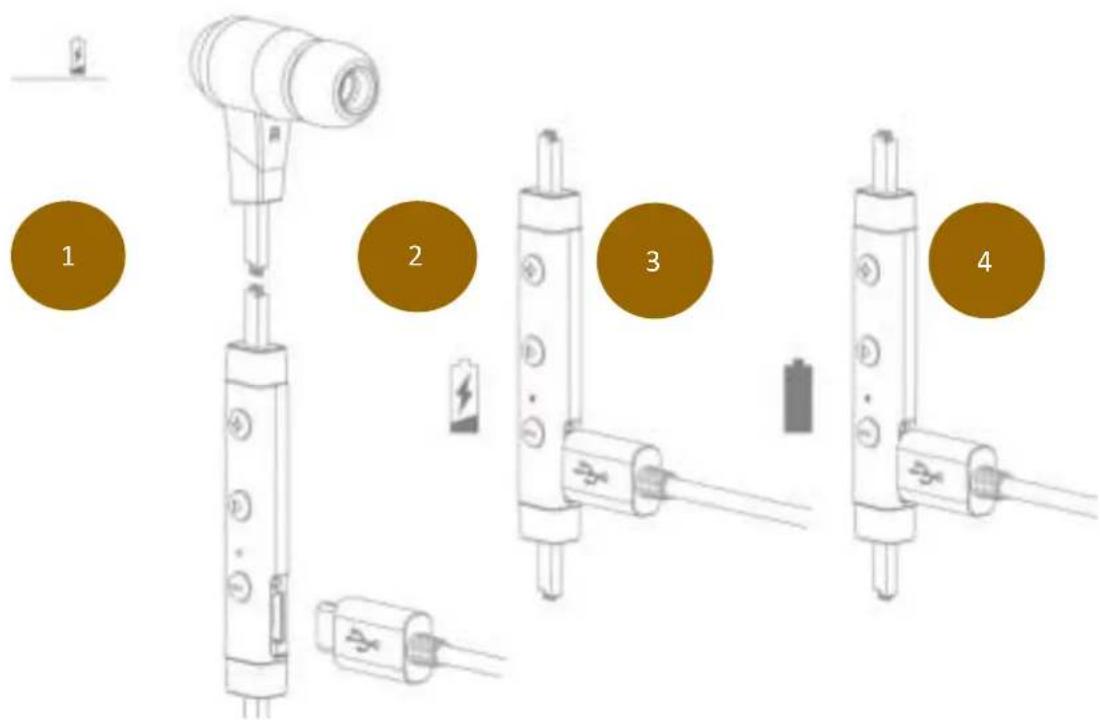
Charging Your BE6i
Although your BE6i in-ear headphones come with a par ally charged ba ery, it is recommended that you fully charge your BE6i before rst use.
- Open the charge port cover on the controller.
- The charge cable should be connected to the charge port and either to a PC or a dedicated USB charger.
- When charging, the LED indicator is red.
- LED Indicator turns blue once charging is complete.
NOTE: It takes up to 2.5 hours to fully charge the BE6i.
Checking Ba ery Level
You can check the ba ery level of your BE6i with the LED indicator *
To check ba ery level:
-
Press the Power/Func on, volume up, and volume down but ons simultaneously.
-
The LED indicator will ash red and blue simultaneously. The ba ery level will be indicated by the number of ashes, as described in the table below:
Number of Flashes Ba ery Level
| Number of ashes | Voice prompts(enable) |
| 2 | Ba ery low |
| 3 | Ba ery at 50% |
| 5 | Full ba ery |
NOTE: When the ba ery level is very low, you will hear a beep or a "Battery Low" voice prompt from your BE6i every 2 minutes when the es mated ba ery reserve remaining me is under 15minutes.
IN ADDITION:
-
When the Voice prompts are switched o you will hear a beeping sound (A short double tone) every two minutes.
-
Users with iOS devices and some Android models will be able to view the ba ery status on their device's display
*On some Android and all Windows operated devices you cannot check the ba ery level for your BE6i when you listen to music, in the middle of a phone call or in pairing mode.
Bluetooth Pairing
flowchart
graph TD
    A["1"] --> B["2"]
    B --> C["..."]
    D["1"] --> E["3"]
    E --> F["..."]
    G["1"] --> H["3"]
    H --> I["..."]
Using your BE6i for rst me
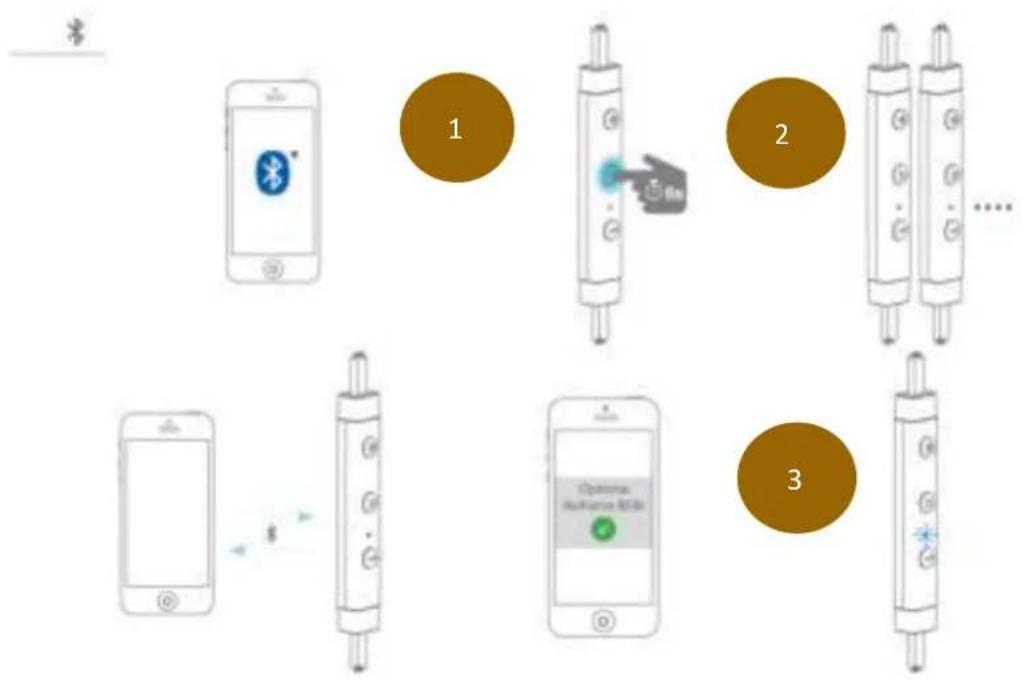
Pairing BE6i with source device
- Press and hold the BE6i's Power/Func on button for 6 seconds un I the LED indicator light ashes blue/red. Your BE6i is now in pairing mode.
- Turn on Bluetooth® on your source device, then select "Optoma NuForce BE6i" once it appears on the device list.
NOTE: Consult your source device's user manual for instructions on ac va ng Bluetooth.
- Once successfully paired, the LED indicator will ash blue and you hear "Primary device connected" (when voice prompt enabled) from your BE6i, or a beep if voice prompt is not enabled.
Please note:
A. You must always enter "Pair" mode from a powered-o state. Otherwise, pushing the Power/Func on bu on for more than 3 seconds from a powered-on state turns the BE6i o .
B. If le inac ve in pairing mode, your BE6i will automa cally power
o a er 3 minutes.
C. Your BE6i can store pairing informa on for up to eight devices. To pair additional devices to your BE6i ensure that your BE6i is not concurrently connected to any device, then repeat the steps 1,2,3 outlined above. In case where your BE6i have already stored pairing informa on for eight devices and a ninth device is paired, the stored informa on for the very rst device will be deleted.
Power On/Power O
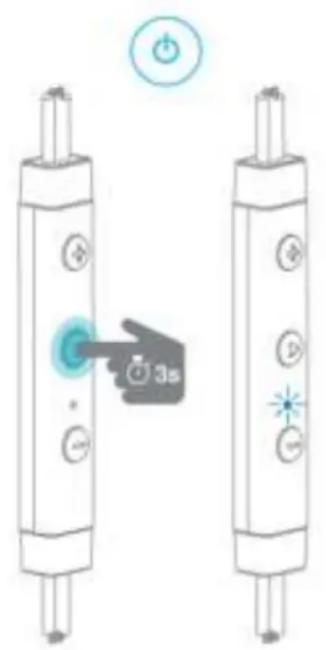

To power on your BE6i, press Power/Func on bu on for about 3 seconds un I the LED indicator ashes blue and you hear the "Power on" when voice prompt is ac vated or a beep if the voice prompt is not used.
NOTE:
Once you have successfully paired the BE6i to a Bluetooth-enabled device, the BE6i will automa cally connect with that device once it is powered on again. For more informa on check “Bluetooth Pairing” sec on.
If you have stored pairing informa on for mul ple devices and more than one of those devices is Bluetooth enabled, the BE6i will automa cally connect with the most recently paired device and will also enable mul point connec on.
For more informa on read sec on "Multipoint Connections".
To turn the BE6i to OFF, push Power/Func on button for about 3 seconds un I the LED indicator turns red and you hear the “Power o ” ” when voice prompt be ac vated or a beep if the voice prompt is not used.
Wearing Your BE6i
flowchart
graph TD
    A["Circle Component"] --> B["Part with Ring"]
    B --> C["Component with Ring"]
    C --> D["Final Product with R Markers"]
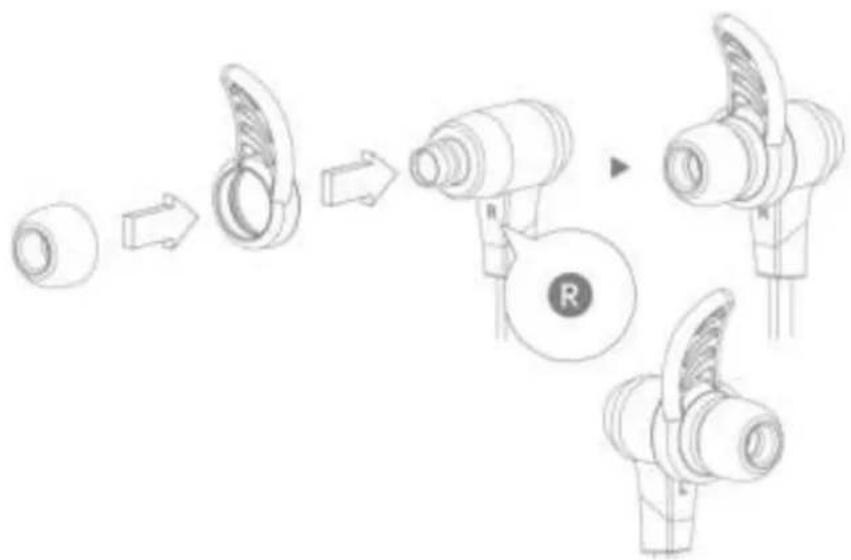
To ensure a secure and comfortable t when wearing your BE6i:
-
Install the stabilizers on the BE6i.
-
Select right size of ear ps and install ps on BE6i.
-
Rotate the stabilizers and place the BE6i into each ear so that they are posi oned comfortably.
Magne c caps at the end of the earphones let users click the earphones together and secure them around user's neck for ease of use.
Handling Phone Calls
When your BE6i are connected to a Bluetooth-enabled smartphone you can handle your phone calls directly using your BE6i in ear headphones.
The followings describe phone call op ons:
| Call op on | Status | Ac on |
| Answer a call | Incoming call | Tap the Power/Func on bu on |
| Decline a call | Incoming call | Press the Power/Func on bu on for 2 seconds |
| End a call | In a call/outgoing call | Tap the Power/Func on bu on |
| Redial the last number | Standby/connected | Double tap the Power/Func on bu on |
| Mute on or mute o microphone | In a call/outgoing call | Tap the Volume Up and Volume Down simultaneously |
| Switching handset/earphone voice | In a call | Press the Volume Up and Volume Down bu ons simultaneously for 2 seconds |
| Adjust the volume | Tap the Volume Up or Volume Down bu on | |
| Ac vate Siri (iOS) or Google Voice Search (Android) | Standby/Connected | Tap the Power/Func on and Volume Up bu ons simultaneously |
Listening to Music
You can enjoy and control Audio through the in line controller on your BE6i.
| Audio op on | Ac on |
| Play or pause audio | Tap the Power/Func on bu on |
| Skip to next track | Press the Volume Up bu on for 2 seconds |
| Play previous track | Press the Volume Down bu on for 2 seconds |
| Adjust the volume | Tap the volume up or volume down bu on |
*Please note: when mu ng the BE6i or reac va ng it from MUTE there will be a very slight delay
Pairing with a Laptop
The connec on instruc ons below apply to owners of Windows 7, 8, 8.1 and 10.
- Power your PC/Laptop
- Find "Bluetooth Settings"
- Switch your laptop Bluetooth to "On"
-
Turn the BE6i to "Pairing Mode"
-
When the BE6i is discovered by your laptop left click on "Pair"
-
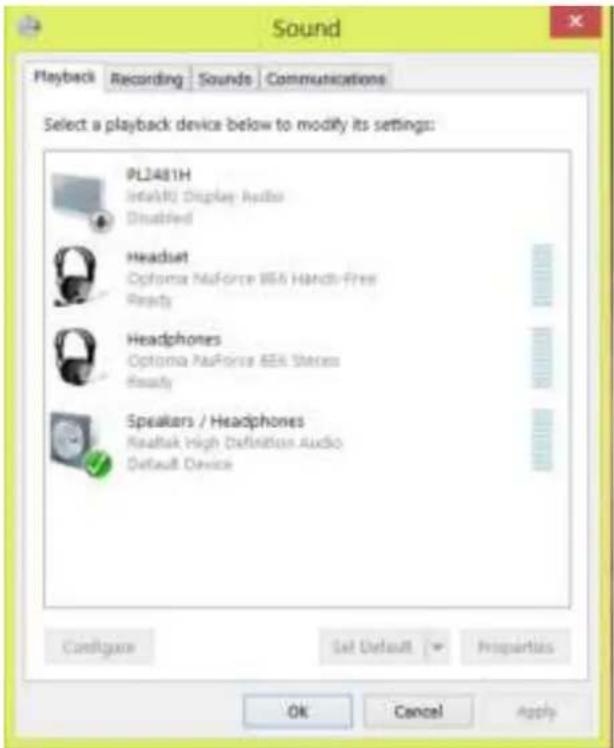
Right click on the speaker symbol at the bottom right side of the screen
-
From the dropdown menu right click on the "Playback Device"
-
Please choose and right click the "Optoma NuForce BE6i stereo ready" (see image below text)
-
Click on HEADPHONES to set the "Headphones Optoma NuForce BE6i" as default device
-
Press OK
Pairing with a Mac
The connec on instruc ons below apply to owners of all current and recent iOS versions
- Power your Mac
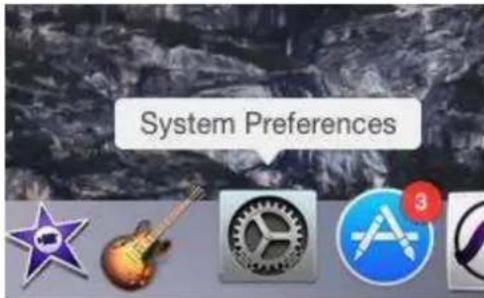
- Open "System Preferences"
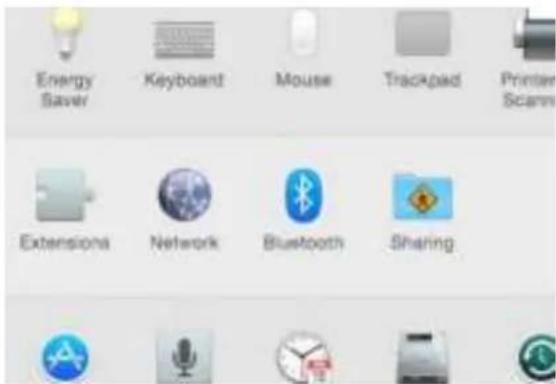
- Click on the Bluetooth symbol
- Turn the Optoma NuForce BE6i to "Pairing Mode"
- When the Optoma NuForce BE6i is discovered by your Mac click on "Pair"
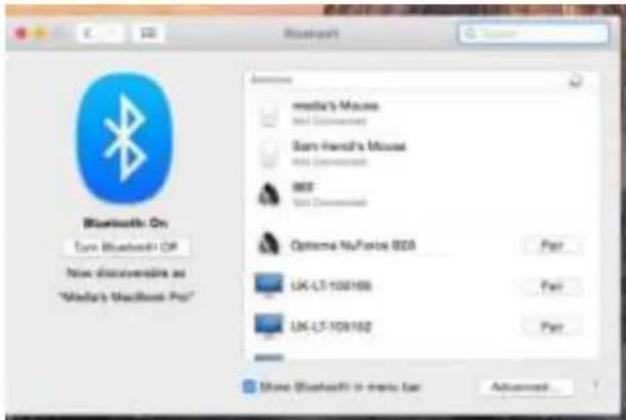
- Your Mac is now ready to play audio via the BE6i
MISCELLANEOUS
Mul point Connec ons
If you have stored pairing informa on for mul ple devices and more than one of those devices have Bluetooth enabled at the same me, your BE6i will enable mul point connec on.
Mul point connec on allows your BE6i to hold connec ons with two devices at the same me while playing audio signal from only one of the two devices.
Mul point connec on works in the following ways:
- Your BE6i automa cally connects with the most recently paired device ("Primary device").
- You must manually connect the second device ("Secondary device") to your BE6i via its operating system.
- The BE6i will priori ze the audio from Primary device.
- You can control Primary device using the BE6i in line controller.
- When Primary device is idle, your BE6i can receive audio from Secondary device.
- Secondary device must be controlled directly from its operating system.
- Simultaneous audio from both devices is disabled.
Restore Factory Se ngs
When you restore the BE6i to its factory se ngs, the paired devices stored will be deleted.
To restore factory se ngs:
1 Ensure that your BE6i are not connected to any device.
2 Put the BE6i in pairing mode.
3 Press simultaneously the Power/Func on, Volume Up, and Volume Down bu ons for 2 seconds un I the LED indicator ashes red ve mes and you hear ve short tones from the BE6i.
Because all pairing informa on is deleted a er restoring factory se ngs, the BE6i will directly enter pairing mode once powered on.
Voice Prompts list
The BE6i are pre-loaded with English voice prompts
"Power On"
"Power O "
"Full Ba ery"
"Ba ery at 50%"
"Ba ery Low"
"Primary device connected"
"Secondary device connected"
"Device disconnected"
"Mute On"
"Mute O"
"Pairing Mode Ac vated"
"Redial Last Number"
"Transfer Audio"
"Voice Dial"
"Voice Prompts Enabled"
| Audio op on | Ac on |
| Ac vate voice prompts | Press the Power/Func on and Volume Up bu ons simultaneously for 2 seconds |
| Turn o voice prompt | Press the Power/Func on and Volume Down bu ons simultaneously for 2 seconds |
Disclaimer
Please be advised, the BE6i is equipped with the latest technology however func onality may vary by device.
Federal Communica on Commission Interference
Statement
This equipment has been tested and found to comply with the limits for a Class B digital device, pursuant to Part 15 of the FCC Rules. These limits are designed to provide reasonable protec on against harmful interference in a residential installation.
This equipment generates, uses and can radiate radio frequency energy and, if not installed and used in accordance with the instruc ons, may cause harmful interference to radio communica ons. However, there is no guarantee that interference will not occur in a par cular installa on. If this equipment does cause harmful interference to radio or television recep on, which can be determined by turning the equipment o and on, the user is encouraged to try to correct the interference by one of the following measures:
. Reorient or relocate the receiving antenna.
. Increase the separa on between the equipment and receiver.
. Connect the equipment into an outlet on a circuit different from that to which the receiver is connected.
. Consult the dealer or an experienced radio/TV technician for help.
FCC Cau on: To assure con nued compliance, any changes or modi ca ons not expressly approved by the party responsible for compliance could void the user's authority to operate this equipment. (Example - use only shielded interface cables when connec ng to computer or peripheral devices).
FCC Radia on Exposure Statement
This equipment complies with FCC RF radia on exposure limits set forth for an uncontrolled environment. This equipment should be installed and operated with a minimum distance of 0.5 cen meters (.20 of an Inch) between the radiator and your body.
This transmi er must not be co-located or opera ng in conjunc on with any other antenna or transmi er.
The antennas used for this transmi er must be installed to provide a separa on distance of at least 0.5 cen meters (.20 of an Inch) from all persons and must not be co-located or opera ng in conjunc on with any other antenna or transmi er.
This device complies with Part 15 of the FCC Rules. Opera on is subject to the following two conditions:
(1) This device may not cause harmful interference, and (2) This device must accept any interference received, including interference that may cause undesired opera on.
Speci ca on
| Connec on type | Bluetooth 2.4Ghz | |
| Bluetooth type | V4.0+EDR Compliant | |
| Bluetooth pro le | HSP 1.2, HFP 1.6, A2DP 1.2, AVRCP 1.4 , aptX, AAC | |
| Codec | SBC, aptX, AAC | |
| Cable length | 550 | mm |
| Driver Type | Dynamic | |
| Driver size | 10 | mm |
| Impedance | 20 | Ohm |
| Ba ery life (es mated) | Up to 8 hours | |
| Ba ery type | Lithium-ion ba ery, Cylindrical Type, Typical3.7V/120mAh | |
| Microphone sensi vity | -42dB | |
| Frequency response | 20Hz - 20kHz | |
| Sensi vity | 95dB +/-3dB at 1KHz | |
| power consump on | 15mA at A2DP mode, speaker output 75dB SPL | |
| Range | Up to 10m | |
| Weight | 19 | Grams |


Optoma

- Contents
- BE6i EARPHONES
- The BASICS
- Charging Your BE6i
- Checking Ba ery Level
- To check ba ery level:
- IN ADDITION:
- Bluetooth Pairing
- Using your BE6i for rst me
- Power On/Power O
- NOTE:
- Wearing Your BE6i
- Handling Phone Calls
- Listening to Music
- Pairing with a Laptop
- Pairing with a Mac
- MISCELLANEOUS
- Mul point Connec ons
- Restore Factory Se ngs
- Voice Prompts list
- Disclaimer
- Federal Communica on Commission Interference
- Statement
- FCC Radia on Exposure Statement
- Speci ca on
- Optoma
Brand : OPTOMA
Model : Nu Force BE6i
Category : Headphones