Twin 9.6 - Walkie-talkie Intelbras - Free user manual and instructions
Find the device manual for free Twin 9.6 Intelbras in PDF.


| Product Type | Talkie Walkie |
| Brand | Intelbras |
| Model | Twin 9.6 |
| Channels | 14 FRS (462.5625 - 467.7125 MHz) |
| Subcodes | 99 (38 CTCSS + 61 DCS) |
| Operating Frequency | UHF 462.5625 - 467.7125 MHz |
| Power Source | NiMH battery pack or 4 AAA alkaline batteries |
| Battery Life | 12 hours typical (90% standby, 5% talk, 5% receive) |
| Output Power | Maximum 500 mW |
| Display | Backlit LCD with channel, code, battery level, and icons |
| VOX | Yes, with 5 sensitivity levels (OFF, 1-5) |
| Call Tones | 5 selectable call tones |
| Channel Sweep | Yes, scans all 14 channels |
| Keypad Lock | Yes, with ON/OFF setting |
| Monitor Mode | Yes, momentary and continuous |
| Roger Beep | Yes, can be enabled/disabled |
| Charger | Table charger with LED indicator, 9~11V DC input |
| Headset Jack | Yes, 2.5mm (optional headset) |
| Warranty | 1 year (3 months legal + 9 months contractual) |
| Care | Clean with dry cloth; remove batteries for long storage; keep away from pacemakers |
Frequently Asked Questions - Twin 9.6 Intelbras
User questions about Twin 9.6 Intelbras
0 question about this device. Answer the ones you know or ask your own.
Ask a new question about this device
Download the instructions for your Walkie-talkie in PDF format for free! Find your manual Twin 9.6 - Intelbras and take your electronic device back in hand. On this page are published all the documents necessary for the use of your device. Twin 9.6 by Intelbras.
USER MANUAL Twin 9.6 Intelbras
Care and safety....17
Installing the battery 17
Battery charge level and low battery alarm 17
Using the table charger....17
Using the radio 18
Technical specifications.... 19
Warranty terms 20
intelbras twin
Radiocomunicador
Modelo Twin 9,6
• 14 FRS Channels
- Battery chargers
• 99 codes (38 CTCSS / 61 DCS)
- Battery indicator
• Channel monitoring
- Internal VOX circuit
- Channel sweep
• 5 Selectable call tones - Keypad lock
-
Backlit display
-
Keypad with beep
- Optional headset
- Headset jack
• Roger Beep
Product
Radio
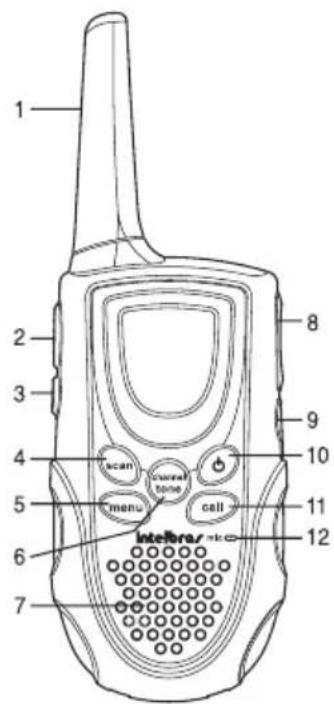
- Antenna
- PTT key
- Monitor key
- Scan key (sweep)
- Menu key
- Channel Tone key
- Speakers
- Increase/Decrease key (volume and channel)
- Phone/microphone jack
- ON/OFF key
- Call key
- Microphone
Display
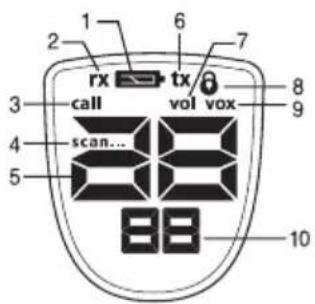
- Battery indicator
- Reception indicator
- Call indicator
- Scan indicator
- Channel indicator
- Transmission indicator
- Volume adjust indicator
- Keypad lock indicator
- VOX indicator
- Sub code indicator
Charger
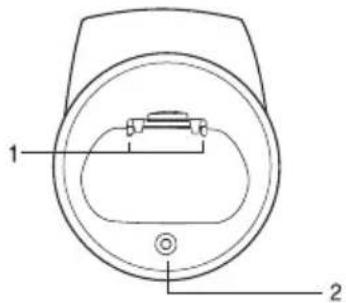
-
Battery charge terminal
-
LED charge indicator
Care and safety
• Never open your radio.
- Never change or substitute any part in your radio except the batteries.
- Your radio can cause interference in TV or radios even when appropriately operated. Switch it off to determine if your radio is the cause of interference. If interference stops, your radio is the cause.
- Only use a dry and clean cloth to clean the radio. If the radio is exposed to moist, immediately switch it off and remove the batteries. Clean the battery compartment with a dry cloth to avoid damage by water. Next, immediately take the device to an authorized technical assistance.
- If the radio is to be kept for long periods of time, remove the batteries because they corrode with time and can damage your radio.
• The people who use pacing device should:
• Always keep the radio at a distance of over 15 cm from the pacing device when the radio is switched on.
• Do not carry the radio in the shirt pocket.
- Use the ear opposite the pacing device to reduce interference potential.
- Immediately switch off the radio when there is suspicion of interference.
- The batteries should be handed to Intelbras authorized technical assistance or another point of collection at the end of its life cycle for appropriate disposal.
- For being a Radiocommunication Equipment of general use, the equipment user, at any time or in any channel, should give priority to the emergency communication messages related to life safety.
Installing the battery
- Ensure that the radio is switched off;
- Remove the battery compartment door by pressing the tab at the bottom of the compartment door, and remove the cover;
- Install the battery kit in the compartment. The battery should stay with the contacts out and downwards;
- Replace the battery compartment door;
Note: always ensure that the battery is totally uncharged before recharging it to prolong its life.
Battery charge level and low battery alarm
This radio has a battery level meter on the display to indicate its status. When the battery is low, the 📄 icon will blink. Recharge the battery immediately or, if you are using alkaline batteries, substitute to continue using the radio.
Using the table charger
Ensure that the radios are switched off before charging so that the battery meter indicates correctly;
- Connect the AC/DC converter in the DC IN 9\~11 V jack and in a 110/220 VAC plug;
- Place the chargers on the flat surface and insert the radios with the keypad facing forward;
- Ensure that the charge indicator comes on. Charge the batteries for 16 hours and remove the radios from the chargers after charging.
Attention: do not place radios on the charger when using alkaline batteries.
Using the radio
Switching on the radio and adjusting the volume
- Press and hold the ⬆ key to switch on the radio and increase the volume by pressing the ▲ key. Press the ▼ key to reduce the volume;
- Press and hold the ⏻ key again to switch off the radio.
Adjusting the key tone (beeps)
Your radio emits a beep every time one of the keys is pressed (except the PTT and CALL key). To disable this tone press and hold the CALL key while the radio is switched on. Repeat this procedure to enable the key tone.
Browsing through the menu
Use the Menu function to access the radio facilities.
- Press the MENU key to enter Menu.
- Repeatedly pressing this key, you will proceed through the menu until you return to the Normal operating mode.
Choosing a channel
Your radio has 14 channels and 99 CTCSS/DCS codes that you can use to talk to other people. To talk to someone, both should choose the same channel and CTCSS/DCS code.
To chose a channel
With the radio in Normal mode, press the CHANNEL TONE key and next press the ▲ or ▼key to choose the channel number, which will be shown on the display.
Reach in open area
The FRS channels (1 to 14) have a reach expectation of up to 9.6 km.
Note: the radio reach can vary depending on the environment and/or topographic conditions.
Choosing a CTCSS code
Each of the 1 to 14 channels can have any of the selected codes (OFF or 1 to 99). The oF (OFF) code indicates that no CTCSS/DCS code is selected. Your radio can only receive a signal that has the same code selected in transmission.
- Press CHANNEL TONE twice. The CTCSS/DCS code will blink;
- Press the ▲ or ▼key to select the desired code number. You can also select oF (OFF) in this stage;
- Exit menu.
Talking on your radio
To talk with another person using the radio:
- Press the PTT key and talk normally at a distance of 5 to 7 cm from the microphone. While you are transmitting, the tx icon will appear on the display. To avoid the cut of the first part of your transmission, wait a little after pressing the PTT key and then start to talk.
- When you are ending your talk, release the PTT key. Now you can hear the other person with whom you are talking to. When in reception the RX icon will appear on the display.
Voice activated transmission (VOX)
Your radio is equipped with a system that can be selected by the voice activated transmitter (VOX) user that can be used in automatic voice transmission. The VOX facility was designed for use with an earphone and microphone (headset). The transmission is initiated with the user speaks into the microphone instead of pressing the PTT key.
To select the VOX level
- Enter Menu. Move through the menu until the vox icon is shown on the display. The current level will be shown (OFF or 1-5). The oF (OFF) level deactivates the VOX while 1-5 adjusts the microphone sensitivity.
- Press the ▲ or ▼ keys to choose the desired sensitivity. Use level 1 to increase the voice sensitivity in silent environments and use a higher level to prevent undesired activation in noisy environments.
Transmitting a call tone
Your Twin radio is equipped with 5 selectable call tones that will be transmitted when the call key is pressed.
To select a call tone
- Enter Menu. Proceed until the call icon is shown on the display. The current call tone (1 to 5) will be shown.
- Press the ▲ or ▼keys to select the desired call tone number. Each tone will be heard through the speaker.
3. Exit Menu.
Press the CALL key to transmit the selected call tone. The selected tone will be transmitted during a fixed time interval. The call tone will be canceled when the PTT key is pressed.
Channel sweep
The radio has a channel sweep system that allows searching for all the 14 channels. When an active channel is detected the radio stops the search and stops on this channel while there is a signal. After two seconds the radio will continue to sweep.
Note: if you press the PTT key while the radio remains on the detected channel, you will transmit on this channel.
To enable channel sweep
Press the SCAN key and the scan icon will show-up on the display. The channel numbers shown on the display will change as the radio searches through the channels.
To disable channel sweep
Press the SCAN or PTT key.
Keypad lock
To lock
-
Enter Menu and proceed until the icon appears. The current status of the oF (OFF) lock will blink;
-
To lock, select ON through the ▲ key;
-
To confirm press the MENU key. The radio will return to Normal mode;
Note: if you exit Menu before confirming the selection through the MENU key the keypad lock will remain disabled.
To unlock the keypad
-
Press and hold the ⏻ key to switch the radio off;
-
Press and hold the ⏻ key again to switch the radio on.
Automatic low consumption
The radio has an exclusive system that extends the battery life. If there is no transmission and no call received in a space of three seconds, your radio will switch to automatic low consumption mode. In this mode, the radio will still be able to receive calls.
Display lighting
The display lighting is automatically turned on when any key (except the PTT key) is operated. The display will remain lit for 10 seconds.
Monitor mode
It allows you to hear weak signals in the current channel on pressing a key.
To enable Monitor mode
-
Press MON for immediate listening. The rx icon will blink.
-
Press and hold MON for 2 seconds for continuous listening. The reception circuit will remain open allow the hearing of weak signs with the noise.
To disable Monitor mode
Press MON to return to Normal mode. The rx icon will no longer blink.
Roger Beep
Roger Beep is a beep that is sent to notify the end of a transmission (PTT or VOX). Roger Beep can be heard through the speaker when the key tone is enabled. When the key tone is disabled, the Roger Beep will not be heard but it will be transmitted.
To enable Roger Beep
Press and hold the ▲ key while switching the radio on.
To disable Roger Beep
Press and hold the ▲ key while the radio switching on.
Technical specifications
| Channels 14 FRS | |
| Sub codes | CTCSS: 1 a 38DSC: 39 a 99 |
| Operation frequency UHF | 462,5625 to 467,7125 MHz |
| Power source NiMH Battery Pack or 4 AAA alkaline batteries | |
| Battery life | 12 hours typical for alkaline battery use12 hours typical for NiMH battery pack use |
| Output power Maximum of 500 mW | |
Note: the battery life is defined as 90% of the waiting time (rest), 5% of the conversation time and 5% of the reception time.
| Frequency tableChannel Frequency Channel Frequency Channel Frequency | |||||
| 1 | 462.5825 | 5 | 462.6625 | 10 | 467.6125 |
| 2 | 462.5875 | 6 | 462.6875 | 11 | 467.6375 |
| 3 | 462.6125 | 7 | 462.7125 | 12 | 467.6625 |
| 4 | 462.6375 | 8 | 467.5625 | 13 | 467.6875 |
| 9 4 67.5875 14 467.7125 | |||||
| CTCSS (Hz) code table | |||||||||||||
| Cod. | Freq. | Cod. | Freq. | Cod. | Freq. | Cod. | Freq. | Cod. | Freq. | Cod. | Freq. | Cod. | Freq. |
| oF | OFF | 6 | 82.5 | 12 | 100.00 | 18 | 123.0 | 24 | 151.4 | 30 | 186.2 | 36 | 233.6 |
| 1 | 67.0 | 7 | 85.4 | 13 | 103.5 | 19 | 127.3 | 25 | 156.7 | 31 | 192.8 | 37 | 241.8 |
| 2 | 71.9 | 8 | 88.5 | 14 | 107.2 | 20 | 131.8 | 26 | 162.2 | 32 | 203.5 | 38 | 250.3 |
| 3 | 74.4 | 9 | 91.5 | 15 | 110.2 | 21 | 136.5 | 27 | 167.9 | 33 | 210.7 | ||
| 4 | 77.0 | 10 | 94.8 | 16 | 114.8 | 22 | 141.3 | 28 | 173.8 | 34 | 218.1 | ||
| 5 | 79.7 | 11 | 97.4 | 17 | 118.8 | 23 | 146.2 | 29 | 179.9 | 35 | 225.7 | ||
| DCS code table | |||||||||||
| SubCod. N° | Cod. Octal | SubCod. N° | Cod. Octal | SubCod. N° | Cod. Octal | SubCod. N° | Cod. Octal | SubCod. N° | Cod. Octal | SubCod. N° | Cod. Octal |
| 39 | 023 | 49 | 071 | 59 | 134 | 69 | 223 | 79 | 306 | 89 | 411 |
| 40 | 025 | 50 | 072 | 60 | 143 | 70 | 226 | 80 | 311 | 90 | 412 |
| 41 | 026 | 51 | 073 | 61 | 152 | 71 | 243 | 81 | 315 | 91 | 413 |
| 42 | 031 | 52 | 074 | 62 | 155 | 72 | 244 | 82 | 331 | 92 | 423 |
| 43 | 032 | 53 | 114 | 63 | 156 | 73 | 245 | 83 | 343 | 93 | 431 |
| 44 | 043 | 54 | 115 | 64 | 162 | 74 | 251 | 84 | 346 | 94 | 432 |
| 45 | 047 | 55 | 116 | 65 | 165 | 75 | 261 | 85 | 351 | 95 | 445 |
| 46 | 051 | 56 | 125 | 66 | 172 | 76 | 263 | 86 | 364 | 96 | 464 |
| 47 | 054 | 57 | 131 | 67 | 174 | 77 | 265 | 87 | 365 | 97 | 465 |
| 48 | 065 | 58 | 132 | 68 | 205 | 78 | 271 | 88 | 371 | 98 | 466 |
| 99 | 503 | ||||||||||
Warranty terms
For your comfort, fill out the data below, for only with the presentation of this together with the receipt of purchase of the product, you will be able to use the benefits of this warranty.
Name of customer: Customer signature:
Invoice Number: Date of Purchase:
Model:
Reseller:
Serial
Number:
It is expressed that this contractual warranty is conferred by the following conditions:
- All the parts, pieces and components of this product, except headphone, are guaranteed against eventual production defects that may appear, during a period of 1 (one) year, this period of 3 (three) months is a legal warranty and another 9 (nine) months of contractual warranty, counting from the date of the delivery of the product to the consumer, as it stated on the purchase receipt of the product, which is an integral part of this Term throughout the country. This contractual warranty implicates in the free substitution of the parts, pieces and components that have production defects, besides the labor used in that repair. If there is no production defect verified, but defects from incorrect use, the consumer will pay for these expenses.
- When the defect is verified, the Consumer should immediately communicate with the closest Authorized Service Center which is in the list supplied by the manufacturer - only these are authorized to examine and to repair the defect during the guarantee period here foreseen. If this is not respected this warranty will lose its validity, because the product will have been violated.
- In the eventuality that the Consumer requests a home visit he should contact the nearest service center to verify the cost of a technical visit. If it is necessary to remove the product, the resulting expenses, transportation and insurance of the product are under the responsibility of the consumer.
- The warranty will lose its validity if any of the following possibilities occur: a) if the defect was caused by the consumer or third parties, and not because of the manufacturer b) if damage to the product originating from accidents, sinister, agents of nature (rays, floods, collapses, etc.), humidity, tension in the electrical network (overloads provoked by accidents or excessive variation on the network), installation/use not in accordance with the User's Manual or due to natural wear and tear of the parts, pieces and components; c) if the product has suffered from chemical, electromagnetic, electric or animal attacks (insects, etc.); d) if the serial number of the product has been adulterated or deleted; e) if the device has been violated.
Being these conditions of this complementary Term of Warranty stated, Intelbras S/A reserves the right to alter the general technical and aesthetic characteristics of its products without previous notice.
The process of fabrication of this prodcut is not covered by Intelbras environmental management system.
All images featured in this manual are for illustration purposes.

intelbras
SUPORTE A CLIENTES
For information, suggestions, complaints and assistance:
soporte@intelbras.com
- INTELBRAS TWIN
- PRODUCT
- CHARGER
- CARE AND SAFETY
- INSTALLING THE BATTERY
- BATTERY CHARGE LEVEL AND LOW BATTERY ALARM
- USING THE TABLE CHARGER
- USING THE RADIO
- SWITCHING ON THE RADIO AND ADJUSTING THE VOLUME
- ADJUSTING THE KEY TONE (BEEPS)
- BROWSING THROUGH THE MENU
- CHOOSING A CHANNEL
- TO CHOSE A CHANNEL
- REACH IN OPEN AREA
- CHOOSING A CTCSS CODE
- TALKING ON YOUR RADIO
- VOICE ACTIVATED TRANSMISSION (VOX)
- TO SELECT THE VOX LEVEL
- TRANSMITTING A CALL TONE
- TO SELECT A CALL TONE
- EXIT MENU
- CHANNEL SWEEP
- TO ENABLE CHANNEL SWEEP
- TO DISABLE CHANNEL SWEEP
- KEYPAD LOCK
- TO LOCK
- TO UNLOCK THE KEYPAD
- AUTOMATIC LOW CONSUMPTION
- DISPLAY LIGHTING
- MONITOR MODE
- TO ENABLE MONITOR MODE
- TO DISABLE MONITOR MODE
- ROGER BEEP
- TO ENABLE ROGER BEEP
- TO DISABLE ROGER BEEP
- TECHNICAL SPECIFICATIONS
- WARRANTY TERMS
- INTELBRAS
- SUPORTE A CLIENTES
Brand : Intelbras
Model : Twin 9.6
Category : Walkie-talkie