ZOG21411XK - Oven ZANUSSI - Free user manual and instructions
Find the device manual for free ZOG21411XK ZANUSSI in PDF.

User questions about ZOG21411XK ZANUSSI
0 question about this device. Answer the ones you know or ask your own.
Ask a new question about this device
Download the instructions for your Oven in PDF format for free! Find your manual ZOG21411XK - ZANUSSI and take your electronic device back in hand. On this page are published all the documents necessary for the use of your device. ZOG21411XK by ZANUSSI.
USER MANUAL ZOG21411XK ZANUSSI
| Safety information | 2 |
| Safety instructions | 3 |
| Product description | 6 |
| Before first use | 6 |
| Daily use | 7 |
| Clock functions | 8 |
| Using the accessories | 9 |
| Additional functions | 9 |
| Helpful hints and tips | 9 |
| Care and cleaning | 14 |
| What to do if... | 15 |
| Technical data | 16 |
| Installation | 17 |
| Environment concerns | 21 |
Subject to change without notice.
Safety information
Before the installation and use of the appliance, carefully read the supplied instructions. The manufacturer is not responsible if an incorrect installation and use causes injuries and damages. Always keep the instructions with the appliance for future reference.
Children and vulnerable people safety
⚠ Warning! Risk of suffocation, injury or permanent disability.
- This appliance can be used by children aged from 8 years and above and persons with reduced physical, sensory or mental capabilities or lack of experience and knowledge if they are supervised by an adult or a person who is responsible for their safety.
- Do not let children play with the appliance. Children under 3 years must not be left unsupervised in the vicinity of the appliance.
- Keep all packaging away from children.
- Keep children and pets away from the appliance when it operates or when it cools down. Accessible parts are hot.
- If the appliance has a child safety device, we recommend that you activate it.
- Cleaning and user maintenance shall not be made by children without supervision.
General Safety
- Only a qualified person must install this appliance and replace the cable.
- Internally the appliance becomes hot when in operation. Do not touch the heating elements that are in the appliance. Always use oven gloves to remove or put in accessories or ovenware.
- Do not use a steam cleaner to clean the appliance.
■ Before maintenance cut the power supply. - Do not use harsh abrasive cleaners or sharp metal scrapers to clean the glass door since they can scratch the surface, which may result in shattering of the glass.
- If the supply cord is damaged, it must be replaced by the manufacturer, an authorized Service or similarly qualified persons in order to avoid a hazard.
- Ensure that the appliance is switched off before replacing the lamp to avoid the possibility of electric shock.

Safety instructions
Installation

Warning! Only a qualified person must install this appliance.
- Remove all the packaging.
- Do not install or use a damaged appliance.
- Obey the installation instruction supplied with the appliance.
- Always be careful when you move the appliance because it is heavy. Always wear safety gloves.
- Do not pull the appliance by the handle.
- Keep the minimum distance from the other appliances and units.
- Make sure that the appliance is installed below and adjacent safe structures.
- The sides of the appliance must stay adjacent to appliances or to units with the same height.
Electrical connection

Warning! Risk of fire and electrical shock.
- All electrical connections should be made by a qualified electrician.
- The appliance must be earthed.
- Make sure that the electrical information on the rating plate agrees with the power supply. If not, contact an electrician.
- Always use a correctly installed shockproof socket.
- Do not use multi-plug adapters and extension cables.
- Make sure not to cause damage to the mains plug and to the mains cable. Contact the Service or an electrician to change a damaged mains cable.
- Do not let mains cables to come in touch with the appliance door, specially when the door is hot.
- The shock protection of live and insulated parts must be fastened in such a way that it cannot be removed without tools.
-
Connect the mains plug to the mains socket only at the end of the installation. Make sure that there is access to the mains plug after the installation.
-
If the mains socket is loose, do not connect the mains plug.
- Do not pull the mains cable to disconnect the appliance. Always pull the mains plug.
- Use only correct isolation devices: line protecting cut-outs, fuses (screw type fuses removed from the holder), earth leakage trips and contactors.
- The electrical installation must have an isolation device which lets you disconnect the appliance from the mains at all poles. The isolation device must have a contact opening width of minimum 3 mm.
Gas connection
- All gas connections should be made by a qualified person.
- Before installation, make sure that the local distribution conditions (nature of the gas and gas pressure) and the adjustment of the appliance are compatible.
- Make sure that there is air circulation around the appliance.
- The information about the gas supply is on the rating plate.
- This appliance is not connected to a device, which evacuates the products of combustion. Make sure to connect the appliance according to current installation regulations. Pay attention to requirements regarding adequate ventilation.
Use

Warning! Risk of injury, burns or electric shock or explosion.
- Use this appliance in a household environment.
- Do not change the specification of this appliance.
- Make sure that the ventilation openings are not blocked.
- Do not let the appliance stay unattended during operation.
-
Deactivate the appliance after each use.
-
Be careful when you open the appliance door while the appliance is in operation. Hot air can release.
- Do not operate the appliance with wet hands or when it has contact with water.
- Do not apply pressure on the open door.
- Do not use the appliance as a work surface or as a storage surface.
- Always keep the appliance door closed when the appliance is in operation.
- Open the appliance door carefully. The use of ingredients with alcohol can cause a mixture of alcohol and air.
- Do not let sparks or open flames to come in contact with the appliance when you open the door.
- Do not put flammable products or items that are wet with flammable products in, near or on the appliance.

Warning! Risk of damage to the appliance.
- To prevent damage or discoloration to the enamel:
- do not put ovenware or other objects in the appliance directly on the bottom.
- do not put aluminium foil directly on the bottom of the appliance.
- do not put water directly into the hot appliance.
- do not keep moist dishes and food in the appliance after you finish the cooking.
- be careful when you remove or install the accessories.
- Discoloration of the enamel has no effect on the performance of the appliance. It is not a defect in the sense of the warranty law.
- Use a deep pan for moist cakes. Fruit juices cause stains that can be permanent.
- This appliance is for cooking purposes only. It must not be used for other purposes, for example room heating.
- Always cook with the oven door closed.
Care and Cleaning

Warning! Risk of injury, fire or damage to the appliance.
- Before maintenance, deactivate the appliance and disconnect the mains plug from the mains socket.
- Make sure the appliance is cold. There is the risk that the glass panels can break.
- Replace immediately the door glass panels when they are damaged. Contact the Service.
- Be careful when you remove the door from the appliance. The door is heavy!
- Clean regularly the appliance to prevent the deterioration of the surface material.
- Remaining fat or food in the appliance can cause fire.
- Clean the appliance with a moist soft cloth. Only use neutral detergents. Do not use abrasive products, abrasive cleaning pads, solvents or metal objects.
- If you use an oven spray, obey the safety instructions on the packaging.
- Do not clean the catalytic enamel (if applicable) with any kind of detergent.
Internal light
- The type of light bulb or halogen lamp used for this appliance, is only for household appliances. Do not use it for house lighting.
Warning! Risk of electrical shock.
- Before replacing the lamp, disconnect the appliance from the power supply.
- Only use lamps with the same specifications.
Disposal
Warning! Risk of injury or suffocation.
- Contact your municipal authority for information on how to discard the appliance correctly.
- Disconnect the appliance from the mains supply.
- Cut off the mains cable and discard it.
- Flat the external gas pipes.
- Remove the door catch to prevent children and pets to get closed in the appliance
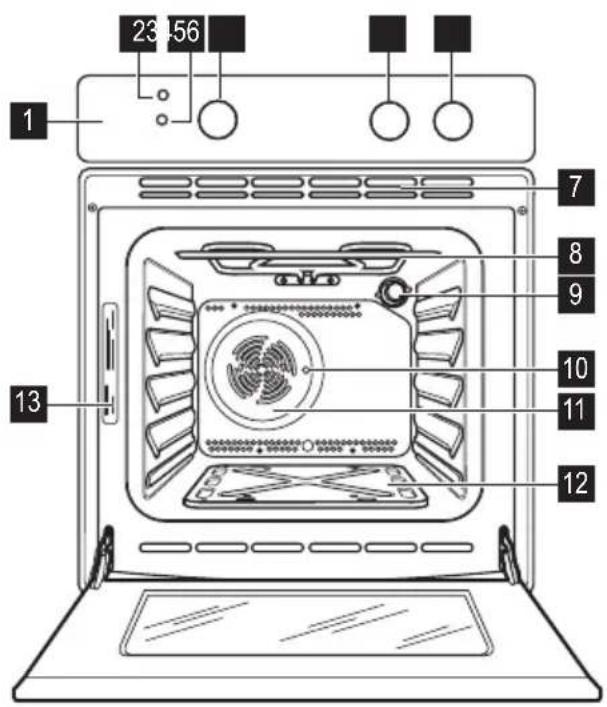
1 Control panel
2 Power indicator
3 Grill indicator
4 Gas oven control knob
5 Oven function control knob
6 Minute Minder
7 Air vents for the cooling fan
8 Grill
9 Oven lamp
10 Turnspit hole
11 Fan
12 Oven cavity bottom plate
13 Rating plate
Oven accessories
- Wire shelf
For cookware, cake tins, roasts. - Aluminium baking tray
For cakes and biscuits.
Before first use
- Grill- / Roasting pan
To bake and roast or as pan to collect fat. - Turnspit
For roasting larger joints of meat and poultry.
Warning! Refer to the Safety chapters.
Initial cleaning
- Remove all accessories and removable shelf supports (if applicable).
- Clean the appliance before first use.
Important! Refer to the chapter "Care and cleaning".
Preheating
Preheat the empty appliance to burn off the remaining grease.
-
Set the function 📋 and the maximum temperature
-
Let the appliance operate for 60 — 90 minutes.
- Set the function ☐ and the maximum temperature.
- Let the appliance operate for 5 — 10 minutes.
Accessories can become hotter than in normal use. The appliance can emit odour and smoke. This is normal. Make sure that the airflow is sufficient.
Let the oven cool down. Dampen a soft cloth with warm water and a little mild washing-up liquid and use this to clean the oven cavity.

Warning! Refer to the Safety chapters.
Oven Functions
| Oven function Application | ||
 | OFF position The appliance is off. | |
 | Oven lamp To activate the oven lamp without a cooking function. | |
 | Electric grill with turnspit | To grill meat, including kebabs and smaller pieces of meat. |
 | Range of temperature adjustment | To adjust the temperature for the electric grill (from a minimum of about 50 °C to a maximum of about 200 °C). |
 | True fan cooking | To bake on more than one shelf positions at the same time. To dry food. To be used in combination with the burner of the gas oven |
Power indicator
The power indicator comes on only when you turn the oven function control knob.
Gas oven control knob
| Symbol | Function |
| ● | The oven burner is off |
| min - 240 | Range of temperature adjustment for Conventional Cooking |
Gas oven cooking
Ignition of oven gas burner:
- Open the oven door.
- Press the gas oven control knob and turn it to ☆ . Keep it pushed for some seconds, but no more than 15 seconds. Do not release it until the flame comes on.
Manual ignition:
If there is no power supply, temporarily.
- Open the oven door.
- Hold a flame near the hole in the bottom of the oven cavity.
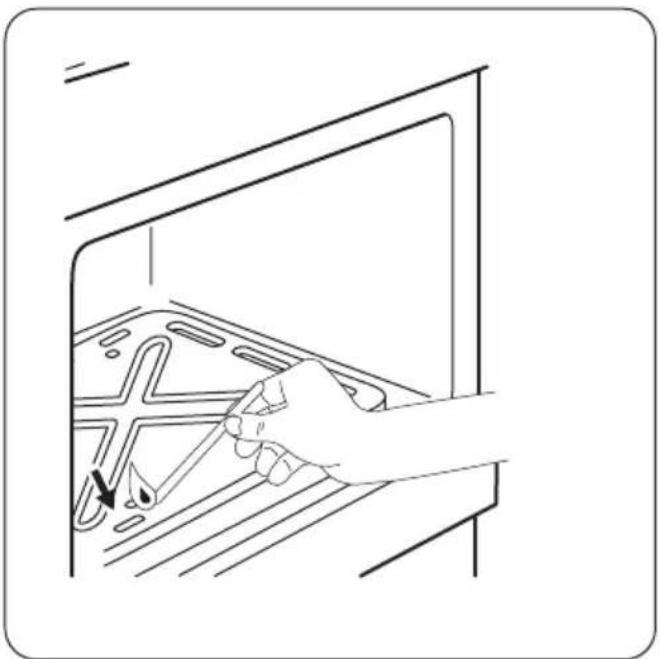
natural_image
Line drawing of a hand using a tool to adjust or install a component inside a container (no text or symbols)-
At the same time push the gas oven control knob and turn it counterclockwise to the maximum temperature.
-
When the flame comes on, keep the gas oven control knob pushed for approximately 15 seconds.
Control the flame through the holes in the bottom of the oven.
i If the oven gas burner does not come on or if it accidentally goes out:
- Release the gas oven control knob and turn it to the "Off" position.
- Leave the oven door open.
- After one minute, try to light the oven gas burner again.
After ignition:
- Release the gas oven control knob.
- Close the oven door.
- Turn the gas oven control knob to the necessary temperature setting.
Oven safety device:
The gas oven has a thermocouple. It stops the gas flow, if the flame goes out.
You can not use the gas oven and the electrical grill with turnspit (if present) at the same time.
Using the Fan Gas Oven
Warning! Always cook with the oven door closed.
The gas burner heats up the air inside the oven. The fan moves hot air to keep the equal temperature.
- Light the oven gas burner (refer to "Gas Oven Cooking").
- Upon ignition, turn the oven function control knob to position 📋.
The oven fan starts after approximately 10 minutes of cooking.
Grilling
- Turn the oven function knob clockwise to 📄. The symbol 📊 on the control
Clock functions
Minute Minder
Use it to set a countdown time for an oven function.
This function has no effect on the operation of the oven.
knob indicates the temperature range. (from a minimum of about 50^ C to a maximum of about 200^ C)
-
Adjust the grill and the grid pan runner position to allow for different thickness of food. Place the food close to the top element for faster cooking and further away for more gentle cooking.
-
You should place most foods on the grid in the grill pan to allow maximum circulation of air and to lift the food out of the fats and juices. If you prefer, you may place directly on the grill pan food such as fish, liver and kidneys.
- To minimise splashing, you should thoroughly dry food before grilling. Brush lean meats and fish lightly with a little oil or melted butter to keep them moist during cooking.
- You may place accompaniments such as tomatoes and mushrooms underneath the grid when grilling meats.
- You should use the top runner position when toasting bread.
- You should turn over the food during cooking, as you require.
Grill indicator
The grill indicator (refer to "Product description") comes on when the grill cooking function is selected. It goes off when the oven reaches the correct temperature. It then cycles on and off to show the temperature adjusts.
- Turn the knob for the timer as far as it goes, then turn it to necessary time period.
- After the time period is completed, an acoustic signal sounds.
Warning! Refer to the Safety chapters.
Turnspit
Warning! Be careful when you use the turnspit. The forks and the spit are sharp. There is a risk of injury.
Warning! Use oven gloves when you remove the turnspit. The turnspit and the grill are hot. There is a risk of burns.
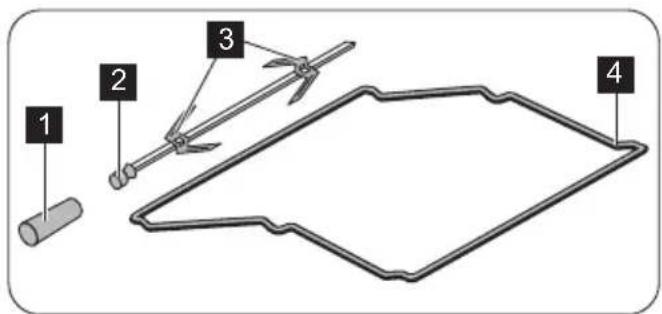
1 Handle
2 Spit
3 Forks
4 Turnspit frame
- Put the turnspit handle into the spit.
- Put the roasting pan on the lowest shelf level.
Additional functions
Cooling fan
When the appliance operates, the cooling fan activates automatically to keep the surfaces of the appliance cool. If you deactivate the appli-
Helpful hints and tips
- The appliance has four shelf levels. Count the shelf levels from the bottom of the appliance floor.
-
The appliance has a special system which circulates the air and constantly recycles the steam. With this system you can cook in a steamy environment and keep the food soft inside and crusty outside. It decreases the
-
Put the turnspit frame on the second shelf position from the bottom.
- Install the first fork on the spit, then put the meat on the turnspit and install the second fork.
- Use the screws to tighten the forks.
- Put the tip of the spit into the turnspit hole. Refer to "Product description".
- Put the front part of the spit on the turnspit frame.
natural_image
Diagram showing mechanical assembly with gears and tools, including a magnified inset illustrating gear rotation (no text or labels)- Remove the turnspit handle.
- Turn the knob for the oven functions to ☐. The turnspit rotates.
10 Set the necessary temperature. Refer to the cooking tables.
ance, the cooling fan continues to operate until the temperature in the appliance cools down.
cooking time and energy consumption to a minimum.
- Moisture can condense in the appliance or on the door glass panels. This is normal. Always stand back from the appliance when you open the appliance door while cooking. To decrease the condensation, operate the appliance for 10 minutes before cooking.
- Clean the moisture after each use of the appliance.
- Do not put the objects directly on the appliance floor and do not put aluminium foil on the components when you cook. This can change the baking results and cause damage to the enamel.
Baking cakes
- Do not open the oven door before 3/4 of the set cooking time is up.
- If you use two baking trays at the same time, keep one empty level between them.
Cooking meat and fish
- Use a deep pan for very fatty food to prevent the oven from stains that can be permanent.
- Leave the meat for approximately 15 minutes before carving so that the juice does not seep out.
- To prevent too much smoke in the oven during roasting, add some water into the deep pan. To prevent the smoke condensation, add water each time after it dries up.
Cooking times
Cooking times depend on the type of food, its consistency, and volume.
Initially, monitor the performance when you cook. Find the best settings (heat setting, cooking time, etc.) for your cookware, recipes and quantities when you use this appliance.
Baking and roasting table
CAKES
| TYPE OF DISH | Fan Cooking | Cooking time [min] | Notes | |
| Shelf position | Temp [°C] | |||
| Whisked recipes | 3 | 160 | 45 - 60 | In a cake mould |
| Shortbread dough | 3 | 160 | 20 - 30 | In a cake mould |
| Buttermilk cheese-cake | 1 | 160 | 70 - 80 | In a 26 cm cake mould on a wire shelf |
| Apple cake (Apple pie) | 2 (left and right) | 160 80 - 100 | In two 20 cm cake moulds on a wire shelf ^1) | |
| Strudel | 2 | 150 | 60 - 80 | In a baking tray |
| Jam-tart 2 (left and right) | 165 30 - 40 | In a 26 cm cake mould | ||
| Sponge cake | 2 | 160 | 50 - 60 | In a 26 cm cake mould |
| Christmas cake / Rich fruit cake | 2 150 90 - 120 | In a 20 cm cake mould ^1) | ||
| Plum cake | 2 | 160 | 50 - 60 | In a bread tin ^1) |
| Small cakes - one level | 3 | 140 - 150 | 20 - 30 | In a baking tray |
| Small cakes - two levels | 2 and 4 | 140 - 150 | 25 - 35 | In a baking tray |
| Biscuits / pastry strips - one level | 3 | 140 - 150 | 30 - 35 | In a baking tray |
| Biscuits / pastry strips - two levels | 2 and 4 | 140 - 150 | 35 - 40 | In a baking tray |
| Meringues | 3 | 120 | 80 - 100 | In a baking tray |
| Buns 3 180 15 - 20 | In a baking tray ^1) | |||
| Eclairs | 3 | 170 | 25 - 35 | In a baking tray |
| Plate tarts | 2 | 170 | 45 - 70 | In a 20 cm cake mould |
| Rich fruit cake | 2 | 150 | 110 - 120 | In a 24 cm cake mould |
| Victoria sandwich 1 160 50 - 60 | In a 20 cm cake mould ^1) | |||
1) Preheat the oven for 10 minutes.
BREAD AND PIZZA
| TYPE OF DISH | Fan Cooking | Cooking time [min] | Notes | |
| Shelf position | Temp [°C] | |||
| White bread | 1 | 190 | 60 - 70 | 1 - 2 pieces, 500 gr per piece1) |
| Rye bread | 1 | 180 | 30 - 45 | In a bread tin |
| Pizza | 1 | 230 - 250 | 10 - 20 | In a baking tray or a deep pan1) |
| Scones | 3 | 190 | 10 - 20 | In a baking tray1) |
1) Preheat for 10 minutes.
FLANS
| TYPE OF DISH | Fan Cooking | Cooking time [min] | Notes | |
| Shelf position | Temp [°C] | |||
| Pasta flan | 2 | 180 | 40 - 50 | In a mould |
| Vegetable flan | 2 | 175 | 45 - 60 | In a mould |
| Quiches | 1 | 180 | 50 - 60 | In a mould ^1) |
| Lasagne | 2 | 180 - 190 | 25 - 40 | In a mould ^1) |
| Cannelloni | 2 | 180 - 190 | 25 - 40 | In a mould ^1) |
1) Preheat for 10 minutes.
MEAT
| TYPE OF DISH | Fan Cooking | Cooking time [min] | Notes | |
| Shelf position | Temp [°C] | |||
| Beef | 2 | 190 | 50 - 70 | On a wire shelf |
| Pork | 2 | 180 | 90 - 120 | On a wire shelf |
| Veal | 2 | 175 | 90 - 120 | On a wire shelf |
| English roast beef, rare | 2 200 50 | - 60 On a wire shelf | ||
| English roast beef, medium | 2 200 60 | - 70 On a wire shelf | ||
| English roast beef, well done | 2 200 70 | - 75 On a wire shelf | ||
| Shoulder of pork | 2 | 170 | 120 - 150 | With rind |
| Shin of pork | 2 | 160 | 100 - 120 | Two pieces |
| Lamb | 2 | 175 | 110 - 130 | Leg |
| Chicken 2 200 70 - 85 Whole | ||||
| Turkey | 2 | 160 | 210 - 240 | Whole |
| Duck | 2 | 220 | 120 - 150 | Whole |
| Goose | 1 | 160 | 150 - 200 | Whole |
| Rabbit | 2 | 175 | 60 - 80 | Cut in pieces |
| Hare | 2 | 175 | 150 - 200 | Cut in pieces |
| Pheasant | 2 | 175 | 90 - 120 | Whole |
FISH
| TYPE OF DISH | Fan Cooking | Cooking time [min] | Notes | |
| Shelf position | Temp [°C] | |||
| Trout / Sea bream | 2 | 175 | 40 - 55 | 3 - 4 fish |
| Tuna fish / Salmon | 2 | 175 | 35 - 60 | 4 - 6 fillets |
Gas Oven Cooking

The time does not include preheating.
Always preheat the empty oven for 10 minutes.
| Weight (kg) | TYPE OF DISH | Gas Oven Cooking | Cooking time in minutes | Notes | |
| Temp. (°C) | level | ||||
| MEAT & POULTRY | |||||
| 1 | Beef with bone | min. | 2 or 3 | 40 | |
| 1 | Beef without bone | 190 | 2 or 3 | 50 | |
| Weight (kg) Temp. (°C) level | TYPE OF DISH Gas Oven Cooking | Cooking time in minutes | Notes | ||
| 1 | Lamb | min. | 2 or 3 | 40 - 50 | |
| 1 Pork | 175 2 or 3 50 | ||||
| 1,2 | Chicken / Rabbit | 210 | 2 or 3 | 70 - 80 | |
| 1 | Duckling | 190 | 2 or 3 | 80 | |
| 1 | Turkey | 180 | 2 or 3 | 60 | |
| 0,5 | Casseroles | min. | 2 or 3 | 150 | |
| 1 | Baked vegetables | min. | 2 | — | varies according to the vegetable |
| PASTRY | |||||
| Fruit tart | 165 | 2 | 35 | ||
| Fruit pie | min. | 2 or 3 | 35 | ||
| Sausage rolls | 180 | 2 or 3 | 20 | ||
| Chaux pastry | 190 | 2 or 3 | 25 - 30 | ||
| Vol au vents | 175 | 2 or 3 | 15 | ||
| Jam tarts | 180 | 2 or 3 | 30 - 40 | in a 26 cm aluminium mould on the wire shelf | |
| PUDDINGS | |||||
| Egg Custard in a Bain Marie | min. 2 or 3 60 - 75 | ||||
| CAKES | |||||
| Rich fruit cake | min. | 2 or 3 | 150 - 170 | in a 20 cm mould on the wire shelf | |
| Plain fruit cake | min. | 2 or 3 | 150 | ||
| Madeira | min. | 2 or 3 | 105 - 120 | ||
| Small cake | min. | 3 | 30 - 40 | ||
| Ginger bread | min. | 3 | 35 - 45 | ||
| BREAD | |||||
| 0,5 | Bread loaves | 190 | 2 or 3 | 40 - 50 | in the aluminium baking tray |
| 1 | Bread loaves | 190 | 2 or 3 | 50 - 60 | in the aluminium baking tray |
| Rolls and buns | 180 | 2 or 3 | 15 - 20 | ||
| Biscuits | 180 | 2 or 3 | 25 - 35 | ||
Grilling
i Preheat the empty oven for 10 minutes, before cooking.
| Quantity Grilling Cooking time [min] | ||||||
| TYPE OF DISH Pieces [g] Shelf posi- | tion | Temp [°C] | 1st side 2nd side | |||
| Fillet steaks | 4 | 800 | 4 | max. | 12 - 15 | 12 - 14 |
| Beef steaks | 4 | 600 | 4 | max. | 10 - 12 | 6 - 8 |
| Sausages | 8 | - | 4 | max. | 12 - 15 | 10 - 12 |
| Pork chops | 4 | 600 | 4 | max. | 12 - 16 | 12 - 14 |
| Chicken (cut in 2) | 2 | 1000 | 4 | max. | 30 - 35 | 25 - 30 |
| Kebabs | 4 | - | 4 | max. | 10 - 15 | 10 - 12 |
| Breast of chicken | 4 | 400 | 4 | max. | 12 - 15 | 12 - 14 |
| Hamburger | 6 | 600 | 4 | max. | 13 - 15 | 12 - 14 |
| Fish fillet | 4 | 400 | 4 | max. | 12 - 14 | 10 - 12 |
| Toasted sandwiches | 4 - 6 | - | 4 | max. | 5 - 7 | - |
| Toast | 4 - 6 | - | 4 | max. | 2 - 4 | 2 - 3 |
Turnspit
i Preheat the empty oven for 10 minutes, before cooking.
| TYPE OF DISH | [g] | Shelf position | Temp [°C] | Cooking time [min] |
| Poultry | 1000 | 2 | max. | 50 – 60 |
| Roasts | 800 | 2 | max. | 50 – 60 |
Care and cleaning
Warning! Refer to the Safety chapters.
- Clean the front of the appliance with a soft cloth with warm water and a cleaning agent.
- To clean metal surfaces use a usual cleaning agent.
- Clean the oven interior after each use. Fat accumulation or other food remains may result in a fire. The risk is higher for the grill pan.
- Clean stubborn dirt with a special oven cleaner.
- Clean all oven accessories after each use and let them dry. Use a soft cloth with warm water and a cleaning agent.
- If you have nonstick accessories, do not clean them using aggressive agents, sharp-
edged objects or a dishwasher. It can destroy nonstick coating.
i Stainless steel or aluminium appliances:
Clean the oven door with a wet sponge only. Dry it with a soft cloth.
Do not use steel wool, acids or abrasive materials, as they can cause damage to the oven surface. Clean the oven control panel with the same precautions.
Cleaning the door gasket
- Regularly do a check of the door gasket. The door gasket is around the frame of the oven cavity. Do not use the appliance if the door gasket is damaged. Contact the Service Centre.
- To clean the door gasket, refer to the general information about cleaning.
Cleaning the oven door
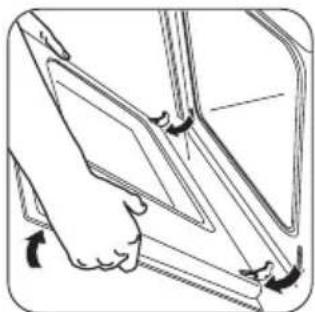
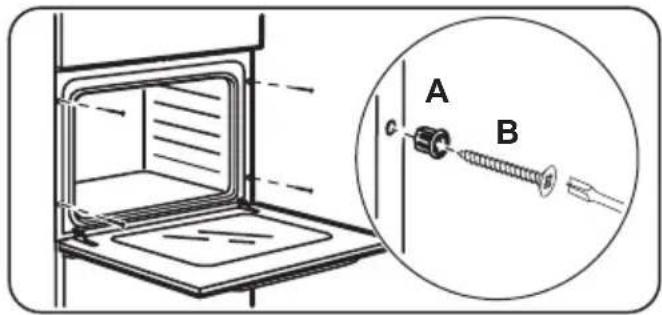
You can remove the oven door to clean it.
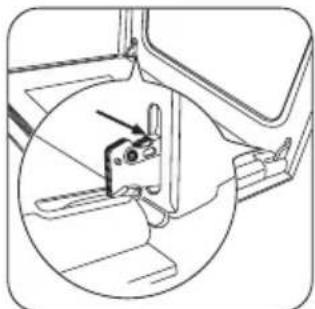
natural_image
Technical line drawing of a mechanical assembly with a circular inset showing a component (no text or symbols)① Open the door fully and hold the two door hinges.
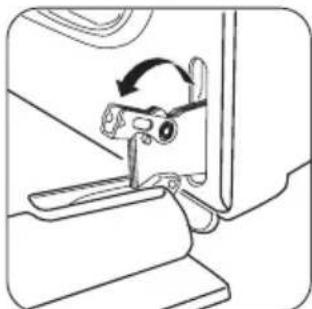
natural_image
Line drawing of a mechanical clamp or bracket assembly with an arrow indicating rotation (no text or symbols)② Lift and turn the levers on the two hinges.
natural_image
Line drawing of a person inserting or removing a device into a larger device (no text or symbols present)③ Close the oven door to the first opening position (halfway). Then pull forward and remove the door from its seat. Put the door on a soft cloth on a stable surface.
What to do if...

Warning! Refer to the Safety chapters.
Clean the oven door with water and soap. Dry the oven door carefully.
When the cleaning is completed, install the oven door. To install the oven door, do the above steps in the opposite sequence.
Oven lamp

Warning! Be careful when you change the oven lamp. There is a risk of electrical risk.
Before you change the oven lamp:
- Deactivate the oven. - Remove the fuses in the fuse box or deactivate the circuit breaker.

Put a cloth on the bottom of the oven to prevent damage to the oven light and s cover.
- Turn the glass cover counterclockwise to remove it.
- Clean the glass cover.
- Replace the oven light bulb with an applicable 300^ C heat-resistant oven light bulb.
Use the same oven lamp type. - Install the glass cover.
| Problem Possible cause Remedy | ||
| The appliance does not operate. | The appliance is not activated. | Activate the appliance. Refer to the chapter "Daily Use". |
| The appliance does not operate. The fuse in the fuse box is released. | Do a check of the fuse. If the fuse is released more than one time, contact a qualified electrician. | |
| The oven lamp does not operate. The oven lamp is defective. Replace the oven lamp. | ||
| Steam and condensation collect on the food and in the oven. | You left the dish in the oven for too long. | Do not keep the dishes in the oven for longer than 15 - 20 minutes after the cooking ends. |
| The flame is blown out immediately after ignition. | The thermocouple is not sufficiently heated. | After lighting the flame, keep the knob pushed for approximately 15 seconds. |
If you cannot find a solution to the problem yourself, contact your dealer or the service centre.
The necessary data for the service centre is on the rating plate. The rating plate is on the front frame of the appliance cavity.
We recommend that you write the data here:
Model (MOD.) ......
Product number (PNC) ....
Serial number (S.N.) ....
Technical data
Total rating
| Electric: 1,7 kW | |
| Gas: G20 (2H) 20 mbar = | 2,5 kW |
| G30/G31 (3B/P) | 30/30 mbar = 2,5 kW |
| G20 (2H) 13 mbar = | 2,5 kW |
| Electric supply: 230 V ~ 50 Hz | |
| Category: II2H3B/P | |
| II2H3+ (for Portugal) | |
| Gas Supply: G20 (2H) 20 mbar | |
| Appliance class 3 | |
Gas Oven Burner Data
| Gas type | Injector mark1/100 mm | Nominal gas powerkW | Nominal gas flowg/h | Reduced gas powerkW | By-pass needle1/100 mm | Nominal gas pressurembar |
| Natural gas (G20) | 114 | 2,7 | - | 1,0 | Reg. | 20 |
| Liquid gas (G30/G31) | 078 | 2,5 | 182 | 1,0 | 52 | 30/3028-30/37 (only for Portugal) |
| Gas type | Injector mark1/100 mm | Nominal gas powerkW g/h | Nominal gas flowkW 1/100 mm | Reduced gas powermbar | By-pass needle | Nominal gas pressure |
| Natural gas (G20)(Only for Russia) | 124 | 2,5 | - | 1,0 | Reg. | 13 |
Installation

Warning! Refer to the Safety chapters.
Safety for installation
These installation instructions are for authorized persons only!

Warning! Let only authorized persons (gas and electricity) do the installation, connection and maintenance of the appliance. If you do not refer to an authorized person, the guarantee becomes invalid if there is damage. Follow the correct procedure and the instructions in this user manual for installation, operation and maintenance of gas and electrical appliances.

Warning! Before installation, make sure that the local supply conditions (the type of gas and the gas pressure) and the adjustment of the appliance are compatible.

Warning! The adjustment conditions for this appliance are located on the label or g plate.

Warning! The manufacturer is not responsible for damages caused by an installation which does not agree with the instructions in the manual.
Installation environment:
- This appliance is not connected to a combustion products evacuation device.
- Only install the appliance in a room with sufficient ventilation.
- Keep natural ventilation holes open or install a cooker hood.
- There must be a 130 cm ^2 minimum opening in the built-in cabinet. The use of a gas cooking appliance results in the production of heat and moisture in the room in which it is installed. Ensure that the kitchen is well ventilated: keep natural ventilation holes open or install a mechanical ventilation device (mechanical extractor hood). Prolonged intensive use of the appliance may call for additional ventilation, for example opening a window, or more effective ventilation, for example increasing the level of mechanical ventilation where present.
Gas connection
The gas supply ramp is on the rear side of the control panel.

Warning! Do not use rubber flexible pipes.

Warning! Before the gas connection, disconnect the mains plug from the ns socket or deactivate the fuse in fuse box. Close the primary valve of gas supply.
A) Flexible metallic pipe
D) Male / female adapter
E) Gas supply ramp
- Do not fully move the oven into the built-in cabinet (about 30 cm).
There are two connection modes:
a) Connection with flexible metallic pipe (maximum 2 m):
- Put the supplied gasket between the pipe and the gas supply ramp.
- Turn the pipe to the 1/2" gas supply ramp.
b) Connection with rigid metallic pipe (soft copper, minimum diameter: 8 mm):
- Use a male / female adapter (not supplied) to install the nut and the olive on the gas supply ramp.
- Put the pipe into the gas supply ramp.
-
Use a 22 mm spanner to tighten the nuts. Keep the gas supply ramp in correct position, do not apply force on the gas supply circuit.
-
Fully insert the appliance into the built-in cabinet. See instructions in "Building-in the appliance".
-
Check with the leak detection fluid if the connection seal is made properly.
Warning! Do not use a flame to control for leaks!
Warning! Do not squeeze the gas supply ramp and the pipe when you move the oven into the built-in cabinet.
Warning! Only for Russia: this appliance operates with the natural gas G20 20 mbar. Before the gas connection, it is important to adjust the setting to the correct type of gas (G20 13 mbar). Refer to the instructions in "Adjustment to different types of gas".
Adjustment to different types of gas
Warning! Let only an authorized person do the adjustment to different types of gas.
This appliance is for operation with natural gas G20 20 mbar.
With the correct injectors, you can also operate it with another type of gas (refer to "Gas oven Burner Data").
The gas rate is adjusted to suit.
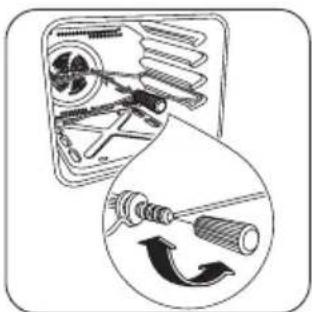
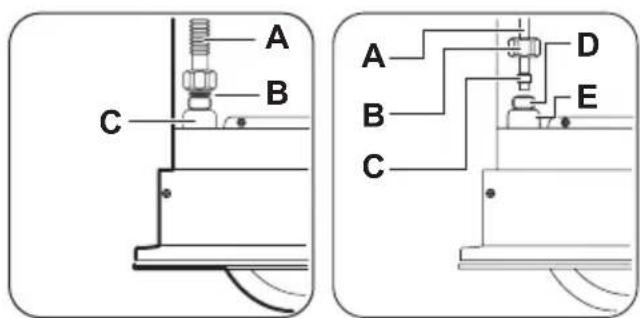
Replacing the gas oven burner injector:
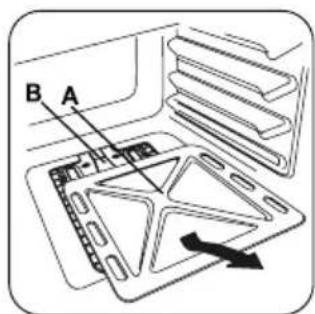
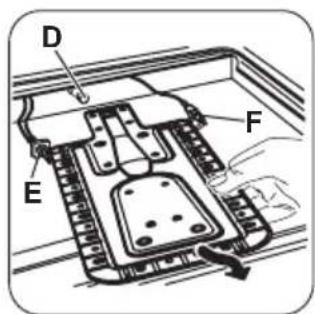
-
Remove the bottom plate of the oven cavity (A) to get access to the gas oven burner (B).
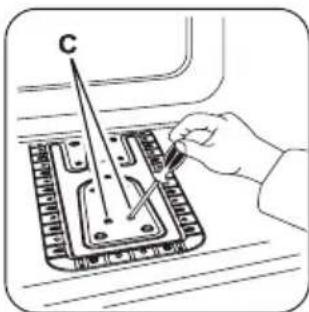
-
Release the two screws (C), which keep the gas oven burner in position.
-
Carefully move the gas oven burner off the injector support (D). Slowly move it to the left side. Make sure that the gas oven burner bush stays on the burner mouthpiece. Do not apply force to the wire of the spark plug connector (F) and to the thermocouple conductor (E).
- Unscrew the gas burner injector (D) with a 7 mm socket spanner and remove it. Replace it with the necessary one (see table "Gas Oven Burner Data").
- Assemble the gas oven burner in opposite sequence.
- Replace the gas type sticker near the gas supply ramp with the one related to the new gas type (supplied with the injector kit).

Warning! A primary air adjustment of the gas oven burner is not necessary.
Minimum level adjustment of the gas oven burner:
- Disconnect the mains plug from the mains socket.
- Turn the control knob to the minimum position and remove it.
- Adjust the adjustment screw (A) with a thin bladed screwdriver.
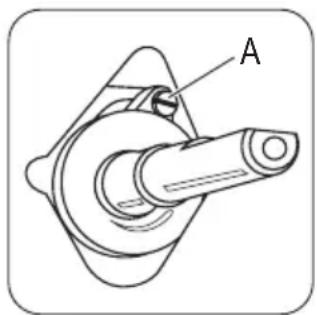
natural_image
Mechanical component diagram showing a shaft and housing assembly (no text or symbols)| Change of type of gas | Adjustment of the adjustment screw |
| from natural gas to liquid gas | fully tighten the adjustment screw in |
| from liquid gas to natural gas | release the adjustment screw approximately 1/2 of a turn |
Only for Russia:
| from liquid gas to natural gas 13 mbar | release the adjustment screw approximately 3/4 of a turn |
| from natural gas 20 mbar to natural gas 13 mbar | release the adjustment screw approximately 1/4 of a turn |
- Attach the gas oven control knob.
- Put the mains plug into the mains socket.

Warning! Only put the mains plug into the mains socket when all parts are put back into their initial position.
- Light the gas oven burner (see section "Gas oven cooking - Ignition of the oven gas burner").
- Set the gas oven control knob to 240 and let the oven heat for 10 minutes minimum.
- Turn the gas oven control knob from 240 to minimum.
Control the flame. If the flame goes out, do the procedure from point 1 to point 8 again. There must be a small regular flame on the gas oven burner crown.
The manufacturer objects liability if you do not obey to this safety measures.
Building In
Conditions for building-in:
- Only set up the appliance in a kitchen or in a kitchen-dining room.
- Do not set up the appliance in a bathroom or a bedroom.
- You can install the appliance "built-in" or "built-under":

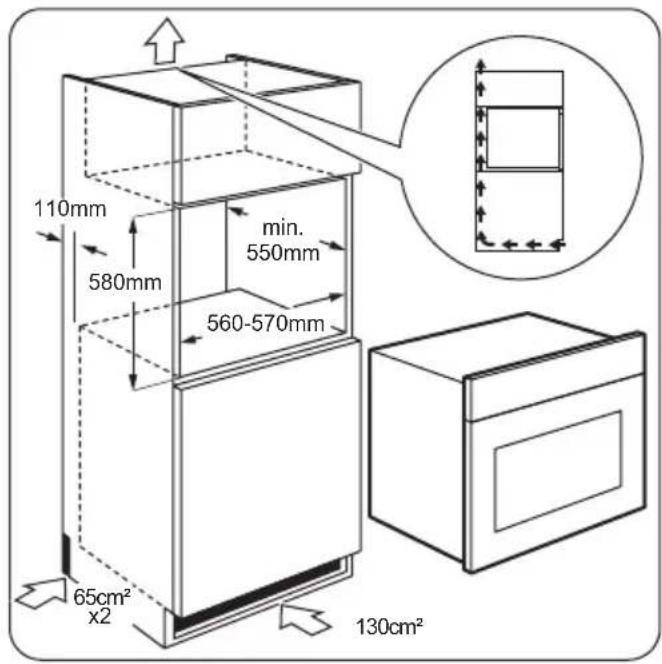
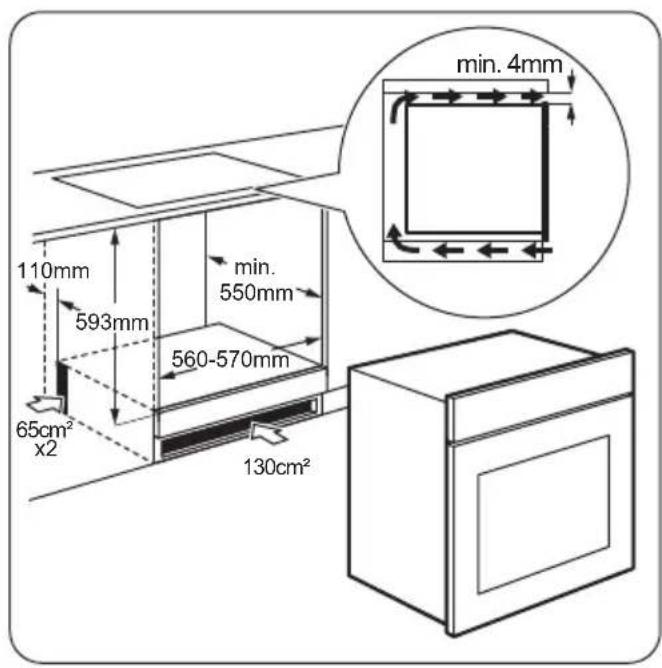
- The related illustrations show the necessary dimensions of the oven and the cabinet (in millimetres).
- The dimensions of the built-in cabinet must agree with the related illustrations.
- There must be a minimum clearance of 4 mm between the top surface of the appliance and the inner top of the cabinet.
- When you install the appliance "built-under" (below a hob), install the hob before the oven unit.
- The materials must be resistant to a temperature increase of minimum 60 °C above the ambient temperature.
- There must be a continuous air supply around the oven in order to not have the oven become too hot.
- For correct operation, the oven cabinet must have a minimum opening of 130 ~cm^2 in the front or on the sides (a minimum of 65 ~cm^2 for each side). The manufacturer recommends a 130 ~cm^2 opening in the front for a brick cabinet and a 65 ~cm^2 opening for each side for a wooden cabinet.
- When you install a hob above the oven, make different electrical connections for the hob and for the oven.
Only make connections with correct cables for the power supplied.
i Make sure that after the installation, an engineer can have easy access to the oven if repairs or maintenance are necessary.
Electrical installation
Warning! Only a qualified person must do the electrical installation.
The manufacturer is not responsible if you do not follow the safety precautions from the chapter "Safety Information".
This appliance is only supplied with a main cable.
Environment concerns
Recycle the materials with the symbol 🔒 Put the packaging in applicable containers to recycle it.
Help protect the environment and human health and to recycle waste of electrical and electronic appliances. Do not dispose appliances marked with the symbol ✗ with the household waste. Return the product to your local recycling facility or contact your municipal office.
Cable
Cable types applicable for installation or replacement: H07 RN-F, H05 RN-F, H05 RRF, H05 VV-F, H05 V2V2-F (T90), H05 BB-F. For the section of the cable refer to the total power (on the rating plate) and to the table:
Total power Section of the cable
maximum 1380 W 3 x 0.75 mm²
maximum 2300 W 3 x 1 mm²
maximum 3680 W 3 x 1.5 mm²
The earth cord (green / yellow cable) must be 2 cm longer than phase and neutral cables (blue and brown cables).

Packaging material
The packaging material is environmentally-friendly and recyclable. Plastic parts are marked with international abbreviations such as PE, PS, etc. Dispose of the packaging material in the containers provided for this purpose at your local waste management facility.
Cuprins
natural_image
Line drawing of a hand using a tool to adjust or install a component inside a storage cabinet (no text or symbols)natural_image
Diagram showing mechanical assembly with gears and a tool, enclosed in a circular inset illustrating rotation (no text or labels)natural_image
Technical line drawing of a mechanical assembly with a magnified inset showing a component detail (no text or symbols)natural_image
Line drawing of a mechanical component with an arrow indicating rotation (no text or symbols)natural_image
Illustration of a hand inserting a card into a folder (no text or symbols visible)natural_image
Mechanical component diagram showing a shaft and housing assembly (no text or symbols)natural_image
Line drawing of a hand using a tool to adjust or install a component inside a storage cabinet (no text or symbols)-
Истовремено притисните командно дугме за гасну пећницу и окрените га у смеру казальки на сату до максимальне температуре.
-
Када се пламен упали, држите командно дугме за гасну пећницу прити-снутим око 15 секунди.
natural_image
Diagram showing mechanical assembly with gears and a screwdriver, plus a circular inset illustrating the process (no text or symbols)natural_image
Technical line drawing of a mechanical assembly with a circular inset showing a component detail (no text or symbols)natural_image
Mechanical diagram showing a lever mechanism with an arrow indicating rotational motion (no text or symbols present)natural_image
Line drawing of a person holding a folder with arrows indicating movement (no text or symbols)natural_image
Mechanical component diagram showing a shaft and housing assembly (no text or symbols)www.zanussi.com/shop