HMS6002W - Blender Home Electric - Free user manual and instructions
Find the device manual for free HMS6002W Home Electric in PDF.


| Product Type | Hand Mixer Set |
| Brand | Home Electric |
| Model | HMS6002W |
| Power Supply | 230-240 V~, 50 Hz |
| Power Consumption | 300 W |
| Speed Settings | 5 speeds |
| Turbo Function | Yes |
| Eject Button | Yes |
| Mixer Mount | Yes, with release button |
| Mixing Bowl | Included, rotates during operation |
| Accessories | 2 whisks, 2 dough hooks, 1 spatula |
| Material | Plastic housing |
| Color | White |
| Maximum Continuous Operation | 10 minutes |
| Overload Protection | Yes (motor cooling required) |
| Dishwasher Safe Parts | Whisks and dough hooks |
| Warranty | 3 years |
| Intended Use | Domestic only |
| Safety Features | Suction feet for stability |
| Cleaning | Wipe with damp cloth; accessories washable with warm water and detergent |
Frequently Asked Questions - HMS6002W Home Electric
User questions about HMS6002W Home Electric
0 question about this device. Answer the ones you know or ask your own.
Ask a new question about this device
Download the instructions for your Blender in PDF format for free! Find your manual HMS6002W - Home Electric and take your electronic device back in hand. On this page are published all the documents necessary for the use of your device. HMS6002W by Home Electric.
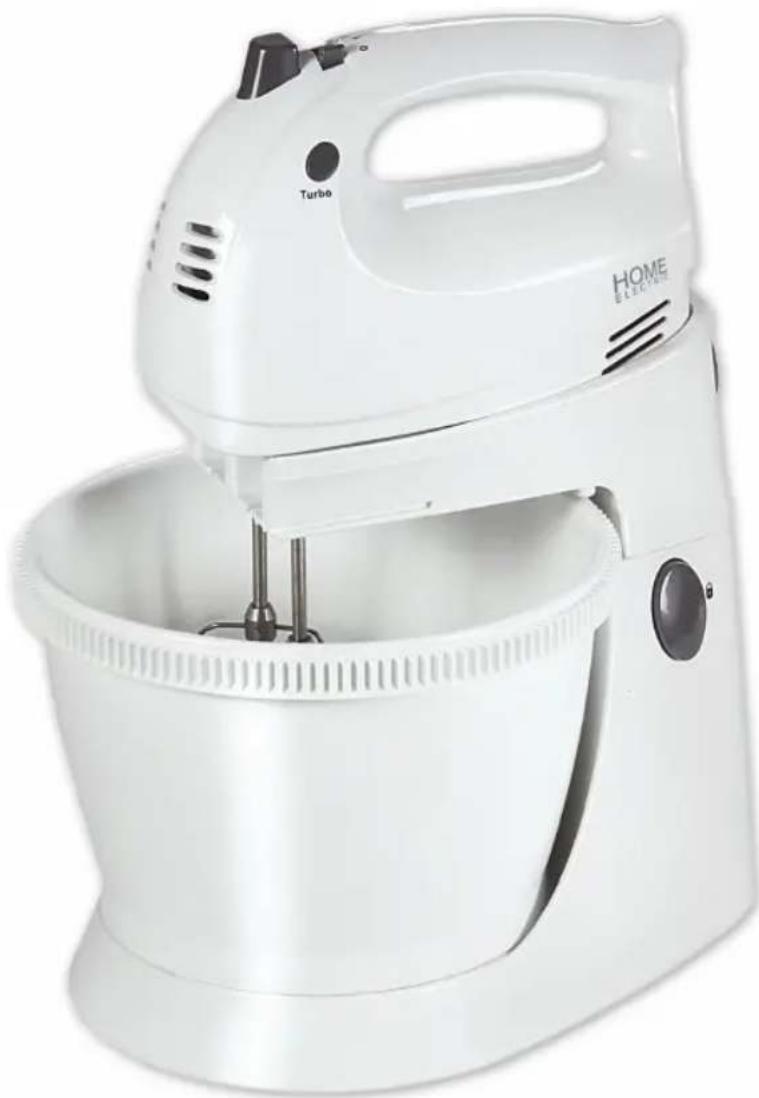
USER MANUAL HMS6002W Home Electric
Handmixer Set Hand Mixer Set
HMS5002
natural_image
White electric mixer with a side-mounted stand mixer, no visible text or symbols on the device itself.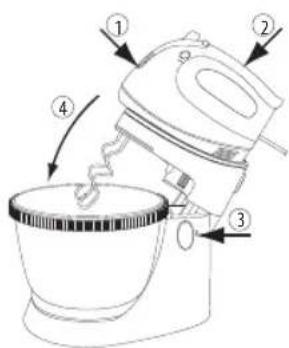

IMPORTANT SAFETY INSTRUCTIONS 13-14
CONTROL ELEMENTS....15
OPERATING INSTRUCTIONS 16-18
CLEANING AND CARE, TECHNICAL DATA....19
WARRANTY 20-21
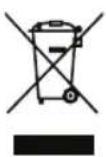
Proper disposal of this product:
This label indicates that, in the EU, electronic devices cannot be disposed of with regular household waste.
Please use the return or collections systems of your municipality or contact the seller where you purchased this product.
IMPORTANT SAFETY INSTRUCTIONS
General
- Read this manual before first use thoroughly. It contains important information for your safety as well as for the use and maintenance of the equipment. Keep these instructions for future reference and pass it on with the device.
- Pay particular attention to the warnings on the device and in this instruction manual.
• Use the device only for its intended purpose. Improper use may lead to hazards.
• This device is designed for household use only. It is not suitable for commercial use. - In the event of improper use or wrong operation, we do not accept any liability for resulting damages.
- The use of accessories and components not expressly recommended by the manufacturer may result in injuries or damages and voids the warranty.
- This device is not intended to be used by persons (including children) with reduced physical, sensory or mental abilities or lack of experience and / or lack of knowledge unless they are supervised by a person responsible for their safety or have received instructions on how to use the device.
• Children should be supervised to ensure that they do not play with the device.
• Never leave the device unsupervised while it is switched on. - Do not place heavy objects on top of the device.
- Never immerse electrical parts of the device in water during cleaning or operation. Never hold the device under running water.
Power supply
• The mains voltage must match the information on the rating label of the device.
- The power plug is used as the disconnect device. Please be sure that the power plug is in operable condition.
- Only removing the power plug can separate the device completely from the mains supply.
- Avoid damages to the power cord that may be caused by kinks or contact with sharp corners.
• Make sure, the device, including power cord and power plug are not exposed to hot surfaces.
- Only unplug from the power outlet by the plug itself. Do not pull on the cord.
- Disconnect the power plug when the device is not in use, in case of malfunctions, prior to attaching accessories and prior to each cleaning.
- If the power cord or the casing of the device is damaged or if the device is dropped, the device may not be used before it is examined by a professional electrician.
- A damaged power cord may only be replaced by the manufacturer or a workshop commissioned by the manufacturer or by a similarly qualified person in order to avoid hazards.
IMPORTANT SAFETY INSTRUCTIONS
Installation location
- Place the device on a flat, sturdy and slip-resistant surface.
• Use this device in dry indoor areas only and never outdoors. - Warning: Do not use this device near water or heavy moisture; e.g. in a damp basement or beside a swimming poor or bathtub.
- Keep this device away from all heat sources like for example, ovens, hot plates and other heat-producing devices/objects.
- Protect this device from extreme heat (over 35^ C) and cold (under 5^ C) as well as from direct sunlight and dust.
Specific safety instructions
- Turn the device on only once the whisk or dough hook is located deeply into the mixing bowl.
- Keep hands, hair, items of clothing and kitchen utensils away from moving whisks/dough hooks in order to prevent injuries and to prevent the device from being damaged.
- Attention: This device is not intended for the mixing of hot foods, liquids or hot fat.
- Clean the device and other accessories after each use. Refer to the Chapter CLEANING AND CARE.
CONTROL ELEMENTS
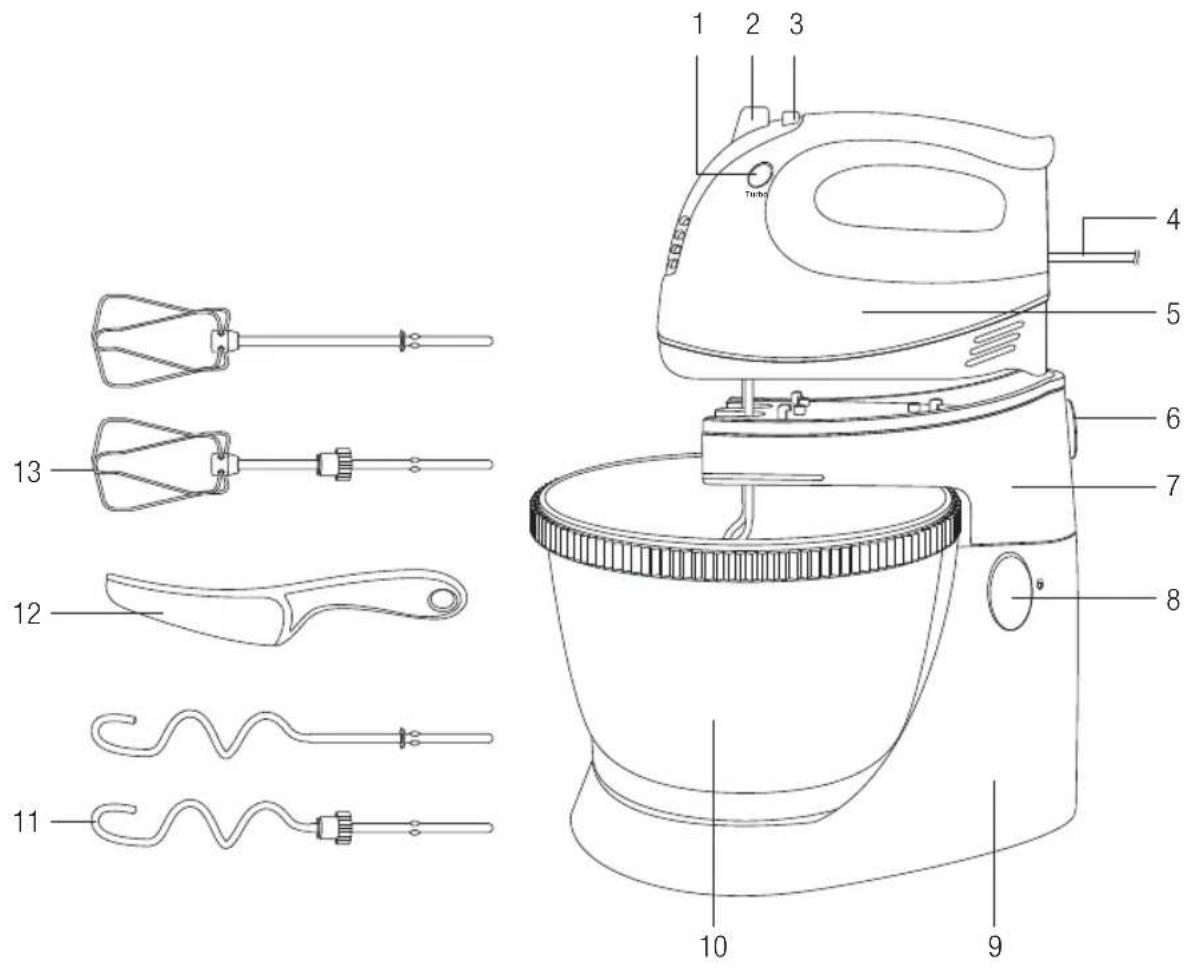
1 Turbo button
2 Eject button
3 Speed control (5 speeds)
4 Power cord with plug
5 Motor unit
6 Mixer release button
7 Mixer mount
8 Release button for mixer mount
9 Base
10 Mixing bowl
11 Dough hook
12 Spatula
13 Whisk
OPERATING INSTRUCTIONS
Intended use
- This device is suitable for simple mixing of liquid and solid foods only. Any other use can lead to damages to device or injuries.
Unpacking and checking
- Carefully take the device and its accessories out of the packaging. Retain the packaging in case you would like to store the device away or transport it at a later date. If you choose to dispose of the packaging, then please do so according to the applicable legal regulations.
- Check the packaging contents for completeness and damages. Should the contents in the packaging not be complete or be damaged, do not use the device. Return it to your retail outlet immediately.
Attaching hand mixer to mixer mount
- Wash the hand mixer, whisk (13), dough hook (11), spatula (12) and mixing bowl (10) with warm water and some dish detergent before first use. Dry all pieces completely. Refer to CLEANING AND MAINTENANCE chapter.
- Put the base (9) on an even, stable and slip-resistant surface. Press the base lightly on the surface when setting up so that the suction feet under the base find a good hold.
- Put the desired ingredients in the mixing bowl (10) and put it on the base (9).
- Attach the whisk (13) or dough hook (11) to the hand mixer. Rotate the whisk/dough hook gently until it locks into place. The whisk/dough hook with the white part can only be put in the socket with the star-shaped marking. Do not insert the whisk/dough hook into the socket otherwise.
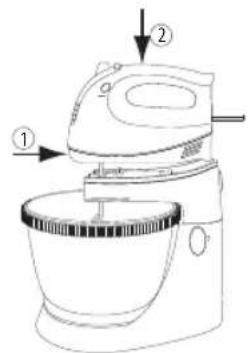
- Mixer mount in a horizontal position: Hold the hand mixer over the mixer mount (7), so that the whisk/dough hook is located in front of the recesses in the mixer mount. Lead the whisk/dough hook into the holes and put the hand mixer on the mixer mount. Press the hand mixer firmly until it snaps onto the mixer mount (fig. 1).
- If the mixing bowl (10) contains a large amount of ingredients, it is easier to tilt the mixer mount (7) first and then attach the hand mixer to it.
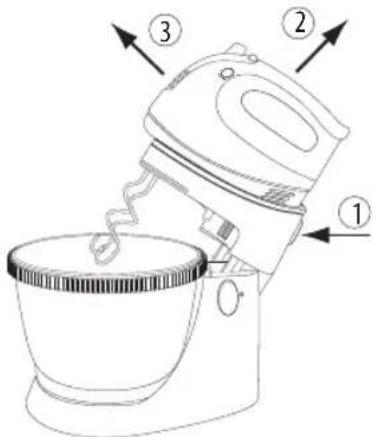
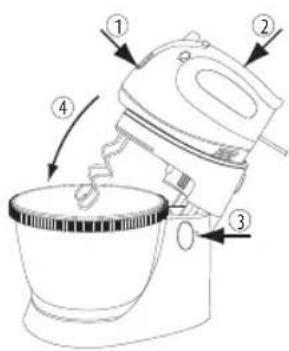
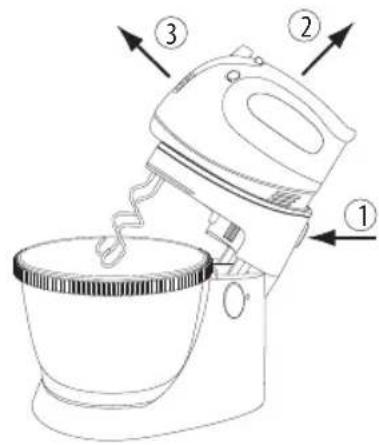
- Mixer mount tilted: Hold the release button (8) pressed and tilt the mixer mount (7) to the back (fig. 2). Put the hand mixer on the tilted mixer mount as described. Hold the release button (8) pressed and position the hand mixer horizontally so that the whisk / dough hook reaches the ingredients (fig. 3).
OPERATING INSTRUCTIONS
Mixing
- Connect the plug (4) into a suitable outlet.
- Note: The mixing bowl (10) is especially suitable for processing larger amounts. It rotates during operation. In order to process smaller amounts, use a smaller mixing bowl and hold the mixer with your hand.
- Put the desired ingredients in a smaller mixing bowl.
- Hold the hand mixer deeply in the mixing bowl with the ingredients and only then switch on the device.
- Put the speed control (3) onto speed 1 in order to switch on the device.
• This device has 5 speed levels. Set the speed with the speed control (3). - Press the Turbo button (1), in order to mix at maximum speed.
- Put the speed control (3) at 0 to switch the device off.
• Pull the plug (4) from the outlet when you are finished mixing. - Clean the device after each use. Refer to the chapter CLEANING AND MAINTENANCE.
Duration of Operation
• The device is designed to process normal household quantities.
- Extreme stress on the device may cause an overload of the motor. In this case, the motor needs a cooling down period to room temperature.
- The device must not run for longer than 10 minutes under continuous operation. Let it then cool to room temperature before you bring it back into operation.
- If the device is noticeably warm, turn it off immediately and pull the plug (4). Allow the device to cool down completely before you bring it back into operation.
Tips
• Always begin mixing at a low speed. Increase the speed gradually to the speed as given in the recipe.
- Mix the ingredients only as long as specified in the recipe. Fold in dry ingredients only until they are mixed with the rest of the ingredients. Always use the slow speed for this.
- Ingredients from the refrigerator such as butter and eggs are easier to mix once they have been brought to room temperature.
- Climatic conditions, seasonal temperature deviations, the temperature of ingredients and their properties vary from region to region and influence the mixing time and the results obtained.
OPERATING INSTRUCTIONS
Removing hand mixer from mixer mount
- Remove the plug (4) from the power outlet before removing the hand mixer (7) from the mixer mount.
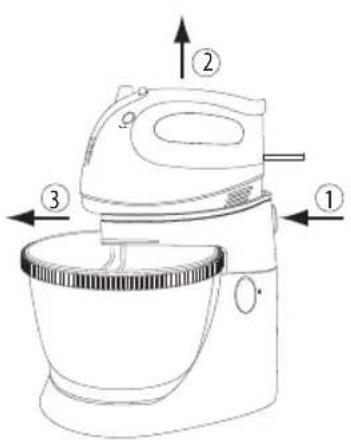
- Mixer mount in horizontal position: Hold the mixer release button (6) pressed on the mixer mount. Pull the hand mixer upward and then to the front in order to remove it from the mixer mount (7) (fig. 4).
- Mixer mount tilted: You can also remove the hand mixer from the mixer mount (7) in a tilted position. Hold the release button (8) pressed to the base and tilt the mixer mount with the mounted mixer toward the back (fig.5). Now hold the mixer release button (6) pressed and remove the hand mixer from mixer mount as described (fig.6).
- Press the eject button (2) to unlock the whisk/dough hook and to remove it from the hand mixer.
CLEANING AND CARE, TECHNICAL DATA
• Unplug the power cord (4) and allow the device to cool completely before cleaning.
- Clean the whisk (13), dough hook (11), spatula (12) and mixing bowl (10) with warm water and some dishwashing detergent immediately after use. The whisk and dough hook can also be washed in the dishwasher. Dry all of the pieces completely before using again.
- Never immerse electrical parts of the device in water during cleaning or operation. Never hold the device under running water.
- Clean the exterior surfaces of the housing, the mixer mount (7) and the base (9) with a slightly damp cloth.
- Never use solvents and abrasives, hard brushes, metallic or sharp objects for cleaning. Solvents are harmful to health and attack the plastic parts. Abrasive cleaners and tools do scratch the surface.
Technical data
Power supply 230-240 V\~, 50 Hz
Power consumption 300 W
Short time operation 10 min.
Manufactured for JGC-Company GmbH
Heckhofweg 146
50739 Köln
Customer Service E2 Servicecenter GmbH
Max-Planck-Strasse 13
50858 Köln-Marsdorf
Telephone
01805-22 17 84
Monday-Friday, 10:00 - 18:00
(Euro 0.14/min from German landline; other charges may apply from mobile phone)
Please enter the serial number of your device here:
Customer Info Manufacturer's Warranty
HOME ELECTRIC
Thank you for your purchase of one of our products. We hope you will enjoy using our high-quality product. Our strict production control ensures the high quality of our devices. However, in the event that you wish to submit a qualified claim, we grant a
3 years
warranty as of the date of purchase, subject to the following conditions:
This warranty does not affect your statutory warranty claims as consumer toward the seller of the device. These rights are not affected by our manufacturer's warranty. The warranty granted by us is valid only for domestic use of the device and is limited to the area of the Federal Republic of Germany.
The warranty term is 3 years as of the date of purchase.
It is within HOME ELECTRIC's discretion to fulfil the warranty by repair or replacement of the device or defect component. Other claims are excluded. In case of questions regarding HOME ELECTRIC products you no longer need to take the time to go to the seller but may call our service hotline or service center directly. A team of highly qualified product consultants and technicians is available from Monday through Friday from 10:00 a.m. to 6:00 p.m.

Service Hotline: 01805 / 22 17 84 (€ 0.14 per min)
When mailing your device, please also include a short description of the problem as this will facilitate handling. Please mail your device, without exception, only to our authorised service partner and use only the enclosed return coupon. If the return coupon is missing please contact the above service hotline.
ATTENTION: Mailings that are not pre-paid will not be accepted!
Customer Info Manufacturer's Warranty
HOME ELECTRIC
Our service partner requires proof of purchase, either as original receipt or cash receipt printed by the seller to perform warranty repairs. The serial number on the device must also be readable. We are unable to perform warranty services free of charge without proof of purchase. We recommend keeping the original packaging in order to ensure safe transport of the device in case of a warranty claim.
Warranty repairs may be performed exclusively by E2 Servicecenter GmbH or contractual partners authorised by it. Repairs performed by the customer or other shops void the warranty; a claim for cost reimbursement does not exist. The warranty is void or does not cover:
⇒ in case of improper use
⇒ in case of mechanical damages to the device from outside forces
⇒ in case of transportation damages
⇒ for wear parts
⇒ in case of operating errors and misuse
⇒ when placing the device in wet rooms or outdoors
in case of damages resulting from force, war, water, lightning, excess voltage, and other reasons not within the scope of HOME ELECTRIC's responsibility.
⇒ in case of excessive use, in particular in case of non-domestic use
⇒ in case of disregard of the user instructions and installation errors
⇒ if the device does not have a technical defect
⇒ for transport and travel costs as well as costs incurred by installing and uninstalling the device
The warranty does not include any subsequent liability on our part, in particular no liability for damages to the device itself or incurred by the loss of the device until the time of repair (e.g. travel costs, handling costs, etc.). However, this does not limit or exclude our statutory warranty, in particular pursuant to the Product Liability Act.
Any warranty services provided by us do not extend the warranty term of 3 years as of the date of purchase, also not in terms of possibly exchanged components.
We wish you much joy with your new device and hope that your next one will be another HOME ELECTRIC product.
- IMPORTANT SAFETY INSTRUCTIONS
- General
- Power supply
- Installation location
- Specific safety instructions
- CONTROL ELEMENTS
- OPERATING INSTRUCTIONS
- Intended use
- Unpacking and checking
- Attaching hand mixer to mixer mount
- Mixing
- Duration of Operation
- Tips
- Removing hand mixer from mixer mount
- CLEANING AND CARE, TECHNICAL DATA
- Technical data
- Customer Info Manufacturer's Warranty
- HOME ELECTRIC
- years
Brand : Home Electric
Model : HMS6002W
Category : Blender