NJ-9600U - Juicer KUVINGS - Free user manual and instructions
Find the device manual for free NJ-9600U KUVINGS in PDF.


| Product Type | Slow Masticating Juicer |
| Model | NJ-9600U |
| Brand | Kuvings |
| Dimensions (H x W x D) | Approx. 42 x 20 x 16 cm (16.5 x 7.9 x 6.3 inches) |
| Weight | Approx. 6.5 kg (14.3 lbs) |
| Power | 150W, 120V~60Hz |
| Juicing Speed | 80 RPM (slow masticating) |
| Motor Type | High-torque DC motor |
| Feeding Chute Diameter | Approx. 5 cm (2 inches) for whole produce |
| Pulp Container Capacity | 1.5 L |
| Juice Jug Capacity | 1.0 L |
| Material | BPA-free Tritan jug, Ultem auger, Stainless steel strainer |
| Safety Features | Safety locking arm, overload protection, non-slip feet |
| Cleaning & Maintenance | Includes cleaning brush; all parts dishwasher safe (top rack) |
| Accessories Included | Juice jug, pulp container, cleaning brush, recipe book |
| Warranty | 10-year warranty on motor, 2-year on parts |
| Repairability | Spare parts available (auger, strainer, caps) |
| Certifications | ETL, FDA approved materials |
Frequently Asked Questions - NJ-9600U KUVINGS
User questions about NJ-9600U KUVINGS
0 question about this device. Answer the ones you know or ask your own.
Ask a new question about this device
Download the instructions for your Juicer in PDF format for free! Find your manual NJ-9600U - KUVINGS and take your electronic device back in hand. On this page are published all the documents necessary for the use of your device. NJ-9600U by KUVINGS.
USER MANUAL NJ-9600U KUVINGS
natural_image
Line drawing of a blender with handle and spout, no text or symbols presentKuivings US Customer Service
Phone: 138916825440
Email: support@nuclk
©2012 Kuvings All rights reserved
Headquarters
NUC Electronics CO., Ltd
675, Chimsar-3Dong, Buk-gu, Daegu, 702-053, Korea
1021 41856732
CAREFULLY READ AND SAVE THESE INSTRUCTIONS
US/CANADA USE ONLY (110/120V)
HOUSEHOLD USE ONLY
PartsIm
IMPORTANT SAFEGUARDS
When using electrical appliances, basic safety precautions should always be followed including the following:

-
Read all instructions.
-
To protect against risk of electrical shock do not put main body in water or other liquid.
-
Close supervision is necessary when any appliance is used by or near children.
-
Unplug from outlet when not in use, before putting on or taking off parts, and before cleaning.
-
Avoid contacting moving parts.
-
Do not operate any appliance with a damaged cord or plug or after the appliance malfunctions, or is dropped or damaged in any manner. Return appliance to the nearest authorized service facility for examination, repair or electrical or mechanical adjustment.
-
The use of attachments not recommended or sold by the manufacturer may cause fire, electric shock or injury.
-
Do not use outdoors.
-
Do not let cord hang over edge of table or counter.
-
Always make sure juicer cover is clamped securely in place before motor is turned on. Do not unfasten clamps while juicer is in operation.
-
Be sure to turn switch to OFF position after each use of your juicer. Make sure the motor stops completely before disassembling.
-
Do not put your fingers or other objects into the juicer opening while it is in operation. If food becomes lodged in opening, use food pusher or another piece of fruit or vegetable to push it down. When this method is not possible turn the motor off and disassemble juicer to remove the remaining food.
-
Do not use the appliance if the rotating sieve is damaged.
-
When a separable pulp container is provided, Do not operate without the pulp container in place does not fit, contact a qualified electrician. Do not modify the plug in any way.
SAVE THESE INSTRUCTIONS
Notice Before Use
• Be careful of knives for they are very sharp.
- Do not push small/large feed tube pusher too strongly to protect knife.
- When you hear noise of vibration, stop machine and take out the remnants from knife and start again
- Please use small feed tube pusher only in large feed tube pusher.
General Notice Before Use
• Make sure to use appropriate voltage.
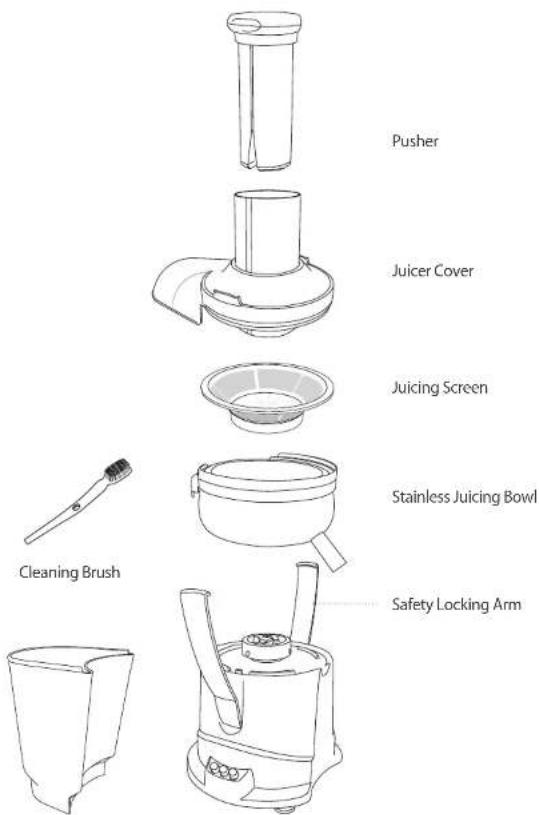
• Make sure of assembling status for main body, stainless juicing bowl, juicer cover, safety locking arm.
text_image
Pusher Juicer Cover Juicing Screen Stainless Juicing Bowl Cleaning Brush Safety Locking ArmPulp Container Base
How to use the juicer
Assembly / Operation / Disassembly
How to assemble
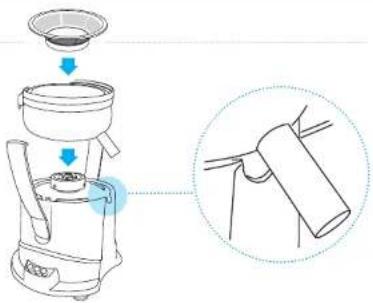
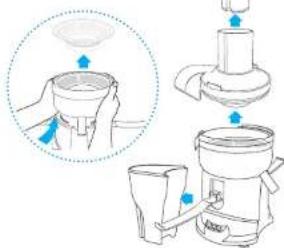
1 Put juicing bowl on the base and insert juicing screen firmly into the base as shown below.
text_image
Diagram illustrating the step-by-step process of a coffee maker with a funnel and side view showing the resulting container.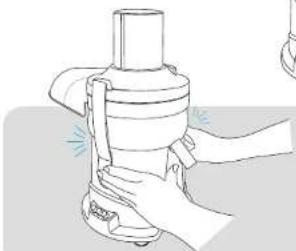
natural_image
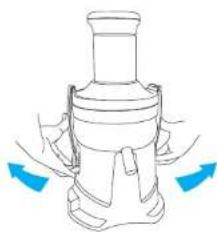
Illustration of a hand holding a cylindrical device with a flame-like extension (no text or symbols)2 Put juicer cover on the juicing bowl and push safety locking arm firmly inward on both sides of the base until you hear them 'click' as shown below.
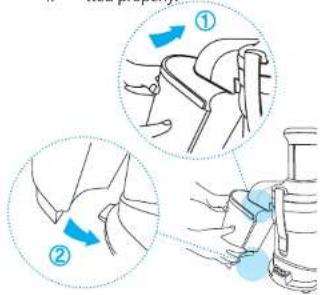
3 Put pulp container into the juicer cover outlet as shown in the drawing and then push it until it locks into the juicer base ②. Juice may leak out or excessive vibration may occur when it's not fitted properly.
text_image
Diagram illustrating two steps of a mechanical device with blue arrows indicating motion direction, labeled ① and ②.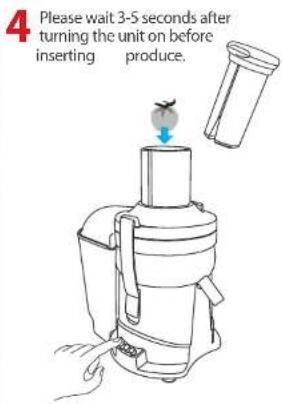
text_image
4 Please wait 3-5 seconds after turning the unit on before inserting produce.How to operate
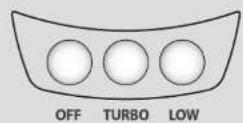
Push LOW button
to make natural juice with soft fruits like watermelon, peeled oranges, etc.
Push TURBO botton
to make natural juice with hard fruits and vegetables like apples, carrots, celery, etc.
How to disassemble
1 Turn the machine off and unplug the power cord from the wall outlet. Pull out the safety locking arm to disassemble.
natural_image
Line drawing of a hand holding a small object with blue arrows indicating direction (no text or symbols)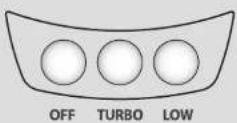
2 Follow the assembly steps in reverse to disassemble.
- Remove the juicing screen after disassembling the juicing bowl from the base.
text_image
Diagram illustrating a food cleaning or cleaning process with labeled steps and directional arrows indicating components.Tips
- For safety, always make sure the unit is unplugged before assembly or disassembly.
- When assembling the juicer, the parts must be in alignment or the arms will not lock.
- Check that the parts are aligned before locking the arms. If the parts are not aligned as shown in the manual, forcing the arms shut may cause damage!
- For best results slowly feed large or hard ingredients with the pusher in 2-3 stages, alternating between pushing and pausing. This technique ensures the maximum amount of juice extraction and also prevents malfunction.
TroubleshootingCa
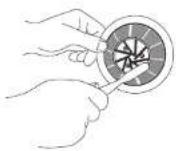
1 Wash with warm water and a gentle dish detergent and wipe dry with a dishtowel. Clean juicing screen with the supplied brush, do not use a sponge. (Be careful when you clean the knives)
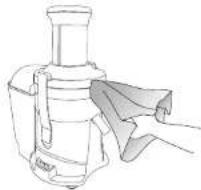
2 Wipe body clean with a damp towel and be careful not to get the body wet. Water in the body can cause a malfunction or electric shock!
natural_image
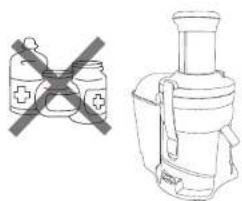
Line drawing of a hand holding a small object, possibly a blender or blender (no text or symbols present)3 When you wash the juicer, do not use harsh chemicals. These chemicals may react with and discolor the juicer.
natural_image
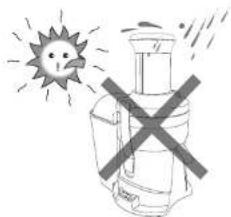
Two line drawings: one showing a crossed-out medicine bottle and another showing a juice maker (no text or symbols)4 Do not store the juicer in direct sunlight or high humidity
natural_image
Simple line drawing of a sun with a crossed-out X symbol, no text or symbols presentTips
- Most juicer parts are top shelf dishwasher safe, low temperature cycle recommended.
- For best results hand wash with a soft cloth using mild detergent and towel dry.
- The juicing screen is hand wash only using the included cleaning brush or similar plastic bristled dish brush).
- When cleaning with plastic brushes please note that occasionally bristles get caught in the strainer - make sure none are left behind before next use.
• Do not wash any juicer parts with harsh or abrasive cleaners. - Please wipe the exterior clean using a damp soft cloth.
• Do not wash or submerge the juicer body.
| PROBLEM SOLUTION | |
| Safety locking arms will not lock | When assembling the juicer the parts must be in alignment or the arms will not lock. Check that the parts are aligned before locking the arms. The parts will only fit in the orientation shown in the manual – do not force the locking arms shut if parts are misaligned. |
| Juicer vibrates excessively Stop | the juicer and reassemble the juicer properly. In particular, make sure the juicing screen is properly seated and no parts are broken. |
| Juice is leaking from juice cover outlet during juicing | Juice may leak out if the pulp container is not fitted properly. Please make sure the pulp container is locked into place. |
| Motor has slowed down Too | much produce is being fed into the juicer at once. Let the juicer finish processing the produce and be sure to feed more slowly and/or smaller pieces. Also be sure to use the turbo setting for hard fruits and vegetables. Stop the juicer and check that the juicing screen does not have excess pulp build up – if it does clean juicing screen and be sure to slow the rate at which you feed produce. Alternating ingredients between soft and hard produce items can also help. |
| Motor has jammed Stop the | juicer immediately and dissemble and clean the juicing screen. Feed less produce at once to prevent jamming. |
| Motor stops while juicing or won't turn back on after extended juicing | Allow the unit to cool down for 2 hours before resuming operation. |
| Pulp is wetter than usual Stop | the juicer and check that the juicing screen is not clogged. Try juicing at a slower rate. |
Notes
Electrical Specification
| Product | Juicer |
| Model Number | NJ-9300U, NJ-9500U, NJ-9600U NJ-9700U |
| Warranty | 3 Year |
| Voltage/Hertz | AC 120V, 60Hz |
| Power Consumption | 350W |
| Continuous Maximum Use | Less than 30 Minutes |
natural_image
Line drawing of a juicer with handle and side panel (no text or symbols)
text_image
Kuvings®JUGUERA
text_image
Diagram showing a coffee maker with a lid and a side-view view of its handle, illustrating the process from feeding to cleaning.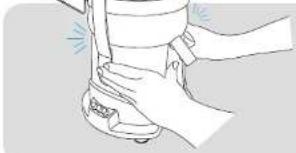
natural_image
Line drawing of a hand holding a small object with motion lines indicating movement (no text or symbols)text_image
Diagram illustrating two steps of a hand manipulation or cleaning process, labeled ① and ② with blue arrows indicating movement.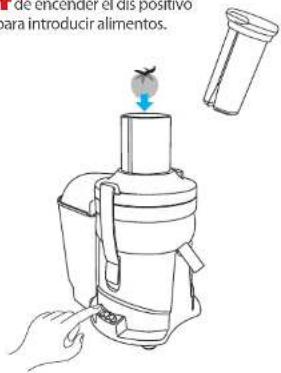
natural_image
Line drawing of a hand holding a blender with blue directional arrows indicating motion (no text or symbols)