REVO830 - Juicer KUVINGS - Free user manual and instructions
Find the device manual for free REVO830 KUVINGS in PDF.


User questions about REVO830 KUVINGS
0 question about this device. Answer the ones you know or ask your own.
Ask a new question about this device
Download the instructions for your Juicer in PDF format for free! Find your manual REVO830 - KUVINGS and take your electronic device back in hand. On this page are published all the documents necessary for the use of your device. REVO830 by KUVINGS.
USER MANUAL REVO830 KUVINGS
text_image
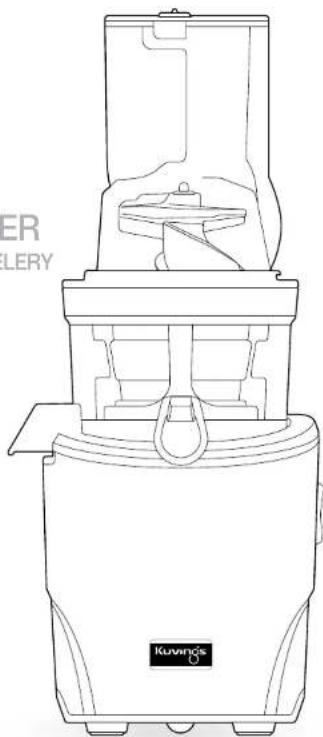
Kuvings® WHOLE SLOW JUICERKuvings®
REVO830
KUVINGS
WHOLE SLOW JUICER
OPTIMIZED FOR CARROTS & CELERY
MANUAL
• After you read this manual,
keep in a place you can reach easily.
• Household use only.
natural_image
Line drawing of a Kuvangs blender with control panel and speaker (no text or symbols on the device itself)
HOW TO USE
CONTENTS
02 Important Safeguards
04 Safety Warning
06 Parts
08 How to Assemble
10 How to Operate
12 Tips on Operation
13 Tips on Ingredients
14 Ingredient Preparation
18 How to Disassemble and Clean
20 How to Clean Silicone Parts
21 How to Use the Cleaning Tool
22 How to Use the Blank Strainer
24 How to Use the Smoothie Strainer
26 How to Use the Lid Opener
28 Troubleshooting Q&A
29 Specifications
IMPORTANT SAFEGUARDS
When using electrical appliances, basic safety precautions should always be followed including the following:
- Read all instructions.
- To protect against risk of electrical shock, do not put motor or base of unit in water or other liquid.
- Keep away from children.
- Unplug from outlet when not in use, before adding or removing parts, and before cleaning.
- Avoid contact with moving parts. Do not attempt to alter the parts to disable the safety interlock mechanisms.
- Do not operate any appliance with a damaged cord or plug or after the appliance malfunctions, or is dropped or damaged in any manner. Contact the manufacturer at their customer service telephone number for information on examination, repair, or adjustment.
- The use of attachments not recommended or sold by the manufacturer may cause fire, electric shock or injury.
- Do not use outdoors.
- Do not let cord hang over edge of table or counter.
- To unplug the machine from an outlet, grasp the plug and pull. Never pull from the power cord.
-
Always attach plug to the appliance and check that the control is OFF before plugging cord into wall outlet. To disconnect, turn the control to OFF, then remove plug from wall outlet.
-
Make sure juicer is assembled properly before motor is turned on. Do not remove drum lid or parts while juicer is in operation.
- Turn switch to OFF position after using juicer. Make sure the motor stops completely before disassembling.
- Do not put your fingers or other objects into the juicer opening while it is in operation. If food becomes lodged in opening, use food pusher or another piece of fruit or vegetable to push it down. When this method is not possible, turn the motor off and disassemble juicer to remove the remaining food.
- Do not use the appliance if the rotation wiper is damaged.
- Make sure the juice cup and pulp cup are always in place before operating juicer.
- Please do not alter the appliance in any way.
- Do not use the appliance for anything other than its intended purpose as described in the manual.
- This appliance should be used for the recommended use time.
- This appliance is not intended for use by persons (including children) with reduced physical, sensory, or mental capabilities, or lack of experience and knowledge, unless they are closely supervised by a person responsible for their safety. Children shall not play with the appliance. Cleaning and user maintenance shall not be made by children without supervision.
- Do not use or store the appliance near a heated oven or stove.
SAVE THESE INSTRUCTIONS
- This appliance is for household use only. Please carefully follow the instructions in the manual.
(The appliance cannot be covered under the manufacture warranty if the product is abnormally or commercially used.) - Save the instruction manual for future reference.
- If the appliance is given away as a gift, please include the manual with the product.

SAFETY WARNING SAFETY WARNING
The following precaution is provided to ensure the safety of the user. Please carefully read through the precautions and exercise a degree of care when using the appliance.
⚠ Warning : Warns risk of death or severe injuries.
Caution : Warns risk of injuries or appliance damage.
Prohibited Follow Inst Must take action Do not disassemble

Do not plug multiple power cords in a single outlet during operation. → It may cause an explosion or fire.
Do not touch the power cord with wet hands. → It may cause electrical shock.
Do not leave the appliance unattended. Unplug the power cord from the outlet when not in use.
Use a dry towel to clean the power cord if it is dirty or wet. → It may cause electrical shock or fire.
Do not drop the appliance nor inflict strong force to the appliance. → It may damage or break the appliance.
Do not unplug by pulling off the power cord cable. → It may damage the power cord and cause electrical shock.
Do not put your finger or other objects into the feed chute while it is in operation. → It may cause injury.

Do not put the parts in the dishwasher or extremely hot water.
→ The parts may wear faster.
Do not repair, disassemble the base, or customize the appliance.
→ The appliance may not operate properly, causing fire, electrical shock or injury.
Do not use the appliance on an uneven surface.
→ It may cause a malfunction if the appliance tips over.
Keep away from children and store the appliance in a safe place.
→ It may cause injury.
Please do not store or operate the appliance near any heating appliance.
→ The appliance may become discolored or deformed.
Do not use any hazardous chemicals to clean the appliance or flammable sprays near the appliance.
→ It may change the color of the appliance or could result in a fire.
To protect the power cord, please do not aggressively bend or put heavy objects on top of the power cord.
→ It may cause short circuit or even fire.
Operating the juicer without ingredients can cause damage to the screw.
For cleaning parts that come in contact with food, please follow the instructions on pages 18-21.
PARTS
* The products illustrated in this bucket may vary slightly from the actual product.
“The products illustrated in this booklet may vary slightly from the actual product.”
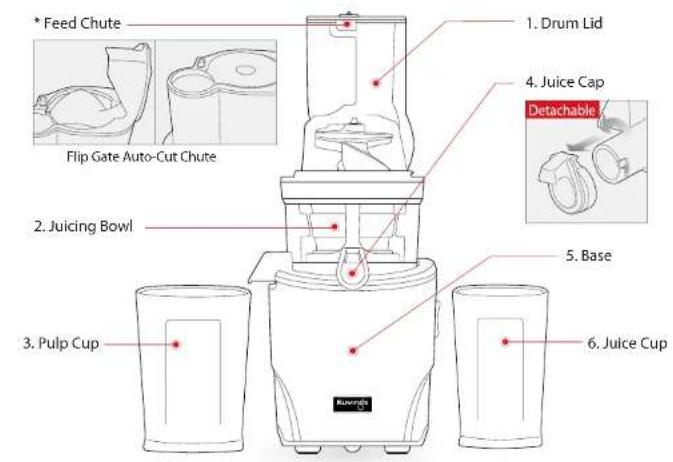
text_image
* Feed Chute 1. Drum Lid 4. Juice Cap Detachable Flip Gate Auto-Cut Chute 2. Juicing Bowl 5. Base 3. Pulp Cup 6. Juice Cup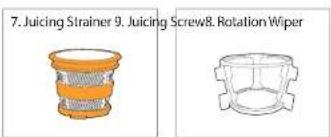
text_image
7. Juicing Strainer 9. Juicing Screw8. Rotation Wiper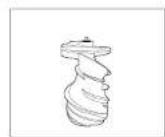
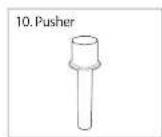
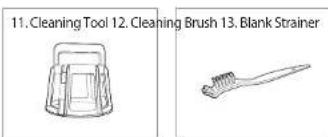
text_image
11. Cleaning Tool 12. Cleaning Brush 13. Blank Strainer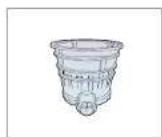
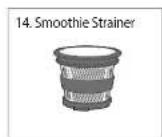
text_image
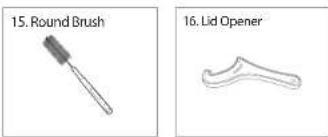
15. Round Brush 16. Lid Opener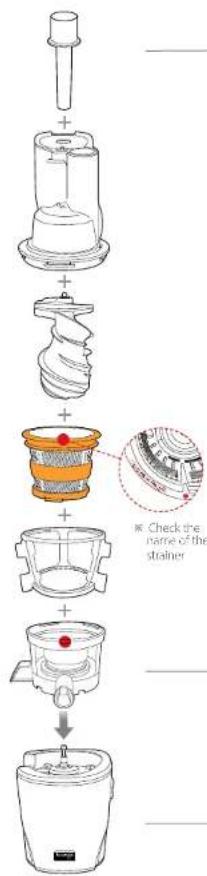
text_image
Check the name of the stainerSTEP 1
Top-set assembly
Align the red dots ● on each part and assemble in the order shown. Once assembled, turn the drum lid clockwise to close.
STEP 2
Top-set and base assembly
Place the assembled top-set on the base. Align the juice spout with the logo on the base.
HOW TO ASSEMBLE
STEP 1
Top-set assembly
Check Before Operating
- Wash the parts before first use.
- Ensure that the silicone ring is assembled properly.
1
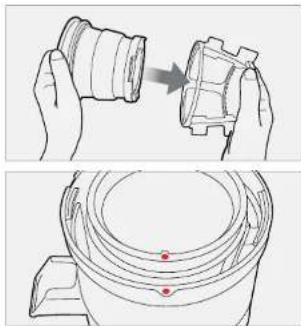
Insert the strainer into the rotation wiper, then place into the juicing bowl, ensuring the red dot ● on the strainer is aligned with the red dot ● on the juicing bowl.
natural_image
Technical line drawing showing two views of a mechanical component being handled, with no visible text or symbols.2
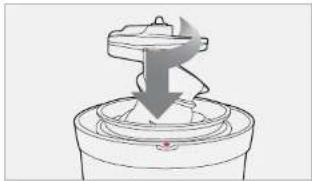
Place the juicing screw into the strainer. Turn and press down on it until it clicks into place.
natural_image
Diagram of a mechanical component with a downward arrow indicating force or motion (no text or symbols)Note | The drum lid will not close unless the juicing screw is all the way in.
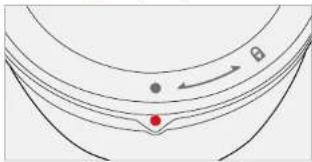
3 Place the drum lid onto the juicing bowl, aligning the white dot ● on the drum lid with the red dot ● on the juicing bowl. Turn the drum lid clockwise until the lock mark ● on the lid is lined up with the red dot ● on the juicing bowl.
natural_image
Diagram showing curved lines with a red dot and arrow, no text or symbols present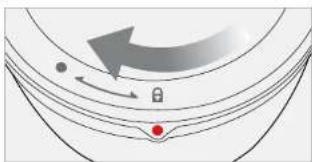
natural_image
Diagram showing a curved arrow with a lock icon and a red dot at the bottom, no text or symbols present.STEP 2
Top-set and base assembly
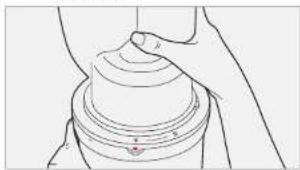
TIP
For easy assembly, hold the drum lid and turn clockwise as shown in the illustration.
natural_image
Line drawing of a mechanical component with layered structure and a red mark (no text or symbols)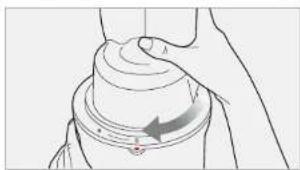
natural_image
Line drawing of a hand holding a mechanical component with an arrow indicating direction (no text or symbols)4
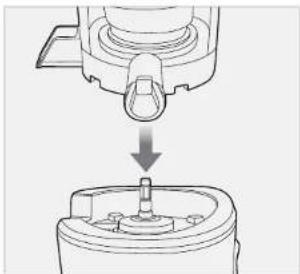
Place the assembled top-set on the base. Align the juice spout with the logo on the base.
natural_image
Technical line drawing of a mechanical component with a downward arrow indicating assembly or adjustment (no text or symbols)5
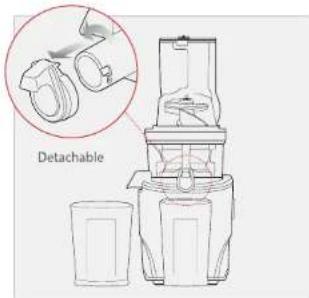
Place the pulp cup under the pulp spout and place the juice cup under the juice spout as shown in the illustration.
Note | These cups can be interchanged depending on the quantity of juice created.
text_image
DetachableHOW TO OPERATE
After preparing the ingredients, plug the power cord into a wall outlet.
Note
- Do not touch the power cord with wet hands. It may cause electrical shock, short-circuit, or fire.
- Ensure the power cord is plugged into a power outlet.

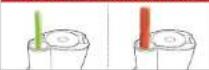
Press the FORWARD button to operate.
Note
• Forward: Pulls down and slowly masticates the ingredients.
- Reverse: Pushes the ingredients back up to dislodge them.
If the ingredients become jammed in the screw and the drum lid does not open, press the OFF button. Then press and hold the REVERSE button until the ingredients become dislodged. Repeat REVERSE - OFF - FORWARD as often as needed to dislodge food.
If the juicer stops during operation
Switch the button to OFF position then press and hold the REVERSE button until the ingredients become dislodged.
Repeat REVERSE - OFF - FORWARD as needed.
FORWARD: Pulls down the food
OFF: Stops the operation
REVERSE: Pushes the food back up





Note
- REVERSE: Pushes the ingredients back up to dislodge them. The REVERSE button only works while holding down the switch.
- Switch OFF, ensuring that the juicer comes to a complete stop. Then press REVERSE. Hold the REVERSE button for 2-3 seconds and release. Repeat as needed. Let the juicer stop completely before using the REVERSE button to prevent malfunction.
- If the juicer does not work after these steps, disassemble and clean the parts before operating the juicer again.
Insert the prepared ingredients into the feed chute, one piece at a time.
Note |
• Prepare Ingredients for optimal extraction.
- If a large quantity of ingredients are put into the feed chute it can cause the juicer to stop. Insert the ingredients one piece at a time.
- Remove hard seeds, pits, and thick rinds from fruit.
Insert Into the Auto-Cut Chute
Hard vegetables & high fiber foods | (E.g. carrots, celery, kale)
Tip | • Tough and fibrous ingredients:
Ingredients with a width of 1.5 inches or less can fit into the auto-cut chute. Larger ingredients need to be trimmed to fit into the auto-cut chute.
- Fibrous leafy vegetables (celery, kale, collard greens, etc.): Ensure stems are no more than 1.5 inches wide. Bunch the leaves together to fit into the auto-cut chute.
Insert into the Flip Gate

Soft fruits & vegetables (E.g. apples, oranges, tomatoes)
Tip | • Soft ingredients: Insert ingredients into the flip gate and push down with the flip gate lid. If the ingredients are larger than the flip gate, cut them into smaller pieces.

Juice Cap
Use the juice cap to make mixed juice, prevent drips, or rinse between different juices.
TIP
- Juicing with the juice cap closed creates various mixed juice creations with different fruits, vegetables, and other ingredients.
- After juicing, close the juice cap to stop juice from dripping, especially when disassembling the juicing bowl off of the base.
- When making different juices, quickly rinse any leftover flavors by running a cup of water through the juicer with the juice cap closed.
Note |
- Leave the juice cap open when juicing ingredients that often create foam during extraction. (e.g. apples, celery)
- Pay close attention when operating with the juice cap closed. Juice may overflow if the juice collected in the juicing bowl exceeds its capacity.

After juice and pulp have been completely extracted, switch the unit OFF.
Note |
- If the remaining ingredients in the juicing bowl have not been extracted completely, the drum lid may not open easily. (After each extraction, run the juicer for an additional 30 seconds to let the juicer extract the remaining pulp.)
When the drum lid is stuck, press the REVERSE - OFF - FORWARD buttons in that order, repeating 2-3 times to dislodge food. Then place your hands on top of the drum lid and firmly press down as you simultaneously turn the drum lid counterclockwise to open.
* Depending on the ingredients, pour water down the feeding tube to rinse out the interior of the juicing bowl and then try to take off the drum lid.
TIPS ON OPERATION TIPS ON INGREDIENTS
- Operating the juicer without ingredients can cause damage to the screw.
- Do not continuously operate the juicer for more than 30 minutes.
This can cause the motor to overheat.
After continuous use, let the juicer rest for 30 minutes to cool down before starting another session. - Do not put hands, utensils, tongs, or other objects into the feed chute other than the provided pusher.
- During operation, do not put spoons, spatulas or other objects into the juice spout of the juicing bowl.
If objects are put into the juice spout during operation, such materials can get stuck and damage the juicer parts. - Do not put dried whole grains, fruits with hard seeds, or ice into the machine.
These may damage the juicer parts.
(e.g. juicing bowl, juicing screw, and strainer) - Beans or grains can be used if soaked overnight or boiled.
- Fruits with pits and hard seeds (e.g. nectarines, peaches, mangoes and cherries) must be pitted before juicing.
- Use of ice in the juicer will decrease the product durability over time.
- Beans or grains can be used if soaked overnight or boiled.
- Fruits with pits and hard seeds (e.g. nectarines, peaches, mangoes and cherries) must be pitted before juicing.
- Use of ice in the juicer will decrease the product durability over time.
- Do not use ingredients containing excessive amounts of vegetable oil or animal fat. Do not use the juicer to extract vegetable oil from ingredients.
If vegetable/animal oil gets on the juicing screw, it may reduce performance and even damage the part. - Do not reinsert the extracted pulp into the juicer. This can cause the juicer to stop or cause the drum lid not to open.
- After juicing ingredients with seeds, like grapes, thoroughly clean all the crevices on the bottom of the juicing screw.
Juicer damage due to owner negligence or from not following the instructions in the owner's manual will void the warranty service.
DO NOT put the following ingredients into the juicer:
Hard seeds

Peach, nectarines, apricot, plum, mango, etc. Remove hard seeds from the ingredients before juicing.
Hard or inedible skins
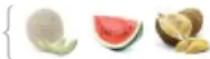
Pineapple, melon, mango, orange, etc. Peel the skins from the ingredients before juicing.
Large frozen fruits or ice

Large frozen fruits.
Do not process whole frozen fruits. Thaw frozen fruits slightly before making smoothies or sorbet with the juicer. Do not process ice.
Vegetable/animal oil

Sesame seed, butter, margarine, etc.
Do not extract ingredients containing vegetable or animal oil. This can reduce performance and even damage the juicer.
Others
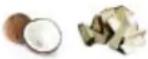
Coconut, sugarcane, whole grains, etc.
Do not extract ingredients with no water content.
Experience the best quality juice by understanding each ingredient's characteristics and knowing the optimal way of handling the ingredients.
The Slow Juicer is an innovative product that uses a patented slow-speed masticating technology to efficiently extract the juice from ingredients. The Julcer is designed to obtain the best results from ingredients with firm composition and with high water content. For best results, each ingredient should be prepared and extracted depending on its characteristics and properties.
INGREDIENT PREPARATION
Before Operating:
- Before Operating: If the juicer is jammed or if the drum lid does not open, press the REVERSE button and hold until ingredients become dislodged. Repeat REVERSE-OFF-FORWARD as needed.
- Continue operating the juicer until all the ingredients in the juicing bowl are extracted. The drum lid may not open easily if there is a lot of pulp remaining in the juicer.
• Every ingredient yields different amounts of juice.
Juice Yield:
- For optimal extraction and maximum juice yield, prepare the ingredients following the guidelines given in this section.
- Insert ingredients slowly, monitoring how the ingredients are extracted. The juice yield may vary depending on the juicing speed.
Soft fruits and vegetables (e.g. apples, oranges, tomatoes)
Flip Gate
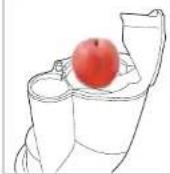


- Peel the skin off oranges. Remove the stems of tomatoes and apples. - Slowly insert Ingredients into the flip gate.

- if the ingredients are larger than the flip gate, cut the ingredients into smaller pieces.
PREPARATION TIPS:
- If the ingredients are larger than the flip gate, them in half or into wedges.
JUICING TIPS:
- Fruits with hard seeds must be pitted before extraction.
- Use the pusher to push the ingredients down the feed chute. (The pusher also blocks any juice that may spray during extraction.)
- Leave the juice cap open when juicing ingredients that create excessive foam during extraction. (Foam can accumulate if operated with the juice cap closed.)
- It is recommended that the extracted juice be consumed within 48 hours. Depending on the density of the ingredients, the extracted juice can gradually show layers over time.
- When an ingredient is being masticated by the juicing screw, the squeezed ingredient may splash juice up the feed chute. Use the pusher to block out the juice splash when juicing.
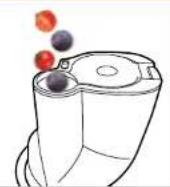
Ingredients with small seeds (e.g. raspberry, pomegranate, grape)
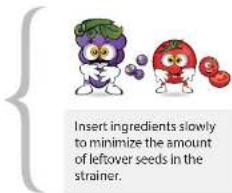
Slowly insert ingredients with small seeds to prevent the seeds from clogging the strainer.
Auto-Cut Chute
text_image
Insert ingredients slowly to minimize the amount of leftover seeds in the strainer.PREPARATION TIPS:
• Thoroughly rinse ingredients. Remove and discard any stems.
• For best results, juice with ingredients that contain more water (e.g. apples, pears).
JUICING TIPS:
- Depending on the size of the berry, insert 3-5 at a time while monitoring the extraction.
- For small ingredients like pomegranate seeds and raspberries, insert about 1 tablespoon (5g) at a time.
Caution
If the lid does not open due to excessive amount of small seeds left in the juicing bowl, continuously run the juicer for 30 seconds to extract any leftover seeds. If the lid is still stuck, repeat REVERSE - OFF-FORWARD until the ingredients become dislodged. Place both hands on the drum lid and firmly press down while simultaneously turning the drum lid to open. Depending on the ingredients, pour some water down the feed chute to help with dislodging.
INGREDIENT PREPARATION
How to Use the Juice Cap:
- Juicing with the juice cap closed allows mixed juice creations with different fruits, vegetables and liquids.
• After juicing, close the juice cap to block excess juice from dripping, especially when disassembling the juicing bowl off the base. - When making different juices, quickly rinse away any leftover flavors by running a cup of water through the juicer with the juice cap closed.
- Leave the juice cap open when juicing ingredients that create excessive foam during extraction (e.g. apples, celery).
- Pay close attention when operating the Juicer with the juice cap closed. Juice may overflow if the juice collected in the juicing bowl exceeds its capacity marked on the juicing bowl.
Adjusting the Amount of Pulp in the Juice:
- Depending on the ingredient, you may get extra pulp in the juice when juicing continuously.
• To reduce the amount of pulp, disassemble the top-set and wash frequently.
Hard fruits and vegetables (e.g. carrots, beets, ginger, kohlrabi, quince)
Hard fruits and vegetables may put excess strain onto the motor and cause it to stall.
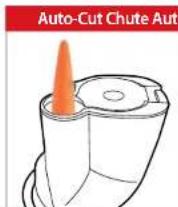

Ingredients with a thickness of 1.5 inches or less can be inserted whole. For thicker ingredients, cut them by 1.5 inches of width or less before feeding.
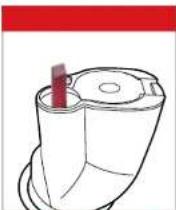

Beets, ginger, quince, and kohlrabi can be cut into 1 inch or less pieces for easier juicing.
Caution | It is not recommend to juice large amounts of dry root vegetables, such as beets, ginger, kohlrabi, or hard fruits like quince, by themselves.
- Bu, k juicing these only ingredients may cause a decrease in product performance.
PREPARATION TIPS:
• Prepare carrots after removing the stem.
- Soak ingredients like carrots in cold water for about 30 min prior to juicing for best results.
JUICING TIPS:
- Slowly insert the ingredients one at a time.
• To maximize the juice yield, juice with ingredients with high water content.
Fibrous and/or tough leafy ingredients (e.g. celery, kale)
Auto-Cut Chute
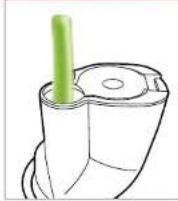

Bundle up the leafy part and insert them facing down. Do not collect more than 2 cups (500g) per session.
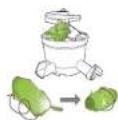
If leafy ingredients wrap around the juicing screw, open the lid and remove the fibers before continuing to juice.
PREPARATION TIPS:
- Separate each stem. Cut the outer stems that are thick and tough to be 1.5 inches wide.
- Soak the leafy greens in cold water for about 30 min prior to juicing for best results.
JUICING TIPS:
• One at a time, slowly insert the prepared ingredients.
- Insert more ingredients after the previously inserted ingredients have been completely extracted.
① Roll leaves into spirals before inserting into the juicer.
② For best result, disassemble and wash the top-set before juicing again.
③ For ingredients like wheatgrass, grab a handful and insert in a bundle.
- It's best to juice with ingredients with higher amounts of liquid, like apples or carrots.

Caution | • For ingredients like pineapple, slice off the rind of the pineapple and cut around the fibrous core. Cut the flesh of the pineapple into smaller pieces.
- Recommended amount of juicing per session is 2 cups (500g). When juicing more than 2 cups, wash the top-set before juicing the next batch.
HOW TO DISASSEMBLE AND CLEAN
*The products illustrated in this bucket may vary slightly from the actual product.
1 Switch OFF and unplug the power cord from the wall outlet.
Note | Extract all the remaining pulp in the juicing bowl before stopping the juicer.
- For easier clean up, operate the juicer for an additional 30 seconds after the juice is extracted.
- When the drum lid is stuck, press the REVERSE - OFF - FORWARD button in this order, switching back and forth 2 to 3 times to dislodge. Then place both hands on the drum lid and firmly press down while simultaneously turning the drum lid to open.
• Fill the juicing bowl with water and run the juicer before opening the drum lid. It may help to open the drum lid when stuck.
2 Turn the drum lid counterclockwise to open.
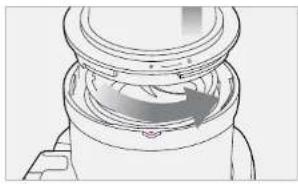
natural_image
Technical line drawing of a mechanical component with internal flow arrows (no text or symbols)Note | When moving the appliance, do not lift by grabbing the feed chute. Always lift the appliance by grabbing the base or handle.
3 Turn the top-set counterclockwise and lift off the base.
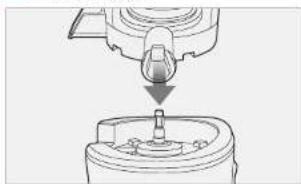
natural_image
Technical line drawing of a mechanical component with a downward arrow indicating motion (no text or symbols)4 Remove the juicing screw, strainer and rotation wiper unit from the juicing bowl. Clean with provided brush.
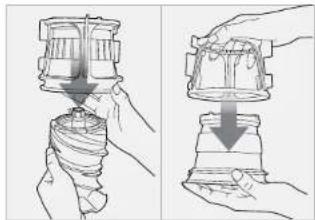
natural_image
Illustration of two hands performing a mechanical press or stamping operation (no text or symbols present)Note | • Immediately clean the juicer after each use. If remaining residue in the juicer dies up, it can make disassembling and clean-up difficult. The excess build up can cause poor performance in future uses.
- For easier disassembly, place the top-set in the sink and run water through the top of the top-set.
• Thoroughly rinse the bottom of the juicing screw.
5 Place the juicing bowl under running water.
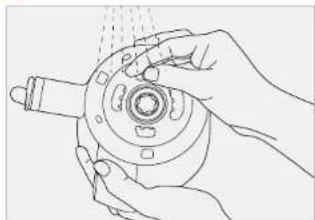
natural_image
Line drawing of hands holding a mechanical component with a spray gun (no text or symbols)TIP | • The round brush can clean the juice spout of the juicing bowl.
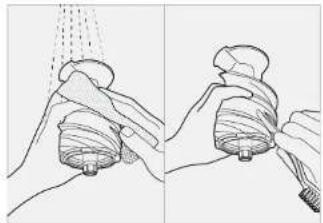
6 Under running water, clean the outside of the juicing screw with a dish scrubber. Use the tip of the cleaning brush to push out any residue in the crevices on the bottom of the juicing screw.
natural_image
Illustration of two hands using a showerhead to lift a shower, showing spray application (no text or symbols)Tip | Thoroughly clean the juicing screw ensuring that the juicing screw is clean without any residue.
• Completely dry before using.
Note | • After juicing ingredients with seeds, make sure to thoroughly clean the bottom crevice of the juicing screw. (If this area isn't properly cleaned, it can cause the part to be damaged).
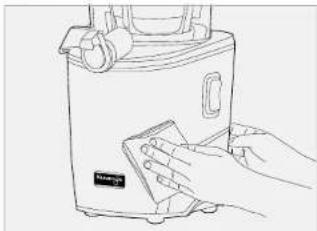
7 Clean the body with a soft damp towel and dry.
natural_image
Line drawing of a hand cleaning a small appliance with a cloth (no text or symbols)Note | • If the towel is dripping wet, make sure to squeeze out the excess liquid before using it on the juicer.
Quick Rinsing
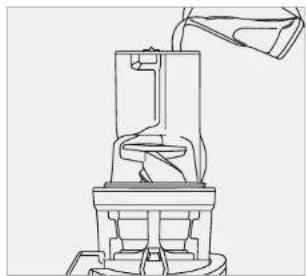
1 With the juice cap closed, fill the juicing bowl with water and turn on the juicer.
natural_image
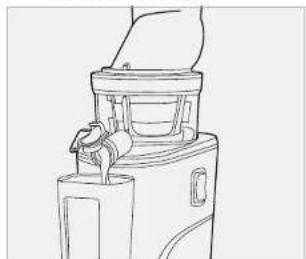
Technical line drawing of a mechanical device with a pouring component (no text or symbols)2 Let it run for about 1 minute. Open the juice cap and let the water run out of the juicing bowl.
natural_image
Line drawing of a blender with a handle and lid, no text or symbols presentTip | It is not necessary to completely clean the juicer in between juices during a single juicing session.
- When finished with juicing, always disassemble and clean thoroughly between juicing sessions to prevent residue buildup.
HOW TO CLEAN SILICON PARTS
Tip | Clean the rotation wiper under running water.
Thoroughly dry after cleaning. Before assembling the top-set, ensure that the silicon ring is firmly inserted.
Note | If the silicon ring is not firmly inserted, juice may leak from the bottom of the juicing bowl.
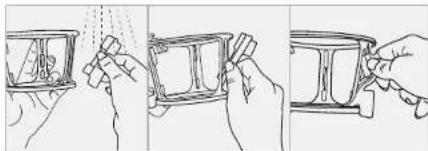
natural_image
Illustration of hands holding a cup and a tray, showing step-by-step preparation (no text or symbols)Silicon Brush
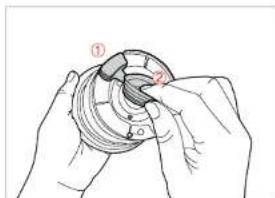
Pull out the silicon brushes from the rotation wiper to clean.
After cleaning, insert into the slot with the tail pointing down as shown in the illustration.
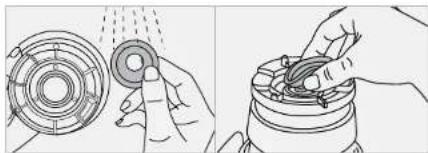
natural_image
Illustration showing two hands operating a mechanical component with a circular component and a handle, no text or symbols present.Silicon Ring
Remove the silicon ring from strainer to clean.
After cleaning, push in the silicone ring.
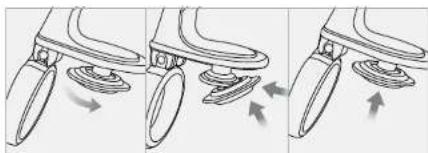
natural_image
Three-panel diagram showing a foot with wheels and directional arrows indicating motion (no text or symbols)Juice Cap
Remove from the juice spout to clean.
After cleaning, attach the juice cap silicon to the juice spout.
Cleaning inside of the bowl
Please unscrew the cover on the bottom and clean inside. After cleaning, make sure that protrusion part of gear is placed on the outer part so it fits (connects) with the drum. Sequence of assembly is in reverse order of disassembly.
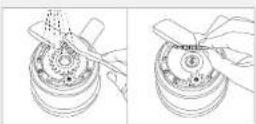
HOW TO USE THE CLEANING TOOL
* The products illustrated in this bucket may vary slightly from the actual product.
Tip | The cleaning tool makes clean-up quick and easy. Completely dry after cleaning.
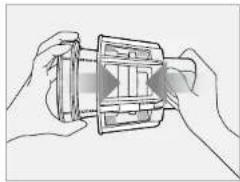
1 Hold the cleaning tool with one hand and insert the strainer into the cleaning tool.
Note | Insert the strainer until you hear a click.
2 Under running water, rotate the cleaning tool and the strainer in opposite directions to clean.
3 Thoroughly rinse the inside and outside of the strainer under running water.
4 After cleaning, remove the strainer from the cleaning tool. Dry before storing.
natural_image
Line drawing of hands holding a mechanical component with a tool, no text or symbols present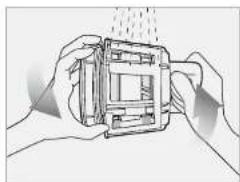
natural_image
Illustration of hands holding a small mechanical component with spray, no text or symbols present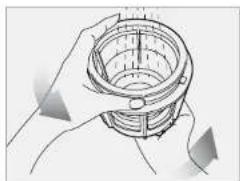
natural_image
Illustration of hands holding a cylindrical mechanical component (no text or symbols visible)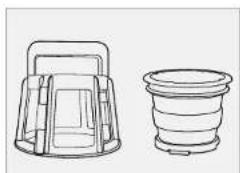
natural_image
Line drawings of two plastic containers, one with a handle and the other with a spool (no text or symbols)HOW TO USE THE BLANK STRAINER
* Disassemble in reverse order of assembly.

Before use, make sure the silicon ring is correctly in place.

To assemble the top-set place the juicing screw and the blank strainer in the juicing bowl and close the lid.
① Insert the blank strainer into the juicing bowl while aligning the red dots of the blank strainer and the juicing bowl.
② Insert the juicing screw into the blank strainer with a twisting motion.
③ Place the lid onto the juicing bowl by aligning the white dot of the lid with the red dot of the juicing bowl. Then, rotate the lid clockwise until the lid is secured.
* When using the blank strainer, always leave the juice cap open.
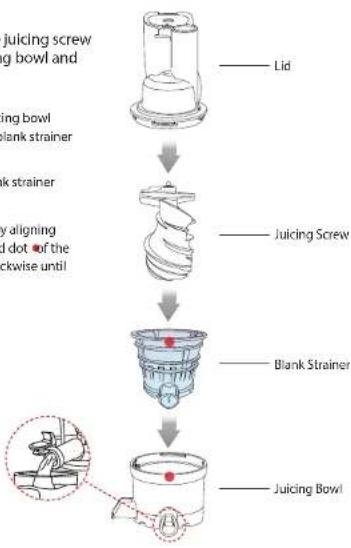
flowchart
graph TD
    A["Lid"] --> B["Juicing Screw"]
    B --> C["Blank Strainer"]
    C --> D["Juicing Bowl"]
    style A fill:#f9f,stroke:#333
    style B fill:#ccf,stroke:#333
    style C fill:#cfc,stroke:#333
    style D fill:#fcc,stroke:#333

IMPORTANT TIPS
- Allow the frozen items to thaw for 5 to 20 minutes before use.
- Put a small portion of ingredients at a time and give enough time for the juicer to process before putting more. Do not overfeed.
- When using the blank strainer, always leave the Smart Cap open.
• Make sure the silicone ring is correctly in place. - Do not insert ice, meat, oil, or fat-based ingredients.
- Remove hard seeds, pits, or peels.
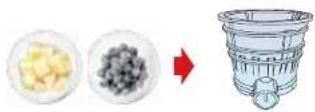
HOW TO CLEAN THE SILICON RING
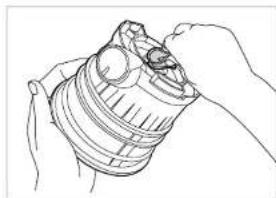
natural_image
Line drawing of a hand holding a cylindrical object (no text or symbols)The silicon ring is removable for cleaning. After cleaning, insert the silicon ring as shown in the picture.
TIP | Carefully insert the silicon ring by aligning grooves and wedges.
HOW TO USE THE SMOOTHIE STRAINER
* Disassemble in reverse order of assembly.

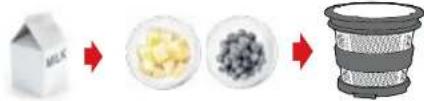
Use the smoothie strainer to create a rich smoothie texture with frozen berries, banana, mangoes, and avocados.

To assemble the top-set place the juicing screw and the smoothie strainer in the juicing bowl and close the lid.
① Insert the rotation wiper and the smoothie strainer into the juicing bowl while aligning the red dots of the smoothie strainer and the juicing bowl.
② Insert the juicing screw into the smoothie strainer with a twisting motion.
③ Place the lid onto the juicing bowl by aligning the white dot of the lid with the red dot of the juicing bowl. Then, rotate the lid clockwise until the lid is secured.
※ When using the smoothie strainer, make sure the juice cap is closed to make a thoroughly combined smoothie.
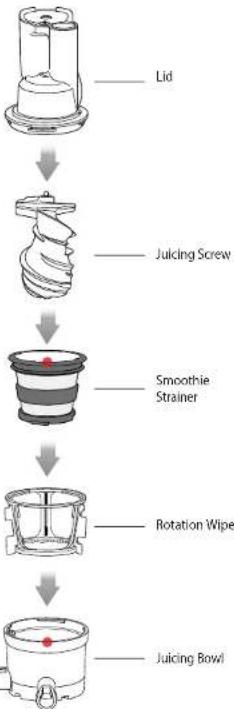
flowchart
graph TD
    A["Lid"] --> B["Juicing Screw"]
    B --> C["Smoothie Strainer"]
    C --> D["Rotation Wiper"]
    D --> E["Juicing Bowl"]

IMPORTANT TIPS
- It's normal to have leftover pulp inside the juicer when using the smoothie strainer. Limit to making a maximum of 2 cups of smoothie per session.
- For best result, add at least 1/2 cup of juice or any type of liquid for every 1 cup of smoothie. Add a little more liquid if needed.
- Put a small portion of ingredients at a time and give enough time for the juicer to process before putting more. Start with soft ingredients first then add harder ingredients for the best result.
- When using frozen ingredients, make sure to thaw for at least 10 minutes before using it.
- Limit to processing 1 cup of loose greens per session. Do not use vegetable stems or celery.
- Keep the smart cap closed when using the smoothie strainer.
- Remove hard seeds, pits, or any peels.
- Do not insert ice, meat, oil, or fat-based ingredients.
text_image
MILK → cheese chips →HOW TO CLEAN THE SILICON COVER
natural_image
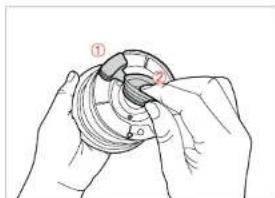
Illustration of hands holding a mechanical component with numbered callouts (no text or symbols)The silicon cover is removable for cleaning. After cleaning, insert the silicon cover as shown in the picture.
TIP | Carefully insert the silicon cover by aligning grooves and wedges.
HOW TO USE THE LID OPENER
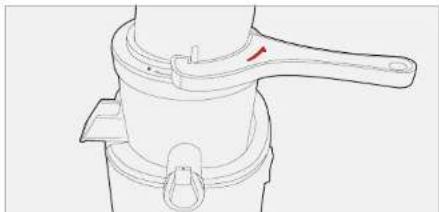
Use the lid opener when the lid doesn't open normally after juicing.
Position the lid opener horizontally and connect the hooks as shown in the illustration.
CAUTION Be sure that the top-set is on the main body before using the lid opener.
natural_image
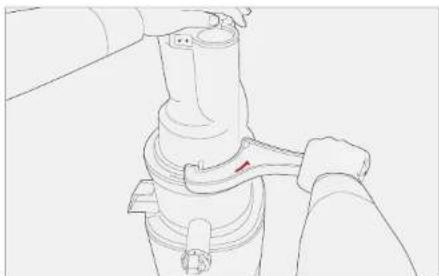
Line drawing of a mechanical device with a handle and lever (no text or symbols)Hold the feed chute steady and turn the lid opener counterclockwise.
natural_image
Line drawing of a mechanical assembly with a hand operating a tool (no text or symbols)TROUBLESHOOTING Q&A
■ When there is no power to the juicer:
- Check if the power cord is properly plugged in.
- Check if the drum lid and the juicing bowl are
properly assembled. - Check if the top-set and the base are properly assembled.
- Juicer will not operate if parts are not assembled properly.
Low juice yield:
- Different ingredients hold different amounts of liquid that will yield different amounts of juice.
- If the ingredients are not fresh, they may contain reduced amounts of liquid which will yield less juice. Soak ingredients in cold water for about 30 min prior to juicing for the best results.
- If the ingredient itself has low water content, it may help to soak it in water before juicing.
- If juicing ingredients with small seeds, after a few servings the juice yield may be reduced. For best results, disassemble and wash the top-set in between juice sessions.
- If there is seed residue on the bottom of the strainer, this can affect juicer performance and the overall juice yield.
There is too much pulp in the juice:
• To reduce the fine pulp, clean the top-set frequently and remove the pulp.
- If the strainer and the screw are damaged and affecting the juicer's performance, it is recommended the parts be replaced.
* The lifetime of each part may vary depending on length and method of use and ingredients extracted.
The drum lid will not close:
• Make sure the juicing screw is pushed all the way into the strainer in order for the drum lid to close properly.
- If the juicing screw is not properly in position, the drum lid may not close.
Odd noise from the juicer
- Check if the parts are assembled correctly.
Try reassembling the parts and listen for the odd noise. - Do not start the juicer unless there are ingredients and or liquid in it.
- Operating the juicer without ingredients can cause damage to the screw.
- If the juicer is operated without ingredients or liquid, the noise level can increase and can also lead to damage.
• The friction noise from the juicing screw and the strainer will disappear when ingredients are inserted into the juicer.
• If the noise occurs when ingredients are inserted into
the juicer, check the size of the ingredients.
Do not insert anything over 1.5 inches in thickness.
Depending on the type of ingredients, the dimensions can be smaller.
The noise can occur if the juicer is operated on an uneven or slanted surface. Place the juicer on a horizontally flat surface when operating.
■ The extracted pulp is very moist:
During the very beginning of extraction, the pulp can be more moist temporarily.
Pulp can be affected by the ingredient's condition. When the ingredient is not fresh, the juice often sticks to the pulp.
■ During operation, the juicing bowl shakes:
The juicing screw and the strainer are set up to crush and squeeze the ingredients. It is normal for the juicing screw and the strainer to vibrate.
If the ingredient is very fibrous, the vibration from the top-set may be stronger.
During juicing, the juicer stopped:
Check the power cord and make sure it is plugged in correctly.
Check that all the parts are correctly assembled. If too many ingredients are inserted at one time this can cause the juicer to stop,
When the juicer stops because there are too many ingredients inserted in it, press the REVERSE - OFF - FORWARD button in this order, switching back and forth 2 to 3 times.
The reverse setting will push the ingredients up, and the forward setting will pull the ingredients down.
After using for more than 30 minutes, the juicer may stop due to overload protection. Let the juicer cool for 30 minutes to 1 hour before juicing again.
If there are hard seeds within the ingredients, remove them before juicing. Hard seeds can damage the juicer.
■ Layers of separation in the juice:
Depending on the density of the ingredients, the extracted juice may show layers of different juices. It is different from separation due to oxidation caused by juicing with a high-speed juicer.
The drum lid is stuck:
After juicing, let the juicer operate for another 30 seconds to extract the remaining pulp.
If there is too much pulp in the top-set, this can cause the drum lid to not open. In this situation, press
TROUBLESHOOTING Q&A SPECIFICATIONS
the REVERSE-OFF-FORWARD button in that order, and repeat 2-3 times. Then place both hands on the drum lid and firmly press down while simultaneously turning the drum lid to open.
- Pour water down the feed chute to rinse out the inside and then try opening the drum lid.
■ Juice dripping down the base:
- If the silicon ring on the bottom of the strainer is not put in correctly, the juice may seep out onto the juicer base. Before assembling the parts, check and make sure the silicon ring has the flat part in the middle, on the inside of the strainer and the skirt on the outside of the strainer.
Is it possible to juice ingredients with tough fiber?
- Ingredients like celery or ginger contain long fibers that may wrap around the juicing screw and affect the juicer's performance. When juicing fibrous ingredients, do not collect more than 1 lb. of juice. After collecting this quantity or less, clean the top-set completely before juicing again.
■ Discoloration of the plastic parts:
- After juicing, if the juicer is not cleaned right away, the remaining pulp inside the top-set can dry up which can make disassembling and cleaning hard. This can also affect the juicer's performance and color.
- Ingredients that are rich in carotenoids such as carrots and spinach may dye plastic parts. When the parts are dyed with carotenoids, rub vegetable oil in to the dyed areas and use mild soap to clean.
- Vegetable oil should only be used during clean-up for parts that are discolored. Do not use vegetable oil on the juicing screw or the strainer. If vegetable oil or oil from animal fat gets on the juicing screw or the strainer, this can affect the juicer's performance and may result in damaged parts.
- The silicon pieces on the top-set can be detached to be thoroughly cleaned.
■ Using for purposes other than juicing:
• This juicer is designed to juice ingredients like fruits and vegetables.
• Do not use the juicer for extracting vegetable oil.
- Do not juice ingredients with high contents of vegetable/animal oil.
- If vegetable/animal oil gets on the juicing screw or the strainer, this can affect the performance of the juicer and could result in damaged parts.
| Product | Juicer |
| Model | REVO830, REVO830M |
| Voltage | AC120V, 60Hz |
| Power Consumption | 240W |
| Maximum Use | Less than 30 min |
| Weight | 7.5kg (16.5 lbs) |
| Dimension | 256 x 210 x 480 mm (10 x 8 x19 in) |
| Manufacturer | NUC Electronics Co., Ltd. |
| Type | Low speed compression |
| Origin | Made in Korea |

text_image
Kuvings® WHOLE SLOW JUICERKuvings®
REVO830
EXTRACTEUR BASSE VITESSE KUVINGS
OPTIMISÉ POUR LES CAROTTES & CÉLERI
MANUEL
natural_image
Line drawing of a Kuvanis blender with control panel and speaker (no text or symbols on the device itself)TABLE DE MATIÈRES
text_image
Technical diagram illustrating the assembly of a blender with labeled parts and a magnified view of the component.ÉTAPE 1
natural_image
Technical line drawing showing two views of a mechanical component with red dots indicating points (no text or symbols present)2
natural_image
Diagram of a mechanical component with a downward arrow indicating force or direction (no text or symbols)natural_image
Diagram showing a curved path with a red dot and directional arrow, no text or symbols present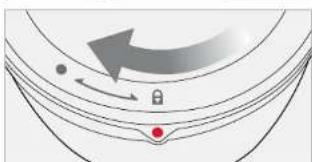
natural_image
Diagram showing a curved arrow with a dot and a lock, no text or symbols presentÉTAPE 2
natural_image
Line drawing of a hand pressing down on a cylindrical object (no text or symbols)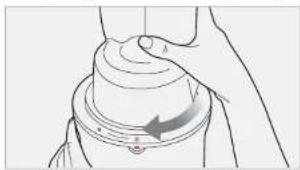
natural_image
Line drawing of a hand holding a mechanical component with an arrow indicating motion (no text or symbols)4
natural_image
Technical line drawing of a mechanical component with a downward arrow indicating process (no text or symbols)5
natural_image
Technical line drawing of a mechanical component with no visible text or symbolsnatural_image
Mechanical assembly diagram showing a tool pressing into a cylindrical component (no text or symbols visible)natural_image
Illustration of two hands performing a mechanical press or stamping operation (no text or symbols present)natural_image
Line drawing of hands holding a mechanical component with a spray gun (no text or symbols)natural_image
Illustration of two hands holding a mechanical device, showing motion and assembly (no text or symbols)natural_image
Line drawing of a hand cleaning a blender with a sponge (no text or symbols)natural_image
Technical line drawing of a mechanical device with a pouring component (no text or symbols)natural_image
Line drawing of a blender with handle and spout (no text or symbols)natural_image
Illustration of hands holding a cup and a tray, showing step-by-step preparation (no text or symbols)Ailettes en silicone
natural_image
Illustration showing two hands performing a mechanical operation: one pouring liquid into a circular component, the other handling a tool (no text or symbols present)Anneau en silicone
natural_image
Three-panel diagram showing a foot with circular components and directional arrows indicating motion (no text or symbols)Smart Cap (Bouchon)
natural_image
Line drawing of hands holding a mechanical component with a tool, no text or symbols presentnatural_image
Illustration of hands holding a small mechanical component with spray, no text or symbols presentnatural_image
Illustration of hands holding a cylindrical mechanical component with a scale and pointer (no text or symbols)natural_image
Line drawings of two plastic containers, one with a handle and the other with a spool (no text or symbols)natural_image
Line drawing of a hand holding a cylindrical container (no text or symbols)Use the smoothie strainer to create the rich, smoothie texture with frozen berries, banana, mangoes, and avocados.
text_image
MLK → ↑ ↓NETTOYAGE DU REVÊTEMENT EN SILICONE