18-2868 - Oven Cotech - Free user manual and instructions
Find the device manual for free 18-2868 Cotech in PDF.


| Product Type | Electric Convection Heater |
| Brand | Cotech |
| Model | 18-2868 / TBK050-M10X-UK |
| Power Supply | 220–240 V AC, 50 Hz |
| Power Output | Max 1000 W (Express) / 500 W (Economy) |
| IP Rating | IP24 (splash-proof) |
| Dimensions (L × W × D) | 49 × 42 × 9 cm |
| Weight | Approx. 3.5 kg |
| Cable Length | 1.8 m |
| Installation Options | Free-standing with feet or wall-mounted with included bracket |
| Controls | Power switch (OFF/EXPRESS/ECONOMY) + Thermostat dial |
| Safety Features | Tip-over switch, overheat protection, earth connection |
| Heating Element | PTC ceramic or similar (not specified) |
| Application | Indoor domestic use only |
| Care Instructions | Wipe with dry cloth; do not use water or solvents |
| Included Accessories | Feet (pair), wall bracket, wall plugs, screws, spacers, anchor |
Frequently Asked Questions - 18-2868 Cotech
User questions about 18-2868 Cotech
0 question about this device. Answer the ones you know or ask your own.
Ask a new question about this device
Download the instructions for your Oven in PDF format for free! Find your manual 18-2868 - Cotech and take your electronic device back in hand. On this page are published all the documents necessary for the use of your device. 18-2868 by Cotech.
USER MANUAL 18-2868 Cotech
ART.NO
18-2868
36-5613
MODEL
TBK050-M10X-UK
TBK050-M10X

Important!
Read the entire instruction manual carefully and make sure that you fully understand it before you use the equipment. Keep the manual for future reference.
Viktig information:
Original instructions
Bruksanvisning i original
Please read the entire instruction manual before using the product and then save it for future reference. We reserve the right for any errors in text or images and any necessary changes made to technical data. If you have any questions concerning technical problems please contact our Customer Services.
Safety
The following safety instructions must be followed; for your safety and the safety of others. Carefully read through all the instructions before using the heater.
- Children between the ages of 3 and 8 must only switch the heater on/off provided that it has been placed or installed in its normal operating position and provided that the children are under adult supervision or have been instructed in the save use of the product and understand the hazards associated with heaters.
- Children between the ages of 3 and 8 must not plug the heater into an electrical socket, change the settings, clean or carry out any maintenance work on the heater.
- Children under the age of 3 must not be in the vicinity of the heater unless they are under the constant supervision of an adult.
- WARNING – certain parts of the heater can become very hot and cause burns. Special care must be shown if children, pets or anyone requiring special attention is present in the same room as the heater.
- The heater should not be placed directly beneath a wall socket.
- The heater must never be used with a timer or other equipment which turns the heater on automatically. This is because the heater might be in a dangerous position or covered by a flammable object which could constitute a fire hazard.
- Never place the heater close to a bathtub, shower or swimming pool.
- The heater must not be immersed in water for cleaning.
- Do not place the heater close to curtains or combustible materials which could ignite and start a fire. The heater must not be placed on a soft carpet, rug or similar surface which could block the air intake on the bottom of the heater.
Fire hazard!
- The heater must not be covered over with anything whilst it is switched on or before it has cooled down after use.
- Do not coil the mains lead around the heater.
- The heater must never be used where flammable liquids or explosive gases are stored.
- The heater must not be used as a towel dryer or for drying clothes.
- Do not use the heater for heating greenhouses, saunas, drying rooms or similar locations.
- Do not use the heater for heating locations where livestock or animals are housed.
-
The heater should be placed on a flat, level surface.
-
The heater becomes very hot during use and will remain so for a while, even after being switched off. The heater should therefore never be touched until it has cooled sufficiently.
- The heater should be treated with care; it should not be subjected to impacts and vibrations.
- The heater must only be connected to an earthed electrical socket.
- If the heater is damaged it should be replaced by a qualified service technician.
- If the mains lead is damaged it must only be replaced by the manufacturer, retailer or other qualified service technician.
- The heater may be used by persons with reduced physical, sensory or mental capability, lack of experience or knowledge which could jeopardise their safety, provided they have been given supervision or instruction concerning the safe use of the product and understand the hazards involved.
- The heater is only intended for domestic use. It must not be used on building sites, in greenhouses, barns or stables containing combustible dust.
- The heater becomes very hot during use. Pull out the plug and let the heater cool before cleaning.
- The heater should be plugged into an electrical socket which is visible and easy to access.
• Always unplug the heater when it is not in use. - The heater is only designed for normal indoor use (IP24) and must not be used outdoors.
- Never turn the heater off by unplugging it. Always turn the heater off by setting the on/off switch to the off position.
- Ensure that no foreign objects enter the heater as this may lead to short circuiting, electric shock, or a fire hazard.
- Never position the heater in such a way that the mains lead is directly in front of or touching the housing of the heater.
- The heater must only be connected to an earthed electrical socket with a power supply of 220–240 V AC.
- Only use the heater as described in the instruction manual. Do not use the heater for any purpose other than that for which it was intended or modify it in any way.
- Make sure the heater is clean and is not covered with dust or residue.
- The heater can either be used with the included feet fitted, standing on a hard flat level surface or mounted on a wall using the included wall bracket.
- For extra safety, all electrical products connected to the mains should be run through an RCD for personal safety. The RCD should be rated to trip at 30 mA.
Storage
Store the heater in its box in a cool and dry location, together with its instruction manual.
Assembly
Compact electric radiator for free-standing or wall mounted use.
Fixings

- Wall plugs and screws (2 ×)
- Wall anchor with 1 short screw and 1 wall screw
- Wall bracket with short screw (2 ×)
- Spacer with short screw (2 ×)
- Foot with screw (2 ×)
Free standing use
Securely attach both feet (5) to the bottom of the heater using the supplied sheet metal screws.
Note: The heater must not be used free-standing if the feet are damaged or missing.

Wall mounted use
- Screw the wall brackets (3) on either side of the handle on the back of the heater using the short screws. The screws must be in the lower holes in order for the heater to hang on the keyhole slots.
- Screw the spacers (4) onto the lower edge of the back of the heater using short screws.
- Screw the wall anchor (2) to the lower back of the heater using a short screw.

-
Measure the distance between the centres of the keyhole slots and mark out the position of the mounting screws on the wall. Screw in the two long screws, but not completely, leave them protruding about 5 mm. Use a masonry drill and wall plugs if necessary.
-
Hang the heater onto the screws.
-
Screw the wall anchor (2) onto the wall using the long screw.
Operating instructions
- Stand the heater on a firm, flat level surface or mount it on a wall using the included bracket and in accordance with the pictured minimum clearance requirements (in millimetres).

- Make sure that the power switch is set to POWER OFF before plugging the heater into a wall socket.
- Plug the mains lead into a wall socket.
- Set the power switch knob to either EXPRESS (1000 W) or ECONOMY (500 W). The power indicator lamp lights up when the heater is heating, i.e., when the heater is plugged in, switched on and the thermostat is operating.
- Set the fundamental temperature setting: slowly turn the thermostat clockwise to MAX and let the heater warm up. Then slowly turn the thermostat anticlockwise until it clicks and the heater switches off (the indicator light goes out). Leave the heater on for a while and fine-tune the thermostat setting to the desired temperature.
- Set the power switch to POWER OFF to switch the heater off and then unplug it from the wall socket when you have finished using it.
Note: The heater is fitted with a tip-over switch which switches the heater off if it leans or falls over. The tip-over switch resets automatically as soon as the heater returns to the vertical.

Care and cleaning
We recommend that the heater is cleaned at least once a month and before storing it away.
- Switch the heater off, unplug it from the wall socket and let it cool.
- Use a dry cloth to wipe off any dust or debris from the housing.
- Avoid using water, wax, polish, solvents or other chemical solutions.
Disposal
This product should be disposed of in accordance with local regulations. If you are unsure how to proceed, contact your local council.
Specifications
Voltage 220–240 V AC, 50 Hz
Output power Max 1000 W
IP rating IP24
Cable length 1.8 m
Size 49 × 42 × 9 cm (L × W × D)
Panelelement
ART.NR 18-2868 MODELL TBK050-M10X-UK 36-5613 TBK050-M10X
Väggmontering
Veggmontering
- Fest veggfestene (3) med korte skruer på begge sider av håndtaket på baksiden av ovnen. Skruen skal skrus i det nedre hullet slik at nøkkelhullfeste blir riktig.
- Skru fast distansestykkene (4) med korte skruer. Det skal festes lengst nede på baksiden av elementet.
- Skru fast veggforankringen (2), som sitter lengst nede på elementet, med en kort skrue.

- Merk først av avstanden mellom nøkkelhullfestene på veggen og skru i to lange skruer som elementet skal henge på. Ikke skru dem helt inn, men la det være en avstand på ca. 5 mm mellom skruehode og vegg. Bruk bor og plugg dersom det er behov for det.
- Heng opp ovnen på skruene.
- Skru fast veggforankringen (2) i veggen med en lang skrue.
Bruk
- Ovnen skal plasseres på en jevn, horisontal, stabil og hard flate eller den kan henges på en vegg med monteringsdetaljene ihht. målene på skissen (i millimeter).
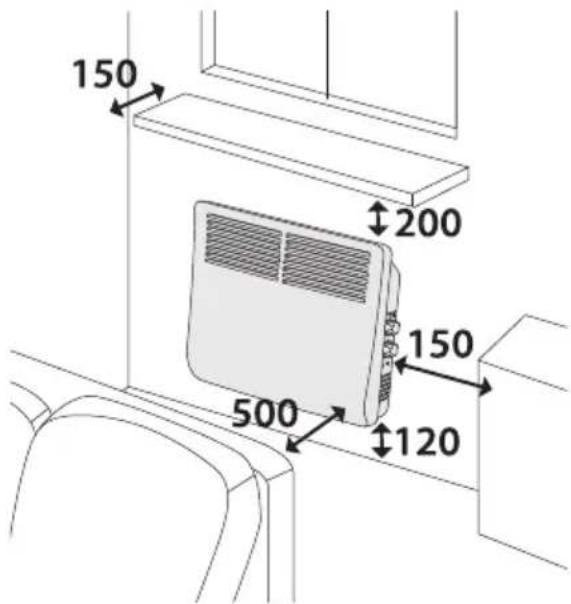
- Påse at strømbryteren står innstilt på POWER OFF før strømmen kobles til.
- Sett støpselet i strømuttaket.
- Still strømbryteren på EXPRESS (1000 W) eller ECONOMY (500 W). Kontrollampen lyser när elementet varmer, d.v.s. när det er koblet til et strømuttak, og strømbryteren og termostaten er tilkoblet.
- Still inn grunninnstillingen for temperaturen: Drei termostaten sakte medurs til MAX og la ovnen bli varm. Drei så termostaten moturs, sakte, til du hører en klikkelyd og ovnen stenges (kontroll-lampen slukkes). La ovnen stå på en stund og finjuster deretter termostaten til ønsket temperatur.
- Still inn bryteren på POWER OFF for å stenge elementet, og trekk deretter ut støpselet når du ikke skal bruke det mer.
Seinäkiinnitys
Wandmontage
POSTAL 10 – 13 Market Place
Kingston Upon Thames
Surrey
KT1 1JZ
DEUTSCHLAND

Brand : Cotech
Model : 18-2868
Category : Oven