721-231 - Snow blower Meec Tools - Free user manual and instructions
Find the device manual for free 721-231 Meec Tools in PDF.


| Product Type | Snow Blower |
| Brand | Meec Tools |
| Model | 721-231 |
| Power Source | Electric Corded |
| Motor Power | 2000 W |
| Clearing Width | 50 cm (20 in) |
| Intake Height | 30 cm (12 in) |
| Throwing Distance | Up to 10 m |
| Chute Rotation | 180° (Manual) |
| Number of Wheels | 2 |
| Weight | 20 kg (44 lb) |
| Dimensions (L x W x H) | 60 x 50 x 80 cm |
| Housing Material | Steel / Plastic |
| Safety Features | Release switch, overload protection |
| Maintenance | Clean after each use, check bolts, oil if needed |
| Storage | Store indoors in dry place |
| Accessories Included | Auger, collection bag |
| Warranty | 2 years (standard) |
Frequently Asked Questions - 721-231 Meec Tools
User questions about 721-231 Meec Tools
0 question about this device. Answer the ones you know or ask your own.
Ask a new question about this device
Download the instructions for your Snow blower in PDF format for free! Find your manual 721-231 - Meec Tools and take your electronic device back in hand. On this page are published all the documents necessary for the use of your device. 721-231 by Meec Tools.
USER MANUAL 721-231 Meec Tools
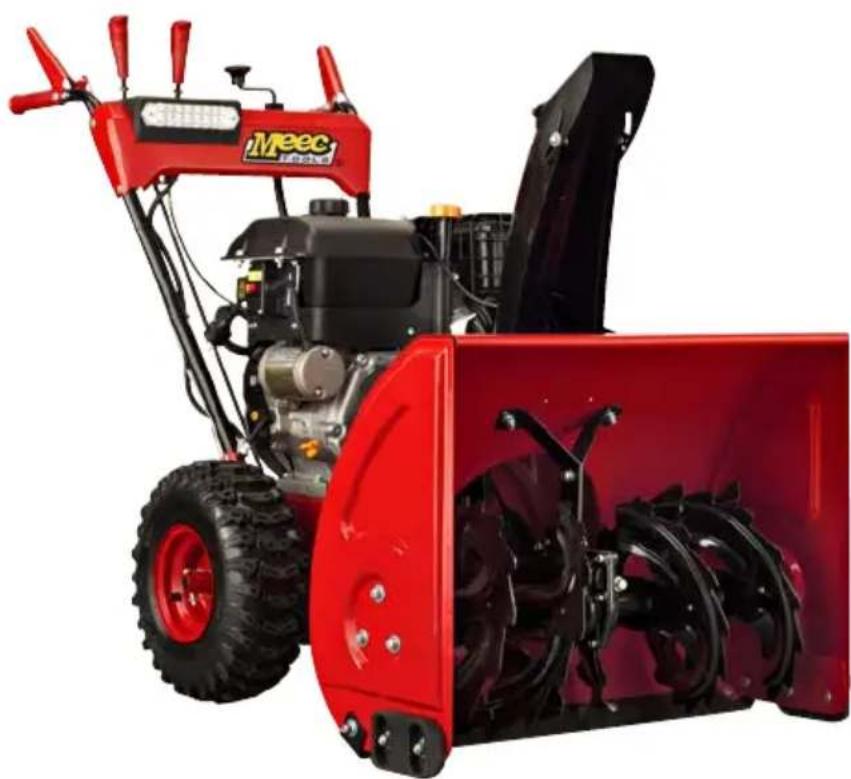
natural_image
Red Meec snowbar with visible blades and control panel (no text or symbols)EN - Operating instructions in original
Date of production: 2014-11-19
© Jula AB
SVENSKA....7
SÄKERHETSANVISNINGAR....7
Utbildning 7
Före Användning 7
SAFETY INSTRUCTIONS 94
Training 94
Before use. 94
Handling fuel 95
Use 95
Maintenance and storage 96
Symbols 96
TECHNICAL DATA 99
DESCRIPTION 100
LEVERS 101
Lights 102
Skids 102
Clearing tool....103
Fuel recommendations 103
Oil recommendations 104
ASSEMBLY 104
Unpacking 104
Lower and upper handle 105
Auger lever rod....106
Ejector chute....108
Skids....109
OPERATION....109
Before use....109
Starting the engine 111
Electric start 111
Propulsion, transmission 112
AUGER....112
Drive lever and Gear lever 112
Switching off....113
CLEARING THE EJECTOR CHUTE....113
TIPS! 113
MAINTENANCE 114
Engine maintenance 114
Lubrication 116
Service 117
Storage....119
TROUBLESHOOTING 120
SÄKERHETSANVISNINGAR
natural_image
Diagram of two symmetrical arms with a curved arrow indicating rotation or movement (no text or symbols)- Brytpinne
- Sprint
natural_image
Close-up of a mechanical linkage component with a white arrow pointing to a bolt (no visible text or symbols)natural_image
Close-up of mechanical components with a metallic bracket and threaded rod (no visible text or symbols)natural_image
Close-up of a mechanical assembly with a metallic component and threaded fastener (no visible text or symbols)natural_image
Close-up of a metal mechanical component with a circular opening, being handled by gloved hands (no visible text or symbols)natural_image
Close-up of a robotic arm with labeled parts (1 and 2), no visible text or symbols beyond labels- Styrklack
- Skruv
natural_image
Mechanical assembly diagram showing a bracket with arrows indicating direction of motion or force (no text or symbols)- Elektrod
natural_image
Mechanical assembly diagram showing a pipe joint with two labeled parts A and B (no text or symbols beyond labels)SERVICE
natural_image
Mechanical component diagram showing a bracket with arrows indicating direction of movement or rotation (no text or symbols)natural_image
Symbol of a trash bin crossed with no visible text or labelsVärna om miljön!
VEDLIKEHOLD OG OPPBEVARING
- Rotorspak
- Girvelger
- Betjeningshåndtak, utkastdeflektor
- Kjørespak
- Motor
- Utkastenhet
- Renseverktøy
- Rotor
- Slepesko
- Lyskaster
- Hjul
natural_image
Diagram of two symmetrical arms with a curved arrow indicating rotation or movement (no text or symbols)- Brytepinne
- Splint
natural_image
Close-up of a mechanical linkage component with a white arrow pointing to a bolt (no visible text or symbols)natural_image
Close-up of mechanical components with a metallic bracket and threaded rod (no visible text or symbols)Monter beinets øvre del og lås fast med en pinne.
natural_image
Close-up of a mechanical assembly with a metallic bracket and threaded connector (no visible text or symbols)natural_image
Close-up of a mechanical component with a metallic ring and clamped parts, no visible text or symbols.natural_image
Close-up of a robotic arm with labeled parts (1 and 2), no visible text or symbols beyond labels- Styrkelakk
- Skrue
natural_image
Mechanical assembly diagram showing a bracket with bolts and directional arrows indicating motion (no text or symbols)- Elektrode
natural_image
Mechanical assembly diagram showing a pipe joint with two labeled parts A and B (no text or symbols beyond labels)SERVICE
natural_image
Mechanical component diagram showing a bracket with directional arrows indicating movement or force (no text or symbols)- Skrue
- Brytepinne
- Splint
- Flenselåsemutter
- Skrapeplate
BYTT UT SKRAPEPLATEN
- Løsne skruene og flensmutrene som fester skrapeplaten til maskinens deksel.
- Skift ut skrapeplaten.
- Monter den nye skrapeplaten med alle skruehodene på innsiden av dekselet.
- Dra til så hardt som mulig.
OPPBEVARING
natural_image
Symbol of a trash bin crossed with a diagonal line, no text or labels presentVärna om miljön!
natural_image
Diagram of a human arm with a curved arrow indicating rotation or movement (no text or symbols)UCHWYTY DOLNY I GÓRNY
natural_image
Close-up of a mechanical linkage component with a white arrow pointing to a bolt (no visible text or symbols)natural_image
Close-up of mechanical components with a metallic bracket and threaded rod (no visible text or symbols)natural_image
Close-up of a mechanical assembly with a metallic component and threaded fastener (no visible text or symbols)natural_image
Close-up of a metal mechanical component with a circular opening, being handled by gloved hands (no visible text or symbols)natural_image
Close-up of a robotic arm with labeled parts (1 and 2), no visible text or symbols beyond labelsnatural_image
Mechanical assembly diagram showing a bracket with arrows indicating direction of motion or force (no text or symbols)- Elektroda
natural_image
Mechanical assembly diagram showing a pipe joint with two labeled parts A and B (no text or symbols beyond labels)SERWIS
natural_image
Mechanical component diagram showing a bracket with arrows indicating direction of movement or rotation (no text or symbols)natural_image
Symbol of a trash bin crossed with a diagonal line, no text or labels presentVärna om miljön!
Read the operating instructions carefully before use!
Please retain for future reference.
WARNING Some of the machine's components and engine exhaust fumes contain chemicals which can cause cancer, birth defects or other reproductive problems.
DANGER! The machine must only be used in accordance with these instructions. Read all warnings, safety instructions and other instructions. Failure to follow all instructions and safety information may result in serious personal injury.
TRAINING
- Read all instructions and safety instructions and all warning labels on the machine before assembly and use. Save these instructions for future use.
- Familiarise yourself with the machine's controls and how to use it. Learn how to quickly bring the machine to a stop and disengage the power.
- Do not allow children under the age of 14 to use the machine. Children over the ages of 14 are permitted to use the machine but only under adult supervision.
- Never let children or persons unfamiliar with the machine or who have not read these instructions operate it.
- Objects ejected by the machine can cause serious personal injury. Plan work to avoid ejection of material towards walls, bystanders, etc.
- Keep bystanders, especially children and pets at least 20 metres from where the machine is being used. Turn off the machine if anyone enters the work area.
- Be careful not to slip or fall especially when operating in reverse.
BEFORE USE
- Carefully inspect the area where the machine will be used and remove stones, wires, bones and other foreign objects.
• Always wear eye protection when working with or on the machine. - Dress properly. Do not wear loose-fitting clothes or jewellery. These can get stuck in moving parts. Wear slip-resistant footwear.
- Machines fitted with an electric start engine must only be plugged into an earthed power socket.
- Adjust the hood height to prevent it picking up gravel and the like.
- Release and disengage all control levers before starting the engine.
- Make no adjustments while the engine is running, except when asked to do so in the instructions manual.
- Allow the engine and the machine to adjust to the outdoor temperature before clearing snow.
HANDLING FUEL
- Exercise caution when handling fuel as there is a risk for personal injury and/or property damage. Petrol is extremely flammable and can be explosive under certain conditions. Wash immediately if you get petrol on your skin or clothes.
- Use only an approved fuel can.
- Store and keep petrol away from sparks, open flames, heat sources and other ignition sources. Smoking is prohibited when handling fuel.
- Never refuel indoors.
- Never remove the fuel cap and refill the tank while the engine is running.
- Allow the engine to cool for at least 2 minutes before refilling fuel.
- Do not overfill the tank. Do not fill the petrol tank more than 1 cm below the filler pipe to allow the fuel to expand.
- Replace and tighten the fuel cap.
- Wipe up any spilled fuel immediately. Move the machine away from the refill area before starting it. Wait 5 minutes before starting the engine.
- Never store the machine or fuel can indoors where there are ignition sources such as boilers, immersion heaters, tumble dryers and electric motors which can cause sparks to avoid the risk fuel fumes igniting.
- Allow the machine to cool down for at least 5 minutes before storing it away.
USE
- Keep hands and fingers away from moving parts. There is a risk of serious personal injury and/or death.
- Never attempt to bypass or disengage the auger rotation – risk of serious personal injury.
- It must be possible to move control levers up and down and they must disengage automatically when released.
- Do not use the machine if the exit chute is missing or damaged. Safety devices must be fitted correctly and function properly.
- Never start the engine indoors or in an enclosed area. Engine exhaust fumes contain carbon monoxide, an odourless and lethal gas.
- Never use the machine when you are tired or under the influence of drugs, alcohol or medication.
- The muffler and engine become hot - risk of burns. Keep bystanders, especially children and pets at a safe distance.
- Be careful when working on or crossing entrances, roads, etc.
- Pay attention to traffic and hidden dangers.
- Be very careful when changing direction and on slopes.
- Plan the work so that ejected snow does not hit windows, walls, cars, etc. to avoid the risk of damage to property and/or personal injury.
-
Never direct the ejector chute towards people or animals and never let anyone stand in front of the machine.
-
Do not overload the machine by trying to remove too much snow too quickly.
- Never use the machine in poor visibility or low light. Keep proper footing and balance at all times and hold the handle firmly. Never run with the machine.
- Disengage the auger drive during transport and when the machine is not in use.
- Never operate the machine quickly on slippery surfaces. Be very careful when reversing or pulling the machine toward you.
- Never put your hands in the ejector chute or intake opening. Always use the accompanying clearing tool to clear the ejector chute. Never attempt to clear the ejector chute when the engine is running. Turn off the engine, disengage all control levers and wait until all moving parts have come to a complete standstill before attempting to clear the chute.
- Only use parts and accessories that are recommended by the manufacturer. Contact your dealer if you have any questions.
MAINTENANCE AND STORAGE
- Never modify the safety devices in any way. Regularly check that all safety devices are in place and are functioning properly.
- Turn off the engine and disengage all the control levers and wait until all moving parts have come to a complete standstill before performing repairs, lubrication and/or inspection. Pull off the spark plug cable and earth it to the engine to prevent accidental start.
- Check regularly that all bolt fasteners are correctly tightened. Retighten if necessary. Regularly check the machine visually for damage.
- Glide plates and skids wear over time. Regularly check all components and replace if necessary. Use only original spare parts recommended by the manufacturer, as the use of other spare parts can cause personal injury and/or damage to property.
- Regularly check that all the control levers can be moved up and down and automatically disengage when released. Adjust, if necessary, according to these instructions.
- Safety information and warning stickers on the machine must always be intact and legible. Replace immediately if this not the case.
- Observe applicable laws and regulations relating to fuel, oil, etc.
- Before putting the machine away for storage, let it run for several minutes to clear any snow. Otherwise the snow can freeze causing the auger to get stuck.
- Never store the machine or fuel can indoors where there are ignition sources such as boilers, immersion heaters, tumble dryers and electric motors which can cause sparks to avoid the risk fuel fumes igniting.
- Follow the instructions for storage.
WARNING Never let children or persons unfamiliar with the machine or who have not read these instructions operate it.
SYMBOLS
The following symbols appear on the machine. Read all instructions and safety instructions and all warning labels on the machine before assembly and use.
| SYMBOL EXPLANATION | |
 | WARNING Read the instruction manual. |
 | Read these instructions carefully - read these instructions carefully before assembly and use. |
 | Wear hearing protection. |
 | Wear safety goggles. |
 | WARNING Rotating parts! Keep hands and fingers away from moving parts when the machine is running. There is a risk of serious personal injury and/or death. |
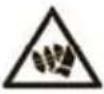 | WARNING Rotating parts! Keep hands and fingers away from moving parts when the machine is running. There is a risk of serious personal injury and/or death. |
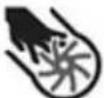 | WARNING Rotating parts! Keep hands and fingers away from moving parts when the machine is running. There is a risk of serious personal injury and/or death. |
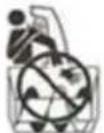 | WARNING Rotating parts! Keep hands and fingers away from moving parts when the machine is running. There is a risk of serious personal injury and/or death. |
 | WARNING Rotating parts! Wait until all moving parts have stopped completely before touching them. |
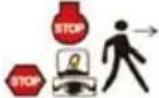 | WARNING Rotating parts! Wait until all moving parts have stopped completely before touching them. |
 | WARNING Objects ejected by the machine can cause serious personal injury. Keep bystanders, especially children and pets at least 20 metres from where the machine is being used. |
 | WARNING Objects ejected by the machine can cause serious personal injury. Keep bystanders, especially children and pets at least 20 metres from where the machine is being used. |
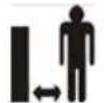 | WARNING Objects ejected by the machine can cause serious personal injury. Keep bystanders, especially children and pets at least 20 metres from where the machine is being used. |
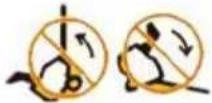 | WARNING Do not tilt the machine forward or back. |
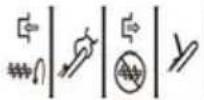 | Release the auger lever to disengage the auger. |
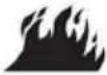 | WARNING Petrol is extremely flammable. Allow the engine to cool for at least 2 minutes before refilling fuel. |
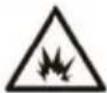 | WARNING Petrol is explosive. Allow the engine to cool for at least 2 minutes before refilling fuel. |
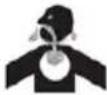 | WARNING Never start the engine indoors or in an enclosed area. Engine exhaust fumes contain carbon monoxide, an odourless and lethal gas. |
 | WARNING Do not use the machine in the rain or in wet areas. |
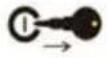 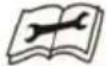 | WARNING Remove the ignition key and read the instruction manual before cleaning, servicing and/or maintaining the machine. |
WARNING Never let children or persons unfamiliar with the machine or who have not read these instructions operate it. Save these instructions for future use.
TECHNICAL DATA
Clearing width 660 mm
| Intake height 510 mm | |
| Propulsion | Self-propelled |
| Wheels 14" inflated rubber wheels | |
| Gears 5 forward gears, 2 reverse gears. | |
| Start Cord start or 230 V electric start | |
| Engine type 1 cylinder 4-stroke engine | |
| Cylinder displacement 358 cm | ^3 |
| Power 6.8 kW /9.25 Hp | |
| Fuel | Petrol |
| Recommended oil 5W-30 (temp. as low as -18°C) | |
| Oil tank volume 1.0 litre | |
| Chute adjustment 2-way | |
| Ejector chute 190° rotation | |
| Deflector, ejector chute 60° rotation | |
| Measured sound power level L_wA | 101 dB(A), K = 3 dB(A) |
| Guaranteed sound power level L_wA | 104 dB(A), K = 3 dB(A) |
| Sound pressure level L_pA | 89.2 dB(A), K = 2.5 dB(A) |
| Max. vibration 3.55 m/s | ^2 , K = 1.5 m/s ^2 |
WEAR HEARING PROTECTION
The declared vibration value, which has been measured by a standardised test method, can be used to compare different tools with each other and for a preliminary assessment of exposure.
WARNING The vibration during actual use may deviate from the stated value, depending on how the tool is used. It is therefore necessary to determine which safety precautions are required to protect the user, based on an actual operating conditions, taking into account all stages of the work cycle, e.g. the time when the machine is switched off and when it is idling, in addition to the time the power switch is on.
The figures stated are actual measured sound levels, which may not be necessarily safe to work with. Whilst there is a correlation between the stated sound level and the sound level experienced, this cannot be used reliably to determine whether or not safety precautions are required. Other factors influence noise levels in each individual case, for instance the acoustics in the work premises and any other sources of noise such as other machines or processes. The admissible sound level values can also vary from country to country. Users are obliged to determine any risks.
DESCRIPTION
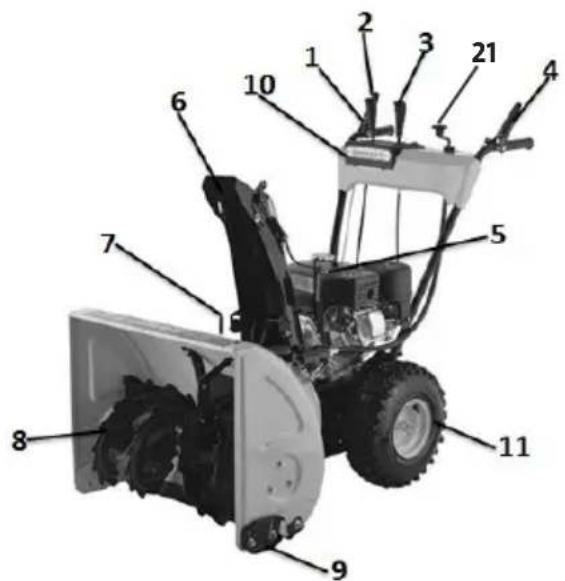
- Auger lever
- Gear lever
- Control handle, ejector deflector
- Drive lever
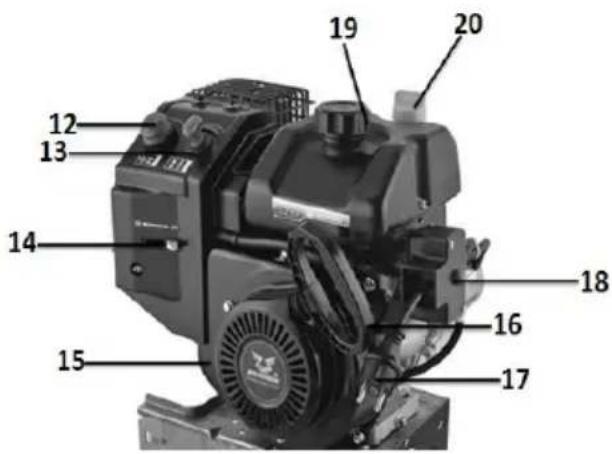
- Motor
- Ejector chute
- Clearing tool
- Rotor
- Guide plate
- Lights
- Wheels
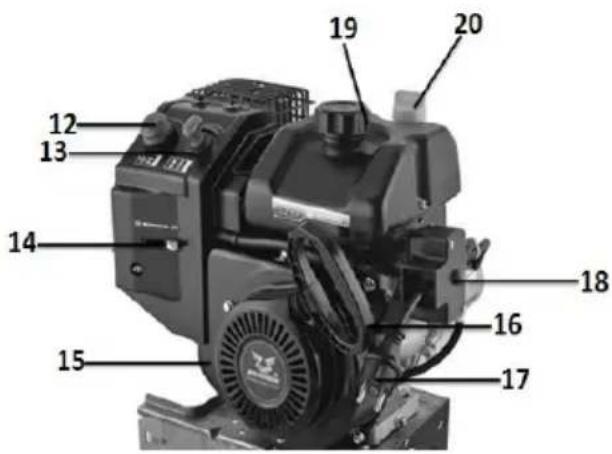
- Fuel pump bulb
- Ignition key
- Choke
- Oil drain plug
- Handle, pull start cord
- Earthed plug
- Electric start button
- Fuel cap
- Oil filler cap
- Control lever, ejector chute
WARNING Read all the instructions, safety instructions and all the warning stickers on the machine prior to use.
LEVERS
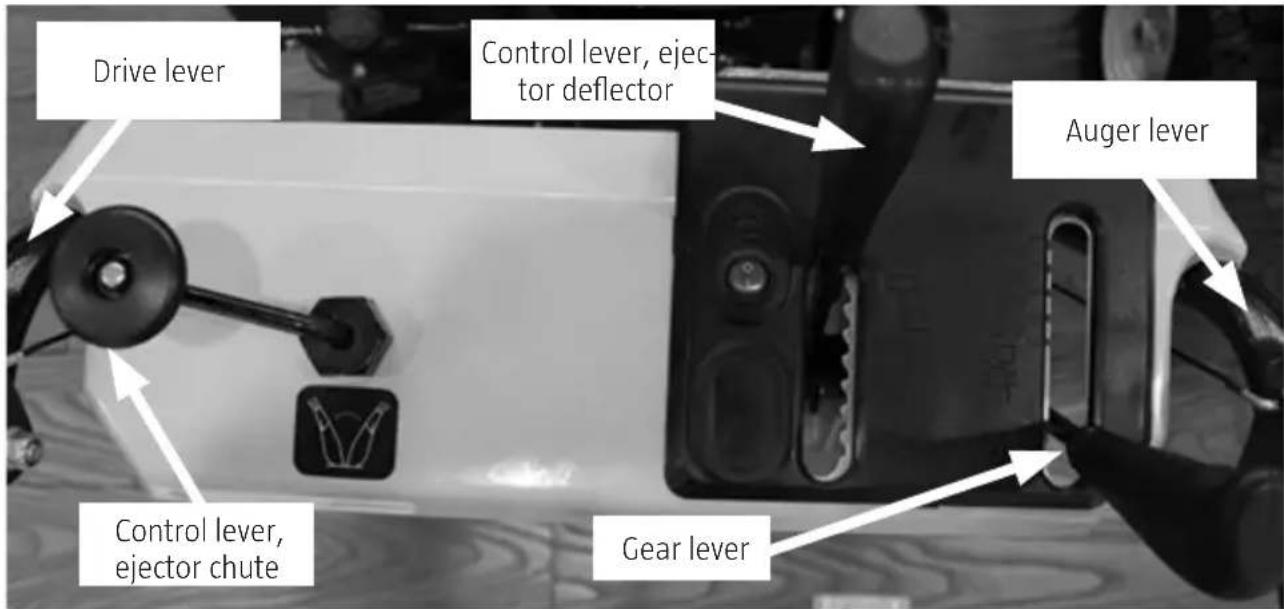
DRIVE LEVER
The drive lever is on the left hand side of the handle. Press in the drive lever to propel the machine and release it to stop.
IMPORTANT! Release the drive lever before changing gear.
AUGER LEVER
The auger lever is on the right hand side of the handle. Press it in to engage the auger and release to stop ejecting the snow. Also release the drive lever to stop propelling the machine.
IMPORTANT! Check that the auger is working properly before each use. Carry out any adjustments and/or repairs as described in these instructions as otherwise there is a risk of personal injury and/or damage to property.
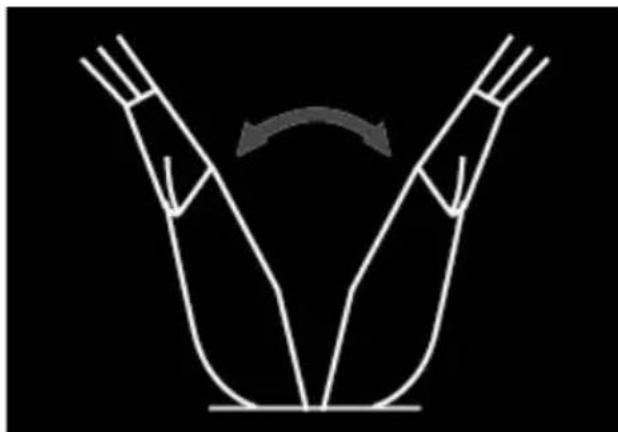
CONTROL LEVER, EJECTOR CHUTE
The ejector chute control lever is on the left hand side of the machine.
natural_image
Diagram of two symmetrical arms with a curved arrow indicating rotation or movement (no text or symbols)Set the required ejection direction by turning the control handle as follows.
- Turn clockwise to turn the ejector chute to the left.
- Turn anti-clockwise to turn the ejector chute to the right.
CONTROL LEVER, EJECTOR DEFLECTOR
The ejector deflector controls the ejection height. Raise or lower the deflector using the control handle.
GEAR LEVER
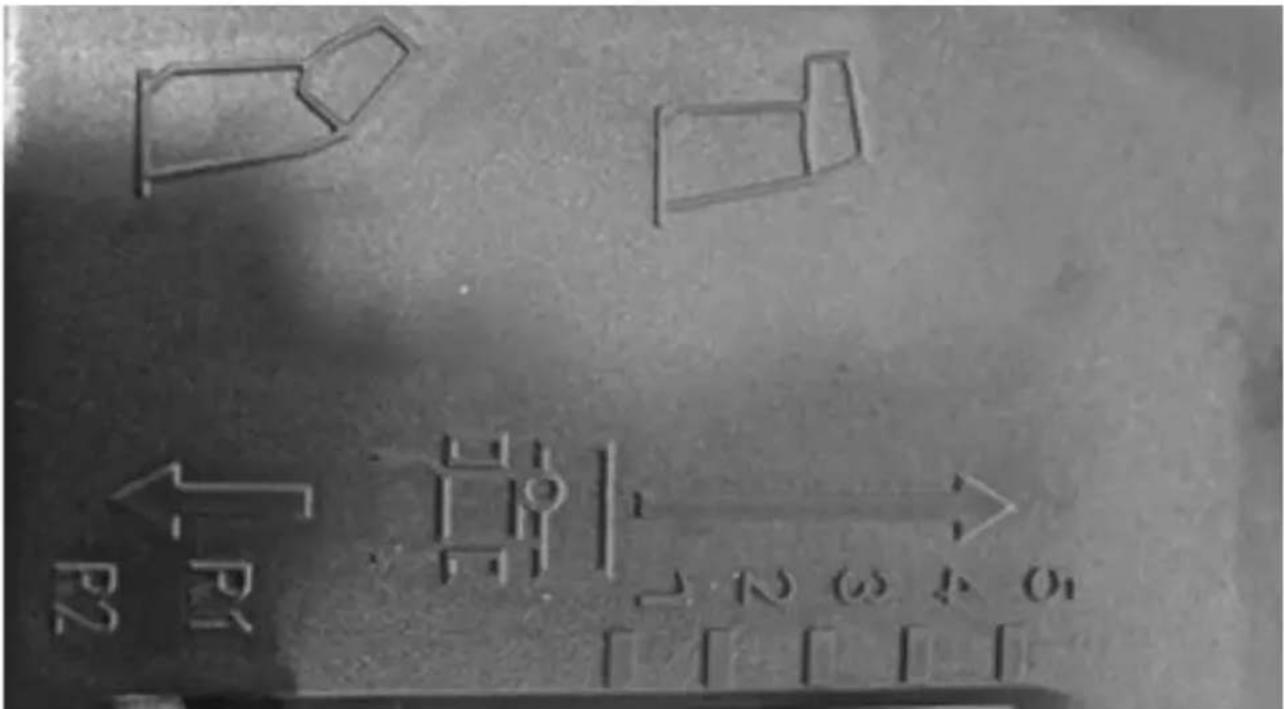
The gear lever is found on the handle and has 7 positions, five forward gears and two reverse gears.
FORWARD DRIVE
The machine has 5 gears (1-5) for forward drive with different speeds, where 1 is the lowest gear. Use the lowest gear when clearing snow.
IMPORTANT! Release the drive lever before changing gear.
REVERSE PROPULSION
The machine has 2 gears (R1-2) for reverse drive with different speeds, where 1 is the lowest gear.
IMPORTANT! Release the drive lever before changing gear.
LIGHTS
The lights are turned on and off using a switch on the control panel.
SKIDS
The distance between the guide plates and the ground is set by moving the skids. See the section on skids in the assembly section.
CLEARING TOOL
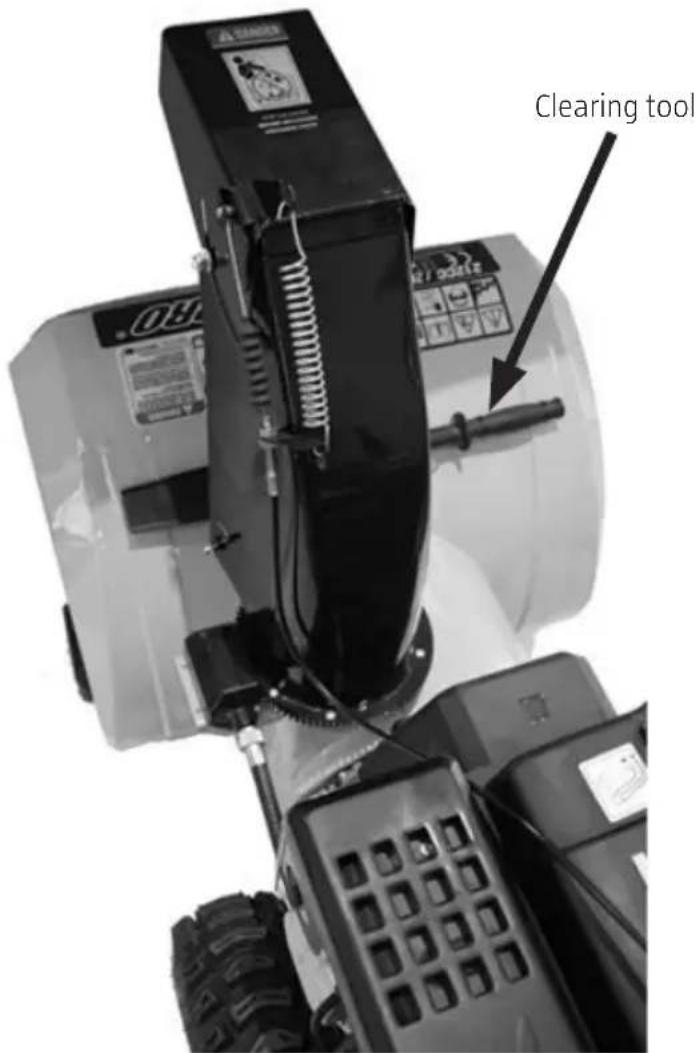
The clearing tool is attached at the back of the auger hood.
FUEL RECOMMENDATIONS
Use alkylate petrol or unleaded petrol with a rating of at least 95 octane. Petrol with at most 10% ethanol or 15% MTBE (methyl tertiary butyl ether) can be used. Never use old, contaminated fuel or fuel mixed with oil. Prevent water and debris getting into the fuel tank. Do not use E85.
OIL RECOMMENDATIONS
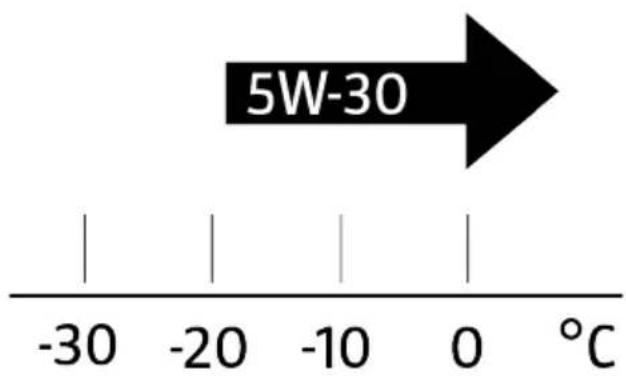
SYNTHETIC OIL
Use oil according to the table:
5W-30 (temp. as low as -18°C)
The engine's oil volume is 1 litre. Do not overfill.
Use only high-quality engine oil.
IMPORTANT! Use only oil recommended by the manufacturer. Using other oil can damage the engine.
ASSEMBLY
NOTE: The right and left sides of the machine are specified as viewed from the operating position behind the machine.
UNPACKING
Remove the plastic covering parts of the machine and unpack all the loose parts.
LOOSE PARTS
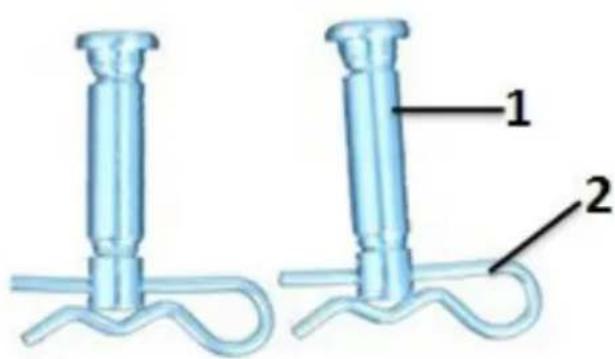
- Shear bolt
- Cotter pin
The auger is fitted to the spiral shaft with two shear bolts. If the auger hits ice or another fixed object, the bolts can shear.
Two extra shear bolts are supplied. Keep them in a safe place until they are needed.
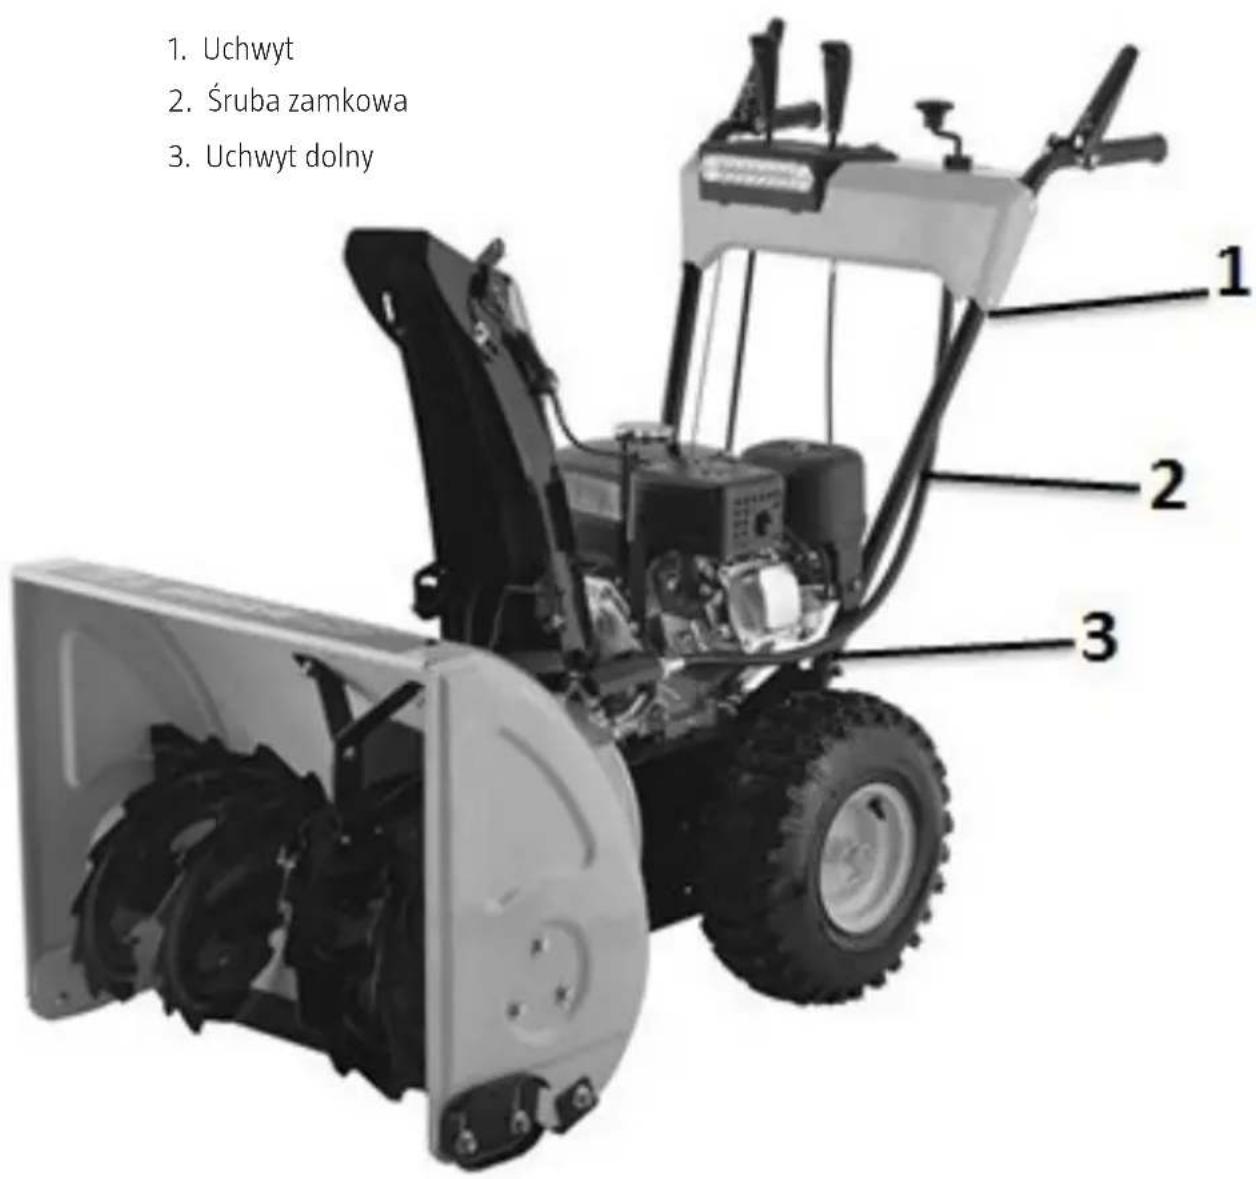
LOWER AND UPPER HANDLE
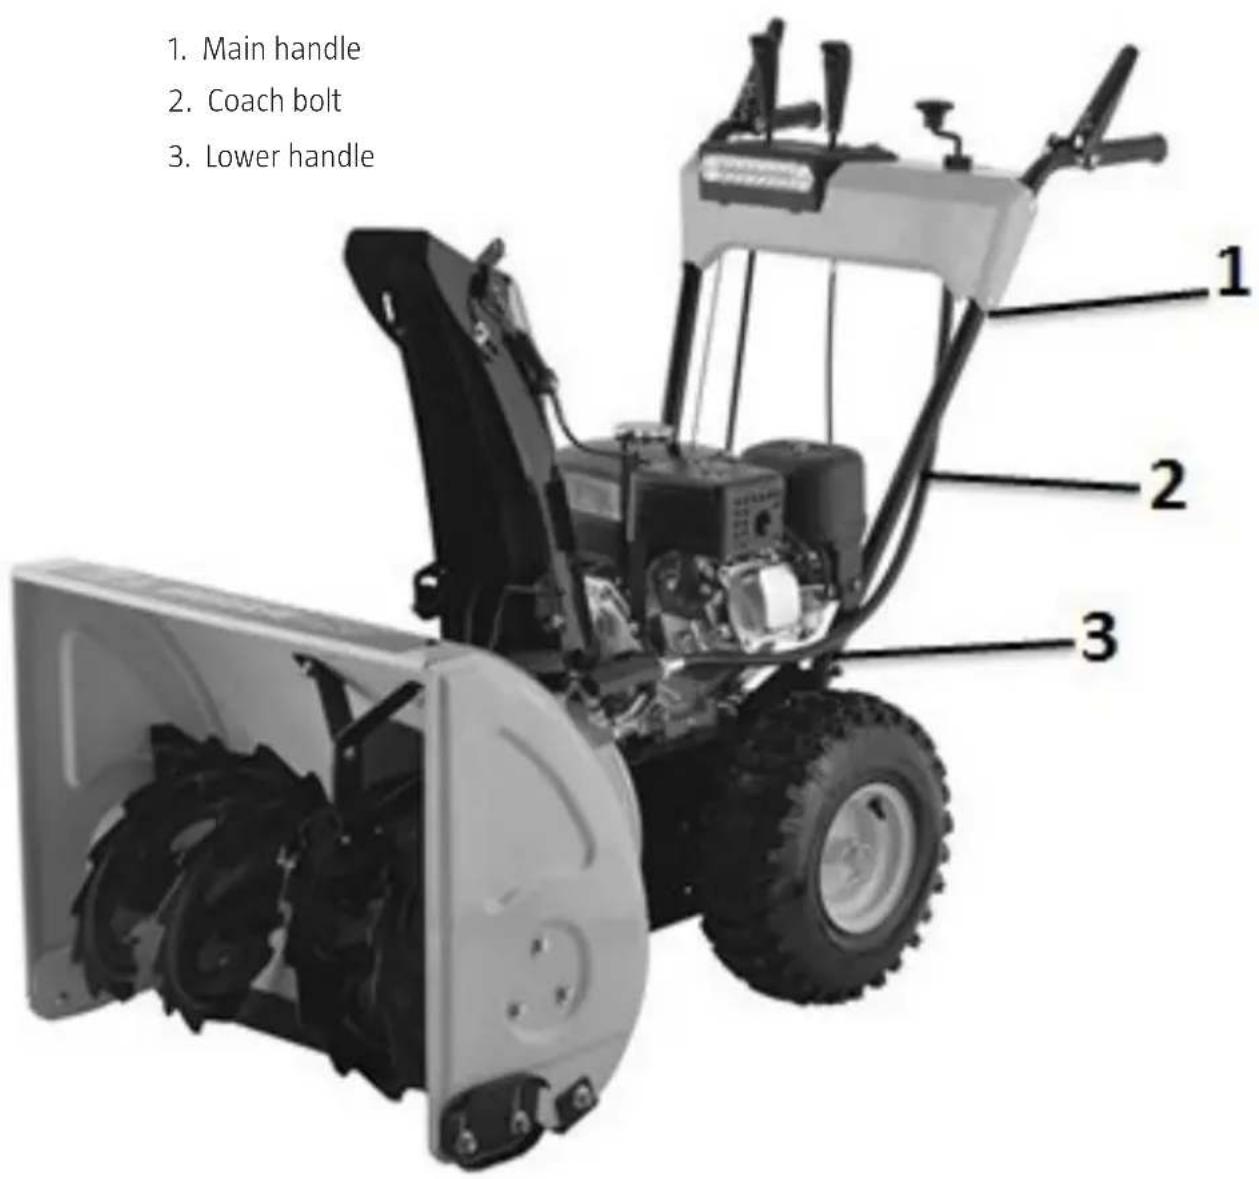
- Fit the handle with the supplied coach bolts, cup washers and nuts.
AUGER LEVER ROD
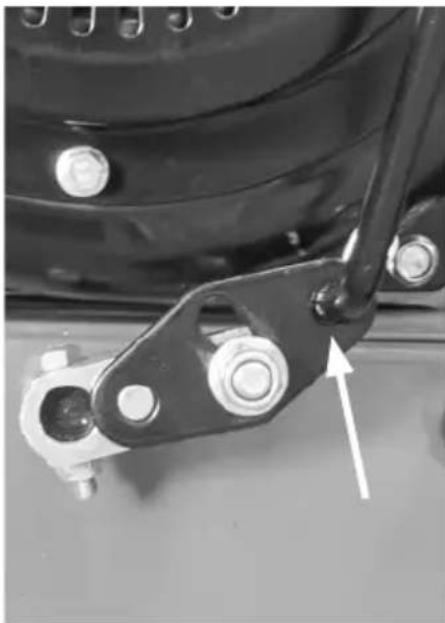
natural_image
Close-up of a mechanical linkage component with a white arrow pointing to a bolt (no visible text or symbols)Fit the lower section of the rod and lock in place with a cotter pin.
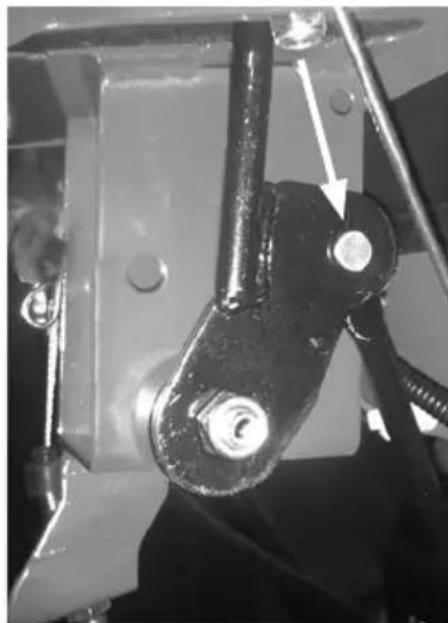
natural_image
Close-up of mechanical components with a metallic bracket and threaded rod (no visible text or symbols)Fit the upper section of the rod and lock in place with a cotter pin.
IMPORTANT! Fit the drive lever cable and the auger lever rod: The drive lever cable is attached on the left hand side and the auger lever cable on the right.
WARNING Do not tension the cable too much as this prevents correct disengagement of the auger which can cause personal injury and/or damage to property.
CONTROL LEVER, EJECTOR CHUTE
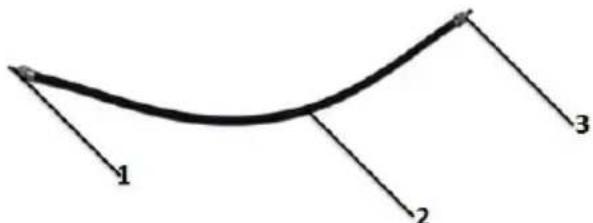
- Cable
- Cable casing
- Nut
- Remove the nut and washer from the bracket for the ejector chute control handle using a spanner.
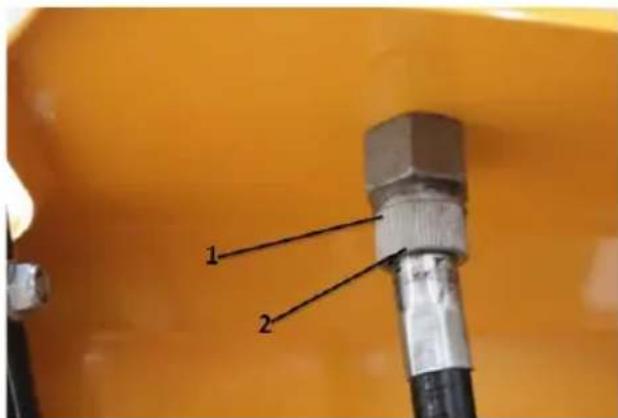
- Bracket for ejector chute control handle
-
Washer, nut
-
Insert the bracket through the hole in the left hand section of the upper handle.
- Place the washer on the handle bracket.
• Fit and tighten the nut.
natural_image
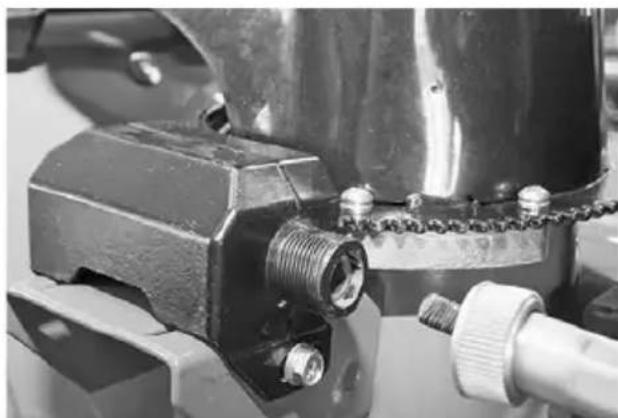
Close-up of a mechanical component with threaded fastener and pipe fitting (no visible text or symbols)- Remove the nut from the upper end of the handle bracket.
- Insert the handle bracket through the hole in the connector.
- Screw the bolts back in place.
EJECTOR CHUTE
natural_image
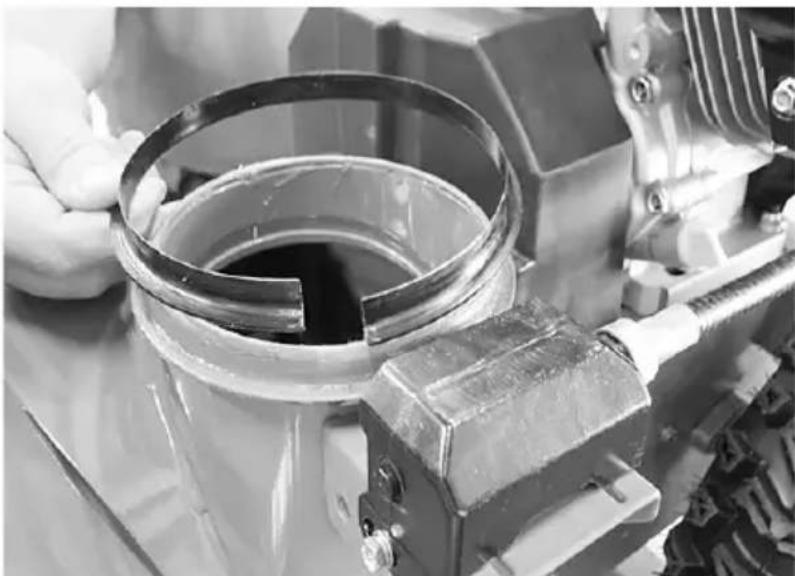
Close-up of a mechanical component with a metallic ring and clamped parts, no visible text or symbols.- Remove the bolts and plastic glide rings from the ejector chute.
- Press the ejector chute into place in its holder.
- Fit the plastic ring.
natural_image
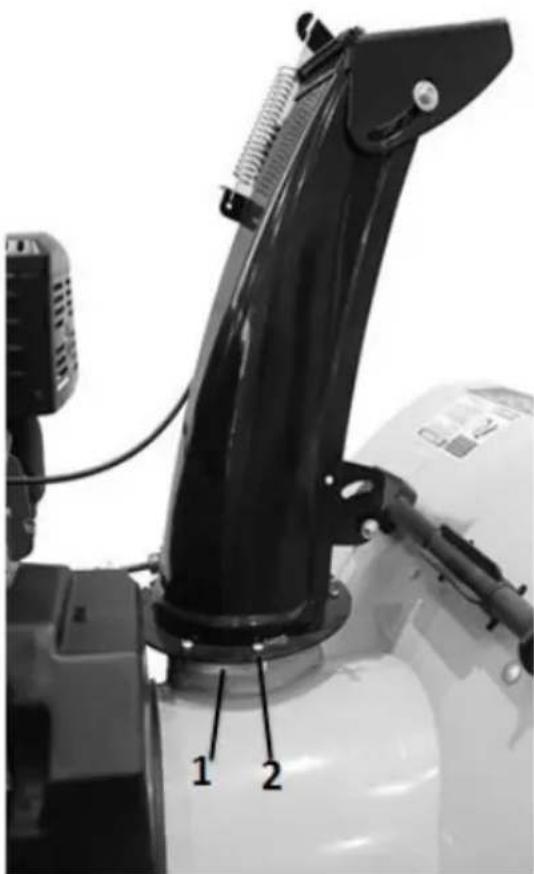
Close-up of a robotic arm with labeled parts (1 and 2), no visible text or symbols beyond labels- Guide collar
- Screw
- Insert the screw with the washer into the hole in the ejector chute and tighten clockwise.
SKIDS
WARNING Do not drive the machine over gravel when the engine is running. Gravel can be drawn in and blown out which can cause personal injury and/or damage to property.
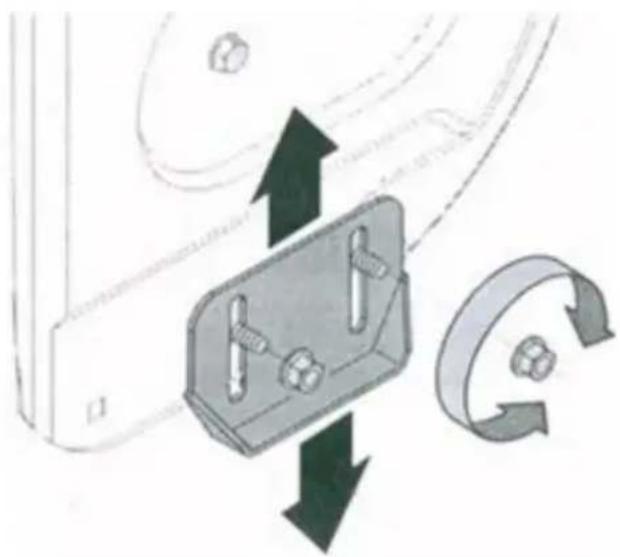
The distance between the glide plates and the ground can be adjusted as follows.
natural_image
Mechanical assembly diagram showing a bracket with bolts and directional arrows indicating motion (no text or symbols)-
Move the guide plates up the auger hood for light snowfalls.
-
Set the guide plates in the centre position or lower for work on uneven surfaces.
To move the skids:
- Loosen the four nuts and bolts.
-
Move the skids to the desired position.
-
Check that the bottom of the skids rests on the ground along their entire length, to avoid the skids wearing unevenly.
-
Fully tighten the bolt fasteners.
OPERATION
BEFORE USE
WARNING Read all the instructions, safety instructions and all the warning stickers on the machine prior to use.
OIL AND FUEL
Fill with oil and petrol.
REFILLING FUEL
WARNING Exercise caution when handling fuels. Petrol is extremely flammable and can be explosive under certain conditions. Never refuel indoors or when the engine is running. Store and keep petrol away from sparks, open flames, heat sources and other ignition sources. Smoking is prohibited when handling fuel.
WARNING Exercise caution when handling fuels. Petrol is extremely flammable and can be explosive under certain conditions. Never refuel indoors or when the engine is running. Store and keep petrol away from sparks, open flames, heat sources and other ignition sources. Smoking is prohibited when handling fuel.
WARNING Keep hands and feet away from moving parts. Do not use easy start spray. The fumes are extremely flammable.
- Clean the area around the fuel cap before opening the cap.
- There may be a plastic cover in the fuel filling pipe to protect the tank during manufacture. Remove and discard this cover. Screw the fuel cap on the tank after filling with fuel.
- The fuel tank has a level indicator. Fill up to the red plate in the sieve. Do not overfill.
- Avoid spilling fuel when refilling. Spilt fuel and fuel fumes can cause fires. Wipe off any excess fuel before starting the engine.
- Avoid repeated or long term skin contact with fuel and/or inhaling fuel fumes.
- Replace and tighten the fuel cap.
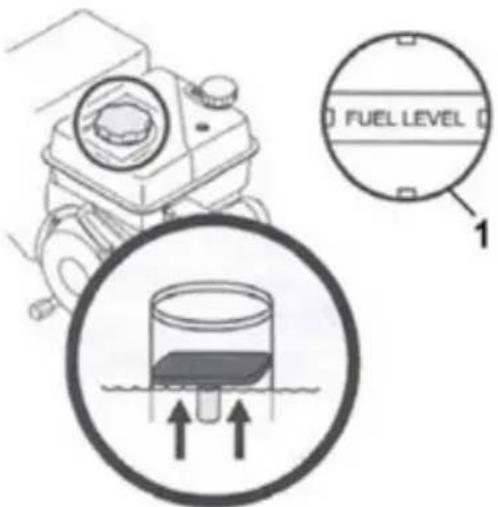
- Fuel level indicator, viewed from above.
CHECKING OIL LEVEL
IMPORTANT! The engine is supplied without oil. Fill with 1 litre of oil and check the oil level before starting the engine. Do not run the engine with too little oil as this can cause serious engine damage. The guarantee does not cover damage caused by running the engine with too little oil.
NOTE: Place the machine on a level surface to check the oil level. The engine must be turned off.
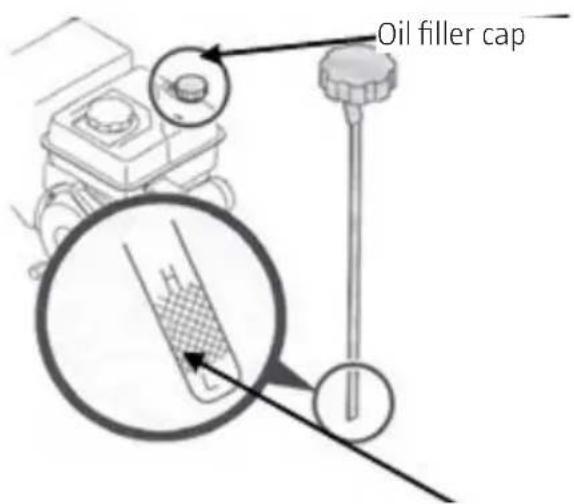
NOTE: The level must be between the max. (H) and min. (L) markings.
-
Remove the oil filler cap with the dipstick and wipe the dipstick.
-
Insert the dipstick again without screwing it in, pull it out and read the oil level. Fill with oil if the level is low.
-
Recommended oil quality and volumes can be found in the technical data section.
-
NOTE: Do not overfill. Overfilling can cause smoke, make it hard to start the engine and/or cause the build-up of deposits on the spark plug.
-
Put the oil filler cap with the dipstick back in place and tighten it before starting the engine.
STARTING THE ENGINE
Follow the instructions below to start the engine.
NOTE: Check that the auger lever and the drive lever are disengaged (up) before starting the engine.
- Insert the ignition key. Do NOT turn the ignition key. The engine cannot start without the ignition key.
- Open the fuel tap.
- Close the choke if the engine is hot. Open the choke if the engine is cold.
- If the engine is cold, block the ventilation hole and press the pump bulb 3 to 5 times. If the engine is hot, block the ventilation hole and press the pump bulb once.
- To start the engine, slowly pull the start cord until you feel some resistance and then pull it quickly. Hold the starter handle when the pull cord retracts after a start. If the cord retracts too quickly, the start handle can cause personal injury and/or damage to property. Repeat the process if needed.
- Close the choke slowly when the engine gets hot. If the engine stops, start it again and let it run for a short time with the choke half open before you slowly slide the choke until it is closed.
NOTE: Always block the ventilation hole when you press the pump bulb. If the temperature is below -9°C, you may need to press the pump bulb a number of times.
ELECTRIC START
WARNING The electric start device must be connected to an earthed electrical socket. Read the user instructions carefully before use.
- Carry out the first four steps.
- Connect the power cord for the connection box on the engine and to a socket.
- Press the start button on the connection box to start the engine. Release the button as soon
as the engine starts, otherwise the electric start device can be damaged.
- Open the choke slowly when the engine gets hot. If the engine stops, start it again and let it run for a short time with the choke half open before you slowly slide the choke to the open position.
PROPULSION, TRANSMISSION
- Let the engine run at high speed and put it in a suitable gear for the job at hand. There are 5 forward gears and 2 reverse gears.
- Press it in to engage the auger and release to stop ejecting the snow.
- Press in the drive lever to propel the machine and release it to stop.
- Release the drive lever before changing gear.
AUGER
STARTING THE AUGER
Press the auger lever toward the handle to engage the auger and release it to stop blowing snow.
AUGER LEVER FUNCTION CHECK
Check that the auger is working in accordance with these instructions.
IMPORTANT! Perform the following checks before the machine is used for the first time and before it is used at the start of a season.
IMPORTANT! Perform the adjustments in a well-ventilated area according to the instructions below.
Check the auger lever and make any adjustments in a well-ventilated area according to the instructions below.
- When the auger lever is disengaged (up), there should be very little play on the cable but it must not be too tight.
- Stand in the operating position behind the handle and engage the auger.
- Keep the auger engaged for about 10 seconds and then release the auger lever. Repeat several times.
- Allow the engine to run with the auger lever disengaged. Go to the front of the machine.
- Check that the auger has come to a complete standstill and does not move.
- Start the engine and check that the auger engages and disengages correctly.
Check that the drive lever and the gear lever work in accordance with the instructions below.
- Turn off the engine and put the gear lever in the highest forward gear. Engage the drive lever and push the machine forward. The machine should move forward. Press in the drive lever. The wheels should stop moving.
-
Disengage the drive lever and push the machine forward again.
-
Move the gear lever to the highest reverse gear and back to the highest forward gear. It must be easy to move the gear lever and the wheels should rotate.
- If the lever is stiff or if the wheels stop moving, loosen the lock nut on the drive lever cable and extend the cable by turning the nut one turn.
- If the wheels do not stop moving when you engage the drive lever, loosen the lock nut on the drive lever cable and shorten the cable one turn of the nut.
- Repeat the check and adjust again if necessary. Tighten the lock nut after adjustment.
SWITCHING OFF
- Close the fuel tap.
- Remove the ignition key to prevent unintentional or unpermitted starts. Keep the key in a safe place. The engine cannot start without the ignition key.
- Wipe all the levers on the engine dry.
CLEARING THE EJECTOR CHUTE
The clearing tool is attached at the back of the auger hood.
Clear the ejector chute according to the instructions below.
- Disengage the auger lever and the drive lever.
- Stop the engine by pulling out the key.
- Remove the clearing tool from its holder.
- Clear away snow and ice using the clearing tool.
WARNING Never use your hands to clear the chute. Use the clearing tool or a stick.
Put the clearing tool back in its holder and start the engine.
Stand in the operating position behind the handle and engage the auger lever for a few seconds to eject any snow and ice remaining in the ejector chute.
TIPS!
NOTE: Let the engine run for a few minutes. The engine does not produce maximum output until it reaches operating temperature.
WARNING The muffler, muffler guard and other engine parts can get very hot during use - risk of burn injuries.
- Clear the snow as soon as possible for the best results.
- If possible aim the ejector chute in the direction of the wind.
-
Let each row overlap the previous one.
-
The skids are normally placed 6 to 7 mm below the glide plates. If the snow is well packed, the skids can be moved upward to allow the glide plates to get closer to the ground. When driving on gravel, the skids can normally be sunk to lift the glide plates off the ground.
- Once work is completed, let the machine run for a number of minutes until all the snow is ejected. Otherwise the snow can freeze causing the auger to get stuck.
- Clean the machine carefully after each use.
MAINTENANCE
WARNING Turn off the engine and disengage all the control levers and wait until all moving parts have come to a complete standstill before performing repairs, lubrication and/or inspection. Pull off the spark plug cable and earth it to the engine to prevent accidental start. Always wear eye protection when working with or on the machine.
ENGINE MAINTENANCE
WARNING Switch off the engine and pull out the ignition key before carrying out any maintenance:
MAINTENANCE TABLE
Perform maintenance according to the table below. In demanding conditions, maintenance should be carried out at more regular intervals.
| Remedy | After 5 hours of operation | Before each use and after 5 hours of operation | Every season and after 25 hours of operation | Every season and after 50 hours of operation | Every season and after 100 hours of operation | Service date |
| Motor oil check | X | |||||
| Changing the engine oil | X | |||||
| Spark plug check | X | |||||
| Spark plug service | X | |||||
| Cleaning muffler area | X |
CHANGING THE ENGINE OIL
NOTE: Check the oil level before each use and after every 5 hours of operation.
- Suck out the old oil using a hand pump for oil change, a so-called oil change pump.
IMPORTANT! Use intact safety gloves and wash your skin with soap and water after an oil change.
NOTE: Used oil must be disposed of in accordance with local regulations.
SPARK PLUG
WARNING The muffler gets very hot when the engine has been running and remains hot long after the engine has been stopped - risk of burns.
For good engine performance, the spark plug must be clean and have the right spark plug gap.
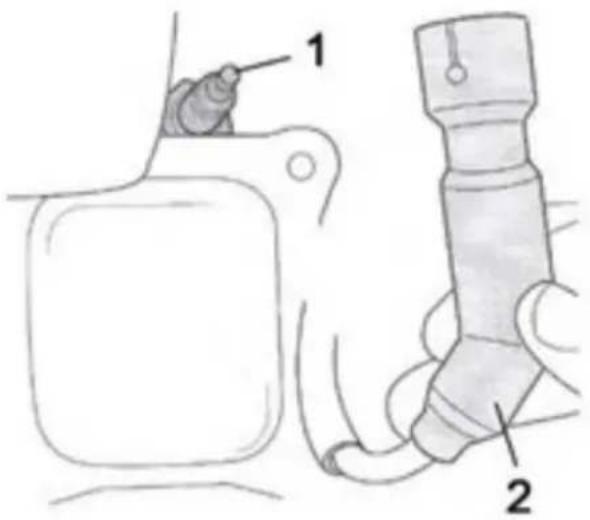
-
Spark plug
-
Spark plug cap
-
Remove the spark plug cap from the spark plug and unscrew the spark plug using a spark plug spanner.
- Check the spark plug. Discard the spark plug if it is visibly worn or if the insulator is cracked or broken. Clean the spark plug with a steel brush if it is to be used again.
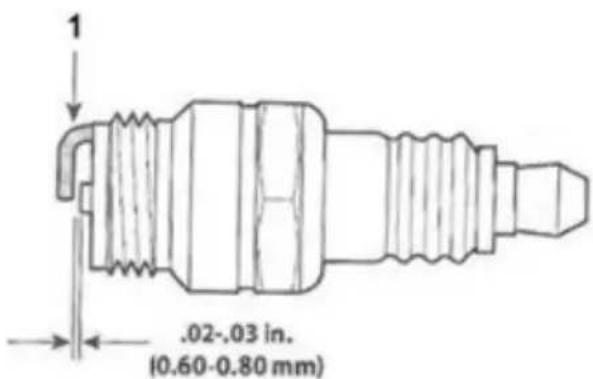
- Electrode
• Measure the electrode gap with a feeler gauge. Correct the gap, if necessary, by gently bending
the ground electrode. The gap should be 0.6 to 0.8 mm.
- Check that the gasket is in good condition. Unscrew the spark plug carefully by hand to avoid damaging the threading.
- Tighten the spark plug with a suitable spark plug wrench to compress the gasket.
NOTE: A new spark plug must be turned an extra half a turn after it has been screwed in place to compress the gasket. A used spark plug must be turned an extra 1/8–1/4 turn after it has been screwed in place to compress the gasket.
IMPORTANT! Tighten the spark plug correctly. A loose spark plug can overheat and damage the engine.
CLEANING THE ENGINE
Let the engine cool for at least 30 minutes before cleaning it. Regularly remove any debris that collects on the engine.
IMPORTANT! Never spray the engine with water. This can contaminate the fuel or the water can get in through the muffler and damage the engine.
WARNING Remove any deposits from the muffler before use (a fire risk).
WARNING Avoid contact with moving parts during maintenance tasks that have to be performed while the engine is running. The muffler, muffler guard and other engine parts can get very hot during use - risk of burn injuries.
LUBRICATION
GEAR LINKAGE
Lubricate the gear linkage and the front angle gear with suitable grease once a year or after 25 hours of operation.
IMPORTANT! Keep rubber wheels and aluminium belt pulleys free from grease and oil.
CONTROL HANDLE, EJECTOR CHUTE
Using suitable grease, lubricate the worm gear for setting the ejection direction.
GEARBOX
The gearbox is lubricated at the factory and is maintenance-free.
AUGER BEARING
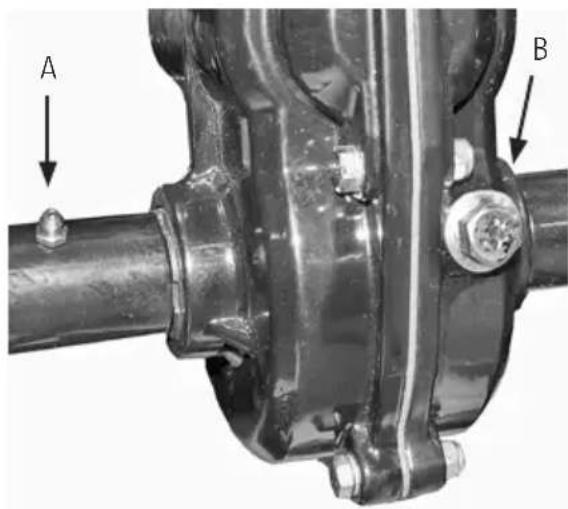
Use the nipples (A) on the auger shaft to lubricate the auger bearings. Loosen the screws (B) to lubricate the angle gear. Lubricate once a year or after 25 hours of operation.
natural_image
Mechanical assembly diagram showing a pipe joint with two labeled parts A and B (no text or symbols beyond labels)SERVICE
WARNING Turn off the engine and disengage all the control levers and wait until all moving parts have come to a complete standstill before performing repairs, lubrication and/or inspection. Pull off the spark plug cable and earth it to the engine to prevent accidental start. Always wear eye protection when working with or on the machine.
AUGER
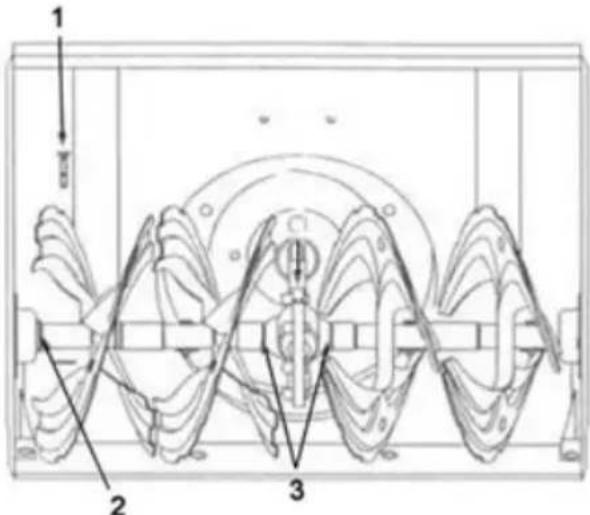
- Shear bolt
- Bearing
- Shaft sleeve
The auger is fitted to the shaft using two shear bolts. If the auger hits ice or another fixed object, the bolts can shear.
If the auger does not rotate, check if the shear bolts are intact. Extra shear bolts are supplied.
Lubricate the shaft before fitting new shear bolts.
IMPORTANT! Only use shear bolts recommended by the manufacturer. Injuries caused by use of other components is not covered by the guarantee.
GUIDE PLATES AND SKIDS
Check the guide plates and skids for damage and replace if necessary.
REPLACING THE SKIDS
natural_image
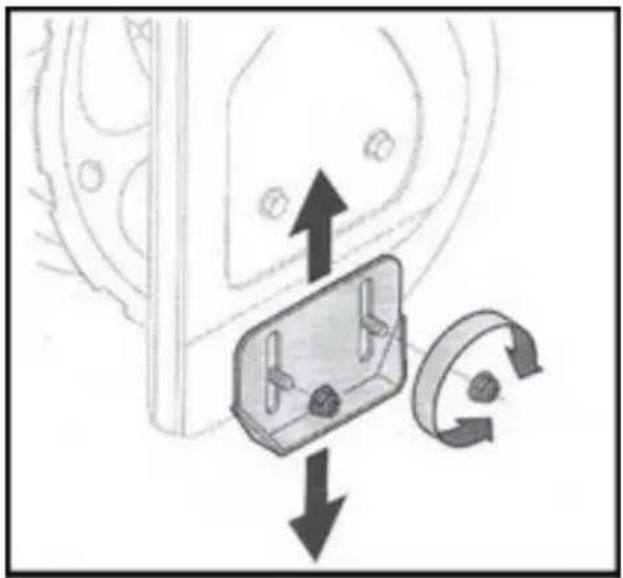
Mechanical component diagram showing a bracket with directional arrows indicating motion or force (no text or symbols)- Loosen the four nuts.
- Replace the skids.
- Adjust the skids to the desired position.
- Check that the bottom of the skids rests on the ground along their entire length, to avoid the skids wearing unevenly.
- Fully tighten the bolt fasteners.
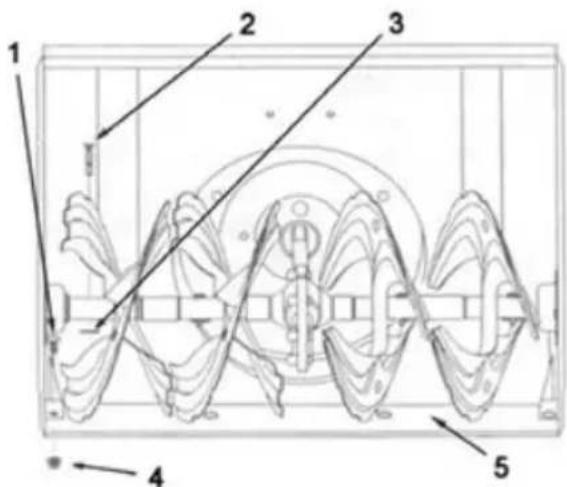
- Screw
- Shear bolt
- Cotter pin
- Flange lock nut
- Guide plate
REPLACING GUIDE PLATES
- Loosen the bolts and flange nuts holding the guide plates to the machine hood.
- Replace the guide plates.
- Fit the new guide plates with all the bolt heads on the inside of the hood.
- Tighten as much as possible.
STORAGE
WARNING Never store the machine or fuel can indoors where there are ignition sources such as boilers, immersion heaters, tumble dryers and electric motors which can cause sparks to avoid the risk fuel fumes igniting.
WARNING Let the engine cool and drain the fuel into a suitable container. Work outside, at a safe distance from any ignition sources. Allow engine to cool. Store and keep petrol away from sparks, open flames, heat sources and other ignition sources. Smoking is prohibited when handling fuel. The fuel that remains in the engine in hot weather is broken down and can cause starting problems.
Follow the instructions below if the machine is not going to be used for at least 30 days.
- Empty the carburettor and the fuel tank to prevent deposits forming in the fuel system.
- Run the engine until the fuel tank is empty and the engine stops due to a shortage of fuel.
-
Replace the engine oil.
-
Remove the spark plug and pour two tablespoons of engine oil into the cylinder through the spark plug hole. Cover the spark plug hole with a cloth and turn the engine by pulling the starter cord several times to distribute the oil. Put the spark plug back in place.
-
Clean the engine and the area around the muffler.
-
Rub all untreated metal surfaces with an oily cloth to prevent corrosion.
-
Follow the lubricating instructions in the maintenance section.
-
Keep the machine clean and dry.
Store the machine in a dry, well-ventilated place. Never store the machine indoors where there are ignition sources such as boilers, immersion heaters, tumble dryers and electric motors which can cause sparks to avoid the risk fuel fumes igniting.
Store the machine on a flat surface. If the engine is tilted, fuel and/or oil can leak out.
NOTE: Apply a thin coat of oil to all untreated metal surfaces to prevent corrosion, particularly to chains, springs, bearings and wires.
Adjustment
WARNING Make no adjustments while the engine is running, except when asked to do so in the instructions manual.
TROUBLESHOOTING
PROBLEM POSSIBLE CAUSE ACTION
| Engine will not start | Empty fuel tank or old fuel. | ⇒ | Fill the tank with fresh petrol. |
| Blocked fuel line. | ⇒ | Clear the fuel line. | |
| Loose spark plug lead. | ⇒ | Fit the spark plug lead to the spark plug. | |
| Defective spark plug. | ⇒ | Clean the spark plug. Adjust the electrode gap or replace the spark plug. | |
| Throttle in stop position. | ⇒ | Set the throttle to high rpm position (rabbit symbol). | |
| Ignition key not inserted correctly. | ⇒ | Insert the ignition key correctly. | |
| The engine does not run smoothly | Open the choke. | ⇒ | Close the choke entirely. |
| Blocked fuel line or old fuel. | ⇒ | Clean the fuel line and fill the tank with fresh petrol. | |
| Water or dirt in the fuel system. | ⇒ | See the engine maintenance section. | |
| Carburettor not properly adjusted. | ⇒ | See the engine maintenance section. | |
| Engine overheating Carburettor not properly adjusted. | ⇒ | See the engine maintenance section. | |
| Low power | Loose spark plug lead. | ⇒ | Attach the spark plug lead to the spark plug. |
| Ventilation hole in the fuel tank cap is blocked. | ⇒ | Clear the ventilation hole. | |
PROBLEM POSSIBLE CAUSE ACTION
| Heavy vibration Loose parts or damaged auger. | ⇒ | Turn off the engine immediately, remove the ignition key and wait until all moving parts have come to a standstill. Check for any damage. Tighten all bolt fasteners. Repair if necessary. Contact an authorised service centre if the problem remains. |
| Forward drive does not work. | Drive belt loose or damaged. | ⇒ Replace the belt. |
| The auger does not stop when the auger lever is released. | The auger lever cable is incorrectly adjusted. | ⇒ Adjust the auger lever cable. |
| The machine does not eject snow | The ejector chute is blocked. | ⇒ Turn off the engine immediately, remove the ignition key and wait until all moving parts have come to a standstill. Clear the ejector chute with the clearing tool or a stick. |
| One or more shear bolts have sheared. | ⇒ Replace the shear bolts. | |
| Foreign object blocking the auger. | ⇒ Turn off the engine immediately and remove the ignition key. Remove the object from the auger. | |
| Auger lever cable incorrectly adjusted. | ⇒ Adjust the auger lever cable. | |
| Auger drive belt loose or damaged. | ⇒ Replace the belt. |
Jula reserves the right to make changes. In the event of problems, please contact our service department by phoning
0200-88 55 88.
Jula AB, Box 363, SE-532 24 SKARA
www.jula.se
natural_image
Symbol of a trash bin with crossed lines indicating no waste, and a solid black rectangle below (no text or labels)Värna om miljön!
- SVENSKA....7
- SÄKERHETSANVISNINGAR....7
- SAFETY INSTRUCTIONS 94
- TECHNICAL DATA 99
- DESCRIPTION 100
- ASSEMBLY 104
- OPERATION....109
- MAINTENANCE 114
- TROUBLESHOOTING 120
- SÄKERHETSANVISNINGAR
- SERVICE
- Värna om miljön!
- VEDLIKEHOLD OG OPPBEVARING
- BYTT UT SKRAPEPLATEN
- OPPBEVARING
- UCHWYTY DOLNY I GÓRNY
- SERWIS
- Read the operating instructions carefully before use!
- TRAINING
- BEFORE USE
- HANDLING FUEL
- USE
- MAINTENANCE AND STORAGE
- SYMBOLS
- TECHNICAL DATA
- WEAR HEARING PROTECTION
- DESCRIPTION
- LEVERS
- DRIVE LEVER
- AUGER LEVER
- CONTROL LEVER, EJECTOR CHUTE
- CONTROL LEVER, EJECTOR DEFLECTOR
- GEAR LEVER
- FORWARD DRIVE
- REVERSE PROPULSION
- LIGHTS
- SKIDS
- CLEARING TOOL
- FUEL RECOMMENDATIONS
- OIL RECOMMENDATIONS
- SYNTHETIC OIL
- ASSEMBLY
- UNPACKING
- LOOSE PARTS
- LOWER AND UPPER HANDLE
- AUGER LEVER ROD
- EJECTOR CHUTE
- OPERATION
- OIL AND FUEL
- REFILLING FUEL
- CHECKING OIL LEVEL
- STARTING THE ENGINE
- ELECTRIC START
- PROPULSION, TRANSMISSION
- AUGER
- STARTING THE AUGER
- AUGER LEVER FUNCTION CHECK
- SWITCHING OFF
- CLEARING THE EJECTOR CHUTE
- TIPS!
- MAINTENANCE
- ENGINE MAINTENANCE
- MAINTENANCE TABLE
- CHANGING THE ENGINE OIL
- SPARK PLUG
- CLEANING THE ENGINE
- LUBRICATION
- GEAR LINKAGE
- CONTROL HANDLE, EJECTOR CHUTE
- GEARBOX
- AUGER BEARING
- GUIDE PLATES AND SKIDS
- REPLACING THE SKIDS
- REPLACING GUIDE PLATES
- STORAGE
- Adjustment
- TROUBLESHOOTING
Brand : Meec Tools
Model : 721-231
Category : Snow blower