WeMove Atlantis - Mobile Phone NGM - Free user manual and instructions
Find the device manual for free WeMove Atlantis NGM in PDF.


| Product Type | GSM/WCDMA/Wi-Fi Mobile Phone |
| Brand | NGM |
| Model | WeMove Atlantis |
| Display | Capacitive touch screen |
| SIM Slots | Dual USIM: slot 1 supports WCDMA/GSM, slot 2 supports GSM |
| Memory Card Slot | microSD (up to capacity not specified) |
| Battery Type | Lithium-ion (removable) |
| Charging | Micro USB connector, wall charger or PC USB |
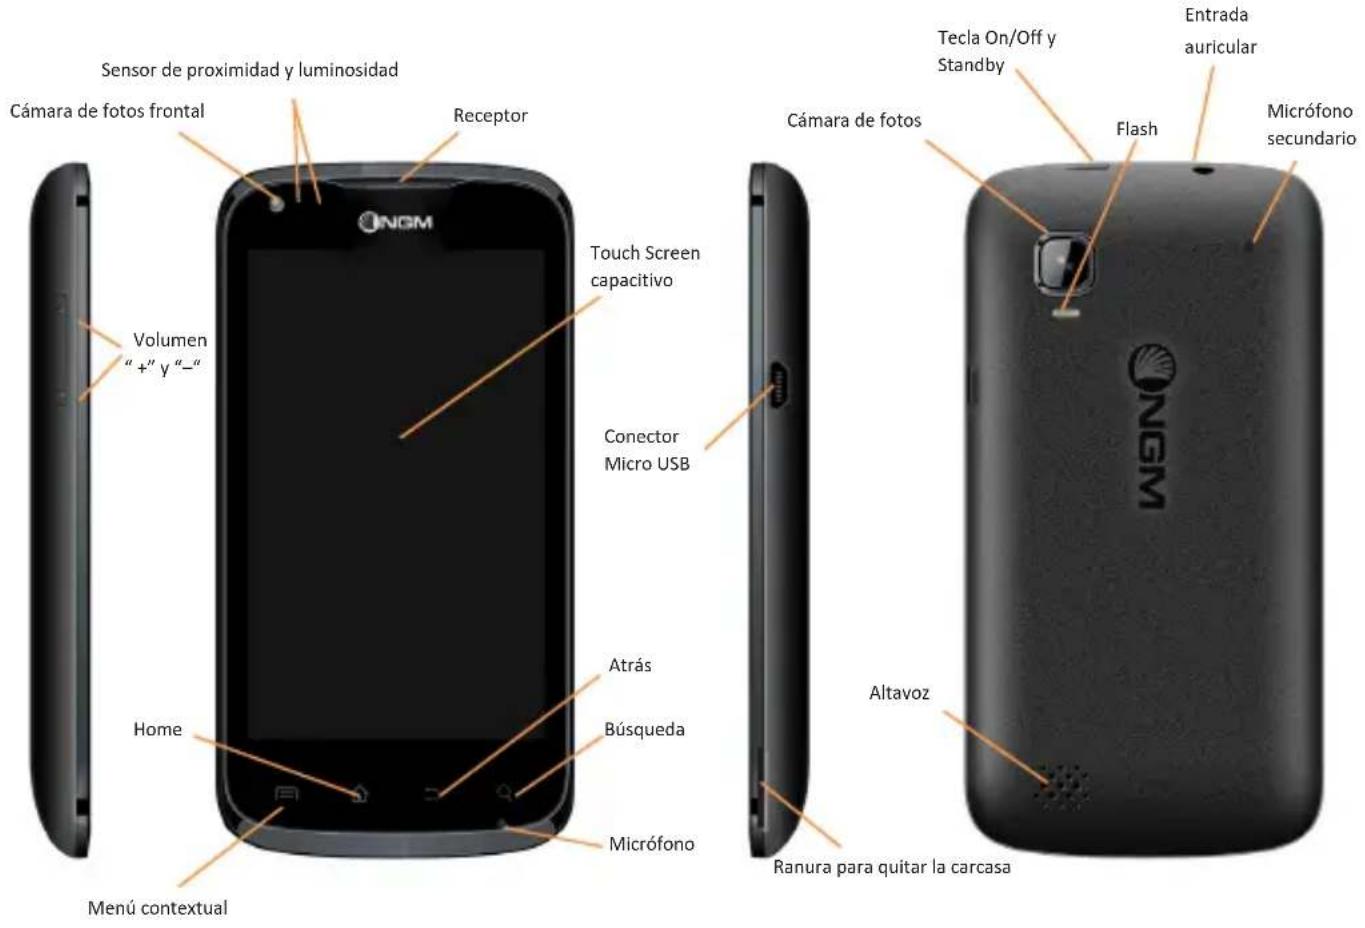
| Connectivity | Wi-Fi 802.11 b/g/n, Bluetooth, GPS, Micro USB 2.0, 3.5mm headphone jack |
| Camera | Rear camera with flash (specs not detailed) |
| Sensors | Brightness sensor, proximity sensor, accelerometer (implied) |
| Operating System | Android (version not specified) |
| Input Method | SwiftKey predictive keyboard |
| Specific Absorption Rate (SAR) | 0.426 W/kg (at ear, over 10g tissue) |
| Navigation | NGM Navigation System (pre-installed) |
| Dimensions | Not specified in manual |
| Weight | Not specified in manual |
Frequently Asked Questions - WeMove Atlantis NGM
User questions about WeMove Atlantis NGM
0 question about this device. Answer the ones you know or ask your own.
Ask a new question about this device
Download the instructions for your Mobile Phone in PDF format for free! Find your manual WeMove Atlantis - NGM and take your electronic device back in hand. On this page are published all the documents necessary for the use of your device. WeMove Atlantis by NGM.
USER MANUAL WeMove Atlantis NGM
natural_image
3D diagram of a device with a red arrow pointing to a component on a flat surface (no text or symbols)S.A.R. (Specific Absorption Rate)
http://www.who.int/peh-emf/publications/facts/fs193_italian_2010.pdf

Copyright © 2012 NGM Italia
Installing the USIM cards
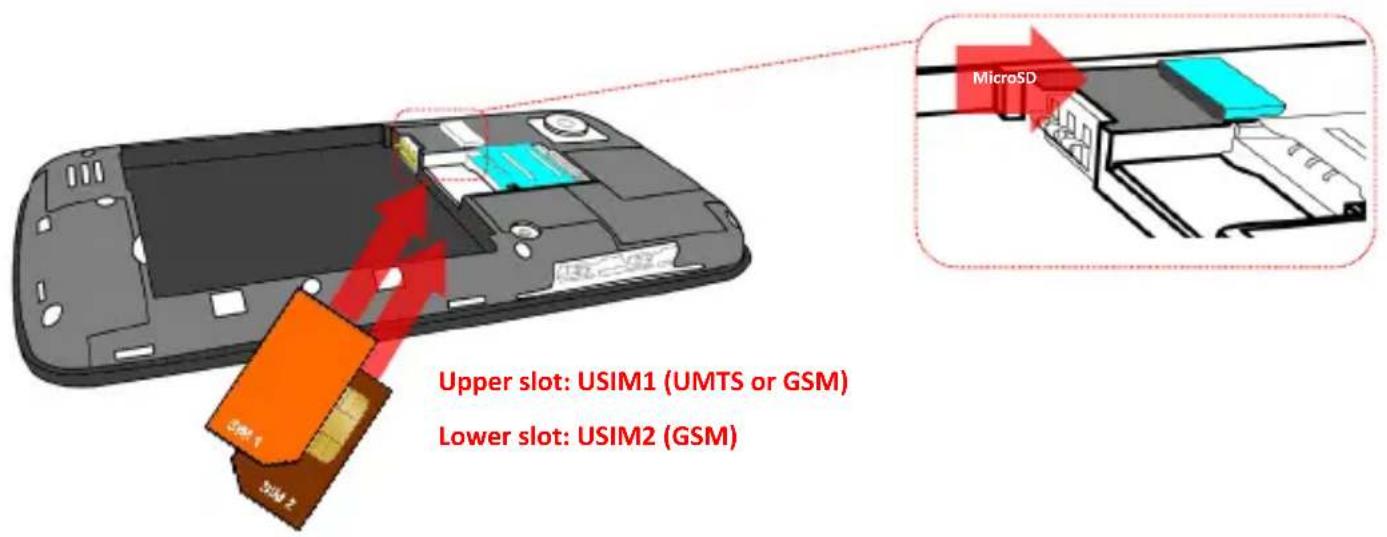
The USIM card stores information as your personal phone number, PIN code, carrier services numbers, contacts and other important details. To access the USIM slots, turn off the phone, take off the back cover by lifting it up from its lower part. The slots for the USIM cards are placed over the battery tray. Insert your USIM cards following the illustration. The upper slot supports WCDMA.
Installing the memory card
In order to use all functions of NGM ATLANTIS, it is advisable to install a micro-SD card: it must be inserted in the back side of the phone, after powering it off, removing the back cover and the battery. A dedicated slot for the memory card is placed right next to USIM slots; slide in the memory card so that the gold contacts are turned downwards.
Inserting the battery
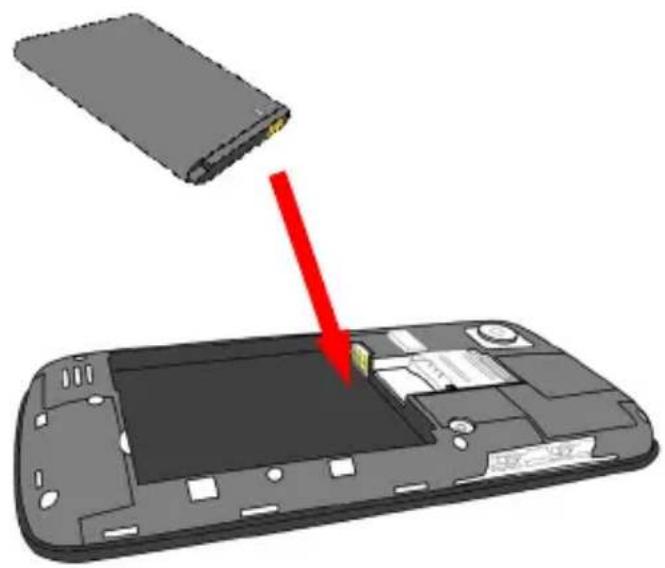
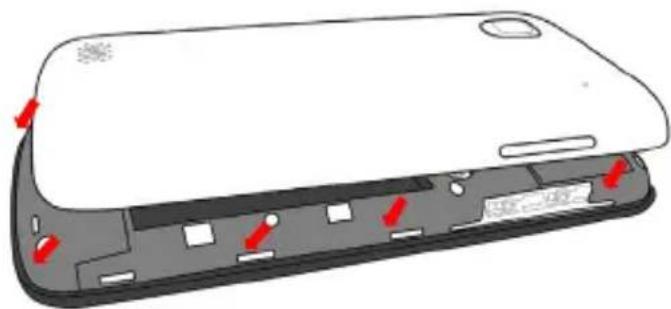
Your device is provided with a lithium-ion battery and is designed to be used exclusively with original NGM batteries and chargers. The battery must be inserted into the backside of the phone (see illustration below) with the battery contacts facing the contacts in the battery tray. When done, put the hind cover back into position as shown in the following illustrations.
natural_image
Diagram of a device showing a battery lid being inserted into a smartphone chassis, with a red arrow indicating the process (no text or symbols present)Charging the battery
Please charge the battery completely before starting to use the device. Use the provided USB cable, connecting one end to the provided wall socket adaptor (placed into a socket) and the other end to the USB connector placed on the right side of the phone. The phone can also be charged by connecting it to a PC USB port but in that case it will charge more slowly. While the battery is charging, an animation on screen will show the charging progress if the phone is on. Once charge is completed, the icon will be filled and the phone can be disconnected from the grid.
Warning: Do not connect the phone to a booting-up or running down PC to avoid voltage jumps. In order to preserve the correct functioning of the device and in order not to compromise warranty, the sole use of original NGM battery chargers and accessories are recommended. Please charge the battery indoors, in a dry and favorable environment. It's normal for the battery to get slightly warm during the charging process. The battery will reach its full capacity when cycled several times.
natural_image
Diagram of a smartphone rear panel showing internal components and red arrows indicating movement or force (no text or symbols present)
Turn on, turn off and standby
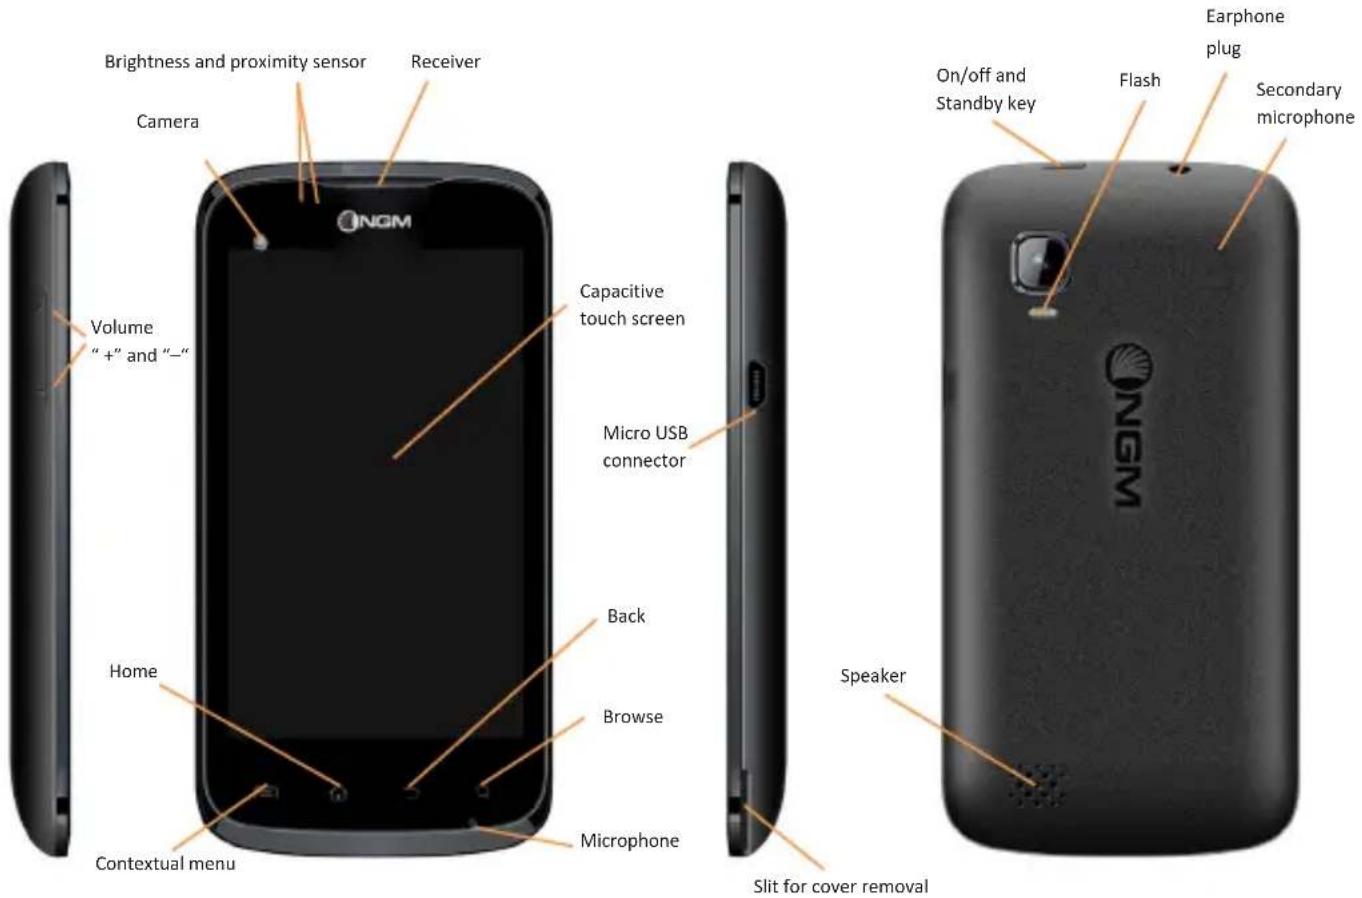
Press and hold the on/off key to turn on the phone. Press and hold the same key and confirm your intention to turn off the phone. A quick pressure of the on/off key sets the phone on standby-mode (screen off) or allows you to go back to the standby screen (see below).
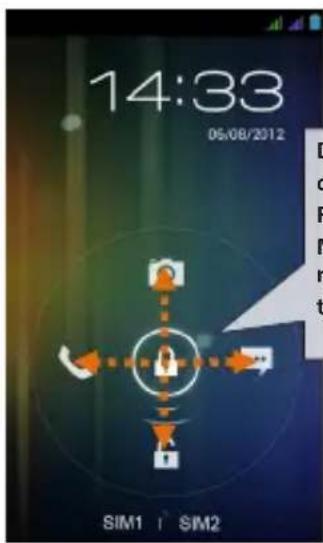
Drag down the lock in order to unlock the screen. For direct access to the Messaging / Call/ Camera menus, move the lock on the correspondent icons.
The main screen
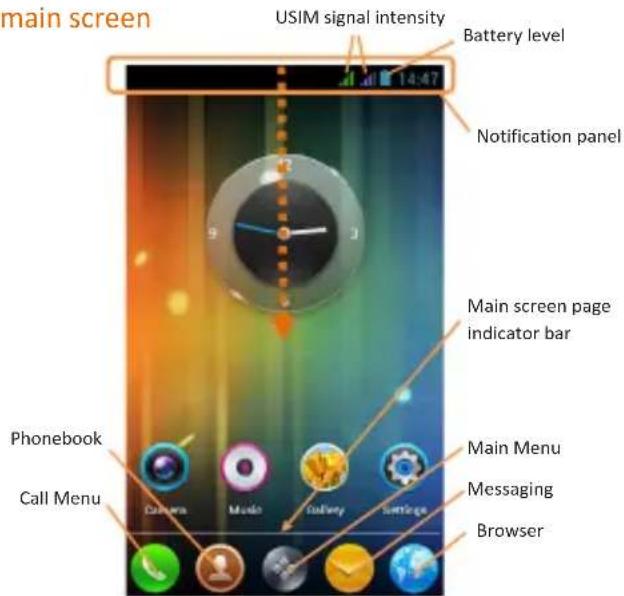

The main screen is the starting point for the use of all applications of the phone. Other main screen pages are available (as indicated by the white bar), just swipe the screen left or right. These pages can be freely personalized with one's favorite applications, shortcuts and widgets. Just keep pressed the icon of the wished function in the application menu under the Widgets function and then place the icon on the preferred main screen. To remove the icons, keep them pressed and drag them to the big "X" that appears in the upper part of the screen.
![The Main Menu Notification panel Menu page indicator APPS WIDGETS SIM Toolkit Phone Email Calculator People Browser Sound[Recent] Calendar Settings Clock Videos FM Radio Search Gallery File Manager Downloads Camers Messaging Music News & News](/content/2026/05/782380/images/3daf0e3e2d81303d225a07323b29e9f462abafa4423c5d7f420adf910887e9d6.jpg)
Use the touch screen by touching, pressing, sliding your finger over it. Select an application from the main menu or scroll the main menu pages right and left to find the desired one. Press the back key to get back to the previous screen or press Home to get back into the main screen.
Managing the two USIM cards
From the main menu, select Settings > SIM Management (in Wireless & Networks). Select the "USIM1" and/or "USIM2" operator checkboxes to activate/deactivate the USIM cards selectively in any moment. In this menu you can moreover assign custom colors to each USIM card and define the card (or "always ask") for your voice calls, vido calls or data connections.
Managing calls
Voice calls
From the main screen, touch the Call Menu icon in order to open the calling screen. Use the virtual keypad to digit the desired phone number.
Select the calling icon of the USIM card that you want to call with. To end the call, press the End key.
To answer a call, drag the phone icon to the right; to reject a call, drag the phone icon to the left. To reject a call with a text message, drag the phone icon upwards. To silence an incoming call, briefly press the Volume "+" or "-" keys on the right side of the device.
Call a number from the call history
From the main screen, select Call Menu and the Call log tab (clock Icon) to access rapidly the last sent, missed and received or all calls.
Click onto the calling icon to the right of the number to call it back.
Managing contacts
Add a new contact
From the main screen/menu, select the Contacts icon.
① Select the icon with the “+” on it.
Select the storage (Phone, USIM1 or USIM2).
Insert Name, Number and eventual other details (if saving on the phone memory).
Confirm by selecting Save.
Add a new contact from the call history
From the main screen, select Call Menu and the Call log Tab (arrows icon).
Keep the desired number pressed (among the incoming, outgoing and missed calls) until a popup with various options appears.
Select Add to Contacts and choose if you want to create a new one or add the number to an existing contact.
Enter the name and eventual other information and confirm by selecting Done.
Set ringtones
Select a ringtone
From the main menu, select Settings > Device > Audio Profiles > General.
In Voice call ringtone, select the desired ringtone.
If you wish to set a personalized ringtone, from Music you can select a song and by pressing the contextual menu, choose Set as ringtone. After, the song will be available in the list of selectable ringtones.
Note: you can use *mid, *wav or *mp3 files as ringtones.
Screen lock and shortcuts
From the main menu, select Settings > Personal > Security > Screen lock. Select the desired unlocking mode (None, Slide, Face Unlock, Pattern, PIN or Password) and confirm. In order to quickly lock the screen, briefly press on the power on/off key of the phone. To unlock it, follow the instructions on the screen.
Rapid activation of vibration mode
Rapidly disable ringtones and message alerts by pressing Volume "-" until it gets to minimum and then switches to Vibration mode. By pressing "-" again, you set it Silent.
Send and receive messages
Send SMS and MMS
From the main screen or menu, select Messaging and select the icon with the "+" symbol to access the text input screen for a new message.
Write the first few letters of a contact name into the recipients bar and select the desired contact from the popup contact list that will appear, or directly insert the recipient's number.
Write the text into the dedicated space with the virtual keypad.
Select the Attach-icon to insert multimedia files (the message will automatically be converted into MMS).
Press the Send key and then the USIM that you want to use (unless a Default SIM has been chosen in SIM Management)

Connectivity
The operation system requires an active data connection. If data traffic is not included in your phone contract, it could imply extra costs. In that case it is advisable to configure the internet access through WiFi. The activation/deactivation of the data traffic on the USIM is in Settings > Wireless and Networks > SIM Management > Data Connection.
Connect to the Internet using WLAN
Connect to the wireless net using the Wi-Fi function. In order to activate it, from the main menu choose Settings > Wireless and Networks > Wi-Fi on/off. Configure Wi-Fi and manage the access points by selecting Wi-Fi. Please follow all warnings and indications concerning the use of wireless devices in areas where the use of such functions is restricted (airplanes, hospitals, etc.). Switch to Airplane mode when you have to use only the functions that do not need Network access.
Connecting to a Bluetooth device
Switch on the other Bluetooth™ device. Refer to the documentation of the device.
From the main menu, select Settings > Wireless and Networks > Bluetooth on/off to activate Bluetooth. For a rapid activation/deactivation use the dedicated key on the notification panel.
Select Bluetooth > Search for devices to find other Bluetooth devices.
Among the found devices, select the name of the device that you want to pair. The phone will try to pair the device, eventually asking for a pairing code.
Web navigation
Connect to the Internet
From the main screen or the main menu, select Browser. Write the URL into the address bar to start navigation. If you choose to navigate with the phone network data connection, please make sure to be informed about the costs or choose a "flat" data tariff with your operator. Alternatively, you can use the Wi-Fi connection (see paragraph "Connectivity").
Configure an account in the Email application of the Main Menu, following the indications.
GPS geolocalization
The Global Positioning System (GPS) is a system based on the satellite-related position determination, with global and continuous covering. The function is in Settings > Personal > Location services > GPS satellites. Inside the same menu you can also activate Location service that contributes in the position finding using the available Wireless Networks. When the GPS function is active, the phone begins to collect data from the available satellites and determines the current position. Limit the use of battery and memory by switching off this function when you don't need it.
The phone integrates the NGM NAVIGATION SYSTEM©, that is accessible through the main menu. For more details please visit www.ngm.eu.
Rapid access
Notification panel
Open the notification panel by touching the upper area containing the battery and signal-intensity icons and drag it downwards. To hide the panel, push it up again starting from the bottom. From the panel you have rapid access to a list of notifications from the USIM or the System and to the control panel with 12 management and settings - widgets.
Rapid access to recent applications
When you are inside any application, press and hold the Home Icon: a list of the most recent applications that have been opened will be shown and can be directly selected.
Contextual menu
Inside any application, press the Contextual Menu Icon to visualize a contextual menu that refers to the application with related functions.
SwiftKey text input
The default text input method is the SwiftKey keyboard. SwiftKey is an advanced predictive text input system; when writing SMS, MMS or E-mails, this mode predicts the word while you are writing it, changing it at every key pressure. During the first use, the program will suggest with popups the innovations and peculiarities of this writing system.
SwiftKey has an “intelligent” Dictionary that retrieves words also from other applications in the phone, such as the phonebook or the social networks etc. For the correct use of this function, the micro-SD contained in the selling package has to be installed into the phone.
To change the text input parameters, select Settings > Personal > Language and input > SwiftKey for NGM-Mobile

Warning: NGM Italia will not bear responsibility for any incompliance with the above guidelines or improper use of the mobile phone. The company reserves the right to modify any of the content in this user guide without previous public announcement. The content of this manual may vary from the actual content displayed in the mobile phone. In such case, the latter shall govern.
Certifications
Declaration of conformity (R&TTE)
We, NGM Italia
Declare under our sole responsibility that the product identified as GSM/WCDMA/Wi-Fi Mobile Phone: NGM ATLANTIS
Conforms to the following standards and specifications:
Health EN 50360, EN 62209-1
Safety EN 60950-1+A11
EMC EN 301 489-1/-7/-17
Radio EN 301 511
EN 300 328
We declare that all the series of fundamental radio test have been conducted and that the aforesaid product meets all the essential requirements of the Directive 1999/5/EC.
The conformity assessment procedure referred to in Article 10 and detailed in Annex IV of Directive 1999/5/EC has been followed with the involvement of the following notified bodies:
PHOENIX TESTLAB GmbH
Königswinkel 10,
D-32825 Blomberg,
Germany
C€0700
All technical documents conserved at NGM Italia S.r.l. Available on request.
(UE Authorized Representative)
NGM Italia S.r.l.
Via L. Da Vinci, 7 – Ponticelli
56020 Santa Maria a Monte (Pi)
S.A.R. (Specific Absorption Rate)
Information on SAR certifications
Cell phones are radio transceivers. They have been projected not to exceed the radio wave exposition limits recommended by international guidelines. These guidelines have been determined by the international independent scientific organizations ICNRP and IEEE and include security limits to ensure protection to all persons, independently from their age and health conditions.
This phone meets European Union (EU) requirements concerning exposure to radio waves coming from telecommunication and radio devices. The exposure standard for mobile phones employs a unit of measurement known as SAR (Specific Absorption Rate). The SAR limit recommended by the EU Council is 2.0 W/kg averaged over ten grams of body tissue.
The highest SAR value for this model phone when tested for use at the ear was 0,426 watt/kg [1,2]. Although the SAR is determined at the highest certified power level, the actual SAR of the phone while operating can be well below the maximum value. This is because the phone is designed to operate at multiple power levels so as to use only the power required to reach the network. In general, the closer you are to a base station, the lower the power output of the phone. The Declaration of Conformity here above proves that the
designated product is in compliance with the essential requirements and other relevant provisions of the R&TTE - Directive (European Radio & Terminal Telecommunications Equipment)1999/5/EC
[1] These controls have been made according to international guidelines on controls.
[2] For the use next to the body, this telephone model has been controlled and is conform to the directives for the exposition to electromagnetic radiation, when used with accessories provided by or approved by NGM and not containing metallic parts and that position the mobile phone at least at 1,5 cm distance from the body.
Warnings
WHO (World Health Organization) confirms that the actual scientific information does not indicate the necessity to adapt particular precautions for the use of cell phones.
Nevertheless, for all those users not comforted by these data, NGM advises to limit their own and their children's exposure, for instance by reducing the calling time, or by using earpieces or hands-free devices to keep the mobile phone distant from the body and the head.
For more information on the argument, NGM invites to consult the WHO document (Fact sheet N°193, June 2011) entitled Electromagnetic fields and public health: mobile phones at the following web address:
http://www.who.int/mediacentre/factsheets/fs193/en/index.html
NGM advises to use mobile devices of any brand or model with moderation and to keep them at a minimum distance of 1,5cm from the body or to use earpieces or other hands-free devices.

Copyright © 2012 NGM Italia
No part of this manual may be reproduced, distributed, translated, or transmitted in any form or by any means, electronic or mechanical, including photocopying, recording, or storing in any information storage and retrieval system, without the prior written permission of NGM Italia.
Bluetooth® is a registered trademark of the Bluetooth SIG, Inc. worldwide.
Wi-Fi® and the Wi-Fi logo are registered trademarks of the Wi-Fi Alliance.

ATLANTIS
natural_image
Diagram showing a device being inserted into a smartphone casing, with a red arrow indicating the process (no text or symbols present)Akku aufladen
natural_image
Diagram of a smartphone rear panel showing internal components and red arrows indicating movement or force (no text or symbols present)
S.A.R. (Specific Absorption Rate)
Copyright © 2012 NGM Italia
natural_image
Diagram showing a device being inserted into a smartphone casing, with a red arrow indicating the process (no text or symbols present)Cargar la batería
natural_image
Cross-sectional diagram of a smartphone showing internal components and red arrows indicating parts (no text or symbols)
S.A.R. (Specific Absorption Rate)
Copyright © 2012 NGM Italia
- S.A.R. (Specific Absorption Rate)
- Copyright © 2012 NGM Italia
- Installing the USIM cards
- Installing the memory card
- Inserting the battery
- Charging the battery
- Turn on, turn off and standby
- Managing the two USIM cards
- Managing calls
- Voice calls
- Call a number from the call history
- Managing contacts
- Add a new contact
- Add a new contact from the call history
- Set ringtones
- Select a ringtone
- Screen lock and shortcuts
- Rapid activation of vibration mode
- Send and receive messages
- Send SMS and MMS
- Connectivity
- Connect to the Internet using WLAN
- Connecting to a Bluetooth device
- Web navigation
- Connect to the Internet
- GPS geolocalization
- Rapid access
- Notification panel
- Rapid access to recent applications
- Contextual menu
- SwiftKey text input
- Certifications
- Declaration of conformity (R&TTE)
- Information on SAR certifications
- Warnings
- ATLANTIS
- Akku aufladen
- Cargar la batería
Brand : NGM
Model : WeMove Atlantis
Category : Mobile Phone