
CP9VP6 DE/HA - Cooker HOTPOINT - Free user manual and instructions
Find the device manual for free CP9VP6 DE/HA HOTPOINT in PDF.

| Product Type | Freestanding electric cooker |
| Brand | Hotpoint |
| Model | CP9VP6 DE/HA |
| Category | Cooker |
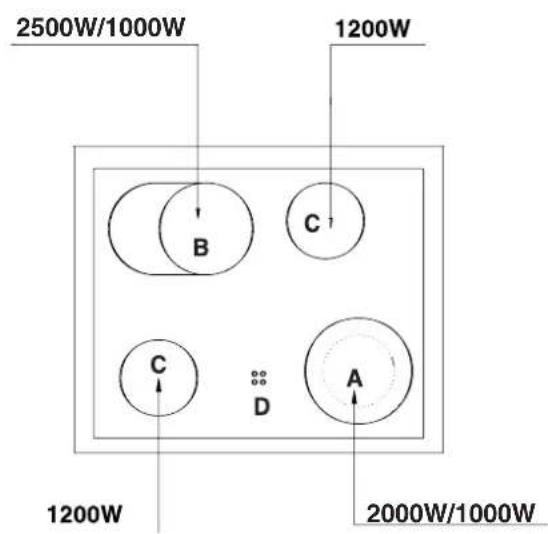
| Hob Type | Ceramic glass hob |
| Number of Cooking Zones | 4 |
| Cooking Zone 1 (Left Front) | 2500W / 1000W (dual) |
| Cooking Zone 2 (Left Rear) | 1200W |
| Cooking Zone 3 (Right Front) | 1200W |
| Cooking Zone 4 (Right Rear) | 2000W / 1000W (dual) |
| Oven Type | Multifunctional electric oven |
| Oven Functions | Upper + lower heat, lower only, upper only, grill, maxigrill, maxigrill + fan, lower + fan, circular + fan, quick defrost |
| Oven Inner Coating | Self-cleaning microporous enamel |
| Timer | Electronic timer with delayed start, cooking duration, and timer function |
| Controls | Knobs for hob and oven functions, electronic timer |
| Power Supply | 230/400 V ~ 50 Hz |
| Maximum Power Absorption | 10000 W |
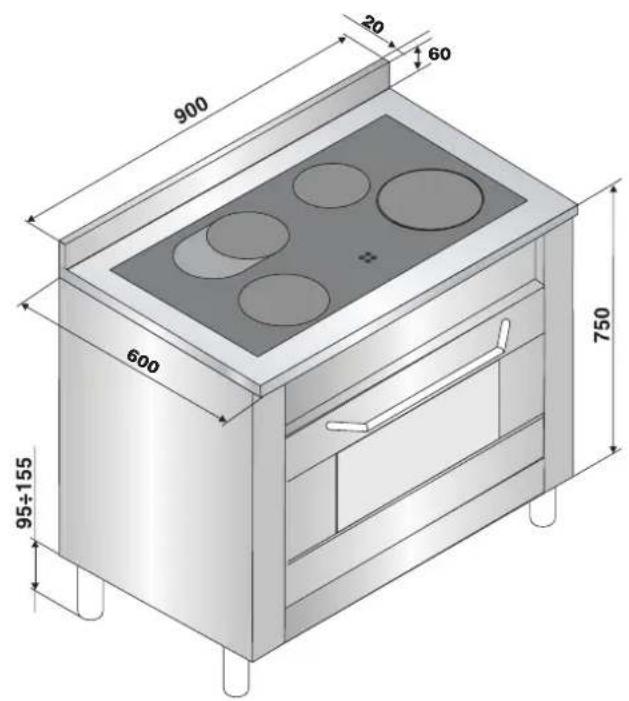
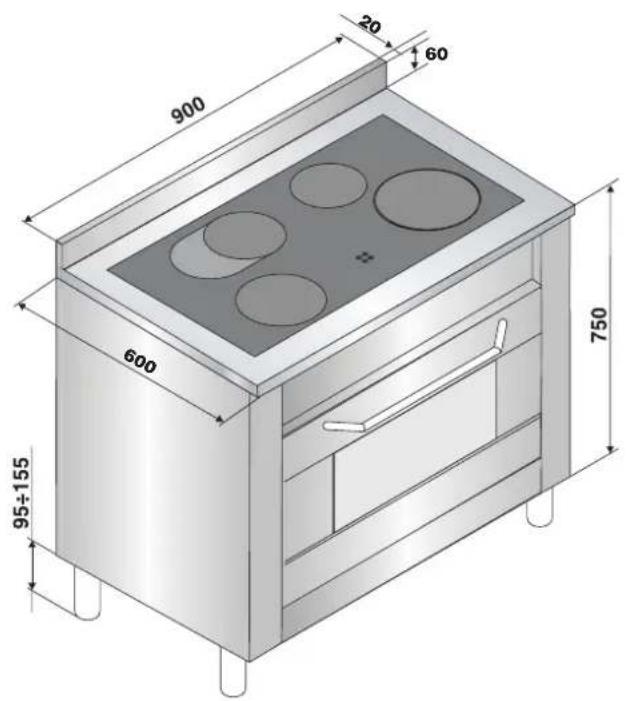
| Dimensions (W x D x H) | 900 x 600 x 750 mm (excluding adjustable feet, range 95-155 mm) |
| Safety Features | Residual heat indicator lights (4), child safety device available (BAB kit) |
| Cleaning | Removable oven door, ceramic hob scraper recommended, self-cleaning oven enamel |
| Accessories Included | Rotisserie spit, drip pan, shelf |
| Oven Light | 15 W, E14 cap, high temperature (300°C) |
Frequently Asked Questions - CP9VP6 DE/HA HOTPOINT
User questions about CP9VP6 DE/HA HOTPOINT
0 question about this device. Answer the ones you know or ask your own.
Ask a new question about this device
Download the instructions for your Cooker in PDF format for free! Find your manual CP9VP6 DE/HA - HOTPOINT and take your electronic device back in hand. On this page are published all the documents necessary for the use of your device. CP9VP6 DE/HA by HOTPOINT.
USER MANUAL CP9VP6 DE/HA HOTPOINT
DE


natural_image
Simple line drawing of a ladder leaning against a wall, with arrows indicating motion direction (no text or symbols)natural_image
Technical line drawing of a mechanical component with no visible text or symbolsnatural_image
Illustration of a hand using a paintbrush to brush residue in a circular container (no text or symbols)
natural_image
Crossed black-and-white diagram showing three metallic cylindrical objects and a box, no text or symbols present.PRAKTISCHE BACK-/BRATHINWEISE
DE
Electrical connection, 17
TECHNICAL FEATURES
Description of the appliance, 18
OPERATING INSTRUCTIONS, 19
MULTIFUNCTIONAL ELECTRIC OVEN, 20
TIMER (ELECTRIC OVEN), 21
CLEANING AND MAINTENANCE, 22-23
COOKING ADVICE, 24

GB
1 This appliance was designed for domestic use inside the home.
2 Before using the appliance, please read this instruction booklet carefully as it contains important information regarding the safe installation, operation and maintenance of the cooker. Keep this booklet in a safe place so that, if necessary, it may be consulted at a later date.
3 After the packaging has been removed, make sure that the appliance is intact and has not been damaged in any way. If there is any doubt, contact a professionally qualified technician and do not use the appliance. All packaging (plastic bags, polystyrene foam, staples, etc.) should be kept out of reach of children as it presents a potential hazard.
4 The appliance must be installed by a qualified individual in compliance with the instructions provided. The manufacturer shall not be held responsible for any harm caused to individuals or animals, or for any damage to personal property resulting from incorrect installation.
5 The electrical safety of this appliance is only guaranteed when it has been correctly connected to an efficient earthed electricity supply in compliance with current electrical safety regulations. This is a fundamental safety requirement which must be checked and, if there is any doubt, you should ask a professionally qualified technician to carry out a thorough check of the supply system. The manufacturer shall not be held responsible for any damage caused by a mains supply which has not been earthed correctly.
6 Before connecting the appliance, make sure its rating corresponds to the power supply data.
7 Make sure that the mains supply and the electrical sockets can withstand the maximum power of the appliance, which is indicated on the serial number plate. If there is any doubt, contact a professionally qualified technician.
8 The appliance must be connected to the mains using an omnipolar switch with a minimum contact opening of 3 mm.
9 This appliance should only be used for the purpose for which it was designed.
10 Any other purpose (for example, heating the room) constitutes improper use of the oven and is dangerous.
11 The manufacturer may not be held responsible for any damage caused as a result of improper, incorrect and unreasonable use of the appliance.
12All users of electrical appliances should observe several basic rules. These include:
- Do not touch the appliance with wet or damp hands or feet.
- Do not use the appliance when barefoot.
- Do not use extension cords. If this cannot be avoided, be especially careful.
- When unplugging the appliance always pull the plug from the mains socket, do not pull on the cable.
- Do not leave the appliance exposed to atmospheric agents (rain, sunlight, etc.)
- Do not allow children or disabled individuals to operate the appliance without supervision.
13Always disconnect the appliance from the mains supply (either by unplugging it or by shutting off the switch) before cleaning it or carrying out any maintenance work.
14If the glass surface cracks, disconnect the appliance from the power supply immediately. When it comes to repairing the appliance, use the services of an authorised technical assistance centre only and make sure that genuine spare parts are used. Failure to comply with the above may compromise the safety of the appliance.
15Before disposing of the appliance, make it unusable by unplugging it and cutting off the power supply cable. It is also advisable to remove any potentially hazardous parts, especially with regard to children who may use the old appliance as a toy.
16The glass ceramic hob is able to withstand temperature fluctuations and shocks. Nevertheless, if it is struck with objects such as knives or utensils with sharp edges, it may break. If this should occur, disconnect the electricity supply immediately and contact an authorised assistance centre.
17 Bear in mind that the cooking zone remains hot for at least half an hour after it has been switched off. Make sure that no pans or other objects are inadvertently left on any zones which are still hot.
18Do not switch on the cooking zones if there are any pieces of aluminium foil or plastic objects on top of the hob.
19Do not get too close to any cooking zones which are still hot.
20If you are using small domestic appliances near the hob, make sure that their power supply cables do not come into contact with the hot parts of the hob.
21Make sure that pan handles are turned towards the centre of the hob in order to avoid accidental burns.
22Never leave a cooking zone switched on without a pan on top of it, as doing so will lead to the maximum heat level being reached in a very short time, potentially resulting in damage to the heating elements.
23Please read before using the appliance for the first time: The glue used to create a seal around the glass may leave a greasy residue. We recommend these are removed using a non-abrasive cleaning product before the appliance is used. During the first few hours of operation, there may be a smell of rubber; this will disappear quickly.
24Do not look directly at the halogen heating elements while they are switched on: they produce a strong light which may irritate the eyes.
25The accessories which may come into contact with food are made using materials which conform to the provisions set out in Directive 89/109 EEC dated 21/12/88 and in the Italian Law Decree 108 dated 25/01/92.
26Always make sure the knobs are in the "0" position when the appliance is not in use.
27 If the cooker is placed on a pedestal, take all necessary precautions to ensure that the appliance does not slide off this pedestal.
28 Do not use steam cleaning machines to clean the appliance.
29 Do not block openings or gaps.
30 When cooking with the oven and grill, the glass door and the parts surrounding it are subjected to significant increases in temperature. It is therefore best to make sure that children do not play near the appliance. As we are always trying to improve the safety of our products, our Central Office and our Authorised Assistance Centres (see attached list) offer a supplementary child protection device. To request this, use the code: BAB – followed by the appliance model number.
31 Do not let children play with the appliance.
32The appliance should not be operated by people (including children) with reduced physical, sensory or mental capacities, by inexperienced individuals or by anyone who is not familiar with the product. These individuals should, at the very least, be supervised by someone who assumes responsibility for their safety or receive preliminary instructions relating to the operation of the appliance.
This appliance conforms to the following European Economic Community directives:
- 2006/95/EEC dated 12/12/06 (Low Voltage) and subsequent amendments;
- 89/336/EEC dated 03/05/89 (Electromagnetic Compatibility) and subsequent amendments;
- 90/396/EEC dated 29/06/90 (Gas) and subsequent amendments;
- 93/68/EEC dated 22/07/93 and subsequent amendments.
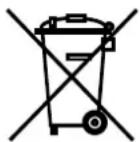

Disposal of household appliances
The European Directive 2002/96/EC relating to Waste Electrical and Electronic Equipment (WEEE) states that household appliances should not be disposed of using the normal solid urban waste cycle. Exhausted appliances should be collected separately in order to optimise the cost of re-using and recycling the materials inside the machine, while preventing potential damage to the atmosphere and to public health. The crossed-out dustbin is marked on all products to remind the owner of their obligations regarding separated waste collection. For further information relating to the correct disposal of exhausted household appliances, owners may contact the public service provided or their local dealer.
INSTRUCTIONS FOR THE INSTALLER
GB
The following instructions should be carried out by a qualified technician to ensure that the appliance is installed, adjusted and technically serviced correctly in compliance with current regulations.
Important: any adjustments, maintenance, etc. must be carried out after the appliance has been disconnected from the electricity supply. Whenever it is necessary to maintain the electrical connections, proceed with extreme caution.
The cooker has the following technical features:
Class: 1
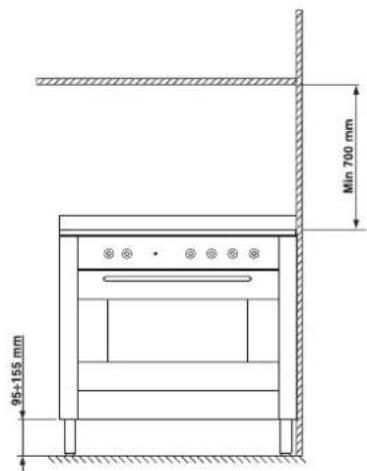
The maximum dimensions of the cooker are listed in the figure on page 2. To ensure the appliance operates correctly if installed inside a cabinet, the minimum distances indicated in fig. 10 must be observed. Furthermore, adjacent surfaces and the rear wall must be able to withstand a temperature of 65^ C. There are 4 adjustable feet on the lower part of the cooker; these can be used to level the cooker when necessary. The appliance must be positioned so that it is level. Warping resulting from bad positioning can alter the features and performance of the appliance.

Fig.10
THE EQUIPMENT MUST BE EARTHED CORRECTLY. The hob is designed for operation with an alternating current at the power supply voltage and frequency indicated on the data plate (this is located underneath the hob; alternatively the information may be found at the end of the instruction manual). Make sure that the local power supply voltage value is the same as the value indicated on the data plate. The appliance does not come with a power supply cable, because the size of this cable should be determined according to the type of electrical connection used (see connection diagram below). Use a H05RR-F-type rubber cable. Open the terminal board, following the instructions for the adjacent figure:
To install the power supply cable, follow the instructions below:
- Loosen the cable clamp screw "V" and the wire contact screws (fig. 11).
- Fix the wires under the screw heads in accordance with the following diagram.
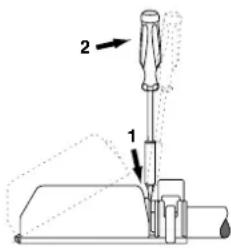
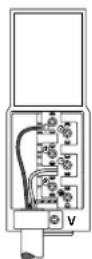
Fig.11
- Secure the power supply cable by fastening the cable clamp screw, then put the cover back on.
| Electrical connection | Power supply voltage | Fuse | Cross-section |
 | 230V -1+N ~ 50Hz | 32^* A 4 mm^2 | |
 | 400V 2+N ~ 50Hz | 32 A 4 mm^2 | |
 | 400V -3+N ~ 50Hz | 25 A 2.5 mm^2 | |
 | 230V -2 ~ 50Hz | 32^* A 4 mm^2 | |
 | 230V -3 ~ 50Hz | 25 A 2.5 mm^2 | |
 | 230V -2+2N ~ 50Hz | 25^* A 2.5 mm^2 |
*Application of the simultaneity coefficient in compliance with the relevant standard.
Connecting the power supply cable to the mains Find a plug which is suitable for the load indicated on the data plate and fit it onto the cable. The appliance must be directly connected to the mains using an omnipolar switch with a minimum contact opening of 3 mm installed between the appliance and the mains. The switch must be suitable for the load indicated and must comply with current electrical regulations (the earth wire must not be interrupted by the switch). The supply cable must not be placed in areas where any part of it could reach temperatures higher than 50°C. Before connecting the appliance to the power supply, make sure that:
- The modulating valve and the electricity supply can withstand the maximum power of the appliance (see the data plate for details);
- The electricity supply system is earthed correctly, in compliance with current laws and regulations;
- The power socket or omnipolar switch may be reached easily once the hob has been installed.
TECHNICAL FEATURES:
Voltage and Frequency 230/400 V \~ 50 Hz
Max. absorption: 10000 W

Description of the appliance
GB
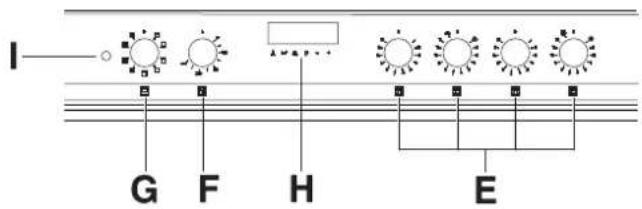

A Heating element
B Heating element
C Radiant/halogen heating element
D Residual heat indicator lights
E Hotplate selection controls
F Thermostat
G Function selector
H Electronic timer
I Electric oven operation indicator light
Description of the heating elements
The radiant elements "A-B-C" consist of circular heating elements. These become red a few seconds after they have been switched on.
They are extremely easy to use because they are similar to the other heating elements. Please refer to table 1.
Control knobs
Each cooking zone is fitted with a control knob "E", which can be used to continuously adjust the temperature intensity level to values between a minimum of 1 and a maximum of 12. Table1 lists the correspondences between the positions indicated on the knob and the use for which the hotplates are recommended.
The "A-B" hotplate control knob usually only activates the small / part of the hotplate. To activate the entire large hotplate, turn the knob past position 12, to the 🐎/○mbol; a click will indicate that the entire hotplate has been activated. The temperature level may now be adjusted to the desired value, up to level 12, using the same knob.
| Pos. | Automatic hotplate |
| 0 | Off |
| 1 | Melting butter, chocolate |
| 2 | Heating liquids |
| 3 | |
| 4 | Soups and sauces |
| 5 | |
| 6 | Cooking at boiling point |
| 7 | |
| 8 | Pan-roasting |
| 9 | |
| 10 | Boiling large quantities |
| 11 | |
| 12 | Frying |
Residual heat indicator light (D)
This indicates that one or more cooking zones are at a temperature greater than 60^ C, even after the cooking zones have been switched off. The hob is fitted with 4 residual heat indicator lights, one for each cooking zone.
Advice for the operation of the ceramic glass hob
To achieve the best results using your hob, there are several basic suggestions which should be taken into account while cooking or preparing food.
- Use pans with a flat base so as to ensure the pan adheres properly to the cooking zone.
- Always use pans with a diameter which is large enough to cover the cooking zone fully, in order to use all the available heat.
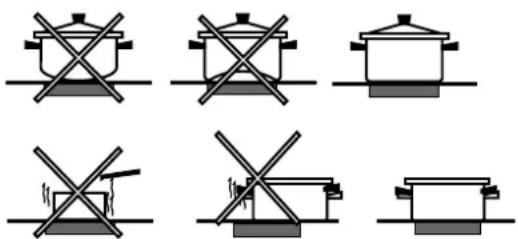
- Make sure that pan bases are always clean and dry, in order to guarantee perfect contact with the hob and to safeguard the durability of the hotplates and the pans themselves.
- Do not use cookware which has been used with gas burners. The concentration of heat from gas burners is such that it may warp the base of the pan, and therefore the desired result will never be achieved if it is then used on the glass ceramic hob.
MULTIFUNCTIONAL ELECTRIC OVEN
GB
The oven offers new, different combinations of electrical heating elements; by selecting the most suitable combination for the dish you wish to cook, the results achieved will be very precise.
The various functions can be selected by turning selector knob "G" to the following positions:
| Symbol | Function | Power |
| 0 | 0) Off | - |
| [3K40] | 2) Upper + lower heating elements | 2350 W |
 | 3) Lower heating element | 1300 W |
 | 4) Upper heating element | 1050 W |
| [CWKC] | 5) Grill heating element | 2000 W |
 | 6) Maxigrill heating element | 3050 W |
 | 6) Maxigrill heating elements + fan | 3100 W |
| [CW8A] | 7) Lower heating elements + fan | 1350 W |
| [9504] | 8) Circular heating element + fan | 2850 W |
 | 9) Quick defrosting | 50 W |
After selecting the cooking function, set thermostat knob "F" °C to the desired temperature.
- For normal cooking procedures using conventional methods (roasts, biscuits, etc.), use the function (heat from above + below). Only place the foods to be cooked in the oven when the selected temperature has been reached and, if possible, use only one shelf. If you wish more heat to be generated below or above the dish, turn the selector to position (heat from below), (heat from below + fan) or (heat from above).
- With function (fan), cooking takes place through the action of air which has been preheated by a heating element and which is then circulated inside the oven by a fan. The oven heats up very quickly, therefore the foods you wish to cook may also be placed inside the oven as soon as it is switched on. It is also possible to cook using two shelves at the same time.
- The “quick defrosting” function takes place without using the heating elements; only the oven light and the fan are activated.
- Cooking with the grill uses a high power level, which makes it possible to brown the surface of foods quickly; it is particularly suited to the cooking of meats, which should remain soft and juicy on the inside.
To cook with the grill, turn selector knob "G" to one of the following positions: ▼ (grill), □ (maxigrill),
(maxigrill with fan).
While the grill is operating, the oven door must be kept shut. The thermostat knob should also be positioned at a maximum of 200^ C.
Oven light
Lighting inside the oven is obtained automatically when selector knob "G" is set to any position. If you wish to switch the light on without activating any of the heating elements, set the thermostat knob to 0°C. Indicator light "I"
This indicates the heating-up phase of the oven is underway; as soon as the inside of the oven reaches the set temperature the light switches off.
At this point the indicator light will begin switching on and off intermittently; this shows that the thermostat is operating correctly in order to maintain a constant temperature inside the oven.
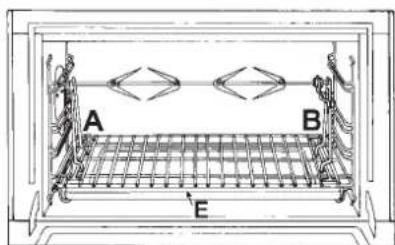
Spit - Rotisserie
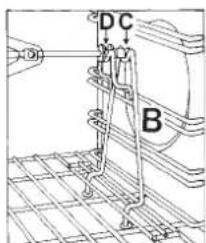
This accessory should only be used when cooking with the grill. Proceed as follows: thread the meat you wish to cook onto the rod positioned across the oven lengthwise, fixing it in place with the adjustable forks supplied (fig. 2a).
Position supports "A" and "B" (fig. 2b) in the relevant holes in dripping pan "E", rest the groove on the rod in slot "C" and use the guide rail to place the rack in the lowest position in the oven; next position the rod in the rotisserie spit hole, sliding the groove forwards to slot "D". Activate the grill and rotisserie spit by turning knob "H" on the commutator to the positions displaying the
(grill), (maxigrill) or (maxigrill with fan) symbols.
This feature allows you to program the oven or the grill as follows:
- Delayed cooking start time with a specified duration;
- Immediate start with a specified duration;
- Timer.
Button functions:
Δ: timer with hours and minutes;
: cooking time;
: cooking end time;
: manual change;
-: set cooking time (countdown);
+: set cooking time (counting upwards from zero).
How to reset the digital clock
After the appliance has been connected to the power supply, or after a power cut, the clock display will begin to blink, showing the figure: 0.00
- Press the □ and ▶ buttons simultaneously, then set the exact time (within 4 seconds) using the - and + buttons.
The button + brings the time value forward.
The button - brings the time value back.
The time can also be changed in the following two ways:
-
Repeat all of the steps above.
-
Press the 📋 button, then use the - and + buttons to update the time.
Operating the oven manually
Once the time has been set, the programmer automatically switches to manual mode.
Note: Press the 📋 button to restore the manual mode after every "Automatic" cooking session.
Delayed cooking start time with a specified duration The total cooking duration and the time at which the cooking will finish must be set. If we suppose that the time display reads 10:00:
-
Turn the oven control knob to the desired setting and temperature (example: static oven mode at 200^ C).
-
Press the 📋 button, then set the desired cooking duration (within four seconds) using the - and + buttons. Supposing the cooking duration is set at 30 minutes, the display will read as follows:
0·30
Release the button, and within 4 seconds, the current time will reappear with the 🔊 symbol, along with the word "auto"
- Press the 📄 button, then use the - and + buttons to set the desired cooking end time. Let us suppose this time is 1:00 p.m.
13·00
- After the button has been released, the current time will be displayed after approximately 4 seconds:
10·00
When the text "auto" appears, this indicates that the cooking duration and the time it is due to finish have been programmed in automatic mode. At this point, the oven will switch on automatically at 12:30 and switch off after 30
minutes. When the oven is switched on, the symbol will be displayed for the entire cooking duration. The cooking duration can be displayed at any time by pressing the button, and the time it is due to finish may be displayed by pressing the button.
Once cooking is complete, a buzzer will sound; to turn it off, simply press any button except the - and + buttons.
Immediate start with a specified duration By programming just the duration (points 1 and 2 of the "Delayed cooking start time with a specified duration" section), cooking will begin immediately.
To cancel a cooking schedule which has already been programmed
Press the button and use the - button to reset the time to
0·00
then press the manual cooking mode button
Timer feature
The timer feature allows you to enter a specific amount of time and counts down from this time to zero. This feature does not switch the oven on or off; it merely sounds a buzzer when the set time has elapsed.
When the △ button is pressed, the following appears:
0·00
Then use the - and + buttons to set the desired time. As soon as the button has been released, the timer will start to count down and the current time will be displayed.
10:00
After the time has elapsed, an audible signal will be emitted; this can be switched off by pressing any button (except the - and + buttons). At this point the symbol ⚠ will also switch off.
Correcting/deleting data
- The data entered can be changed at any time by pressing the corresponding button and the – or + buttons.
- When the data for the cooking duration is deleted, the data for the cooking end time is also deleted automatically, and vice versa.
- If the oven has already been programmed, it will not accept cooking end times which are before the start of the programmed cooking process.
Important: The appliance must be disconnected from the electricity supply before any cleaning procedures are performed.
To maximise the lifespan of the appliance, it should be cleaned regularly and in accordance with the following instructions:
Inner surface of the oven door:
Clean using a cloth which has been dampened with hot water and non-abrasive liquid detergent, then rinse and dry thoroughly.
Inside the oven:
- The inside of the oven is coated with a special, self-cleaning microporous enamel which, at normal cooking temperatures between 200 and 300°C, oxidises and completely eliminates all traces of grease or other substances which stick to the inner walls of the appliance. Cleaning is therefore a much shorter process: it is, in fact, enough simply to wipe the surfaces of the oven with a damp cloth after every use, in order to remove the thin layer of dust which may be deposited during the cooking process. This will help to preserve the self-cleaning feature of the oven.
- In the event that liquids have spilled over during cooking, or if the residue has not been completely eliminated (for example, when cooking with the grill, which does not reach a high enough temperature for the self-cleaning enamel to be activated completely), we recommend that the oven is left to operate at its maximum temperature when empty so that all traces of grease and other substances can be eliminated.
- If, after numerous attempts, there are still obvious greasy marks on the self-cleaning areas which are most likely due to the non-observance of the abovementioned maintenance guidelines, clean the su rfaces thoroughly using hot water and a soft cloth (do not use any type of detergent), then rinse thoroughly and dry.
- Do not use sharp objects to remove any crusted-on residue, as doing so may scratch the self-cleaning surface.
- If the self-cleaning surfaces inside the oven are damaged or rendered unusable due to maintenance procedures being forgotten or performed incorrectly over a number of years, it is possible to request a self-cleaning panels kit, which can be used to coat the inside of the oven. To order this kit, please contact one of our authorised Assistance Centres.
Outer areas of the oven:
- Only perform this cleaning procedure when the oven is cold.
- Steel parts – especially areas with screen-printed symbols - should not be cleaned using thinners or abrasive detergents; you should preferably just use a cloth which has been dampened with warm water and washing up liquid.
Stainless steel can be marked by hard water which has been left on the surface for a long time, or by aggressive detergents containing phosphorus.
It is therefore necessary to rinse the surface well and dry it carefully after it has been cleaned.
Important: cleaning must be performed horizontally, in the same direction as the satin-finish effect of the steel.
- After cleaning, various treatments may be performed in order to restore the shine of the surfaces: only use products which are designed for use with stainless steel.
Important: do not use abrasive powders, aggressive detergents or acidic substances for cleaning purposes.
Removing/fitting the oven door
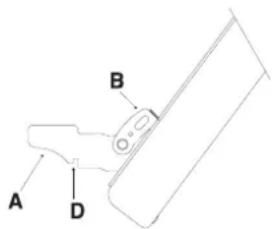
The oven door can be removed in order to make cleaning the inside of the appliance easier. Proceed as follows (fig. 6-7):
- Open the door fully and lift up the two small levers "B" (fig. 6);
- Now, when the door is closed slightly, it can be lifted out by removing hooks "A" as shown in figure 7.
natural_image
Simple line drawing of a ladder leaning against a vertical post, with arrows indicating motion direction (no text or symbols)FIGURE 6 FIGURE 7
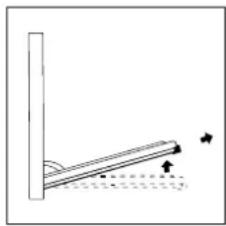
To replace the door:
- With the door in an upright position, insert the 2 hooks "A" into the vents;
- Make sure that slot "D" is perfectly fastened to the edge of the vent (move the door forwards and backwards slightly);
- Keep the door completely open, shift the 2 levers "B" downwards, then close the door.
Replacing the oven light
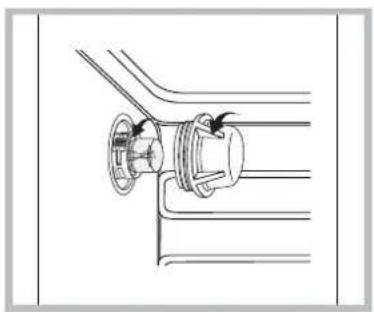
Make sure that the equipment is not connected to the electricity supply.
Unscrew the protective glass cap inside the oven, unscrew the light bulb and replace it with another one suited to high temperatures (300°C), which has the same characteristics as follows:
-Voltage 230 V
-Power 15 W
-E 14 cap.
natural_image
Pure technical diagram of a mechanical assembly with no text, numbers, or symbolsCleaning the glass ceramic hob
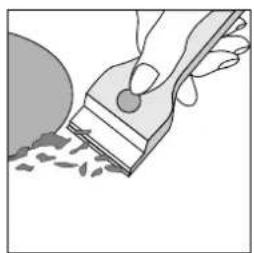
Before cooking, the surface of the hob should be cleaned using a damp cloth, to remove dust or residue from foods cooked previously. The surface of the hob should be cleaned regularly with a solution of warm water and non-abrasive detergent. It will occasionally be necessary to use special cleaning products for glass ceramic hobs. First, remove all food residues and traces of grease from the hob using a special
cleaning scraper, for example CERA (not supplied). Clean the hob when it is warm; use a suitable cleaning product and absorbent kitchen paper, polish with a damp cloth and dry. Aluminium foil, plastic objects or synthetic materials which are accidentally melted on the hob, even sugar or foods with a high sugar content, should be removed from the hot cooking zone immediately, using a scraper. Special cleaning products form a transparent protective layer which repels dirt. This also protects the surface from potential damage caused by foods with a high sugar content. Never use abrasive products or sponges; even aggressive chemical detergents such as oven sprays or stain removal products should be avoided.
natural_image
Illustration of a hand using a paintbrush to brush residue in a circular container (no text or symbols)
natural_image
Crossed black-and-white diagram showing three metallic containers and a box, no text or symbols present.Cooking times may vary depending on the nature of the food, its evenness and its volume. The first time you cook using the appliance, it is therefore wise to select the lowest indicated cooking time and then increase it if necessary.
CONVECTION cooking mode
| Type of dish Temperature °C | Cooking time (minutes) | Type of dish Temperature °C Cooking time (hours) | |||
| Pastries and cakes | Meat | ||||
| Fruit pie | 130 | 60-70 | Turkey (4-8 kg) | 160 | 3-412 |
| Meringues | 130 | 30-40 | Goose (4-5 kg) | 160 | 4-412 |
| Sponge cake | 150 | 20-30 | Duck (2-4 kg) | 170 | 112-212 |
| Angel cake | 160 | 40-50 | Capon ( 212-3 kg) | 170 | 2-212 |
| Madeira cake | 160 | 40-50 | Braised beef ( 1-112 kg) | 160 | 3-312 |
| Chocolate cake | 170 | 30-40 | Leg of lamb | 160 | 1-112 |
| Flat sweet loaf | 170 | 40-50 | Roast hare (2 kg) | 160 | 1-112 |
| Puffs | 200 | 15-20 | Roast pheasant | 160 | 1-112 |
| Flaky pastry biscuits | 200 | 15-20 | Chicken ( 1-112 kg) | 170 | 1-112 |
| Mille feuilles | 200 | 15-20 | |||
| Short crust pastry | 200 | 15-20 | Fish | 200 | 15-25 minutes |
GRILL cooking
| Type of dish | Cooking time (minutes) | Position of shelf |
| Chops (0.5 kg) | 60 | 3^rd guide rail |
| Saussages | 15 | 2^nd guide rail |
| Grilled chicken (1 kg) | 60 | 1^st guide rail |
| Veal on the spit (0.6 kg) | 60 | - |
| Chicken on the spit (1 kg) | 60 | - |
The first guide rail is the one in the lowest position.
FAN-ASSISTED cooking mode
| Type of dish | Guide rail no. from bottom | Quantity kg | Temperature °C | Time (minutes) |
| Cakes | ||||
| * With beaten mix, in mould | 1-3 | 1 | 175 | 60 |
| * With beaten mix, without mould | 1-3-4 | 1 | 175 | 50 |
| Short pastry, flan base | 1-3-4 | 0.5 | 175 | 30 |
| Short pastry with wet filling | 1-3 | 1.5 | 175 | 70 |
| Short pastry with dry filling | 1-3-4 | 1 | 175 | 45 |
| * With natural leavened mix | 1-3 | 1 | 175 | 50 |
| Small cakes | 1-3-4 | 0.5 | 160 | 30 |
| Meat | ||||
| Roasts under the grill | ||||
| Veal | 2 | 1 | 180 | 60 |
| Beef | 2 | 1 | 180 | 70 |
| English roast beef | 2 | 1 | 220 | 50 |
| Pork | 2 | 1 | 180 | 70 |
| Chicken | 2 | 1-1.5 | 200 | 70 |
| Roasts on a tray | ||||
| Veal | 1-3 | 1 | 160 | 80 |
| Beef | 1-3 | 1 | 160 | 90 |
| Pork | 1-3 | 1 | 160 | 90 |
| Chicken | 1-3 | 1-1.5 | 180 | 90 |
| Turkey slices | 1-3 | 1.5 | 180 | 120 |
| Duck | 1-3 | 1-1.5 | 180 | 120 |
| Casseroles | ||||
| Beef casserole | 1 | 1 | 175 | 120 |
| Veal casserole | 1 | 1 | 175 | 110 |
| Fish | ||||
| Fillets, steaks, cod, hake, sole | 1-3 | 1 | 180 | 30 |
| Mackerel, turbot, salmon | 1.3 | 1 | 180 | 45 |
| Oysters | 1-3 | 180 | 20 | |
| Timbales | ||||
| Baked pasta dish | 1-3 | 2 | 185 | 60 |
| Vegetable pudding | 1-3 | 2 | 185 | 50 |
| * Sweet and savoury soufflés | 1-3 | 0.75 | 180 | 50 |
| * Pizzas and savoury rolls | 1-3-4 | 0.5 | 200 | 30 |
| Toasted sandwiches | 1-3-4 | 0.5 | 190 | 15 |
| Defrosting | ||||
| Ready-to-eat meals | 1-3 | 1 | 200 | 45 |
| Meat | 1-3 | 0.5 | 50 | 50 |
| Meat | 1-3 | 0.75 | 50 | 70 |
| Meat | 1-3 | 1 | 50 | 110 |
Notes:
1) Cooking times do not include an oven preheating period, except where expressly indicated with an asterisk.
2) The degree value listed in the table is the preferred value when cooking on several levels.
3) The times given refer to cooking on a single shelf; when cooking on several shelves increase times by 5 to 10 minutes.
4) When roasting beef, veal, pork or turkey on the bone or in rolled joint form, increase times by 20 minutes.

Deutsch, 1

English,13

Espanol,25

Nederlands, 37
CP9VP6 DE/HA
Sumario
ADVERTENCIAS, 26-27
ES


natural_image
Simple line drawing of a ladder leaning against a wall, with arrows indicating motion direction (no text or symbols)FIGURE 6 FIGURE 7
natural_image
Pure mechanical diagram showing a valve or fitting with no text, numbers, or symbolsnatural_image
Illustration of a hand using a tool to brush or brush over scattered particles (no text or symbols)
natural_image
Illustration of three metallic containers crossed with a black X symbol, no text or labels presentES
NL
natural_image
Simple line drawing of a ladder leaning against a wall, with arrows indicating motion direction (no text or symbols)AFBEELDING 7
natural_image
Pure technical diagram of a mechanical assembly with no text, numbers, or symbolsnatural_image
Illustration of a hand using a tool to brush or scrape material from a circular object (no text or symbols)
natural_image
Exterior view of three metallic containers crossed with a black diagonal line (no text or symbols)NL