70073 Compact - Cooker Lakeland - Free user manual and instructions
Find the device manual for free 70073 Compact Lakeland in PDF.


| Product Type | Compact Ceramic Hob |
| Brand | Lakeland |
| Model | 70073 Compact |
| Power Settings | 6 settings (1-6) |
| Power Outputs | 200W, 600W, 1000W, 1400W, 1600W, 2000W |
| Temperature Ranges | 85-155°C (1), 185-215°C (2), 285-315°C (3), 385-415°C (4), 485-515°C (5), 575-600°C (6) |
| Timer | Up to 99 minutes with countdown display |
| Display | LED digital display |
| Control | Rotary dial with push-to-toggle ON/OFF and timer setting |
| Hotplate Material | Ceramic glass |
| Cooling | Automatic fan cooling until below 60°C |
| Safety Features | Auto shut-off after 99 min; overheat protection; child safety (ages 8+) |
| Electrical Connection | 13 amp fused plug, earthed, 230V |
| Compliance | EU Directives 2006/95/EC, 2004/108/EC |
| Cleaning | Wipe with damp cloth; use specialist glass hob cleaner; avoid abrasives |
| Storage | Loosely coil power cable; store in dry place |
| Carry Handles | Yes, for portability |
| Warranty / Support | Contact Lakeland customer care: 015394 88100 |
Frequently Asked Questions - 70073 Compact Lakeland
User questions about 70073 Compact Lakeland
0 question about this device. Answer the ones you know or ask your own.
Ask a new question about this device
Download the instructions for your Cooker in PDF format for free! Find your manual 70073 Compact - Lakeland and take your electronic device back in hand. On this page are published all the documents necessary for the use of your device. 70073 Compact by Lakeland.
USER MANUAL 70073 Compact Lakeland
natural_image
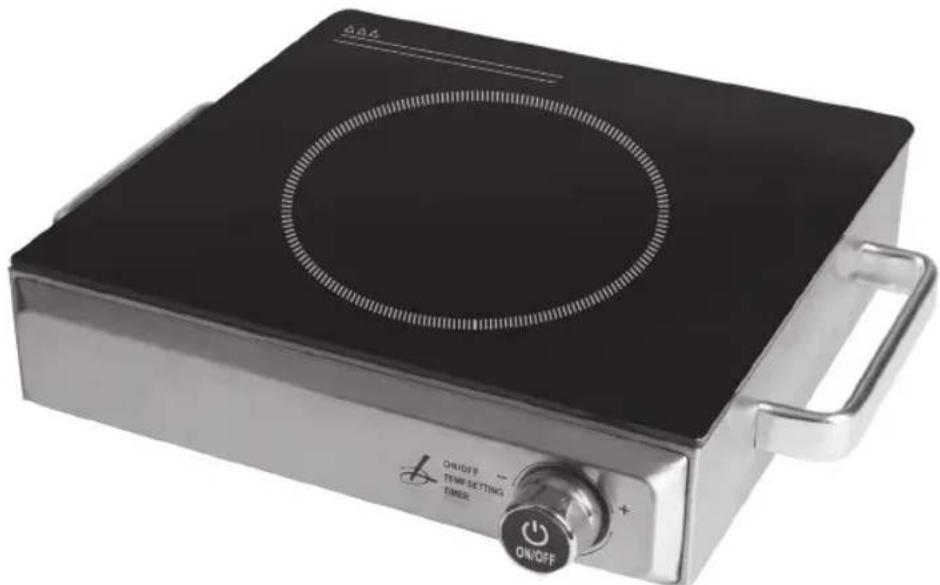
Black rectangular electrical stove with a circular vent on top, showing ON/OFF control buttons (no text or symbols on the stove itself)LAKELAND COMPACT CERAMIC HOB
Thank you for choosing the Lakeland Compact Ceramic Hob.
Please take a little time to read this booklet before you use your machine and keep it in a safe place for future reference.
The Compact Ceramic Hob is perfect for small spaces or when you need an extra hob for cooking larger meals. Simple to use - twist the dial to heat, cook, boil and fry. Very responsive, it heats up quickly to give you full control over your cooking. The timer can be set up to 99 minutes, and the digital display counts down your cooking time.
An award winning family-owned business, here at Lakeland we still have the same values of excellent quality, value for money and exceptional customer care as we did when we first set up the company in the 1960s.
Our products are carefully selected and rigorously tested to meet our high standards, so you can be assured that any product you purchase will be easy-to-use and highly durable.
CONTENTS
Product features....4
Safety cautions....5-6
Instructions for use 7-9
Troubleshooting....10
Care and cleaning 10
Recycling your electricals 11
Electrical connections....11
PRODUCT FEATURES
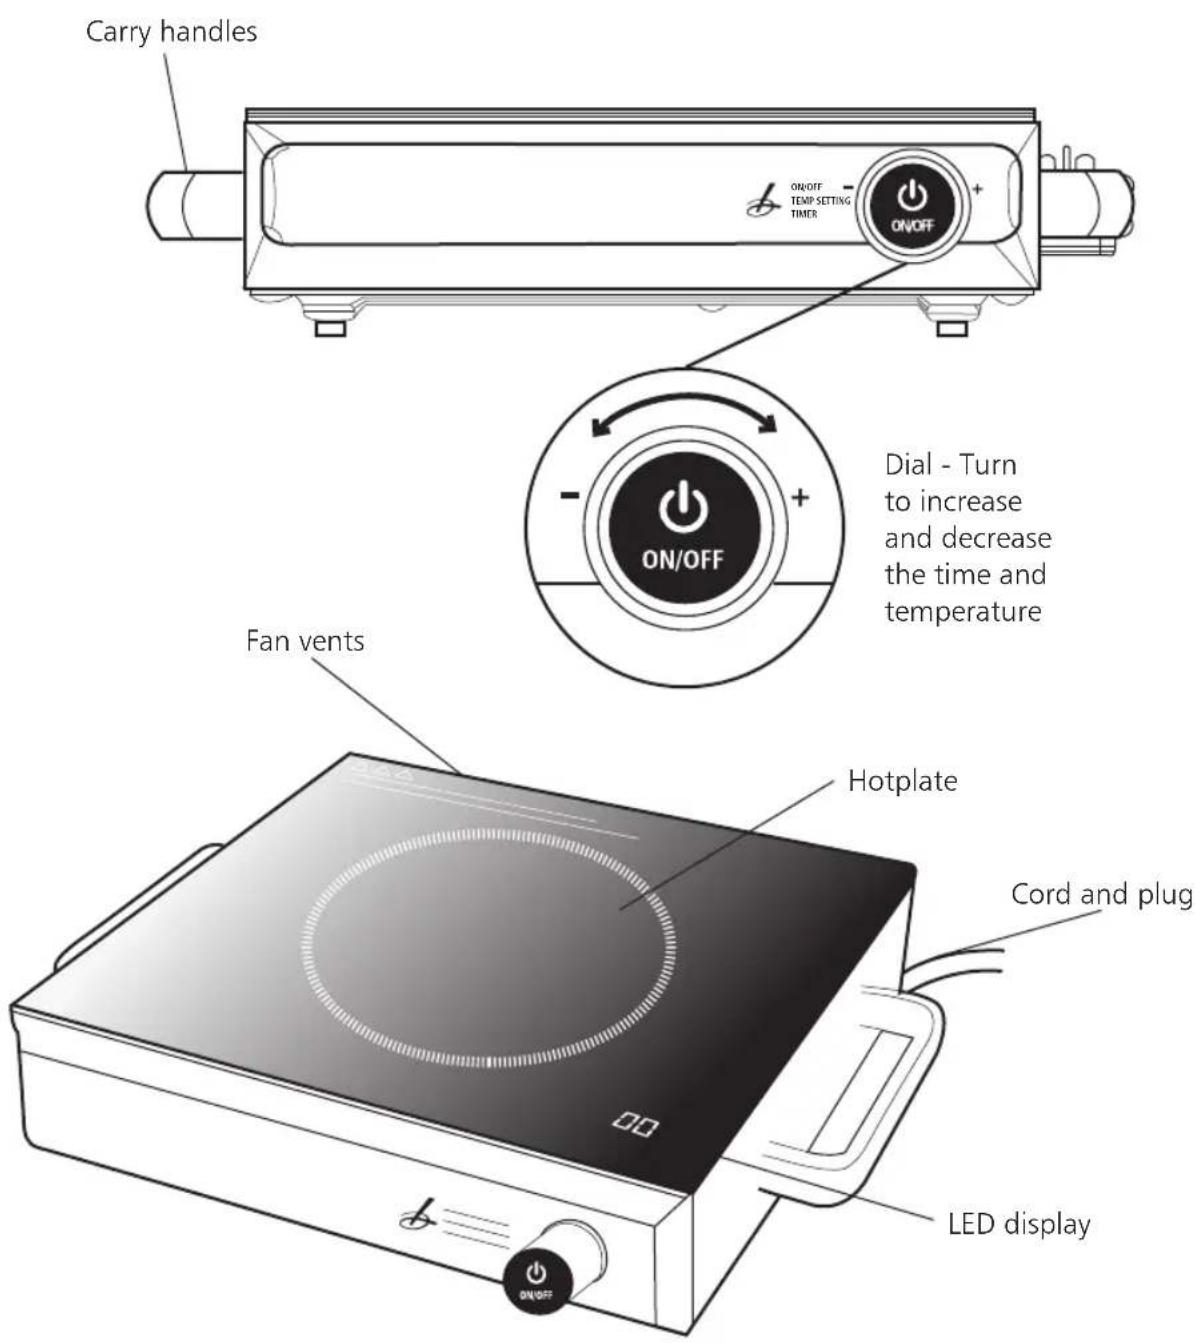
SAFETY CAUTIONS
Carefully read all the instructions before using the appliance and keep in a safe place for future reference. Always follow these safety cautions when using the appliance to avoid personal injury or damage to the appliance. This appliance should be used only as described in this instruction book.
- This appliance can be used by children aged from 8 years and above and persons with reduced physical, sensory or mental capabilities or lack of experience and knowledge if they have been given supervision or instruction concerning use of the appliance in a safe way and understand the hazards involved. Children shall not play with the appliance. Cleaning and user maintenance shall not be done by children unless they are older than 8 and supervised.
- Make sure your electricity supply matches the voltage shown on the appliance.
- Ensure all packaging materials and any promotional labels or stickers are removed from the appliance before the first use.
- Always inspect the appliance before use for noticeable signs of damage. Do not use if damaged or has been dropped. In the event of damage, or if the appliance develops a fault contact the Lakeland customer care team on 015394 88100.
- Do not use this appliance if the lead is damaged. If the lead is damaged it must be replaced with a special lead. Contact the Lakeland customer care team on 015394 88100.
• Always use the appliance on a dry, level, heat resistant surface. - Unplug from the mains when not in use and before cleaning. To disconnect, turn the socket to "off" and remove the plug from the mains socket.
- Do not use any accessories or attachments with this appliance other than those recommended by Lakeland.
- To protect against fire, electric shock or personal injury, do not immerse cord, plug or lid in water or other liquids.
- Do not leave the lead hanging over the edge of a kitchen table or worktop. Avoid contact between the lead and hot surfaces.
- For indoor use only.
- For domestic use only.
-
This appliance should be used for preparation of food as described within the instructions for use that accompany it.
-
Always ensure that your hands are dry before removing the plug from the mains socket. Never pull the plug out of the mains socket by its lead.
- To avoid injury or possible fire, do not cover the appliance when in use.
- Do not connect this appliance to an external timer or remote control system.
- An extension cable may be used with care. The electrical rating of the cable should be at least as great as the appliance. Do not allow the cable to hang over the edge of the worktop or touch any hot surfaces.
- This appliance complies with the basic requirements of Directives 04/108/EC (Electromagnetic Compatibility) and 06/95/EC (Safety of Domestic Electrical Appliances).
- WARNING: A cut off plug inserted into a 13amp socket is a serious safety (shock) hazard. Ensure the cut off plug is disposed of safely.
- CAUTION: The plastic bags used to wrap this appliance or the packaging may be dangerous. To avoid risk of suffocation, keep these bags out of reach of babies and children. These bags are not toys.
- Keep the appliance, plug and lead away from hot ovens, electric and gas burners, flames and hot surfaces.
- The hob surfaces can be very hot when the appliance is in use. DO NOT TOUCH hot surfaces as possible injury could occur. Allow the hob to cool completely before handling or moving this appliance.
- The hob should only be used at least 10cm away from a wall, to allow airflow through the fan vents. Do not insert anything in the fan vents.
- Do not use a heat diffuser or place any other material between the hob and the pan when in use.
- If the glass hob surface is cracked, turn the power off immediately and do not use.
- Do not switch on the hob without a pan. Do not leave the hob unattended. Do not attempt to heat combustible materials on the hob.
INSTRUCTIONS FOR USE
Unpack the hob and remove all the packaging materials.
Before first use, wipe the hob surface with a clean damp cloth and dry.
The hob should only be used at least 10cm away from a wall, to allow airflow through the fan vents.
TURNING THE HOB ON AND OFF
Plug in and switch on the hob at the socket. The hob will bleep and the display will illuminate and show '88' and then '—' to show it is on standby.
Press in and hold dial for 3 seconds, there will be a bleep. The hob will illuminate for a few seconds and the display will read '1' to show the hob surface is heating and on.
To switch off, press in and hold the dial for 3 seconds, there will be a bleep. The hob light will go out and the display will read '00' to show the hob is back on standby.
The fan will continue to run automatically to cool the hob, until it has cooled below 60°C.
Switch off and unplug the hob at the socket.
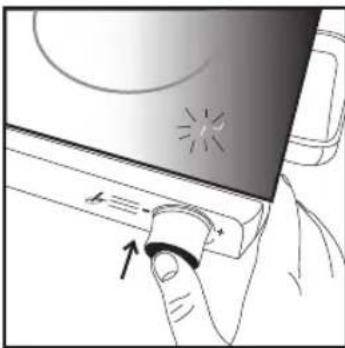
natural_image
Illustration of a hand pressing down on a computer monitor with an arrow indicating press direction (no text or symbols present)Press in and hold dial for 3 seconds, there will be a 'BLEEP'
WARNING
The hob surfaces can be very hot when the appliance is in use. DO NOT TOUCH hot surfaces as possible injury could occur. Allow the hob to cool completely before handling or moving this appliance.
There are 6 power/temperature settings, and the hob illuminates with a brighter light as the power/temperature increases.
With the hob switched on, turn the dial clockwise to increase the power/temperature, and anti-clockwise to decrease the power/temperature.
The hob will bleep as it moves between each setting. It will bleep twice at the minimum and maximum setting ('1' and '6'), as it cannot go beyond these.
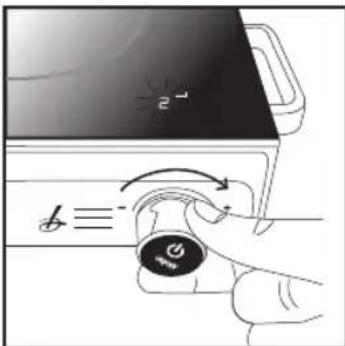
Turn the dial clockwise to increase the power/temperature
POWER/TEMPERATURE SETTINGS
| Setting | 1 | 2 | 3 | 4 | 5 | 6 |
| Power (Watts) | 200W 6 | 00W 100 | 0W 1400 | W 1600W | 2000W | |
| Temperature (Celsius) | 85-155°C | 185-215°C | 285-315°C | 385-415°C | 485-415°C | 575-600°C |
USING THE TIMER
The timer can be set to cook for up to 99 minutes, before switching off.
The hob will automatically shut off after 99 minutes if the timer has not been set.
Once you have selected the power/temperature, press the dial once. It will display '99' and already be counting down from 99 minutes, from the moment you selected your setting.
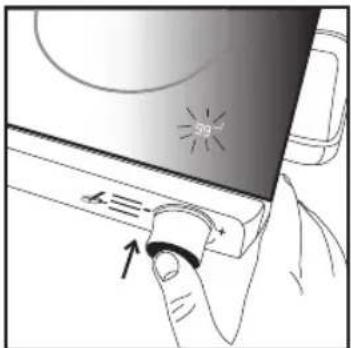
Turn the dial anti-clockwise to decrease the time you would like to cook, and clockwise to increase the time.
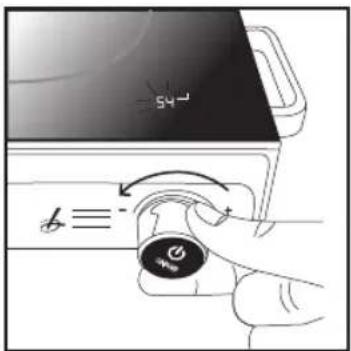
The hob will bleep as it moves between minutes. It will bleep twice at the minimum and maximum time ('1' and '99'), as it cannot go beyond these times.
The display will count down and show how many minutes are left, it will bleep 5 times for the last 5 seconds, then one long bleep as it switches off, and displays '00' to show it is on standby.
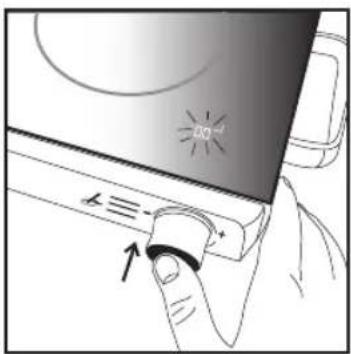
The fan will continue to run automatically to cool the hob, until the hob has cooled below 60^ C.
TROUBLESHOOTING
Following are some common problems that can occur when using the Compact Ceramic Hob. Please review the problems, their possible cause and any corrective action that should be taken. The hob may bleep when displaying these warnings.
| Problem | Possible cause | Solution |
| The hob stops cooking and displays 'E1', 'E2', 'E4' or 'E5'. | There is a fault with the temperature sensor. | Turn off the cooker and contact the Lakeland customer care team on 015394 88100. |
| The hob displays 'E3'. The electrics inside the hob have overheated. | Check that the fan is still working, and there is nothing blocking the air vents. Remove the pan and allow it to cool, and resume cooking.If there is a fault with the fan, contact the Lakeland customer care team on 015394 88100. | |
| The hob displays 'E6' or 'E7'. The power source voltage is too high or too low. | Turn off the hob and check your power supply is compatible with the voltage on the rating label. | |
| The hob displays 'Ed' or will not switch on. | The hob has short circuited and has a fault. | Contact the Lakeland customer care team on 015394 88100. |
CARE AND CLEANING
- Before the first use and after every use, clean each part thoroughly.
- Periodically check all parts before reassembly.
- Always switch off, unplug, and allow the hob to cool completely before cleaning.
- Wipe the hob with a clean damp cloth. CAUTION: Never immerse the appliance in water or any other liquids.
- You may use specialist glass hob cleaner to wipe surface if required, but always try on a small area before first use.
- Do not use abrasive cleaners, bleaching agents or metal scourers on any parts. This will damage the appliance.
- Clean any dust inside the fan vents with a soft brush.
- Make sure that the appliance is completely clean and dry before you store it.
- Store the appliance with the power cable loosely coiled. Never wrap it tightly around the machine.
RECYCLING YOUR ELECTRICALS
Along with many other high street retailers, Lakeland has joined a scheme whereby customers can take their unwanted electricals to recycling points set up around the country.
Visit www.recycle-more.co.uk to find your nearest recycling point.
ELECTRICAL CONNECTIONS
THIS APPLIANCE MUST BE EARTHED
This appliance is fitted with a fused three-pin plug to BS1363 which is suitable for use in all homes fitted with sockets to current specifications. If the fitted plug is not suitable for your socket outlets, it should be cut off and carefully disposed of. To avoid an electric shock, do not insert the discarded plug into a socket.
FITTING A NEW PLUG
If for any reason you need to fit a new plug, the flexible mains lead must be connected as shown here. The wires in the mains lead fitted to this appliance are coloured in accordance with the following code:
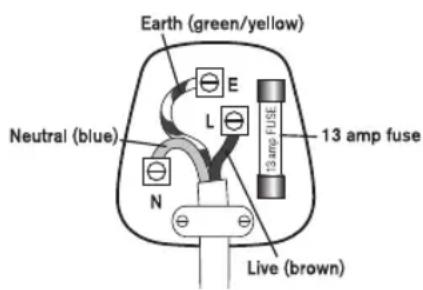
Connect BLUE to Neutral (N)
Connect GREEN and YELLOW to Earth (E)
Connect BROWN to Live (L)
13 amp fuse to be used
If the colours of the wires in the mains lead of this appliance do not correspond with the coloured markings identifying the terminals in your plug, proceed as follows. The wire which is coloured green and yellow MUST be connected to the terminal which is marked with the letter E (Earth). The wire which is coloured blue MUST be connected to the terminal which is marked with the letter N (Neutral). The wire which is coloured brown MUST be connected to the terminal which is marked with the letter L (Live).
Before refitting the plug cover, check that there are no cut or stray strands of wire inside the plug. Use a 13 amp BS1362 fuse. Only BSI or ASTA approved fuses should be used. If you are at all unsure which plug or fuse to use, always refer to a qualified electrician.
Note: after replacing or changing a fuse on a moulded plug which has a fuse cover, the cover must be refitted to the plug; the appliance must not be used without a fuse cover. If lost, replacement fuse covers can be obtained from an electrical shop. This appliance complies with the following EU Directives: 2006/95/EC (Low Voltage Directive) and 2004/108/EC (EMC Directive).
GEBRAUCHSANWEISUNG
KOMPAKT-KERAMIKKOCHFELD
natural_image
Black electric stove with circular top and ON/OFF control knob (no text or symbols on body)KOMPAKT-KERAMIKKOCHFELD VON LAKELAND
natural_image
Illustration of a hand pressing down on a device handle with an arrow indicating press direction (no text or symbols)Alexandra Buildings, Windermere, Cumbria, UK LA23 1BQ
Tel: +44(0)15394 88100 www.lakeland.co.uk
D Tel: 0800 444 1500 www.lakeland.de
- LAKELAND COMPACT CERAMIC HOB
- CONTENTS
- PRODUCT FEATURES
- SAFETY CAUTIONS
- INSTRUCTIONS FOR USE
- TURNING THE HOB ON AND OFF
- WARNING
- POWER/TEMPERATURE SETTINGS
- USING THE TIMER
- TROUBLESHOOTING
- CARE AND CLEANING
- RECYCLING YOUR ELECTRICALS
- ELECTRICAL CONNECTIONS
- THIS APPLIANCE MUST BE EARTHED
- FITTING A NEW PLUG
- GEBRAUCHSANWEISUNG
- KOMPAKT-KERAMIKKOCHFELD
- KOMPAKT-KERAMIKKOCHFELD VON LAKELAND
Brand : Lakeland
Model : 70073 Compact
Category : Cooker