LED2601 - Television Manta - Free user manual and instructions
Find the device manual for free LED2601 Manta in PDF.


| Product Type | LED TV |
| Brand | Manta |
| Model | LED2601 |
| Screen Size | 26 inches (66 cm) |
| Display Resolution | 1366 x 768 pixels (HD) |
| Refresh Rate | 60 Hz |
| Dimensions (with stand) | 62.5 x 40.5 x 17.5 cm |
| Weight (with stand) | 4.2 kg |
| Power Consumption (typical) | 40 W |
| Standby Power Consumption | < 0.5 W |
| Power Supply | AC 100-240 V, 50/60 Hz |
| Connectivity | HDMI (2), USB (1), VGA, AV, RF, Headphone jack |
| Built-in Tuner | DVB-T2/C, Analog |
| Sound Output | 2 x 5 W (stereo) |
| Wall Mount Compatibility | VESA 100 x 100 mm |
| Accessories Included | Remote control, batteries, stand, user manual |
| Cleaning Instructions | Wipe with a soft, dry cloth. Do not use liquids or solvents. |
| Safety Precautions | Place on stable surface; avoid blocking vents; unplug during storms. |
| Repairability | Contact authorized service center for parts and repairs. |
Frequently Asked Questions - LED2601 Manta
User questions about LED2601 Manta
0 question about this device. Answer the ones you know or ask your own.
Ask a new question about this device
Download the instructions for your Television in PDF format for free! Find your manual LED2601 - Manta and take your electronic device back in hand. On this page are published all the documents necessary for the use of your device. LED2601 by Manta.
USER MANUAL LED2601 Manta
natural_image
Abstract black-and-white circular logo with interlocking curved shapes (no text or symbols)MANTA
LED TV 26"
LED2601
Instrukcja obsługi
User's Manual
Bedienungsanleitung
Control Panel Button Function....16
TV Terminal Connections....16
Optional Configuration as below 16
Remote Control....17
OSD Basic adjustment 18
Installation Guide....18
Channel 18
Picture 19
Sound 19
Lock System....20
Setup 20
PC 21
DTV Features....21
LED TV
Favorite List....21
Program Information 21
Audio....21
Electronic Program Guide EPG....22
Subtitle 22
Common interface....22
USB Features....22
Photo 22
Music 23
Movie....23
Text 23
PVR Operation 23
Trouble Shooting....24
Specification 25
Bedienungsanleitung
INSTRUKCJA OBSŁUGI
Złącze Cl
natural_image
Black-and-white beach scene with palm trees and a sandy shore (no visible text or symbols)natural_image
Black-and-white photo of a boat docked at a waterfront with city skyline and cloudy sky in the background (no visible text or symbols)Control Panel Button Function
VOL+: Volume up.
VOL-: Volume down.
CH+: TV channel up.
CH- : TV channel down.
MENU : Press to select the main menu.
SOURCE : Select the input signal.
POWER : Turn the TV on or off.
TV Terminal Connections

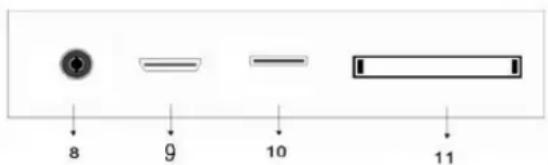
- HEADPHONE output terminal.
- PC AUDIO terminal.
- VGA input terminal.
- Mini-YPBPR input terminal.
- SCART input terminal.
- Video input terminal.
- AUDIO input terminal.
- TV antenna.
- HDMI input terminal.
- USB input terminal.
- Cl slot
Optional Configuration as below
Connect the USB to the USB jack on the set.
NOTE
- It is only 500 mA MAX of DC current output when you connect with USB jack
- To ensure the Mobile HD works well, you should use other power supply for the Mobile HD. And do not use the USB jack in the same time.
- It supports Mobile HD by connecting with USB jack (must more than 2 GB). The partitions of the Mobile HD can't be more than 4 partitions. The max partition is 2TB. It supports FAT/FAT32 document. The max FAT document is 4GB and the max FAT32 document is 2TB.
USER'S MANUAL
Remote Control

(↓): Press this button to Turn the TV on or off.
X : Press this button to mute or restore sound.
NICAM/A2: In the TV condition, press this key to select the stereo mode.
ASPECT: Press to adjust picture ratio.
PMODE: Select picture mode.
SMODE: Select sound mode.
0-9: Select and switch to a channel using 0 - 9.
-/-: Switch the program digit.
←→: Switch back and front between the current and previ-
ous channels. Repeat the program in MEDIA
DISPLAY: Display TV information.
FREEZE: Press to hold the picture.
AUTO: Start to record.
(The U disk will be formatted when in burning, please do not
store important files in the U disk)
AUTO: Adjust the picture automatically in pc mode.
RED, GREEN, YELLOW, BLUE: Correspond to the different colored subjects.
SLEEP: Set the sleep timer.
SOURCE: Press to change signal source.
ENTER: Enter the selected option or execute the selected operation.
NOTE: press this button to display "channel list" in TV source.
MENU: Press this button to enter the main menu for various optional adjustable setting.
EXIT: Exit the OSD (On-screen display).
CH▼/CH▲: Change the channel up and down.
VOL▼/VOL▲: Adjust the volume.
SUBTITLE: Open or close subtitle.
(Used for models with DTV function only)
T.SHIFT: Press the button to pause current DTV program and start record background
(Used for models with DTV function only)
HOLD: Freeze a multi-page passage on screen in Teletext mode. (Used for European region only)
▶: Press to start playing the MEDIA, or to pause playing.
(Used for models with MEDIA function only)
REVEAL: Press this button to reveal the hidden information in
Teletext page. Press again to hide the information.
◀◀: Press to play backward
(Used for models with MEDIA function only)
SIZE: Display the top, bottom or all of page to read easily in
Teletext mode.
▶▶: Press to play forward.
(Used for models with MEDIA function only)
INDEX: Press this button to go to the index page in Teletext.
■: Stop playing the Media.
(Used for models with MEDIA function only)
◀◀: Skip to previous chapter
(Used for models with MEDIA function only)
S.PAGE: Carry out the function of SUBCODE in the text while enter the text display mode.
▶▶|: Skip to next chapter
(Used for models with MEDIA function only)
TEXT: Press to enter the Teletext mode.
FAV: Switch between customer set "Favorite List"
AUDIO: Press to select the DTV audio.
(Used for models with DTV function only)
DTV: Press to switch to DTV (Digital TV) mode.
NOTE: press this button to display "Record list" in DTV
EPG: Enter electronic program guide.
(Used for models with DTV function only)
TV/RADIO:Switch between TV and RADIO
(Used for models with DTV function only)
USER'S MANUAL
OSD Basic adjustment
Installation Guide
If this is the first time you are turning on the TV and there are no programs in the TV memory, the installation Guide menu will appear on the screen.
- Press the ◀/▶/▼/▲ button to select the local language.
- Press the ◀/▶/▼/▲ button to select mode.
- Press the ◀/▶/▼/▲ button to select the local country you want to
- Press the ◀/▶/▼/▲ button to select Air or cable.
- Press the ◀ / ▶ / ▼ / ▲ button to select mode :DTV + ATV,DTV,ATV.
- Press the ◀/▶/▼/▲ button to select "ON" or "OFF".
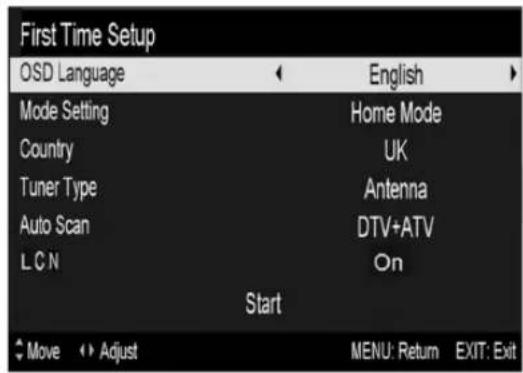
Note:
Searching for platform will take a long time, please be patient!
Channel
Press MENU button to display the main menu. Press ◀/▶ button to select CHANNEL in the main menu

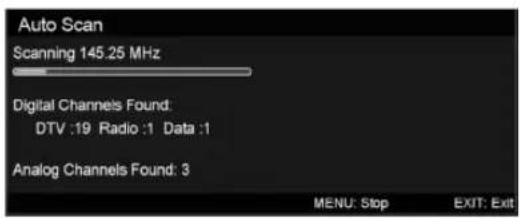
- Auto Scan
Press ▲ / ▼ button to select "Auto Scan"
Press ▲ / ▼ button to select country and press the◀ / ▶ button to select mode.
Press ▲/▼ button"and then press ► button to start scanning. Press "MENU" or "EXIT" button to stop
Note: Searching for platform will take a long time. Please be patient!

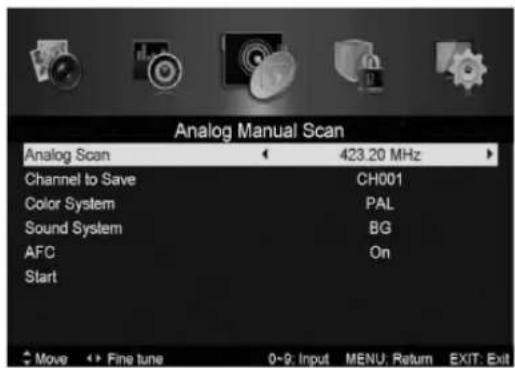
- Analog Manual Scan
Press ▲/▼ button to select "Manual scan" and press the ▶ button to Analog manual scan.
Press "MENU" button to return the previous menu. Press "EXIT" button to exit the menu.
USER'S MANUAL
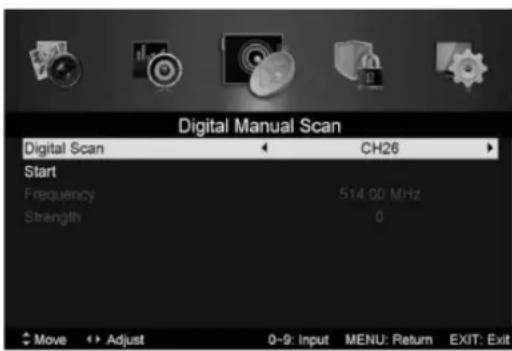
3. Digital Manual Tuning
Press ▲ / ▼ button to select "Diigital Manual Scan" and press the ▼ button to start.
Press "MENU" button to return the previous menu.
Press "EXIT" button to exit the menu.
4.Channel Edit
Press ▲ / ▼ button to select "Channel Edit" and press the "ENTER" button to enter.
a. DELETE
Press ▲ / ▼ button to select the program and press "RED" button once to delete the program.
b. RENAME
Press ▲/▼, button to select the program and press "GREEN" button to rename the program. Press ◀/▶, button to select the item which you want to change and press the ◀/▶, button to select the different item. Press "ENTER" button to confirm.
NOTE:
RENAME only use in ATV.
b. MOVE
Press ▲ / ▼, button to select the channel and press the "YELLOW" button to move. Then press the ▲ / ▼, button to select the channel with which you want to move. Press "YELLOW" button again to confirm.
c. SKIP
Press ▲ / ▼, button to select the channel which you want to skip and press the "BLUE" button to skip. Press "BLUE" button again to cancel the setting.
5. Signal information (only use in DTV)
Press ▲ / ▼, button to select "Signal information" and press the "ENTER" button. Press "MENU" button to return the previous menu. Press "EXIT" button to exit the menu.
Picture
You can select the type of picture, which best corresponds to your viewing.
Press the "MENU" button to enter the OSD menu. Then press ◀/▶, button to select the "PICTURE" menu. Press ▲/▼ button to select "Picture Mode" and press the ◀/▶, button to select.

- Pressk ▲ / ▼ button to select "Brightness" and press the ◀ / ▶ button to enter brightness adjustment menu to adjust brightness.
- Press ▲ / ▼, button to select "Contrast" and press the ◀/▶ button to enter contrast adjustment menu to adjust contrast.
- Press ▲ / ▼ button to select "Sharpness" and press the ◀ / ▶ button to enter sharpness adjustment menu to adjust sharpness.
- Press ▲ / ▼ button to select "Saturation" and press the ◀ / ▶ button to enter Saturation adjustment menu to adjust saturation.
- Press ▲ / ▼ button to select "Hue" and press the ◀ / ▶ button to enter hue adjustment menu to adjust hue.
- Press ▲ / ▼ button to select "Sharpness" and press the ◀ / ▶ button to enter sharpness adjustment menu to adjust sharpness.
- Press ▲ / ▼ button to select "Color Temp" and press the ◀ / ▶ button to select mode Standard/Cool/Warm..
- Press ▲ / ▼ button to select "Aspect Ratio" and press the ▲ / ▼ button to select.
Press ▲ / ▼ button to select "Advanced Settings" and press the ▶ button to enter Advanced Settings adjustment menu to adjust.
Sound
You can select the type of sound, which best corresponds to your listening.
Press the "MENU" button to enter the OSD menu. Then press
◀/▶ button to select the "SOUND" menu.
USER'S ManUaL

- Press ▲ / ▼ button to select "Sound Mode" and press the ◀ / ▶ button to select mode.
- Press ▲ / ▼ button to select "Treble" and press the ◀ / ▶ button to adjust.
- Press ▲ / ▼ button to select "Bass" and press the ◀ / ▶ button to adjust.
- Press ▲ / ▼ button to select "Balance" and press the ◀ / ▶ button to adjust.
- Press ▲ / ▼ button to select "Surround sound" and ◀ / ▶ button to select "ON" or "OFF".
- Press ▲ / ▼ button to select "EQ Setting" and ◀/▶ button to enter EQ Setting adjustment menu to adjust EQ..
- Press ▲ / ▼ button to select "AVL" and press the ◀ / ▶ button to select "On" or "Off".
Lock System
Press the "MENU" button to enter the OSD menu. Then press ◀/▶ button to select the "Lock System" menu. The default password is "0000".
note:
The administrator password is "8899".

- Press ▲ / ▼ button to select "Enable" and then press ◀ / button to select "On" or "Off"
-
Press ▲/▼ button to select "channel locks" and press the
▶ button to select channels to lock. -
Press ▲ / ▼ button to select "Parental Rating" and press the ◀/▶ button to set.
- Press ▲ / ▼ button to select "Lock Keypad", then press button to select "On" or "Off", The key board will be invalid if you set Lock Keypad "On".
- Press ▲ / ▼ button to select "Hotel Model" and press the ▶ button to enter the sub-menu to set.

- Press ▲ / ▼ button to select "New Password" and set your new password.
6.. Press ▲ / ▼ button to select "Clear Lock" and then press the ▶ button to clear.
Setup
Press the "MENU" button to enter the OSD menu. Then press ◀/▶ button to select the "SETUP" menu.

- Press ▲/▼ button to select "OSD Language" and press the ◀/▶ button to select the OSD language which you desire.
- Press ▲ / ▼ button to select "Audio Language" and press the ▶ button to enter the Audio language adjustment menu to select the Audio language which you desire.
- Press ▲ / ▼ button to select "Subtitle" and press the ▶ button to select "On" or "Off".
USER'S MANUAL
Note:
This function is only used for DTV source.
- Press ▲ / ▼ button to select "Teletxt" menu and press the ▶ button to enter sub-menu.
- Press ▲ / ▼ button to select "Blue Screen" and press the ◀ / ▶ button to select "On" or "Off".
- Press ▲ / ▼ / ◀ / ▶ button to select Mode Setting.
- Press ▲ / ▼ / ◀ / ▶ button to select "Time Setting".
- Press ▲ / ▼ / ◀ / ▶ button to select "PVR Settings".
- Press ▲ / ▼ button to select "First Time Installation", then press "ENTER" button to set relevant options including OSD language, country and tuning.
- Press ▲ / ▼/ ◀ / ▶ button to select "OAD", then press "ENTER" button to enter sub menu.
- Press ▲ / ▼ button to select "Reset", then press "ENTER" a dialogue. Press ▶ button selecting "Yes" to restore all setting to default setting.
PC
Press the "MENU" button to enter the OSD menu. Then press ◀/▶ button to select the "PC Setting" menu. (Only available in PC model).

Press ▲ / ▼ button to select "Auto Adjust" menu and press the ▶ button to auto adjustment.
Press ▲ / ▼ button to select "H Position" and press the ◀ / ▶ button to adjust.
Press ▲ / ▼ button to select "V-Position" and press the ◀ / ▶ button to adjust.
Press ▲ / ▼ button to select "Phase" and press the ◀ / ▶ button to adjust.
Press ▲ / ▼ button to select "Clock" and press the ◀ / ▶ button to adjust.
DTV Features
Favorite List
When the source is selected as DTV, users can enter Favorite List by pressing "FAV" button. The "Favorite List" window is illustrated as follows:

Program Information
When the source is selected as DTV, you can press "display" button to display the channel's information. The program information window is illustrated as follows:

Audio
USER'S MANUAL
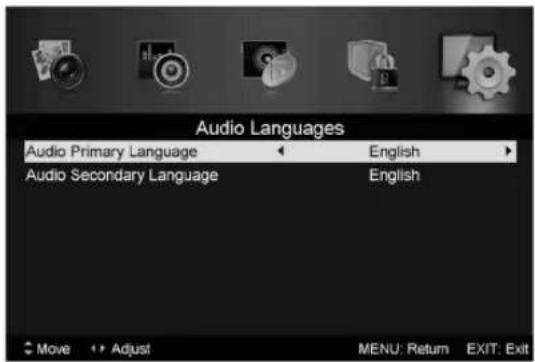
When the source is selected as DTV, users can enter the Setup menu to enter the "Audio Language" menu. The "audio language" window is illustrated, and press ▲ / ▼ button to select the "audio language" menu.
Electronic Program Guide EPG
Electronic Program Guide (EPG) provides program information which will be broadcasted now or in the future. The system will display EPG window by pressing "EPG" button. DATE and TIME information is displayed on the right of the window. The left side shows all channels. The right side shows the programs in the channel. The selected program is also displayed on the top of the screen.
Press the ▲ / ▼ button to select the "program". You can press "RED" button to enter record mode. Press "GREEN" button to display the program's detail. Press "YELLOW" button to Check details at PVR's Schedule List introduction. Press "Blue" button to enter remind setting.
Press the ▲ / ▼ button to select "CH" and press the ◀ / ▶ button to select the channel number to see the current channel's program forecast.
Note: The U disk will be formatted when in burning, please do not store important files in the U disk.
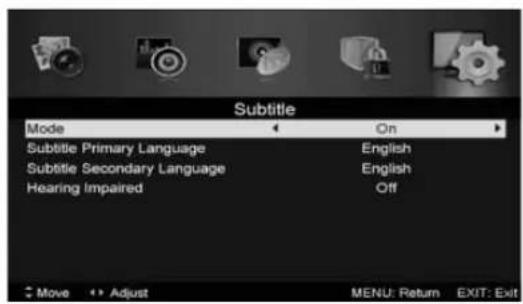
Subtitle
When the source is selected as DTV, users can go to the menu to set.
Note:
The pictures in regard to function are provided for reference purposes only.
Common interface
Press the ◀ / ▶ button to select Common interface, then press ENTER button to enter sub menu.
Only available when there is CI card under DTV.

USB Features
Press the "SOURCE" button to change to the "MEDIA" source.

Photo
natural_image
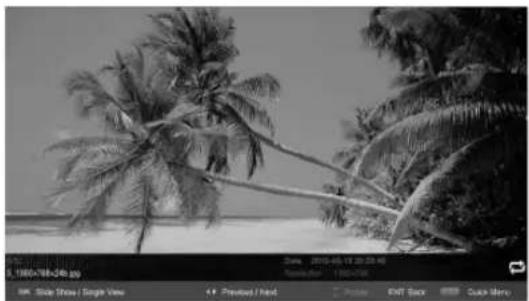
Black-and-white beach scene with palm trees and sandy shore (no visible text or symbols)- Press the ◀/▶ button enter the "PHOTO" option, and press enter button to enter
- Press ◀/▶ button to select drive disk you want to watch, then press enter button to enter.
- Press "BLUE" button to enter the sub menu to set.
- Press the "exit" button to back to the previous menu.
USER'S MANUAL
Music

- Press ◀/▶ button to select MUSIC in the main menu, then press enter button to enter
- Press ◀/▶ button to select drive disk you want to watch, then press enter button to enter
- Press "BLUE" button to enter the sub menu to set.
4.. Press the "exit" button to back to the previous menu
Movie

natural_image
Black-and-white photo of a boat docked at a waterfront with city skyline in background (no visible text or symbols)- Press ◀/▶ button to select MOVIE in the main menu, then press enter button to enter
- Press ◀/▶ button to select drive disk you want to watch, then press enter button to enter
- Press "BLUE" button to enter the sub menu to set.
- Press the "exit" button to back to the previous menu.
Text

- Press ◀ / ▶ button to select TEXT in the main menu, then press enter button to enter.
- Press ◀/▶ button to select drive disk you want to watch, then press enter button to enter
- Press "BLUE" button to enter the sub menu to set.
- Press the "exit" button to back to the previous menu.
PVR Operation
In DTV source, press the "MENU" button to enter the OSD menu. Then press ◀/▶ button to select the "Setup" menu.

- Press ▲ / ▼ button to select "PVR Settings" and press the "ENTER" or ▶ button to enter.
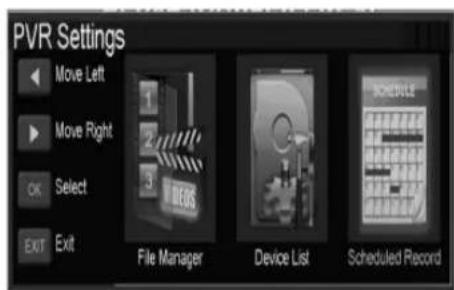
a) Press ◀/▶ button to select "File Manager" and press the "ENTER" button to check PVR file system.

USER'S MANUAL
b) Press ◀ / ▶ button to select "Device List" and press the "ENTER" button to the sub menu.

c) Press ◀/▶ button to select "Scheduled Record" and press the "ENTER" button to set.
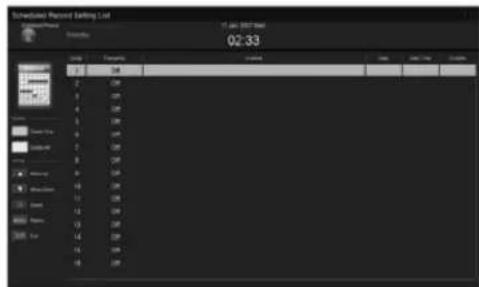
Note:
- The U disk will be formatted when in format, please do not store important files in the U disk.
- Press "Button for the first time to start recording, for the second time, the sign of recorder will be slimmed down, but it's still under recording.
Trouble Shooting
Before consulting service personnel, check the following chart for possible solutions.
| PROBLEM SOLUTION | |
| TV will not turn on | Make sure the power cord is plugged in.The batteries in the remote control may beExhausted; replace the batteries. |
| No picture, no sound | Check the cable between TV and antenna/ external AV device.Press the power button on the remote.Press the SOURCE button the remote, then press the ▲ / ▼ button repeatedly to select the TV source. |
| Poor picture, sound OK | Check the cable between TV and antenna/ external AV device.Try another channel, the station may have broadcast difficulties.Adjust the brightness/contrast in the Video menu. Check that the unit is set to PAL |
| Audio noise Move any infrared equipment away from the TV. | |
USER'S MANUAL
Specification
Screen size: 26" TFT-LED panel
DVB-T with H264
Aspect ratio: 16:9
Resolution: 1366X768 HD Ready
Viewing angle: 170o (W); 160o (Sz)
Brightness: 250cd/m2
Contrast ratio: 4000:1
Response time: 5ms
Speaker system details: 2 x 6 Watt
Screen mode: 4:3, 16:9
TV tuner reception system: PAL/SECAM
Dolby Digital Plus (E-AC-3)
Stereo reception system: B/G,D/K,I,L/L,M/N
DBX noise reduction
Teletext: 1000 pages (Europa only)
In/Out Connections: HDMI, SCART AV-in., Earphone out., VGA
in., PC AUDIO in, USB
Consumption Standby: 1W
Working Consumption: 60W (max)
Bedienungsanleitung
2. Manuelles Scannen (Analogscannen)
Programminfos
BEDIENUNGSANLEITUNG
CI-Anschluss
natural_image
Black-and-white beach scene with palm trees and sandy shore (no visible text or symbols)natural_image
Black-and-white photo of a boat on a waterfront with city skyline and cloudy sky in the background (no visible text or symbols)PVR-Modus
BEDIENUNGSANLEITUNG
Разъм Cl

natural_image
Black-and-white beach scene with palm trees and a shoreline (no visible text or symbols)natural_image
Black-and-white photo of a boat docked at a waterfront with a city skyline and cloudy sky in the background (no visible text or symbols)
- MANTA
- LED TV 26"
- LED2601
- LED TV
- Bedienungsanleitung
- INSTRUKCJA OBSŁUGI
- Złącze Cl
- Control Panel Button Function
- TV Terminal Connections
- Optional Configuration as below
- NOTE
- USER'S MANUAL
- OSD Basic adjustment
- Installation Guide
- Channel
- Digital Manual Tuning
- 4.Channel Edit
- a. DELETE
- b. RENAME
- NOTE:
- b. MOVE
- c. SKIP
- Signal information (only use in DTV)
- Picture
- Sound
- Lock System
- Setup
- PC
- DTV Features
- Favorite List
- Program Information
- Audio
- Electronic Program Guide EPG
- Subtitle
- Common interface
- USB Features
- Photo
- Music
- Movie
- Text
- PVR Operation
- Trouble Shooting
- Specification
- Manuelles Scannen (Analogscannen)
- Programminfos
- CI-Anschluss
- PVR-Modus
- Разъм Cl
Brand : Manta
Model : LED2601
Category : Television