
UFS 933 - Satellite receiver KATHREIN - Free user manual and instructions
Find the device manual for free UFS 933 KATHREIN in PDF.


| Product type | Satellite receiver |
| Brand | Kathrein |
| Model | UFS 933 |
| Tuner | DVB-S/S2 |
| Signal control | DiSEqC™ 1.0, Unicable (single-cable system) |
| Video outputs | HDMI, SCART (TV) |
| Audio outputs | HDMI, SCART, S/PDIF (digital optical) |
| Other ports | USB 2.0 (for external storage), Ethernet (service only), LNB IN, LOOP OUT |
| Remote control | Included, with 2 x AAA batteries |
| Power supply | Internal, 230 V AC, 50 Hz (mains cable) |
| Power consumption | Typical 15 W (standby <1 W) |
| Scope of delivery | UFS 933 receiver, Quick Start Guide, remote control, HDMI cable, 2 x AAA batteries, HD+ card |
| Safety instructions | Do not open casing; keep away from moisture and heat; use only indoors; disconnect before cleaning |
| Cleaning | Dry cloth only; disconnect mains before cleaning |
| Disposal | Electronic waste according to WEEE; batteries separately |
| Installation requirements | Free-standing, at least 10 cm clearance above, 5 cm behind, 2 cm sides; do not cover ventilation slots |
| HD+ capability | Yes (with included HD+ card) |
Frequently Asked Questions - UFS 933 KATHREIN
User questions about UFS 933 KATHREIN
0 question about this device. Answer the ones you know or ask your own.
Ask a new question about this device
Download the instructions for your Satellite receiver in PDF format for free! Find your manual UFS 933 - KATHREIN and take your electronic device back in hand. On this page are published all the documents necessary for the use of your device. UFS 933 by KATHREIN.
USER MANUAL UFS 933 KATHREIN
Connection and Set-up
UFS 933
English
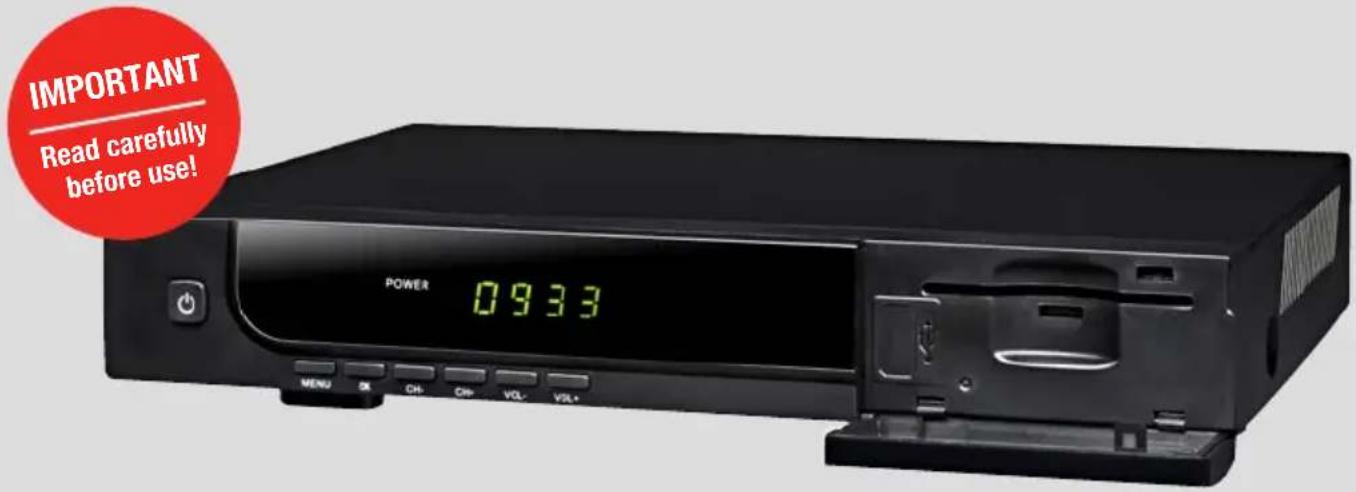
Table of Contents
1 About this guide .... 3
2 Explanation of symbols and safety instructions .... 3
2.1 Explanation of symbols and signal words....3
2.2 Safety instructions....5
2.3 General notes 7
2.4 Abbreviations and technical terms....8
3 Scope of delivery 9
4 Controls and connections....10
4.1 Front....10
4.2 Back....11
4.3 Remote control functions....12
5 Inserting batteries into the remote control....14
6 Connecting the receiver 14
6.1 Requirements....14
6.2 Selecting the installation site....16
6.3 Connecting the antenna cable....16
6.4 Connecting the TV set 17
7 Initial set-up 18
7.1 Remote control....18
7.2 Performing the initial set-up 19
7.3 Performing optional settings 20
8 Troubleshooting 26
9 Cleaning 29
10 Disposal....29
11 Copyright and licence conditions......30
12 General Terms and Conditions of Business for HD+ (with subscription) 31
1 About this guide
This Quick Start Guide describes a quick and easy procedure for connecting the receiver to the most popular satellite systems and then setting it up. Furthermore, the guide describes the buttons of the remote control and their functions as well as operation of the receiver menu using the example of the option Channel Lock.
For further details, see the comprehensive instructions for use at www.kathrein.com.
▶ Go to www.kathrein.com ▶ SAT ▶ Find out more about our satellite reception solutions
▶ Product Overview▶ Receivers ▶ Satellite Receivers (DVB-S)
⇒ The information about your receiver model can be downloaded from the product page.
2 Explanation of symbols and safety instructions
2.1 Explanation of symbols and signal words
Symbols
 | General warning sign |
 | Risk of material damage |
Signal words
| Warning This | signal word indicates a hazard with a medium level of risk which can lead to death or severe injuries. |
| Caution This | signal word indicates a hazard with a low level of risk which can lead to minor or moderate injuries. |
| Attention This | signal word indicates a hazard which can lead to material damage. |
| Tip | This signal word indicates useful tips and recommendations. |
Other Symbols
| Symbol Meaning | |
| ▶ | Operating instructions |
| 1, 2, 3...n | Operating instructions in a fixed order |
| ⇒ | Result of an operating instruction |
| √ | Condition for the execution of an operating instruction |
| ● | List/list entry |
| — | List/list entry second level |
| OK | Buttons of the remote control or elements in the receiver menu |
Presentation of operating instructions
The operating instructions in this guide are shown either in the short or the long form.
Short form
Example: Menu ▶ Installation ▶ Auto Scanning
Long form
- Step 1 Example: 1. Press Menu.
- Step 2 2. Select Settings.
- Step 3 3. Select Parental Lock.
2.2 Safety instructions

WARNING
Danger to life due to electric shock!
▶ Do not open the casing of the unit.
▶ Make sure that, for example. children do not insert any objects into the ventilation slots.
▶ Make sure that any repairs on the unit are carried out by qualified staff.
▶ Make sure that the power supply cable is not damaged.
▶ Disconnect a unit with a damaged power supply cable from the mains (unplug it at the socket).
▶ Make sure that a unit with a damaged power supply cable is repaired by an electrical specialist before being used again.
Danger to life when operating the unit in inappropriate ambient conditions or due to improper cleaning!
Moisture in the unit can lead to electric shock or fire hazard due to spark formation.
▶ Use the receiver and power supply indoors only.
▶ Protect the unit from moisture, dripping and splash water.
▶ Do not operate the unit in damp areas.
▶ Only use the unit in a moderate climate, not in tropical conditions.
▶ Do not place any vessels containing liquid on the unit, e.g. vases.
▶ Disconnect the mains plug before cleaning the unit.
▶ Restrict cleaning to only the outer surface of the unit.
▶ Use a dry cloth for cleaning.

WARNING
Danger to life due to improper use of batteries!
When used improperly, batteries can be damaged and can explode. Damaged batteries release caustic substances or can form explosive compounds.
▶ Do not expose batteries excessively to sources of heat, direct sunlight or fire.
▶ Comply with safety instructions stated on the batteries.
▶ Replace the batteries only with types that are identical or equivalent.


ATTENTION
Material damage due to:
Incorrect supply voltage!
▶ Operate the unit only at the specified mains voltage. It is stated at the back of the unit or on the external power supply unit.
Incorrectly earthed antenna system!
▶ Earth the antenna system in accordance with regulations or connect an equipotential bonding conductor.
▶ Comply with EN 60728/11 and, where applicable, with national regulations.
Overheating!
▶ Do not cover or block the ventilation slots or the fan of the unit by, for example, other objects, magazines, table cloths, clothing or curtains.
▶ Do not place any objects on top of the unit.
▶ Do not place naked flames on the unit, e.g. candles.
▶ Do not expose the unit to direct sunlight.
Long periods of absence or storms!
▶ If you are going to be absent for a long time or if there is a storm, always switch off the receiver by pressing the ON/OFF switch.
▶ Pull the plug out of the mains socket to completely disconnect the unit from the mains.
▶ Disconnect other devices connected with the unit from the mains.
Incorrect connections!
▶ Connect the unit as it is described in the enclosed instructions for use.

ATTENTION
Loss of data and software corruption due to the receiver being disconnected from the mains whilst in use!
▶ Always switch the receiver into stand-by mode by pressing the stand-by button on the remote control before disconnecting it from the mains.
→ Altered and new data are saved.
2.3 General notes
Effects of the heat generated by the unit
Every electronic device generates heat. Although the temperature rise of the unit lies within the permissible range, sensitive furniture surfaces and veneers may, however, become discoloured by the effects of constant heat over time.
The feet of the unit can cause changes to the colour of treated furniture surfaces.
▶ To avoid possible discolouration, place the unit on a suitable stable flat underlay.
Product return/Original packaging
Due to the nature of their construction receivers are fragile, and only the original packaging can be relied on to provide adequate protection. If the receiver is not shipped correctly, the guarantee/warranty on it will be voided.
▶ Keep the original packaging in case you need to return the product at any time.
Updates
The information in this manual was correct at the time of going to press. However, we reserve the right to make changes at any time and without prior notice. If new software which affects the information in this manual (e.g. changes to the menus and/or functions) is released for your receiver, where we believe it necessary, we will make available a new manual for download under www.kathrein.com.
▶ Note the basic settings that you make when setting up the receiver for the first time, so that you can restore them later, if necessary.
Tip
Keep these instructions for further reference and give them to the next owner if the unit is sold.
2.4 Abbreviations and technical terms
| DiSEqC | DiSEqC (Digital Satellite Equipment Control) is a digital control signal system which allows reception from more than 1 satellite. |
| HDMI | HDMI (High Definition Multimedia Interface) is a digital interface for video and audio. |
| LNB | The LNB (Low Noise Block Converter) is located at the focal point of a satellite antenna. The LNB converts the satellite frequencies into lower frequencies which can be processed by a satellite receiver. |
| OSD | OSD (On Screen Display) is the appearance of the receiver menu on TV to operate the receiver and change settings. |
| PCM | PCM (Pulse-Code Modulation) is a method used to translate an analogue audio signal into a digital audio signal. The digital audio signal is released at S/PDIF output. |
| S/PDIF | S/PDIF (Sony/Philips Digital Interface Format) is a digital interface for electrical or optical transmission of digital audio signals such as Dolby Digital AC-3. |
| UTC | UTC (Universal Time, Coordinated) is the coordinated world time based on the London Greenwich zero meridian. Central European Time (CET) corresponds to UTC+1:00. In summer the time used is Central European Summer Time (CEST) which corresponds to UTC+2:00. |
3 Scope of delivery

① UFS 933 Receiver
② Quick Start Guide
③ Remote control
④ HDMI cable
⑤ 2 batteries AAA 1.5 V
⑥ HD+ card
The accessories supplied may differ in appearance from those illustrated.
Fig. 1: Scope of delivery (with packaging)
4 Controls and connections
4.1 Front

Fig. 2: Front
① On/Off Button (operation/stand-by) switches between ON and Stand-By
② Menu Button opens the menu
③ OK confirms the selection in the menu
④ CH-/CH+
switches between channels or menu items
⑤ VOL-/VOL+
controls volume or switches
between menu items
⑥ Channel display shows the current channel
⑦ Lid covers the slot for the HD+ card
⑧ Slot for the HD+ card
4.2 Back

Fig. 3: Back
① LNB IN antenna connection
② LOOP OUT
③ Ethernet only for service
④ S/PDIF digital audio output
⑤ USB 2.0 connection connection for an external USB storage
⑥ HDMI HDMI connection
⑦ TV scart connection
⑧ ON/OFF switch turns the receiver on and off 4
⑨ Power supply cable
4.3 Remote control functions
Tip
- This sections describes the basic functions of the remote control for displaying broadcast TV programmes (live mode). For a detailed description of the remote control, see the UFS 933 comprehensive instructions for use at www.kathrein.com.
- Many buttons have one or several context-dependent functions described either at the bottom of the user interface or at the bottom/top of the main menu.
- Use the remote control to switch the receiver to stand-by to minimise the power consumption.
- For longer breaks in use, disconnect the receiver from the mains so as to avoid possible damage due to power surges (lightning strikes). A switchable multi-way socket extension allows you to do this for both the TV set and other associated devices with a single switch.

① Mute sound
/ Rewind and fast-forward a recording
② Pause and continue playback
End a recording/playback
Record Button: Record a programme
Zoom: Enlarge the view
③ Video format: Change TV and video aspect ratio and TV resolution
F1: no function
Timer: Show, add or delete timer
④ TEXT: Show teletext and subtitles
④ Info: Show information about the current channel
TV/R: Switch between TV and radio
Red Button: Context-dependent functions
Blue Button: Context-dependent functions
⑤ Green Button (SLEEP): Set the switch-off timer
Audio: Change the audio language or sound mode
⑥ Take a step back in menus and displays Hide banner
Navigate in the menu and in lists
⑦ ▶ control volume
Switch between channels
Show channel list/channel information
⑧ Open submenus Confirm inputs
⑨ Show Favourites list
⑩ Show channels seen last
⑪ Switch between pages in lists Navigate in the menu and in lists
⑫ Start Media Player
⑬ Number pad Sort recordings in the Media Player
⑭ Call up multi-feed channels Context-dependent functions
⑮ Show information about buttons and functions
⑯ Turn the volume up (Vol+) and down (Vol-)
⑰ Show EPG
⑱ Show the main menu
⑲ Switch the receiver on and off and to stand-by
5 Inserting batteries into the remote control
- Remove the cover from the remote control. To do this, press on the point ② and push the cover ① off to the rear ③ (Fig. 4).
- Insert the batteries supplied ④ into the battery compartment ⑤. Ensure correct polarity of the batteries (the polarity is marked inside the battery compartment).
- Fit the cover again and slide it forward to the stop.

Fig. 4: Inserting batteries into the remote control (showing the principle)
6 Connecting the receiver
6.1 Requirements
This Quick Start Guide describes how to connect and commission single systems of type DiSEqC™1.0 or simple LNB for the satellites Astra 19.2° East and Hotbird 13° East.
For more information, see the UFS 933 comprehensive instructions for use at www.kathrein.com. Contact your specialist dealer directly if you have questions or encounter problems.
Tip
Note the difference between a single-device system and a single-cable system:
In classic satellite distribution (single-device system), each receiver/participant is connected to its own antenna cable.
In the single-cable system, several receivers/participants are connected to a single antenna cable. Transmission channels are used to allow each receiver/participant to receive broadcast channels independently.
![graph TD A["Satlan"] --> B["Satellite"] B --> C["Receiver"] C --> D["Receiver"] D --> E["Receiver"] C --> F["Satellite Link"] F --> G["Satellite Link"] G --> H["Satellite Link"] H --> I["Satellite Link"] I --> J["Satellite Link"] J --> K["Satellite Link"] K --> L["Satellite Link"] L --> M["Satellite…](/content/2026/05/778705/images/5df820aa9afd01d7f2cf679d9bc16a5ec6712bd0048f891f06409d812207f7a1.jpg)
Fig. 5: Single-device system
![graph TD A["Satán"] --> B["Satellite Link"] B --> C["Receiver"] C --> D["Satellite Link"] D --> E["Receiver"] E --> F["Satellite Link"] F --> G["Receiver"] G --> H["Satellite Link"] H --> I["Receiver"] I --> J["Satellite Link"]](/content/2026/05/778705/images/c1d433d54d054298a47f7e2a1a23912551fdcd42377fbf9f1ef753306fd4ec76.jpg)
Fig. 6: Single-cable system
6.2 Selecting the installation site
ATTENTION
Material damage due to improper installation site!
Follow the following instructions to avoid material damage:
▶ Maintain at least the following clearance around the unit: 10 cm above, 5 cm behind, 2 cm to either side.
▶ Never install the unit in a cupboard or on shelves with inadequate ventilation.
▶ Do not install the unit close to the sources of heat.
▶ Do not expose the unit to direct sunlight.
▶ Install the unit close to an easily accessible mains socket to be able to disconnect the unit from the mains at any time.
▶ Do not place any heavy objects on the receiver, e.g. TV.
6.3 Connecting the antenna cable
√ A sufficiently long antenna cable with F screw-on connectors is available (Fig. 7).

Fig. 7: F screw-type connector
- Connect the coaxial cable of the LNB to the tuner input LNB IN. Tighten the cable only hand-tight.
- Using the antenna cable, connect the tuner input LNB IN to a Sat socket (①, ②, ③ in Fig. 8):
a) Insert the F screw-on connector centrally into LNB IN and push it in to the stop.
b) Tighten the union nut on the F screw-type connector.
6.4 Connecting the TV set
- Using the HDMI cable, connect the HDMI port on the receiver to the TV set (④ in Fig. 8).
Alternatively, connect the TV port on the receiver to the TV set using a scart cable (⑤, not included in the scope of delivery).
- Carry out the initial set-up as described in Chapter 7.
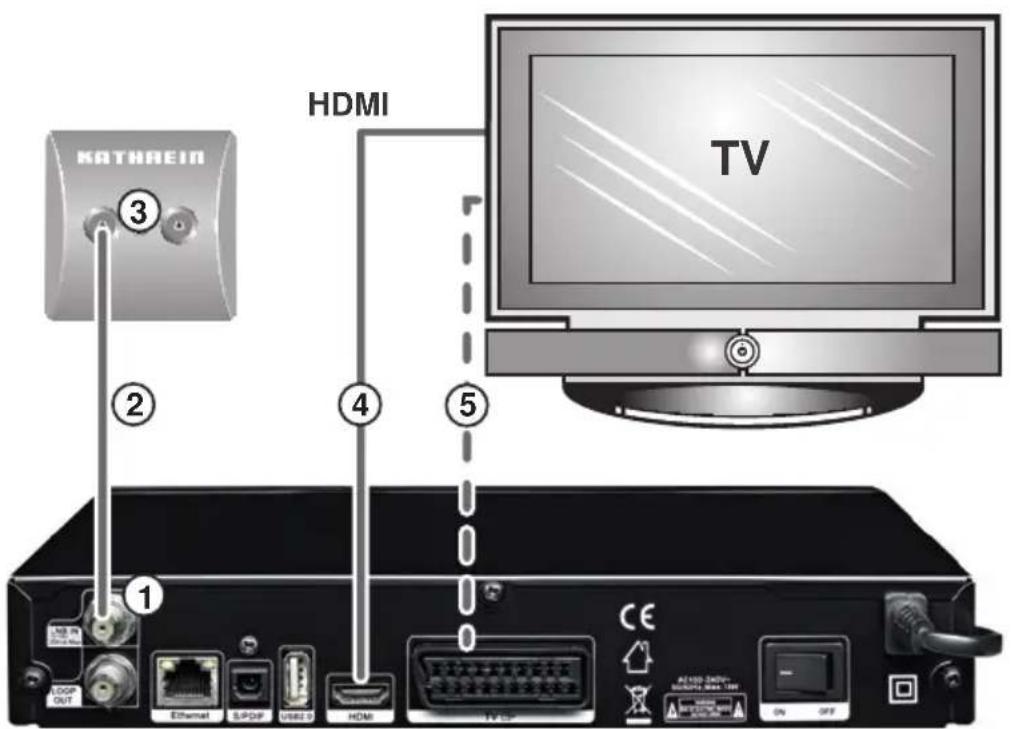
Fig. 8: Cable connection of the receiver
7 Initial set-up

ATTENTION
Material damage due to improper cable connection!
▶ Only connect the unit to the mains and perform the initial set-up after the installation work has been properly carried out as described in the previous chapters.

Nothing you do during the initial set-up can damage your reception system. Ask your specialist dealer if you have questions or encounter problems.
7.1 Remote control
For the initial set-up you will need to use the following buttons on the remote control:
 | navigate in the menu and in lists |
 | navigate in the menu and listsselect functionschange settings |
 | shows a channel listcalls up a submenuconfirms settings |
| Red button | takes one step back |
| MENU shows the menu | |
| BACK leaves the Installation Guide | |
| Blue button | confirms settingsgoes to the next page |
7.2 Performing the initial set-up
7.2.1 Switching on the receiver, selecting language and time zone

- Connect the receiver and the TV set to the mains.
- Switch the TV set on.
- Select the input on the TV set which the receiver is connected to.
- Switch the receiver on using the ON/OFF switch.
⇒ The receiver shows the available languages (see figure on the left).

-
Press △ ▽ to select a language.
-
Press OK or Blue Button to confirm the selection.
→ The menu Time Setting opens, the menu item Daylight Saving displays the option OFF (see figure on the left).
- Press ▶ to select between the options OFF and ON.
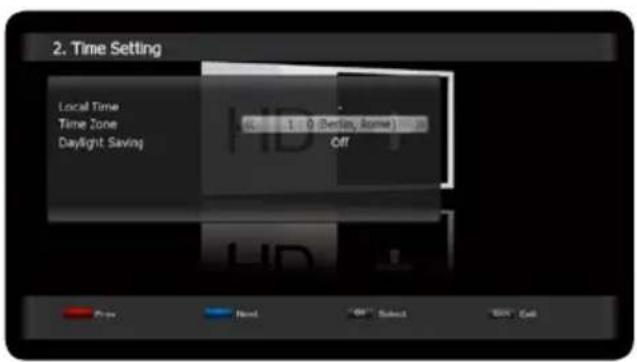
- Press △ ▽ go to the menu item Time Zone.
- Press ▶ to select the Time Zone.
Tip
The receiver has a default setting of the time zone UTC + 1:0 (Berlin, Rome), Daylight saving OFF. You can change the time setting at any time (Menu ▶ System Setup ▶ Time Setting ▶ Time Zone/Daylight Saving).

- Press OK or Blue Button to confirm the selection.
⇒ The settings are saved and the channel list is being loaded. A channel is shown (example in the figure on the left). The initial set-up is completed.
Tip
Since the channel list for Astra 19.2° is preset by default, it is not necessary to perform a channel search. The DiSEqC Signal is set to OFF. You can perform a channel search at any time (Menu ▶ Installation ▶ Auto Scanning).
7.3 Performing optional settings
This section describes how to operate the menu using several examples.
For more information, see the UFS 933 comprehensive instructions for use at www.kathrein.com.
Channel Lock
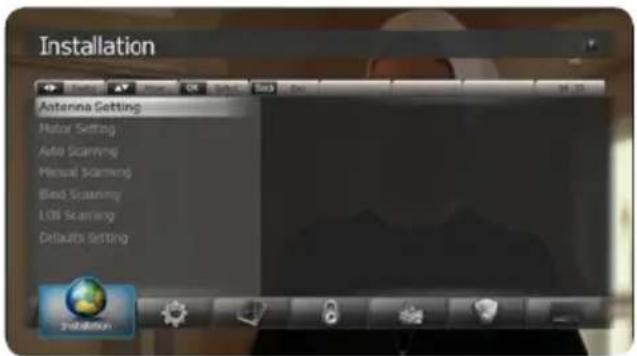
- Press MENU.
⇒ The menu Installation appears.

- Press □ until the menu Parental Lock appears.
⇒ The menu Parental Lock appears and the option Channel Lock is active (see figure on the left).
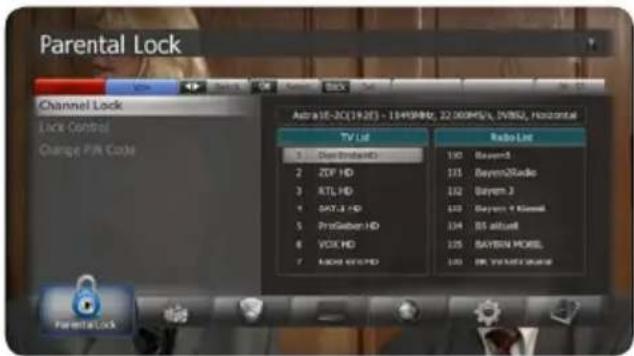
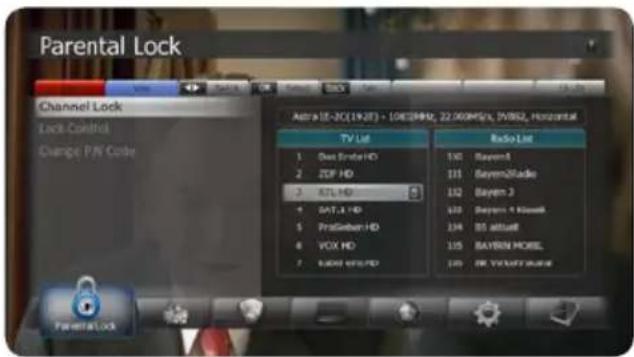


-
Press OK to open the channel list (see figure on the left).
-
Press ▶ to select a channel to be locked.
-
Press OK to lock the channel.
⇒ A lock appears next to the channel (see figure on the left). The channel is locked.
Press OK once again to unlock the channel.
- Press Red Button to save the changes.
→ The Menu Lock with the fields for the password input appears.
Alternatively:
Press Back.
→ The following system message appears (see figure on the left).
Use ▶ to select Yes.
⇒ The Menu Lock with the fields for the password input appears.

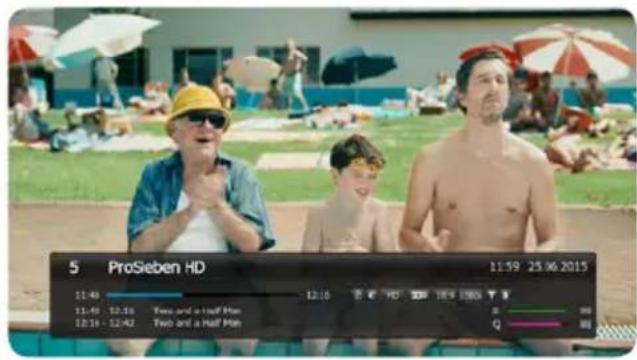
- Enter the preset password 0000.
→ The changes are saved and the chosen channel is locked – no picture is displayed (see figure on the left).
- To show the locked channel at a later date, enter the password 0000.
→ The channel is shown.
Adjusting the antenna system
You need to change the antenna settings only if your antenna system is not a single-device system of the type DiSEqC™1.0 or a simple LNB.
▶ Set the antenna system of the single-cable system type as described in Setting the single-cable system, p. 23.
▶ Adjust the antenna settings under Menu ▶ Installation ▶ Antenna Setting.
Setting the single-cable system
Tipp
Information about the single-cable system
In the single-cable system, several receivers/subscribers are connected to a common antenna cable. The system functions as follows:
- Channels from several satellites are transmitted on up to 32 transmission channels. - Each transmission channel is permanently assigned to one receiver/subscriber.
Note
Each transmission channel may only be assigned to one receiver/ subscriber to prevent cross-channel interference.
- One transmission frequency is assigned to each transmission channel. See the documentation of the single-cable multi-switch to determine which frequency you must assign to which transmission channel.

1. Press Menu.
→ The menu Installation appears, the menu item Antenna Setting is active.

2. Press OK.
→ The satellite list and the tuner settings appear.


-
Press and then a number of times to go to the setting value Unicable (set to OFF, see figure on the left).
-
Press OK.
⇒ The entry mask Ⓐ appears (see figure on the left).
-
Press ▼ to go to the setting value Frequency.
-
Enter the frequency value 1) using the number pad (example on the left: 1284 MHz).
-
Press ▼ to go to the SatCR setting value (transmission channel).
-
Select a transmission channel 1) using the buttons (example on the left: 0).
-
Press OK.
⇒ A system message appears for several seconds (see figure on the left).
- Press Menu.
⇒ A TV channel is shown.
Software update
The receiver obtains the data for a software update from the satellite signal.

ATTENTION
Material damage and loss of data due to the receiver being turned off during an update!
▶ Do not turn off the receiver during an update.
Performing a software update using the satellite signal

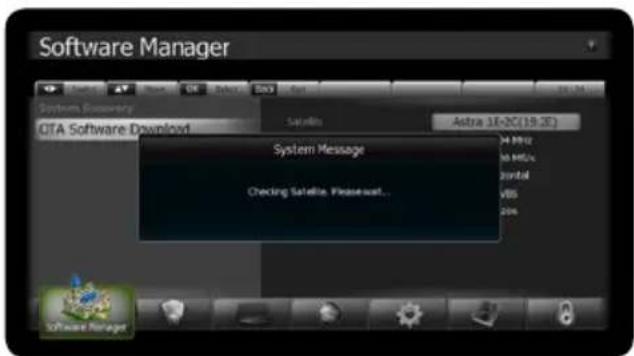
- Open Menu ▶ System Setup ▶ System Information.
→ The version numbers are displayed.
-
Note the current version number to control the software update later.
-
Open Menu ▶ Software Manager ▶ OTA Software Download.
-
Press OK to search for an update.
⇒ The receiver checks if there is a new software version available. If there is an update, an update dialogue appears.
- Press Yes to start the update.
→ After a successful update the receiver reverts to normal operation.
- Open Menu ▶ System Setup ▶ System Information.
⇒ If the update was successful, the displayed version number is higher and the date is more recent than the values you have previously noted.
Tip The update works only with the preset satellite and transponder (Astra 19.2°).
8 Troubleshooting
The receiver is not responding, or the TV display remains black
Unfortunately, your receiver does not receive any signal or the signal is too weak. Please make sure if your receiver has been connected correctly to the satellite system and/or if your satellite antenna is directed correctly (Message 102)
| Possible Causes Remedy | |
| The mains plug or the antenna cable are not connected or the mains plug is not correctly plugged into the mains socket | Check the mains plug and the antenna cable as well as the mains plug connection |
| The receiver and TV set are connected incorrectly | Connect the receiver and TV set according to Fig. 8, p. 17 |
| An incorrect input is selected on the TV set | Select the input on the TV set which the receiver is connected to |
| The receiver and/or the TV set are not switched on or are on stand-by | Turn on the receiver and the TV set |
| The antenna is set incorrectly | Check antenna settings (Menu ► Installation ► Antenna Setting) |
| Brightness is set incorrectly | Check brightness (Menu ► System Setup ► OSD Setting ► Transparency) |
| The receiver and/or TV set are not responding to the remote control | see The receiver is not responding to the remote control, p. 27 |
| The satellite antenna (satellite dish) is aligned incorrectly and the antenna signal is too weakThe antenna cable is incorrectly connected or damagedThe tuner is configured incorrectly | Consult an antenna specialist |
| The antenna cable is causing a short circuit | Check the antenna cable and replace it, if necessary |
| internal fault 1. Turn off the receiver and unplug the antenna cable.2. Wait about 30 seconds.3. Connect the antenna cable and turn on the receiver.4. Check the satellite system if the message is displayed again.5. If necessary, consult an antenna specialist. | |
Several or all channels are not shown
| Possible Causes Remedy | |
| The tuner is set incorrectly | Check antenna settings (Menu ► Installation ► Antenna Setting)If necessary, consult an antenna specialist |
| There is a channel outage Make sure there is no outage in your area | |
The receiver is not responding to the remote control
| Possible Causes Remedy | |
| The batteries of the remote control are ... flat,of the wrong type,have been inserted the wrong way round. | The batteries must be ...replaced,replaced,inserted the right way round; seeFig. 4, p. 14. |
| The remote control is not directly pointed at the receiver | Point the remote control directly at the receiver |
Bad picture or sound quality or no sound
| Possible Causes Remedy | |
| Obstacles in reception Position the antenna | such that there are no obstacles in reception |
| A mobile phone or a microwave are situated close to the receiver | Make sure that there is no mobile phone or microwave close to the receiver |
| The volume of the receiver/TV set is set incorrectly | Adjust the volume of the receiver/TV set |
| The mute function is activated Deactivate the mute function | |
| Audio settings are incorrect Change the audio settings, e.g. select Dolby Digital instead of PCM (Menu ▶ System Setup ▶ Audio Setting ▶ SPDIF Output) | |
The incorrect time is displayed
| Possible Causes Remedy | |
| Daylight Saving is set incorrectly Check the time zone and correct it, if necessary (Menu ▶ System Setup ▶ Time Setting ▶ Time Zone/Daylight Saving) | |
| Incorrect time was transferred from the received signal | 1. In live mode, select a channel that transmits time and date 1) .2. Turn off the receiver using the remote control first, then using the ON/OFF switch.3. Wait 10 s and turn on the receiver. |

Please note that the UFS 933 is an HD+ receiver and that the time update must take place over an HD+ channel. If you have set the receiver to a different satellite that does not support any HD+ channels, the receiver might display the incorrect time.
None of the above points describes my problem
Contact your specialist dealer if after reading the Quick Start Guide and the instructions for use you still have unanswered questions or cannot solve a problem.
The Kathrein customer hotline is also available on 0180 5 122240 *).
Tip
Device information required for a claim under warranty
If a claim under warranty is made, it is possible that we will require precise information about the device, such as device name, order number, serial number. You can find this information on the sticker on the underside of the device.
9 Cleaning
Pay attention to the following when cleaning the unit:
▶ Disconnect the mains plug before cleaning the unit.
▶ Do not open the casing of the unit.
▶ Do not insert any objects into the ventilation slots.
▶ Use a dry cloth for cleaning.
▶ Restrict cleaning to only the outer surface of the unit.
10 Disposal

Electronic devices
Electronic equipment is not domestic waste – in accordance with directive 2002/96/EC OF THE EUROPEAN PARLIAMENT AND THE COUNCIL dated 27th January 2003 concerning used electrical and electronic appliances, it must be disposed of properly. At the end of its service life, take this receiver for disposal at a designated public collection point.
Spent batteries
Spent batteries are special waste. Do not throw used batteries into your household waste; take them to a collection point for old batteries.
11 Copyright and licence conditions
Audio MPEG Inc. and Sisvel S.p.A.
This unit makes use of legally protected technologies, which are protected by patents in the USA and also by other intellectual property rights in other countries. KATHREIN-Werke KG has obtained licenses from Audio MPEG Inc. and Societa' Italiana per lo sviluppo dell'elettronica, Sisvel S.p.A. to use these technologies. These licences carry certain restrictions, which apply also to you as the customer. Accordingly this unit may only be used by the end customer for private non-commercial purposes and for the licensed content. It may not be used for commercial purposes. The use of products or processes that are sold or used with this unit is not included in this statement. The use of reverse engineering is not permitted in respect of the licensed technologies, nor is disassembly.
DiSEqC™
The term DiSEqC ™ used in these operating instructions is a registered trade mark of the European Telecommunication Satellite Organisation (EUTELSAT).
Software changes/use of applications
Any modifications to the receiver software, or the use of applications not provided by Kathrein will invalidate the warranty: You will have to bear the costs yourself for dispatching and repairing any receiver that requires attention due to modifications to the software and use of applications other than those provided by Kathrein.
Therefore you should use exclusively software and applications provided by Kathrein for your receiver. These are available by downloading from the satellite or from the Internet (www.kathrein.com).
Kathrein assumes no liability for the loss of recordings/data on internal hard disks or external storage media.
The software installed on the device/product before dispatch from the factory is suitable for its function and is of the quality usual for this type of software. It has not been technically possible to fully eliminate all bugs during the software development process. However, the software as delivered is considered to be defective only if it fails to perform the functions usual for the device/product. A shortcoming that causes only an insignificant reduction in quality does not rank as a defect. Functional shortcomings in the software or program that result from hardware defects, ambient conditions, incorrect operation or the like do not rank as software defects.
DOLBY AUDIO
Manufactured under licence from Dolby Laboratories. Dolby and the double D symbol are registered trademarks of Dolby Laboratories.
HDMI® HIGH-DEFINITION MULTIMEDIA INTERFACE
HDMI, the HDMI logo and High-Definition Multimedia Interface are trademarks or registered trademarks of HDMI Licensing LLC in the United States and in other countries.
12 General Terms and Conditions of Business for HD+ (with subscription)


- CONNECTION AND SET-UP
- UFS 933
- ENGLISH
- TABLE OF CONTENTS
- 1 ABOUT THIS GUIDE
- 2 EXPLANATION OF SYMBOLS AND SAFETY INSTRUCTIONS
- 2.1 EXPLANATION OF SYMBOLS AND SIGNAL WORDS
- PRESENTATION OF OPERATING INSTRUCTIONS
- SHORT FORM
- LONG FORM
- 2.2 SAFETY INSTRUCTIONS
- WARNING
- DANGER TO LIFE DUE TO ELECTRIC SHOCK
- DANGER TO LIFE WHEN OPERATING THE UNIT IN INAPPROPRIATE AMBIENT CONDITIONS OR DUE TO IMPROPER CLEANING
- DANGER TO LIFE DUE TO IMPROPER USE OF BATTERIES
- ATTENTION
- MATERIAL DAMAGE DUE TO
- INCORRECT SUPPLY VOLTAGE
- INCORRECTLY EARTHED ANTENNA SYSTEM
- OVERHEATING
- LONG PERIODS OF ABSENCE OR STORMS
- INCORRECT CONNECTIONS
- LOSS OF DATA AND SOFTWARE CORRUPTION DUE TO THE RECEIVER BEING DISCONNECTED FROM THE MAINS WHILST IN USE
- 2.3 GENERAL NOTES
- EFFECTS OF THE HEAT GENERATED BY THE UNIT
- PRODUCT RETURN/ORIGINAL PACKAGING
- UPDATES
- TIP
- 2.4 ABBREVIATIONS AND TECHNICAL TERMS
- 3 SCOPE OF DELIVERY
- 4 CONTROLS AND CONNECTIONS
- 4.1 FRONT
- 4.2 BACK
- 4.3 REMOTE CONTROL FUNCTIONS
- 5 INSERTING BATTERIES INTO THE REMOTE CONTROL
- 6 CONNECTING THE RECEIVER
- 6.1 REQUIREMENTS
- NOTE THE DIFFERENCE BETWEEN A SINGLE-DEVICE SYSTEM AND A SINGLE-CABLE SYSTEM
- 6.2 SELECTING THE INSTALLATION SITE
- MATERIAL DAMAGE DUE TO IMPROPER INSTALLATION SITE
- 6.3 CONNECTING THE ANTENNA CABLE
- 6.4 CONNECTING THE TV SET
- 7 INITIAL SET-UP
- MATERIAL DAMAGE DUE TO IMPROPER CABLE CONNECTION
- 7.1 REMOTE CONTROL
- 7.2 PERFORMING THE INITIAL SET-UP
- 7.2.1 SWITCHING ON THE RECEIVER, SELECTING LANGUAGE AND TIME ZONE
- 7.3 PERFORMING OPTIONAL SETTINGS
- CHANNEL LOCK
- ADJUSTING THE ANTENNA SYSTEM
- SETTING THE SINGLE-CABLE SYSTEM
- TIPP
- INFORMATION ABOUT THE SINGLE-CABLE SYSTEM
- NOTE
- PRESS MENU
- PRESS OK
- SOFTWARE UPDATE
- PERFORMING A SOFTWARE UPDATE USING THE SATELLITE SIGNAL
- 8 TROUBLESHOOTING
- THE RECEIVER IS NOT RESPONDING, OR THE TV DISPLAY REMAINS BLACK
- SEVERAL OR ALL CHANNELS ARE NOT SHOWN
- THE RECEIVER IS NOT RESPONDING TO THE REMOTE CONTROL
- NONE OF THE ABOVE POINTS DESCRIBES MY PROBLEM
- DEVICE INFORMATION REQUIRED FOR A CLAIM UNDER WARRANTY
- 9 CLEANING
- 10 DISPOSAL
- ELECTRONIC DEVICES
- SPENT BATTERIES
- 11 COPYRIGHT AND LICENCE CONDITIONS
- DISEQC™
- SOFTWARE CHANGES/USE OF APPLICATIONS
- 12 GENERAL TERMS AND CONDITIONS OF BUSINESS FOR HD+ (WITH SUBSCRIPTION)
Brand : KATHREIN
Model : UFS 933
Category : Satellite receiver