
PN40HD - Media player HAMA - Free user manual and instructions
Find the device manual for free PN40HD HAMA in PDF.


| Product Type | Full-HD Media Player |
| Brand | Hama |
| Model | PN40HD |
| Dimensions (WxHxD) | 230 x 64 x 168 mm |
| Net Weight (incl. AC adapter) | Approx. 2.1 kg |
| Power Supply | AC adapter: 100-240 V, 50/60 Hz; Output: DC 5V |
| Power Consumption (Operation) | Approx. 20 W |
| Standby Power | < 1 W |
| Video Output | HDMI V1.3, Component Y/Pb/Pr, Composite A/V |
| Audio Output | HDMI, Optical S/PDIF, Analog stereo (via A/V out) |
| Network Connectivity | 10/100 Mbps Ethernet, Optional WLAN via USB adapter (802.11b/g/n) |
| USB Ports | 2 x USB 2.0 Host (compatible with USB 1.1) |
| eSATA Interface | Yes |
| Supported Video Formats | AVI, MKV, TS, MP4, MOV, VOB, ISO, DAT, WMV, ASF, RM, RMVB, FLV (up to 1080p) |
| Supported Audio Formats | MP3, OGG, WMA, WAV, AAC, FLAC |
| Supported Photo Formats | HD JPEG, BMP, GIF, TIF, PNG |
| Supported Subtitle Formats | SRT, SMI, SSA, ASS, IDX/SUB, SUB |
| Supported File Systems | FAT, FAT32, NTFS, EXT3 |
| Remote Control | Yes, with 36 buttons |
| Operating Temperature | +5°C to +35°C |
| Operating Humidity | 5% to 80% RH |
| Included Accessories | Audio/Video cable, Y/Pb/Pr cable, Remote control, 2x AA batteries, AC adapter, User manual |
Frequently Asked Questions - PN40HD HAMA
User questions about PN40HD HAMA
0 question about this device. Answer the ones you know or ask your own.
Ask a new question about this device
Download the instructions for your Media player in PDF format for free! Find your manual PN40HD - HAMA and take your electronic device back in hand. On this page are published all the documents necessary for the use of your device. PN40HD by HAMA.
USER MANUAL PN40HD HAMA
natural_image
Black rectangular electronic device with a circular lens and a small screen (no visible text or symbols)Inhaltsverzeichnis
Einführung 4
Vorwort 4
natural_image
Pure electrical circuit lines without any symbolsFull-HD Mediaplayer •
Audio-/Video-Kabel •
Y/Pb/Pr-Kabel
Fernbedienung •
Weitere Anschlüsse
natural_image
Diagram of a computer setup with monitor, keyboard, and connected cables (no text or labels)natural_image
Diagram showing a computer setup connected to an analog device with three connected cables (no text or symbols visible)natural_image
Illustration of a desktop computer setup with monitor, tower, and connected cables (no text or symbols)HINWEIS
natural_image
Diagram showing audio equipment connections including a CD, two speakers, and an optical device (no text or symbols present)SRT, SMI, SSA, ASS, IDX/SUB, SUB
10/100Mbps Auto-Negotiation Ethernet ■
Information on this user manual . 82
Liability disclaimer 83
Warnings 83
Intended use 84
Copyright 84
Safety 85
Danger of electric shock ..... 8 5
Handling batteries 85
Fundamental safety precautions . 86
Design and function ..... 87
Front of the device 87
Back of the device 88
Remote control 89
Functions of the remote control buttons ..... 9 0
Function overview 92
AV output ..... 92 Multimedia playback ..... 9 2 Network functions ..... 9 2
Setup and connection ..... 9 3
Safety precautions 93
Unpacking 93
Checking contents and packaging ..94
Disposal of the packaging ..... 94
Requirements for the place of operation .... 95
Electrical connection ..... 9 5
Mains connection ..... 96
Additional connections .....9 7
Connecting a USB mass storage device ..... 97 (e.g., MP3 player, external USB storage disk, U disk, USB stick).97 Connecting an external hard disk with the SATA interface ..... 97 Connecting to a television ..... 98 Connecting to a digital audio system ..... 101 Connecting to a computer network ..... 102
Setting up 103
Inserting batteries into the remote control 103
Switching the device ON and OFF .103
Setting the menu language ..... 1 0 4
Operation 105
Opening the main menu and navigating 105
Setup menu 105
Opening the setup menu and navigating 105
Changing audio settings ..... 1 0 6
Changing video settings ..... 1 0 7
Setting the screen size ..... 111
Activating gapless playback . . . 111
Configuring network settings . . 112
Changing system settings .... 121
Miscellaneous 124
Browser menu 127
Opening the browser menu and navigating 127
Browsing all files 129
Browsing music files ..... 1 3 0
Browsing photo files 131
Browsing video files ..... 1 3 2
Audio and video streaming via a network ..... 134
Audio and video streaming via UPnP server 137
Renaming/deleting files or folders 140
Managing your playlist ..... 1 4 0
File Copy (copying files) ..... 1 4 2
Internet radio 144
Stations 146
Genre 146
Favourites 146
Search 146
NAS function ..... 147
Upgrading the firmware ..... 148
Troubleshooting 149
Troubleshooting chart ..... 149
Frequently asked questions (FAQs) 150
Storage 155
Appendix 155
Support and contact information ..155
Technical data 156
Supported I/O interfaces ..... 156
Supported file systems ..... 1 5 6
Supported formats ..... 156
Supported video formats ..... 156
Supported audio formats ..... 156
Supported subtitle formats .... 1 5 7
Network performance features.157
General 157
Operating restrictions ..... 1 5 7
Introduction
Foreword
Dear Customer,
By purchasing this Full-HD media player, you have decided in favour of a quality product from Hama that corresponds to the latest development standards with respect to engineering and functional performance.
The PRN40HD is intended for playing back and recording of digital media (videos, music and photos) on a television, beamer or computer monitor. Integrate the media player into your home network and access the locally stored files directly.
Please read the information contained in this user manual to familiarise yourself quickly with the device and be able to make full use of its functions.
We wish you a lot of pleasure with the device.
Information on this user manual
This instruction manual forms an integral part of the PRN40HD media player (hereinafter referred to as device) and contains important information on the intended use, safety, connection and operation of the device.
The user manual must be kept near to the device at all times. Its contents must be read and applied by all persons who use or maintain the device.
Keep this user manual in a safe place and pass it on with the device to any future owners.
Liability disclaimer
All technical information, data and instructions on installation, operation and maintenance of the device contained in this user manual represent the current status at the time of printing and are based on the best possible knowledge gained by experience and know-how.
The manufacturer assumes no liability for damage or injury resulting from failure to observe the user manual, use for other than the intended purpose, unprofessional repairs, unauthorised modifications or use of non-approved spare parts.
Warnings
The following warnings are used in this user manual:
DANGER
A warning of this category indicates an impending dangerous situation.
If the dangerous situation is not avoided, it may lead to serious injury or even death.
Follow the instructions in this warning to avoid the danger of ▶ serious injury or even death.
WARNING
A warning of this category indicates a potentially dangerous situation.
If the dangerous situation is not avoided, it may lead to injuries.
Follow the instructions in the warning to prevent injuries to persons.
NOTE
▶ A note indicates additional information that simplifies the use of the device.
Intended use
This device is intended only for playing back or recording digital media on a television, beamer or computer monitor.
Any other use other than previously stated is considered as improper use.
WARNING
Danger resulting from improper use!
If the device is not used for its intended purpose or used in any other way, it may be or become a source of danger.
Only use the device for its intended purpose.
Observe the procedures described in this user manual.
No claims of any kind will be accepted for damage or injury resulting from use of the device for other than its intended purpose.
The risk has to be borne solely by the owner of the device.
Copyright
This documentation is protected by copyright.
Any duplication or reprinting, in whole or in part as well as reproduction of any illustrations even in modified form is only permitted with the written approval of the manufacturer.
It is forbidden by law to copy, broadcast, display, transmit via cable, play back in public or hire out material protected by copyright without the consent of the copyright owner.
Unless otherwise indicated, all trademarks and logos mentioned are trademarks of Hama GmbH and are protected by law. Microsoft, Windows and the Windows logo are trademarks of Microsoft Corporation. All other product and company names are trademarks of their respective owners.
Safety
This device complies with the prescribed safety regulations. Improper use can however, result in personal injury and/or damage to the device.
Danger of electric shock
DANGER
Danger to life by electric shock!
Contact with live wires or components could lead to serious injury or even death!
Observe the following safety precautions to avoid electric shocks:
Do not use the device if the AC adapter, the adapter cable or ▶ mains plug are damaged.
Do not open the housing of the device. Danger of electric shock if live connections are touched and/or the electrical and mechanical configuration is changed.
Handling batteries
WARNING
Danger resulting from improper use!
Observe the following safety instructions to ensure safe handling of the batteries:
Do not throw batteries into a fire.
Do not short circuit the batteries.
Do not try to recharge the batteries.
Check batteries regularly. Leaking battery acid can cause ▶ permanent damage to the device. Particular care and attention is required when dealing with damaged or leaking batteries.
Danger of acid burning! Wear protective gloves.
Keep batteries out of the hands of children. If swallowed, consult a doctor immediately.
Remove the batteries from the remote control when the device is not to be used for a longer period of time.
Fundamental safety precautions
Observe the following safety instructions to ensure safe handling of the device:
Inspect the device for visible signs of damage before use. Do not use a damaged device.
Do not allow children to play with the device. ■
Persons who due to their physical, mental or motor response abilities are unable to operate the device may only use it under supervision or instruction by a responsible person.
Do not open the device. Unauthorised opening and repairs can lead to considerable danger for the user and cause serious damage to the device. Only allow qualified persons to carry out repairs. Improper repairs will void the warranty.
Repairs to the device during the warranty period may only be carried out by service centres authorised by the manufacturer otherwise the warranty will become void in the event of subsequent damage.
Defective parts may only be replaced with original spare parts. ■ Only original spare parts guarantee that the safety requirements are met.
Protect the device against humidity and penetration by liquids. If the device comes into contact with liquids, disconnect it from the power supply immediately.
Clean the housing of the device with a slightly dampened cloth. ■ Do not use any aggressive or abrasive cleaning agents or solvents.
Do pull on the power cable to remove the mains adapter from the ■ mains socket
Do not place any objects on the device. ■
Electronic devices are sensitive so avoid knocks and blows.
Disconnect the mains adapter from the mains socket in the event of faults or during thunderstorms.
Design and function
Front of the device

natural_image
Pure electrical circuit lines without any symbols① ON/OFF button and power indicators: switches the device on or off. Switching off the device. The power indicator lights up:
blue when the device is switched on and – red in standby mode. –
2 USB display: lights up when a USB device is connected.
3 Infrared remote control sensor: The remote control sensor receives signals from the remote control.
Back of the device

① DC IN: DC socket for connecting an AC adapter.
2 eSATA: for connecting an external hard disk with a SATA interface.
3 RJ45 LAN: LAN interface for connection of a local wired network.
4 HDMI: HDMI interface: high-definition multimedia interface for connection of an HD TV (high-definition TV) (picture and sound transmission).
⑤ Y/Pb/PR COMPONENT VIDEO OUT: component output/socket for connection of a television (picture transmission only).
6 A/V OUT: output for video, right and left audio channel.
⑦ 2 x USB Host (type A): two USB connecting USB devices (e.g., ext. hard disks, MP3 players or USB sticks) to the device.
8 S/PDIF OPTICAL: optical audio output for connecting a digital audio system or an audio link to an interfaced television.
Remote control
All functions of the device can be controlled using the remote control.
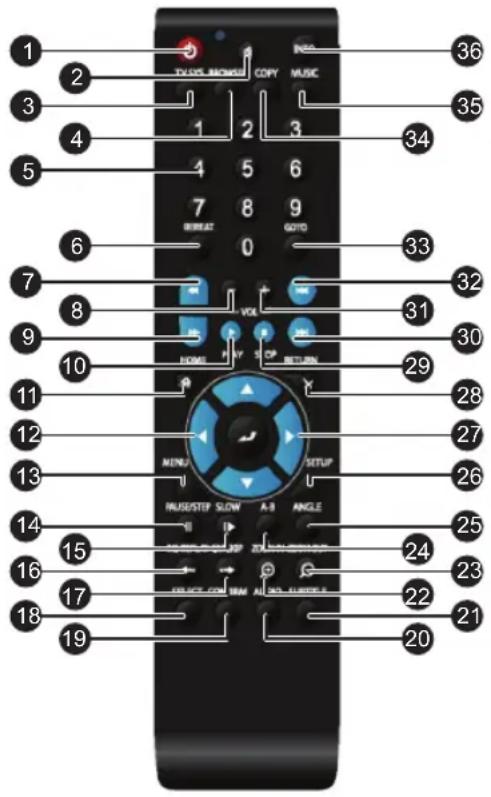 | 1 ON/OFF (Standby) |
| 2 Mute | |
| 3 TV SYS. | |
| 4 BROWSER | |
| 5 Numeric buttons | |
| 6 REPEAT | |
| 7 Fast rewind | |
| 8 VOL -: Reduce volume | |
| 9 Fast forward | |
| 10 PLAY: | |
| 11 HOME: Main menu | |
| 12 Navigation buttons | |
| 13 MENU | |
| 14 PAUSE/STEP | |
| 15 SLOW: | |
| 16 INS REPLAY: 10 seconds backwards | |
| 17 → CM SKIP: 30 seconds forward | |
| 18 SELECT | |
| 19 CONFIRM | |
| 20 AUDIO | |
| 21 SUBTITLE | |
| 22 ZOOM IN | |
| 23 ZOOM OUT | |
| 24 A-B | |
| 25 ANGLE: Camera angle | |
| 26 SETUP: Settings | |
| 27 ENTER: Confirm | |
| 28 Return | |
| 29 STOP | |
| 30 ▶I Next | |
| 31 VOL +: Increase volume | |
| 32 I Previous | |
| 33 GOTO | |
| 34 COPY | |
| 35 MUSIC | |
| 36 INFO: Info window |
Functions of the remote control buttons
| No. | Button Function | |
| 1 | ON/OFF(Standby) | ON/OFF switch (standby mode). |
| 2 | MUTE | Mute button. Press the button again to switch on the sound. |
| 3 | TV SYSTEM Select TV system/image definition(NTSC, PAL, 480P, 576P, 720P, 1080I or 1080P). | |
| 4 | BROWSER Browse music, photo and video files on all connected media and on the Internet. | |
| 5 | NUMERIC BUTTONS Enter channel number and other numerical values. | |
| 6 | REPEAT Select repeat option (1, all, random or OFF). | |
| 7 | FAST REWIND Rewind current playback. | |
| 8 | VOL- Reduce volume. | |
| 9 | FAST FORWARD Fast forward current playback. | |
| 10 | PLAY Start playback. | |
| 11 | HOME Display main menu. | |
| 12 | NAVIGATION BUT-TONS | Move cursor up, down, left and right within a menu. |
| 13 | MENU Display menu: | In the browser-menu – Re-name/delete files.Under My_Shortcuts in the NET option of the browser menu – Set up quick-start for the network access. |
| 14 | II PAUSE/STEP | Stop playback. Change to next single picture by pressing again. Return to normal playback by pressing the Play button. |
| 15 | I SLOW | Start slow motion playback. Return to normal playback by pressing the Play button. |
| 16 | ← INS REPLAY | Current playback is rewound back 10 seconds. Ideal for sport pro-grammes. |
| 17 | → CM SKIP | Current playback is rewound back 30 seconds. Ideal for finding spe-cific passages. |
| 18 | SELECT Select files. | |
| 19 | CONFIRM Confirm selection | |
| 20 | AUDIO Select audio track. | |
| 21 | SUBTITLE Set subtitle options. | |
| 22 | ∅ ZOOM IN | Increase image size. |
| 23 | ∅ ZOOM OUT | Decrease image size. |
| 24 | A-B Mark the start and end point of a section to be repeated. | |
| 25 | ANGLE Change the camera perspective during the playback of DVDs (with several camera perspectives). | |
| 26 | SETUP Display setup menu. | |
| 27 | ENTER Select options within a menu. | |
| 28 | × RETURN | Return to previous submenu. |
| 29 | ■ STOP Stop playback. | |
| 30 | ▶▶ NEXT Skip to the next title, chapter or file. | |
| 31 | VOL+ Increase volume. | |
| 32 | |◀◀ PREV | Skip to the previous title, chapter or file. |
| 33 | GOTO Skip to a particular point in the title (mark the point using title, chapter and time). | |
| 34 | COPY Open file copying menu. | |
| 35 | MUSIC Start music playback from a playlist. | |
| 36 | INFO Display or hide the information list during the playback. | |
Function overview
AV output
HDMI V1.3 for output of HD video and audio material ●
Optical S/PDIF connection for perfect audio output ●
Composite interface (yellow/white/red cinch socket) as analogue • AV interface and component video interface (YPbPr, green/blue/red cinch) as analogue video interface
Adjustable resolution (NTSC, PAL, 480p, 576p, 720p, 1080i, 1080p)
Multimedia playback
Via USB data media, external hard disk or network (RJ45 or ●
WLAN (optional))
Film playback: •
AVI/MKV/TS/TP/TRP/M2TS/MPG/MP4/M4V/MOV/VOB/ISO/IFO/
DAT/WMV/ASF/RM/RMVB/FLV
Audio playback: MP3/OGG/WMA/WAV/AAC/FLAC
Photo playback: HD JPEG/BMP/GIF/TIF/PNG ●
Network functions
Audio and video streaming via Ethernet (10M/100M) and wireless • LAN (optional) (802b/g/n)
File release via Samba server •
Audio and video streaming via UPnP media server ●
Internet radio •
Setup and connection
Safety precautions
DANGER
Persons may be injured or material damage may be caused when putting the device into operation!
Observe the following safety precautions to avoid the danger:
Never play with packaging material. Risk of suffocation.
Pay attention to all information on the requirements for the place of operation and the electrical connection of the device to avoid personal injury and material damage.
Unpacking
Unpack all parts of the device and the user manual.
- Remove all packing material and protective film from the device before using.
Checking contents and packaging
The device is supplied with the following components as standard:
Full HD media player •
Audio/video cables •
Y/Pb/Pr cable ●
Remote control •
2 type AA batteries (for remote control) •
AC adapter (AC/DC power adapter) •
User manual •
NOTE
Inspect the delivery for completeness and obvious signs of ▶ damage. Report incomplete or damaged items to your supplier/ retailer immediately.
Disposal of the packaging
The packaging protects the device against damage during transit. The packaging materials have been selected according to environmental and waste disposal aspects and can therefore be recycled.

Returning the packaging for recycling helps conserve raw materials and reduces waste. When no longer required, dispose of the packaging materials in accordance with the local regulations.
NOTE
If possible, keep the original packaging during the warranty period in order to be able to pack the device properly in the event of a warranty claim.
Requirements for the place of operation
For safe and trouble-free operation of the device, the place of operation must satisfy the following requirements:
■ The device must be set up on a solid, flat and horizontal surface.
The device is designed for operation within an ambient temperature range from +5 °C to +35 °C.
Do not use the device in a hot, wet or very humid environment. ■
Do not expose the device to direct sunlight. ■
Do not install the device in the vicinity of magnetic fields. ■
Make sure that there is sufficient space for ventilation. ■
The mains socket must be easily accessible and enable fast disconnection in the event of an emergency.
Electrical connection
For safe and trouble-free operation of the device, the following instructions on electrical connection must be observed:
The device is supplied with 5V DC voltage via the AC adapter ■ provided. Only use the AC adapter provided when connecting to the mains supply.
Before connecting the device, compare the connection data of the AC adapter (voltage and frequency) on the rating plate with those of your mains supply. This data must correspond in order to avoid damage to the device.
Make sure that the adapter cable does not come in contact with hot surfaces or sharp edges.
■ Make sure that the adapter cable is not stretched tightly or twisted.
Do not allow the adapter cable to hang over edges (danger of ■ tripping).
If the device is not to be used for a longer period of time, disconnect the AC adapter from the mains supply.
Mains connection
Plug the AC adapter into the DC IN socket on the back of the device.
Plug the AC adapter into a mains socket.

Additional connections
Connecting a USB mass storage device
(e.g., MP3 player, external USB storage disk, U disk, USB stick)
Switch on the device.
Connect a USB mass storage device (e.g., MP3 player, U disk, USB stick or USB storage disk) to one of the USB ports of the device.
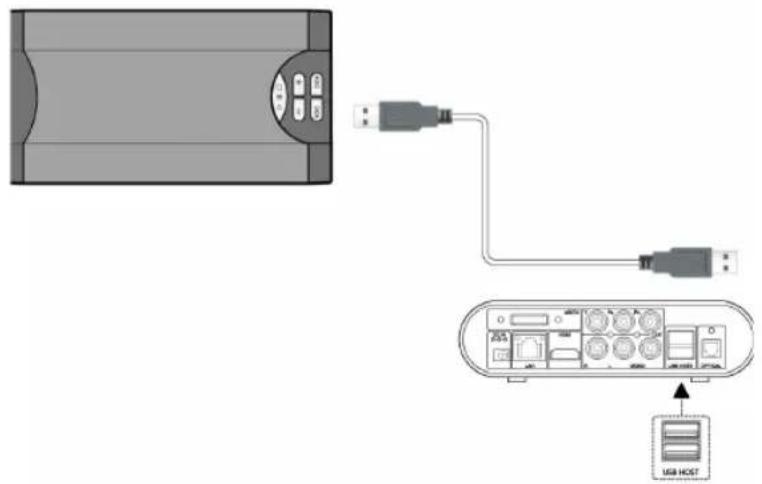
Connecting an external hard disk with the SATA interface
Switch on the device.
Connect the eSATA cable (not supplied as standard) to the eSATA connection on the device.
Connect the other end of the eSATA cable to an external hard disk.

Connecting to a television
A/V OUT: audio-video output
Insert the 3-coloured connectors (red/white/yellow) to the A/V OUT sockets (audio/video output) on the device as illustrated.
Insert the 3-coloured connectors directly into the A/V IN socket (audio-video input) or your television or use a Scart adapter (not supplied as standard). Connect the 3-coloured plugs to the Scart adapter and the Scart adapter to the Scart socket of the television.
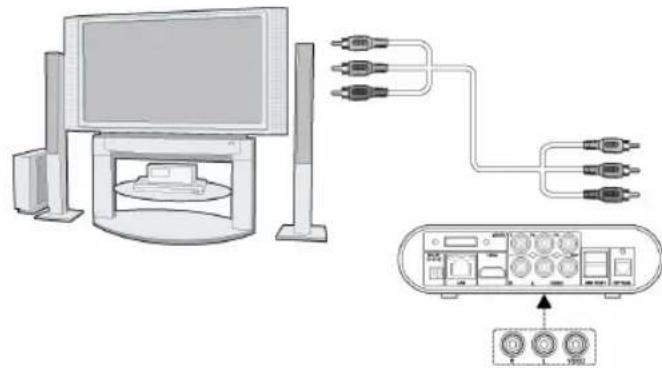
natural_image
Diagram showing a computer setup with connected cables and a control panel (no text or symbols visible)When connection has been established via the audio/video output, files from the device can be played back to the screen of the connected television or other video device.
Y/Pb/Pr COMPONENT OUT: component output
The component output Y/Pb/Pr transmits only video signals (picture). For audio transmission, must establish an additional audio connection between the device and the connected television.
Insert the 3-coloured connectors (red/blue/green) into the Y/Pb/ PR socket (component output) of the device as illustrated.
Insert the 3-coloured plugs into the Y/Pb/PR socket (component input) of your television as illustrated.
NOTE
You can use either the A/V OUT socket (red/white from the ▶ Audio-Video output) or the OPTICAL connection (optical Audio output) for sound transmission (audio signal).

natural_image
Diagram showing a computer connected to an analog oscilloscope via cable routing (no text or symbols present)After connection has been established via the component output Y/Pb/Pr, files from the device can be played back to the screen of the connected television or other video device.
HDMI OUT
The device is equipped with a high-definition multimedia interface (HDMI). HDMI is a high-speed digital interface, which transmits both non-compressed and high-definition video signals. All types of video signal can therefore be transmitted via this output. Sound, even in multi-channel mode, is also transmitted together with the video signals via the HDMI output. You therefore need no additional audio connection between the device and an HD television to transmit the sound. The HDMI output provides the best quality of transmission.
Insert one end of the HDMI cable into the HDMI socket on the device as illustrated.
Insert the other end of the HDMI cable into the HDMI socket of the HD television as illustrated.
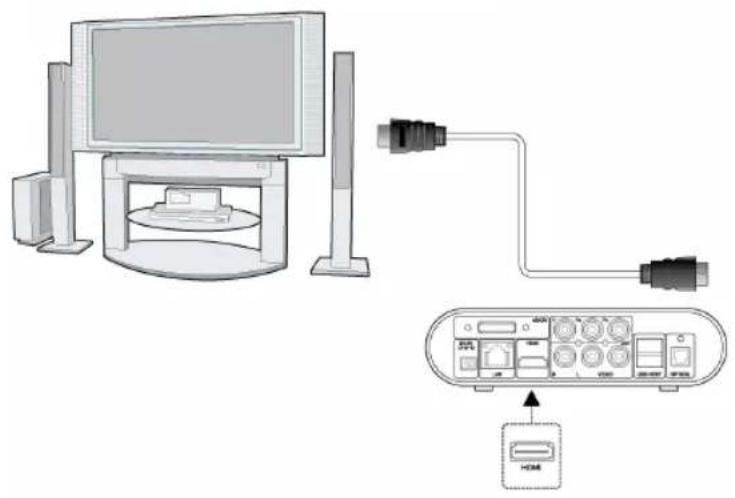
natural_image
Diagram showing a computer monitor connected to an attached device via cable, with a close-up of the device's internal components (no text or symbols visible)NOTE
The HDMI cable is an optional accessory and not supplied as standard.
Connecting to a digital audio system
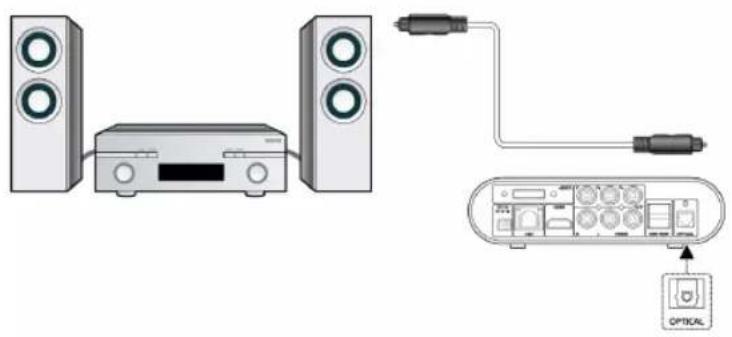
Insert the TOSLINK connector of the fibre optic cable into the OPTICAL socket of the device.
◆ Insert the other connector of the fibre optic cable into your digital-audio system.
natural_image
Diagram showing audio equipment connections including a CD, two speakers, and an optical device (no text or symbols present)This enables you to hear high-performance Dolby Digital, DTS or MPEG sound.
Further information on configuring can be found in the section "Changing audio settings".
NOTE
The fibre optic cable is not supplied as standard.
Connecting to a computer network
LAN connection: Local network
Connecting to a LAN computer network (Local Area Network) requires a network cable (Ethernet cable/twisted-pair cable) Cat5, Cat5e or Cat6.
NOTE
The network cable is not supplied as standard.
Connect the RJ45 plug of the network cable to the LAN interface of the device.
Connect the other end of the network cable to the LAN interface ◆ of your router, network hub or switch.

flowchart
graph TD
    A["Computer"] -->|Signal| B["HUB"]
    B --> C["Router"]
    C --> D["Switch"]
    style A fill:#f9f,stroke:#333
    style B fill:#ccf,stroke:#333
    style C fill:#cfc,stroke:#333
    style D fill:#fcc,stroke:#333
WLAN connection: Wireless local network
NOTE
A WLAN USB stick is required for operating the device via a ▶ WLAN . A WLAN USB stick is not supplied as standard.
Matching accessories can be obtained from specialist retailers or in Internet under www.hama.de.
Switch on the device.
Insert the WLAN USB stick to one of the USB ports (USB HOST) ◆ on the device.
Further information on the wireless setup can be found under "Configuring network settings" in the section "Setup menu".
Setting up
Inserting batteries into the remote control
Open the cover of the battery compartment on the back of the remote control.
Place the two AA batteries supplied into the battery compartment ◆ and pay attention to the correct polarity.
Replace the cover on the battery compartment.
NOTE
Change the batteries when the range of the remote control ▶ decreases or if the media player no longer reacts to all commands.
Switching the device ON and OFF
Switching on
After connecting to the DC IN socket and pressing the ON/OFF button on the front of the device, the main menu appears on the screen and the indicator lamp lights up blue.
NOTE
▶ Alternatively you can press the ⏻ ON/OFF (standby) button on the remote control to switch on the device.
Switching off
After pressing the ON/OFF button on the front of the device, the device switches to standby mode and the indicator lamp lights up red.
NOTE
▶ Alternatively you can press the ⏻ ON/OFF (standby) button on the remote control to switch the device to standby mode.
To switch off the device completely, remove the AC adapter ▶ from the mains socket.
Setting the menu language
You can select the language for displaying menu prompts in the setup menu (Settings). Select your preferred menu language. The selected language is immediately activated. Further information can be found in the section "Setup menu" under "Changing system settings" – "Change menu language".

Operation
All device settings can be accessed via the menus described below.
Opening the main menu and navigating
Switch on the device.
The main menu appears after a few seconds.
NOTE
▶ Alternatively you can also press the ⏻ HOME button on the remote control to open the main menu.
Use the ◀▶▼▲ navigation buttons to move within the menus.
■ Select the menu items with the ↗ Enter button.
Setup menu
You can configure language, audio, video, recording, network and system settings and adapt them to your requirements in the "Setup" settings menu.
Opening the setup menu and navigating
To open the settings menu, press the SETUP button on the remote control or use the ◀▶ navigation buttons to select the "Setup" menu within the main menu.
◆ Press the ◀▶ navigation buttons until the desired submenu is displayed in the selection box.
Press the ▼▲ navigation buttons to select the desired menu ◆ item (setting).
◆ Press the ↗ Enter button to move to the left-hand side of the menu with the corresponding setting values (setting options).
Press the ▼▲ navigation buttons to select the desired setting value (setting option).
◆ Press the ↗ Enter button to confirm the selection and activate the setting.
Changing audio settings
You can configure the playback for audio files in this menu.
Night mode
- Select the submenu "Audio" and the menu item "Night mode" as described in the section "Opening the setup menu and navigating".
The selected menu item with the corresponding setting values (setting options) appears on the screen.

You can activate audio compression or deactivate linear compression of the outgoing audio signal under the "Night mode" menu item. The following options are available here:
| On Select | this option if the audio signal is to be transmitted without amplification. This setting is particularly suitable if you wish to listen to music at night because the volume is relatively low. |
| Off Select | this setting if the audio signal is to be stronger.This setting is more suitable for music playback during the day because the volume is high. |
| Comfort | Select this option if the audio signal is to be transmitted according to user-defined settings. |
◆ Use the ▼▲ navigation buttons to select the desired setting value (desired setting option).
◆ Press the ☐ Enter button to confirm the selection and activate the setting.
Digital output
- Select the submenu "Audio" and the menu item "Digital output" as described in the section "Opening the setup menu and navigating".
The selected menu item with the corresponding setting values (setting options) appears on the screen.
You can select the desired option for the digital audio output under the menu item "Digital output". The following options are available here: HDMI LPCM, HDMI LPCM MULTI CH, HDMI RAW, SPDIF LPCM, SPDIF RAW.
◆ Use the ▼▲ navigation buttons to select the desired setting value (desired setting option).
◆ Press the ↗ Enter button to confirm the selection and activate the setting.
Changing video settings
You can configure the playback for video files in this menu.
Selecting the aspect ratio
- Select the submenu "Video" and the menu item "Aspect ratio" as described in the section "Opening the setup menu and navigating".
The selected menu item with the corresponding setting values (setting options) appears on the screen.

You can adapt the picture format of the outgoing video signal to the connected television under the menu item "Aspect ratio".
The following picture formats (picture aspect ratios) are available here:
| Pan Scan 4:3 | Display of a wide picture on the entire screen whereby unnecessary areas are cut out. Select this option if you have connected a television with a standard screen size (4:3). |
| Letter Box 4:3 | Display of a wide picture with two black bands at the top and bottom of the screen. Select this option if you have connected a television with the standard screen (4:3). |
| 16:916:10 | The picture is compressed and displayed as a full-screen picture. Select this setting if the device is connected to wide-screen television. If you select this option for a normal television, the picture will be distorted because of vertical compression. |
◆ Use the ▼▲ navigation buttons to select the desired picture format.
◆ Press the ☐ Enter button to confirm the selection and activate the setting.
Setting the zoom
- Select the submenu "Video" and the menu item "Zoom out" as described in section "Opening the setup menu and navigating".
The selected menu item appears on the screen.
◆ Use the ▼▲ navigation buttons to activate/deactivate this setting.
◆ Press the ↗ Enter button to confirm the selection.
Setting the brightness
- Select the submenu "Video" and the menu item "Brightness" as described in the section "Opening the setup menu and navigating".
The selected menu item appears on the screen.
◆ Use the ▼▲ navigation buttons to set the brightness.
The new settings are displayed on the screen.
◆ Press the ↗ Enter button to confirm the selection and activate the setting.
Setting the contrast
- Select the submenu "Video" and the menu item "Contrast" as described in the section "Opening the setup menu and navigating".
The selected menu item appears on the screen.
◆ Use the ▼▲ navigation buttons to set the contrast.
The new settings are displayed on the screen.
◆ Press the ↗ Enter button to confirm the selection and activate the setting.
Setting the tint
- Select the submenu "Video" and the menu item "Tint" as described in the section "Opening the setup menu and navigating".
The selected menu item appears on the screen.
◆ Use the ▼▲ navigation buttons to set the tint.
The new settings are displayed on the screen.
◆ Press the ☐ Enter button to confirm the selection and activate the setting.
Setting the colour saturation
- Select the submenu "Video" and the menu item "Colour saturation" as described in the section "Opening the setup menu and navigating".
The selected menu item appears on the screen.
◆ Use the ▼▲ navigation buttons to set the colour saturation.
The new settings are displayed on the screen.
◆ Press the ☐ Enter button to confirm the selection and activate the setting.
Setting the video system
- Select the submenu "Video" and the menu item "Video system" as described in the section "Opening the setup menu and navigating".
The selected menu item with the corresponding setting values (setting options) appears on the screen.
You can adapt the TV standard of the outgoing video signal (the colour transmission system) to the connected television under menu item "Video system". The following TV standards (systems for colour transmission) are available here: HDMI Auto, NTSC, PAL, 480p, 576p, 720p 50 Hz, 720p 60 Hz, 1080i 50 Hz, 1080i 60 Hz, 1080p 50 Hz, 1080p 60 Hz.
◆ Use the ▼▲ navigation buttons to select the desired TV standard.
◆ Press the ↗ Enter button to confirm the selection.
Activating 1080P 24 Hz mode
- Select the submenu "Video" and the menu item "1080p 24 Hz" as described in the section "Opening the setup menu and navigating".
The selected menu item appears on the screen.
◆ Use the ▼▲ navigation buttons to activate/deactivate this setting.
◆ Press the ↗ Enter button to confirm the selection.
Setting the screen size
You can set the screen size if the connected television under the menu item "Screen size".
- Select the submenu "Video" and the menu item "Screen size" as described in the section "Opening the setup menu and navigating".
The screen size is displayed on the screen with a frame.
◆ Use the ▼▲ navigation buttons to reduce or increase the picture height.
◆ Use the ◀▶ navigation buttons to reduce or increase the picture width.
◆ Press the ↗ Enter button to save the setting.
Activating gapless playback
This function must be activated for gapless playback of video files (only TS format) (the naming convention of the files must correspond to the pattern abc01.TS and abc02.TS etc.).
- Select the submenu "Video" and the menu item "Gapless playback" as described in the section "Opening the setup menu and navigating".
The selected menu item appears on the screen.
◆ Use the ▼▲ navigation buttons to activate/deactivate this setting.
◆ Press the ↗ Enter button to confirm the selection.
Configuring network settings
Before you start the network configuration, ensure that
the device is connected to a LAN (wire-bound local computer network) or to a WLAN (wireless local computer network).
The NetBIOS interface and the computer's TCP/IP network protocol are active.
- The firewall is inactive (switched off) or at least permits access to the device.
The GUEST account of your computer is active (enabled).
- The file folders you wish to browse on your computer are enabled, and
EVERYONE or GUEST has access rights to the folders.
LAN setup
- Select the submenu "Network" and the menu item "LAN setup" as described in the section "Opening the setup menu and navigating".
The selected menu item with the corresponding setting values (setting options) appears on the screen.

If you have selected the DHCP IP (AUTO) option, the IP address will be automatically set when a DHCP server is detected.
◆ Press the ↗ Enter button to confirm the IP address.
Fixed IP (manual)
If you have selected the Fix IP (manual) option, you must set the IP address manually. To do this, you must enter the following data: IP address, subnet mask, standard gateway, DNS server IP address.
◆ Use the ◀▶ navigation button and numeric keys to make the entries.
◆ Press the ↗ Enter button to confirm entry.
WLAN setup
Before you start the configuration of a WLAN network, check that
the WLAN USB adapter is connected to the USB HOST port on • the back of the device.
- The wireless router or the access point (AP) or your PC is fitted with a WLAN adapter or a WLAN card.
Your device is within range of the router.
- Select the submenu "Network" and the menu item "W-LAN setup" as described in the section "Opening the setup menu and navigating".
The selected menu item with the corresponding setting values (setting options) appears on the screen.
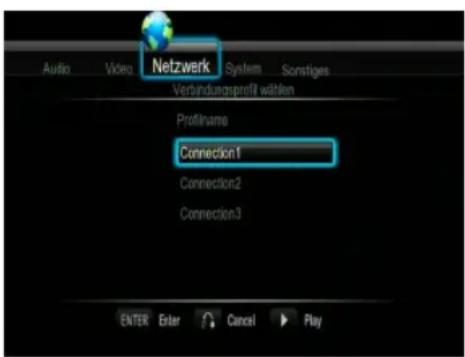
The device can store up to three wireless network connections.
■ Press the ↗ Enter button to proceed to the next step.
■ Press the ✗ RETURN key to cancel the setting.
■ Press the ▶ PLAY-Taste to test the connection.
Three types of connections (access) are available to you: Infrastructure (AP), Peer to Peer (Ad Hoc) and WPS(AP): direct connection to the router.

Select one of the connections and confirm your selection with the Enter button.
Infrastructure (AP): Infrastructure access
In Infrastructure mode, computers with WLAN network adapters, also known as WLAN clients, are connected to an existing network using a WLAN router or access point.
Configuring the network name (SSID)

Each WLAN network has a configurable network name (network identifier) or "SSID" (Service Set Identifier) in order to be able to uniquely identify the wireless network.
■ Press the ↗ Enter button to proceed to the next step.
■ Press the ✗ RETURN key to cancel the setting.
Press the Goto button to refresh the SSID list.
The abbreviations in the column SECURITY of the SSID list have the following meaning:
WEP (Wired Equivalent Privacy) and WPA (Wi-Fi Protected – Access) indicate that a network is encrypted and that a password is necessary in order to access the network.
NONE indicates that a network is freely accessible (non-encrypted).
Enter a WEP/WPA password
![Audio Video Netzwerk System Sonstiges WPA Key 122333 1 2 3 4 5 OK 6 7 8 9 0 q w e r t CAPS y u i o p a s d f g <- k j k l - z x c v b -> n m / \ _ ' = l ] ? shift - - - -](/content/2026/05/778308/images/321fb15adb30a98471a5e6e38684bab833fdf7cfa5efdb6dbd9391abbf5c015f.jpg)
The password or code can be entered using the virtual keyboard.
Use the ◀▶▼▲ navigation buttons to make your selection. ■
Press the ↗ Enter button to enter.
Press "CAPS" to switch between capital and small letters.
- Press "<-" to delete a character and "-->" to insert a space.
Press "Shift" to make more symbols available.
Confirm entry with "OK".
Test connection

The test procedure takes some time. After successful completion of the test, all network data (profile name, IP address, subnet mask, gateway, etc.) are displayed on the screen.
Peer-to-peer (ad hoc): Configuring a computer-to-computer connection
The peer-to-peer mode/access (ad hoc connection) is used to connect computers with a WLAN adapter, so-called "WLAN clients", without the use of a wireless router or wireless access point (AP).

■ Press the ↗ Enter button to proceed to the next step.
■ Press the ✗ RETURN key to cancel the setting.
■ Press the ▶II PLAY/PAUSE button to test the connection.
WPS(AP): configuring a direct connection to the router
In WPS(AP) mode, computers with WLAN network adapters, also known as WLAN clients, are connected to an existing network using a WLAN router or access point. Entering the network name and password is not necessary. The router or access point must support WPS(AP) mode.
Two options are available:
PBC (connecting by pressing a button)
Activate the WPS mode on your router or access point. Pay attention to the instructions in the user manual of the router.
- Press the ↗ Enter button to proceed to the next step.
■ Press the ✗ RETURN key to cancel the setting.
PIN (connecting after entering a PIN)
Enter the PIN displayed into the router. Pay attention to the instructions in the user manual of the router.
■ Press the ↗ Enter button to proceed to the next step.
■ Press the ✗ RETURN key to cancel the setting.
PPPoE setting
If the device is not to be operated via a network but instead via a DSL modem connected to a separate DSL line, you must make the corresponding setting in this window.
- Select the submenu "Network" and the menu item "LAN setup" as described in the section "Opening the setup menu and navigating".
The selected menu item appears on the screen.
The following entries must be made:
| Input field Comments | |
| ADSL user Enter your user name here. | |
| ADSL password Enter password. |
NOTE
User name and ID are provided by your DSL provider.
Entering is carried out via the virtual keyboard.
Refer to the section Entering the WEP-/WPA key for using the virtual keyboard.
Activating NAS mode
You can activate the NAS function in this menu. When the NAS function is activated, you can access storage media (USB, eSATA) connected via the network.
- Select the submenu "Network" and the menu item "NAS mode" as described in the section "Opening the setup menu and navigating".
The selected menu item appears on the screen.
◆ Use the ▼▲ navigation buttons to activate/deactivate this setting.
◆ Press the ↗ Enter button to confirm the selection.
Entering the Host name
You can enter the designation under this menu item which is used for accessing the deice within a network when the NAS function is activated.
- Select the submenu "Network" and the menu item "Host name" as described in the section "Opening the setup menu and navigating".
The virtual keyboard appears on the screen.
Refer to the section Entering the WEP-/WPA key for using the virtual keyboard.
Changing system settings
You can configure the system settings in this menu.

Changing the menu language
You can select your preferred language for the screen menus (OSD) and set it as default language under the menu item "Menu language".
- Select the submenu "System" and the menu item "Menu language" as described in the section "Opening the setup menu and navigating".
The selected menu item with the available menu languages appears on the screen.
◆ Use the ▼▲ navigation buttons to select your preferred menu language.
◆ Press the ↗ Enter button to confirm the selection.
Changing the text encryption setting
You can select your alphabet (character system) and set it as the default under the menu item "Text encryption".
- Select the submenu "System" and the menu item "Text encryption" as described in the section "Opening the setup menu and navigating".
The selected menu item with the available character systems appears on the screen.
◆ Use the ▼▲ navigation buttons to select your preferred alphabet (character system).
◆ Press the ↗ Enter button to confirm the selection.
Upgrading the system
- Select the submenu "System" and the menu item "System update" as described in the section "Opening the setup menu and navigating".
The selected menu item with the available update possibilities appears on the screen.
■ Select "System update" to update the firmware via a USB stick.
Copy the file "install.img" to the main directory of the USB – stick and then connect the stick to the USB port of the device.
Confirm the selection with the ↗ Enter button.
HDD formatting
You can format a hard disk connected to the eSATA interface under the menu item "HDD Format"
NOTE
All data saved on the hard disk is deleted during formatting.
- Select the sub-menu "System" and the menu item "HDD format" as described in chapter "Opening setup menu and navigation".
The selected menu item appears on the screen.
Use the ▼▲ navigation buttons to select the menu item "External HDD" for formatting the hard disk or the menu item "Cancel" to cancel the procedure.
◆ Confirm the selection with the Enter button.
Confirm formatting with the Enter button. A confirmation message appears on the screen with the warning that formatting will irreversibly delete all the data on the hard disk.
◆ Select the button "OK" using the ◀▶ navigation buttons if you wish to continue with formatting the hard disk, or the "Cancel" button if you do not wish to carry out formatting.
◆ Confirm the selection with the Enter button.
Formatting takes a few minutes. When formatting has been successfully completed, a corresponding message appears on the screen.
◆ Press the ↗ Enter button to quit the formatting menu and return to the main menu.
You can now use the hard disk normally.
System information
- Select the submenu "System" and the menu item "System info" as described in the section "Opening the setup menu and navigating".
System information such as the firmware version, HDD information, Mac address, etc. is displayed under the "System info" menu item.
Restore works settings
You can restore the works settings of your device and therefore delete (reset) all subsequent changes under this menu item.
- Select the submenu "System" and the menu item "Works settings" as described in the section "Opening the setup menu and navigating".
The selected menu item appears on the screen.
◆ Use the ▼▲ navigation buttons to select "OK" and restore the works settings or "Cancel" to cancel the procedure.
◆ Press the ☐ Enter button to confirm the selection and to restore the works settings.
Miscellaneous
You can make various settings under this menu item.
- Select the submenu "Miscellaneous" as described in the section "Opening the setup menu and navigating".
The selected submenu appears on the screen.

The following menu items are available:
Resume playback
Activate the function if you wish to resume the playback of videos from the point at which it was stopped (automatic bookmark).
◆ Use the ▼▲ navigation buttons to activate/deactivate the function.
◆ Confirm the selection with the Enter button.
Slide show timing
Here you can set the time intervals between slides in a slide show.
◆ Use the ▼▲ navigation buttons to set the time.
◆ Confirm the selection with the Enter button.
Transition effect
Here you can set the transition effects between images in a slide show.
◆ Use the ▼▲ navigation buttons set the desired transition effect.
◆ Confirm the selection with the ▶ Enter button.
Ken Burns
The Ken Burns effect enables gradual zooming in during playback of photos.
◆ Use the ▼▲ navigation buttons to activate/deactivate the function.
◆ Confirm the selection with the Enter button.
Background music
Here you can set the options for the background music during the display of pictures. Choose between "OFF", "Folder" or "Playlist".
◆ Use the ▼▲ navigation buttons to select the desired option.
◆ Confirm the selection with the Enter button.
Screen saver
Here you can activate/deactivate the screen saver.
◆ Use the ▼▲ navigation buttons to activate/deactivate the screen saver.
◆ Confirm the selection with the Enter button.
Film preview
Here you can activate/deactivate the video preview in the browser menu.
◆ Use the ▼▲ navigation buttons to switch the video preview on/off.
◆ Confirm the selection with the Enter button.
Toggle subtitles on/off
You can switch the display of subtitles (if present) during playback of video files on/off here.
◆ Use the ▼▲ navigation buttons to switch the switch the display of subtitles on/off.
◆ Confirm the selection with the Enter button.
Record audio device
You can determine here which storage device audio data from the Internet is to be recorded to.
◆ Use the ▼▲ navigation buttons to select the desired setting.
The following settings options are available:
External HDD: hard disk connected to the eSATA interface –
USB: storage device connected to the USB port.
◆ Confirm the selection with the Enter button.
Browser menu
In the browser menu you can browse and play back the music, photo and video files on the hard disk of the device, on the interfaced interchangeable storage devices (USB device, eSATA hard disk), in the network (Internet), on a UPnP server or in a play list.
Opening the browser menu and navigating
To open the menu, press either the BROWSER button on the remote control or use the ◀▶ navigation buttons to select the "Browser" within the main menu.

◆ Use the ▼▲ navigation buttons to select the media for storing the desired files. You can select one of the available media:
| USB Connected USB device |
| External HDD Connected eSATA hard disk |
| Network Network (Internet) |
| UPNP Connected UPnP device |
| Playlist Existing playlist ( playback list) |
The following buttons and functions of the remote control are available in this mode.
| Button Function | |
| ▼▲ Navigation button | Move the cursor up or down to select devices, folders or files. |
| ◀▶ Navigation buttons | Select a filter option: All, music, photos and videos. |
| I◀◀ PREV▶▶I NEXT | Go to previous/next page. |
| Enter Open or confirm the selected option. | |
| × RETURN | Return to previous menu. |
Browsing all files
◆ Use the ◀▶ navigation buttons to select the menu item "All" (All files) in the upper menu bar.
A file directory listing all the available files (with files in all supported formats) on the selected medium is displayed on the screen.

◆ Press the ▼▲ navigation buttons to select the desired directory, the desired file folder or the desired file.
◆ Press the ↗ Enter button to open the selected folder or to play back the selected file.
NOTE
Further information on the supported formats can be found in the section "Technical data".
Music titles may possibly not be played back continuously with the filter setting "All". Select the filter "Music" instead.
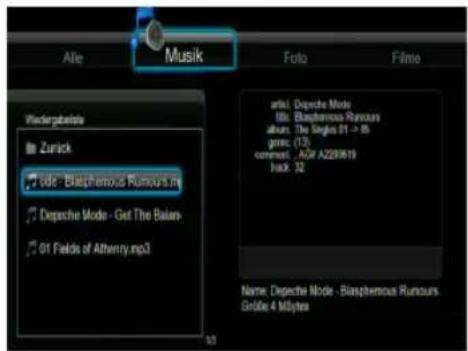
Browsing music files
◆ Use the ◀▶ navigation buttons to select the menu item "Music" (music files) in the upper menu bar.
A file directory listing all the available music files on the selected medium is displayed on the screen.
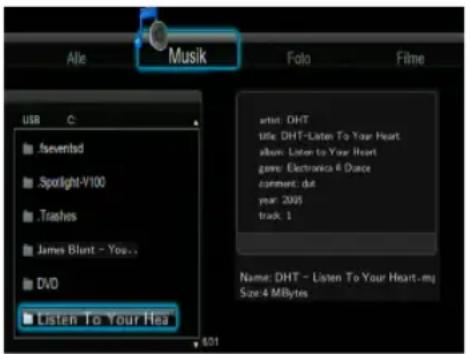
◆ Press the ▼▲ navigation buttons to select the desired directory, the desired file folder or the desired music file.
◆ Press the ↗ Enter button to open the selected folder or to play back the selected music file.
The following buttons and functions are available during music play-back:
| Button Function | |
| ▶ PLAY Start playback. | |
| II PAUSE/STEP Interrupt playback | |
| ◀◀Fast Rewind▶▶Fast Forward | Wind forward/back. Select the speed by pressing the button repeatedly. |
| REPEAT Repeat settings: 1, All and Random. | |
| INFO Display/hide information list during play-back. | |
| ■ STOP Stop playback. | |
| ← INS REPLAY | Current playback is rewound back 10 seconds. |
| → CM SKIP | Current playback is fast forwarded 30 seconds. |
Browsing photo files
◆ Use the ◀▶ navigation buttons to select the menu item "Photos" (photo files) in the upper menu bar.
A file directory with all the available photo files on the selected medium is displayed on the screen.
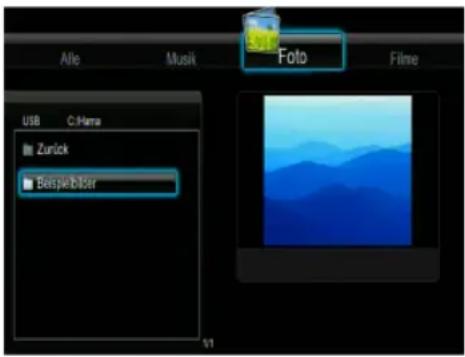
◆ Press the ▼▲ navigation buttons to select the desired directory, the desired file folder or the desired photo file.
◆ Press the ↗ Enter button to open the selected folder or to play back the selected photo file (to display the selected photo on the screen).
The following buttons and functions are available during photo play-back:
| Button Function | |
| ▶PLAY Start playback. | |
| I◀◀ PREV▶▶I NEXT | Display previous or next photo. |
| ◀▶ Navigation buttons | Rotate photo. |
| ○ ZOOM | Zoom picture (increase/decrease size). |
| ■ STOP Stop playback. |
You can also play back photos as a slide show with background music.
First start the music playback. ■
Then open your desired photo folder. ■
If the slide show is activated, it starts automatically after you press the Enter button.
NOTE
▶ Further information can be found under "Slide show timing", "Transition effect" and "Background music" in the section "Setup menu – Miscellaneous".
Browsing video files
Use the ◀▶ navigation buttons to select the menu item "Films" (video files) in the upper menu bar.
A file directory listing all available video files on the selected medium is displayed on the screen.
![Allo Music Foto Filme USB C:\DVD\DEO.TS Zurück -09-07, LA, VS, NO, K [CHD]01-13-08... [CHD]01-14-08.L.. [CHD]01-17-08.P.. [CHD]01-23-08.L.. 00:00:17 / 00:02:26 Name: [CHD]01-09-07, LA, VS, NO, K Size: 273 MBytes](/content/2026/05/778308/images/f6985693c66ed63aff8a404372958df350d6aa295a3c502c3df4aa5079b4964c.jpg)
◆ Press the ▼▲ navigation buttons to select the desired directory, the desired file folder or the desired video file.
◆ Press the ↗ Enter button to open the selected folder or to play back the selected video file.
The selected video film (the selected film) is played back on the screen (in full-screen mode).
The following buttons and functions are available during the video playback:
| Button Function | |
| ▶ PLAY Start playback. | |
| II PAUSE/STEP Interrupt playback/Single frame playback | |
| I▶SLOW Slow motion playback. Set the speed by pressing the button repeatedly. | |
| ◀◀Fast Rewind▶▶Fast Forward | Wind forward/back. Set the speed by pressing the button repeatedly. |
| I◀◀PREV▶▶I NEXT | Play back previous or next film. |
| REPEAT Repeat settings: 1, All and OFF. | |
| ○ZOOM | Zoom picture (increase/decrease size). |
| INFO Display/hide information list during playback. | |
| GOTO Displays the playback search menu. | |
| A-B Mark the start and end point of a section to be repeated. | |
| ANGLE Change the camera perspective during play-back of DVDs (with several camera perspectives). | |
| MENU Return to the main menu during the DVD playback. | |
| AUDIO Change the audio track during playback of DivX videos or DVDs with several audio tracks. | |
| SUBTITLE Subtitle options. Change the text encryption and size/colour/time delay of subtitles. | |
| ■ STOP Stop playback. | |
| ← INS REPLAY | Current playback is rewound back 10 seconds. |
| → CM SKIP | Current playback is fast forwarded 30 seconds. |
Audio and video streaming via a network
You can easily play back shared multimedia files that are stored on a LAN or WLAN network.
NOTE
Before starting playback of multimedia files from the LAN or ▶ WLAN network, please read the section "Setup menu – Configure network settings" and check whether all settings of your LAN or WLAN network are correct.
Select "NET" in the browser menu as the medium where you wish to browse the multimedia files.
There are two ways of finding the shared multimedia files on a ◆ LAN or WLAN network. You can browse the work group to which your computer belongs or use the menu item "My_Shortcuts".

Browsing the work group
You can select the computer's work group from the group list.
◆ To do this, use the ▼▲ navigation buttons to select the name of your computer and press the Enter button to confirm the selection.

Then select the multimedia files you wish to browse, e.g. under menu item "Films".
NOTE
If you browse video files with high definition (definition up to 720p/1080i/1080p) in the LAN or WLAN network, there can be delays during the transfer to the device as the files are buffered. This is due to the limited network speed or signal strength and is quite normal.
Under certain network conditions, it is possible that a work group is not accessible or does not appear in the list. In such situations, you can use the possibility "My_Shortcuts" to browse the shared files.
Browsing "My\_Shortcuts"
Set up a "Specific file server IP" which you can access from the menu item "My_Shortcuts".
Press the MENU button to open a context menu.

◆ To open a further context menu, use the ▼▲ navigation buttons to select the menu item "Add" and confirm the selection with the Enter button.
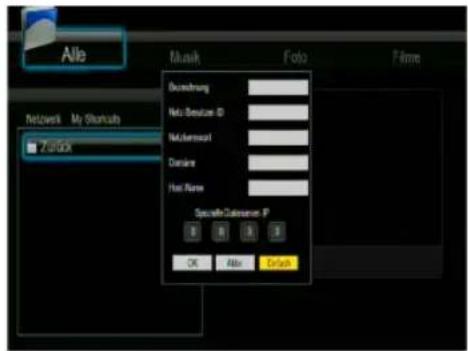
To browse files within the network ("NET" option) with the help of the "My_Shortcuts" function, select and configure the following settings: Designation, Network user ID, Network name, Domain, Host Name (computer name) and Specific file server IP.
Press "OK" to confirm. ■
Press "Cancel to exit."
- Press "Simple/Detail" to switch between simple and extended settings.
- Select the menu item "Shortcut" that you have added and press the ▲Enter button to confirm the menu item.

Then select the multimedia files you wish to browse.
Audio and video streaming via UPnP server
The system has an internal UPnP (Universal Plug and Play) client that enables the device to automatically detect UPnP media servers in the network. You can browse the media files on these servers and stream them continuously.
Installing a UPnP media server on your computer
There are numerous freely and commercially available UPnP server software programmes such as Windows Media Connect, Windows Media Player 11, XBMC Media Center (Linux/MAC/Windows) MediaTek (Linux), etc. Install the desired software onto your computer. As an example, Windows Media Player 11 on Microsoft® Windows XP® SP2 is explained in the following sections.
Enabling media on your computer
With the help of the media enable function of Windows Media Player 11, you have access to the contents of your Windows Media Player library from anywhere in your house.
Start Windows Media Player 11.
- Click Media library -> Add to Media library -> Advanced options to add or remove media data to the library.
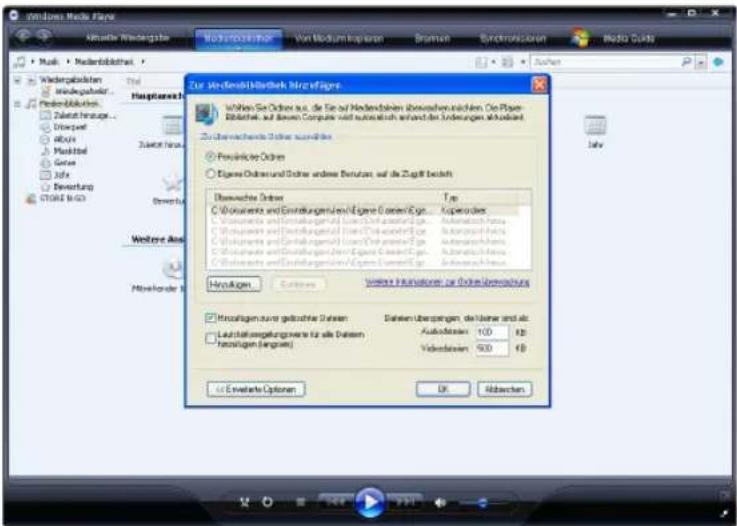
◆ Click media library -> Enable media.
You can now enable or disable device access to the media library.
To enable your device, click ◆ Enable
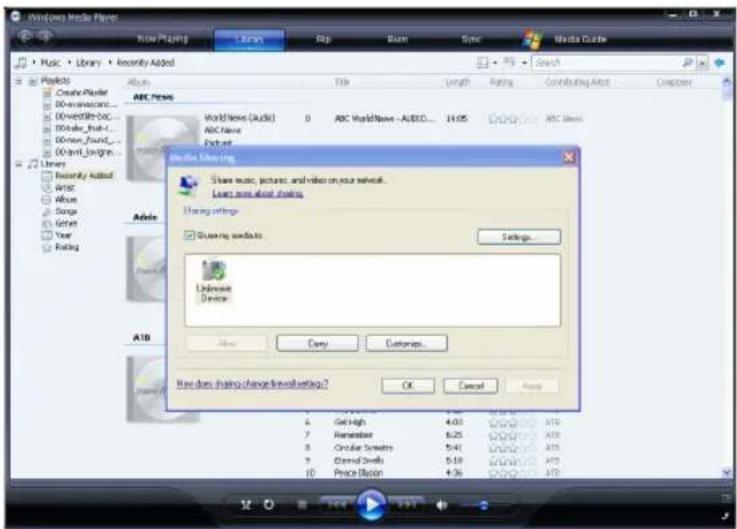
Media streaming on your device
Connect your device to the home network (LAN or WLAN).
◆ Open the browser menu as described in the section "Opening browser menu and navigation".
◆ Use the ▼▲ navigation buttons to select the "UPnP Server" and press the Enter button to confirm the selection.
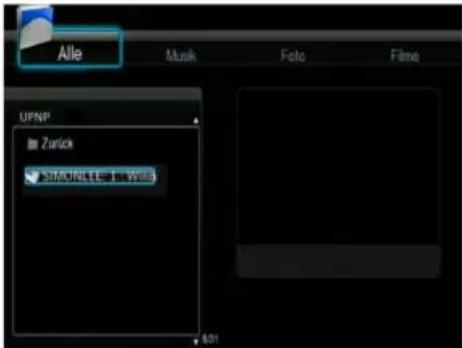
Now browse the media library shared by Windows Media Player 11.

NOTE
Ensure that your device and your computer are in the same local network and same subnet.
Firewalls can block communication between your device and the computer. Open the connections manually and add your device to the "reliable" list or deactivate the firewall temporarily.
Renaming/deleting files or folders
Press the MENU button in the browser menu to rename or delete files or folders.
A context menu is displayed.

◆ Use the ▼▲ navigation buttons to select "Back", "Rename" or "Delete".
◆ Confirm the selection with the ▶ Enter button.
Managing your playlist
This device supports the playlist function. This function allows you to add content on a connected eSATA hard disk as favourites to a "Playlist" (all, music, photos and films) before browsing or playing back.
Adding files to the playlist
Select the file you wish to add to the playlist as a favourite.
◆ Press the SELECT button to add a check mark to the file.
◆ Press the CONFIRM button.
The "Add selected file(s) to the playlist" message appears on the screen. It is possible to select more than one file.


Browsing your playlist
◆ Open the browser menu as described in the section "Opening browser menu and navigation".
◆ Use the ▼▲ navigation buttons to select "Playlist" and press the ▼ Enter button to confirm the selection.
◆ Use the ▼▲ navigation buttons to select "All", "Music", "Photo" or "Films".
◆ Confirm the selection with the ↗ Enter button.
The playlist is opened.
◆ Press the SELECT button to select a file for deletion from the playlist
◆ Press the CONFIRM button to confirm deletion.
File Copy (copying files)
You can copy and move files and folders between removable storage devices (USB dongle, USB hard disks, eSATA hard disk) and the network under the menu item "File Copy".
To open the menu, press either the COPY button on the remote control or use the navigation buttons to select the menu "File Copy" within the main menu.

The following buttons and functions are available in the "File Copy" menu:
| Button Function | |
| ▼▲ Navigation buttons | Move the cursor up or down to select devices or folders. |
| ► Navigation button Move to the next step. | |
| ◄ Navigation button One step backwards. | |
| SELECT Select folders or files (or reset selection). (The selected options are checked). | |
| ■ STOP Delete all selections. | |
| Enter Confirm the selected options. | |
To copy/move folders/files between devices, proceed as follows.
◆ Use the ▼▲ navigation buttons to select the source medium for copying files and the target medium for storing the files to be copied.
◆ Press the ◀ navigation button to cancel the selection. Press the ▶ navigation button to select the next step.
- Select (mark) the source files you wish to copy using the SELECT button.
◆ Press the SELECT button to cancel selection. Press the ▶ navigation button to select the next step.
◆ Use the ▼▲ navigation buttons to select the target folder in which the copied files are to be stored.
◆ Press the ◀ navigation button to cancel the selection. Press the ▶ navigation button to select the next step.
◆ Use the ▼▲ navigation buttons to select of one of the options "Copy" or "Move" and press the Enter button.
◆ Press the ▼▲ navigation buttons, select "Yes" and then press the ▲Enter button to start the copying process.
Select "No" to cancel the copying process ◆
Internet radio
The device contains a function that enables you to listen to Internet radio streams via the SHOUTcast network. In addition, the application permits the recording of individual streams as MP3 files. An external storage device must be connected to the device for this
◆ To open the menu, use the ◀▶ navigation buttons to select the "Internet Radio" menu within the main menu.
NOTE
Ensure that the device is correctly connected to the LAN or ▶ WLAN with Internet access. Further information can be found in the section "Setup menu" under "Configuring network settings".
When the Internet radio menu is opened for the first time, it will take a few seconds for the data to be downloaded from the Internet. Please be patient.
Further information on SHOUTcast can be found on the website: www.shoutcast.com.
The following buttons and functions are available in the "Internet Radio" menu:
| Button Function | |
| ▼▲ Navigation buttons | Move the cursor up or down to select radio or television stations and music genres. |
| I◄◄ PREV►►I NEXT | Go to previous/next page. |
| Enter Open or confirm | the selected option. |
| MENU Add a marked radio station to or delete a marked radio station from your Favourites list. | |
| ►II PLAY Start playback | after selecting a station. |
| REC Start recording. | |
| ■ STOP Stop playback/recording. | |
| × RETURN | Return to previous menu. |
| AUDIO Start recording. | The target drive must be stated in the settings first.Files are stored in the "REC" folder.If this does not exist, it is created automatically. |
| ■ STOP Stop recording. | |
Stations
All downloaded stations are listed here.
Genre
Here you can browse the stations according to music genre, e.g. pop, rock, jazz, etc.
Favourites
Here you can save your favourite stations.
Press the MENU button to add or delete stations from your Favourites.
Search
Here you can search for a specific station.
◆ Use the ▼▲ navigation buttons to select the menu item "Search".
A virtual keyboard appears on the screen. Enter the name of the desired station.
Use the ◀▶▼▲ navigation buttons to make your selection. ■
Press the ↗ Enter button for entry.
Press "CAPS" to switch between capital and small letters.
- Press "<-" to delete a character and "-->" to insert a space.
Press "Shift" to make more symbols available.
Confirm entry with "OK".
The system searches for your desired station.
NAS function
Your device can be used as an NAS (Network Attached Storage) device. You can connect the device to your home network via the LAN or WLAN. In this way it is possible save large volumes of data on a home computer at low cost. In addition, you can access the stored data quickly and conveniently.
After you have connected the device to a LAN or WLAN correctly and the network is ready for use, enter \Host name or \IP address into the "Run" window that you can open in the Windows start menu. Alternatively you can enter \Host name or \IP address into the address field of Internet Explorer on your computer. For example, if the IP address of your device is 192.168.0.9 and the Host name is HAMA, enter \192.168.0.9 or \HAMA and click the "OK" button or press the Enter button.
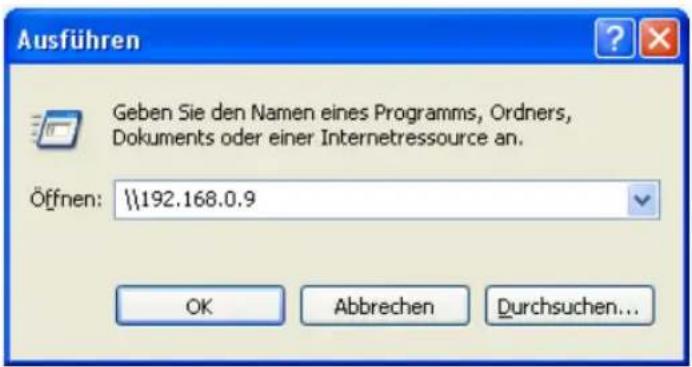
Under Windows Vista and Windows 7, please enter: \192.168.0.9 in the search field and then press the Enter key on the keyboard.

You can then view and edit the files stored on the hard disk of the device. In this way it is also possible to play back the files using the network or to copy files between the PC and the device.
NOTE
▶ Ensure that the "NAS" function is activated in the setup menu.
Upgrading the firmware
The firmware is installed on the device as an operating system (OS). A firmware upgrade means that new elements, improvements and bug-fixes are added to the existing operating system.
To install a new firmware version, proceed as follows:
◆ Copy the file 'install.img' or the expansion files to the main directory of the USB stick, then connect the stick to the USB port of the device.
Switch off the device by pressing the ON/OFF button and remove the power cable of the mains adapter from the DC IN socket on the back of the device.
Keep the ON/OFF button on the front of the device pressed; do not release it.
Insert the power cable into the DC IN socket and wait 15 seconds or longer. Then release the ON/OFF button.
The firmware is installed. Information on another method of installation can be found under "Changing system settings – Upgrading the system" in the section "Setup menu".
NOTE
New firmware versions can be found at www.hama.com
Troubleshooting
Troubleshooting chart
Before sending the device to after-sales service, using the following table to check whether you can remedy the problem yourself.
| Fault Possible cause Remedy | ||
| Power indicator does not light up | Power adapter not properly connected | Make sure the power adapter is plugged into the mains socket and connected to the device. |
| No voltage from the mains socket | Check the fuses. | |
| Device is defective. | Contact after-sales service. | |
| Remote control does not work | Pointing the wrong way | The remote control is not pointing towards the device. |
| Too far away | Ensure that the remote control is not too far away from the device. | |
| Batteries discharged | Change the batteries in the remote control; pay attention to correct polarity when inserting the new batteries! | |
| No picture appears on the TV screen | Cable not connected correctly | Ensure that the interface cable is properly connected to the correct output of the device and the correct input of the television. |
| Wrong input signal selected for the television | Adjust your television to the correct AV input. | |
| No sound can be heard | Device switched to mute | Press the MUTE button on the remote control to cancel the mute setting. |
| No audio connection with component video | Ensure that an additional audio connection has been made. | |
| No colour is displayed | Wrong TV norm selected | Set the correct TV norm (PAL/NTSC) in the setup menu. |
| Wrong colour settings on the television | Correct the colour setting on the television. | |
Frequently asked questions (FAQs)
Question 1. When I want to disconnect the USB device, the message "The device 'Generic data medium' cannot be disconnected at present.
Answer:
Close all programs including Windows® Explorer that may be accessing data on the device. If this does not help, please close all the programs and wait another 20 seconds; then try to disconnect the USB device again by clicking the green arrow. If that still does not help, switch off the device and then disconnect the USB cable.
Question 2. File and folder names exist that I have not created, or the names are some strange gibberish.
Answer:
The file allocation table (FAT) of the device has most probably been corrupted. This can occur if the device is disconnected while reading or writing from/to your computer via USB cable. Windows and Macintosh often write separate files, such as finder.def or "Data medium information of the system" onto the hard disk. These are normal files and do not indicate that anything is wrong with your device.
Question 3. My data has disappeared from the device.
Answer:
make sure that you are using the correct browser mode to browse your files, i.e. using the correct filter: e.g. photos, music or films.
Question 4. Why does the television have a briefly flashing blue screen or screen saver during operation?
Answer:
This is normal during initialisation of the system. It creates the corresponding parameters so that it can transmit the correct video signals to the television. If the television receives incorrect signals during initialisation or the signals are not stable and flickering occurs on the screen, some televisions regard this situation as no signal, resulting in the display of the blue screen or the screen saver.
Question 5: Why does the Television have a totally bad picture when I switch over to Y/Pb/Pr 480p, 576p, 720p, 1080i, or 1080p?
Answer:
Please check whether your television supports the Y/Pb/Pr 480p, 576p, 720p, 1080i, and 1080p formats. If not, please use the A/V signal display instead. Press the TV-SYSTEM button on the remote control and switch the video input of the television to NTSC or PAL.
Question 6. Why is there no sound during the playback of films or music via the Y/Pb/Pr component output?
Answer:
Y/Pb/Pr is a pure video output, it contains no audio signals. When using the Y/Pb/Pr output, connect the A/V OUT port or the S/PDIF socket to the audio output.
Question 7. The SSID names do not appear on the display; "SSID not available!!" is displayed constantly.
Answer:
When the WLAN USB adapter is connected to the device, it takes a short time for the initialisation. Please wait 1 or 2 minutes and then try to refresh the SSID list again.
Question 8. I can see no shared files on my computer via the path Browser -> Network menu.
Answer:
Please check the following:
Connect the device to a network and then assign the IP address.
Activate NetBIOS of TCP/IP on your computer. –
Check the firewall settings of your PC.
Activate the "Guest" account on your computer. –
Enable data access to the folder you wish to browse on your PC and check that the accounts "All" or "Guest" have access rights.
Question 9. I have configured all settings correctly but the wireless network or the UpnP still does not function properly.
Answer:
Are you using a firewall such as Norton Internet Security, McAfee Personal Firewall, Zone Alarm, etc., or are you even using the integrated firewall of Windows XP? (Ensure that the Windows XP Service Pack 2 automatically upgrades your firewall and is activated in the works settings.) If you are using a firewall, this may have to be configured or may require exceptions to enable you to view and communicate with the device in the network. To check whether your firewall is blocking the network communication (including PING and file access), interrupt the connection.
If you can make a connection with the firewall deactivated, you may have to add the device to the "trusted list" or configure the firewall for local Intranet access. In the worst case, deactivate your firewall as long as necessary to allow the device to be used. Then activate it again.
Question 10. I am using the 802.11n WLAN dongle with a wireless 802.11n router. Why is the transmission rate still only 802.11g 54Mbps instead of 300Mbps?
Answer:
The IEEE 802.11n draft does not permit the use of high data transmission rates with WEP or TKIP as Unicast codes. If you are using these encryption methods (e.g. WEP, WPA-TKIP), your data transmission rate will drop to 54 Mbps. You can contact the access point or router manufacturer to download the latest firmware, or try the other encryption methods (WPA2-AES or WPA2-TKIP); or configure an insecure profile, although this method is not recommended.
Question 11. Why are some pictures not displayed in the photo function even though the format is supported?
Answer:
There are various different JPEG formats. This device does not support all of them. In this case, change the image format as follows:
Load the picture into Photoshop or another image processing – programme.
Select "File" in the menu and then "Save as" as illustrated in – the left. Select the JPEG format, enter the file name and click on the "Save" symbol.
After clicking "Save", a new window is opened as illustrated – on the right. Select "Baseline (standard)" or "Optimised baseline";
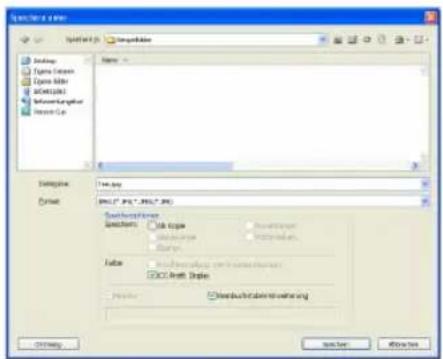

Click the "OK" symbol. -
Question 12. Why can't the device find the hard disk?
Answer:
Make sure that the firmware is correctly installed and that no system partitions on the hard disk have been deleted. In the event of a hard disk fault, back up your data and install the firmware again.
Question 13. Some functions such as playback list etc. do not function. What should I do?.
Answer:
If certain functions of the device do not work correctly, reset the system settings to the works settings (see "Changing system settings" in the section "Setup menu").
NOTE
If you cannot resolve the problem with the steps described ▶ above, please contact after-sales service.
Storage
If you do not intend to use the device for a longer period of time, switch off the device and disconnect it from the power supply and keep it in a clean and dry location without direct exposure to sunlight.
Appendix
Support and contact information
For faulty products:
In the event of product complaints, please contact your retailer or Hama product support.
Internet/World Wide Web:
Product support, new drivers or product information can be obtained from www.hama.com
Support hotline – Hama product support:
Tel. +49 (0) 9091 / 502-115
Fax +49 (0) 9091 / 502-272
E-mail: produktberatung@hama.de
Technical data
Supported I/O interfaces
eSATA ■
2x USB 2.0 PORTS (compatible with USB 1.1)
Component Y/Pb/Pr socket ■
Composite A/V OUT socket (CVBS) ■
HDMI V1.3 interface ■
Optical S/PDIF socket ■
DC IN 5V ■
Supported file systems
FAT/FAT32/NTFS/EXT3
Supported formats
AVI/MKV/TS/M2TS/MPG/MP4/MOV/M4V/VOB/ISO/IFO/DAT/■WMV/ASF/RM/
RMVB/FLV, definition up to 720p/1080i/1080p
MP3/OGG/WMA/WAV/AAC/FLAC
HD JPEG/BMP/GIF/TIF/PNG ■
Supported video formats
MPEG-1
HD MPEG-2
HD MPEG-4 SP/ASP/AVC (H.264)
WMV9 (VC-1)
■RealNetworks (RM/RMVB) 8/9/10, up to 720p
Supported audio formats
■ MP2/3, OGG Vorbis, WMA (DRM and Advanced Profile are not supported), PCM, LPCM, MS-ADPCM, LC-AAC, HE-AAC, COOK, RA-Lossless
Supported subtitle formats
SRT, SMI, SSA, ASS, IDX/SUB, SUB ■
Network performance features
10/100Mbps Auto-negotiation Ethernet ■
IEEE 802.11b/g, up to 54Mbps (supported by optional WLAN ■ USB adapter)
General
Power supply 100 - 240 V/AC, 50/60 Hz ■
Current consumption: ■
AC adapter < 0.5 W
Standby < 1 W
Operation approx. 20 W
Operating temperature +5°C to +35°C (+36°F to +95°F)
Humidity during operation 5% to 80% RH ■
■ Dimensions (WxHxD) 230 x 64 x 168 mm
Net weight
(incl. AC adapter) approx. 2.1 kg
Operating restrictions
This device may only be used indoors in France!
CE!
Sourcecodeinformations
The current source code is available on http://www.hama.com
License information for the software used in the unit.
This product contains Free Software which is licensed under the GNU General Public License version 2 or greater. After you purchase this product, you may procure, modify or distribute the source code of the GPL/LGPL software that is used in this product.
The according source codes can be obtained from our website www.hama.com or by contacting our Support Center which will provide a CD-ROM charging only the actual expensed involved (please ask for the actual fee for CD-ROM first). However, please be noted that we cannot provide guarantee with the source code, and there is also no technical support for the source code from us.
GNU GENERAL PUBLIC LICENSE
Version 2, June 1991
Copyright(C) 1989, 1991 Free Software Foundation, Inc. 51 Franklin Street, Fifth Floor, Boston, MA 02110-1301, USA
Everyone is permitted to copy and distribute verbatim copies of this license document, but changing it is not allowed.
Preamble
The licenses for most software are designed to take away your freedom to share and change it. By contrast, the GNU General Public License is intended to guarantee your freedom to share and change free software--to make sure the software is free for all its users. This General Public License applies to most of the Free Software Foundation's software and to any other program whose authors commit to using it. (Some other Free Software Foundation software is covered by the GNU Lesser General Public License instead.) You can apply it to your programs, too.
When we speak of free software, we are referring to freedom, not price. Our General Public Licenses are designed to make sure that you have the freedom to distribute copies of free software (and charge for this service if you wish), that you receive source code or can get it if you want it, that you can change the software or use pieces of it in new free programs; and that you know you can do these things.
To protect your rights, we need to make restrictions that forbid anyone to deny you these rights or to ask you to surrender the rights. These restrictions translate to certain responsibilities for you if you distribute copies of the software, or if you modify it. For example, if you distribute copies of such a program, whether gratis or for a fee, you must give the recipients all the rights that you have. You must make sure that they, too, receive or can get the source code. And you must show them these terms so they know their rights.
We protect your rights with two steps: (1) copyright the software, and (2) offer you this license which gives you legal permission to copy, distribute and/or modify the software.
Also, for each author's protection and ours, we want to make certain that everyone understands that there is no warranty for this free software. If the software is modified by someone else and passed on, we want its recipients to know that what they have is not the original, so that any problems introduced by others will not reflect on the original authors' reputations.
Finally, any free program is threatened constantly by software patents. We wish to avoid the danger that redistributors of a free program will individually obtain patent licenses, in effect making the program proprietary. To prevent this, we have made it clear that any patent must be licensed for everyone's free use or not licensed at all. The precise terms and conditions for copying, distribution and modification follow.
TERMS AND CONDITIONS FOR COPYING, DISTRIBUTION AND MODIFICATION
This License applies to any program or other 0. work which contains a notice placed by the copyright holder saying it may be distributed under the terms of this General Public License. The “Program”, below, refers to any such program or work, and a “work based on the Program” means either the Program or any derivative work under copyright law: that is to say, a work containing the Program or a portion of it, either verbatim or with modifications and/or translated into another language. (Hereinafter, translation is included without limitation in the term “modification”.) Each licensee is addressed as “you”.
Activities other than copying, distribution and modification are not covered by this License; they are outside its scope. The act of running the Program is not restricted, and the output from the Program is covered only if its contents constitute a work based on the Program (independent of having been made by running the Program).
Whether that is true depends on what the Program does.
You may copy and distribute verbatim copies 1. of the Program's source code as you receive it, in any medium, provided that you conspicuously and appropriately publish on each copy an appropriate copyright notice and disclaimer of warranty; keep intact all the notices that refer to this License and to the absence of any warranty; and give any other recipients of the Program a copy of this License along with the Program.
You may charge a fee for the physical act of transferring a copy, and you may at your option offer warranty protection in exchange for a fee.
You may modify your copy or copies of the 2. Program or any portion of it, thus forming a work based on the Program, and copy and distribute such modifications or work under the terms of Section 1 above, provided that you also meet all of these conditions:
You must cause the modified files to carry a) prominent notices stating that you changed the files and the date of any change.
You must cause any work that you distribute b) or publish, that in whole or in part contains or is derived from the Program or any part thereof, to be licensed as a whole at no charge to all third parties under the terms of this License.
If the modified program normally reads commands c) interactively when run, you must cause it, when started running for such interactive use in the most ordinary way, to print or display an announcement including an appropriate copyright notice and a notice that there is no warranty (or else, saying that you provide a warranty) and that users may redistribute the program under these conditions, and telling the user how to view a copy of this License. (Exception: if the Program itself is interactive but does not normally print such an announcement, your work based on the Program is not required to print an announcement.)
These requirements apply to the modified work as a whole. If identifiable sections of that work are not derived from the Program, and can be reasonably considered independent and separate works in themselves, then this License, and its terms, do not apply to those sections when you distribute them as separate works. But when you distribute the same sections as part of a whole which is a work based on the Program, the distribution of the whole must be on the terms of this License, whose permissions for other licensees extend to the entire whole, and thus to each and every part regardless of who wrote it.
Thus, it is not the intent of this section to claim rights or contest your rights to work written entirely by you; rather, the intent is to exercise the right to control the distribution of derivative or collective works based on the Program.
In addition, mere aggregation of another work not based on the Program with the Program (or with a work based on the Program) on a volume of a storage or distribution medium does not bring the other work under the scope of this License.
You may copy and distribute the Program (or a 3. work based on it, under Section 2) in object code or executable form under the terms of Sections 1 and 2 above provided that you also do one of the following:
Accompany it with the complete corresponding a) machine-readable source code, which must be distributed under the terms of Sections 1 and 2 above on a medium customarily used for software interchange; or,
Accompany it with a written offer, valid for b) at least three years, to give any third party, for a charge no more than your cost of physically performing source distribution, a complete machine-readable copy of the corresponding source code, to be distributed under the terms of Sections 1 and 2 above on a medium customarily used for software interchange; or,
Accompany it with the information you received c) as to the offer to distribute corresponding source code. (This alternative is allowed only for noncommercial distribution and only if you received the program in object code or executable form with such an offer, in accord with Subsection b above.) The source code for a work means the preferred form of the work for making modifications to it. For an executable work, complete source code means all the source code for all modules it contains, plus any associated interface definition files, plus the scripts used to control compilation and installation of the executable.
However, as a special exception, the source code distributed need not include anything that is normally distributed (in either source or binary form) with the major components (compiler, kernel, and so on) of the operating system on which the executable runs, unless that component itself accompanies the executable.
If distribution of executable or object code is made by offering access to copy from a designated place, then offering equivalent access to copy the source code from the same place counts as distribution of the source code, even though third parties are not compelled to copy the source along with the object code.
You may not copy, modify, sublicense, or 4. distribute the Program except as expressly provided under this License. Any attempt otherwise to copy, modify, sublicense or distribute the Program is void, and will automatically terminate your rights under this License. However, parties who have received copies, or rights, from you under this License will not have their licenses terminated so long as such parties remain in full compliance.
You are not required to accept this License, 5. since you have not signed it. However, nothing else grants you permission to modify or distribute the Program or its derivative works. These actions are prohibited by law if you do not accept this License. Therefore, by modifying or distributing the Program (or any work based on the Program), you indicate your acceptance of this License to do so, and all its terms and conditions for copying, distributing or modifying the Program or works based on it.
Each time you redistribute the Program (or 6. any work based on the Program), the recipient automatically receives a license from the original licensor to copy, distribute or modify the Program subject to these terms and conditions. You may not impose any further restrictions on the recipients' exercise of the rights granted herein. You are not responsible for enforcing compliance by third parties to this License.
If, as a consequence of a court judgment or 7. allegation of patent infringement or for any other reason (not limited to patent issues), conditions are imposed on you (whether by court order, agreement or otherwise) that contradict the conditions of this License, they do not excuse you from the conditions of this License. If you cannot distribute so as to satisfy simultaneously your obligations under this License and any other pertinent obligations, then as a consequence you may not distribute the Program at all. For example, if a patent license would not permit royalty-free redistribution of the Program by all those who receive copies directly or indirectly through you, then the only way you could satisfy both it and this License would be to refrain entirely from distribution of the Program.
If any portion of this section is held invalid or unenforceable under any particular circumstance, the balance of the section is intended to apply and the section as a whole is intended to apply in other circumstances.
It is not the purpose of this section to induce you to infringe any patents or other property right claims or to contest validity of any such claims; this section has the sole purpose of protecting the integrity of the free software distribution system, which is implemented by public license practices. Many people have made generous contributions to the wide range of software distributed through that system in reliance on consistent application of that system; it is up to the author/donor to decide if he or she is willing to distribute software through any other system and a licensee cannot impose that choice.
This section is intended to make thoroughly clear what is believed to be a consequence of the rest of this License.
If the distribution and/or use of the Program is 8, restricted in certain countries either by patents or by copyrighted interfaces, the original copyright holder who places the Program under this License may add an explicit geographical distribution limitation excluding those countries, so that distribution is permitted only in or among countries not thus excluded. In such case, this License incorporates the limitation as if written in the body of this License.
The Free Software Foundation may publish 9. revised and/or new versions of the General Public License from time to time. Such new versions will be similar in spirit to the present version, but may differ in detail to address new problems or concerns.
Each version is given a distinguishing version number. If the Program specifies a version number of this License which applies to it and “any later version”, you have the option of following the terms and conditions either of that version or of any later version published by the Free Software Foundation. If the Program does not specify a version number of this License, you may choose any version ever published by the Free Software Foundation.
Sourcecodeinformations
If you wish to incorporate parts of the Program 10. into other free programs whose distribution conditions are different, write to the author to ask for permission. For software which is copyrighted by the Free Software Foundation, write to the Free Software Foundation; we sometimes make exceptions for this. Our decision will be guided by the two goals of preserving the free status of all derivatives of our free software and of promoting the sharing and reuse of software generally.
NO WARRANTY
BECAUSE THE PROGRAM IS LICENSED 11. FREE OF CHARGE, THERE IS NO WARRANTY FOR THE PROGRAM, TO THE EXTENT PERMITTED BY APPLICABLE LAW. EXCEPT WHEN OTHERWISE STATED IN WRITING THE COPYRIGHT HOLDERS AND/OR OTHER PARTIES PROVIDE THE PROGRAM "AS IS" WITHOUT WARRANTY OF ANY KIND, EITHER EXPRESSED OR IMPLIED, INCLUDING, BUT NOT LIMITED TO, THE IMPLIED WARRANTIES OF MERCHANTABILITY AND FITNESS FOR A PARTICULAR PURPOSE. THE ENTIRE RISK AS TO THE QUALITY AND PERFORMANCE OF THE PROGRAM IS WITH YOU. SHOULD THE PROGRAM PROVE DEFECTIVE, YOU ASSUME THE COST OF ALL NECESSARY SERVICING, REPAIR OR CORRECTION.
IN NO EVENT UNLESS REQUIRED 12. BY APPLICABLE LAW OR AGREED TO IN WRITING WILL ANY COPYRIGHT HOLDER, OR ANY OTHER PARTY WHO MAY MODIFY AND/OR REDISTRIBUTE THE PROGRAM AS PERMITTED ABOVE, BE LIABLE TO YOU FOR DAMAGES, INCLUDING ANY GENERAL, SPECIAL, INCIDENTAL OR CONSEQUENTIAL DAMAGES ARISING OUT OF THE USE OR INABILITY TO USE THE PROGRAM (INCLUDING BUT NOT LIMITED TO LOSS OF DATA OR DATA BEING RENDERED INACCURATE OR LOSSES SUSTAINED BY YOU OR THIRD PARTIES OR A FAILURE OF THE PROGRAM TO OPERATE WITH ANY OTHER PROGRAMS), EVEN IF SUCH HOLDER OR OTHER PARTY HAS BEEN ADVISED OF THE POSSIBILITY OF SUCH DAMAGES.
© Copyright 2008 by Hama GmbH & Co KG. All Rights Reserved
All changes of the manual content are possible without advance notice. It is not allowed to duplicate a part of this manual without allowance of the manufacturer. All display samples and descriptions could be different against the content of the package. Hama GmbH & Co KG is not responsible for any damages, injuries or data loss which did occur because wrong handling of the product.

GB Note on environmental protection:
After the implementation of the European Directive 2002/96/EU and 2006/66/EU in the national legal system, the following applies:
Electric and electronic devices as well as batteries must not be disposed of with household waste. Consumers are obliged by law to return electrical and electronic devices as well as batteries at the end of their service lives to the public collecting points set up for this purpose or point of sale. Details to this are defined by the national law of the respective country. This symbol on the product, the instruction manual or the package indicates that a product is subject to these regulations. By recycling, reusing the materials or other forms of utilising old devices/Batteries, you are making an important contribution to protecting our environment.

D-86651 Monheim/Germany
www.hama.com
All listed brands are trademarks of the corresponding companies. Errors and omissions excepted, and subject to technical changes. Our general terms of delivery and payment are applied.

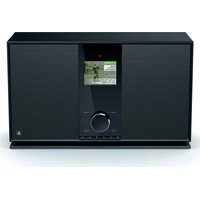
- Inhaltsverzeichnis
- Einführung 4
- Weitere Anschlüsse
- HINWEIS
- Setup menu 105
- Browser menu 127
- File Copy (copying files) ..... 1 4 2
- Internet radio 144
- NAS function ..... 147
- Upgrading the firmware ..... 148
- Troubleshooting 149
- Troubleshooting chart ..... 149
- Frequently asked questions (FAQs) 150
- Storage 155
- Appendix 155
- Support and contact information ..155
- Technical data 156
- Operating restrictions ..... 1 5 7
- Introduction
- Foreword
- Information on this user manual
- Liability disclaimer
- Warnings
- DANGER
- WARNING
- NOTE
- Intended use
- Danger resulting from improper use!
- Copyright
- Safety
- Danger of electric shock
- Handling batteries
- Fundamental safety precautions
- Design and function
- Front of the device
- Back of the device
- Remote control
- Function overview
- AV output
- Multimedia playback
- Network functions
- Setup and connection
- Safety precautions
- Unpacking
- Checking contents and packaging
- Disposal of the packaging
- Requirements for the place of operation
- Electrical connection
- Mains connection
- Additional connections
- Connecting a USB mass storage device
- Connecting an external hard disk with the SATA interface
- Connecting to a television
- A/V OUT: audio-video output
- Y/Pb/Pr COMPONENT OUT: component output
- HDMI OUT
- Connecting to a digital audio system
- Connecting to a computer network
- LAN connection: Local network
- WLAN connection: Wireless local network
- Setting up
- Inserting batteries into the remote control
- Switching the device ON and OFF
- Switching on
- Switching off
- Setting the menu language
- Operation
- Opening the main menu and navigating
- Setup menu
- Opening the setup menu and navigating
- Changing audio settings
- Night mode
- Digital output
- Changing video settings
- Selecting the aspect ratio
- Setting the zoom
- Setting the brightness
- Setting the contrast
- Setting the tint
- Setting the colour saturation
- Setting the video system
- Activating 1080P 24 Hz mode
- Setting the screen size
- Activating gapless playback
- Configuring network settings
- LAN setup
- Fixed IP (manual)
- WLAN setup
- Infrastructure (AP): Infrastructure access
- Test connection
- Peer-to-peer (ad hoc): Configuring a computer-to-computer connection
- WPS(AP): configuring a direct connection to the router
- PBC (connecting by pressing a button)
- PIN (connecting after entering a PIN)
- PPPoE setting
- Activating NAS mode
- Entering the Host name
- Changing system settings
- Changing the menu language
- Changing the text encryption setting
- Upgrading the system
- HDD formatting
- System information
- Restore works settings
- Miscellaneous
- Resume playback
- Slide show timing
- Transition effect
- Ken Burns
- Background music
- Screen saver
- Film preview
- Toggle subtitles on/off
- Record audio device
- Browser menu
- Opening the browser menu and navigating
- Browsing all files
- Browsing music files
- Browsing photo files
- Browsing video files
- Audio and video streaming via a network
- Browsing the work group
- Browsing "My\_Shortcuts"
- Audio and video streaming via UPnP server
- Installing a UPnP media server on your computer
- Enabling media on your computer
- Media streaming on your device
- Renaming/deleting files or folders
- Managing your playlist
- Adding files to the playlist
- Browsing your playlist
- File Copy (copying files)
- Internet radio
- Stations
- Genre
- Favourites
- Search
- NAS function
- Upgrading the firmware
- Troubleshooting
- Troubleshooting chart
- Frequently asked questions (FAQs)
- Answer:
- Question 3. My data has disappeared from the device.
- Question 4. Why does the television have a briefly flashing blue screen or screen saver during operation?
- Question 5: Why does the Television have a totally bad picture when I switch over to Y/Pb/Pr 480p, 576p, 720p, 1080i, or 1080p?
- Question 6. Why is there no sound during the playback of films or music via the Y/Pb/Pr component output?
- Question 7. The SSID names do not appear on the display; "SSID not available!!" is displayed constantly.
- Question 8. I can see no shared files on my computer via the path Browser -> Network menu.
- Question 9. I have configured all settings correctly but the wireless network or the UpnP still does not function properly.
- Question 10. I am using the 802.11n WLAN dongle with a wireless 802.11n router. Why is the transmission rate still only 802.11g 54Mbps instead of 300Mbps?
- Question 11. Why are some pictures not displayed in the photo function even though the format is supported?
- Question 12. Why can't the device find the hard disk?
- Storage
- Appendix
- Support and contact information
- Technical data
- Supported I/O interfaces
- Supported file systems
- Supported formats
- Supported video formats
- Supported audio formats
- Supported subtitle formats
- Network performance features
- General
- Operating restrictions
- Sourcecodeinformations
- Preamble
- TERMS AND CONDITIONS FOR COPYING, DISTRIBUTION AND MODIFICATION
- NO WARRANTY
- GB Note on environmental protection:
- D-86651 Monheim/Germany
- www.hama.com
Brand : HAMA
Model : PN40HD
Category : Media player