
Pocket LOOX T830 - Mobile Phone FUJITSU SIEMENS - Free user manual and instructions
Find the device manual for free Pocket LOOX T830 FUJITSU SIEMENS in PDF.


User questions about Pocket LOOX T830 FUJITSU SIEMENS
0 question about this device. Answer the ones you know or ask your own.
Ask a new question about this device
Download the instructions for your Mobile Phone in PDF format for free! Find your manual Pocket LOOX T830 - FUJITSU SIEMENS and take your electronic device back in hand. On this page are published all the documents necessary for the use of your device. Pocket LOOX T830 by FUJITSU SIEMENS.
USER MANUAL Pocket LOOX T830 FUJITSU SIEMENS
Pocket LOOX T Series

text_image
We make sure FUJITSU COMPUTERS SIEMENSAre there ...
... any technical problems or other questions which you would like help with?
Please contact:
- our Hotline/Help Desk (see Help Desk List or the Internet: www.fujitsu-siemens.com/helpdesk)
- your sales partner
- your sales office
Further information can be found in the "Safety" and "Warranty" manuals.
The latest information on our products, tips, updates, etc., can be found on our website at: www.fujitsu-siemens.com
This manual was produced by Xerox Global Services.
Published by
Fujitsu Siemens Computers GmbH
Edition: 1, July 2006
Order No.: A26391-K182-Z120-1-7619
Pocket LOOX T Series
EasyGuide
| Your Pocket LOOX |
| Working with files |
| Important notes |
| Security functions |
| Equipment overview |
| Connecting and networking the Pocket PC with other devices |
| Getting started |
| Energy saving functions |
| Making telephone calls with the Pocket PC Troubleshooting and tips |
| Operating the Pocket PC |
| Technical data |
| Creating messages |
| Manufacturer's notes |
| Using the Internet |
| Index |
| Using GPS functions |
| Using the camera functions (optional) |
Adobe and Acrobat are trademarks of Adobe systems Incorporated and may be protected in certain countries.
Intel is a registered trademark, XScale is trademark of Intel Corporation, U.S.A.
Microsoft, Windows and ActiveSync are registered trademarks of the Microsoft Corporation.
Windows Mobile is a trademark of Microsoft Corporation.
The SD Logo is a trademark of Secure Digital.
The Bluetooth trademarks are the property of Bluetooth SIG, Inc., U.S.A. licensed for Fujitsu Siemens Computers GmbH.
All other trademarks referenced are trademarks or registered trademarks of their respective owners, whose protected rights are acknowledged.
Copyright © Fujitsu Siemens Computers GmbH 2006
All rights, including rights of translation, reproduction by printing, copying or similar methods, in part or in whole, are reserved.
Offenders will be liable for damages.
All rights reserved, particularly for rights created by patent grant or registration of a utility model or design.
Delivery subject to availability. Right of technical modification reserved.
Contents
Your Pocket LOOX .... 1
Notational conventions 2
Important notes .... 3
Safety notes....3
Using the Pocket PC 4
Equipment overview 5
Indicators (LEDs) and status indicators in the display....6
Using the operating elements....8
Using the keyboard....8
Using the pen and display 11
Using the online buttons for telephony 11
Using the 3-way scroll button and the navigation key 12
Using the application buttons and the softkey buttons 14
Using the on-screen keyboard.... 16
Software overview 18
Accessories 20
Cradle 20
External GPS antenna (optional) 20
Getting started 21
Checking the delivery contents....21
Removing the protective film from the camera and the screen 21
Installing the battery and the SIM card (optional) 22
Connecting the power adapter and charging the battery....23
Starting up your Pocket PC for the first time 23
Calibrating the screen....24
Entering a PIN (optional) 24
Familiarising yourself with basic operation of the device.... 24
Internet and intranet connections with CONNECTMOBILITY-E2C 25
Starting CONNECTMOBILITY E2C 25
User data dialogue 25
GPRS/UMTS provider selection 26
Data synchronisation 26
Data synchronisation via Exchange Server 26
Data synchronisation with ActiveSync 27
Using the online help 31
Making telephone calls with the Pocket PC 33
Making a telephone call.... 33
Making emergency calls.... 34
Answering an incoming call 34
Ending the conversation.... 34
Displaying missed calls 34
Using the Voice Commander 35
Speed dial function.... 36
Using the handsfree function.... 37
Muting the telephone 38
Call holding....38
Making a conference call.... 39
Making video telephone calls (optional) 40
Managing contacts 42
Copying contact details from the Pocket PC to the SIM card 42
Copying contacts from the SIM card to the Pocket PC 42
Displaying services on the SIM card (network provider specific)....43
SIM security 43
SIM Lock 43
Blocking your SIM card 44
Configuring telephone settings 44
Network selection....44
Setting up a mailbox number 45
Setting up the SMS Service Centre 45
Setting up call diversion 46
Operating the Pocket PC 47
Using the profiles of your Pocket PC 47
Selecting profiles....48
Configuring profiles....48
Switching the Pocket PC on and off....48
Switching the Pocket PC off and on during normal use (Standby mode) 49
Switching the Pocket PC off to save battery life....50
Resetting the Pocket PC....50
Soft reset (warm start) 50
Cold starting and resetting factory default settings....51
Out and about with the Pocket PC 52
Transporting Pocket PC....52
In-flight usage 52
Usage while driving....52
Cleaning the Pocket PC 53
Charging the battery....54
Inserting and removing an expansion card 57
Inserting the expansion card....57
Removing the expansion card 58
Using the Pocket PC as a USB Host device....59
Configuring device settings....60
Adapting menus 60
Fast access to programs via FSC SpeedMenu 60
Creating messages 61
Inbox 61
SMS messages....62
Creating and sending SMS messages....62
Managing SMS messages on the SIM card....62
MMS messages 63
Configuring the MMS application....63
Creating and sending MMS messages....64
E-mail 65
Setting up e-mail accounts for POP3, SMTP or IMAP4 65
Setting up an e-mail account for the VPN corporate network....65
Setting up e-mail sending via ActiveSync 66
Creating and sending e-mails 66
Downloading e-mails from a server (e-mail pull)....66
Receiving e-mails and other data automatically in real-time (e-mail push)......67
Using the Internet....69
Accessing the Internet with Internet Explorer....69
Using GPS functions ....71
FSC GPSLocator 71
Using the camera functions (optional) 73
2 megapixel autofocus camera 73
Working with files....77
Windows Media Player 77
Using Java applications....77
Downloading Java applications....77
Starting Java applications 77
Uninstalling Java applications 78
Compressing files with FSC MobileZip....78
Security functions 79
Password protection 80
Device lock (key and display lock) 80
FSC KeyLock 81
FSC SecureLock (optional) 81
Connecting and networking the Pocket PC with other devices....83
Activating and deactivating radio modules 83
Wireless connection via Wireless LAN 83
Wireless communication with Bluetooth 84
Selecting location for Bluetooth operation....84
Energy saving functions 85
General information on energy management 85
Using energy saving functions....85
Configuring standby mode....85
Switching off display lighting 85
Configuring display lighting 86
Configuring key illumination 86
Configuring device behaviour when E-mail push is activated 86
Switching off the sound and setting the volume 86
Using Wireless Manager 87
Troubleshooting and tips....89
Installing new software 89
The Pocket PC's time or date are not correct....89
The display of the Pocket PC remains dark 89
The display is difficult to read 90
The Pocket PC switches off....90
The Pocket PC does not start after being switched on....90
The Pocket PC does not respond any more.... 91
The battery discharges too quickly 91
The End button does not respond properly 91
No sound or minimal volume 92
Poor reception via GPS 92
Contact with hotline/help desk....92
Calling up the IMEI number....92
Calling up the UUID....93
Technical data....95
Pocket PC....95
Battery (Li-Ion) 96
Power adapter 97
Manufacturer's notes 99
Environmental protection 99
Disposal and recycling 99
CE marking 100
Information on exposure/specific absorption rate (SAR)....101
FCC Regulations....102
FCC Warning Statement for WLAN product 102
RF Exposure Information (SAR) 103
Index....105
Your Pocket LOOX ...
... is the first integrated Pocket PC from Fujitsu Siemens Computers which combines a GSM/UMTS mobile telephone with an innovative and high-performance handheld and a GPS navigation system.
With Bluetooth and wireless LAN you can establish a connection to other devices at the office and away from it without bothersome cables. With your Pocket LOOX, you can for example access the Internet via UMTS/GSM or a Wireless LAN. You can call up both web and WAP pages with the Internet Explorer. As well as SMS and MMS messaging, the ergonomic keyboard is also perfect for writing and sending e-mails. Thanks to
the e-mail push function, you no longer need to download incoming e-mails yourself anymore – instead, they are automatically and comfortably transferred directly to your Pocket LOOX. Calendars, contacts and tasks are automatically updated.
Depending on equipment level, your Pocket LOOX will have one or two integrated cameras. The VGA camera is used for video telephony via UMTS. With the aid of the 2 megapixel autofocus camera you can take photographs and then view the results on the high-resolution touchscreen. Alternatively, you can also record video sequences.
Microsoft Windows 5.0 Phone Edition also includes the MS Office applications Microsoft Word, Excel and PowerPoint. You can store notes in written form or verbally as with a dictation device. Under Microsoft Windows 5.0 Phone Edition, your data will also be preserved if the battery ever becomes discharged.
Install ActiveSync on your computer, connect the Pocket LOOX to your computer and you are ready to synchronise your data. In the office you can then effortlessly transfer all your data and newly created documents to your computer.
With the optional USB Host cable you can use your Pocket LOOX as a USB Host device. You can connect different USB devices, such as an external hard disk, to the Pocket PC. Read your favourite book quite comfortably away from home on the display or use the MP3 player.
The following documentation contains additional information on your Pocket PC and the operating system:
• the "Getting Started" poster
- the "Safety" and "Warranty" manuals
- the help function on your Pocket PC
• the files on the Microsoft Getting Started CD (e.g. *.TXT, *.PDF)
Notational conventions
The following symbols and fonts used in this manual:

Pay particular attention to texts marked with this symbol. Failure to observe this warning may endanger your health or safety, destroy the system, or lead to loss of data. The warranty will be invalidated if defects to the Pocket PC are caused as a result of failure to follow the instructions.

Indicates important information which is required to use the system properly.
▶ Texts which follow this symbol describe steps that must be performed in the order shown.
This font Indicates programme names, commands, or menu items.
"Quotation marks" Indicate names of chapters, data carriers and terms that are being emphasised.
Important notes
This chapter contains safety notes and important information you must observe when using your Pocket PC.
This Pocket PC complies with the relevant safety regulations for data processing equipment. If you have questions as to whether you can set up and operate the Pocket PC in the intended environment, please contact your sales point or our hotline/help desk.
Safety notes

Observe the safety notes in the "Safety" manual and the following safety notes to prevent injuries, damage to your device or data loss.
- During installation and before operating the device, observe the instructions on environmental conditions in "Technical data".
- Connect the mains adapter plug to the mains adapter. The mains adapter plug must never be connected to an electrical outlet without the mains adapter.
- The mains adapter must only be connected to an electrical outlet when the Pocket PC or the cradle is connected to the mains adapter.
- Do not use the mains adapter for other devices.
- When transporting the device on a trip, observe the information in "Out and about with the Pocket PC".
- After resetting the Pocket PC (i.e. after a cold start or resetting the device to the factory defaults) the telephone functions are active. In the process, the WLAN radio component will briefly become active while it is initialised. Please be aware of this if you are in an environment where radio components must not be used (e.g. hospital, aircraft). Bluetooth is not activated after a reset.
- Prolonged use of headphones, especially at very loud volumes, can cause hearing damage.
Using the Pocket PC
Store the Pocket PC in a fully charged state in a dry environment. When storing the device please do not exceed the permissible temperature limits – see "Technical data", section "Pocket PC". The lower the temperature at which the batteries are stored, the lower the rate of self-discharge.

Avoid leaving your Pocket PC lying in direct sunlight in a car. The temperature could exceed the permissible temperature in such cases.
To protect the battery, battery charging is interrupted at excessively high temperatures.
Please note that batteries discharge themselves over time. Therefore, recharge the battery of your Pocket PC at regular intervals during the storage period.
Protect your Pocket PC against dirt. Dirt or other contamination can cause contact faults on the connections.
Equipment overview
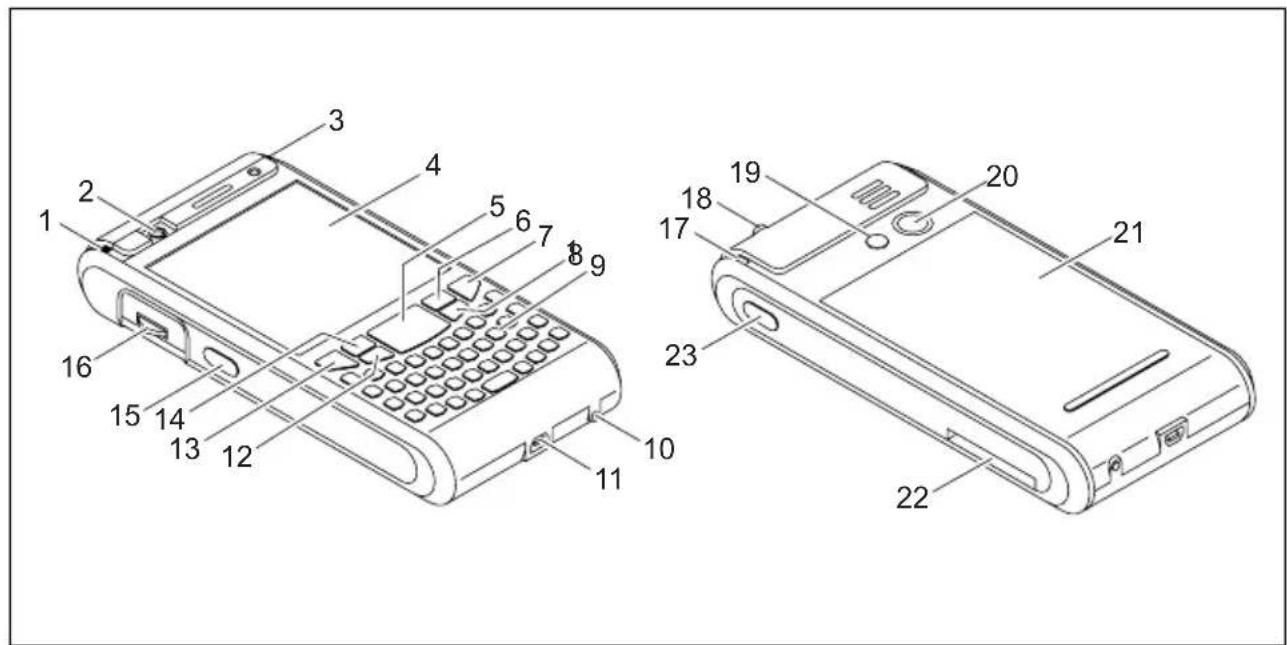
text_image
Technical diagram of a mobile phone with numbered parts for identification1 = Antenna indicator
2 = VGA camera
3 = Battery/events indicator
4 = Display
5 = Navigation key
6 = Softkey button 2
7 = End button
8 = Application button 2: Inbox
9 = Keyboard with integrated number block
10 = GPS antenna port
11 = Mini USB port
12 = Application button 1: Calendar
13 = Answer button
14 = Softkey button 1
15 = Application button 5: SpeedMenu and camera
16 = 3-way scroll button
17 = Pen slot
18 = Socket for headphones or headset
19 = GSM port
20 = 2 megapixel autofocus camera
21 = Battery compartment
22 = Slot for SD/MMC expansion card
23 = Application button 6: Voice notes
Indicators (LEDs) and status indicators in the display
Your Pocket-PC has two flashing indicators (LEDs) on the casing which light up in different colours, as well as various status indicators in the title bar of the display which will provide you with information about the current status of your device.
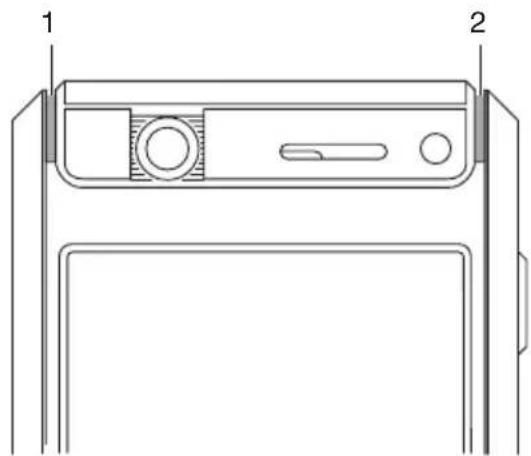
natural_image
Technical line drawing of a device rear panel with labeled components (no text or symbols present)1 = Antenna indicator
2 = Battery/events indicator
Indicators (LEDs)
| Indicator Colour Indicator | state Meaning | ||
| Green Flashing GPS has been activated. Antenna (1) | |||
| Blue Flashing Bluetooth is active. | |||
| Battery/events (2) | On Battery is fully charged. Orange | ||
| Slow flashing Battery being charged | |||
| Red Quick | flashing Battery is overheated. | ||
| Blue Slow | flashing New message | available, missed call or schedule reminder active. | |
| Green Slow | w flashing New e-mail waiting. | ||

If more than one event occurs at the same time then the LEDs will flash in the relevant colours in turn.
For example, if a new e-mail is received while the battery is being charged, the indicator will flash orange and green in turn.
Status indicators on the display
The most important status indicators are shown below:
| Status icon | Meaning Status | icon | Meaning |
 | New e-mail, SMS or MMS |  | No signal |
 | Incoming telephone call |  | GPRS available |
 | Active telephone call |  | GPRS active |
 | Active call via data line |  | UMTS available |
 | Call forwarding |  | Roaming |
 | call is held. |  | Synchronisation error |
 | Missed call(s) |  | Antenna switched off |
 | Battery indicator – battery full |  | All system tones switched on |
 | Battery low |  | All system tones switched off |
 | Battery being charged | ### | WLAN active |
 | Signal strength |  | WLAN access point available |
 | Caps Lock activated |  | Special characters and numbers activated |
Using the operating elements
Your Pocket PC offers various operating elements:
- Keyboard with integrated number block
- Pen and display
• Online buttons for telephony - 3-way scroll button
- Navigation key, application buttons and softkey buttons
- On-screen keypad
Using the keyboard
The keyboard is designed to offer all of the functions of a keyboard with an integrated number block. Some enhanced keyboard functions are accessed via key combinations (short cuts).

Lower case letters are output by default.
To obtain a higher case letter, press and hold the corresponding letter button.
Description of buttons
The key buttons on your keyboard are described below together with their functions:
| Key Function | |
Backspace key | The Backspace key deletes the character to the left of the cursor. |
Enter key (return) | Brief press of the buttonThe enter key terminates a command line. The command you have entered is executed when you press this key.Long press of the buttonThe device lock (key lock and display lock) is set or cancelled, see also "Device lock (key and display lock)". |
Shift key | The Shift key causes uppercase characters to appear. In the case of overlay keys, the character printed on the upper left of the key appears when that key is pressed.Double-clicking the buttonSet permanent use of higher case. |
FN key | Brief press of the buttonTheFNkey activates the special characters or numbers on overlay keys.Long press of the buttonPressing theFNkey for longer switches the keyboard illumination on or off.Double-clicking the buttonEngage theFNkey to activate or deactivate FN mode. |
Tab key | The Tab key moves the cursor to the next tab stop. |
Start key | The Start key invokes the Windows Start menu. |
OK key | Closes the active window. |
| Spacebar | Inserts the space character. |
Symbol key | Brief press of the buttonReplaces the current character with a related character with an accent, e.g. the letter “a” is changed to “á”. Up to 5 different related characters are available. Pressing the button again switches to the next available related character.Long press of the buttonA window containing all of the available characters is opened or closed (if open). |
Asterisk key | Long press of the buttonThe Pocket PC is set to Silent Mode, or Silent Mode is deactivated. All tones and the vibration alarm are activated or deactivated. |
Key combinations (short cuts)
Key combinations are entered as follows:
▶ Press and hold the first key in the combination.
▶ While holding the first key down, press the second key in the combination.
| Key combination Function | |
| FN + navigation key down Scroll down | |
| FN + navigation key up Scroll up | |
| FN + navigation key left Jump to the start of a list or e-mail | |
| FN + navigation key right Jump to the end of a list or e-mail | |
| FN and Shift/Double-click on Shift | Set permanent use of higher case |
| Shift + navigation key left Decrease display brightness | |
| Shift + navigation key right Increase display brightness | |
| Shift + Del Delete character to the right of the cursor |
Application-dependent key-combinations
Key combinations are a useful way of quickly accessing functions in many applications, e.g. your inbox or the Telephone function. You can operate the device almost entirely without the pen.
▶ Press the right-hand softkey button in the application.
A menu showing the available functions is displayed.
▶ Press the letter which is underlined in the function you wish to execute.
The function is then executed.
Using the pen and display
With the aid of the supplied pen, you can also perform actions by touching the display.
▶ Briefly touch the desired element on the display with the pen to trigger an action.
▶ To activate popup menus, again touch the desired element with the pen, but this time leave the pen to rest on the element for a moment. The popup menu appears and you can select an element by touching it.
Using the online buttons for telephony
When you launch the Telephone application, a window pops up with the online buttons for telephony:
▶ Enter the required telephone number by touching the display with the pen.
or
▶ Enter the required telephone number via the integrated number block on the keyboard.
You can now make a call – see "Making a telephone call".
Using the 3-way scroll button and the navigation key
3-way scroll button
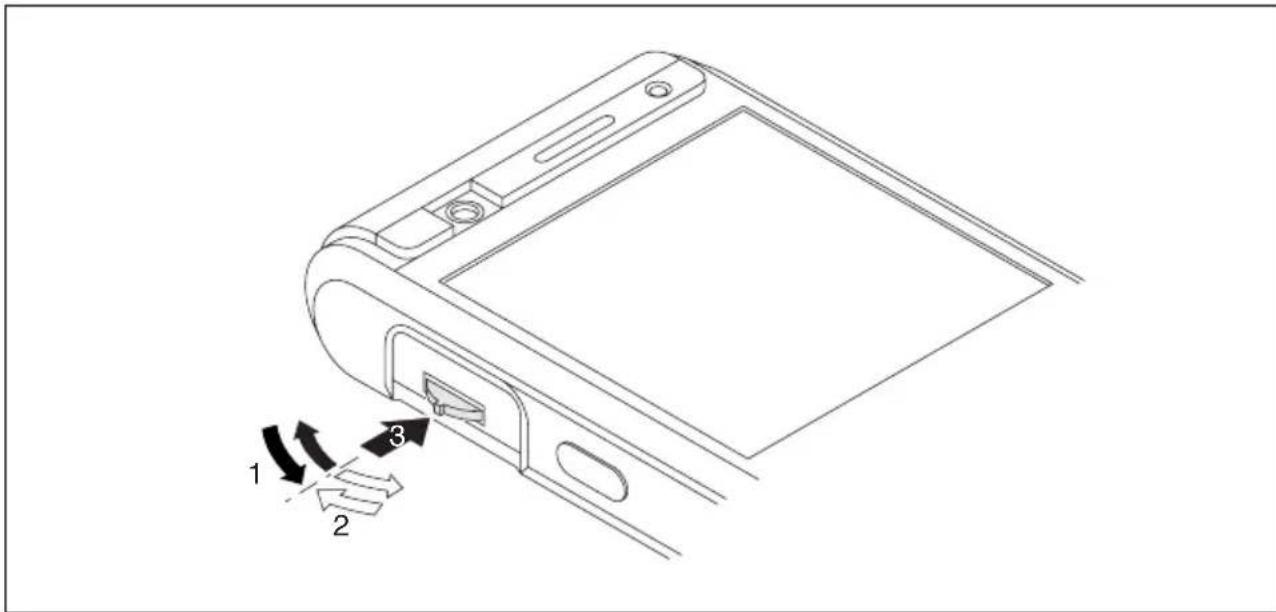
text_image
Technical diagram of a device rear panel with labeled components and directional arrows indicating movement or assembly.With the scroll button you can scroll up or down and forward or backward (1, 2) within the menu or application. You activate menu entries by pressing the scroll button in the centre position (3).

If you are in the Telephone application you can use the 3-way scroll button to adjust the telephone volume.
Navigation key
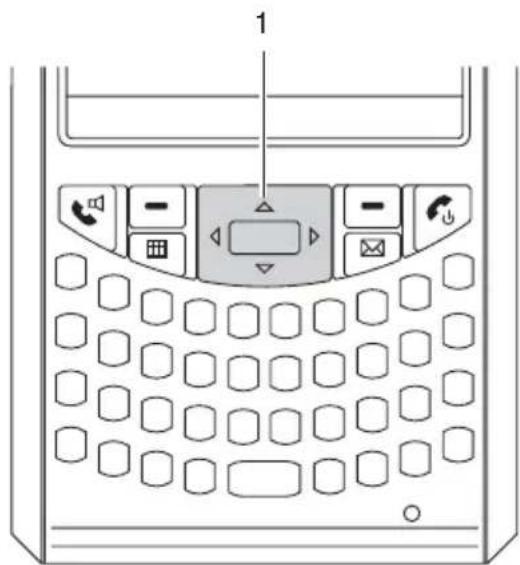
text_image
1The way in which the navigation key (1) works depends on the application you are in. In some applications you scroll line-by-line up, down, left or right in a menu. To activate menu items press the middle of the navigation key. By contrast, in other applications – e.g. e-mail – you can page up or down with the navigation key.
Using the application buttons and the softkey buttons
With the application buttons and the appropriate presets (see "Configuring the application buttons"), you can open your preferred programs and applications directly from standby mode or from within an application.
As the application buttons react differently to short or long presses you can assign a total of eight different programmes or applications to the application buttons.
In addition, your Pocket PC also has two softkey buttons.
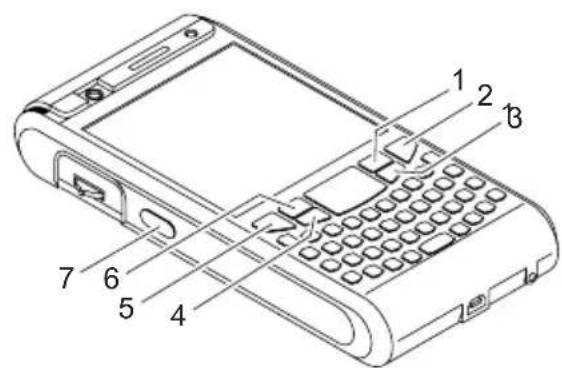
text_image
Diagram of a mobile phone with numbered parts labeled for identification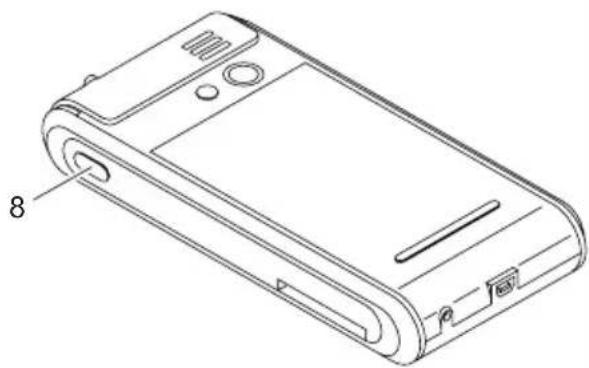
natural_image
Line drawing of a mobile phone casing with labeled component '8' (no text or symbols beyond label)1 = Softkey button 2
2 = End button
3 = Application button 2: Inbox
4 = Application button 1: Calendar
5 = Answer button
6 = Softkey button 1
7 = Application button 5: Camera
8 = Application button 6: Voice notes
| Key | Allocated function for a short press | Allocated function for a long press |
| End button | ·During an active call: ends the call. ·For an incoming call: ignores the call. ·In the Today screen: puts the device into Standby mode ·In other applications: switches to the Today screen ·For active data connections: terminates the data connection Each time you press the button, a connection is terminated (call, data connection) or the device switches to the Today screen. You may have to press the button several times consecutively to put the device in Standby mode. | ·During a call: ends the call. ·Otherwise: the Profiles menu is displayed. |
| Answer button | ·During an active call: call is held. ·For an incoming call: the call is answered. ·If no call is active: opens the application Telephone. | During a call: Activates or deactivates the internal loudspeaker (handsfree mode). Any other connected devices, e.g. BT headset or receiver, are deactivated or activated accordingly. This means that the loudspeaker can be activated even with the headset connected. |
| Softkey button 1 | Depends on the particular application. | |
| Softkey button 2 | ||
| Application button 1 | Calendar New calendar entry. | |
| Application button 2 | Inbox Create new mail. | |
| Application button 5 | FSC SpeedMenu or camera application (depending on the device type) In the camera application: ·Short press: Operates shutter release. ·Short half-press: Autofocus | FSC SpeedMenu or not assigned (depending on the device type) |
| Application button 6 | Application for creating voice notes (dictation unit) | Create new voice note |
Configuring the application buttons
You can also assign other applications or functions to the preselected application buttons.
▶ Select Start – Settings – Personal – Buttons.
▶ Touch the corresponding button in the selection list with the pen.
▶ Assign an application or function to the button.
▶ Confirm withK.
Using the on-screen keyboard
In some applications which allow text input you will see the symbol for the on-screen keyboard in the footer.
You can use the on-screen keyboard in different ways:
| Mode Description | |
| Symbols Keyboard showing all available symbols and special characters | |
| Keypad Standard on-screen keyboard | Touch the keys on the keyboard shown on-screen to enter text. |
| Letter recognizer Write individual letters, numbers and punctuation marks – they are then converted into typed text. | |
| Block recognizer Input text as a connected block of text to write letters, numbers, symbols and punctuation marks which are then converted into typed text. Use gestures to input the Enter key and the Backspace key. | |
| Transcriber Write in cursive handwriting or individual letters – or in a combination of the two – and convert the result into typed text. | |
Displaying/hiding the on-screen keyboard
▶ Touch the icon for the on-screen keyboard.
The on-screen keyboard is displayed on the screen.
▶ Touch the icon for the on-screen keyboard again to close the keyboard.
Changing on-screen keyboard mode
The on-screen keyboard is displayed.
▶ Click on the arrow next to the on-screen keyboard icon.
A popup window appears with the available modes.
▶ Select your preferred mode.

More information about the on-screen keyboard and its different modes can be found in the online help function of your Pocket PC.
Software overview
The following table provides an overview of the most important programs which are already installed on your Pocket PC and where you can find information on using these programs.
| Software Used for Operating information | ||
| Telephone Telephone application with video telephony functionality | Help file on Pocket PC | |
| Word Mobile For word processing Help file on Pocket PC | ||
| Excel Mobile For spreadsheet functions Help file on Pocket PC | ||
| PowerPoint Mobile For opening and displaying presentations created on a PC | Help file on Pocket PC | |
| Outlook Mobile Mailbox, calendar, contacts, notes, tasks | Help file on Pocket PC | |
| ActiveSync For data synchronisation Help file on the Pocket PC and on the computer on which you installed ActiveSync. | ||
| Internet Explorer Mobile Browser for websites and WAP sites Help file on Pocket PC | ||
| Windows Media Player Mobile 10 | For playing audio and video files Help file on Pocket PC | |
| Pocket MSN | •MSN Messenger for receiving and sending text messages via the Internet•MSN Hotmail for receiving and sending e-mails via an MSN Hotmail account | Help file on Pocket PC |
| FSC SpeedMenu Quick start menu for simplifying daily procedures. Adapt the menu to your needs. Support for one-handed operation | Help file on Pocket PC | |
| FSC CONNECTMOBILITY-E2C | Connection manager for efficient management and control of complex Internet and Intranet connections. Automates and minimizes user actions. | Help file on Pocket PC |
| FSC Voice Recorder Brings g | genuine Dictaphone© functionality to the Pocket PC | Help file on Pocket PC |
| FSC Panning | Experiencing problems when scrolling in Internet Explorer Mobile?FSC Panning quickly brings window contents into view. Especially useful on large websites. | Help file on Pocket PC |
| FSC KeyLock | Protects against accidental starting of the Pocket-PC when a key is pressed | Help file on Pocket PC |
| FSC MobileZip Open, unpack, create and edit Zip archives | Help file on Pocket PC |
| FSC Backup (optional) Data backup and restoration Help file on Pocket PC | |
| Voice Commander Control the device with your voice. For telephone calls, calling up information about your contacts and about your programs. | Help file on Pocket PC |
| GPSLocator GPSLocator illustrates the basic functions of your GPS system | Help file on Pocket PC |
| SIM Manager Manages the data on your SIM card Help file on Pocket PC | |
Accessories
We offer a range of accessories to make it easier and more convenient to work with your Pocket PC. Information on additional accessories for your Pocket PC can be found on our website at www.fujitsu-siemens.com/accessories.
Below you will find a short description of the special accessories for your Pocket PC.
Cradle
With the cradle you can charge the battery in the Pocket PC and/or synchronise data between the Pocket PC and a computer.
External GPS antenna (optional)
With a Pocket PC with integrated GPS, you can connect an external GPS antenna to the underside of the Pocket PC. The external GPS antenna improves performance under difficult reception conditions.
Getting started
It will only take a few moments to have your Pocket PC up and running, ready for use. The steps you will need to work through include:
- Checking the delivery contents
- Removing the protective film from the camera and the screen
• Installing the battery and the SIM card (optional)
• Power adapter connecting - Starting up your Pocket PC for the first time
- Calibrating the touchscreen
- Familiarising yourself with basic operation of the device
• Performing initial data synchronisation with ActiveSync or Exchange Server (optional)
More information on these individual steps can be found on the poster “Getting Started” and in the chapters below.
Checking the delivery contents
▶ Check the contents of your delivery package – use the “Getting Started” poster to make sure nothing is missing.
Removing the protective film from the camera and the screen
The lens of the camera (optional) and the display are covered with a protective film to protect them against scratches.
Before starting up the Pocket PC, remove the protective films on the lens of the camera and the display.
Installing the battery and the SIM card (optional)
You can use your Pocket PC in two different modes of operation:
- Without a SIM card: no telephony functions available
- With a SIM card: telephony functions are available
The SIM card is provided by the operator of your telephone network. Use of a SIM card is optional. If you choose to use the Pocket PC without a SIM card then the telephony functions will not be available. However, calls to emergency services are also possible without a SIM card.
natural_image
Line drawing of a mobile phone casing with a black arrow pointing to the internal panel (no text or symbols)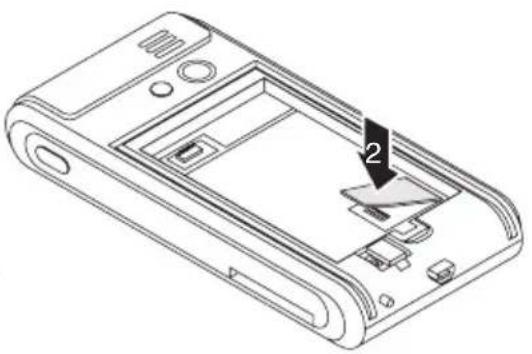
natural_image
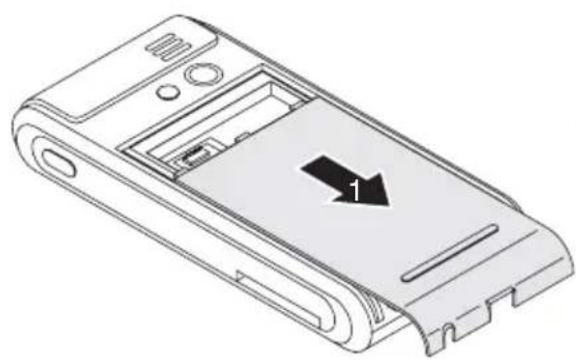
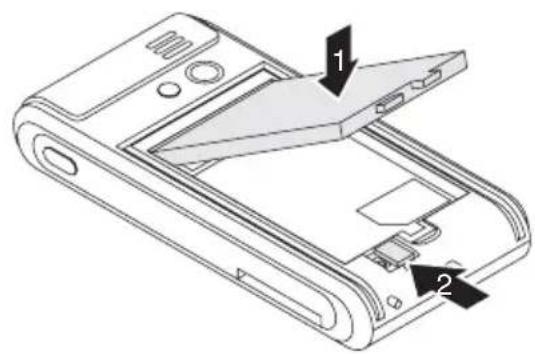
Line drawing of a mobile phone casing with internal components and a labeled component (no text or symbols present)▶ Slide off the cover from the Pocket PC in the direction of the arrow (1).
If using a SIM card, insert it in the direction of the arrow into the SIM card slot (2).
text_image
Technical diagram of a flip-flop device with labeled parts 1 and 2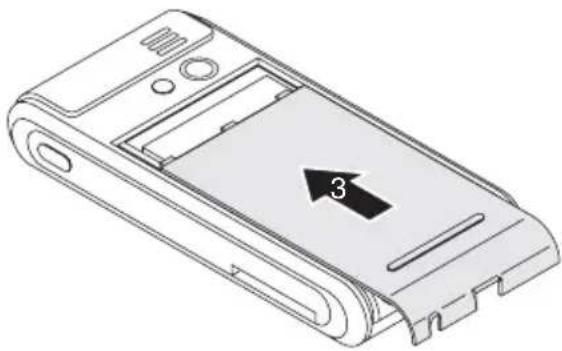
natural_image
Technical line drawing of a mobile phone casing with a labeled component (no text or symbols beyond the number 3)▶ Insert the battery in the battery compartment (1).
▶ Slide the battery catch in the direction of the arrow (2).
▶ Slide the cover back on in the direction of the arrow as far as it will go (3).

Your new battery will not be charged when you unpack it. Therefore, before using the device for the first time without a mains power supply you should charge the battery until the corresponding LED indicator stops flashing.
Connecting the power adapter and charging the battery

Please observe the safety information in the "Important notes" chapter.
Information on connecting the mains adapter and charging the battery can be found in "Operating the Pocket PC" in the section "Charging the battery".
Starting up your Pocket PC for the first time
text_image
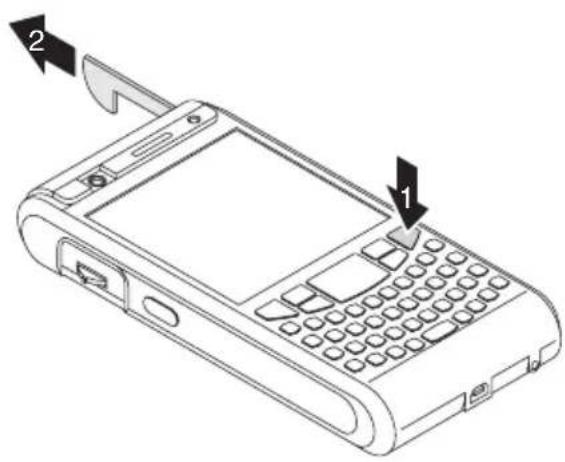
Diagram of a mobile phone with labeled parts, showing front panel and keypad interface▶ Press the End button to switch on the Pocket PC (1).
The Pocket PC is switched on.
▶ Pull out the pen in the direction of the arrow (2).
Calibrating the screen
The display of your Pocket PC is a touchscreen. To ensure that the touchscreen of your Pocket PC reacts correctly when touched with the pen, you will be asked to calibrate the touchscreen after the initial start-up.
▶ Touch the centre of the cross hairs that appear on the display with the stylus.
▶ You will need to repeat this procedure several times, whereby the cross hairs will appear at different locations on the display each time.
▶ Follow the instructions on the display.
Entering a PIN (optional)
If you are using a SIM card you will be asked to enter your PIN once the calibration process is finished.
▶ Enter your PIN.
Familiarising yourself with basic operation of the device
Next, the operating system provides a brief introduction to the operation of the Pocket PC with the pen after the initial start-up.
▶ Follow the instructions on the display.
Today screen
Following the introduction the Today screen appears. The Today screen shows all important current information at a glance. From this screen you have access to all programs and to the system settings.

Please also use the help function available on your Pocket PC if you want to know more about using the programs contained in the operating system.
Internet and intranet connections with CONNECTMOBILITY-E2C
CONNECTMOBILITY-E2C (E2C for short) is a tool that enables you to establish a connection to the Internet or to your company's intranet very easily by simply pressing a button.
With a few clicks you can change between your company WLAN, your private WLAN at home or a WLAN hotspot in a cafe or at the airport. You can connect to BT or IrDA via your GPRS-capable telephone without having to think about settings and automatically start your preferred application.

If you are using a SIM card from one of the major network operators in Europe then the pre-settings of your network operator will be automatically adopted.
Detailed information on the use of CONNECTMOBILITY-E2C can be found in the help file on your Pocket PC.
Starting CONNECTMOBILITY E2C
▶ Select Start - Programs - CONNECTMOBILITY E2C.
CONNECTMOBILITY-E2C is started.
User data dialogue
If additional data are required to establish the connection to the required target network, e.g. GSM, VPN, WLAN WPA PEAP, then they are requested after the "Connect" softkey is pressed - but before the actual connection is established.
The following data may be concerned depending on the type of connection:
- User name
- Password
- Domain
- RSA ID PIN
- RSA ID Token
GPRS/UMTS provider selection
If E2C determines while establishing a connection with a GPRS/UMTS network that you are not in your home country, E2C attempts to read out the home provider of your mobile phone to establish a GPRS/UMTS connection with the related settings. If E2C is unable to read out the home provider of your mobile phone, the dialogue "GPRS/UMTS provider selection" opens. Here you can provide E2C with the missing data required to automatically establish the GPRS/UMTS connection. E2C requires information on the country and the home provider of your mobile phone from you.
Data synchronisation
Two data synchronisation methods are available:
- Exchange Server
• ActiveSync
Data synchronisation via Exchange Server
Exchange Server allows you to synchronise data with a server directly via WLAN or GPRS.
Configuring Exchange Server
▶ Select Start - Programs - ActiveSync.
The ActiveSync window appears on the screen.
▶ Select Menu – Add Server Source or Menu – Configure Server.
The Server Settings window is then displayed.
▶ Enter the name of the server on which Exchange Server is running.
▶ Click on Next to confirm.
▶ Enter the user name, password and domain.
▶ If necessary click on Advanced to make further settings.
▶ Click on Next to confirm.
▶ Select the data you wish to synchronise via Exchange Server.
▶ If necessary click on Settings to make further settings.
▶ Click on Finish to confirm.
The data are synchronised with Exchange Server.
Synchronising data with Exchange Server
▶ Select Start - Programs - ActiveSync.
The ActiveSync window appears on the screen.
▶ Select Synchronize.
▶ Enter your password.
The data are synchronised with Exchange Server.
Data synchronisation with ActiveSync
With ActiveSync you can synchronise your data on your Pocket PC and your computer (e.g. Outlook data).
You can also use ActiveSync to upload new software onto your Pocket PC.
The USB cable and the ActiveSync software are provided for data synchronisation. ActiveSync is already installed on your Pocket PC. You only need to install ActiveSync on your computer.
Installing ActiveSync on your computer
You will find the ActiveSync program and the necessary driver on the supplied Microsoft Getting Started CD.
▶ Insert the Microsoft Getting Started CD in the optical drive of your computer.
The ActiveSync installation program will start.
If the installation program of ActiveSync does not start automatically, double-click on the file Setup.exe of ActiveSync.
▶ Follow the instructions on the display.
During the installation the software will attempt to establish a connection to the Pocket PC.

If you have not yet installed Outlook on your computer, you will need to install it on your computer before the first data synchronisation takes place between your Pocket PC and your computer. You will find Outlook on the supplied Microsoft Getting Started CD.
Performing a data synchronisation
After you have specified the desired and required settings for synchronisation in the ActiveSync Setup Wizard on your computer, the first synchronisation starts automatically.
You need to copy the data you have processed on your Pocket PC on the road onto your computer so that you can access the latest version of the data there as well. This procedure is conveniently enabled with data synchronisation:
In the ActiveSync program you can specify that the latest version of a file is checked and then automatically updated on the respective data carrier - regardless of whether it is the Pocket PC or a computer.
You can synchronise data between your Pocket PC and your computer via the cradle, using a USB cable or via Bluetooth or wireless LAN.
Information about how to synchronise data using ActiveSync can be found in the ActiveSync help file on your computer.
Connecting your Pocket PC and computer
flowchart
graph TD
    A["Computer"] -->|2| B["Switch"]
    B --> C["Device 1"]
    C --> D["Device 2"]
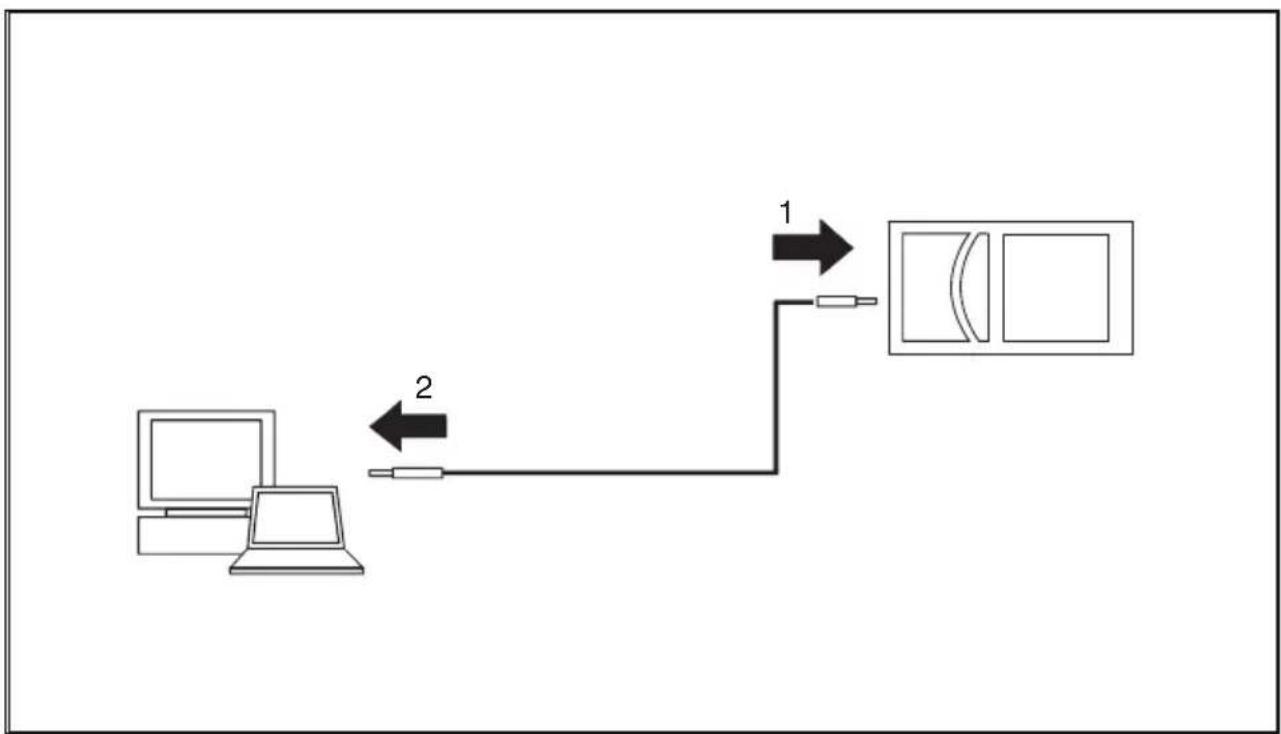
▶ Switch the computer on.
▶ Connect the USB cable to your Pocket PC (1) and to one of the USB ports (2) of your computer.
The Pocket PC is now connected to your computer. The ActiveSync partnership is established between your Pocket PC and computer, and the data are synchronised.

More detailed information about data synchronisation with ActiveSync can be found in the help file on your Pocket PC.
Using the cradle
With the cradle you can charge the battery in the Pocket PC and/or synchronise data between the Pocket PC and a computer.
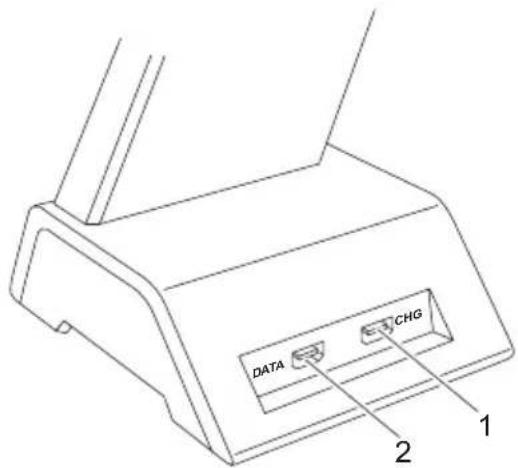
The cradle has two mini USB ports: one port for data synchronisation and one port for the mains adapter:
text_image
DATA CHG 1 21 = Port for the charging device
2 = Data synchronisation port
Selecting a location for the cradle
Place the cradle on a stable, flat and non-slip surface. In view of the multitude of different finishes used on furniture, it is possible that the rubber feet of the Pocket PC will mark the surface they stand on.
The cradle and the mains adapter should be at least 200 mm apart.
The Pocket PC and the cradle should not be subjected to extreme environmental conditions. Protect the Pocket PC and cradle from dust, moisture and heat.
Using the cradle for data synchronisation

Before the first data synchronisation between your Pocket PC and computer, you will need to install the program ActiveSync on your computer (see "Installing ActiveSync on your computer").
flowchart
graph TD
    A["Computer"] -->|3| B["Switch"]
    B --> C["Device 1"]
    C -->|2| D["Device 2"]
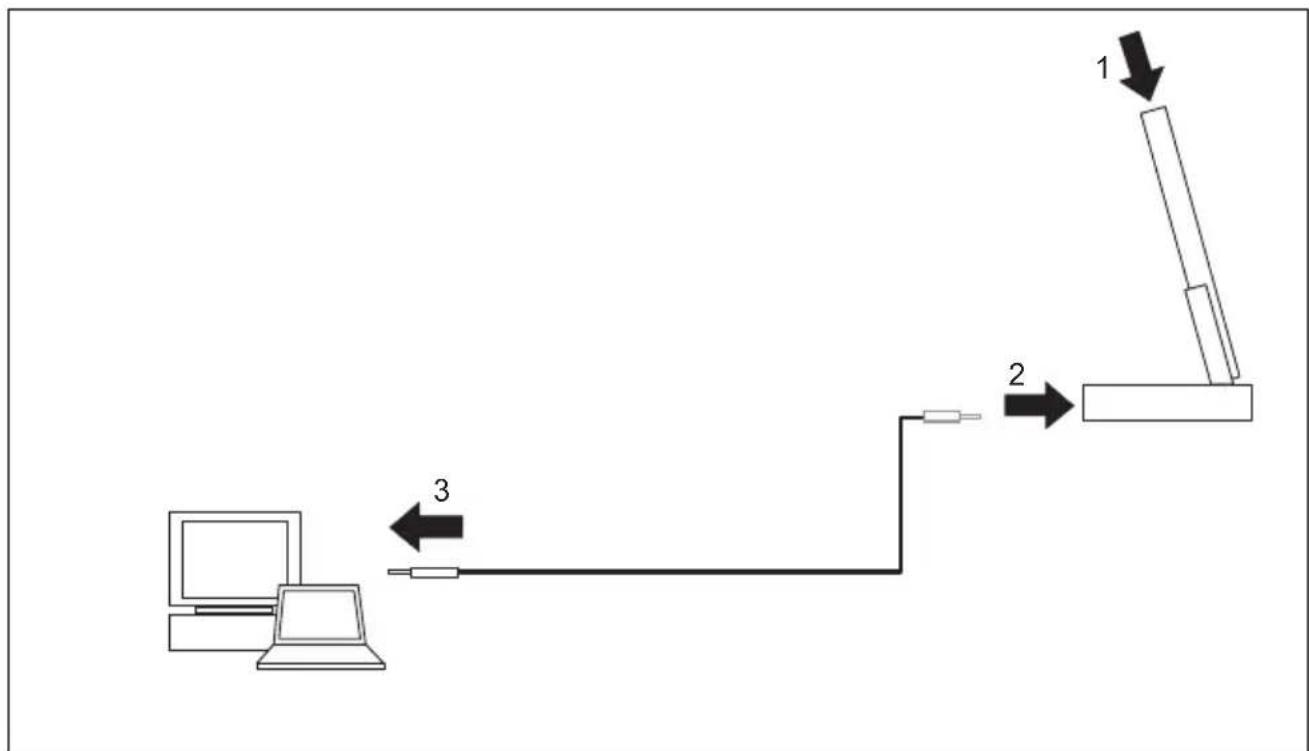
▶ Switch the computer on.
▶ Place the Pocket PC in the cradle (1).
Connect the USB cable to the data synchronisation port of the cradle (2).
▶ Connect the USB cable to one of the USB ports of your computer (3).
The Pocket PC is now connected to your computer. The ActiveSync partnership between your Pocket PC and your computer is established.
If the battery charge level of your Pocket PC is low, you should connect the mains adapter (see "Connecting the power adapter").
More information on data synchronisation can be found in the help file on your Pocket PC.
Using the online help
Your Pocket PC comes with a detailed online help function. You can call up the online help directly or context-sensitively from an application:
Starting the online help independently of an application:
▶ Click on Start – Help.
The Help window opens.
Click on Contents to view all of the available help topics.
Alternatively you can click on Search to find specific topics.
Starting the online help from an application:
You are in an application.
▶ Click on Start – Help.
A Help window pops up with topics related to the application.
Making telephone calls with the Pocket PC
Your Pocket PC is equipped with all of the functions of a modern mobile telephone. If you have a SIM card from a telephone network operator you can use it. Without a SIM card you will only be able to make calls to the emergency services.
Making a telephone call
The Pocket PC offers you various ways to make telephone calls:
Enter a phone number
You are in the Today screen.
▶ Enter the required telephone number via the keyboard.
▶ Press the Answer button.
The connection is established.
Select a phone number from your contacts
▶ Click on Start – Contacts.
You saved contacts are displayed.
▶ Touch the required contact.
The details for the selected contact are then shown.
▶ Touch the corresponding telephone number.
▶ Press the Answer button.
The connection is established.
Select a phone number from your list of calls
▶ Press the Answer button.
The online keyboard for telephony is displayed.
▶ Touch Recent Calls.
The list of recent calls is displayed.
▶ Touch the corresponding telephone number.
▶ Press the Answer button.
The connection is established.
Making emergency calls
You can make emergency calls with your Pocket PC even if you do not have a SIM card and without entering the PIN or a password.
▶ Enter the emergency call number directly.

If your PIN starts with the same numbers as an emergency number (e.g. 999), the characters that are the same as the emergency number may not be encrypted on the screen when you enter the PIN. As soon as you enter a number that is not part of the emergency number, the characters will be encrypted on the screen.
Answering an incoming call
On your Pocket PC, incoming calls are signalled by the selected ringtone/vibration alarm and a corresponding display on the screen.
▶ To answer the call, touch Answer on the screen.
or
▶ Press the Answer button.

You can also use the Ignore option if you would prefer not to answer the incoming call.
Ending the conversation
▶ Press the End button.
or
▶ Touch End on the display.
Displaying missed calls
Missed calls are indicated by the right-hand indicator flashing blue as well as the word Note on the bottom left of the footer.
▶ Touch Note to display the missed call.
or
▶ Press the left, preselected softkey button.
The number of missed calls is displayed.
▶ Select View to display the caller's telephone number.
or
▶ Click on Close to close the window without having the telephone number displayed.
Using the Voice Commander
With the aid of the Voice Commander speech recognition application you can save a voice identifier for each of your contacts. Once this has been set up, you only need to say the voice identifier in the Voice Commander application and your Pocket PC will automatically dial the telephone number of the contact.

For best results with the Voice Commander system, we recommend that you assign the Voice Commander application to one of the application keys – see "Configuring the application buttons".
Making a call via Voice Commander
▶ Select Start - Programs - Voice Commander.
Voice Commander is opened. You are prompted to speak a command.
Say "call
Once Voice Commander has been able to assign your text to a command you will be asked to confirm it.
▶ If the command has been correctly recognised say "yes".
The phone number of the contact is dialled.

Detailed information on the use of the Voice Commander system can be found in the help file on your Pocket PC.
Speed dial function
You can assign speed dial numbers to up to 99 contacts. These speed dial numbers allow you to dial required telephone numbers more quickly.
Programming the speed dial function
▶ Click on Start – Contacts.
You saved contacts are displayed.
▶ Touch the required contact.
The details for the selected contact are then shown.
▶ Select Menu – Add Speed Dial.
▶ Choose an available speed dial number, e.g. "29".
▶ Confirm with OK.
The speed dial number for your contact has now been saved.
Making a call via the speed dial number
▶ Press the Answer button.
The online keyboard for telephony is displayed.
▶ Enter * plus the speed dial number, e.g. "29".
The contact assigned to this speed dial number is displayed.
▶ Press the Answer button.
The connection is established.
Using the handsfree function
With the aid of the handsfree function you can make calls via the loudspeaker without having to hold the telephone to your ear. In the process, the loudspeaker volume and the microphone sensitivity are significantly increased.
▶ Press the Answer button.
The online keyboard for telephony is displayed.
▶ Enter the telephone number with the stylus pen.
▶ Press the Answer button.
The connection is established.
▶ Touch Handsfree.
or
▶ Press and hold the Answer button.
The handsfree function is now active, and the loudspeaker is switched on.
▶ Touch Handsfree Off to switch the loudspeaker off again.
or
▶ Press and hold the Answer button.
Muting the telephone
During a call you can mute the microphone of your Pocket PC to prevent the other person from being able to hear what you or someone else in the room is saying.
▶ Press the Answer button.
The online keyboard for telephony is displayed.
▶ Enter the telephone number.
▶ Press the Answer button.
The connection is established.
▶ Touch Sound Off.
The microphone is switched off.
▶ To switch the microphone back on, touch Sound On.
Call holding
This function allows you to put a call on hold without terminating it. In this case the person at the other end of the line will hear music while he or she is on hold. In the mean time you can for example dial a second telephone number and set up a second telephone connection.
▶ Press the Answer button.
The online keyboard for telephony is displayed.
▶ Enter the telephone number.
▶ Press the Answer button.
The connection is established.
▶ Tap Hold.
The call is put on hold. While it is on hold, the person at the other end of the line hears music.
▶ If you would like to set up a second telephone connection, touch the keyboard in the footer and dial the required number.
▶ To terminate the second call, touch End.
▶ Touch Alternate Line to speak to the first person again.

You can also combine two held calls into a conference call – see "Making a conference call".
Making a conference call
You have established two telephone connections, see "Call holding". You would like to combine these two calls to a conference call.
Setting up a conference call
▶ Touch Menu – Conference.
All connections are combined to a conference call.
Disconnecting all connections from the conference call
▶ Tap on End.
All connections are disconnected.
Disconnecting selected connections
▶ Touch Menu – Private.
All active connections are displayed.
▶ Tap on the connection you would like to terminate.
▶ Tap on End.
The selected connection is terminated. All other connections remain connected.
Making video telephone calls (optional)
Depending on the equipment level, your Pocket PC is supplied with a camera which enables you to make video telephone calls. Video telephone calls are also possible if the person receiving the call has video functionality without the corresponding camera.

Please check with your telephone network operator whether separate activation is required for this service.
GPRS does not support video telephony. Video telephone calls can only be made via a UMTS connection.
The quality of the video telephone call depends largely on the strength of the UMTS network. The video telephone call will be interrupted in the event of network fluctuations.
Answering an incoming video telephone call
On your Pocket PC, incoming video telephone calls are signalled by the selected ringtone/vibration alarm and a corresponding display on the screen.
▶ To answer the call, touch Answer on the screen.
or
▶ Press the Answer button.

You can also use the Ignore option if you would prefer not to answer the incoming call.
The video camera on the front of the device is activated, the camera window appears in the display and the connection is established.
▶ Position yourself in front of the video camera so that your picture is shown clearly on the display of the Pocket PC.
Making a video telephone call
You are logged into a UMTS network.
▶ Press the Answer button.
The Telephone application is displayed.
▶ Enter the required telephone number.
▶ Select Video.
The video camera on the front of the device is activated, the camera window appears in the display and the connection is established.
▶ Position yourself in front of the video camera so that your picture is shown clearly on the display of the Pocket PC.
Once a connection has been successfully established, the display on the Pocket PC will show the picture of the person you are calling.
Further options for video telephone calls
Further video telephony options are available in the Telephone window:
| Option Meaning | |
 | Interrupts the video transmission without terminating the video telephone call. |
 | Mutes the microphone. |
 | Switches between the cameras.By default the camera on the front of the device is used for video telephone calls.This function allows you to switch to the 2 megapixel autofocus camera on the back of the device. |
 | Changes the video settings:Both video pictures are the same size.Only the video picture of the person making the call is shown.Own video image is large, video image of the other person is small.Own video image is small, video image of the other person is large. |
| End | Terminates the video telephone call. |
Managing contacts
The Pocket PC offers you two ways to save contact details:
• Use the "Contacts" application to save the contact details directly onto your Pocket PC.
- Save the contact details on the SIM card (optional)
With the "Contacts" application, your Pocket PC offers an address book with comprehensive functions. You can save your contact data in a local address book on your Pocket PC.

Detailed information on the use of the "Contacts" application can be found in the help file on your Pocket PC.
Copying contact details from the Pocket PC to the SIM card
The "Contacts" application also allows you to copy contact data from the local address book of your Pocket PC to your SIM card.

The "Contacts" application displays both contacts from the local address book and contacts from the currently used SIM card. Contacts on the SIM card are marked with the SIM card symbol.
▶ Click on Start – Contacts.
The contacts are displayed.
▶ Touch the required contact.
The contact is opened.
▶ Select the menu Save to SIM.
The contact is copied to the SIM card.
Copying contacts from the SIM card to the Pocket PC
With the aid of the SIM Card Manager you can display the contact data on the SIM card and copy them to your Pocket PC.
▶ Select Start - Programs - SIM Contacts.
The SIM Card Manager is opened with the contact data saved on the SIM card.
▶ Select Copy now to transfer the contact data from the SIM card to your Pocket PC.
The contact data are copied across.
Displaying services on the SIM card (network provider specific)
With the aid of the "SIM Toolkit" application you can also display the services, e.g. Info-Services, made available by your telephone network provider with your SIM card.
▶ Select Start - Programs - SIM Toolkit.
The available services are displayed.

Please contact your telephone network provider for more information about the services available.
SIM security
If you are operating your Pocket PC with a SIM card, the system will ask you to enter your PIN number whenever you switch the telephone function on or off, completely shut down the device or change the battery and/or the SIM card.
However, you can also deactivate the PIN request in the device settings if you would prefer to start up your Pocket PC without being asked for your PIN number:
▶ Click on Start – Settings – Telephone.
▶ Place a tick next to the option Switch off PIN request.
The PIN is no longer requested when the device is started up.
SIM Lock

Depending on your telephone network provider, your Pocket PC may have a SIM lock, i.e. you may not be able to use your device with SIM cards from other network providers.
For more information about how to cancel the SIM lock, please contact your telephone network provider.
Blocking your SIM card
The SIM card is provided by the operator of your telephone network.

Please contact the operator of your telephone network if you would like to have your SIM card blocked.
Configuring telephone settings
The SIM card for telephony functions is provided by the operator of your telephone network. As a result, the telephone settings depend to a large extent on the functions made available by your telephone network provider.

Detailed information on the configuration of telephone settings can be found in the help file on your Pocket PC.
Network selection
If you use more than one network you can define one of the networks as your preferred network.
▶ Click on Start – Settings – Personal.
▶ Select Telephone.
The window with the settings for the Telephone application is now displayed.
▶ Select the Network tab.
▶ Select Find network.
Your network connections are updated.
▶ Tap on Define networks.
The strongest network is automatically selected.
or
▶ Under the network selection options select Manual.
A list of the available networks is displayed.
▶ Choose your preferred network.
▶ Confirm your settings with OK.
The network is selected.
Setting up a mailbox number

The mailbox number is provided by your telephone network provider.
▶ Select Start – Settings – Personal – Telephone – Services.
In the scroll menu select the entry Mailbox and SMS.
▶ Select Request settings.
The settings are read in from the network.
▶ Enter your mailbox number under Mailbox.
▶ Confirm with OK.
The mailbox number is set up.
Setting up the SMS Service Centre

The number of your SMS Service Centre is provided by your telephone network provider and may already be pre-selected.
▶ Select Start – Settings – Personal – Telephone – Services.
In the scroll menu select the entry Mailbox and SMS.
▶ Select Request settings.
The settings are read in from the network.
▶ Enter the number of your SMS Service Centre under SMS Service Number.
▶ Confirm with OK.
The SMS Service Centre is set up.
Setting up call diversion
With your Pocket PC you can divert incoming calls – e.g. when your device is switched off, or if you are currently using a different telephone, or in case you are already answering another call on the line.
▶ Select Start – Settings – Personal – Telephone – Services.
▶ Select Call diversion in the scroll menu.
▶ Select Request settings.
The settings are read in from the network.
▶ Enter the desired settings for the call diversion.
▶ Confirm with OK.
Call diversion is set up.
Operating the Pocket PC
This chapter contains descriptions of the operating elements of your Pocket PC as well as information about how to use it.

Please refer to the notes in "Important notes".
Using the profiles of your Pocket PC
Default profiles provide convenient access to frequently used system settings, tailored to the particular way in which you are using the device. With the aid of these profiles you can control power consumption or the radio modules of your device. You can also use profiles to control data behaviour and the acoustic/visual behaviour.
| Profile Description | |
| Standby The Pocket PC is | switched to Standby mode. |
| Switching off The Pocket PC is completely switched off. | |
| In-flight mode | All radio modules (telephone, WLAN, Bluetooth) are deactivated. The Pocket-PC is operated as a handheld only. |
| Direct push Deactivates or | activates the E-mail push function, see "Receiving e-mails and other data automatically in real-time (e-mail push)". |
| Outside Mode for loud environments. The volume of acoustic signals is increased. | |
| Meeting mode | Acoustic signals are switched off. Vibration function is active. |
| Normal mode The volume of the acoustic signals corresponds to the standard volume of the device. | |
| Maximum power | Mode for high-speed working with comparatively high power consumption. |
| Maximum battery life Energy saving mode. | |
| Automatic | The Power Manager determines the optimum power consumption mode and the processor performance. The CPU automatically switches between the power profiles according to the required use. |
| BT handsfree Switches the | Pocket PC to Bluetooth handsfree (optional). |

If you would like to switch off the vibration function as well as the system tones, you can activate silent mode by pressing and holding the star key.
Selecting profiles
▶ In the Today screen, press and hold the End key.
The profile list is displayed.
▶ Use the navigation key to select the desired profile.
The profile is activated.
▶ Confirm with the Enter key.
Configuring profiles
▶ In the Today screen, press and hold the End key.
The profile list is displayed.
▶ Use the navigation key to select the desired profile.
▶ Select Menu - Edit.
▶ Enter the settings for the profile and confirm with OK.
The new profile settings are saved.

Detailed information on the configuration of the profiles can be found in the help file on your Pocket PC.
Switching the Pocket PC on and off
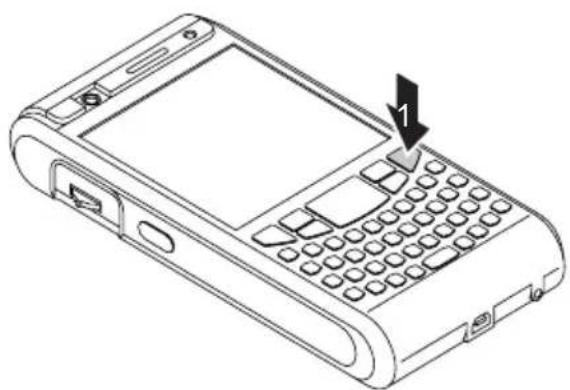
The Pocket PC is switched on and off with the End key. After certain applications or the installation of new programs, it may be necessary to restart the Pocket PC with a soft reset. It is only necessary in rare and exceptional cases to reset the Pocket PC to the factory defaults.
natural_image
Line drawing of a mobile phone with keypad and control buttons (no text or symbols)1= End button
Switching the Pocket PC off and on during normal use (Standby mode)
Switching the Pocket PC to Standby mode
▶ From the Today screen, briefly press the End button.
The Pocket PC is switched to Standby mode.

If you have specified a switch-off time in the system settings, your Pocket PC will automatically switch to Standby mode after this specified time.
There are two ways to switch on your Pocket PC:
Switching on with the End button
▶ Briefly press the End key.
▶ If the device lock is activated, press and hold the Enter button afterwards.
The Pocket PC is switched on.
Switching on with the application buttons
By default, you can also switch your Pocket PC on by briefly pressing one of the application buttons.
▶ Briefly press any one of the application buttons.
The applications assigned to the respective button appear on the screen.

With the appropriate setting in FSC KeyLock you can prevent the Pocket-PC being started by pressing the application button.
Detailed information about FSC KeyLock can be found in the help file on your Pocket PC.
Switching off the Pocket PC to save battery life
Switching off
▶ In the Today screen, press and hold the End key.
The profile list is displayed.
▶ Select the profile Switch off.
The profile is activated. All programs are closed and the Pocket PC is completely switched off. The power consumption of the Pocket PC is reduced to a minimum.
▶ To switch the Pocket PC back on again, press and hold the End button.
Resetting the Pocket PC
Soft reset (warm start)
After certain applications or the installation of new programs, it may be necessary to restart the Pocket PC with a soft reset.

Unsaved data will be lost. Shut down all programs before you restart the Pocket-PC.
natural_image
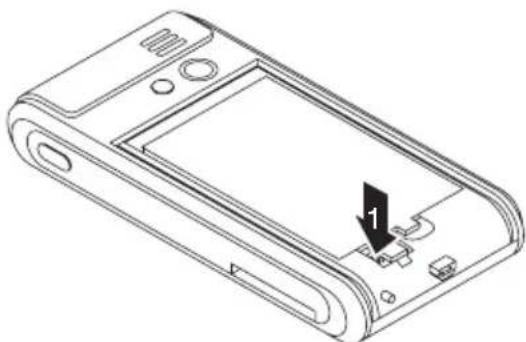
Line drawing of a mobile phone casing with a labeled component (no text or symbols present)▶ Slide off the battery cover from the Pocket PC.
▶ Briefly press the stylus tip into the soft reset opening (1).
The warm boot is carried out.
Cold starting and resetting factory default settings
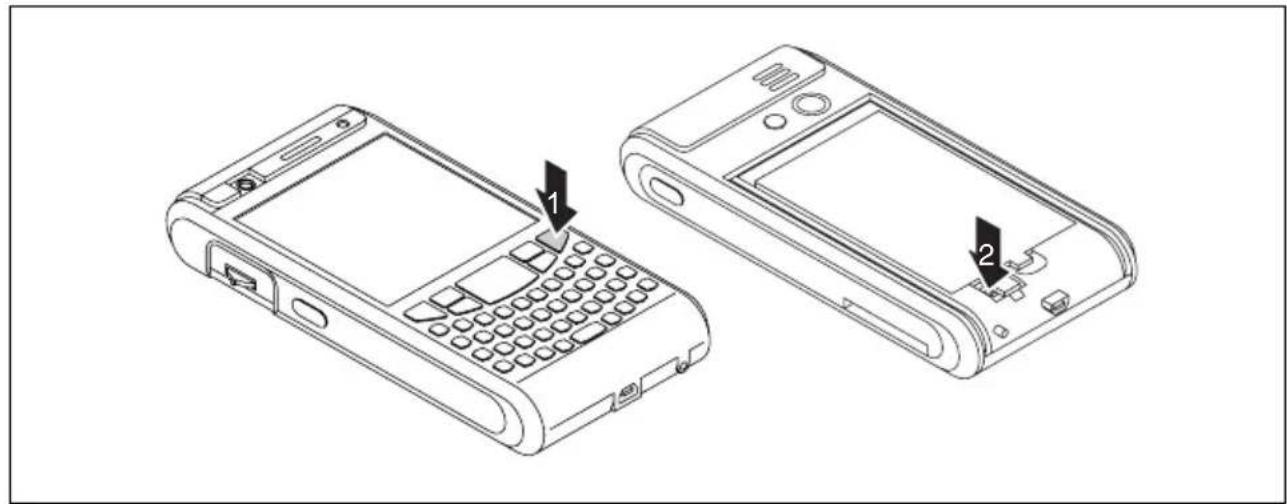
If your Pocket PC stops working and switching off and on with the End button and the soft reset is unsuccessful, you can perform a cold start with your Pocket PC or reset it to the factory default settings.

Unsaved data will be lost. Only carry out a cold start and resetting when the battery is fully charged.
natural_image
Line drawing of two mobile phones with labeled buttons, showing front and back views (no text or symbols present)▶ Slide off the battery cover from the Pocket PC.
▶ At the same time press and hold the End button (1) and press the tip of the stylus pen into the soft reset opening (2).
▶ Release the end button as soon as a list of possible options is displayed on the screen.
▶ Select Skip if you would like to perform a normal cold start.
▶ To restore the Pocket PC to the factory defaults select Factory Defaults.
The selected option is performed.
It may take a few minutes for the factory defaults to be restored. At the end an acoustic signal sounds. Please follow the further instructions on the display.

The data memory is deleted when the Pocket PC is restored to its factory defaults. This means: You will lose all data (documents, additionally installed programs, personal settings) that you haven't saved elsewhere. Always back up your data on a regular basis (memory card, FSC Backup).
If you have set a password with FSC SecureLock then this password will remain.
Out and about with the Pocket PC
Please observe the following information when you are out and about with your Pocket PC.
Transporting Pocket PC
▶ Switch the Pocket PC off.
▶ Disconnect the cables from the Pocket PC.
If the device needs to be shipped, use the original packaging or other suitable packaging to protect it from damage caused by mishandling.
▶ Use a bag for the Pocket PC when transporting it. The bag offers protection against knocks and bumps and is available as an accessory.
In some countries the use of Bluetooth is restricted or completely prohibited. Ask about the regulations in the country you will be travelling in before starting your trip. As a precaution, switch Bluetooth off in case there is any uncertainty at your place of residence.
▶ Protect the Pocket PC from severe shocks and extreme temperatures (e.g., direct sunlight in a car).

If you are travelling abroad, check that the mains adapter can be operated with the local mains voltage. Do not use any other voltage converter!
In-flight usage
If you wish to use your Pocket PC during a flight as a pure handheld without telephony functions, Bluetooth or WLAN, check with the airline first whether and under what conditions this is allowed.
Before embarking on the flight, make sure that you switch off all telephony functions, Bluetooth and WLAN functions. To do this, select the "In-flight mode" profile – see "Using the profiles of your Pocket PC".
Usage while driving
▶ Use a handsfree system, e.g. a handsfree installation in the vehicle or the optional Bluetooth headset, and select the BT handsfree profile before you start driving – see "Using the profiles of your Pocket PC".
Cleaning the Pocket PC
▶ Switch the Pocket PC off.
▶ Pull the power plug out of the mains outlet.

Do not use any cleaning agents that contain abrasives or may corrode plastic.
Please ensure that no liquid enters the Pocket PC.
▶ Clean the surface of the device with a dry cloth.
If it is very dirty, you can clean the device and the display with a damp cloth.
Charging the battery
Your Pocket PC is equipped with a powerful battery. When you're on the road your Pocket PC is supplied with power by the integrated battery.

The battery is not charged on delivery and should be charged prior to the first mobile use.
You have three ways of recharging the battery:
- You can connect the Pocket PC directly to an electrical outlet with the mains adapter.
- You can connect the cradle to an electrical outlet with the power adapter and insert the Pocket PC into the cradle.
- You can connect the Pocket PC to a computer's USB port using a USB cable.
You can continue to work with the Pocket PC during charging. This extends the charging time.

Please read the information about the mains adapter in "Connecting the power adapter" chapter.
Recharging the battery directly via the mains adapter
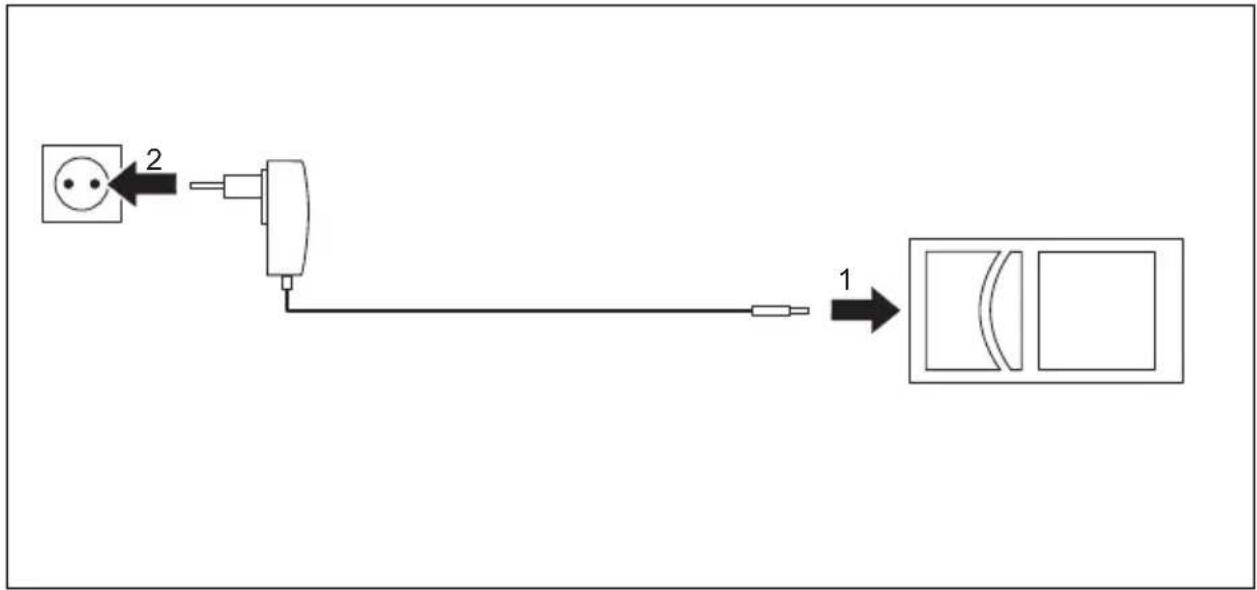
You can connect the mains adapter directly to the Pocket PC.
text_image
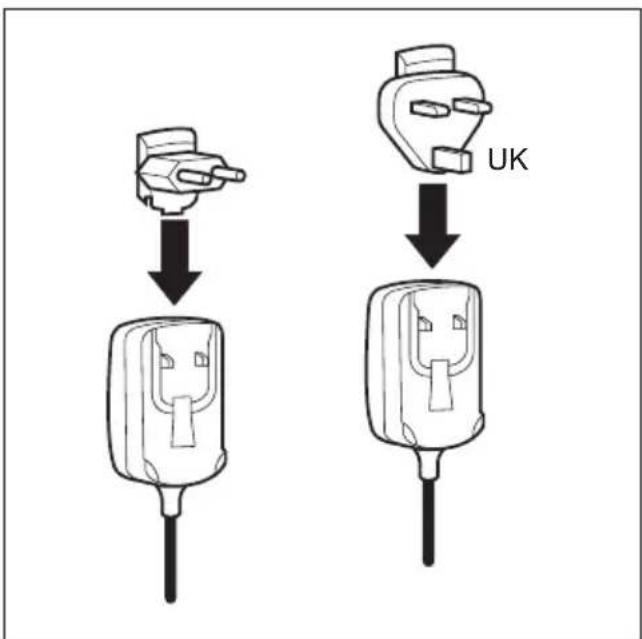
UK▶ Slide the suitable mains adapter plug into the mains adapter in the direction of the arrow until it engages.
flowchart
graph LR
    A["Power Source"] -->|2| B["Switch"]
    B --> C["Output Unit"]
▶ Connect the mains adapter cable to the mini USB port on the Pocket PC (1).
▶ Plug the mains adapter into a mains outlet (2).
The installed battery is now charged. The power-on indicator flashes orange.
When the battery is fully charged, the battery indicator lights continuously orange.
Charging the battery via the cradle
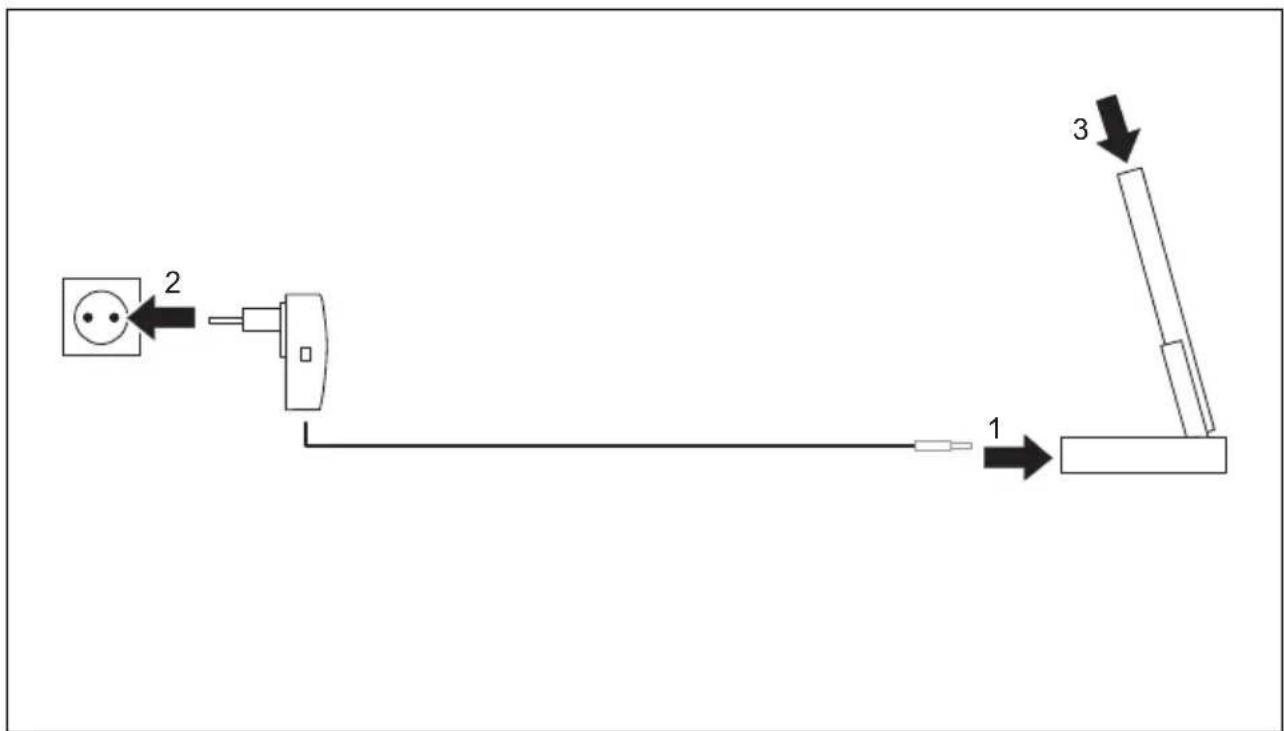
You can connect the mains adapter to the cradle:
flowchart
graph TD
    A["Power Source"] --> B["Switch"]
    B --> C["Tank"]
    C --> D["Terminal"]
    style A fill:#f9f,stroke:#333
    style B fill:#ccf,stroke:#333
    style C fill:#cfc,stroke:#333
    style D fill:#fcc,stroke:#333
▶ Connect the mains adapter cable to the charging device port on the cradle (1).
▶ Plug the mains adapter into a mains outlet (2).
▶ Place the Pocket PC in the cradle (3).
The installed battery is now charged. The power-on indicator flashes orange.
When the battery is fully charged, the battery indicator lights continuously orange.
Charging the battery via a USB port
▶ Connect the USB cable to your Pocket PC.
- Connect the USB cable to the computer's USB port.

Depending on the charge current the charging process may take longer than with a mains adapter.
Optimising battery life
When you have completely charged the battery, you can operate the Pocket PC without a mains power connection. However, it is not possible to exactly specify the maximum operating time, as different applications use more or less energy.
In the system settings you can make settings that help you save energy when using your Pocket PC – see “Energy saving functions”. Doing this will help you to optimise battery life.
Inserting and removing an expansion card
A slot enables the operation of an expansion card of the type "Secure Digital I/O" or "MultiMediaCard".

Observe the manufacturer's instructions when using the expansion cards. Never use force when inserting or removing an expansion card. Make sure that no foreign objects enter the slot.
Inserting the expansion card
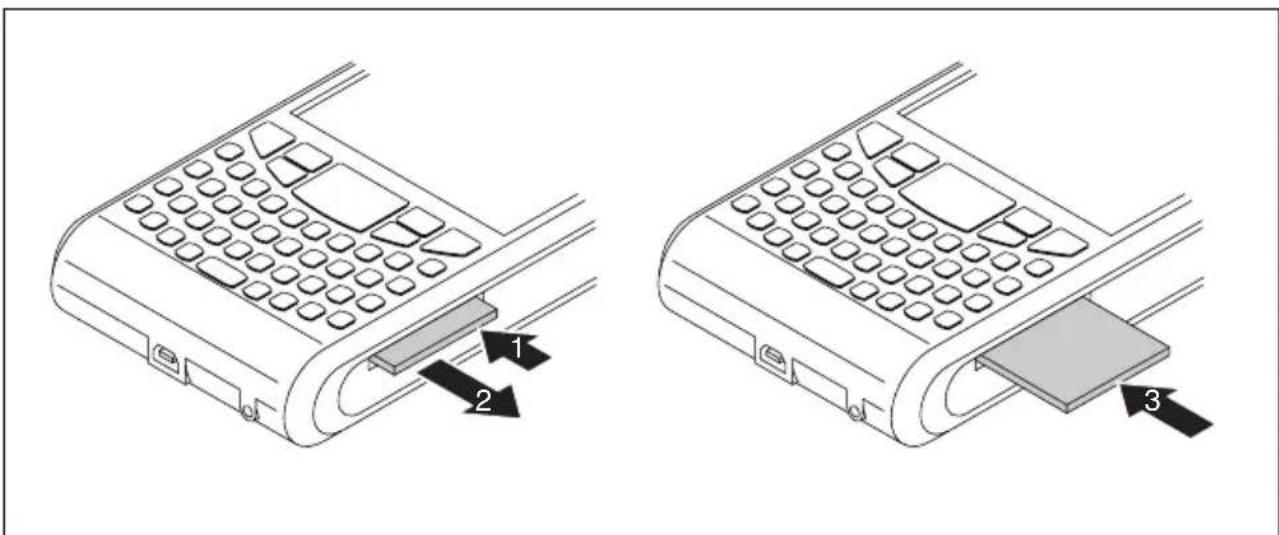
text_image
Technical diagram showing two views of a lander's keyboard with labeled parts 1, 2, and 3.If necessary, also press on the edge of the placeholder so that the placeholder is slightly pushed out of the slot (1).
▶ Pull the placeholder out of the Pocket PC (2).
▶ Carefully push the expansion card into the slot (3).
The expansion card can protrude by one to several millimetres (depending on the type of expansion card).

Keep the placeholder for the expansion card in a safe place. When you remove the expansion card again, you should reinsert the expansion card placeholder. This prevents foreign matter from getting into the slot.
Removing the expansion card
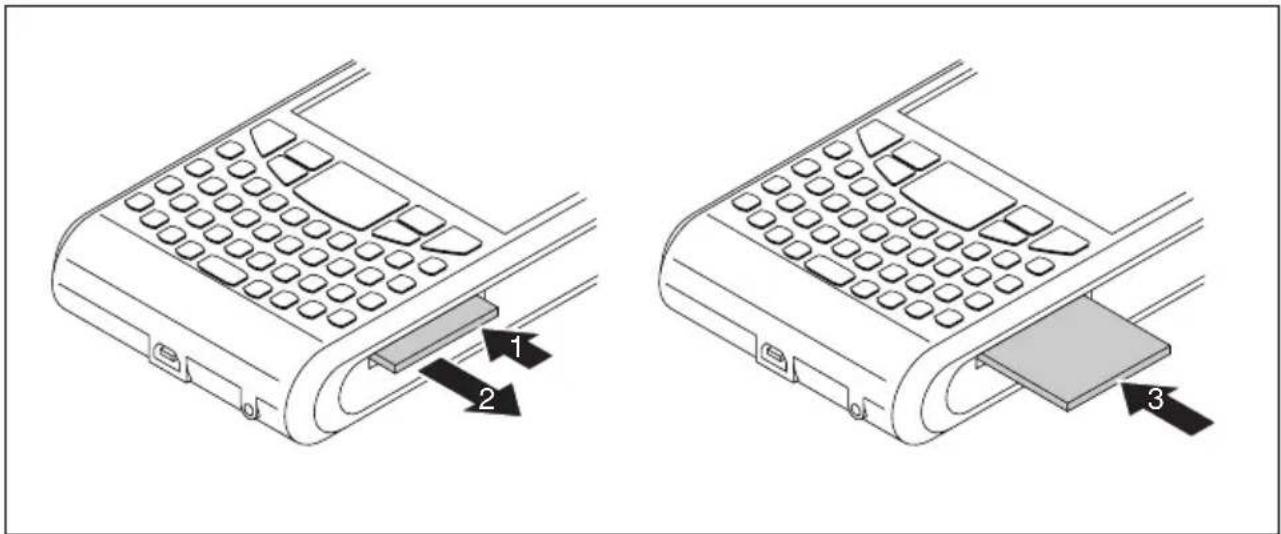
text_image
Technical diagram showing two views of a remote control device with labeled parts 1, 2, and 3.▶ Press on the edge of the expansion card so that the expansion card slightly jumps out of the slot (1).
▶ Slide the expansion card out of the Pocket PC (2).
▶ Insert the placeholder into the slot again (3) if necessary.
The placeholder protrudes by one to two millimetres.
Using the Pocket PC as a USB Host device
natural_image
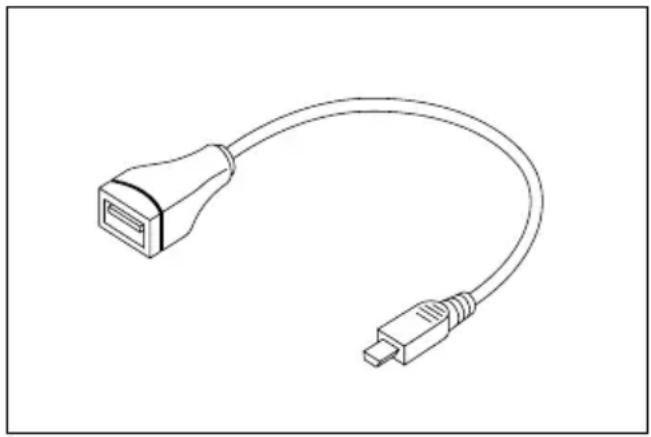
Line drawing of a USB cable with connector port (no text or symbols)With the optional USB Host cable you can use your Pocket PC as a USB Host device and connect various USB devices, such as a MEMORYBIRD, to the Pocket PC.

You can connect USB devices from Fujitsu Siemens Computers (e.g. MEMORYBIRD or STORAGEBIRD) immediately.
If you want to connect other USB devices, ask your dealer whether you will need to install corresponding drivers first.
The current consumption of the USB device must not exceed 100 mA (at +5 V). USB devices with a current consumption of more than 100 mA must be supplied with power via their own power supply.
▶ Select Start – Settings – System – USB Mode.
The window for selecting the USB mode pops up.
▶ Select the USB Host option.
▶ Confirm with OK.
▶ Connect the USB host cable to the mini USB port on the Pocket PC.
▶ Connect the USB device (such as a MEMORYBIRD) to the USB port of the USB Host cable.
The USB device is now connected to your Pocket PC.
If the battery charge level of your Pocket PC is low, you should connect the mains adapter (see "Connecting the power adapter").
▶ When you no longer need to operate the Pocket PC as a USB Host, change the USB mode back to USB Client.
Configuring device settings

Detailed information about how to configure device settings such as the date, time, alarms, background images, tones, application and task displays etc. can be found in the help file on your Pocket PC.
Adapting menus
Frequently used programs appear in the Start menu. You can adapt the Start menu to meet your needs.
▶ Touch the Menus symbol under Start - Settings - Personal.
A list of programs/applications appears.
To remove programs from the Start menu, click in the checkbox of the program. The check mark is removed from the checkbox.
To add programs to the Start menu, click in the checkbox of the desired program. A check mark appears in the checkbox.
Fast access to programs via FSC SpeedMenu
Do you want fast access to programmes but all application buttons are already assigned? Do you always open the same documents and folders? Do you sometimes miss having an extra hand for using the stylus?
Use FSC SpeedMenu and accelerate daily processes on your Pocket LOOX!
• Create and organise your own list of frequently used documents, programs and folders.
- Open them quickly directly from the menu.
- One-handed or stylus operation as desired.

Detailed information on this topic can be found in the help file on your Pocket PC.
Creating messages
Just like any other mobile phone, you can use your Pocket PC to send SMS and MMS messages as well as e-mails.
Incoming messages are indicated with the die LEDs (see "Indicators (LEDs) and status indicators in the display") and a message on the screen and, depending on the device settings, via a signal tone or vibration alarm.
Inbox
You can use the Inbox to check and manage all incoming and sent message types (SMS, MMS, e-mail), as well as to create and send new messages.
The last messaging application that was used is always active in the window, e.g. MMS or e-mail.
All message types have their own account with subfolders.
Via the Inbox menu you can display the accounts and subfolders for the active message type or for a different message type:
- Trash
Draft - Inbox
• Outgoing messages - Sent messages
With the aid of the Sort by menu you can also display the messages according to certain criteria:
- Message type
- From
- Date received
- Subject
Use the New function to create a new message of the currently selected message type.
Display inbox
▶ Click on Start – Messaging.
The inbox is displayed.
▶ Select the required message type and the required subfolder via the Inbox.
All messages of the selected type are displayed.
SMS messages
You can also use your Pocket PC to create SMS text messages in exactly the same way as a normal mobile telephone. Each SMS text message can contain a maximum of 160 characters.
Creating and sending SMS messages
▶ Click on Start – Messaging.
▶ Click on the dropdown menu Inbox.
▶ Tap on the SMS account.
▶ Select New.
A window opens for writing the new SMS.
▶ Enter the addressee and the text message for the SMS.
▶ Select Send.
The SMS message is sent.

Detailed information on SMS messaging can be found in the help file on your Pocket PC.
Managing SMS messages on the SIM card
With the SMS Manager you can display all of the messages saved on your SIM card, transfer them to your Pocket PC or delete them from the SIM card.
▶ Select Start - Programs – SMS Manager.
The SMS manager is displayed together with the SMS messages saved on the SIM card.
▶ Select the required SMS message.
▶ To copy an SMS message into the Inbox of your Pocket PC, select Save – Save to Inbox.
▶ To copy all SMS messages into the Inbox of your Pocket PC, select Save – Save All To Inbox.
Do delete an SMS message from the SIM card, select Delete – Delete From SIM.
Do delete all SMS messages from the SIM card, select Delete – Delete All SMS.
▶ Select OK to exit the SMS Manager.
MMS messages
MMS (Multimedia Messaging Service) messages are messages which can contain multimedia objects like pictures, sound or video clips (3GP, MP4, AVI, WMV). You can attach files with a maximum size of up to 300 kB.
Before you can send any MMS messages you will need to configure your MMS application, see "Configuring the MMS application".

Your telephone network provider will generally provide you with the data for your MMS connection.
Configuring the MMS application
In order to configure your MMS application, you will need to define your MMS connection and an MMS profile.
Configuring the MMS connection
▶ Click on Start – Settings.
▶ Select the Connections tab.
▶ Select the Connections icon.
▶ Select Advanced.
▶ Select Find networks.
▶ Under Use programs with automatic Internet access click on New.
The ISP name window appears on the screen.
▶ Enter MMS in this field..
▶ Select the Modem tab.
▶ Select New.
▶ Under Enter name of connection enter the name "My connection".
▶ From the Select modem dropdown list select the entry Mobile radio connection (GPRS).
▶ Select Next.
The My connections window appears on the screen.
▶ Under Access point name, enter the name for the access point provided to you by your telephone network provider.
▶ Select Next.
▶ Enter the user name, password and domain given to you by your telephone network provider.
▶ Click on Finish to confirm your entries.
Your MMS connection is configured.
Configuring the MMS profile
You are in the Today screen. Your MMS connection is configured.
▶ Click on Start – Messaging.
The inbox is displayed.
▶ Click on Menu – MMS Settings.
The Settings window appears on the screen.
▶ Choose any profile and tap on Edit.
The Profile Settings window is displayed.
▶ Enter the profile settings provided by your telephone network provider.
▶ Click on Finish to confirm your entries.
Your MMS profile is configured.
Creating and sending MMS messages
▶ Click on Start – Messaging.
▶ Click on the dropdown menu Inbox.
▶ Tap on the MMS account.
▶ Select New.
The window with the new MMS is opened.
▶ Enter the addressee and the subject of the MMS.
To attach a picture or video clip, select Menu – Insert – Picture or Menu – Insert – Video and select the picture or video you would like to attach.
The picture or video clip is displayed in the MMS window.
To attach an audio file, select Menu – Insert – Voice note and select the audio file you would like to attach.
The audio file is displayed in the MMS window.
To attach a different file type, select Menu – Insert – File and select the file.
The file is displayed in the MMS window.
▶ Select Enter text and type in your text message.
▶ Select Send.
The MMS message is sent.
With the Pocket PC you have various options for sending and receiving e-mails:
Private mail:
- Via a POP3, SMTP or IMAP4 account from your ISP
Company mail:
• Via a VPN corporate network
- Via ActiveSync
In order to be able to send e-mails you will therefore need a suitable e-mail account from your ISP or a suitable e-mail account on a VPN corporate network (Virtual Private Network).
Setting up e-mail accounts for POP3, SMTP or IMAP4
▶ Click on Start – Messaging.
▶ Click on the dropdown menu Inbox.
▶ Tap on the e-mail account.
▶ Select Menu – Tools – New Account.
▶ Enter the required data.
▶ Click on Finish to confirm your entries.
Setting up an e-mail account for the VPN corporate network

Your ISP or administrator will generally be able to provide you with the data for your e-mail account.
▶ Select Start - Programs - ActiveSync.
The ActiveSync window is opened.
▶ Select Menu – Add Server Source or Menu – Configure Server.
The Server Settings window is opened.
▶ Enter the server address.
▶ Click on Next to confirm.
▶ Enter the user name, password and domain.
▶ Click on Finish to confirm your entries.
Setting up e-mail sending via ActiveSync
Connect your Pocket PC to your computer, see "Connecting your Pocket PC and computer".
▶ Follow the instructions on the display.
Creating and sending e-mails
With your Pocket PC you can easily send e-mail messages with attachments (photos, voice notes, files).
▶ Click on Start – Messaging.
▶ Click on the dropdown menu Inbox.
▶ Tap on the e-mail account.
▶ Select New.
The window with the new e-mail is opened.
▶ Enter the addressee, the subject and the message.
▶ Select Send.
The e-mail is sent.

Detailed information on creating and sending messages can be found in the help file on your Pocket PC.
Downloading e-mails from a server (e-mail pull)
The process for downloading e-mails from a server depends on your e-mail account:
- If you have an Outlook e-mail account then you can transfer your e-mails via ActiveSync to your handheld – see "Data synchronisation with ActiveSync".
- If you have an ISP e-mail account or a VPN server connection then you will need to log on to the Internet or network.
▶ Click on Start – Messaging.
▶ Click on the dropdown menu Inbox.
▶ Tap on the e-mail account.
▶ Click on Menu – Send/Receive.
Any new e-mails on the server are transferred to the Pocket PC, and e-mails in the "Outgoing messages" folder of your Pocket PC are transferred to the server for sending.
Receiving e-mails and other data automatically in real-time (e-mail push)
If you have a data connection to a mobile network provider (GPRS/UMTS) for your Pocket PC then your e-mails, calendar data, contact data, tasks etc. can be delivered from the network to your Pocket PC in real-time via e-mail push.
If your device is switched off (Standby mode) when new data are received via e-mail push then the LED will start to flash.
The following conditions must be satisfied in order to use e-mail push:
- The server must support e-mail push.
- Exchange Server 2003 Service Pack 2 is installed.
- Direct push has been set up by your administrator on your Pocket PC.

Please consult your administrator if you have any queries.
In general, e-mail push should already be activated on your device after being set up by the administrator.
To deactivate e-mail push, you will need to deactivate the corresponding profile on your Pocket PC:
▶ In the Today screen, press and hold the End key.
The profile list is displayed.
▶ Select the profile Direct Push.
The profile is deactivated.
E-mail push is deactivated.
▶ To reactivate e-mail push, select the profile Direct Push again.
The profile is activated.

Detailed information on adjusting the device behaviour when e-mail push is activated can be found in "Configuring device behaviour when E-mail push is activated".
Using the Internet
In order to use the Internet you will need to have Internet access via an ISP or on a VPN corporate network (Virtual Private Network).
In some cases your Internet access may already be pre-configured on your device. If this is the case you will simply need to launch Internet Explorer – see "Accessing the Internet with Internet Explorer".
Otherwise you can configure your Internet access via FSC CONNECTMOBILITY-E2C. Detailed information on this topic can be found in the help file on your Pocket PC.

Your ISP or administrator will be able to provide you with the required Internet access data.
Accessing the Internet with Internet Explorer
With FSC CONNECTMOBILITY-E2C you can set up a connection to the Internet or to your company's intranet via WLAN, GSM or GPRS at the push of a button.
Your Pocket PC uses Internet Explorer Mobile as its Internet browser. This offers extensive browser functionality.
Calling up Internet Explorer Mobile
You have selected the desired connection type with FSC CONNECTMOBILITY-E2C and established a connection.
▶ Click on Start – Internet Explorer.
Internet Explorer is displayed.

Detailed information on the use of Internet Explorer Mobile and FSC CONNECTMOBILITY-E2C can be found in the help file on your Pocket PC or in "Internet and intranet connections with CONNECTMOBILITY-E2C".
Using GPS functions
With a GPS receiver and navigation software you can use the Pocket PC as a navigation system. Depending on the equipment, the GPS receiver is either integrated or available as an external accessory.

Map materials for your Pocket PC are available from retailers on DVD or on memory cards or via an online shop.
You have two options for using the navigation software on your Pocket PC:
- You can use the navigation software on a preinstalled expansion card.
- You can install the navigation software via your computer, e.g. from a DVD.

To register your navigation software you will require the serial number of the navigation software and possibly also the device ID of your Pocket PC.
The device ID will be displayed after the initial start-up of the navigation software if necessary.
Register your navigation software and your map materials as described in the instructions for the navigation software.
A description of how to use the navigation software is provided in the instructions on the navigation software.

If the reception signal is weak, you can connect an external GPS antenna. The external GPS antenna improves performance under difficult reception conditions.
The external GPS antenna is available as an accessory.
GPS connects to COM6 at 9600 Bit/s.
Detailed information on this topic can be found in the help file on your Pocket PC.
FSC GPSLocator
FSC GPSLocator is demonstration software which illustrates how the GPS receiver of your Pocket LOOX device works.
When you start the FSC GPSLocator the GPS receiver is also activated. Exiting the programme deactivates the GPS receiver.
The GPS module is calibrated the first time you start it. This can take several minutes. When you subsequently start the device your GPS receiver will be ready for use in just a few seconds.
Inside a building you will not normally be able to receive a GPS signal. It is therefore best to calibrate the GPS receiver out in the open.
GPSLocator shows you the GPS coordinates of your current location. If you are on the move with the device - either on foot or in the car - the direction of movement and speed are also displayed.
The POI Finder is an application which helps you to find your way back to a previously saved position.
Using the camera functions (optional)
Depending on its equipment level, your Pocket PC will come with two integrated cameras: one VGA camera on the front and one 2 megapixel autofocus camera on the back of the device (resolution: 1600 x 1200).
You can use the VGA camera for video telephone calls – see "Making video telephone calls".
With the 2 megapixel autofocus camera you can record both individual still photographs as well as short video sequences.
2 megapixel autofocus camera
Supported file formats
| File type Formats | |
| Pictures | BMP, JPG |
| Video AVI, WMV, MPEG4, 3GP |
Starting the application "Pictures & Videos"
You can create and manage pictures and videos with the Pictures & Videos application.
▶ Select Start - Programs – Pictures & Videos.
The application Pictures & Videos is opened.
Starting the camera directly
▶ Push the application button 5: Camera
The camera is started.
Taking pictures
The camera window is open.

You can focus manually by gently pressing application button 5.
▶ To take a picture, press application button 5.
The picture is taken and displayed in the Pictures & Videos window as a full-size picture.
▶ Select Camera to take more pictures.
▶ Select OK to return to the overview of all pictures and videos.
Recording a video sequence
The application Pictures & Videos is opened.
▶ Select Camera.
or
▶ Tap the Camera icon.
The camera window opens.
▶ Select Menu – Video.
The camera is switched to video mode.
▶ To start the video recording, press application button 5.
The video recording starts.
▶ To stop the video recording, press application button 5 again.
The video recording stops.
▶ If you would like to record more video sequences, press application button 5 again.
▶ Select OK to return to the overview of all pictures and videos.
Configuring the camera and video settings
Depending on whether the camera mode or video mode is active, further options for using the camera are available in the Menu.
Camera settings
| Option Meaning | |
| Video This option switches the camera to video mode. | |
| Mode | With this option you can choose between different recording modes:Normal: For taking individual shots.Burst: For taking a sequence of 5 shots.Timer: Self timer option (5-second delay) |
| Brightness Adjustment of the brightness settings | |
| Resolution Adjustment of the image resolution | |
| Zoom Adjustment of the zoom settings | |
| Options | Various options are available for changing settings (image size, slide show, file location etc.). |
Video settings
| Option Meaning | |
| Photo This option switches the camera to photo mode. | |
| Brightness Adjustment of the brightness settings | |
| Quality Adjustment of the video quality settings | |
| Options | Various options are available for changing settings (image size, slide show, file location etc.). |

Detailed information on this topic can be found in the help file on your Pocket PC.
Working with files
Windows Media Player
With Windows Media Player, you can play back various audio and video formats on your Pocket PC:
| File type Formats | |
| Audio WMA, MP3, | WAV |
| Video | WMV, MPEG4 |

You can find detailed information on how to use the Windows Media Player in the help file on your Pocket PC.
Using Java applications
With the JBlend programme, you can run Java applications for mobile devices, download them from the Internet onto your device and install them.
Downloading Java applications
▶ Select Start – Programs – JBlend.
The programme and the available Java applications are displayed.
▶ Select Download.
Internet Explorer is displayed.
▶ Enter the desired Internet address.
▶ Download the desired Java application.
You will be asked if you wish to install the Java application.
▶ Confirm with Yes.
Starting Java applications
▶ Select Start – Programs – JBlend.
The programme and the available Java applications are displayed.
▶ Tap on the Java application you wish to start.
The Java application is started.
Uninstalling Java applications
▶ Select Start – Programs – JBlend.
The programme and the available Java applications are displayed.
▶ Select the Java application you wish to uninstall.
▶ Select Menu - Delete.
You will be asked if you wish to uninstall the Java application.
▶ Confirm with Yes.
Compressing files with FSC MobileZip
FSC MobileZip lets you open, unpack, create and edit Zip archives.
FSC MobileZip extends the popup menu in the File Explorer. If you tap for longer on a file, you will see additional entries in the popup menu, with which you can quickly create and extract archives.
FSC MobileZip supports archives up to a size of 4 GB as well as password protection with simple encryption.

You can find detailed information on how to use FSC MobileZip in the help file on your Pocket PC.
Security functions
Your Pocket PC can be protected or locked in several ways:
| Lock Meaning | |
| Password protection | Password protection provided by the Microsoft Windows 5.0 Phone Edition operating system, see "Password protection".Password protection is lost if the device is reset to the factory settings. |
| Device lock (key and display lock) | Protects the device by locking the operating elements against accidental inputs during operation, see "Device lock (key and display lock)". |
| FSC KeyLock Prevents | the device in standby mode (disabled status) from being reactivated when an application key is pressed, see "FSC KeyLock". |
| FSC SecureLock (optional) | Protects the devices against access by third parties by requesting a password, see "FSC SecureLock".Password protection is retained even if the device is reset to the factory settings and offers special anti-theft protection A stolen device is worthless. |
| SIM Lock The device is | only activated for a specific SIM card (by the telephone network operator), see "Making telephone calls with the Pocket PC", section "SIM Lock".Prevents the device from being used with other SIM cards. |
Password protection
You can use a password to protect your Pocket PC against unauthorised use. This makes your data accessible only to persons who know the password.

When FSC SecureLock is set, this password protection can only be lifted after the FSC SecureLock has been cleared.
▶ Tap on the Password symbol under Start – Settings – Personal.
▶ Select the type of password you prefer:
- A password consisting of four numbers (simple 4-digit password).
– A password of alphanumeric characters (a complex alphanumeric password).
If a password has been assigned, you will have to enter this password the next time you switch on.
If you have forgotten your password, you can restart your Pocket PC by resetting it to the factory settings (see "Cold starting and resetting factory default settings").
Device lock (key and display lock)
With the device lock (key and display lock) you can lock the following device elements and functions during active operation, in order to prevent accidental inputs:
• Application buttons
- Keypad
- Display
- Acceptance of an incoming call via the talk key
• Ending a call via the End key

The device can be switched off even when the device lock is active.
Locking the device
▶ Press and hold the Enter key.
The device is locked.
Deactivating the device lock
▶ Press and hold the Enter key.
or
▶ Press Unlock and the star key consecutively.
The device is unlocked.
FSC KeyLock
Use the FSC KeyLock to prevent accidental activation of your Pocket LOOX. for example, if the device is in your pocket.
Normally, the device is activated if one of the application or telephone keys is pressed.
Activating FSC KeyLock
▶ Select Start – Settings – Personal – Keys – FSC KeyLock.
▶ Activate Lock application keys.
Switching on with active lock
▶ Briefly press the End key.
▶ Then press and hold the Enter key.
FSC SecureLock (optional)
To protect your Pocket PC and your data from unauthorised access by third parties, you can protect it with a password.
▶ Select Start – Settings – System – Secure Lock.
▶ Activate the Theft protection control box.
▶ Select the desired type of password in the Password type field. Enter the password and confirm it if necessary.
▶ Enter a term on the Note tab page that will remind you of your password if necessary, but which will not enable other users to guess your password.
This term is displayed if the password has been entered incorrectly several times.
▶ Tap OK.
If your Pocket PC is reset to the factory settings, you will be prompted to enter the password.
Connecting and networking the Pocket PC with other devices
The Pocket PC offers a wide range of ways to exchange data with other devices or to work in a network.
In addition, the wireless LAN (optional) and Bluetooth (optional) radio modules are available for wireless communication.
This chapter provides information on wireless data transfer
- Via wireless LAN
- Via Bluetooth
Activating and deactivating radio modules
You can use Wireless Manager to activate or deactivate the telephone, Bluetooth and WiFi/WLAN.
You are in the Today screen.
▶ Tap on the telephone symbol.
The Wireless Manager is displayed.
▶ To activate or deactivate the telephone, Bluetooth or WiFi/WLAN, tap on the symbol next to WiFi, Bluetooth or Telephone.
or
▶ To activate or deactivate all components, tap on the symbol next to All.
The selected component is activated or deactivated.
Wireless connection via Wireless LAN
Your Pocket PC is equipped with an integrated wireless LAN. Information on this topic is provided in the help file on your Pocket PC. You can establish WLAN connections using the CONNECTMOBILITY-E2C software.

You can find more information on the CONNECTMOBILITY-E2C software in the "Internet and intranet connections with CONNECTMOBILITY-E2C" section and in the help file on your Pocket PC.
Wireless communication with Bluetooth
With your Pocket PC with an integrated Bluetooth module you can communicate wirelessly with other Bluetooth devices, e.g. with another Pocket PC, a computer or a mobile phone.
You can establish Bluetooth connections via the BT Manager. Start the BT Manager via the FSC SpeedMenu, see "Fast access to programs via FSC SpeedMenu".
Example:
You want to use a Bluetooth headset.
▶ Enter a new "Handsfree/headset" device in the B BT Manager.
▶ Follow the instructions on the display.

You can find detailed information on the BT Manager in the help file on your Pocket PC.
Selecting location for Bluetooth operation
- We recommend that you use the Pocket PC with the Bluetooth components in a typical operating environment. Other Bluetooth devices, which you want to communicate with, should be located at a distance of up to 10 m.
- Only install a partner device within the recommended distance. Observe the output power class of the partner device when doing so. Details are contained in the operating manual for the partner device.
- Use the Pocket PC with the Bluetooth at least 2 m away from other electrical or electronic systems. If you must use the Pocket PC near a microwave cooker, then maintain a distance of at least 3 m from the microwave cooker, as the reception is subject to interference from the microwaves.
- Should problems result when communicating via Bluetooth because radios or radio devices are located in the vicinity, then move the Pocket PC to a different location.
Energy saving functions
The Pocket PC uses less power when the energy saving functions are enabled. This means you can work with the Pocket PC for longer before having to recharge the battery.
General information on energy management
The battery operating time is considerably dependent on the applications used. Please note that a particularly large amount of energy is required to play sound files or make sound recordings.
Data exchange with a computer also consumes additional battery power. Therefore, always connect your Pocket PC to an electrical outlet during data exchange if possible.
Using energy saving functions
You can save energy in several ways to optimally utilise the battery operating time:
Configuring standby mode
▶ Under Start – Settings – System – Power, select the number of minutes after which the Pocket PC is to switch into the standby mode when it is not used.
After the specified time has passed, the Pocket PC will automatically bet set to standby mode.

Press the End key to end standby mode.
The Pocket PC returns to the point at which you interrupted your work.
Switching off display lighting
▶ Under Start – Settings – System – Display lighting, select the number of minutes after which the display lighting is to be switched off in the battery mode when the Pocket PC is not used.
Configuring display lighting
You can adjust the display lighting on your Pocket PC to make it darker or brighter. Reduce the display brightness to save energy.
▶ Select Start – Settings – System – Display lighting – Brightness.
▶ Use the slide control to adjust the display lighting during battery operation and/or during use with an external power supply, until the desired level of brightness is reached.
▶ Confirm with OK.

The display lighting can also be configured by pressing the key combination Shift + Navigation key right or left.
Configuring key illumination
▶ Select Start – Settings – System.
▶ Select Key illumination.
The window for adjusting the key illumination is displayed.
▶ Set the desired duration of key illumination during battery operation and during use with an external power supply.
▶ Confirm with OK.

Key illumination can also be activated and deactivated by pressing and holding the FN key.
Configuring device behaviour when E-mail push is activated
You can configure how your device should behave when E-mail push is activated. Usually, the device LED starts flashing when new information is being received. However, you can change this behaviour.
▶ In the Today screen, press and hold the End key.
The profile list is displayed.
▶ Use the navigation key to select the desired profile.
▶ Select Menu – Edit.
▶ Enter the settings for E-mail push and confirm with OK.
Switching off the sound and setting the volume
▶ Tap on the loudspeaker symbol in the title bar.
A popup window for the loudspeaker settings appears.
▶ Set the desired volume on the slide control with the stylus.
▶ To switch off the sound, activate the selection field for Off with the stylus.
▶ Touch the display anywhere outside the popup window.

Device sounds can also be activated and deactivated by pressing and holding the star key.
Using Wireless Manager
You can use Wireless Manager to manage the energy status of telephone, Bluetooth and WiFi/WLAN.
You are in the Today screen.
▶ Tap on the telephone symbol.
The Wireless Manager is displayed.
▶ To activate or deactivate the telephone, Bluetooth or WiFi/WLAN, tap on the symbol next to WiFi, Bluetooth or Telephone.
or
▶ To activate or deactivate all components, tap on the symbol next to All.
The selected component is activated or deactivated.
Troubleshooting and tips
If a fault occurs in your Pocket PC, try to eliminate it with the measures described in this chapter. If you fail to correct the problem, proceed as follows:
▶ Make a note of the steps and the circumstances that led to the fault. Also make a note of any error messages displayed.
▶ Switch the Pocket PC off.
▶ Contact your sales outlet or our hotline/help desk.
Installing new software
You will find information on installing supplementary programmes in the ActiveSync help file that you can call up after installing ActiveSync on your computer.
When installing programmes or drivers, important files may be overwritten and modified. You should make a backup before the installation in order to access the original files if an error should occur after installation (see "Data synchronisation with ActiveSync").
The Pocket PC's time or date are not correct
| Cause Troubleshooting | |
| Time and date are incorrect. | ▸ Tap on theClocksymbol under Start – Settings – System.▸ Change the time.or▸ Connect your Pocket PC viaActiveSyncto your computer.▸ Synchronise data between the Pocket PC and the computer. The time and date are also synchronised in the process. |
The display of the Pocket PC remains dark
| Cause Troubleshooting | |
| Display lighting is switched off. | ▶ Press and hold the End key. |
The display is difficult to read
| Cause Troubleshooting | |
| Reflected glare | ▶ Turn the Pocket PC until you can see the information in the display again. |
The Pocket PC switches off
| Cause Troubleshooting | |
| The battery is dead. | ► Connect the power adapter to the Pocket PC to charge the battery.or► Connect the power adapter to the cradle and insert the Pocket PC in the cradle to charge the battery.The battery is charging. The power-on indicator flashes orange. |
The Pocket PC does not start after being switched on
| Cause Troubleshooting | |
| The battery is dead. | ► Connect the power adapter to the Pocket PC to charge the battery.or► Connect the power adapter to the cradle and insert the Pocket PC in the cradle to charge the battery.The battery is charging. The power-on indicator flashes orange. |
| The power adapter is not connected correctly. | ► Switch the Pocket PC off.► Check whether the power adapter is properly connected to the Pocket PC and the electrical outlet.► Then switch the Pocket PC on again . |
The Pocket PC does not respond any more
| Cause Troubleshooting | |
| An application program has caused the fault. | ► Restart the Pocket PC (see "Switching the Pocket PC on and off").or► If the restart does not work, reset the Pocket PC to the factory settings (see "Cold starting and resetting factory default settings"). |
| The battery is dead. | ► Connect the power adapter to the Pocket PC to charge the battery.or► Connect the power adapter to the cradle and insert the Pocket PC in the cradle to charge the battery.The battery is charging. The power-on indicator flashes orange. |
The battery discharges too quickly
| Cause Troubleshooting | |
| The battery is either too hot or too cold. | ▶ Bring the Pocket PC up / down to a normal temperature again.If the operating time of the battery mode is extremely short, the battery is probably old and should be replaced.Please contact your dealer for a new battery. |
The End button does not respond properly
| Cause Troubleshooting | |
| You have pressed the End key for too long to switch the Pocket PC on or off. | ▶ Briefly press the End key until the Pocket PC switches on or off. |
No sound or minimal volume
| Cause Troubleshooting | |
| Volume set wrongly. | ▸ Touch the loudspeaker symbol in the navigation bar.A popup window for the loudspeaker settings appears.▸ Activate the selection field for On with the stylus.or▸ Set the desired volume on the slide control with the stylus. |
Poor reception via GPS
| Cause Troubleshooting | |
| The installation position of the Pocket PC in your vehicle is unfavourable. | ▶ Change the installation position of the Pocket PC. |
| Your vehicle's windscreen is coated. | ▶ Use an external GPS antenna (available as an accessory). |
Contact with hotline/help desk
If you are unable to solve a certain problem, please contact the hotline/help desk. Additional details are contained in the "Safety" and "Warranty" manuals. Please have the following information ready when you call:
- The model name and serial number of the Pocket PC. The serial number is located on a sticker on the backside of the Pocket PC.
- Notes of any messages that appear on the screen and information on acoustic signals.
- Any changes you have made to the hardware or software after receiving the Pocket PC.
- Your system configuration and all peripheral devices connected to your system (e. g. keyboard).
- Your sales contract.
- Your IMEI number.
The Fujitsu Siemens Computers hotline or help desk requires the device information for your Pocket PC in order to process your problem. You can find this information directly on your device:
Calling up the IMEI number
The IMEI number (International Mobile Equipment Identity) is a 15-digit serial number, which is used to uniquely identify your Pocket PC.
▶ Select Start – Settings – System – System information.
▶ Select Identity.
The IMEI number is displayed.
Calling up the UUID
The UUID (Universally Unique Identifier) is a globally unique 16 or 28 bit number, that is also used to identify your device.
▶ Select Start – Settings – System – System information.
▶ Select Identity.
The UUID is displayed.
Technical data
Pocket PC
| System Pocket LOOX T810 Pocket | LOOX T830 | |
| General | ||
| Processor Intel® PXA270 416 MHz | Hz based on Intel® XScaleTM micro-architecture | Intel® PXA270 416 MHz based on Intel® XScaleTM micro-architecture |
| Memory | System memory (RAM): 64 MB Flash memory (ROM): 128 MB | System memory (RAM): 64 MB Flash memory (ROM): 128 MB |
| Electrical data | ||
| Regulations complied with CE, FCC Part 15 Class B, EN 60950, UL, cUL | CE, FCC Part 15 Class B, EN 60950, UL, cUL | |
| Protection class III III | ||
| Maximum power draw: (Pocket PC on with battery charging) | 5 W 5 W | |
| Display | ||
| Transflective TFT display 2.4 inch | 240 x 249 colours, 65,536 colours, LED background lighting | 2.4 inch, 240 x 249 colours, 65,536 colours, LED background lighting |
| Card slots | ||
| "Secure Digital I/O", | "MultiMediaCard" | "Secure Digital I/O", "MultiMediaCard" |
| Ports/interfaces | ||
| Input/output port USB 1.1 USB 1.1 | ||
| Audio | Microphone, headphones (3.5 mm), receiver for GSM/UMTS calls | Microphlon,d,peak,peaker, headphones (3.5 mm), receiver for GSM/UMTS calls |
| Bluetooth Bluetooth 2.0 Bluetooth 2.0 | ||
| Wireless LAN 802.11 b/g, WiFi certified 802.11 b/g, WiFi certified | ||
| GPS | SiRF Star III | SiRF Star III |
| Cameras | ||
| Camera 1 – VGA camera (640 x 480) for video | telephony via UMTS | |
| Camera 2 – 2 mega pixel auto-focus camera | (1600 x 1200) for images/video | |
| Baseband | ||
| UMTS/GSM/GPRS Baseband | EMP U250 GSM 900/180/1900 UMTS 2100 | EMP U250 GSM 900/180/1900 UMTS 2100 |
| Environmental conditions | ||
| Environment class 7K1/7K2 | DIN IEC 721 EN 60721 DIN IEC 721 EN 60721 | |
| Housing class 7M2 DIN IEC | 721 EN 60721 DIN IEC 721 EN 60721 | |
| Temperature | ||
| • Operation | -10 °C -55 °C | -10 °C -55 °C |
| • Transport | -40 °C -75 °C | -40 °C -75 °C |
| • Storage < 1 month | -20 °C -60 °C | -20 °C -60 °C |
| • Storage > 1 month | -20 °C -45 °C | -20 °C -45 °C |
| Dimensions | ||
| Height/width/depth 126.6 mm | m x 64.6 mm x 21.6 mm 126.6 mm | x 64.6 mm x 21.6 mm |
| Weight 195 g +/-10 g 195 g | +/-10 g | |
Battery (Li-Ion)
| Rated capacity 1530 mAh | |
| Charging time (when not in operation): | Max. 4 hours |
| Operating time | Up to 4 hours GSM talk timeUp to 150 hours standby |
Power adapter
| Electrical data | |
| Primary:Rated voltage:Rated frequency: | 100-240 V50 - 60 Hz |
| Secondary:Rated voltage:Max. rated current: | 5 V +/- 5 %1.0 A |
Manufacturer's notes
Environmental protection
Fujitsu Siemens Computers has defined standards for environment-friendly product design with a guideline applicable corporate-wide. The binding application of these internal guidelines continuously implements ecological product requirements. The main points are:
- Repair friendliness and long life due to modular design
- Low noise emissions
- Low energy consumption
- Minimization of material diversity
• Ecological criteria for plastics - Avoidance of materials harmful to the environment
- Recyclability
More details on the subject of environmental protection are available on the Internet at: www.fujitsu-siemens.de/umwelt or www.fujitsu-siemens.com/rl/aboutus/envman/index.html.
Disposal and recycling
You will find further information about country-specific recycling and disposal options in the Internet at www.fujitsu-siemens.com/recycling or on the Microsoft Getting Started CD.
CE marking
C€0889①
Products bearing the CE marking comply with the R&TTE Directive (1999/5/EC), EMC Directive (89/336/EEC), and the Low Voltage Directive (73/23/EEC) issued by the Commission of the European Community.
CE compliance of this device is valid only if powered with by a CE-marked AC Adapter provided by Fujitsu Siemens Computers. Compliance with these directives implies conformity to the following European Norms (in parentheses are the equivalent international standards and regulations):
• EN 55022 (CISPR 22) — Electromagnetic Interference
• EN 55024 (IEC 61000-4-2, 3, 4, 5, 6, 8, 11) — Electromagnetic Immunity
• EN 61000-3-2 (IEC 61000-3-2) — Power Line Harmonics
• EN 61000-3-3 (IEC 61000-3-3) — Power Line Flicker
• EN 60950 (IEC 60950) — Product Safety
- ETS 300 328-2 — Technical requirements for 2.4 GHz radio equipment
- EN 301 489-1, -17 — General EMC requirements for radio equipment
The IEEE 802.11b wireless LAN and Bluetooth functionality of this product can be used in the following EU countries, EU candidate countries and EFTA countries: Belgium, Denmark, Germany, Estonia, Finland, France, Greece, Great Britain, Ireland, Iceland, Italy, Liechtenstein, Latvia, Lithuania, Luxemburg, Malta, Netherlands, Norway, Austria, Poland, Portugal, Sweden, Switzerland, Slovakia, Slovenia, Spain, Czech Republic, Hungary and Cyprus.

The user is responsible for radio interference that may occur when operating the device.
For IEEE 802.11b wireless LAN operation of this product, only a limited band is available in France (Channels 10, 11, 12, and 13 only). The Autorité de régulation des télécommunications (ART) has special regulations for hotspots allowing other channels, too.
Please check with ART (http://www.art-telecom.fr) on this for local rulings and for authorization.
Information on exposure/specific absorption rate (SAR)
This device meets the EU requirements (1999/519/EU) on the limitation of exposure of the general public to electromagnetic fields by way of health protection.
The limits are part of extensive recommendations for the protection of the general public. These recommendations have been developed and checked by independent scientific organisations through regular and thorough evaluations of scientific studies. To guarantee the safety of all persons, regardless of age and health, the limits include a significant safety buffer.
Before radio devices can be put in circulation, their agreement with European laws or limits must be confirmed; only then may the CE symbol be applied.
The unit of measurement for the European Council's recommended limit for mobile telephones is the "Specific Absorption Rate" (SAR). This SAR limit is 2.0 W/kg, averaged over 10g of body tissue. It meets the requirements of the International Commission on Non-Ionizing Radiation Protection (ICNIRP) and was included in the European Standard EN 50360 for mobile radio devices. The SAR regulation for mobile telephones is in line with European Standard EN 50361. The maximum SAR value is calculated at the highest output level in all frequency bands of the mobile telephone. During use, the actual SAR level is usually much lower than the maximum value, because the mobile telephone works in different output levels. It only transmits with as much output as is required to reach the network. In general the following applies: The closer you are to a base station, the lower the transmission output of your mobile telephone.
This highest SAR values for this device, measured in accordance with the standard, are:
Pocket LOOX T830 Pocket LOOX T810
When used next to ear: 0.188 W/kg (PCS Head) 0.111 W/kg (PCS Head)
When worn on body: 1.01 W/kg (PCS Body) / 0.91 W/kg (PCS Body) / 0.029 W/kg (WLAN Body) 0.042 W/kg (WLAN Body)
The SAR value for this device is also available on the Internet at www.fcc.gov/oet/fccid, if you search for "QQXUPX001". Even if the SAR value differs depending on the device and the position used, all Fujitsu Siemens Computers devices comply with the legal requirements.
FCC Regulations
This device complies with part 15 of the FCC Rules. Operation is subject to the following two conditions: (1) This device may not cause harmful interference, and (2) this device must accept any interference received, including interference that may cause undesired operation.
This device has been tested and found to comply with the limits for a Class B digital device, pursuant to Part 15 of the FCC Rules. These limits are designed to provide reasonable protection against harmful interference in a residential installation. This equipment generates, uses and can radiate radio frequency energy and, if not installed and used in accordance with the instructions, may cause harmful interference to radio communications. However, there is no guarantee that interference will not occur in a particular installation If this equipment does cause harmful interference to radio or television reception, which can be determined by turning the equipment off and on, the user is encouraged to try to correct the interference by one or more of the following measures:
- Reorient or relocate the receiving antenna.
- Increase the separation between the equipment and receiver.
- Connect the equipment into an outlet on a circuit different from that to which the receiver is connected.
- Consult the dealer or an experienced radio/TV technician for help.
Changes or modifications not expressly approved by the party responsible for compliance could void the user's authority to operate the equipment.
FCC Warning Statement for WLAN product
This device complies with part 15 of the FCC Rules. Operation is subject to the following two conditions: (1) This device may not cause harmful interference, and (2) this device must accept any interference received, including interference that may cause undesired operation.
This device has been tested and found to comply with the limits for a Class B digital device, pursuant to Part 15 of the FCC Rules. These limits are designed to provide reasonable protection against harmful interference in a residential installation. This equipment generates, uses and can radiate radio frequency energy and, if not installed and used in accordance with the instructions, may cause harmful interference to radio communications. However, there is no guarantee that interference will not occur in a particular installation If this equipment does cause harmful interference to radio or television reception, which can be determined by turning the equipment off and on, the user is encouraged to try to correct the interference by one or more of the following measures:
- Reorient or relocate the receiving antenna.
- Increase the separation between the equipment and receiver.
- Connect the equipment into an outlet on a circuit different from that to which the receiver is connected.
- Consult the dealer or an experienced radio/TV technician for help.
Changes or modifications not expressly approved by the party responsible for compliance could void the user's authority to operate the equipment.
This device complies with FCC radiation exposure limits set forth for an uncontrolled environment. In order to avoid the possibility of exceeding the FCC radio frequency exposure limits, human proximity to the antenna shall not be less than 20 cm (8 inches) during normal operation.
RF Exposure Information (SAR)
This device meets the government's requirements for exposure to radio waves. This device is designed and manufactured not to exceed the emission limits for exposure to radio frequency (RF) energy set by the Federal Communications Commission of the U.S. Government.
The exposure standard for wireless devices employs a unit of measurement known as the Specific Absorption Rate, or SAR. The SAR limit set by the FCC is 1.6 W/kg. *Tests for SAR are conducted using standard operating positions accepted by the FCC with the device transmitting at its highest certified power level in all tested frequency bands. Although the SAR is determined at the highest certified power level, the actual SAR level of the device while operating can be well below the maximum value. This is because the device is designed to operate at multiple power levels so as to use only the poser required to reach the network. In general, the closer you are to a wireless base station antenna, the lower the power output.
The highest SAR value for the device as reported to the FCC when tested for use at the ear is 0.237 W/kg (PCS Head) and 0.033 W/kg (WLAN Head) for model T830, and 0.111 W/kg (PCS Head) and 0.025 W/kg (WLAN Head) for model T810, and when worn on the body, as described in this user guide, is 1.01 W/kg (PCS Body), and 0.029 W/kg (WLAN Body) for model T830, and 0.91 W/kg (PCS Body), and 0.042 W/kg (WLAN Body) for model T810. (Body-worn measurements differ among device models, depending upon available enhancements and FCC requirements.)
While there may be differences between the SAR levels of various devices and at various positions, they all meet the government requirement.
The FCC has granted an Equipment Authorization for this device with all reported SAR levels evaluated as in compliance with the FCC RF exposure guidelines. SAR information on this device is on file with the FCC and can be found under the Display Grant section of http://www.fcc.gov/oet/fccid after searching on FCC ID: QQXUPX001.
For body worn operation, this device has been tested and meets the FCC RF exposure guidelines for use with an accessory that contains no metal and the positions the handset a minimum of 1.5 cm from the body. Use of other enhancements may not ensure compliance with FCC RF exposure guidelines. If you do not use a body-worn accessory and are not holding the device at the ear, position the handset a minimum of 1.5 cm from your body when the device is switched on.
Index
2
2 megapixel autofocus camera 5
3
3-way scroll button 5 using 12
A
Accessories 20
ActiveSync data synchronisation 28
ActiveSync-creating partnership 28
Alarms setting 60
Answer button 5
Application button calendar button 5 camera 5 Mail Received 5 SpeedMenu 5 switching on 49
Application buttons using 14
B
Background setting 60
Battery capacity 4 charging 54 charging via a USB port 56 charging via mains adapter 54 charging via the cradle 55 discharges 91 inserting 22 installing 21 storing 4 technical data 96
Bluetooth 84 activating 83 indicator 6
Bright display 90
C
Calibrating the screen 24
Call holding 38 making 33
Call diversion
setting up 46
Camera recording videos 74 settings 74 taking pictures 73 using 73
CE marking 100
Cleaning 53
Cold start 51
Conference call 39
Configuring telephone settings 44
Configuring device settings 60
CONNECTMOBILITY E2C starting 25
CONNECTMOBILITY-E2C 25
Contacts 42
Conversation ending 34
D
Dark display 89
Data technical 95
Data synchronisation via cradle 30
Data synchronisation via ActiveSync 28
Data synchronisation via Exchange Server 30
Data transmission Bluetooth 84 Wireless LAN 83
Date setting 60
Date is incorrect 89
Description of buttons 8
Device behaviour with e-mail push 86
Device information 92
Device lock 8, 80
Directory 42
Display 5 reflection glare 90 remains dark 89 using 11
Display is difficult to read 90
Display lighting 85 configuring 86
Display, difficult to read 90
Disposal 99
E
Electromagnetic compatibility 100
configuring 65
creating 65, 66
IMAP4 65
POP3 65
sending 66
SMTP 65
VPN corporate network 65
E-mail pull 66
E-mail push 67
device behaviour 86
E-mail sending
via ActiveSync 66
Emergency call 34
End button 5
does not respond 91
switching off 49
switching on 49
Energy saving functions 85
Exchange Server
configuring 26
data synchronisation 26
synchronising data 27
Expansion card 57
inserting 57
removing 58
F
Factory default settings 51
Fast access to programs 60
First start-up 23
FN mode 9
FSC GPSLocator 71
FSC KeyLock 81
FSC MobileZip 78
FSC SecureLock 81
FSC SpeedMenu 60
G
GPS 71
indicator 6
GSM port 5
H
Handsfree function 37
Hardware, overview 5
Hold
call 38
Hotline/help desk 92
|
IMEI number 92
Inbox 61
E-mail 61
MMS 61
SMS 61
Incoming call 34
Incorrect date/time 89
Indicator 5, 6
battery charge level 6
Bluetooth 6
GPS 6
message 6
Installation, new software 89
Installing ActiveSync 27
Internet
CONNECTMOBILITY-E2C 25
using 69
Internet Explorer 69
Intranet
CONNECTMOBILITY-E2C 25
J
Java applications
viewing 77
JBlend
Java 77
K
Key combinations 10
Key illumination
configuring 86
Keypad 8
M
Mailbox
setting up 45
Mains adapter
with mains adapter cable to Pocket PC 55
Menu
adapting 60
Messages
creating 61
Microphone 5
Mini USB port 5
Missed calls
displaying 34
MMS
configuring 63
sending 63
Modes
profiles 47
Muting
telephone 38
N
Navigation key 5 using 12
Network selectin 44
No sound 92
Notational conventions 2
Note cleaning 53
Notes CE marking 100 disposal 99 Safety 3
0
Online buttons for telephony using 11
Online help using 31
On-screen keyboard using 16
Operating elements 5, 8
Operation, basic 24
Optical indicators profiles 47
Optimising battery life 56
Optimising energy management 85
Overview hardware 5 software 18
P
Password protection on Pocket PC 80
PDF files viewing 77
PDF Viewer 77
Pen removing 23 using 11
PIN 43 entering 24
Pocket PC cleaning 53 connecting with computer 28 connecting with other devices 83 does not start 90 does not work 91 inflight usage 52 networking 83 operating 47 resetting 50 switches off 90 switching off 48 switching on 23, 48
transporting 52
usage while driving 52
Poor GPS reception 92
Ports 5
Power adapter connecting 23 technical data 97
Preparation for use 21 basic operation 24 connecting the power adapter 23 first start-up 23 inserting the battery 22 screen 24 Today screen 24
Profiles 47 configuring 48 selecting 48
Program ClearVue PDF 77 FSC MobileZip 78 Windows Media Player 77
R
Radio components activating 83
Radio indicator 5, 6
Recycling 99
Resetting 50, 51
S
Safety notes 3
Screen cleaning 53
SD slot 5
Security 79
Selecting the telephone network 44
Setting up the SMS Service Centre 45
Short cuts 10
Signs and symbols 2
Silent mode 9, 47
SIM card blocking 44 installing 21
SIM card manager 42
SIM contacts 42 managing 42
SIM Lock 43
SIM security 43
SMS creating 62
SMS Service Centre number setting up 45
Soft reset carrying out 50
Softkey buttons
using 14
Software
new installation 89
overview 18
Sound
switching off 86
Speed dialling 36
Standby mode 49
Status
battery charge status 6
message 6
Status indicator 5
Storage, battery 4
Summer time 89
Switching off 50
Switching off the Pocket PC 50
Switching on 50
Switching on the Pocket PC 50
Switch-off time 49
T
Technical data 95
battery 96
Pocket PC 95
power adapter 97
Telephone
muting 38
settings 44
using 33
Telephone functions 33
Telephone settings
configuring 44
Time
incorrect 89
setting 60
Time is incorrect 89
Tips 89
Today screen 24
Tones
setting 60
Transport 52
Troubleshooting 89
U
USB data transfer 59
USB Host
using Pocket PC as a USB Host 59
Using the cradle 29
V
VGA camera 5
Video telephone calls 40
Voice Commander 35
Voice dialling 35
Voice notes 5
Volume
profiles 47
Volume, minimal 92
W
Warm start 50
Windows Media Player 77
Winter time 89
Wireless data transmission 83, 84
Wireless LAN 83
activating 83
Wireless Manager 87
WLAN 83
activating 83