
Fi-6750S - Scanner FUJITSU SIEMENS - Free user manual and instructions
Find the device manual for free Fi-6750S FUJITSU SIEMENS in PDF.


| Product Type | Document Scanner |
| Model | Fi-6750S |
| Brand | Fujitsu Siemens |
| Scan Speed (A4, Color, 200 dpi) | 50 ppm / 100 ipm |
| Optical Resolution | 600 dpi |
| Document Size | Up to A4 (210 x 297 mm) |
| Automatic Document Feeder Capacity | 100 sheets |
| Interface | USB 2.0, Ultra SCSI |
| Dimensions (W x D x H) | Approx. 340 x 370 x 260 mm |
| Weight | Approx. 10 kg |
| Power Supply | AC 100-240 V, 50/60 Hz |
| Power Consumption (Operating) | Approx. 45 W |
| Power Consumption (Standby) | Approx. 15 W |
| Image Sensor | Color CCD |
| Duplex Scanning | Yes |
| Software Included | PaperStream, ScandAll Pro |
| Maintenance | Regular cleaning of ADF rollers and glass; replaceable pickup rollers |
| Consumables | Pickup roller, brake roller, pad assembly |
| Repairability | User-replaceable consumables; professional service for major repairs |
| Safety | CE, UL, TUV certified |
Frequently Asked Questions - Fi-6750S FUJITSU SIEMENS
User questions about Fi-6750S FUJITSU SIEMENS
0 question about this device. Answer the ones you know or ask your own.
Ask a new question about this device
Download the instructions for your Scanner in PDF format for free! Find your manual Fi-6750S - FUJITSU SIEMENS and take your electronic device back in hand. On this page are published all the documents necessary for the use of your device. Fi-6750S by FUJITSU SIEMENS.
USER MANUAL Fi-6750S FUJITSU SIEMENS
Thank you for purchasing a fi-6670(A) / fi-6770(A) / fi-6750S Color Image Scanner series. This manual provides the basics of how to operate and handle the scanner.
Refer to the Getting Started for information on how to install and connect the scanner, and how to install related scanning software.
natural_image
Illustration of two printer machines on a striped background, no text or symbols presentP3PC-2252-02ENZ0
| TOP | |
| Contents | |
| Index | |
| Introduction | |
| Shows scanner's parts names and their functions plus the basic operation. | Scanner Overview |
| Explains how to load documents on the scanner. | Loading Documents |
| Explains how to scan documents using a scanning application “ScandAll PRO.” | How to Use ScandAll PRO |
| Describes the configurable parameters in the scanner drivers. | Scan Parameters |
| Explains how to scan various types of documents. | Various Documents |
| Explains how to clean the scanner. | Daily Care |
| Explains how to replace the scanner consumables. | Consumables |
| Explains how to troubleshoot scanner problems. | Troubleshooting |
| Explains how to configure scanner settings using the Software Operation Panel. | Operational Settings |
| Appendix | |
| Glossary |

How to Use This Manual
How to Use This Manual
How to Use This Manual
The following shows the tips for using this manual.
Cover page

TOP: Moves to the top page of this manual.
Contents: Moves to the top page of the Table of Contents.
Index: Moves to the top page of the Index section.
Contents page
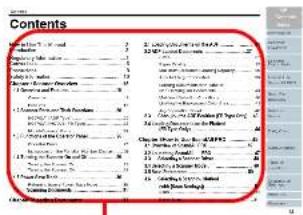
Clicking the title moves to the page that describes it.
Index page
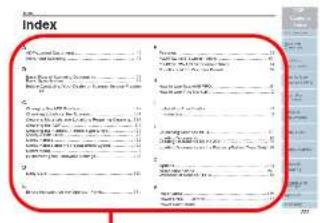
Clicking the page for the desired item in the Index moves to the page that describes it.
Common Notes:
- Clicking a blue-colored character string (where your mouse pointer changes to the shape of a hand pointing upward (such as when you hover over the string) moves to the linked section.
- In this manual, you can use the navigation option of Adobe ® Acrobat ® or Adobe ® Reader.
For details, refer to the Adobe ® Acrobat ® or Adobe ® Reader Help. - Keyboard assistance is also available. Use the PageUp key to go to the previous page, and the PageDown key to the next page.
Introduction
Thank you for purchasing our fi-6670(A)/fi-6770(A)/fi-6750S series Color Image Scanner.
Scanner Models
This manual covers the following five scanner models, each featuring as:
| Model Description | |
| fi-6670fi-6670A | Equipped with an automatic document feeder (ADF) for automatic document feeding and duplex scanning.The fi-6670A comes with a color graphics adapter (CGA) board as a standard feature. It enables advanced image processing at a high speed when used with Kofax VRS. |
| fi-6770fi-6770A | Equipped with an automatic document feeder (ADF) for automatic document feeding and duplex scanning, and a flatbed for scanning documents such as thin paper or thick books.The fi-6770A comes with a color graphics adapter (CGA) board as a standard feature. It enables advanced image processing at a high speed when used with Kofax VRS. |
| fi-6750S | Equipped with an automatic document feeder (ADF) for automatic document feeding and simplex scanning, and a flatbed for scanning documents such as thin paper or thick books.The ADF features simplex scanning only. |
Manuals
The following manuals are included in the for the scanner. Read them as needed.
| Manual Description | |
| Package Contents List (paper) | Lists all the items contained in the scanner package. Make sure all are included in the package. |
| Getting Started (paper, PDF) | Outlines the procedures from installing up to starting the operation of the scanner. Read this manual first. |
| Operator's Guide (This Manual) (PDF) | Provides detailed information on how to operate, and maintain the scanner daily, how to replace the consumables, and how to troubleshoot problems. Included in the SETUP DVD-ROM.The PDF data is included in the SETUP DVD-ROM. |
| FUJITSU TWAIN 32 User's Guide (PDF) | Explains how to install and operate the FUJITSU TWAIN 32 scanner driver. Included in the SETUP DVD-ROM. |
| Image Processing Software Option User's Guide (PDF) | Explains how to install and operate the Image Processing Software Option. Included in the SETUP DVD-ROM. |
| VRS Note (PDF) | Explains how to connect and install Kofax VRS. Included in the SETUP DVD-ROM. |
Introduction
| Manual Description | |
| Error Recovery Guide (HTML help) | Details the status of the scanner and explains how to resolve problems encountered. Contains movies that explain how to replace the consumables. Included in the SETUP DVD-ROM. |
| Help - Embedded in scanner drivers | Explains how to use the scanner drivers, and how to configure the settings for them. |
| Help - Embedded in related applications | Explains how to use and configure the settings for the application software. Use help files as necessary. Can be referenced from the applications. |
Trademarks
Microsoft and Windows are registered trademarks of Microsoft Corporation in the United States and/or other countries.
ISIS and QuickScan are trademarks or registered trademarks of EMC Corporation in the United States.
Adobe, the Adobe logo, and Acrobat are either registered trademarks of Adobe Systems Incorporated in the United States and/or other countries.
Kofax and VRS are trademarks or registered trademarks of Kofax Image Products, Inc.
Other product names are the trademarks or registered trademarks of the respective companies.
Manufacturer
PFU LIMITED
International Sales Dept., Imaging Business Division, Products Group
Solid Square East Tower, 580 Horikawa-cho, Saiwai-ku, Kawasaki-shi Kanagawa 212-8563, Japan
Phone: (81-44) 540-4538
All Rights Reserved, Copyright © PFU LIMITED 2008
Regulatory Information
FCC Declaration
This equipment has been tested and found to comply with the limits for a Class B digital device, pursuant to Part 15 of the FCC Rules.
These limits are designed to provide reasonable protection against harmful interference in a residential installation. This equipment generates, uses, and can radiate radio frequency energy and, if not installed and used in accordance with the instruction manual, may cause harmful interference to radio communications.
However, there is no guarantee that interference will not occur in a particular installation. If this equipment does cause harmful interference to radio or television reception, which can be determined by turning the equipment off and on, the user is encouraged to try to correct the interference by one or more of the following measures:
- Reorient or relocate the receiving antenna.
- Increase the separation between the equipment and receiver.
- Connect the equipment into an outlet on a circuit different from that to which the receiver is located.
- Consult your dealer or an experienced radio/TV technician.
FCC warning: Changes or modifications not expressly approved by the party responsible for compliance could void the user's authority to operate the equipment.

The use of a shielded interface cable is required to comply with the Class B limits of Part 15 of FCC rules. The length of the Power cable must be 3 meters (10 feet) or less.
Canadian DOC Regulations
This digital apparatus does not exceed the Class B limit for radio noise emissions from digital apparatus set out in the Radio interference Regulations of the Canadian Department of Communications.
This Class B digital apparatus complies with Canadian ICES-003.
Regulatory Information
International ENERGY STAR® Program
As an ENERGY STAR ® Partner, PFU LIMITED has determined that this product meets the ENERGY STAR ® guidelines for energy efficiency.
The International ENERGY STAR ® Office Equipment Program is an international program that promotes energy saving through the penetration of energy efficient computers and other office equipment. The program backs the development and dissemination of products with functions that effectively reduce energy consumption. It is an open system in which business

proprietors can participate voluntarily. The targeted products are office equipment such as computers, monitors, printers, facsimiles, copiers, scanners, and multifunction devices. Their standards and logos are uniform among participating nations.
Use in High-Safety Applications
This product has been designed and manufactured on the assumption that it will be used in office, personal, domestic, regular industrial, and general-purpose applications.
It has not been designed and manufactured for use in applications (simply called "high-safety applications" from here on) that directly involve danger to life and health when a high degree of safety is required, for example, in the control of nuclear reactions at nuclear power facilities, automatic flight control of aircraft, air traffic control, operation control in mass-transport systems, medical equipment for sustaining life, and missile firing control in weapons systems, and when provisionally the safety in question is not ensured.
The user should use this product with adopting measures for ensuring safety in such high-safety applications. PFU LIMITED assumes no liability whatsoever for damages arising from use of this product by the user in high-safety applications, and for any claims or compensation for damages by the user or a third party.
Conventions
Symbols Used In This Manual
For notational convention, the following symbols are used in this manual:

This symbol alerts operators to particularly important information. Be sure to read this information.

This symbol alerts operators to helpful advice regarding operation.
Naming Conventions in This Manual
Scanners:
The scanners are indicated as follows:
| Model Indication | ||
| fi-6670/fi-6670A ADF type Scanner | ||
| fi-6770/fi-6770A/fi-6750S Flatbed type | ||
The explanation in this manual bases on the following models:
ADF type: fi-6670
Flatbed type: fi-6770
Operating Systems and Software Products:
The OSs and products in this manual are indicated as follows:
| Product Indication | ||
| Microsoft® Windows® 2000 Professional operating system | Windows 2000 | Windows (*1) |
| Microsoft® Windows® XP Professional operating system (32/64-bit)Microsoft® Windows® XP Home Edition operating system | Windows XP | |
| Microsoft® Windows ServerTM 2003 Standard Edition operating system (32/64-bit) | Windows Server 2003 | |
| Microsoft® Windows Vista® Home Basic operating system (32/64-bit)Microsoft® Windows Vista® Home Premium operating system (32/64-bit)Microsoft® Windows Vista® Business operating system (32/64-bit)Microsoft® Windows Vista® Enterprise operating system (32/64-bit)Microsoft® Windows Vista® Ultimate operating system (32/64-bit) | Windows Vista | |
| Microsoft® Office SharePointTM Portal Server 2003 | Microsoft SharePoint Server | |
| Microsoft® Office SharePointTM Server 2007 | ||
| Adobe® Acrobat® | Adobe Acrobat (*2) | |
Conventions
*1: Where there is no distinction between the different versions of the above operating system, the general term "Windows" is used.
*2: All the descriptions in this manual assume the usage of Adobe Acrobat bundled with this product. However, Adobe Acrobat may be upgraded without notice. If the descriptions differ from the screens actually displayed, refer to the Adobe Acrobat Help.
Arrow Symbols in This Manual
Right-arrow symbols ( ) are used to separate icons or menu options you should select in succession. Example: Click [Tool] [Scan Setting].
Screen Examples in This Manual
The screen examples in this manual are subject to change without notice in the interest of product improvement. If the actual displayed screen differs from the screen examples in this manual, operate by following the actual displayed screen while referring to the user's manual of the scanner application you are using. The screen examples used in this manual are of FUJITSU TWAIN 32 scanner driver, FUJITSU ISIS scanner driver, ScandAll PRO (which is an image capturing software), and Adobe Acrobat.
Precautions
Liability Note
READ ALL OF THIS MANUAL CAREFULLY BEFORE USING THIS PRODUCT. IF THIS PRODUCT IS NOT USED CORRECTLY, UNEXPECTED INJURY MAY BE CAUSED TO USERS OR BYSTANDERS.
Also, keep this manual in a safe place so that it can be easily referred to during use of this product.
While all efforts have been made to ensure the accuracy of all information in this manual, PFU assumes no liability to any party for any damage caused by errors or omissions or by statements of any kind in this manual, its updates or supplements, whether such errors are omissions or statements resulting from negligence, accidents, or any other cause. PFU further assumes no liability arising from the application or use of any product or system described herein; nor any liability for incidental or consequential damages arising from the use of this manual. PFU disclaims all warranties regarding the information contained herein, whether expressed, implied, or statutory.
Use of Mercury

Lamp(s) inside this product contain mercury and must be recycled or disposed of according to local, state, or federal laws.
To avoid unexpected injuries:
- Do not put the substance contained in the lamp in your mouth as it has mercury.
- Do not breathe the chemical liquid contained in the scanner lamps.
- Do not incinerate, crush, or shred the lamps or scanner parts.
Maintenance
The user must not perform repairs on this scanner.
Contact the store where you purchased the scanner or an authorized FUJITSU Image Scanner service provider to make repairs to this product.
Precautions
Warning Label


HOT warning label:
The glass surface inside the ADF becomes hot during the operation. Be careful not to touch glass surfaces inside the ADF.
To avoid burns, never touch around the area indicated by this label.
Take care not to get your finger(s) caught in the ADF while turning.
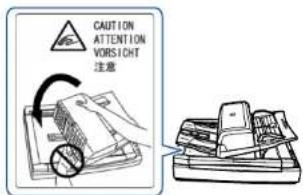

You must NOT remove this warning label from your scanner. When it gets old or unreadable by staining or scratches, contact the store where you purchased the scanner or an authorized FUJITSU scanner service provider.
Safety Information
This manual describes important details for users to use this product safely and correctly. Read this manual thoroughly before you start using this product.
Be sure to read and fully understand the Safety Information, in particular.
In addition, keep this manual handy during use of this product, so that you can refer to it quickly when necessary.
Warning Indications Used In This Manual
The following indications are used in this manual to obviate any change of accident or damage to you and/or the product.
 | This indication alerts operators to an operation that, if not strictly observed, may result in severe injury or death. |
 | This indication alerts operators to an operation that, if not strictly observed, may result in safety hazards to personnel or damage to the product. |

A TRIANGLE symbol indicates that special care and attention is required. The drawing inside the triangle shows the specific caution.

A CIRCLE with a diagonal line inside shows action which users may not perform. The drawing inside or under the circle shows the specific action that is not allowed.

Outline characters on a colored background show instructions users should follow. It may also include the drawing that shows the specific instruction.

The following are important warnings described in this manual.
| Description | |
| Do not damage the power cable.A damaged power cable may cause fire or electric shock. Do not place heavy objects on power cable, or pull, bend, twist, heat, damage or modify Power cables.Do not use any damaged power cables or power plugs, or install any cables or power plugs to loose wall sockets. | |
| Use only specified power cables and interface cables.Use only specified power cables and interface cables. Failure to use the correct cables might cause electric shock and/or equipment failure.Do not use the power cable provided with the scanner for other devices, since this might cause equipment failure and other troubles or an electric shock. | |
| Make sure to ground the scanner.Make sure to ground to avoid electric shock. Be sure to ground before plugging into a power outlet.Unplug from the outlet before removing the ground connection. | |
Safety Information
| Description | |
 | Use the scanner only at the indicated power voltage. Do not connect to multiple-power strips.Use the scanner only at the indicated power voltage and current. Improper power voltage or current might cause fire or electric shock. Do not connect to multiple-power strips. |
 | Do not touch the power cable with wet hands.Do not touch the power plug with wet hands. Doing so might cause electric shock. |
 | Wipe off any dust from the power plug.Wipe off any dust from the metal parts on the power plug or metal fittings with a soft, dry cloth. Accumulated dust might cause fire or electric shock. |
| [ZZ6W] | Do not install the scanner in a location that has oil smoke, steam, humidity, and dust.Do not install the scanner in a location subject to oil smoke, steam, humidity, and dust. Doing so might cause a fire or electric shock. |
| [ZZ26] | Do not use the scanner if there is a strange odor.If you detect excessive heat coming from the scanner or detect smoke, strange smells or noises during the operation, immediately disconnect the power plug from the power outlet. Before contacting the store where you bought the scanner or an authorized FUJITSU scanner service provider, make sure that any smoke coming from it has completely stopped. Never try fixing such problems by yourself. Doing so is dangerous. |
 | Disconnect the power if the scanner is damaged.If the scanner is damaged for any reason, immediately disconnect the power plug from the power outlet. Then, contact the store where you bought the scanner or an authorized FUJITSU scanner service provider. |
| Description | |
| Do not put liquids inside the scanner.Do not insert or drop any metal objects into the ADF slot or ventilation ports on the scanner.Do not scan any wet documents or documents with paper clips or staples attached.Do not splash or allow the scanner to get wet.If foreign objects (water, small metal objects, liquids, etc.) get inside the scanner, immediately disconnect the power plug from the power outlet. Then, contact the store where you bought the scanner or an authorized FUJITSU scanner service provider.Pay particular attention to this warning in households where there are small children. | |
| Unplug the scanner when a trouble occurs.Immediately unplug the scanner when a trouble occurs.Never cut the ground connection until the scanner is unplugged from the power outlet. | |
| Do not disassemble the scanner.Do not take apart or modify the scanner. The inside of the scanner contains high-voltage components.Touching these components might cause electric shock or fire. | |
| Do not use aerosol or alcohol sprays near the scanner.Do not use any flammable substance or alcohol based cleaning sprays (such as aerosol sprays) to clean the scanner.Sparks, caused by static electricity, generated when blowing off dust and dirt from the outside of the scanner, may cause a fire. | |
| Do not place the scanner within the reach of small children.To avoid injuries, do not place the scanner in an area where small children may be able to reach. | |
| Do not touch the heated section for a long time.Do not touch the heated section such as the bottom of the scanner for a long time.Doing so may cause a low-temperature burn on your skin. | |
TOP
Contents
Index
Introduction
Scanner Overview
Loading Documents
How to Use ScandAll PRO
Scan Pa- rameters
Various Documents
Daily Care
Consumables
Trouble-shooting
Operational Settings
Appendix
Glossary
Safety Information
Description

Do not cover the scanner with something during its operation.
Do not use the scanner while covered with a blanket, etc. Doing so may raise the temperature inside and cause a fire.

Do not use the scanner where it gets wet.
Do not use the scanner at a place such as a bathroom, shower room, or swimming pool where it may easily get wet. Doing so might cause electric shock or fire.

CAUTION
The following are important cautions described in this manual:
Description

Do not install the scanner on an unstable work table.
When installing the scanner on a work table, make sure that the table is flat and level. Place the scanner so that none of its parts extend beyond the edge of the table.
Also, it must be strong enough to support the weights of the scanner and other devices.

Firmly insert the power plug.
Firmly insert the power plug into the power outlet as far it can go

Do not block the ventilation ports.
Do not block the ventilation ports. Blocking the ventilation ports generates heat inside of the scanner, which may result in fire or scanner failure.

Do not place heavy objects or stand on the top of the scanner.
Do not place heavy objects on the scanner or stand on its top to perform other work.
Doing so might cause injuries and equipment failure.

Do not use the scanner immediately after moving it from a cold place into a warm room.
Do not use the scanner immediately after moving it from a cold place into a warm room.
Condensation may occur, which might lead to scanning errors. Let the scanner dry for one or two hours before you use it.
Safety Information
| Description | |
| Before moving the scanner, disconnect the power plug from the power outlet.Do not move the scanner with the power and interface cables connected as this can damage the cables, which can later cause fire, electric shock as well as injuries.Before moving the scanner, be sure to disconnect the power plug from the power outlet, and all other interface cables. Make sure that the floor is free of any obstructions. | |
| Protect the scanner from static electricity.Install the scanner away from strong magnetic fields and other sources of electronic noise. Also, protect the scanner against any static electricity, which can cause the scanner to malfunction.Choose a static-free place to install the scanner. | |
| Avoid any contact when scanner is in use.Avoid getting a sleeve, necktie, or hair caught up in any scanner mechanism during scanning since this may cause injuries. | |
| Disconnect the power plug from the power outlet when the scanner is not in use for a long period of time.When the scanner is not going to be used for a long period of time, be sure to disconnect the power plug from the power outlet. | |
| Do not install the scanner in direct sunlight.Do not install the scanner under direct sunlight or near heating apparatus. Doing so might cause excessive heat to build up inside the scanner, which can cause scanner trouble or even fire. Install the scanner in a well-ventilated location. | |
| Do not try to move or lift the scanner alone.When transporting the scanner, never carry it alone. | |
| Description | |
| Before moving the scanner, make sure the transport lock is locked. (Flatbed type)When moving the scanner, be sure to lock the transport lock and the ADF transport lock in order to prevent damage to the scanner. | |
| Handle documents carefully.When handling documents, be careful not to cut your fingers with them. | |
| Do not make the scanner wet while carrying it outside.When carrying the scanner outside while it is raining or snowing, pay special attention so the scanner does not get wet. | |
Contents
Contents
How to Use This Manual 2
Introduction 3
Regulatory Information 5
Conventions 7
Precautions 9
Safety Information 11
Chapter 1 Scanner Overview.... 20
1.1 Features 21
Features 21
1.2 Scanner Parts and Their Functions ...... 22
fi-6670/fi-6670A (ADF Type) 22
fi-6770/fi-6770A/fi-6750S (Flatbed Type) .....24
Model-Common Parts 27
1.3 Functions of the Operator Panels 28
Operator Panel 28
Indications on the Function Number Display......30
1.4 Turning the Scanner ON and OFF 31
Turning the Scanner ON 31
Turning the Scanner OFF....31
1.5 Power Save Mode 32
Returning from Power Save Mode ....32
1.6 Basic Flows of Scanning Documents ...... 33
Chapter 2 Loading Documents ...... 38
2.1 Loading Documents on the ADF .....39
2.2 ADF-Loaded Documents 42
Sizes....42
Paper Quality....42
Maximum Document Loading Capacity.... 44
Area Not to be Perforated 44
Loading Documents with Tabs or Non-Rectangular
Documents 45
Multifeed Detection Conditions.... 45
Limiting the Background Color Area.... 46
Job Separation Sheet....47
2.3 Changing the ADF Position
(Flatbed Type Only) 48
2.4 Loading Documents on the Flatbed
(Flatbed Type Only) 50
Chapter 3 How to Use ScandAll PRO .... 51
3.1 Overview of ScandAll PRO 52
3.2 Launching ScandAll PRO 53
3.3 Selecting a Scanner Driver 54
3.4 Selecting a Scanner Model .... 55
3.5 Scan Parameters .... 56
3.6 Scanning Approaches 57
Scanning with [Scan]......57
Scanning with [Batch Scan]....57
3.7 Scanning with [Scan] 58
Contents
3.8 Scanning with [Batch Scan] 61
Creating and Editing Profiles....61
Scanning Documents ......62
Chapter 4 Scan Parameters.... 63
4.1 FUJITSU TWAIN 32 Scanner Driver .... 64
Resolution 64
Scan Type 64
Paper Size....65
Image Mode 65
[Scan] Button....65
[Preview] Button 65
[Close]/[OK] Button 65
[Reset] Button....65
[Help] Button....65
[About] Button....65
[Option] Button 66
[Advance] Button....66
[Config] Button....66
4.2 FUJITSU ISIS Scanner Driver 67
[Main] Tab 67
[Layout] Tab 68
[Image Processing] Tab 69
[Paper Handling] Tab 69
[Gamma] Tab 70
[Color Dropout] Tab....70
[Blank Page Deletion] Tab....71
[Compression] Tab....71
[Imprinter] Tab 72
[About] Tab....72
Chapter 5 Various Documents 73
5.1 Summary 74
5.2 Scanning Documents of Different Types or Sizes ....75
Scanning Both Sides of A Document (fi-6670/fi-6670A/fi-6770/fi-6770A Only).... 75
Scanning A Large-Size Document or Book (Flatbed Type Only)....75
Scanning Documents of Different Widths..... 76
Scanning A Document Longer Than A3 Size..... 77
5.3 Advanced Scanning 79
Excluding Color(s) from Images (Dropout Color) . 79 Skipping Blank Pages ....81
Removing Punch Holes from A Scanned Image.. 82
Scanning A Document from the ADF in Manual Loading Mode....84
Duplex Scanning Using the ADF Virtual Duplex Function (fi-6750S Only) 85
5.4 Setting Post-Scan Operations and Handling .. 87
Automatically Correcting Skewed Document Images....87
Setting Auto Correction for Document Page Orientations....89
Saving Scanned Images in PDF Format...... 90
Dividing Multipage Documents Using Patch Codes....95
Dividing a Multipage Document Using Barcodes . 97
TOP
Contents
Index
Introduction
Scanner Overview
Loading Documents
How to Use ScandAll PRO
Scan Pa- rameters
Various Documents
Daily Care
Consumables
Trouble-shooting
Operational Settings
Appendix
Glossary
Contents
Horizontally Splitting a Scanned Image into Two100
Outputting in Multi-Image Mode ....101
Setting Auto Detection for Content Colors (Color/Monochrome) 103
5.5 Customizing the Hardware Settings .... 106
Using the Scanner Buttons to Start A Scan Quickly....106
Detecting Multifeeds....108
Bypassing Multifeed Detection for a Fixed Format....110
Chapter 6 Daily Care 114
6.1 Cleaning Materials and Locations
Requiring Cleaning 115
Cleaning Materials....115
Locations to Clean and Cleaning Frequency .....116
6.2 Cleaning the ADF 117
Cleaning with a Cloth Moistened with Cleaner F1 117
6.3 Cleaning the Flatbed (Flatbed Type Only) ....122
Chapter 7 Consumables ...... 123
7.1 Consumables and the Replacement
Cycles 124
7.2 Replacing the Pick Rollers .....125
7.3 Replacing the Brake Roller 127
Chapter 8 Troubleshooting.... 129
8.1 Paper Jams 130
8.2 Errors Indicated on the Operator Panel ..... 132
Temporary Errors....133
Device Errors....134
8.3 Troubleshooting 136
Scanner cannot be turned on.... 137 Indication on Function Number Display goes out.... 138
Scanning does not start.... 139
Quality of scanned pictures or photos is not satisfactory when scanning in black and white... 140
Quality of scanned text or lines is unsatisfactory.141 Images are distorted or blurred. 142
Vertical lines appear in scanned images.... 143 Function Number Display indicates an error code (alphabetical letter plus number) alternately after the scanner is turned ON.... 144
Multifeed errors occur frequently.... 145
Pickup errors occur frequently.... 147 Paper jams occur frequently.... 148
Scanned images are elongated when scanned from the ADF....149
There is a shadow on leading edge of scanned image....150
The scanner is not recognized by your computer when Kofax VRS is used.... 151
8.4 Before Contacting Your Dealer or Scanner
Service Provider 152
General Details.... 152
Troubles 152
TOP
Contents
Index
Introduction
Scanner Overview
Loading Documents
How to Use ScandAll PRO
Scan Parameters
Various Documents
Daily Care
Consumables
Trouble-shooting
Operational Settings
Appendix
Glossary
Contents
8.5 Checking Labels on the Scanner 154
Positions of Labels on the Scanner....154
Chapter 9 Operational Settings.... 155
9.1 Starting Up the Software Operation Panel ....156
9.2 Configurable Items 157
Device Setting 157
Device Setting 2....159
9.3 Settings Related to Consumables and
Useful Life Counters ....165
Confirming and Resetting the Counters .....165
Cycle for Cleaning the Scanner [Cleaning Cycle]167
Cycle for Replacing the Consumables
[Useful life counter]....168
9.4 Settings Related to Scanning 169
Adjusting the Starting Position for Scanning
[Offset/Vertical Magnification Adjustment]...... 169
Eliminating Shadows or Stripes on the Scanned
Scanning with Particular Color(s) Dropped Out
[Dropout color]....172
Shorting the Scanning Intervals [Pre-Pick]......173
Cropping the Image Boundary
[AutoCrop Boundary].... 174
Configuring the Data Transfer Width
[SCSI Bus Width]......175
Scan Setting for Documents with Tabs or Non-Rectangular Documents [Scan Setting for Documents
with Tab (Automatic Paper Size Detection)]...... 175
Scan Setting for The Document Whose One
Side Is in Dark Background Color [Scan Setting for
Document in Dark Background Color]...... 176
Adjusting the Scanned Document Output Images
[Overcrop/Undercrop].... 177
Adjusting the Paper Picking Pressure
[Pick Pressure]....178
9.5 Settings Related to Multifeed Detection ..... 180
Multifeed Detection....180
Specifying the Multifeed Detection Range
[Document Check Area Specification for
Multifeed Detection].... 182
Setting A Non-Multifeed-Detection Range
[Intelligent Multifeed Function]...... 185
9.6 Settings Related to Wait Time 186
Timeout for Manual Feeding
[Manual-feed timeout].... 186
Setting the Wait Time in Power Saving Mode
[Power saving].... 187
9.7 Settings Related to Power ON/OFF Control .. 188
Power ON/OFF Control [Power SW Control] ..... 188
Appendix 189
A.1 Basic Specification 190
A.2 Installation Specification 192
A.3 Outer Dimensions 193
ADF type 193
Flatbed type.... 194
A.4 Scanner Options 195
Contents
A.5 Uninstalling the Software ....196
Glossary 197
TOP
Contents
Index
Introduction
Scanner Overview
Loading Documents
How to Use ScandAll PRO
Scan Parameters
Various Documents
Daily Care
Consumables
Trouble-shooting
Operational Settings
Appendix
Glossary
Chapter 1 Scanner Overview
This chapter describes the components of the scanner, showing their names and functions, and explains the basics of how to operate them.
Here, Windows Vista screen samples are used to explain the operations. The screens and operations may differ slightly if the OS that you are using is other than Windows Vista. Take note that, when the FUJITSU TWAIN 32 or FUJITSU ISIS scanner driver is updated, the screens and operations herein may also be slightly different. In such case, refer to the relevant manuals or materials, which are to be supplied when updating the driver.
1.1 Features 21
1.2 Scanner Parts and Their Functions 22
1.3 Functions of the Operator Panels....28
1.4 Turning the Scanner ON and OFF....31
1.5 Power Save Mode....32
1.6 Basic Flows of Scanning Documents....33
1.1 Features
This section explains the major features of the scanner.
Features
The scanner has the following features:
Realizes a high-speed scanning of 90 sheets (or 180 pages) per minute under JPEG compression (fi-6670/fi-6670A/fi-6770/fi-6770A only).
The scanner mounts newly-developed high-speed CCD and high-speed image processing circuit. This mechanism has realized a scan speed of 90 sheets or 180 pages (at 200 dpi) per minute. You can perform a batch scanning of about 45,000 sheets per day.
Reduces the work loss caused by multifeeds.
The scanner mounts an ultrasonic multifeed sensor that definitely detects two or more sheets fed simultaneously (this is called a "multifeed"). This feature enables multifeed detection for documents of different thicknesses, sizes, color and/or color density, thus preventing any work loss caused by multi-feeds.
Provides the Intelligent Multifeed function.
The Intelligent Multifeed function recognizes paper (sticky notes or labels) of the same size which are glued onto a pre-specified same location of your document.
The function suppresses multifeed detection at this location and continues scanning.
Mounts an adjustable ADF (Flatbed type only).
The scanner is equipped with an adjustable ADF. You can rotate it by 180 degree or slide to a desired position among three, thus saving your installation space.
1.2 Scanner Parts and Their Functions
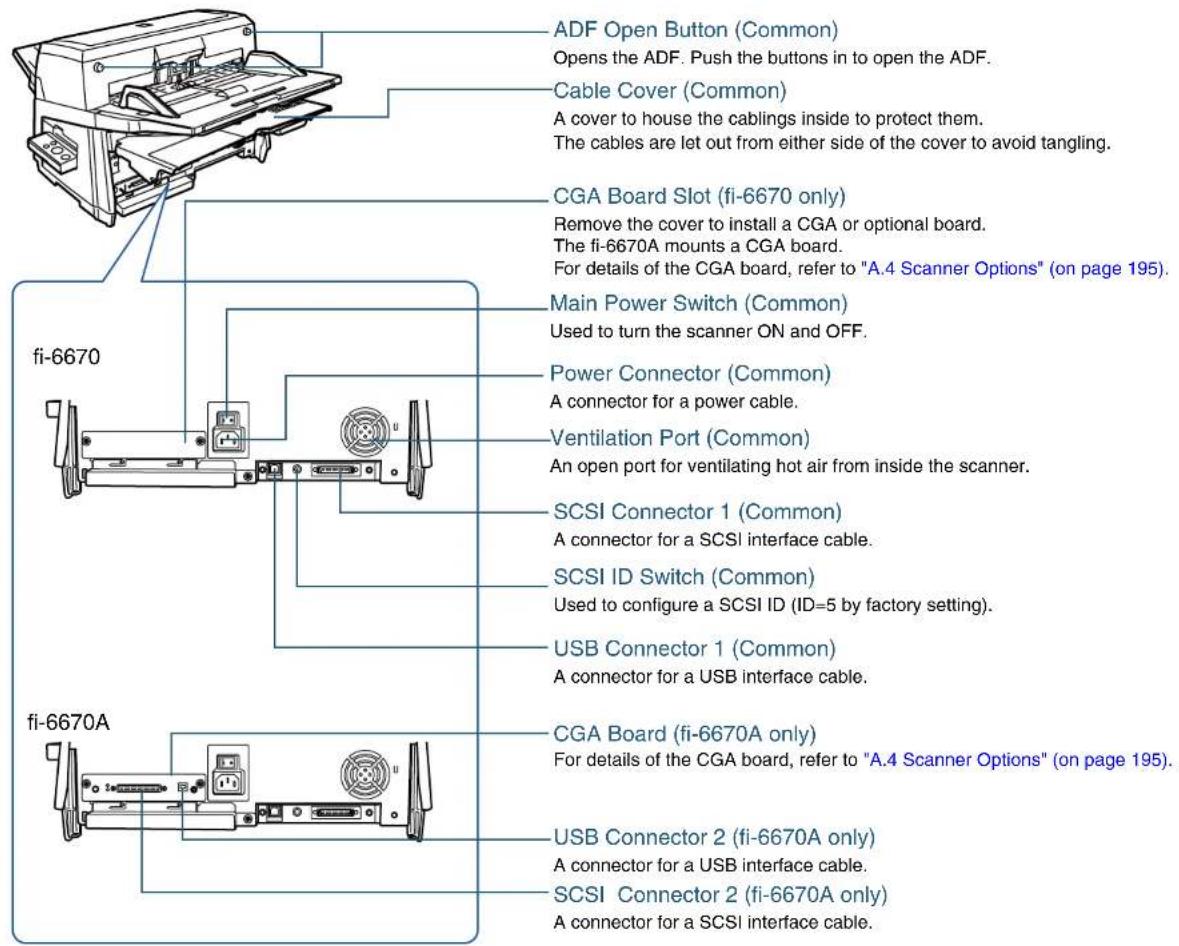
This section shows you the names of the scanner parts, and briefly describes how they function.
fi-6670/fi-6670A (ADF Type)

Chapter 1 Scanner Overview
fi-6770/fi-6770A/fi-6750S (Flatbed Type)

Chapter 1 Scanner Overview
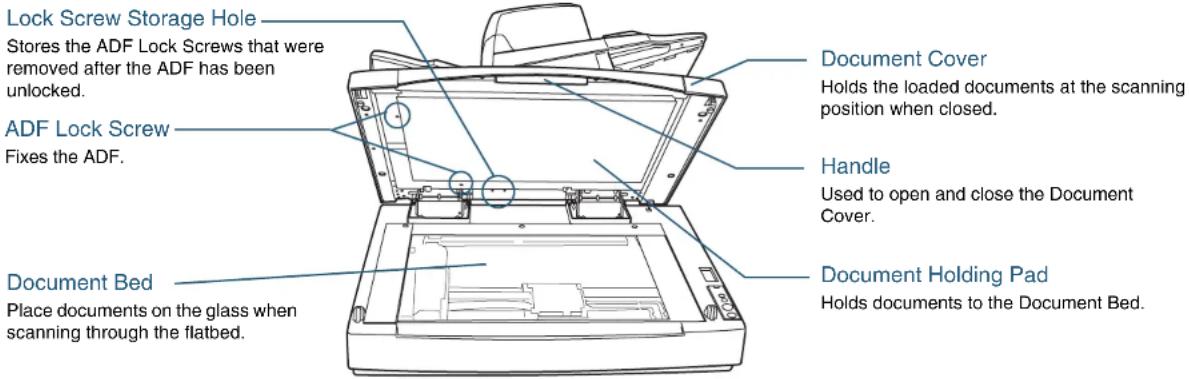

The Document Cover with a black document holding pad is optionally available. This type is convenient for scanning documents in black background when loading them from the flatbed.
This option allows you to correct skewed document images after scanned with the flatbed and to recognize the size of document to output at it original size.
Name: Black Document Pad
Parts No.: PA03338-D960
Chapter 1 Scanner Overview

Model-Common Parts
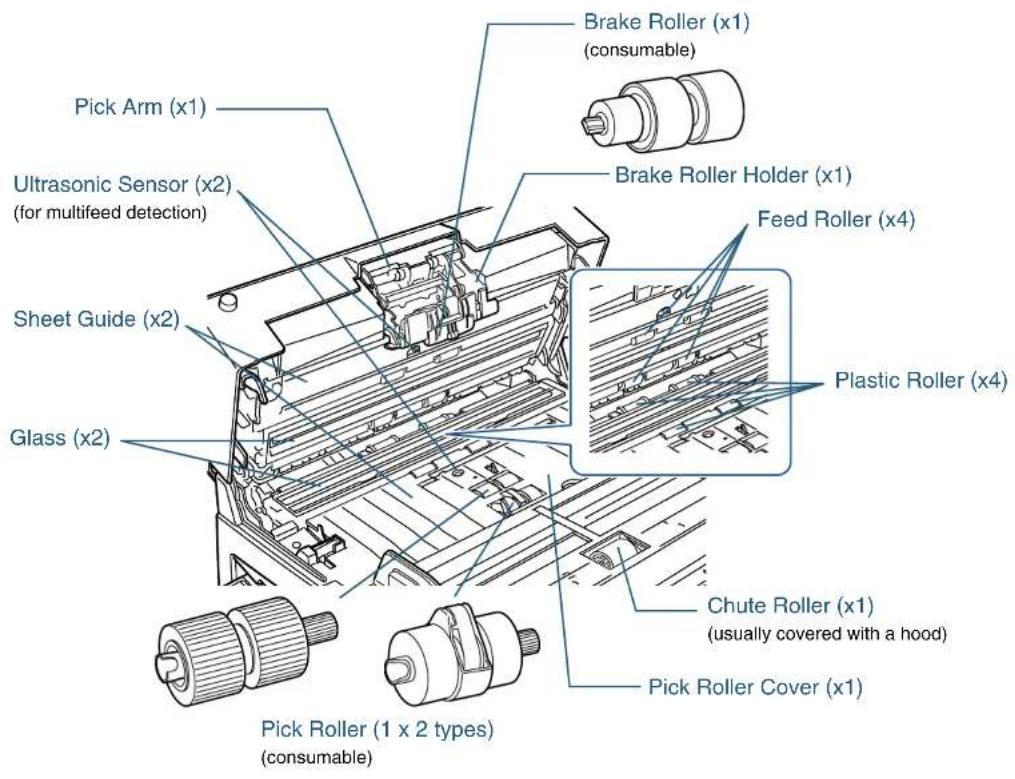
1.3 Functions of the Operator Panels
The Operator Panel Consists of a Function Number Display, operating push buttons, and LEDs.
Operator Panel
fi-6670/fi-6670A (ADF Type)
Two Operator Panels are mounted on the scanner; one each on each side. You can use whichever is convenient for you. They can be folded back in place when not used.

The scanner status can be checked while the Operator Panel is folded back in place.
Lights in green when the scanner is turned ON. Lights in orange when en error occurs.
For details of how to scan documents using the [Scan/Stop] or [Send to] button, refer to the FUJITSU TWAIN 32 Scanner Driver Help included in the SETUP DVD-ROM, and the section "Using the Scanner Buttons to Start A Scan Quickly" (on page 106).
Check LED
Lights in orange when an error occurs.
Function Number Display
Indicates the function number and the scanner status.
[Function] Button
Switches the Function activated by the [Send to] button.
[Power] Button / Power LED
Turns the scanner ON and OFF.
Lights in green when the scanner is turned ON.
[Scan/Stop] Button
Launches linked application software for scanning, etc. Resets the error indication. Cancels ongoing scanning.
[Send to] Button
Launches linked application software for scanning, etc. Resets the error indication.
Chapter 1 Scanner Overview
fi-6770/fi-6770A/fi-6750S (Flatbed Type)
![Check LED Lights (in orange) when an error occurs. Function Number Display Indicates the function number and the scanner status. [Function] Button Switches the Function activated by the [Send to] button. [Send to] Button Launches linked application software for scanning. Resets an error indication. [Scan/Stop] Button Launches linked application software for scanning. Resets an error indication. Cancels ongoing scanning. [Power] Button / Power LED Turns the scanner ON and OFF. Lights (in green) when the scanner is turned ON.](/content/2026/05/862952/images/dda3565d6face3e98e52b89b68a526fe4f7ccb9a92eadae4f35cdcb87f647bc4.jpg)
For details of how to scan documents using the [Scan/Stop] or [Send to] button, refer to the FUJITSU TWAIN 32 Scanner Driver Help included in the SETUP DVD-ROM, and the section "Using the Scanner Buttons to Start A Scan Quickly" (on page 106).
Indications on the Function Number Display
| Indication | Explanation |
| 8Blinks only | one time upon turning on the scanner. |
| P Indicates | that the scanner has been turned ON and is being initialized. |
| 1 Indicates | that initialization has ended successfully. This status is called "Ready Status" in which you can perform a scan. |
| JU | Indicates that a recoverable error occurred during scanning."J" or "U" and an "error number" are displayed alternately. For error details, refer to "Temporary Errors" (on page 133).After the error has been resolved, you can return to the Ready Status (see "1" above) by pressing the [Stan/Stop] or [Send to] button. |
| EFCHAL | Indicates that an abnormality (device error) occurred in the scanner during its initialization or during scanning documents."E", "F", "C", "H", "A", or "L" and an "error number" are displayed alternately.For details of the errors, refer to "Device Errors" (on page 134).If this error occurs, turn the Main Power Switch OFF and then ON again. If the error persists after this, contact the store where you purchased the scanner or an authorized FUJITSU scanner service provider. |
1.4 Turning the Scanner ON and OFF
This section describes how to turn the scanner ON and OFF.
Turning the Scanner ON
The following shows the procedure for turning the scanner ON.

For a SCSI cable connection, be sure to turn on your computer AFTER turning on the scanner, and making sure number "1" indicates on the Function Number Display.
1 Press the "I" side of the Main Power Switch.

2 Press the [Power] button on the Operator Panel.
![Flatbed type [Power] Button ADF type](/content/2026/05/862952/images/f1ecc63a039f36b2ad8ed469fd5454c5f0e7343d094e2d01fee1a1b86f3c0182.jpg)
⇒ The scanner is turned on, and the Power LED lights in green.
Note that, while the scanner is being initialized, the Function Number Display changes as follows: "8" "P" "1", where "1" means the scanner is in the Ready Status.

Use the Main Power Switch to turn the power ON if the Operator Panel power switch has been disabled. For details, refer to "9.7 Settings Related to Power ON/OFF Control" (on page 188).
Turning the Scanner OFF
The following shows the procedure for turning the scanner OFF.
1 Press the [Power] button on the Operator Panel for more than 2 seconds.
⇒ The power is turned off and the Power LED goes off.

- If you will not use the scanner for a long time, press the "O" side of the Main Power Switch to turn the power OFF. Then, unplug the scanner from the power outlet.

- Use the Main Power Switch to turn the power OFF if the Operator Panel power switch has been disabled. For details, refer to "9.7 Settings Related to Power ON/OFF Control" (on page 188).
1.5 Power Save Mode
The Power Save mode is a state in which the powered scanner is kept in a low-powered state if it has not been operated for a certain period of time.
If no operation is performed on the scanner for 15 minutes, the scanner automatically switches to the Power Save mode.
In the Power Save mode, the indication of the Function Number Display on the Operator Panel goes out, but the Power LED stays lit in green.
Returning from Power Save Mode
To return from Power Save mode, perform one of the following:
- Load some sheet of paper on the ADF Paper Chute.
- Hit any button on the Operator Panel. Do not press down the [Power] button for more than 2 seconds. This will turn off the scanner.
- Execute a command from the scanner driver.

You can change the time interval for switching to Power Save mode by using the Software Operation Panel. For details, refer to "Setting the Wait Time in Power Saving Mode [Power saving]" (on page 187).
1.6 Basic Flows of Scanning Documents
This section describes how to scan documents using the scanner.
To scan documents with the scanner, a scanner driver and an application supported by the driver are prerequisites.
Your scanner is accompanied with two drivers; a TWAIN-compliant driver called FUJITSU TWAIN 32 Scanner Driver, and an ISIS-compliant driver called FUJITSU ISIS Scanner Driver; plus an application named ScandAll PRO, which supports both the drivers.

- For details about the scanner drivers, refer to the following:
- "Chapter 4 Scan Parameters" (on page 63)
- FUJITSU TWAIN 32 Scanner Driver Help
- FUJITSU ISIS Scanner Driver Help
- For details of ScandAll PRO, refer to the following:
- "Chapter 3 How to Use ScandAll PRO" (on page 51)
- ScandAll PRO Help
The flow of scanning documents depends on the interface with which the scanner is connected to your computer. The following provides the two types of scanning flows:
Connection via SCSI/USB Connector 1
1 Turn the scanner ON.
For how to turn on the scanner, refer to "1.4 Turning the Scanner ON and OFF" (on page 31).

- For a SCSI cable connection, be sure to turn on your computer AFTER turning on the scanner, and making sure number "1" indicates on the Function Number Display.
- Turn off the scanner and your computer first when you switch the interface cable.
2 Load a target document on the scanner.

natural_image
Line drawing of a printer with a blue arrow pointing to the cover (no text or symbols present)For how to load documents on the scanner, refer to "Chapter 2 Loading Documents" (on page 38).
3 Launch an application you want to use for scanning.
The following steps show example windows when ScandAll PRO is selected.
When ScandAll PRO is launched:
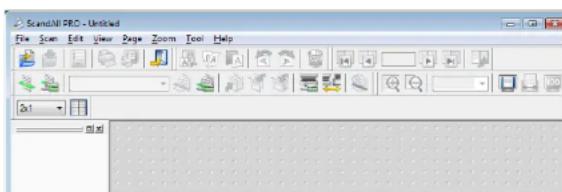
For how to launch ScandAll PRO, refer to "3.2 Launching ScandAll PRO" (on page 53).
Chapter 1 Scanner Overview
4 Select a scanner driver to use.

5 Select a scanner to use.
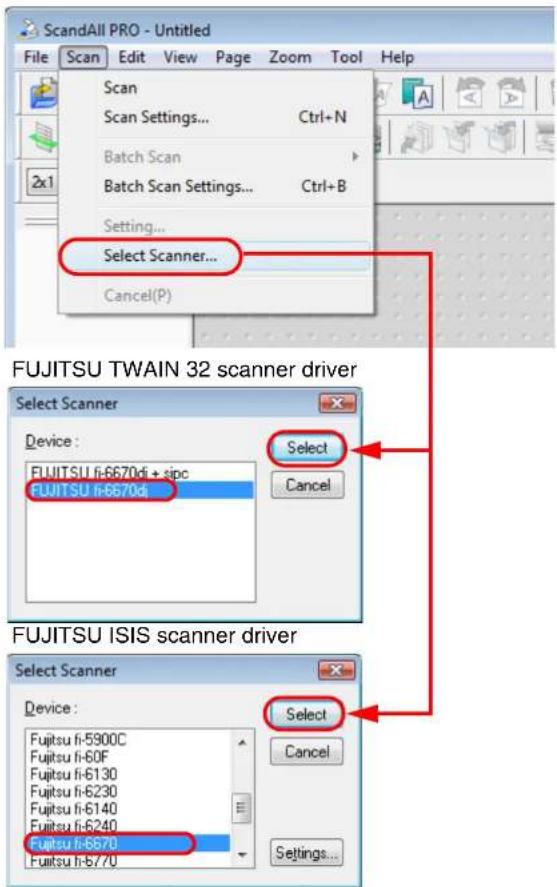
Chapter 1 Scanner Overview
6 In the application, invoke a scanner driver.

FUJITSU TWAIN 32 scanner driver

FUJITSU ISIS scanner driver

7 In the scanner driver's setting dialog box, configure scan parameters.
8Perform a scan.
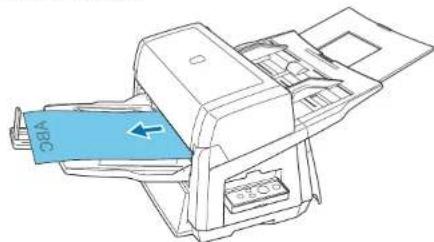
natural_image
Line drawing of a printer with a blue paper feed labeled 'A B C' and an arrow indicating left motion (no text or symbols beyond label)For how to scan using ScandAll PRO, refer to "3.7 Scanning with [Scan]" (on page 58) and "3.8 Scanning with [Batch Scan]" (on page 61).
9 Save the scanned document images to a file.

The procedures and operation slightly may differ depending on the application you use.
For how to scan documents using ScandAll PRO, refer to "Chapter 3 How to Use ScandAll PRO" (on page 51).
If you want to use other applications for scanning, refer to the respective manuals that come with the applications.
Connection via SCSI/USB Connector 2
1 Turn the scanner ON.
For how to turn on the scanner, refer to "1.4 Turning the Scanner ON and OFF" (on page 31).

- For a SCSI cable connection, be sure to turn on your computer AFTER turning on the scanner, and making sure number "1" indicates on the Function Number Display.
- Turn off the scanner and your computer first when you switch the interface cable.
2 Load a target document on the scanner.

natural_image
Line drawing of a printer with a blue label pointing to the paper (no text or symbols on the printer itself)For how to load documents on the scanner, refer to "Chapter 2 Loading Documents" (on page 38).
3 Launch an application you want to use for scanning. The following steps show example windows when VCDemo is selected.
When VCDemo is launched:
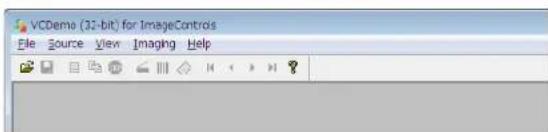
For how to launch VCDemo, refer to the "VirtualReScan (VRS) User's Guide" (VRS User Guide.pdf) in the folder under the path of VRS\HVRS\Documents in the SETUP DVD-ROM.
4 Select a scanner to use.

Chapter 1 Scanner Overview
5 In the application, invoke a scanner driver.


6 In the Scanner Properties dialog box, configure scan parameters.
7 Perform a scan.
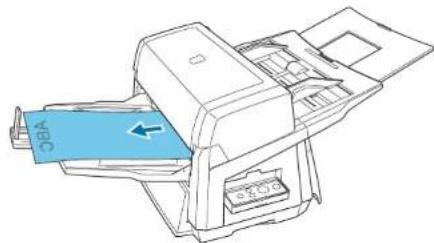
natural_image
Line drawing of a printer with a blue paper labeled 'VBC' being inserted (no text or symbols beyond label)For how to scan documents using VCDemo, refer to the VirtualReScan (VRS) User's Guide" (VRS User Guide.pdf) in the folder under the path of \VRS\HVRS\Documents in the SETUP DVD-ROM.
8 Save the scanned document images to a file.

The procedures and operation slightly may differ depending on the application you use.
If you want to use other applications for scanning, refer to the respective manuals that come with the applications.
Chapter 2 Loading Documents
This chapter describes how to load documents on the scanner.
2.1 Loading Documents on the ADF 39
2.2 ADF-Loaded Documents 42
2.3 Changing the ADF Position (Flatbed Type Only) 48
2.4 Loading Documents on the Flatbed (Flatbed Type Only) .....50
2.1 Loading Documents on the ADF
This section describes how to load documents on the ADF.

- Refer to "2.2 ADF-Loaded Documents" (on page 42) for information about the required document sizes and paper quality for ensuring correct operation when scanning documents from the ADF.
- Refer to "2.3 Changing the ADF Position (Flatbed Type Only)" (on page 48) for how to change the ADF position (Flatbed type only).
1 Align the edge of your document.
1 Confirm that all the document sheets have the same width.
2 Check the number of sheets in the document stack.
The following is a guideline for the limits on loadable sheets:
- A4/Letter-size paper or smaller that makes a document stack of 20 mm (0.79 in.) or less (200 sheets with paper weight of 80 g/m 2 (21 lb))
- A4/Letter-size paper or larger that makes a document stack of 10 mm (0.39 in.) or less (100 sheets with paper weight of 80 g/m 2 (21 lb))
For details, refer to "Maximum Document Loading Capacity" (on page 44).
2 To avoid sticky edges, fan the document as follows:
1 Hold both ends of the document, and bend the document stack into an arch.

2 Firmly holding the document with both hands, bend it back so that the bent section rises up in the middle of the document as follows.

3 Repeat Steps 1 to 2 twice or three times.
4 Turn the document stack by 90 degree, and then fan it in the different orientation again.
5 Align the edge of the document.

For details of how to fan documents, refer to the Error Recovery Guide.
You can find the Error Recovery Guide in the SETUP DVD-ROM. For how to install the Error Recovery Guide, refer to "Chapter 4 Installing the Scanner Software" in the Getting Started.
3 Load the document on the ADF Paper Chute.
Load it face down on the ADF Paper Chute.

natural_image
Line drawing of a printer with a paper clip and label 'VAC' (no text or symbols on the diagram itself)Chapter 2 Loading Documents
For how to load documents with tabs or non-rectangular documents, refer to "Loading Documents with Tabs or Non-Rectangular Documents" (on page 45).

According to the length of your document, slide the Paper Chute Extension out from the ADF Paper Chute up to the position where the document can be fully supported.

natural_image
Line drawing of a printer with paper feed and paper tray, no text or symbols present
When scanning plastic cards, take a special care for the following:
- Place one card at a time on the ADF Paper Chute.
- It is recommended that the front side of the card be placed face down in the ADF.
- Place the card in the following orientation (portrait).
Place face down.

natural_image
Line drawing of a printer with paper feed and paper clip, no text or symbols present- Cards to be scanned should satisfy: ISO7810 type ID-1 type compliant card Size : 86 mm (height) x 54 mm (width) (3.39 in. x 2.13 in.) Thickness : 0.76 ± 0.08 mm (0.030 ± 0.003 in.) Material : Poly vinyl chloride (PVC) or Polyvinyl chloride acetate (PVCA) Before scanning your card, test with a dummy card of the same material to see if it can be fed into the ADF properly.
- Embossed cards cannot be scanned.
- Cards that are excessively rigid or stiff may not feed smoothly.
- Clean off greasy finger prints if any from the surface of your card before scanning.
- Cards cannot be scanned when the imprinter is installed.
Chapter 2 Loading Documents
4 Adjust the Side Guides to the width of the document. Slide the Side Guides so that they will touch both sides of the document tightly. Any gap between the Side Guides and the document edges may make the scanned images skewed.

natural_image
Line drawing of a printer with paper feed and paper tray, no text or symbols present
- Remove paper clips or staples from the document. If a multifeed or mis-picking occurs, reduce the number of the document in the ADF Paper Chute.
- When loading a small document, be careful not to touch the hood for the Chute Roller during scanning. Doing so may let the hood open, which may catch your finger.
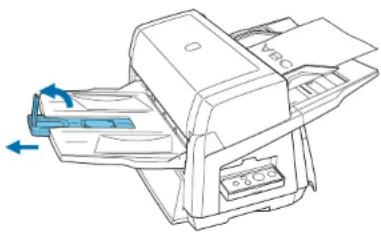
5 Pull out the Stacker Extension to the length of the document, and then raise the Stopper to stop the document.
natural_image
Line drawing of a printer with paper feed and paper roll, showing internal structure without any text or symbols
Adjust the height of the Stacker according to the paper type of the document. Select the lower position for ordinary use. When scanning a thin or curled document, select the upper position.
Lower position (Normal paper)

natural_image
Technical line drawing of a mechanical device with no visible text or symbolsUpper position (Thin paper)

natural_image
Technical line drawing of a mechanical device with no visible text or symbols
The number of document sheets loadable on the ADF decreases when the upper position is selected (about 100 sheets if the paper weight is 80 g/m2 (21 lb)).
6 Start up the application supported by the scanner to scan the document. For how to scan documents using ScandAll PRO, refer to "Chapter 3 How to Use ScandAll PRO" (on page 51).
2.2 ADF-Loaded Documents
Sizes
The following shows the sizes of documents scannable with the ADF.

A : 53 mm (2.09 in.) to 297 mm (11.69 in.)
B : 74 mm (2.91 in.) to 431 mm (16.97 in.) (*1)
*1: Up to 3 m (118.11 inches) of documents can be scanned when "Long page" is selected in [Scan Type].
Paper Quality
Paper Types
The following types of paper are recommended as the scannable documents:
- Woodfree paper
• Wood containing paper
For documents of paper types other than the above, check if they can be scanned; test with a few dummy sheets of the same paper type before scanning the actual document.
Paper Thicknesses
Paper thickness is expressed by "paper weight." The paper thicknesses allowable for scanning on this scanner are as follows:
- A4/Letter size or smaller : 31 g/m 2 to 209 g/m 2 (8.3 lb to 56.1lb )
- Size larger than A4/Letter : 52 g/m 2 to 209 g/m 2 (14.0 lb to 56.1 lb)
• A8 size : 127 g/m 2 to 209 g/m 2 (34 lb to 56.1 lb)
Precautions
The following types of documents may not be scanned successfully:
- Documents of non-uniform thickness (e.g., envelopes and photo-attached documents)
• Wrinkled or curled documents - Folded or torn documents
- Tracing paper
- Coated paper
- Carbon paper
- Photosensitive paper
• Perforated documents - Documents that are not square or rectangular
• Very thin documents
• Photographs (Photographic paper)
You must not scan the following types of documents:
• Paper-clipped or stapled documents
• Documents on which the ink is still wet
• Documents smaller than A8 size
- Documents wider than A3 size (297 mm or 11.69 in.)
- Documents other than paper such as fabric, metal foil, or transparencies
- Important documents such as certificates and cash vouchers that must not get scratched or become smeared

- When scanning a semi-transparent document, slide the [Brightness] bar to light to avoid bleed through.
- To prevent the rollers from becoming dirty, avoid scanning documents containing large areas written or filled with pencil.
- When using the ADF, the leading edge of all document sheets must be evenly aligned. Make sure that curling at the leading edge is within the following tolerances:


- Carbonless paper contains chemical substances that may harm the Brake Rollers or paper-feeding rollers (e.g. Pick Rollers) when documents are fed. Pay attention to the following:
Cleaning : If document jams occur frequently, clean the Brake Rollers and the Pick Rollers. For how to clean the Brake and Pick Rollers, refer to "Chapter 6 Daily Care" (on page 114).
Replacing parts : The service life of the Brake Rollers and the Pick Rollers for scanning "carbonless paper" may be shorter than that for scanning "wood containing paper."
- The service life of the Brake Rollers and the Pick Rollers for scanning "wood containing paper" may become shorter than that for scanning "woodfree paper."
- The Brake Rollers or Pick Rollers could be damaged if any photos or sticky notes on your document have contact with the Brake Rollers or Pick Rollers during scanning.
- Scanning documents of calendered paper, such as photos, may damage their surface.
Maximum Document Loading Capacity
The maximum number of sheets that can be loaded on the ADF Paper Chute is determined by the size and thickness of document. See the following graph:

line
| Paper weight (g/m²) | A4/Letter or smaller | Paper size larger than A4/Letter | | ------------------- | -------------------- | --------------------------------- | | 80 | 200 | 100 | | 120 | 136 | 68 | | 160 | 102 | 51 | | 200 | 80 | 40 || Paper thickness (Unit) | Conversion | |||||||||||
| g/m2 (paper weight) | 31 40 | 52 64 75 | 80 90 | 104 127 | 203 209 | |||||||
| lb | 8.3 11 | 14 17 20 | 20 21 24 | 2834 54 | 56.1 | |||||||
| kg | 26.7 35 | 45 55 | 64.5 69 | 77.5 90 | 110 174 | 180 | ||||||

- The paper weight available for a size larger than A4/Letter ranges from 52g / m2 to 209g / m2 (14.0 lb to 56.1 lb).
- The paper weight for A8 size ranges from 127 g/m 2 to 209 g/m 2 (34 lb to 56.1 lb).
Area Not to be Perforated
When using the ADF, a document error might occur if there are punched hole(s) in the blue-shaded area as in the following figure. When using the flatbed-type scanner, you should scan such a document through its flatbed.

Loading Documents with Tabs or Non-Rectangular Documents
To scan a document with a tab attached at its bottom or a non-rectangular document, place it on the scanner so that its tab or clipped section will be fed last through the ADF.
Good Example:

Bad Example:
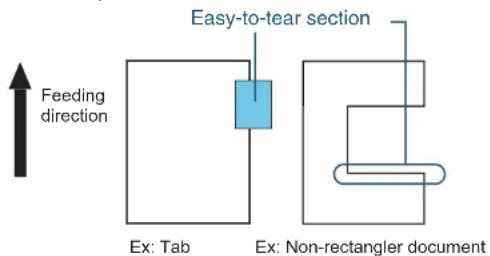

- If scanning a document as in the bad example above, the indicated section may be caught during feeding. This might cause a paper jam or make the document torn.
- If the non-rectangular section or tab of the document (see the figures above) is off the paths of the two Feed Rollers inside, it will not be fed properly. As a result, this part will remain in the ADF, and make the scanned image elongated accordingly.
Multifeed Detection Conditions
A multifeed refers to an error that occurs when more than one sheet of paper is fed into the ADF at the same time.
There are three modes to detect multifeeds: document overlapping, document length, and both document overlapping and length. The following conditions must be satisfied in each of these detection modes.
Detection By Document Overlapping
- Load sheets of the same thickness on the ADF at a time.
- Document paper weight: of 31g / m2 to 209g / m2 (8.3 lb to 56.1 lb) (0.04 mm to 0.26 mm or 0.002 in. to 0.010 in.)
- Punched holes are not allowed within 35 mm (1.38 in.) of the vertical center line of document.
- Do not glue separate paper within 35 mm (1.38 in.) of the vertical center line of document.
Detection By Document Length
- Load sheets of the same length on the ADF at a time.
• Document length deviation: 1% or less - Punched holes are not allowed within 35 mm (1.38 in.) of the vertical center line of document.
Detection By Document Overlapping and Length
- Load sheets of the same thickness and same length on the ADF at a time.
- Document thickness: 31g / m2 to 209g / m2 (8.3 lb to 56.1 lb) (0.04 mm to 0.26 mm or 0.002 in. to 0.010 in.)
• Document length deviation: 1% or less - Punched holes are not allowed within 35 mm (1.38 in.) of the vertical center line of document.
- Do not glue separate paper within 35 mm (1.38 in.) of the vertical center line of document.
Chapter 2 Loading Documents
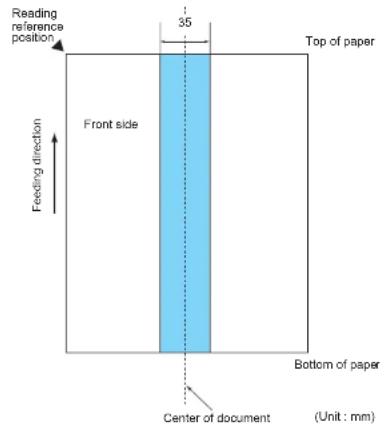

Multifeed detection by document overlapping will often misdetect very thick paper or media such as plastic cards. When scanning documents like this, disable Multifeed Detection.

Some document types and/or some document conditions may cause the multifeed detection rate to drop. Multifeed Detection is not available in the area about 30 mm (1.18 in.) from the leading edge of document.
Limiting the Background Color Area
The area from the leading edge to 3 mm (0.12 in.) down in the scanning area must be in white color (as the document background color).
If [White Level Follower] is enabled, the following blue-shaded area must be either in a color that is the same as the document background color, or in the color to be dropped out. If your document contains any text, frame, or signature in this area, disable [White Level Follower].

For details about [White Level Follower], refer to the FUJITSU TWAIN 32 Scanner Driver Help.
Job Separation Sheet
The following shows the typical format of the job separation sheet.

The document width must be A4/Letter (210 mm or 8.27 in.) or wider.
2.3 Changing the ADF Position (Flatbed Type Only)
This section describes how to change the ADF position.
1 Raise the Stacker.

natural_image
Illustration of a printer or scanner device with a blue arrow indicating rotation (no text or symbols present)2 Holding the handle, lift up the Document Cover.

natural_image
Illustration of a hand using a tool to press or adjust electronic components on a device tray (no text or symbols visible)3 Remove the ADF Lock Screws, and fix them to the Lock Screw Storage Holes.
ADF Lock Screw
Lock Screw Storage Hole

natural_image
Line drawing of a printer or scanner with an open lid and internal components, showing a magnified inset (no text or symbols)
natural_image
Line drawing of a printer with open lid and internal compartments (no text or symbols)
natural_image
Technical diagram showing a mechanical assembly with a circular annotation highlighting a specific component (no text or symbols present)
natural_image
Technical diagram of a mechanical assembly with a highlighted circular component (no text or symbols)
Make sure that the ADF Lock Screws have been inserted into the Lock Screw Storage Holes.
4 Gently close the Document Cover.
Chapter 2 Loading Documents
5 Change the position of the ADF.
Slide the ADF until it clicks into place. Make sure that the ADF is firmly locked to the installation position.
The three adjustable positions of the ADF are:
• Traditional (Traditional style set by default)
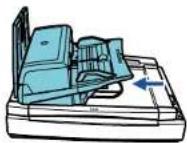
- Standard (Space-saving type and for right-handed operators) Slide the ADF to the center of the scanner.

- Reversed (Space-saving type and for left-handed operators) Slide the ADF to the center of the scanner, and then rotate it counterclockwise by 180 degree.
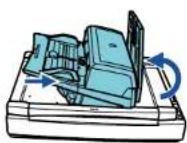

- Be careful not to get your fingers pinched while sliding the ADF.
- Do not rotate the ADF by more than 180 degree. Doing so may damage the ADF.
6 Let the Stacker down.
2.4 Loading Documents on the Flatbed (Flatbed Type Only)
This section describes how to load documents on the flatbed. The flatbed allows for easy scanning of thick documents such as books or irregularly-shaped documents.
1 Holding the handle, lift up the Document Cover.

natural_image
Illustration of a hand inserting a printer into a paper airplane (no text or symbols visible)
Make sure that no document is left on the ADF Paper Chute or on the Stacker.
2 Place a target document on the Document Bed face down and the top left corner aligned to the reference point.

3 Gently close the Document Cover.
4 Start up an application which supports the scanner, and scan the document.
For how to scan documents using ScandAll PRO, refer to "Chapter 3 How to Use ScandAll PRO" (on page 51).

The Document Cover with a black document holding pad is optionally available.
This type is convenient for scanning documents in black background when loading them on the flatbed.
This option allows you to correct skewed document images when scanned with the flatbed and to recognize the size of document output at its original size.
Name: Black Document Pad
Parts No.: PA03338-D960
Chapter 3 How to Use ScandAll PRO
The following explains how to scan documents with the scanner using ScandAll PRO.
Here, Windows Vista screen samples are used to explain the operations. The screens and operations may differ slightly if the OS that you are using is other than Windows Vista. Take note that, when the FUJITSU TWAIN 32 or FUJITSU ISIS scanner driver is updated, the screens and operations herein may also be slightly different. In such case, refer to the relevant manuals or materials, which are to be supplied when updating the driver.
3.1 Overview of ScandAll PRO....52
3.2 Launching ScandAll PRO....53
3.3 Selecting a Scanner Driver....54
3.4 Selecting a Scanner Model....55
3.5 Scan Parameters....56
3.6 Scanning Approaches ....57
3.7 Scanning with [Scan] 58
3.8 Scanning with [Batch Scan]....61
3.1 Overview of ScandAll PRO
ScandAll PRO is software for scanning images, which conforms with both the TWAIN and ISIS standards. In ScandAll PRO, you can use the FUJITSU TWAIN 32 or FUJITSU ISIS scanner driver, or VRS's ISIS interface to read scanned document data as images.

For details about the features of ScandAll PRO, refer to the ScandAll PRO Help.
ScandAll PRO mainly features:
• Supports both the TWAIN and ISIS standards.
- Allows you to specify scan parameters, file format, and destination to save the file before scanning by batch process.
Such settings details can be saved as profiles.
- Allows for editing of scanned image data, such as rotation, reversion, deskewing, sorting, page-insertion, and page-deletion, etc.
- Displays multiple files side-by-side, allowing you to browse them at one time for comparison.
- Outputs both color and binary (monochrome) images simultaneously by one-time scan.
- Inputs and outputs files in bitmap, JPEG or TIFF format.
- Directly outputs scanned images to PDF files or PDF/A files. Creates searchable PDF files and high-compression PDF files as well.
- Saves scanned image data automatically to a specified FTP server or Microsoft SharePoint Server when linked with that server.
- Sends scanned images as attached files when linked with an e-mailer.
- Allows for batch scan operations with a Hot Key on the Keyboard.
- Allows for batch scan operations with the [Scan/Stop] and [Send to] buttons on the scanner by assigning events to them.
- Divides a document and stores divided parts in several folders separately using patch codes or barcodes.
- Recognizes text in the pre-specified zone in the scanned image and outputs it to a file (Zone OCR function).
3.2 Launching ScandAll PRO
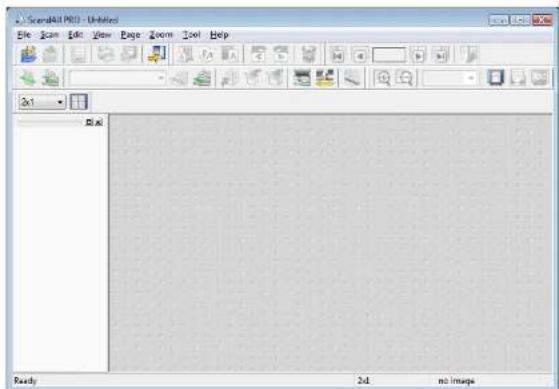
1 Select the [start] menu [All Programs] [Fujitsu ScandAll PRO] [Fujitsu ScandAll PRO].
⇒ ScandAll PRO starts up.
3.3 Selecting a Scanner Driver
ScandAll PRO comes with two scanner drivers; FUJITSU TWAIN 32 and FUJITSU ISIS.
As both of them are supported by ScandAll PRO, you can use either driver according to your preferences.
This section explains how to switch the scanner driver (TWAIN or ISIS) to use in ScandAll PRO.

• In ScandAll PRO, "TWAIN" is selected by default.
• For functional details of the FUJITSU TWAIN 32 scanner
driver, refer to the FUJITSU TWAIN 32 Scanner Driver Help.
- For functional details of the FUJITSU ISIS scanner driver, refer to the FUJITSU ISIS Scanner Driver Help.
1 Select the [Tool] menu [Preferences]. The [Setup] dialog box appears.
2 On the [Scan] tab, under [Device Driver], select either of the drivers.

3 Click the [OK] button to close the [Setup] dialog box.
3.4 Selecting a Scanner Model
Selecting the scanner to use in ScandAll PRO is a must before scanning the actual documents.
The following explains how to select the scanner.
1 Select the [Scan] menu [Select Scanner].
⇒ The [Select Scanner] dialog box appears.
2 Select a scanner you want to use, and click the [Select] button.
Select the scanner model name that you connected to your computer. Note the indication of the scanner model name depends on the scanner driver selected.
| Scanner Model FUJITSU TWAIN 32 FUJITSU ISIS | |
| fi-6670/fi-6670A FUJITSU fi-6670dj Fujitsu fi-6670 | |
| fi-6770/fi-6770A FUJITSU fi-6770dj Fujitsu fi-6770 | |
| fi-6750S FUJITSU fi-6750Sj Fujitsu fi-6750S | |
FUJITSU TWAIN 32 scanner driver:

FUJITSU ISIS scanner driver:

3.5 Scan Parameters
The scan parameters are configured in the setting dialog box of the scanner driver.
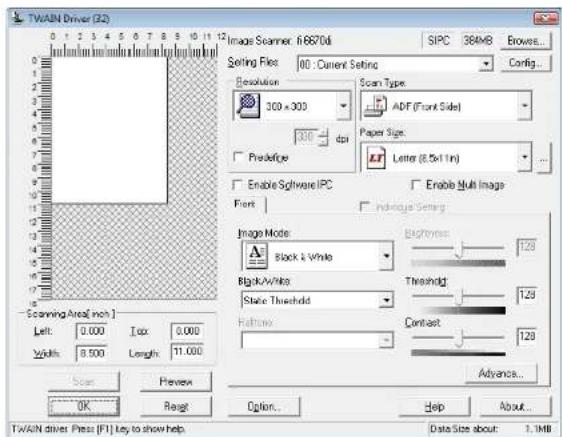
1 Select the [Scan] menu [Scan Settings]. The scanner driver's setting dialog box appears.
FUJITSU TWAIN 32 scanner driver:
FUJITSU ISIS scanner driver:

For the configurable parameters in the respective drivers, refer to "Chapter 4 Scan Parameters" (on page 63).
2 When you have completed the settings, click the [OK] button. ⇒ The scan parameters are configured.
3.6 Scanning Approaches
With ScandAll PRO, you can scan documents through your scanner. The two following approaches are available:
Scanning with [Scan]
Each time you scan documents, you may need to configure new settings as necessary, such as the file format, saving destination, and scan parameters.
Use the [Scan] option when you want to scan documents on a single-shot basis.
For details, refer to "3.7 Scanning with [Scan]" (on page 58).
Scanning with [Batch Scan]
You can create a "profile" that holds predetermined settings such as the file format and saving destination, scan parameters, image processing properties, and the application to link with. According to the profile selected, the scanner automatically scan documents.
You can create more than one profile beforehand, so you do not have to configure new settings every time you scan documents. You only need to switch between profiles.
The [Batch Scan] option is useful in a case where you want to scan a large volume of documents under a particular condition.
For details, refer to "3.8 Scanning with [Batch Scan]" (on page 61).
3.7 Scanning with [Scan]
Each time you scan documents, you may need to configure new settings as necessary, such as scan and saving parameters.
1 Load a target document on the scanner.
For how to load documents on the scanner, refer to "Chapter 2 Loading Documents" (on page 38).
2 Select the [Scan] menu [Scan Settings]. The [Scan Settings] dialog box appears.
3 In the [Scan Settings] dialog box, configure various settings such as for saving the scanned document images.

![FUJITSU SIEMENS Fi-6750S - Scanning with [Scan] - 2](/content/2026/05/862952/images/769849f6166868964807a644091d5b0d3915c85fb708091976e71e89eb3dfeee.jpg)
For information about the configured parameters, refer to the ScandAll PRO Help.
Chapter 3 How to Use ScandAll PRO
4 Click the [Scanner Setting] button.
![FUJITSU SIEMENS Fi-6750S - Click the [Scanner Setting] button. - 1](/content/2026/05/862952/images/49f11258fe4333677292667b29c41f9c8ee15408f9a804d5b2da6c00b4336a86.jpg)
⇒ The scanner driver's setting dialog box appears.
FUJITSU TWAIN 32 scanner driver:
![TWAIN Driver (22) Image Scanner: 6.6870d SIPC 38MB Browse... Sorting Files: 00 : Current Setting Resolution 300 x 300 Scan Type ADF (Front Side) 300 dpi Paper Size: Letter (8.5x1 in) Predefine Enable Software IPC Enable Multi Image Font Preview Setting Image Mode: Black & White Brightness 128 Black & White State Threshold 128 Hollow 128 Contrast 128 Advance... Scanning Area(inch.) Left: 0.000 To: 0.000 Width: 9.500 Length: 11.000 Scan OK Reag Option... Help About... TWAIN driver Press [F1] key to show help Data Size about: 1.1MB](/content/2026/05/862952/images/c3bc230837500f029a9c485184e253ba906b3f74f81f7ebc2c924c02c9d01970.jpg)
FUJITSU ISIS scanner driver:
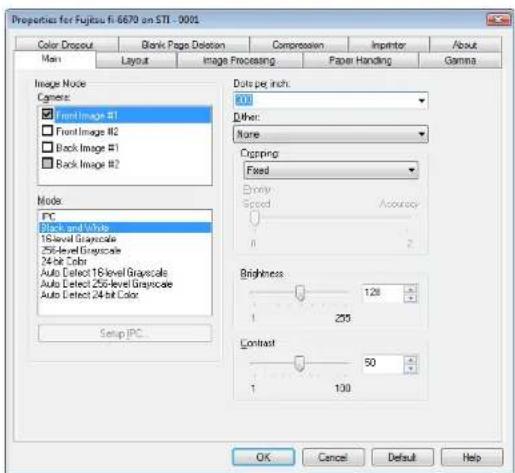
5 Configure the scan parameters.
For the configured parameters, refer to "Chapter 4 Scan Parameters" (on page 63).
6 When you have completed the settings, click the [OK] button.
⇒ You are returned to the [Scan Settings] dialog box.
Chapter 3 How to Use ScandAll PRO
7 Click the [Scan] button.

![FUJITSU SIEMENS Fi-6750S - When you have completed the settings, click the [OK] button. - 2](/content/2026/05/862952/images/cc2ee4b2390c4b886604382a79b83f2cbb09b9f326f27bc1098407a0da88889d.jpg)
When using the FUJITSU TWAIN 32 scanner driver, clicking the [Scan] button may display the scanner driver's setting dialog box. If so, you can also change the settings in the dialog box displayed.
Click the [Scan] button to scan the document. Click the [Close] button when you finish scanning.

If you do not want to display the scanner driver's setting dialog box, clear the [Show TWAIN dialog before each batch scan process] checkbox in the [Scan Settings] dialog box.
⇒ The document is scanned with the scanner. The scanned image(s) are displayed on the ScandAll PRO window, and then saved to a file.
![Scandal Pro - Untitled [1 / 1] File Scan Edit View Page Zoom Tools Help ABC ABC Ready 10.65% 1 / 1 Pages](/content/2026/05/862952/images/c2c3495dfea2201ba276f9b2461b02c7078d089ef5939fbef8f4670bff65914a.jpg)
![FUJITSU SIEMENS Fi-6750S - When you have completed the settings, click the [OK] button. - 5](/content/2026/05/862952/images/43565554dadf1e7c1d5b73d2bb941c3bea3c5b4ec35bd85e36aaf5bf61194a8f.jpg)
- If you unmark the [Save to file] checkbox in the [Scan Settings] dialog box, the scanned document image(s) will no longer be saved to a file. To save the image(s) to a file, select the [File] menu →[Save As].
- To scan documents with the same settings afterwards, select the [Scan] menu [Scan].
- For more details about the features and operations of ScandAll PRO, refer to the ScandAll PRO Help.
For information about other methods of scanning documents using ScandAll PRO, refer to "Chapter 5 Various Documents" (on page 73).
3.8 Scanning with [Batch Scan]
With Batch Scan, you can save various settings as profiles beforehand and then scan documents by using such profiles.
Creating and Editing Profiles
1 Select the [Scan] menu [Batch Scan Settings]. The [Batch Scan Settings] dialog box appears.
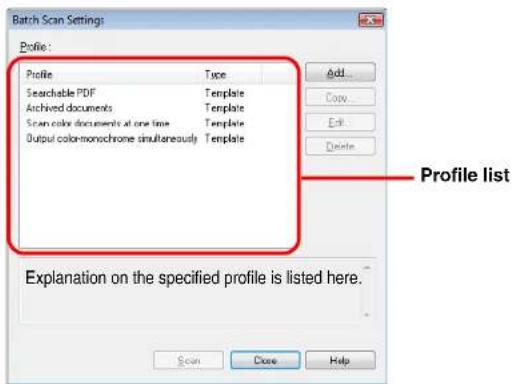
2 Do the following as necessary:
• To create a new profile:
Click the [Add] button.
⇒ A new profile appears in the [Profile Editor] dialog box.
- To create a new profile based on an existing profile: Select a profile you want to change settings for, and click the [Copy] button.
⇒ The profile you selected from the profile list is displayed as a new profile in the [Profile Editor] dialog box.
- To change the settings of an existing profile:
Select a profile you want to change settings for, and click the [Edit] button.
⇒ The selected profile appears in the [Profile Editor] dialog box.
• To delete an existing profile from the profile list:
Select a profile you want to delete, and then click the [Delete] button.
⇒ The selected profile is deleted.

The profile showing "Template" at [Type] in the dialog box is a default sample profile. It cannot be used for actual scanning. Use this profile as the base of new profiles.
Chapter 3 How to Use ScandAll PRO
3 In the [Profile Editor] dialog box, configure settings for scanning and saving the scanned document images.


For information about the setting items you can configure, refer to the ScandAll PRO Help.
4 Click the [OK] button.
⇒ You are returned to the [Batch Scan Settings] dialog box. Added or copied profiles by using the [Add] or [Copy] button are added to the profile list.
Scanning Documents
1 Load a target document on the scanner.
2 Select a profile from the [Select the Batch Profile] dropdown list on the toolbar.

3 Click the [Start Batch Scan] button.
⇒ The document is scanned with the scanner. The scanned image(s) are displayed on the ScandAll PRO window, and then saved to a file.
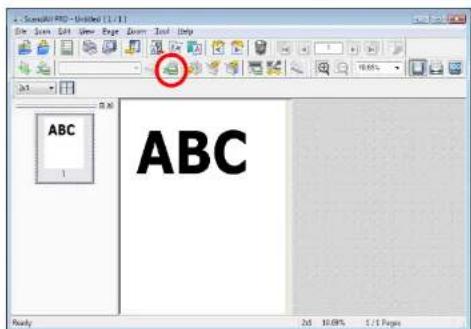

You can perform a scan by using the [Scan] menu or by configuring settings on the [Batch Scan Settings] dialog box as well. For more information, refer to the ScandAll PRO Help.
Chapter 4 Scan Parameters
This chapter describes the scan parameters you can configure for scanning within the scanner driver.
Here, Windows Vista screen samples are used to explain the operations. The screens and operations may differ slightly if the OS that you are using is other than Windows Vista. Take note that, when the FUJITSU TWAIN 32 or FUJITSU ISIS scanner driver is updated, the screens and operations herein may also be slightly different. In such case, refer to the relevant manuals or materials, which are to be supplied when updating the driver.
4.1 FUJITSU TWAIN 32 Scanner Driver 64
4.2 FUJITSU ISIS Scanner Driver 67
4.1 FUJITSU TWAIN 32 Scanner Driver
The FUJITSU TWAIN 32 scanner driver is a driver software product that complies with the TWAIN standard. You can use this driver to perform a scan using a TWAIN-supported scanning application.
Usually, you first invoke a required scanner driver from the scanning application and configure your scanning settings in the scanner driver's setting dialog box. (Depending on the application settings, this setting dialog box may not appear.)

How to invoke a scanner driver depends on the scanning application you use. For details, refer to the manual or help of the application you use.
![TWAIN Driver (B2) Image Scanner: [6670x] SIFC 364MB Browse... Setting File: 00: Current Setting Resolution Scan Type 300 x 300 ADF (Front Side) 300 dpi Paper Size: Predige Letter (8.5x11m) Enable Software IPC Enable Hub Image Front Individual Setting Image Mode Black & White Brightness 1.29 Bgick-White Threshold 1.29 Static Threshold Hathene Contrast 1.29 Width: 0.000 Length: 11.000 Scanning Area(inch) Left Top 0.000 Width: 0.500 Preview OK Reset Options... Help About... Data Size about 1.1MB TWIN driver, Press [F1] key to show help](/content/2026/05/862952/images/99b04fd3a0c2f514269d0f68ad77139e0cc763b77d0536471cdaa0e1328fc2a3.jpg)
In the FUJITSU TWAIN 32 scanner driver, you can configure various scan settings in the dialog box above.
For the major scan parameters, see the description below. For details, refer to the FUJITSU TWAIN 32 Scanner Driver Help.
Resolution
Specify a resolution for scanning images.
You can select a value from the predefined standard resolutions in the drop-down list. If a desired value is not listed, you can select [Custom] to specify the value (in increments of 1 dpi from 50 to 600 dpi).
By marking the [Predefine] checkbox, you can select one of three predefined settings, [Best], [Better], and [Normal], and this allows you to scan documents simply and quickly.
You can also customize the values of [Best], [Better], and [Normal] as desired in the window that appears when the [...] button is clicked.
Scan Type
Specify the side(s) of document to scan.
The specifiable scan types are as follows:
- ADF (Front Side)
• ADF (Duplex) (fi-6670/fi-6670A/fi-6770/fi-6770A only)
• ADF (Virtual Duplex) (fi-6750S only) - Long page (Front Side)
- Long page (Duplex) (fi-6670/fi-6670A/fi-6770/fi-6770A only)
- Flat Bed (flatbed type only)
• ADF (Back Side) (fi-6670/fi-6670A/fi-6770/fi-6770A only)
Chapter 4 Scan Parameters
Paper Size
Select a desired paper size to scan, from the sizes shown in the list.
You can save up to three paper sizes using the [...] button as your customized settings.
Also, you can change the order of the listings displayed.
Image Mode
You can specify the type of the output image of scanned document.
| Mode Description | |
| Black&White Documents are scanned in binary (black & white) mode. | |
| Halftone Documents are scanned through halftone processing in binary (black & white) mode. | |
| Grayscale Documents are scanned in gradations from black to white. In this mode, you can select either [Grayscale] (256) or [4bit Grayscale] (4-bit or 16 grayscale). | |
| SEE (Selectable Edge Enhancement) | Documents with line drawings and photographs are scanned using halftone processing, and only the line drawings and text are emphasized.This mode is most suitable for emphasizing only text of documents containing both photographs and text. |
| Color Documents | are scanned in color mode. In this mode, you can select one out from [24Color] (24-bit color), [256Color] (256 colors), and [8Color] (8 colors). |
[Scan] Button
Clicking this button starts scanning documents with the current settings.
[Preview] Button
Documents can be checked before the actual scanning. You can test-scan documents with the current settings, and display them in the preview window.
[Close]/[OK] Button
Clicking this button saves the current settings and closes the dialog box.
[Reset] Button
This button is used to undo changes to the current settings.
[Help] Button
Clicking this button opens the [FUJITSU TWAIN 32 Scanner Driver Help] window. You can also open the window by pushing the [F1] key.
[About] Button
Clicking this button views the information about the FUJITSU TWAIN 32 Scanner Driver's version.
[Option] Button
You can configure desired options in the dialog box below:

• [Rotation] Tab
Select this tab when configuring settings for the flip side rotation on double-sided scanning, image rotation, document size and skew detection, overscan, hole punch removal, and split image.
• [Job/Cache] Tab
Select this tab when setting the cache mode, multifeed detection, pre-pick control, blank page skipping, etc.
• [Imprinter (Endorser)] Tab
Select this tab when specifying the text to print on scanned documents using the optionally-available imprinter. This tab does not appear unless the imprinter is installed.
- [Generic] Tab
Select this tab when specifying the unit of scaling/measurement in the [TWAIN Driver (32)] dialog box.
Select inches, millimeters (mm), or pixel.
- [Startup] Tab
Select this tab when configuring settings on the scanner's Operator Panel.
• [Filter] Tab
Select this tab for setting the image processing filter(s).
| Filter Description | |
| Digital Endorser Adds a character string (alphanumeric data) to scanned document images. | |
| Page Edge Filler Fills up the margins of scanned document images with a selected color. |
• [Compression] Tab
Select this tab for setting the compression rate of JPEG Transfer.
[Advance] Button
Click this button for setting up for advanced image processing. You can specify Edge Extract, Gamma Pattern, Dropout Color, Reverse, White Page Follower, etc.
[Config] Button
Click this button to configure setting files.
You can save the changes made in the [TWAIN Driver (32)] dialog box, to a file under [Setting File]. From the next scanning, a set of settings is quickly switched by using these setting files.
4.2 FUJITSU ISIS Scanner Driver
The FUJITSU ISIS scanner driver is a driver software product that complies with the ISIS standard. You can use this driver to perform a scan using a ISIS-supported scanning application. Usually, you first invoke a desired scanner driver from the scanning application and configure your scanning settings in the scanner driver's setting dialog box. (Depending on the application settings, this setting dialog box may not appear.)

How to invoke a scanner driver varies depending on the application.
For details, refer to the manual or help of the application you use.
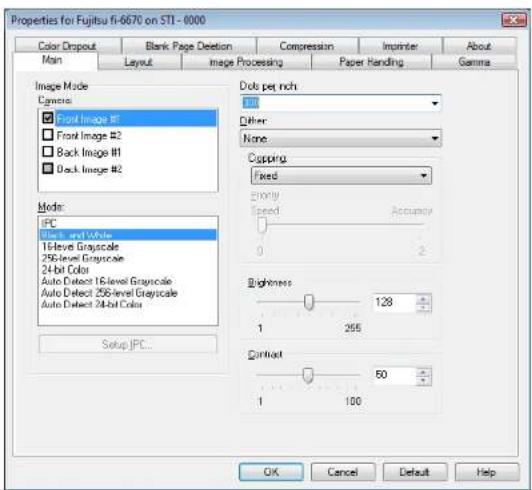
In the FUJITSU ISIS scanner driver, you can configure various scan settings in the dialog box above.
For the major scan parameters, see the description below.
For details, refer to the FUJITSU ISIS Scanner Driver Help.
[Main] Tab

Select this tab when specifying the side of document to scan, color (color/grayscale/black&white), resolution, brightness, and contrast.
Chapter 4 Scan Parameters
[Layout] Tab
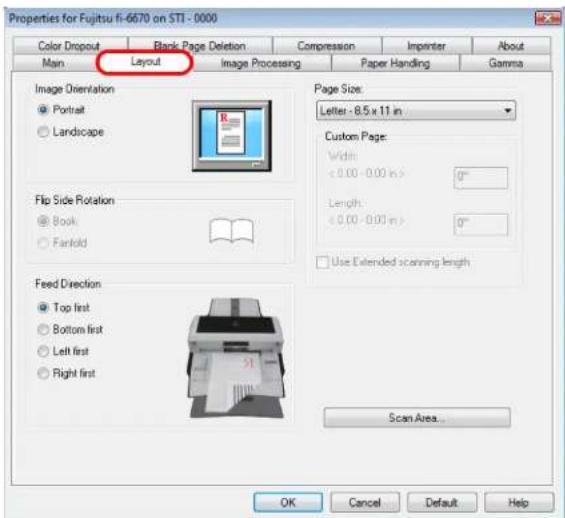
Select this tab when specifying the page orientation of document to scan, the binding direction for double-sided scanning, paper feed direction, and paper size.
Clicking the [Scan Area] button displays the [Scan Area] dialog box.
[Scan Area] Window

You can specify the scan area for the paper size specified for [Paper Size].
Chapter 4 Scan Parameters
[Image Processing] Tab

Select this tab when selecting a common setting pattern for scanning.
You can also configure settings for scanning documents with non-white background, or those with punch holes.
[Paper Handling] Tab

Select this tab when configuring settings for pre-picking (i.e., feeding of loaded document at a scanning point beforehand), and multifeed detection.
If using the Flatbed type, select a desired paper handling type from among [Automatic], [ADF], and [Flatbed] under [Paper Source].
Chapter 4 Scan Parameters
[Gamma] Tab
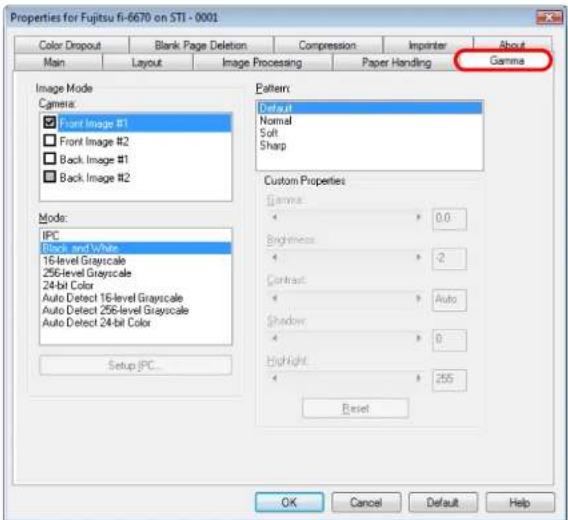
Select this tab when selecting a gamma correction pattern. You can customize detailed settings such as the gamma value and brightness when scanning documents in color mode.
[Color Dropout] Tab
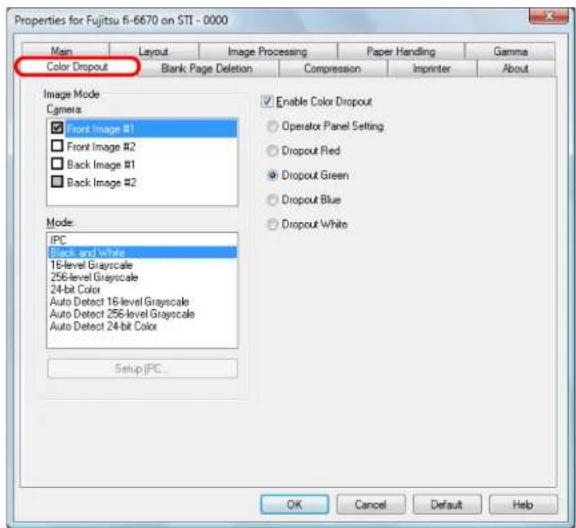
Select this tab when selecting color(s) to drop out when scanning documents.
Chapter 4 Scan Parameters
[Blank Page Deletion] Tab
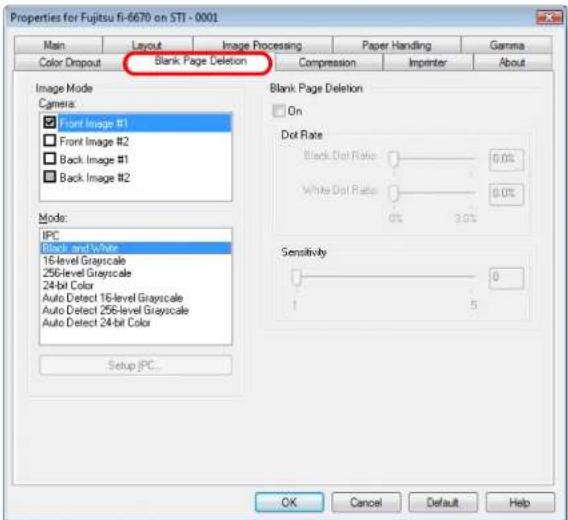
Select this tab when determining how to delete blank pages in scanned documents.
When scanning a document in monochrome mode, you can use the dot rate to process the blank page(s) for the white and black backgrounds separately.
When scanning a document in grayscale/color mode, you can use the sensitivity to process blank page(s) commonly for the white and black backgrounds.
[Compression] Tab

Select this tab when specifying a compression rate and an image quality for images scanned in color or grayscale mode. The sampling ratio used for compressing images is shown here.
Chapter 4 Scan Parameters
[Imprinter] Tab

Select this tab when configuring settings for printing text on scanned documents using the imprinter option (to be purchased separately). This tab is not displayed unless the imprinter option is installed.
[About] Tab

Scanning A Large-Size Document or Book (Flatbed Type Only)
1 Holding the handle, lift up the Document Cover. natural_image
Illustration of a hand pressing down on a printer with an arrow indicating press direction (no text or symbols present)natural_image
Illustration of a hand pressing down on a printer's cover (no text or symbols visible)Chapter 5 Various Documents
4 Select [Flat Bed] under [Scan Type].
5 Specify a desired paper size from [Paper Size], etc.
6 Click the [OK] button.
⇒ The changes made are applied.7 From ScandAll PRO, perform a scan.
For how to perform a scan, refer to "Chapter 3 How to Use ScandAll PRO" (on page 51).  Never look into the light source directly during scanning.  - Do not move the document during scanning. - For a document of up to A3 or Double Letter size, be sure to close the Document Cover before scanning.Scanning Documents of Different Widths
When you scan documents of different widths, scan them, following the procedure below.  When you scan documents of different widths at one time from the ADF, some documents that are small in paper size may be skewed or may not be fed into the scanner. It is recommended that only documents of the same width be scanned at one time.1 To prevent images from being skewed, select [Automatic Page Size Detection] from the [Automatic Size and Skew Detection] drop-down list.
For how to configure the settings, refer to "Automatically Correcting Skewed Document Images" (on page 87).2 Center all the document sheets as shown in the figure below.
flowchart
graph TD
    A["ABC"] --> B["ABC"]
    B --> C["AI"]
    style A fill:#f9f,stroke:#333
    style B fill:#ccf,stroke:#333
    style C fill:#cfc,stroke:#333
Chapter 5 Various Documents
3 Place the whole document on the ADF Paper Chute, and then adjust the Side Guides so that they lightly touch the widest sheets of the document.  When loading a small-size document on the ADF Paper Chute, be careful not to touch the hood for the Chute Roller. Touching the hood during scanning opens it, and may catch your finger in. 4 From ScandAll PRO, perform a scan. For how to perform a scan, refer to "Chapter 3 How to Use ScandAll PRO" (on page 51).Scanning A Document Longer Than A3 Size
1 Load a target document on the ADF Paper Chute. For how to load documents on the ADF Paper Chute, refer to "2.1 Loading Documents on the ADF" (on page 39).  When scanning a document longer than A3 size, pull out the Paper Chute Extension and the Stacker Extension to their maximum. Here, do not raise the Stoppers. 2 Start up ScandAll PRO, and then open the [TWAIN Driver (32)] dialog box. For how to open the [TWAIN Driver (32)] dialog box, refer to "Chapter 3 How to Use ScandAll PRO" (on page 51). 3 Select [Long page (Front Side)] or [Long page (Duplex)] from [Scan Type]. Select [Long page (Front Side)] for single-sided scanning; [Long page (Duplex)] for double-sided scanning.  ⇒ The [Long Page Paper Size Setting] dialog box appears.  The [Long Page Paper Size Setting] dialog box appears for the fi-6670, fi-6670A, fi-6770, or fi-6770A only.Chapter 5 Various Documents
4 Specify the document length, and then click the [OK] button.  5 Click the [OK] button. ⇒ The changes made are applied. 6 From ScandAll PRO, perform a scan. For how to perform a scan, refer to "Chapter 3 How to Use ScandAll PRO" (on page 51).  \- The setting above is not available if any one or both of the following options is enabled: \- Multi Image Output (FUJITSU TWAIN 32 scanner driver) \- Auto Color Detection (ScandAll PRO) \- If you want to scan a document that is longer than 864 mm (34.02 inches), specify a resolution of 200 dpi or lower.5.3 Advanced Scanning
Excluding Color(s) from Images (Dropout Color)
You can select a color from primary colors (red, green, and blue) to remove (drop out) from a scanned document image. For example, when you scan a document containing black text with green background, you can output an image of only black text. flowchart
graph LR
    A["Green Box ABCABC"] --> B["Gray Box"]
3 Click the [Advance] button.
 ⇒ The [Advance] dialog box appears.4 Select a color you want to remove, from the [Dropout Color] drop-down list under [More].
 If you want no color to be dropped out, select [None]. To drop out a desired color, select [Custom], [Custom 2], or [Custom 3]. If you select one of them, the [Select Dropout Color] dialog box will appear. Here, you can specify up to three colors to be dropped out. Chapter 5 Various Documents  \- Original image Color samples are displayed. Select a color to be dropped out. \- Dropout Image The dropped out image is displayed. • [Color 1], [Color 2], and [Color 3] tabs Specify color(s) to be dropped out. Up to three colors can be specified at the same time. \- [Dropout] checkbox Select this checkbox on both the [Color 2] and [Color 3] tabs to make this option effective when specifying two or more colors to be dropped out. \- [Red]/[Green]/[Blue] fields Under [Dropout Color], the specified color's values and the sample color image are displayed. You can change the color values by directly typing in or by using the [ ] and/or [ ] buttons. \- Sample color The color specified to be dropped out is shown here. • [Priority Black] checkbox Select this checkbox not to drop out text. This option prevents low-intensity colors such as black, which are generally used as text, from being dropped out. \- Sensitivity For the color you selected, specify the allowable range of colors to be dropped out. Specifiable range: 15 to 180 degrees The larger the numeric value, the wider the color dropout range is. \- [File] button You can display a desired image file (in the format of \*.bmp) in the [Original image] area and select, from here, the color to be dropped out. • [Apply] button Applies the changes made and closes the dialog box. \- [Cancel] button Cancels the changes made and closes the dialog box. 5 Click the [OK] button. ⇒ You are returned to the [TWAIN Driver (32)] dialog box. 6 In the [TWAIN Driver (32)] dialog box, click the [OK] button. ⇒ The changes made are saved. 7 From ScandAll PRO, perform a scan. For how to perform a scan, refer to "Chapter 3 How to Use ScandAll PRO" (on page 51). Chapter 5 Various DocumentsSkipping Blank Pages
Blank pages (white or black paper) included in your document are detected and removed automatically before scanning. For example, when scanning both double-sided and single-sided documents together in duplex mode, you can obtain the scanned document images with blank pages removed from the single-sided document scanned. 1 Load a target document on the ADF Paper Chute. For how to load documents on the ADF Paper Chute, refer to "2.1 Loading Documents on the ADF" (on page 39). 2 Start up ScandAll PRO, and then open the [TWAIN Driver (32)] dialog box. For how to open the [TWAIN Driver (32)] dialog box, refer to "Chapter 3 How to Use ScandAll PRO" (on page 51). 3 Click the [Option] button.  ⇒ The [Option] dialog box appears. 4 Select the [Job/Cache] tab, and then select the [Blank Page Skip] checkbox.  If this checkbox is marked, the cache mode is automatically switched to [Use Both Memory]. 5 With the slider control under [Blank Page Skip], specify the Blank Page Skip degrees. • In Binary/Halftone mode  The value displayed to the right of the slider bar shows a noise (dots) ratio(\*1). If a scanned page includes dots less than this value, the page is recognized as a blank page.Chapter 5 Various Documents
You can select OFF(- -) or a value from 0.2% to 3.0% (in increments of 0.2%). \*1: Ratio of black dots included in the scanned area (for white pages) • In Color/Grayscale mode  Use the slider bar to specify a level from among five levels (1 to 5). The larger the number, the higher the accuracy. 6 Click the [OK] button. ⇒ You are returned to the [TWAIN Driver (32)] dialog box. 7 In the [TWAIN Driver (32)] dialog box, click the [OK] button. ⇒ Changes made are saved. 8From ScandAll PRO, perform a scan. For how to perform a scan, refer to "Chapter 3 How to Use ScandAll PRO" (on page 51).Removing Punch Holes from A Scanned Image
You can remove or obscure punch holes (black dots) from the output image of a scanned punched document.  Original   Created  Punch hole marks are not removed when: - They are not aligned along with the document edge. - They vary in size or appear at various intervals. - The scanned document is not rectangular. - The scanned document is in dark-colored background. - Characters or figures exist at the edge of the document, or they overlap with the hole marks. - The document of a size larger than the specified page size is scanned with [Automatic Page Size Detection] enabled. - The size of the scanned document is not as specified in [Paper Size] while [Black Background] is selected. 1 Load a target document on the scanner. Fow how to load documents on the scanner, refer to "Chapter 2 Loading Documents" (on page 38). 2 Start up ScandAll PRO, and then open the [TWAIN Driver (32)] dialog box. For how to open the TWAIN Driver (32) dialog box, refer to "Chapter 3 How to Use ScandAll PRO" (on page 51).Chapter 5 Various Documents
3 Click the [Option] button.
 ⇒ The [Option] dialog box appears.4 Click the [Rotation] tab, and then select [Automatic Page Size Detection] or [Black Background] under [Automatic Size and Skew Detection].
If you select a setting other than [Automatic Page Size Detection] or [Black Background], the Hole Punch Removal function will not be available. 5 Select [Fill with white] or [Background color] under [Hole punch removal].
When scanning a color document, select [Background color]. If you select [Fill with white], the punch holes will look as if they are filled with white squares.6 Click the [OK] button.
⇒ You are returned to the [TWAIN Driver (32)] dialog box.7 In the [TWAIN Driver (32)] dialog box, click the [OK] button.
→ Changes made are saved.8From ScandAll PRO, perform a scan.
For how to perform a scan, refer to "Chapter 3 How to Use ScandAll PRO" (on page 51).  Depending on the documents to scan, the characters and/or graphics on them may be mistakenly detected as punch holes and filled with a color, or the punch holes may not be filled with a color at all. If these happen, select [Automatic Page Size Detection] and specify "3" for [Priority] to improve the accuracy of hole punch removal.Scanning A Document from the ADF in Manual Loading Mode
"Manual loading" refers to a user's action to place documents sheet by sheet on the ADF for scanning. Usually, the scanner stops scanning once it senses no sheet loaded in the ADF. In this manual loading mode, if the scanner judges no sheet loaded in the ADF, it waits for the next sheet to come within a predetermined time interval. If the next sheet is loaded in time, the scanner scans it and waits for the next sheet. If no further sheet is found in time, the scanner stops the scanning. With this option, you can confirm contents of multiple sheets of your document sheet by sheet before scanning them. This manual loading is effective when: - Scanning a document while confirming its contents - Batch-scanning a document set, which may cause multifeed or paper jam - Continuously scanning a document set of various shapes or sizes, like clippings of magazines or new papers, that cannot be loaded at once The procedure is as follows: 1 Configure settings in the Software Operation Panel to enable manual loading. For details of the settings, refer to "Timeout for Manual Feeding [Manual-feed timeout]" (on page 186). 2 Load the first sheet of a target document on the ADF Paper Chute. For how to load documents on the ADF Paper Chute, refer to "2.1 Loading Documents on the ADF" (on page 39). 3 Start up ScandAll PRO to perform a scan. For how to perform a scan, refer to "Chapter 3 How to Use ScandAll PRO" (on page 51). ⇒ After the current sheet has been scanned, the scanner waits for the next sheet to load by keeping the rollers on the ADF rotating for the timeout time specified in the Software Operation Panel. 4 Load the next sheet on the ADF Paper Chute. ⇒ The loaded sheet is scanned with the same settings configured. 5 Repeat Step 4 until no remaining sheet is left. ⇒ The scanner terminates the scanning if no paper is loaded on the ADF within the timeout time specified in the Software Operation Panel.  - Pressing the [Send to] button while the scanner is waiting for the next sheet immediately terminates the scanning. - Once the Manual-feed timeout option is enabled, the scanner waits until a sheet to load within a specified timeout time even if you start a scan with no document loaded on the ADF Paper Chute. - You may have to replace the consumables more frequently if you often scan documents in this manual loading mode. Chapter 5 Various DocumentsDuplex Scanning Using the ADF Virtual Duplex Function (fi-6750S Only)
The ADF (Virtual Duplex) option allows you to scan front-side pages of document first, and then scan back-side pages in succession, and automatically sorts these scanned pages in a correct order. This option virtually realizes double-sided scanning on the ADF-type simplex scanner model (fi-6750S). flowchart
graph TD
    A["Front side"] --> B["Back side"]
    B --> C["Sort (Auto)"]
    C --> D["ABC"]
    style A fill:#f9f,stroke:#333
    style B fill:#ccf,stroke:#333
    style C fill:#cfc,stroke:#333
    style D fill:#fcc,stroke:#333
When selecting the "Scan" option
Select the [Perform ADF virtual duplex scanning] checkbox in the [Scan Settings] dialog box. When selecting the "Batch Scan" option
Display the profile to be used for scanning in the [Profile Editor] dialog box. On the [Scan] tab, select [ADF (Virtual Duplex)] from [Scan Type]. When using a scanner driver
In the [TWAIN Driver (32)] dialog box, select [ADF (Virtual Duplex)] from [Scan Type].   In the FUJITSU ISIS scanner driver, you cannot configure settings for ADF virtual duplex scanning. When using this driver, go to the [Scan Settings] dialog box or use the Batch Scan option.Chapter 5 Various Documents
3 From ScandAll PRO, perform a scan.
For how to perform a scan, refer to "Chapter 3 How to Use ScandAll PRO" (on page 51). When the scanning is complete, a message appears to prompt you to load your document face up.4 Load the document face up on the ADF Paper Chute.
For how to load documents on the ADF Paper Chute, refer to "2.1 Loading Documents on the ADF" (on page 39).  When scanning the back side pages, carefully load the document so that: - the back-side pages will be scanned in the same order as the front-side pages. - the front-side pages will not be scanned up-side-down.5 In response to the message shown, click the [Yes] button.
 ⇒ The back-side pages of the document are scanned.6 When the scanning is complete, the scanned document images are sorted automatically.
 \- The ADF Virtual Duplex option is not available once you have selected any of the following. To use the option, clear the selected item(s) in ScandAll PRO and/or in the scanner driver. - the [Output color and monochrome simultaneously] and [Automatic Color-Monochrome Detection] checkboxes on the [File format and Name scheme] tab of the [Profile Editor] dialog box. - any of the checkboxes under [Job Separator Sheet Handling] on the [Document separator] tab of the [Profile Editor] dialog box. - the [Multi Image Output] checkbox in the [Multi Image] dialog box, which is opened by clicking the [Enable Multi Image] checkbox in the [TWAIN Driver (32)] dialog box of the FUJITSU TWAIN 32 scanner driver. - the [Split Image] and [Blank Page Skip] checkboxes in the [Option] dialog box, which is opened by clicking the [Option] button in the [TWAIN Driver (32)] dialog box of the FUJITSU TWAIN 32 scanner driver. - the [On] checkbox under [Blank Page Deletion] on the [Blank Page Deletion] tab of the FUJITSU ISIS scanner driver. - The scanned images are not sorted if the page count on the front pages differs from that on the back sides.5.4 Setting Post-Scan Operations and Handling
Automatically Correcting Skewed Document Images
You can direct the scanner to sense and automatically correct your document skew if it is fed askew into the ADF. flowchart
graph LR
    A["Originals"] --> B["Output"]
    style A fill:#f9f,stroke:#333
    style B fill:#bbf,stroke:#333
4 Select the [Rotation] tab, and then select [Automatic Deskew] or [Automatic Page Size Detection] under [Automatic Size and Skew detection].
Chapter 5 Various Documents
 - When [Automatic Deskew] is selected, the paper size of documents is not automatically detected. - With the [Priority] slider control, you can change the accuracy of Automatic Page Size Detection. \- To give a priority to the scan speed before scanning documents, specify a smaller value. To give a priority to the detection accuracy, specify a larger value. - When detecting a paper size of documents to which index sheets, sticky notes or index stickers are attached, specify 2 for the priority. - When detecting a paper size of documents whose one side (front or back) is in dark background color, specify 3 for the priority. Priority Suited Document Type| 0 Rectangular documents with straight side edges |
| 1 Documents without tabs |
| (those that have no index sheets, sticky notes, or index stickers) |
| 2 Documents with tabs |
| (those that have index sheets, sticky notes, or index stickers) |
| 3 Documents whose one side (front or back) is in dark background |
5 Click the [OK] button.
⇒ You are returned to the [TWAIN Driver (32)] dialog box. 6 In the [TWAIN Driver (32)] dialog box, click the [OK] button. ⇒ Changes made are saved. 7 From ScandAll PRO, perform a scan. For how to perform a scan, refer to "Chapter 3 How to Use ScandAll PRO" (on page 51). Chapter 5 Various DocumentsSetting Auto Correction for Document Page Orientations
You can direct the scanner to automatically correct a batch of documents with a mixture of page orientations. flowchart
graph LR
    A["Originals"] --> B["Output"]
    B --> C["Images"]
    subgraph Originals
        D["DEF"]
        E["Abdefg"]
        F["Hiklmn"]
        G["O"]
    end
    subgraph Outputs
        H["Opqrstu"]
        I["DEF"]
        J["Abdefg"]
        K["Hiklmn"]
    end
Chapter 5 Various Documents
- Documents written in a non-supported language. The supported languages are: Japanese, English, German, French, Spanish, Italian, Korean, Traditional Chinese, Simplified Chinese, Russian, and Portuguese - Documents with uneven colors, design and/or patterns in background - Documents with intricate design - Documents with a lot of noise - To judge text in documents, use a language that is set in Windows's Regional and Language Options. - The image orientation may not be corrected properly depending on the scanner driver setting at scanning (e.g. dithering). - If you cannot correct the image orientation properly, use the Edge Emphasis function of the drivers to correct it. - Shadows may remain on the edge of the scanned image. 5 Click the [OK] button. ⇒ You are returned to the [TWAIN Driver (32)] dialog box. 6 In the [TWAIN Driver (32)] dialog box, click the [OK] button. ⇒ The settings configured are saved. 7 From ScandAll PRO, perform a scan. For how to perform a scan, refer to "Chapter 3 How to Use ScandAll PRO" (on page 51).Saving Scanned Images in PDF Format
You can create PDF data from scanned document images in either of the following two ways:Creating with ScandAll PRO
ScandAll PRO is recommended for scanning in color or grayscale mode. With ScandAll PRO, you can: - Reduce the size of PDF data - Create PDF data with facility  For how to use ScandAll PRO, refer to "Chapter 3 How to Use ScandAll PRO" (on page 51).Creating with Adobe Acrobat
Adobe Acrobat is recommended when you want to create PDF data quickly and when you scan documents in black-and-white mode. You can: • Create PDF data at an original resolution in a short time - Create PDF data compressed to a desired size by changing compression rates The file size of color documents increases if scanned by following a general procedure. You can drastically reduce the size if you run Acrobat Distiller before saving. For details, see the HINT box in Step 10 of the "Creating with Adobe Acrobat" section.  Notes on the use of Adobe Acrobat \- As Adobe Acrobat's settings override the settings in the scanner driver, such as for [Resolution], [Scan Type], and [Image Mode], the scanned image may not be displayed as configured with the previous settings in the scanner driver. \- The following options are not available: - [256 Color] and [8 Color] modes - [Rotation Degree] specified when [End of Page Detection] is selected - Long Page Scanning - Automatic Page Size Detection \- Scanning paper documents with the scanner and converting them into a PDF format with Adobe Acrobat may output unexpected images in the following cases: 1 The "Edge Shadow Removal" option enabled in Acrobat, and the "Digital Endorser" or "Black Background" option specified in the FUJITSU TWAIN 32 scanner driver at the same time. In this case, character strings embedded in the image or the background may be lost. Solution 1: In Acrobat, select [File] ⇔ [Create PDF] ⇔ [From Scanner] ⇔ [Image Settings], and set [Edge shadow removal] to [OFF] or set [Color/Grayscale] and/or [Monochrome] under [Compression] to a setting other than [Adaptive]. Solution 2: Adjust the scanning density in the FUJITSU TWAIN 32 scanner driver. 2 The option(s) [Color/Grayscale] and/or [Monochrome] set to [Adaptive] under [Compression] in Acrobat, and documents scanned at a resolution lower than the recommended value for Acrobat. In this case, inappropriate images may be output. Solution: Under [Compression], set [Color/Grayscale] and/or [Monochrome] to a setting other than [Adaptive]. 3 The "Overscan" option specified in the FUJITSU TWAIN 32 scanner driver to scan documents of Double-Letter size (11x17 in.) or those of A3 size or longer. Such documents may not be scanned properly because scanning of those sizes are not available in Acrobat. Solution: When scanning a Double-Letter sized document (11x17 in.) or an A3-sized or longer document, do not set [Overscan] in the FUJITSU TWAIN 32 scanner driver. For detailed usage and information on Acrobat, refer to "Create a PDF file from a scanned document" in the Adobe Acrobat Help.■Creating with ScandAll PRO
1 Load a target document on the scanner. For how to load documents on the scanner, refer to "Chapter 2 Loading Documents" (on page 38). 2 In ScandAll PRO, select [PDF File], [SinglePage PDF File], [PDF/A file], or [SinglePage PDF/A file] to save the scanned document images.  The file format of [PDF file] or [SinglePage PDF file] is saved as a file compatible with Adobe Acrobat 4.0 (PDF 1.3); that of [PDF/A file] or [SinglePage PDF/A file] saved in a PDF/A-lb format (format for an archive of digital documents based on PDF 1.4). Selecting [SinglePage PDF file] or [SinglePage PDF/A file] creates one file per image, and selecting [PDF file] or [PDF/A file] creates one file containing multiple images.When scanning with the "Scan" option
Select a file format from the [File Format] in the [Scan Settings] dialog box. Chapter 5 Various Documents
When scanning with the "Batch Scan" option
Display a profile name you want to use for scanning your file in the [Profile Editor] dialog box. Select the [File format and Name scheme] tab, and then select a file format from [File Format].  3 To configure PDF-related optional settings, click the [PDF Option] button. ⇒ The [Output PDF File] dialog box appears.  In this dialog box, you can change the compression rate for creating a file, turn on the OCR (i.e., text recognition) function to make searchable PDF files, and enhance the security of created PDF files by adding a password to.  For details about the [Output PDF File] dialog box, refer to the ScandAll PRO Help. 4 From ScandAll PRO, perform a scan. For how to perform a scan, refer to "Chapter 3 How to Use ScandAll PRO" (on page 51).  ScandAll PRO features the outputting of scanned document images as PDF file(s), but does not officially support the function to open PDF files. To view PDF files, it is recommended you use an application that can open PDF files, such as Adobe Acrobat.■Creating with Adobe Acrobat
1 Load a target document on the scanner. For how to load document on the scanner, refer to "Chapter 2 Loading Documents" (on page 38). 2 Select the [start] menu [All Programs] [Adobe Acrobat]. ⇒ Adobe Acrobat starts up. 3 Select the [File] menu [Create PDF] [From Scanner].  ⇒ The [Acrobat Scan] dialog box appears.Chapter 5 Various Documents
4 Select one of the following at [Scanner].
- FUJITSU fi-6670dj - FUJITSU fi-6770dj - FUJITSU fi-6750Sj   If your document is scanned under the default settings, the output image(s) may not be satisfactory. It is recommended the settings be changed, following the procedure below: 1 Clear the [Make Searchable (Run OCR)] checkbox. 2 Click the [Options] button for [Optimization]. →The [Optimization Options] dialog box appears. 3 Select [Custom Settings] and change the following settings: - Color/Grayscale: none - Monochrome: JBIG2 or CCITT Group 4 - Background removal: Off - Edge shadow removal: Off5 Click the [Scanner Options] button.
 ⇒ The [Scanner Options] dialog box appears.6 Select [Show Scanner's Native Interface] at [User Interface], and then click the [OK] button.
 ⇒ The [Scanner Options] dialog box is closed and you are returned to the [Acrobat Scan] dialog box.7 Click the [Scan] button.
 ⇒ The [Save Scanned File As] dialog box appears.Chapter 5 Various Documents
8 Type in the name of the file to save at [File name], and then click the [Save] button.  ⇒ The scanned images are displayed. 9 Configure settings such as for [Image Mode] and [Resolution], and then click the [Scan] button.  10 To finish the scanning, select [Scanning complete] and click the [OK] button.  ⇒ The scanned images are displayed.  For details on the operation of Adobe Acrobat, refer to the Adobe Acrobat Help.  If you save the scanned document images in Step 8 above, the file size may increase greatly. To reduce the size, retry saving the images, following the procedure below. (It may take more time than you save as usual.) 1 Select [File] [Print]. 2 In the dialog box below, select [Adobe PDF] at [Name].  3 Click the [Properties] button. ⇒ The [Adobe PDF Document Properties] dialog box appears. 4 Select the [Adobe PDF Settings] tab. 5 Select a desired job option from [Default Settings]. Here, for example, select [Smallest File Size]. 6 Click the [OK] button. 7 In the [Print] dialog box, click the [OK] button. ⇒ The [Save PDF File As] dialog box appears. 8Specify a desired file name, and then click the [Save] button to save the file.Dividing Multipage Documents Using Patch Codes
ScandAll PRO supports the Job Separation function using patch code sheets. This patchcode-based Job Separation function can divide scanned images of a multipage document into pre-determined units, and then save them to their respective folders separately, without interrupting the ongoing scanning. A multi-page file such as in PDF or TIFF format can be divided into a specified unit, and each of the parts is saved to separate files. The procedure is as follows: 1 Prepare patch code sheets. The PDF file for use as a patch code sheet comes with two size types (A4 and Letter). Before using the patchcode-based Job Separation function, you need to select the [start] menu [All Programs] [Fujitsu ScandAll PRO] [Patch Code (A4)] or [Patch Code (Letter)], and then print the PDF file of either "Patch Code (A4)" or "Patch Code (Letter)" as many as you need.  - Use white paper to print out the patch code sheets. - To make photocopies of the printed patch code sheet, make the same size and same density of photocopies as the original patch code sheets. - Note that using the same patch code sheets repeatedly may decrease the recognition accuracy due to the dirt contaminated on the sheets. If the patch code sheets are not recognized correctly or get smudged, make new prints of the patch code sheets. 2 Create a new batch profile in ScandAll PRO, and then open the [Profile Editor] dialog box. For how to create profiles, refer to "3.8 Scanning with [Batch Scan]" (on page 61).Chapter 5 Various Documents
3 Select the [Document separator] tab, and then select the [Use Patchcode-Based Job Separation Sheet] checkbox.   - To suppress the scanning of patch code sheet images, check the [Remove separation sheet] checkbox. - In Duplex Scan mode, you can disable the scanning of the back side of patch code sheet by selecting the [Remove the next page of a separation sheet] checkbox. 4 Insert the patch code sheets wherever you want the file/folder to separate. Load the document with the patchcode-printed sheets face down on the ADF Paper Chute.  5 Using the batch profile you created above, perform a batch scan. For how to perform a batch scan, refer to "3.8 Scanning with [Batch Scan]" (on page 61).  The following is the procedure for saving the scanned document images, which are divided by patch code sheets, in separate folders. 1 Click the [Name Rule] button on the [File format and Name scheme] tab in the [Profile Editor] dialog box. → The [Name Rule] dialog box appears. 2 Select the [Create Directories Separately] checkbox.  → The created folder is named under the document counter's title, and is used to hold the scanned data files. Example of saving files in folders: When selecting [Create Directories Separately] flowchart
graph TD
    A["0001"] --> B["image0001.jpg"]
    A --> C["image0002.jpg"]
    A --> D["..."]
    A --> E["0002"]
    E --> F["image0001.jpg"]
    E --> G["image0002.jpg"]
    E --> H["..."]
    E --> I["0003"]
    I --> J["image0001.jpg"]
    I --> K["image0002.jpg"]
    I --> L["..."]
Dividing a Multipage Document Using Barcodes
ScandAll PRO supports the Job Separation function using barcode-printed sheets. This barcode-based Job Separation function can divide scanned images of a multi-page document into a pre-determined unit, and then save each part to respective folders separately, without interrupting the ongoing operations. For a multi-page data such as in PDF or TIFF format, this function can divide it into a specified unit, and save each of the parts to separate files. Note not only the document counter, but also the recognized barcode text can be used to name the file or folder. ScandAll PRO can detect the following types of barcodes:| Code Character Set Field Width | ||
| UPC/EAN/JAN | Numbers UPC:12 (UPC-A only; includes check digits)EAN, JAN: 8 or 13 (includes check digits) | |
| CODE39 Numbers, alphabets, 7 symbols | 1 to 32(excludes start/stop codes) | |
| CODABAR 4 | start/stop characters, numbers, 10 alphabets and symbols | 1 to 32(excludes start/stop codes) |
| CODE128Full ASCII codes 1 to 32 | (excludes check characters) | |
Chapter 5 Various Documents
The following lists the barcode detection parameters: The procedure is as follows:| Item Parameter | |
| Barcode height 10 mm to 30 mm / 0.39 to 1.18 inches | |
| Barcode length 300 mm / 11.81 inches or less | |
| Barcode margin 5 mm / 0.20 inches or more on each side of barcode | |
| Barcode base color | White (This may not be recognized correctly depending on the hue of white color of the paper scanned.) |
| Resolution 200 dpi to 600 dpi | |
| Barcode angle Horizontal and vertical | |
Chapter 5 Various Documents
3 Click the [Setup] button.
⇒ The [Barcode Setting] dialog box appears.  - If scanning performance deteriorates because of the barcodes used, limit the barcode types to sense or narrow the barcode area to improve the scanning performance. - If there are multiple barcodes in the barcode detecting area, the one recognized first will be enabled. 4 Insert the barcode-printed sheets wherever you want the file/folder to separate.
Load the document with the barcode-printed sheets face down on the ADF Paper Chute. flowchart
graph TD
    A["BJanuary8"] --> B["BFebruary7"]
    B --> C["BMarch4"]
    D["Barcode printed sheet"] --> E["Output"]
    style A fill:#f9f,stroke:#333
    style B fill:#ccf,stroke:#333
    style C fill:#cfc,stroke:#333
    style D fill:#fcc,stroke:#333
    style E fill:#ffc,stroke:#333
5 Specify the created batch profile, and then perform a batch scan.
For how to perform a batch scan, refer to "3.8 Scanning with [Batch Scan]" (on page 61).  The following procedure shows how to store each of scanned document sheets separated with barcode-printed sheets in separate folders, and to name the folders with the character string recognized from the barcode: 1 On the [File format and Name scheme] tab of the [Profile Editor] dialog box, click the [Name Rule] button. ⇒ The [Name Rule] dialog box appears. 2 Enable [Use Barcode Characters] and select the [Create Directories Separately] checkbox.  → The created folder is named with the barcode recognition character string and is used to store the scanned data. If the [Create Directories Separately] checkbox is left unselected, the character string of the recognized barcode will be regarded as the file name. Example of storing data in folders: When selecting [Create Directories Separately] flowchart
graph TD
    A["January"] --> B["February"]
    B --> C["March"]
    A --> D["image0001.jpg"]
    A --> E["image0002.jpg"]
    B --> F["image0001.jpg"]
    B --> G["image0002.jpg"]
    C --> H["image0001.jpg"]
    C --> I["image0002.jpg"]
Horizontally Splitting a Scanned Image into Two
You can obtain two images by horizontally splitting a single scanned page image.  This function is not supported by all applications. flowchart
graph LR
    A["ABC"] --> B["123"]
    B --> C["ABC"]
    C --> D["123"]
Chapter 5 Various Documents
4 Select the [Rotation] tab, and then select the [Split Image] checkbox.   When a document is scanned in Duplex Scan mode, the scanned back side image(s) are output according to the [Flip Side Rotation] settings in the order below: • Book: Upper half Lower half • Fanfold: Lower half ⇔ Upper half  This function is not available with: • [Multi Image Output] selected • [Color/Monochrome Auto Detection] selected • the resolution set to 1200 dpi 5 Click the [OK] button. ⇒ You are returned to the [TWAIN Driver (32)] dialog box. 6 In the [TWAIN Driver (32)] dialog box, click the [OK] button. ⇒ Changes made are saved. 7 From ScandAll PRO, perform a scan. For how to perform a scan, refer to "Chapter 3 How to Use ScandAll PRO" (on page 51).Outputting in Multi-Image Mode
You can obtain both color/grayscale and binary black-and-white image outputs at a single scan (this is called the Multi Image Output function).  This function is not supported by all applications.  Example: When a color document is scanned 1 Load a target document on the scanner. For how to load documents on the scanner, refer to "Chapter 2 Loading Documents" (on page 38). 2 Start up ScandAll PRO, and then open the [TWAIN Driver (32)] dialog box. For how to open the [TWAIN Driver (32)] dialog box, refer to "Chapter 3 How to Use ScandAll PRO" (on page 51). 1 Load a target document on the scanner. For how to load documents on the scanner, refer to "Chapter 2" Loading Documents" (on page 38). 2 Start up ScandAll PRO, and then open the [TWAIN Driver (32)] dialog box. For how to open the [TWAIN Driver (32)] dialog box, refer to "Chapter 3 How to Use ScandAll PRO" (on page 51).Chapter 5 Various Documents
3 Select the [Enable Multi Image] checkbox.
 ⇒ The [Multi Image] dialog box appears.  4 Select [Multi Image Output] under [Output mode]. 5 Select the order to output multi-images under [Order (for Multi Image Output)]. • Primary: Color/Grayscale Secondary: Binary First, a color or grayscale image is output, and then a black-and-white image. • Primary: Binary Secondary: Color/Grayscale First, a black-and-white image is output, and then a color or grayscale image. 6 Under [Select Current Image Setting], select a side (if in Duplex Scan mode). 7 In the [TWAIN Driver (32)] dialog box, click the [OK] button. ⇒ Changes made are saved. 8From ScandAll PRO, perform a scan. For how to perform a scan, refer to "Chapter 3 How to Use ScandAll PRO" (on page 51).  You can use a batch profile to change settings such as the folders to save respective scanned color/grayscale and black-and-white images, and their file formats and names. The procedure is as follows: 1 In the [Profile Editor] dialog box, select the [File format and Name scheme] tab, and then select the [Automatic Color-Monochrome Detection] checkbox.  2 Specify the respective folder names to save, the file formats, and the file names for the color/ grayscale and black-and-white images. 3 Click the [OK] button. → Changes made are saved. 4 Perform a batch scan. For how to perform a batch scan, refer to "3.8 Scanning with [Batch Scan]" (on page 61).Setting Auto Detection for Content Colors (Color/Monochrome)
You can configure settings so the scanner will automatically detect whether the images are color (or grayscale) or binary black-and-white ones. Scanning color documents produces color (or grayscale) images, and scanning black-and-white documents produces black-and-white images.  This function is not supported by all applications. 1 Load a target document on the scanner. For how to load documents on the scanner, refer to "Chapter 2 Loading Documents" (on page 38). 2 Start up ScandAll PRO, and then open the [TWAIN Driver (32)] dialog box. For how to open the [TWAIN Driver (32)] dialog box, refer to "Chapter 3 How to Use ScandAll PRO" (on page 51). 3 Select the [Enable Multi Image] checkbox. Chapter 5 Various Documents
⇒ The [Multi Image] dialog box appears.  4 Select [Auto Color Detection] under [Output mode]. 5 Under [Select Current Image Setting], select the side(s) to scan. Configure scan settings for both color and black-and-white documents in the [TWAIN Driver (32)] dialog box. You need to pre-configure settings for [Color/Grayscale] detection as well as those for [Binary] detection.  6 In the [TWAIN Driver] dialog box, click the [OK] button. ⇒ Changes made are saved. 7 From ScandAll PRO, perform a scan. For how to perform a scan, refer to "Chapter 3 How to Use ScandAll PRO" (on page 51).  You can use a batch profile to change settings such as the folders to save the scanned color/grayscale and black-and-white images, the file formats, and the file names. The procedure is as follows: 1 In the [Profile Editor] dialog box, select the [File format and Name scheme] tab, and then select the [Automatic Color-Monochrome Detection] checkbox.  2 Specify the respective folder names to save the files, the file formats, and the file names for color/ grayscale and black-and-white images. 3 Click the [OK] button. → Changes made are saved. 4 Perform a batch scan. For how to perform a batch scan, refer to "3.8 Scanning with [Batch Scan]" (on page 61).5.5 Customizing the Hardware Settings
Using the Scanner Buttons to Start A Scan Quickly
You can perform a scan simply by pressing the [Scan/Stop] or [Send to] button on the scanner. To do this, you first need to assign your desired scanning applications to these buttons.Computer Settings
1 Confirm that the scanner is connected properly to your computer, then power on the scanner. For how to connect the scanner to your computer, refer to "Chapter 3 Connecting the Cables" in the Getting Started. 2 Select the [start] menu [Control Panel]. The [Control Panel] window appears. 3 Select the [Hardware and Sound] icon. ⇒ The [Hardware and Sound] window appears. 4 Select the [Scanners and Cameras] icon. ⇒ The [Scanners and Cameras] window appears. 5 Display the properties of the scanner. Double-click the [fi-6670dj], [fi-6770dj], or [fi-6750Sj] icon. 6 Select the [Events] tab, and then select an event from [Select an event].  The following events can be selected: - "Scan Button" (when the [Scan/Stop] button is pressed) - "Send to 1" to "Send to 9" (when the [Send to] button is pressed while a number (from 1 to 9) is displayed on the Function Number Display)Chapter 5 Various Documents
7 Select the application to launch when an event occurs. Select the [Start the program] radio button under [Actions], and then select the application you want to use.  8Click the [OK] button. This completes the computer settings if you will use a scanning application other than ScandAll PRO. Then, continue to configure settings for your scanner.  - The screens and operations may differ slightly depending on the OS you are using. - If you want to link with other buttons here, repeat Steps 5 to 8. 9 Start up ScandAll PRO. 10 Select the [Tool] menu [Preferences]. The [Setup] dialog box appears. 11 Select the [Event] tab. 12 Select the action for the event you selected in Step 7, and then select a profile from the list you want to use for scanning.   You need to create the required profile beforehand. For how to create profiles, refer to "3.8 Scanning with [Batch Scan]" (on page 61). 13 Click the [OK] button. 14 Exit ScandAll PRO. When you press the linked button, ScandAll PRO starts up, and a batch scan is executed according to the selected profile's settings.Scanner Settings
 \- When using the [Scan/Stop] button No setting is needed. ⇒ Pressing the [Scan/Stop] button starts up the application configured. \- When using the [Send to] button Press the [Function] button to change a number displayed on the Function Number Display. When the displayed number and the event number you have selected in Step 5 ("Send to 1" to "Sent to 9") matches, stop pressing the [Function] button. To perform the event configured with "Send to 2," for example, display [2] on the Function Number Display. ⇒ Pressing the [Send to] button starts up the application you selected.  - For details of the Operator Panel, refer to "1.3 Functions of the Operator Panels" (on page 28). - Each time the [Function] button is pressed, the number displayed changes as follows: 1, 2, 3, ...9, C, 1, 2, 3, ....Detecting Multifeeds
A "multifeed" is a feeding error that occurs when two or more sheets in the ADF Paper Chute are fed simultaneously into the scanner. You can set the scanner so it will detect multifeeds and display an error message. To make the scanner to detect multifeeds, change the settings in the scanner driver or in the Software Operation Panel. For how to configure settings in the Software Operation Panel, refer to "Multifeed Detection" (on page 180). 1 Load a target document on the ADF Paper Chute. For how to load documents on the ADF Paper Chute, refer to "2.1 Loading Documents on the ADF" (on page 39). 2 Start up ScandAll PRO, and then open the [TWAIN Driver (32)] dialog box. For how to open the [TWAIN Driver (32)] dialog box, "Chapter 3 How to Use ScandAll PRO" (on page 51). 3 Click the [Option] button.  ⇒ The [Option] dialog box appears.Chapter 5 Various Documents
4 Select the [Job/Cache] tab, and then specify the desired multifeed detection condition at [Multifeed Detection] under [ADF Option].  The following list the multifeed detection conditions:| Condition Description | |
| None Does not detect multifeeds. | |
| Check Overlapping and Length | Monitors both document overlapping and length to detect multifeeds. |
| Check Overlapping | Uses the built-in ultrasonic sensors inside the ADF to monitor document sheets during feeding, and to judge multifeeds according to the deviation of reflected ultrasonic waves. |
| Check Length Monitors the length of document during feeding, and judges multifeeds according to the deviation of lengths sensed. | |
Bypassing Multifeed Detection for a Fixed Format
If you attempt to scan a document sheet with a sticky note, receipt, or photo glued on it while the Multifeed Detection function is enabled, the scanner could mistakenly judge this as a multifeed error and discontinue the scanning. To resolve such a problem, the "Intelligent Multifeed Function" is provided. There are two modes to this function. In one mode, you can suppress multifeeds forcibly by operating the Operator Panel on the scanner. In the other mode, you can suppress multi-feeds automatically by letting the scanner learn the locations and sizes of the sticky note, glued receipt or glued photo beforehand. Intelligent Multifeed Function
Use this function when you want to continue scanning while checking if any sticky notes are attached to the document each time the multifeed error occurs.| Mode Description | |
| Manual Mode (Bypass by Operator Panel button) | The scanner stops scanning each time a multi-feed error is detected. You can resume scanning after checking for any glued paper on your document on detection of each multifeed error. |
| Auto Mode 1 (Bypass by length and position) | Used to scan a document stack with paper of the same size glued at the same position. |
| Auto Mode 2 (Bypass by length) | Used to scan a document stack with paper of different sizes glued at different positions. |
Settings Before Using This Function
Prior to using this function, you need to configure the following settings:■With FUJITSU TWAIN 32 Scanner Driver
1 Start up ScandAll PRO, select the [Scan] menu [Scan Settings]. ⇒ The [TWAIN Driver (32)] dialog box appears. 2 Click the [Option] button.  3 Select the [Job/Cache] tab, and select [Check overlapping] or [Check overlapping and length] for [Multifeed Detection] under [ADF Option].  4 Select the [Startup] tab, and then select the [Enable Scanner Panel] and [Enable [Scan] Button] checkboxes. ■With FUJITSU ISIS Scanner Driver
1 Start up ScandAll PRO, select the [Scan] menu → [Scan Settings]. ⇒ The FUJITSU ISIS scanner driver's setting dialog box appears. 2 Select the [Paper Handling] tab, and then select: \- [Enable] and [Paper Overlap] under [Multifeed Detection] • [On] under [Multifeed Recovery]  3 Specify a desired time (in minutes) at [Auto-cancel Timer].Operating the Scanner
1 After a multifeed error has occurred, press the [Send to] button to eject the document from the paper feed path, or open the ADF and remove the sheets from there. When the sheets are removed, the function number displayed changes as follows: At multifeed error At document ejecting "J" and "2" are indicated alternately. The corresponding function number blinks. 2 Return the ejected or removed sheets to the ADF Paper Chute. If a multifeed error is detected while no paper has been glued on the sheet, press the [Scan/Stop] button or restart the scanning via the computer. (In this case, do not press the [Function] button.) If glued paper is present on the removed/ejected sheet and this is likely the cause of the multifeed error, then go to the next step: ADF Type  Flatbed Type Chapter 5 Various Documents
3
Press the [Function] button, and then make sure that the function number blinks faster than before you pressed the [Scan/Stop] button. Otherwise, restart the scanning via the computer. Note that, from this on, the blinking speed of the function number switches between "slow" and "fast" every time the [Function] button is pressed. According to the mode specified, the scanner operates as explained below if documents are scanned with the function number blinking faster. - Manual Mode (Bypassing by operator panel buttons) The first sheet of document is scanned without a multifeed error being detected. When the second and following sheets are scanned, multifeed errors are detected based on the settings that have been configured in the Software Operation Panel or in the scanner driver. - Auto Mode 1 (Bypassing by Document Overlapping and Length) The scanner remembers the length and location of glued paper (overlap pattern) that caused a multifeed error and continues scanning. When glued paper of a similar pattern is detected, the scanner automatically ignores it to suppress multifeed detection. (\*1)(\*2) - Auto Mode 2 (Bypassing by Document Length) The scanner remembers the length of the glued paper that caused a multifeed error and continues scanning. When glued paper of the same or shorter length is scanned, the scanner automatically ignores it to suppress multifeed detection. (\*2) \*1: In this mode, up to 32 overlap patterns can be remembered (stored in memory). When the 33rd overlap pattern is detected, the first-remembered pattern is deleted from memory. \*2: The remembered overlap patterns can be deleted from memory by pressing the [Function] button for 2 seconds or longer while the function number is blinking. After all overlap patterns are deleted, the display indicates "o" (square). By doing so, you can delete all 32 patterns. Be careful not to delete necessary overlap patterns, too.Chapter 6 Daily Care
This chapter describes how to clean the scanner.    - When operating the scanner, the glasses inside the ADF become very hot. - Before you clean the inside of the scanner, turn off its power and unplug the power cable from the power outlet. Wait for at least 15 minutes for the ADF glasses to cool down. - Before you clean the Feed Rollers and Eject Rollers, turn off the power and unplug the AC adapter from the power outlet. Wait for at least 15 minutes, then turn on the power again.   Do not use any aerosol sprays or alcohol based sprays to clean the scanner. Dust blown up by strong air from the spray may enter the inside of the scanner. This may cause the scanner to fail or malfunction. Sparks caused by static electricity, generated when blowing off dust and dirt from the outside of the scanner, may cause a fire. 6.1 Cleaning Materials and Locations Requiring Cleaning.....115 6.2 Cleaning the ADF 117 6.3 Cleaning the Flatbed (Flatbed Type Only)....1226.1 Cleaning Materials and Locations Requiring Cleaning
Cleaning Materials| Cleaning Material Part No. Remarks | ||
| Cleaner F1 PA03950- | 0352 | 1 bottle (100 ml)Moisten the cloth with this fluid and wipe the scanner clean.As it may take long before the cleaner vaporizes if a large quantity is used. Dampen a cloth with modest quantities of the cleaner. In addition, wipe off the cleaner completely with a soft lint-free cloth to leave no residue on the surface of the cleaned parts. |
| Cleaner F2 PA03950- | 0353 | 1 bottle (80 ml)Use this cleaner to clean the Plastic Rollers only. |
| Cleaning paper CA9 | 9501-0012 | Use this paper together with Cleaner F1. |
| Cleaning wipe PA03 | 950-0419 | 1 box (24 sheets)Pre-moistened with Cleaner F1,Cleaning Wipes are used instead of moistened cloths. |
| Swab Commercially available. | ||
| Dry cloth | ||
| Location Cleaning paper sprayed with | Cleaner F1 (every 10,000 sheets) | Cleaning wipes or cloth sprayed with Cleaner F1 (every 10,000 sheets) | Swab dipped with Cleaner F2 (for areas with heavy dirt) | |
| Flatbed | Document holding pad | No | Yes | No |
| Document bed | No | Yes | No | |
| ADF | Chute roller | No | Yes | No |
| Pick arm | No | Yes | No | |
| Pick roller Yes Yes | No | |||
| Brake roller | Yes | Yes | No | |
| Feed roller | Yes | Yes | No | |
| Plastic roller | Yes Yes | Yes | ||
| Sheet guide/glass | Yes | Yes | No | |
| Ultrasonic sensor | Yes (Use a soft, dry cloth.) | No | No | |
6.2 Cleaning the ADF
As a Guideline, clean the ADF every 10,000 scanned sheets. Note that this guideline varies according to the type of documents you scan. For example, it may be necessary to clean the ADF more frequently if documents are scanned when the toner is not sufficiently fixed on the printout.  When operating the scanner, the glasses inside the ADF become very hot. Before you clean the inside of the scanner, turn off its power and unplug the power cable from the power outlet. Wait for at least 15 minutes for the ADF glasses to cool down.Cleaning with a Cloth Moistened with Cleaner F1
1 Turn off the scanner, and wait for at least 15 minutes. For how to turn off the scanner, refer to "1.4 Turning the Scanner ON and OFF" (on page 31). 2 Pushing the ADF Open Buttons, lift open the ADF. ADF Open Button   Be careful, the ADF may close and pinch your fingers. 3 Clean the following locations using a cloth moistened with Cleaner F1.  To avoid damaging the document sensors, take care so the cloth does not hook them during wiping. natural_image
Technical line drawing of a mechanical assembly with no visible text or symbolsBrake Roller
Lightly clean the Brake Roller along the grooves on the roller, taking care not to scratch its surface. When cleaning the Brake Roller, remove it from the scanner. For how to remove the Brake Roller, refer to "7.3 Replacing the Brake Roller" (on page 127). natural_image
Illustration of hands holding a small electronic component with a blue arrow indicating rotation (no text or symbols)Pick Rollers
Lightly clean the Pick Rollers along the grooves on the rollers, taking care not to scratch their surface. Take particular care when cleaning these rollers as black debris on them adversely affects the pickup performance. For how to remove the Pick Rollers, refer to "7.2 Replacing the Pick Rollers" (on page 125). natural_image
Illustration of two hands holding a small object with directional arrows indicating rotation (no text or symbols)Plastic Rollers
Lightly clean the Plastic Rollers, taking care not to damage their surface. Take particular care when cleaning these rollers as black debris on them adversely affects the pickup performance. Be careful not to damage the sponges attached around the middle of the rollers. natural_image
Technical line drawing of a mechanical component with internal structure and mounting brackets (no text or symbols)Pick Arm
Lightly wipe off the roller at the tip of the Pick Arm. natural_image
Illustration of a hand inserting a component into a device (no text or symbols visible)Chute Roller
Lightly wipe off the Chute Roller with its hood open. natural_image
Illustration of a hand inserting a small blue component into a device casing (no text or symbols visible)Glasses/Sheet Guides/Ultrasonic Sensors
Lightly wipe off the glasses, Sheet Guides, and Ultrasonic Sensors.   If the glass(es) are dirty, vertical streaks may appear in the scanned images. 4 Turn on the scanner. Then, clean the Feed Rollers. For how to turn on the scanner, refer to "1.4 Turning the Scanner ON and OFF" (on page 31). Chapter 6 Daily CareFeed Rollers
The cleaning procedure is as follows:  1 With the power on, open the ADF when the Operator Panel indicates a code other than "P." Note that the Feed Rollers will not rotate if you open the ADF and do the following action while "P" is indicated. 2 Hold down the [Send to] and [Scan/Stop] buttons simultaneously on the Operator Panel. The Feed Rollers and Eject Rollers start to rotate by a certain angle.  Both the Feed Rollers and Eject Rollers turn at the same time. Do not touch the Feed Rollers or Eject Rollers during cleaning if they are rotating. 3 Hold a soft cloth moistened with Cleaner F1 against the surface of the rotating Feed Rollers and Eject Rollers so that the cloth wipes off the surface of the rollers lightly. Take particular care in cleaning these rollers as black debris on them adversely affects the feeding performance. As a guideline, seven presses of the [Send to] and [Scan/Stop] buttons together makes the Feed Rollers to rotate one full turn. ADF type Function Number Display [Scan/Stop] button [Send to] button  Flatbed type  Chapter 6 Daily Care5 Close the ADF.
Press down on the center of the ADF to return it to its original position until the ADF Open Buttons are locked. natural_image
Technical line drawing of a mechanical device with internal components and directional arrows indicating rotation (no text or symbols)6.3 Cleaning the Flatbed (Flatbed Type Only)
1 Holding the handle, lift up the Document Cover. natural_image
Illustration of a hand inserting a printer into a paper airplane (no text or symbols visible)Chapter 7 Consumables
This chapter describes how to replace the scanner consumables.  \- When operating the scanner, the glasses inside the ADF become very hot.  \- Before you replace the consumables, turn the scanner off and unplug the power cable from the power outlet. Wait for at least 15 minutes for the ADF glasses to cool down.  7.1 Consumables and the Replacement Cycles....124 7.2 Replacing the Pick Rollers....125 7.3 Replacing the Brake Roller....1277.1 Consumables and the Replacement Cycles
The following table shows the consumables and their standard replacement cycles.| Consumable Part | No. Standard | Replacement Cycle |
Pick Roller PA03338- | K011 | After scanning of 250,000 sheets or one year |
Brake Roller PA03576- | K010 | After scanning of 250,000 sheets or one year |
7.2 Replacing the Pick Rollers
 The scanner has two Pick Rollers. Be sure to replace both of them at the same time. 1 Remove documents (if any) from the ADF Paper Chute. 2 Pushing the ADF Open Buttons, lift open the ADF.   Be careful, the ADF may close and pinch your fingers. 3 Remove the ADF Paper Chute. natural_image
Technical line drawing of a printer or scanner device with two views of the cover (no text or symbols present)natural_image
Line drawing of a printer or printer with a blue plastic cover on the cover (no text or symbols)Chapter 7 Consumables
2 Pull out the two Pick Rollers from the rotating shaft. natural_image
Technical illustration of a mechanical assembly with blue rollers and a hand holding a component (no text or symbols visible)5 Attach new two Pick Rollers to the scanner.
1 Attach both of the two Pick Rollers to the rotating shaft. Insert each roller so its socket will fit to the rotating shaft screw on the scanner. natural_image
Mechanical assembly diagram showing a hand operating a motor with two blue rollers, and a close-up of the motor's internal components (no text or symbols visible)6 Attach the ADF Paper Chute.
7 Close the ADF.
Press down on the center of the ADF to return it to its original position until the ADF clicks into place. natural_image
Technical line drawing of a mechanical device with internal components and directional arrows indicating motion (no text or symbols)CAUTION
Be careful, the ADF may close and pinch your fingers.  - Do not close the ADF while the Pick Roller Cover is kept open. - Confirm that the Pick Rollers are attached firmly. If not, paper feed errors such as paper jams will occur.8 Reset the pick roller counter.
Start up the Software Operation Panel, and then reset the counter. For details, refer to "Resetting the counters" (on page 166).7.3 Replacing the Brake Roller
1 Remove documents (if any) from the ADF Paper Chute. 2 Pushing the ADF Open Buttons, lift open the ADF.   Be careful, the ADF may close and pinch your fingers. 3 Remove the Brake Roller from the scanner. 1 Holding the Pick Arm, open the Brake Roller Holder in the arrow-indicated direction. natural_image
Illustration of a hand inserting a component into a machine (no text or symbols visible)natural_image
Technical line drawing of a mechanical assembly with an arrow indicating direction (no text or symbols present)Chapter 7 Consumables
6 Attach the Brake Roller to the scanner.
1 Put the Brake Roller by adjusting the flat section of the rotating shaft to the guide slot of the Brake Roller Holder. 2 Close the Brake Roller Holder. natural_image
Technical diagram showing a mechanical assembly with an inset view of a motor or pump component (no text or symbols present)7 Close the ADF.
Press down on the center of the ADF to return it to its original position until the ADF clicks into place. natural_image
Technical line drawing of a mechanical device with internal components and directional arrows indicating motion (no text or symbols)8Reset the brake roller counter.
Start up the Software Operation Panel, and then reset the counter. For details, refer to "Resetting the counters" (on page 166).Chapter 8 Troubleshooting
This chapter describes the measures against document jams or troubles, shows you what to check before asking your nearest scanner service provider for help, and describes how to read the product labels.  For details about troubles that are not described here, and those about the scanning errors, refer to the FUJITSU TWAIN 32 Scanner Driver Help. 8.1 Paper Jams....130 8.2 Errors Indicated on the Operator Panel....132 8.3 Troubleshooting....136 8.4 Before Contacting Your Dealer or Scanner Service Provider152 8.5 Checking Labels on the Scanner....1548.1 Paper Jams
If your document jams, follow the procedure below to remove it.  • Take care not to get injured when removing the jammed document. - Be careful not to get your necktie, necklace, etc. caught in the scanner when removing the jammed document. - The glass surfaces and guides may become hot during operation. Take care not to get burned. 1 Remove the document sheet(s) remaining on the ADF Paper Chute. 2 Pushing the ADF Open Buttons, lift open the ADF. ADF Open Button   Be careful, the ADF may close and pinch your fingers. 3 Remove the jammed document. natural_image
Technical line drawing of a printer or printer with a blue cover (no text or symbols)Chapter 8 Troubleshooting
4 Close the ADF.
Press down on the center of the ADF to return it to its original position until the ADF clicks into place. natural_image
Technical line drawing of a mechanical device with internal components and directional arrows indicating rotation (no text or symbols)8.2 Errors Indicated on the Operator Panel
When an error occurs, the Check LED lights in orange. For temporary errors, the Function Number Display on the Operator Panel indicates [J] or [U] and a number alternately; [E], [F], [C], [H], [A], or [L] and a number alternately for device errors (permanent errors). Temporary errors can be solved by the operator, but the device errors (permanent errors) require recovery works by support engineers. If you want to clear the error indication, press the [Scan/Stop] or [Send to] button. The scanner will return to the "Ready Status." ADF type  Flatbed type  Once the Error Recovery Guide has been installed on your computer, its window appears as soon as your Windows is started up. When a temporary or device (permanent) error occurs, this software displays information such as the error name or error code regarding that error. Write down the information displayed on the message box, and then click the [More Info] button to learn detailed information for troubleshooting.   The Error Recovery Guide is stored in the SETUP DVD-ROM. For how to install this guide, refer to "Chapter 4 Installing the Scanner Software" in the Getting Started. Chapter 8 TroubleshootingTemporary Errors
Temporary errors can be solved by ordinary operators. They are listed as follows:Paper Feed Errors
[J] and a number are displayed alternately.| Indication | Item Remedy | |
| J1 Paper | jam 1 Remove the halted or jammed document remaining inside. For how to remove such documents, refer to "8.1 Paper Jams" (on page 130).2 Confirm that the documents meet the paper conditions for scanning from the ADF.For details, refer to"2.2 ADF-Loaded Documents" (on page 42). | |
| J9 | ||
| J2 Multifeed error Pressing the [Send to] button on the Operator Panel ejects mutiled documents. | ||
■Cover Open and Print Errors
[U] and a number are displayed alternately.| Indication | Item Remedy | |
| U0 Transport lock error(Flatbed type only) | Unlock the Transport Lock.For how to unlock the Transport Lock, refer to "Chapter 3 Connecting the Cables" in the Getting Started. | |
| U4 The ADF opened during scanning. | Close the ADF and load the document again. | |
| U5 The print section of the imprinter opened during scanning.(only when the imprinter option for fi-6670/fi-6670A is installed) | ||
| U6 The print cartridge of the imprinter option is not set. | This is a temporary error related to the imprinter option (sold separately).For details refer to the "Imprinter Operator's Guide." | |
| U7 The imprinter failed to sense documents.Or, the print area is incorrect. | ||
Device Errors
Device errors require recovery works by support engineers. They are listed as follows:■Motor and Optical System Errors
[E] and a number are displayed alternately.| Indication | Item Remedy | |
| E0 Flatbed motor malfunction(Flatbed type only) | 1 Confirm that the Transfer Lock is unlocked.2 Turn the scanner off and on again. | |
| E1 Flatbed optical system malfunction(Flatbed type only) | If the error is still displayed on the Function Number Display, record the indicated error code, and contact the store where you purchased the scanner or an authorized FUJITSU scanner service provider. | |
| Indication | Item Remedy | |
| E2 Optical system error (Front-side scanning thru the ADF) | Turn off and on the scanner again. If the error is still displayed on the Function Number Display, record the indicated error code, and contact the store where you purchased the scanner or an authorized FUJITSU scanner service provider. | |
| E3 Optical system error (Back-side scanning thru the ADF). (fi-6670/fi-6670A/fi-6770/fi-6770A) | ||
| E6 Operator panel error | ||
| E7 Internal memory error (EEPROM) | ||
| E8SCSI | interface circuit error (fi-6670/fi-6670A/fi-6770/fi-6770A) | |
| E9 Image memory error | ||
■ Overrun Errors
[F] and a number are displayed alternately.| Indication | Item Remedy | |
| F2 Pick | arm error Turn off and on the scanner again. | If the alarm is still displayed on the Function Number Display, record the indicated error code, and contact the store where you purchased the scanner or an authorized FUJITSU scanner service provider. |
| F4 Background switching mechanism error | ||
| F6 Fan error | ||
| F7 Heater error | ||
| F8 | ||
| F9 |
Chip Errors
[C] and a number are displayed alternately.| Indication | Item Remedy | |
| C0 LSI | error Turn off and on the sc | anner again.If the error is still displayed on the Function Number Display, record the indicated error code, and contact the store where you purchased the scanner or an authorized FUJITSU scanner service provider. |
| C8Intra | scanner communi-cation error |
Circuit Errors
[H] and a number are displayed alternately.| Indication | Item Remedy | |
| H1 Motor circuit error Turn off and on the scanner again. | ||
| H5 CGA board error(fi-6670/fi-6670A/fi-6770/fi-6770A) | If the error is still displayed on the Function Number Display, record the indicated error code, and contact the store where you purchased the scanner or an authorized FUJITSU scanner service provider. | |
| H6 Imprinter motor circuit error(only when the imprinter option for fi-6670/fi-6670A is installed) | ||
| H7 Lamp circuit error | ||
■Errors in the Option (only when the imprinter option for fi-6670/fi-6670A is installed)
[A] and a number are displayed alternately.| Indication | Item Remedy | |
| A0 Error | in imprinter's control board | Turn off and on the scanner again. If the error is still displayed on the Function Number Display, record the indicated error code, and contact the store where you purchased the scanner or an authorized FUJITSU scanner service provider. |
| A1 Communication | timeout error in the imprinter | |
| A2 Error | in imprinter's ink head | |
| A3 Error | in imprinter's internal memory (EEPROM) | |
| A4 Imprinter ROM error | ||
■Sensor Errors
[L] and a number are displayed alternately.| Indication | Item Remedy | |
| L6 Ultrasonic sensor error Turn off | and on the scanner again.If the error is still displayed on the Function Number Display, record the indicated error code, and contact the store where you purchased the scanner or an authorized FUJITSU scanner service provider. | |
| L9 OMR | sensor error | |
8.3 Troubleshooting
This section describes troubles that may occur during scanning and how to remedy them. Before you ask for repair, check the following list for possible causes. If the remedies in these flowcharts do not solve the problem, check each item in "8.4 Before Contacting Your Dealer or Scanner Service Provider" (on page 152), and then contact the dealer where you purchased the scanner or an authorized FUJITSU scanner service provider. The possible troubles are listed as follows:| Possible Trouble |
| Scanner cannot be turned on. (See page 137.) |
| Indication on Function Number Display goes out. (See page 138.) |
| Scanning does not start. (See page 139.) |
| Quality of scanned pictures or photos is not satisfactory when scanning in black and white. (See page 140.) |
| Quality of scanned text or lines is unsatisfactory. (See page 141.) |
| Images are distorted or blurred. (See page 142.) |
| Vertical lines appear in scanned images. (See page 143.) |
| Function Number Display indicates an error code (alphabetical letter plus number) alternately after the scanner is turned ON. (See page 144.) |
| Multifeed errors occur frequently. (See page 145.) |
| Pickup errors occur frequently. (See page 147.) |
| Paper jams occur frequently. (See page 148.) |
| Scanned images are elongated when scanned from the ADF. (See page 149.) |
| There is a shadow on leading edge of scanned image. (See page 150.) |
| The scanner is not recognized by your computer when Kofax VRS is used. (See page 151.) |
Scanner cannot be turned on.
flowchart
graph TD
    A["Is the power cable connected?"] -->|YES| B["Connect the power cable and AC adapter correctly."]
    A -->|NO| C["Press the Power button."]
    D["Did you turn on the Main Power switch?"] -->|YES| E["Press the Power button."]
    D -->|NO| F["If you cannot solve the problem after taking the measures above, check the items shown in "8.4 Before Contacting Your Dealer or Scanner Service Provider" (on page 152), and then contact the dealer where you purchased the scanner or an authorized FUJITSU scanner service provider."]
    G["Did you press the Power button?"] -->|YES| H["Press the Power button."]
    G -->|NO| I["If you cannot solve the problem after taking the measures above, check the items shown in "8.4 Before Contacting Your Dealer or Scanner Service Provider" (on page 152), and then contact the dealer where you purchased the scanner or an authorized FUJITSU scanner service provider."]
Chapter 8 Troubleshooting
Indication on Function Number Display goes out.
Has the scanner been left out of operation for a long time after powered on?  The scanner is in Power Save mode. Return from Power Save mode by doing one of the following: \- Load some paper on the ADF Paper Chute. \- Hit any button on the Operator Panel. Do not press down the Power button for more than 2 seconds. This will turn off the scanner. \- Execute a command from the scanner driver.  Does the display remain blank even after you have turned ON the scanner again?  The scanner operation is normal.  If you cannot solve the problem after taking the measures above, check the items shown in "8.4 Before Contacting Your Dealer or Scanner Service Provider" (on page 152), and then contact the dealer where you purchased the scanner or an authorized FUJITSU scanner service provider. Chapter 8 Troubleshooting Scanning does not start. flowchart
graph TD
    A["Did you unlock the Transport Lock? (Flatbed type)"] --> B{Turn OFF the scanner and unlock the Transport Lock. For how to unlock the Transport Lock, refer to "Chapter 3 Connecting the Cables" in the Getting Started.}
    B -->|NO| C["Is the document loaded correctly on the ADF Paper Chute?"]
    B -->|NO| D["Reload the document correctly on ADF Paper Chute."]
    C --> E{Is the ADF closed completely?}
    D --> F["Remove the document in the ADF Paper Chute, open the ADF, and then close it completely."]
    E --> G{Is the interface cable connected correctly?}
    F --> H["Connect the interface cable correctly. For how to connect the cable, refer to "Chapter 3 Connecting the Cables" in the Getting Started."]
    G --> I{Is the connector for the interface cable broken?}
    H --> J["Use a new interface cable and correctly connect it."]
    I --> K{Is the specified SCSI ID correctly set? (when a SCSI interface cable is used)}
    J --> L["Turn off the scanner and the computer, specify a correct SCSI ID. Turn on the scanner again. Then, restart the computer. For how to specify the SCSI ID, refer to "Chapter 3 Connecting the Cables" in the Getting Started."]
    K --> M{Does the scanning start after turning on the scanner again?}
    L --> N["The scanner operation is normal."]
    M --> O{No}
    N --> P["If you cannot solve the problem after taking the measures above, check the items shown in "8.4 Before Contacting Your Dealer or Scanner Service Provider" (on page 152), and then contact the dealer where you purchased the scanner or an authorized FUJITSU scanner service provider."]
Chapter 8 Troubleshooting
Quality of scanned pictures or photos is not satisfactory when scanning in black and white.
flowchart
graph TD
A["Did you select "halftoning" or "grayscale"?"] -->|YES| B["Are the upper/lower glasses inside the ADF clean?"]
A -->|NO| C["In the scanner driver, select "halftoning" or "grayscale" before scanning documents.(*1)"]
B -->|YES| D["If you cannot solve the problem after taking the measures above, check the items shown in "8.4 Before Contacting Your Dealer or Scanner Service Provider" (on page 152), and then contact the dealer where you purchased the scanner or an authorized FUJITSU scanner service provider."]
B -->|NO| E["Clean the dirty locations.<br>For how to clean the dirty locations, refer to "Chapter 6 Daily Care" (on page 114)."]
Chapter 8 Troubleshooting
Quality of scanned text or lines is unsatisfactory.
flowchart
graph TD
    A["When scanning with the ADF: Are the upper/lower glasses or rollers inside the ADF clean?"]
    B["When scanning with the Flatbed: Is the Document Holding Pad clean?"] --> C{NO}
    C -->|Yes| D["Is the specified resolution appropriate?"]
    C -->|No| E["Is "Binary (black-and-white)" mode selected?"]
    D --> F{YES}
    F -->|YES| G["Is there any debris (paper powder or dust) on the document?"]
    F -->|NO| H{YES}
    H -->|YES| I["Remove the debris from the document. Such debris on the document may be transferred onto the upper/lower glasses and/or rollers inside the ADF or onto the Document Holding Pad of the Flatbed, causing the scanned images dirty."]
    H -->|NO| J["If you cannot solve the problem after taking the measures above, check the items shown in "8.4 Before Contacting Your Dealer or Scanner Service Provider" (on page 152), and then contact the dealer where you purchased the scanner or an authorized FUJITSU scanner service provider."]
Images are distorted or blurred.
When scanning with the ADF: Are the upper/lower glasses or rollers inside the ADF clean? When scanning with the Flatbed: Is the Document Holding Pad clean?  Was the ADF pressed down during scanning? Were some heavy objects placed on the ADF during scanning?  Was something causing the scanner to vibrate during scanning?  Is the scanner installed on a flat, level surface? Or, is the scanner attached with rubber pads on its bottom?   NO  YES  YES  NO Clean the dirty locations. For how to clean the dirty locations, refer to "Chapter 6 Daily Care" (on page 114). Do not press down on the top of the ADF or place any heavy objects on the ADF during scanning. Do not allow anything to cause the scanner to vibrate while scanning. Install the scanner on a flat, level surface. Or, attach the rubber pads. If you cannot solve the problem after taking the measures above, check the items shown in "8.4 Before Contacting Your Dealer or Scanner Service Provider" (on page 152), and then contact the dealer where you purchased the scanner or an authorized FUJITSU scanner service provider.Chapter 8 Troubleshooting
Vertical lines appear in scanned images.
 Did you scan the document from the flatbed? (Flatbed type) Clean the Document Bed of the Flatbed. For how to clean the Document Bed, refer to "6.3 Cleaning the Flatbed (Flatbed Type Only)" (on page 122). Are the upper/lower glasses and rollers inside the ADF dirty? Clean the upper/lower glasses and rollers inside the ADF. For how to clean the glasses and rollers, refer to "6.2 Cleaning the ADF" (on page 117). Is there any debris (paper powder or dust) on the document? Remove the debris from the document. Such debris on the document may be transferred onto the upper/lower glasses and rollers inside the ADF or the Document Bed of the Flatbed, producing vertical lines in the scanned images. If you cannot solve the problem after taking the measures above, check the items shown in "8.4 Before Contacting Your Dealer or Scanner Service Provider" (on page 152), and then contact the dealer where you purchased the scanner or an authorized FUJITSU scanner service provider.Chapter 8 Troubleshooting
Function Number Display indicates an error code (alphabetical letter plus number) alternately after the scanner is turned ON. flowchart
graph TD
    A["Did you unlock the Transport Lock? (Flatbed type)"] -->|NO| B["Turn OFF the scanner and unlock the Transport Lock, then turn ON the scanner again. For how to unlock the Transport Lock, refer to "Chapter 3 Connecting the Cables" in the Getting Started."]
    A -->|YES| C["Does the Function Number Display indicate any error after turning ON the scanner again?"]
    C -->|NO| D["The scanner operation is normal."]
    C -->|YES| E["If you cannot solve the problem after taking the measures above, check the items shown in "8.4 Before Contacting Your Dealer or Scanner Service Provider" (on page 152), and then contact the dealer where you purchased the scanner or an authorized FUJITSU scanner service provider."]
Multifeed errors occur frequently.
Does the document satisfy the requirements described in Precautions in "Paper Quality" (page 42)?  With the Multifeed Detection set to ON, do the settings configured satisfy the requirements to detect multifeeds correctly?  Did you scan very thick media such as a plastic card?  Did you fan the document before loading it on the scanner?  Has the document just been printed out on a copier or laser printer?  Is the document stack less than 20 mm (0.79 in.) thick (10 mm (0.39 in.) when the document size is larger than A4/Letter)?  Are all the consumables (\*1) installed correctly?  Is any of the consumables (\*1) dirty?   NO Use the document that satisfies the requirements. For the document requirements, refer to "2.2 ADF-Loaded Documents" (on page 42).  NO Configure the settings for detecting multifeeds correctly. For the multifeed detection conditions, refer to "Multifeed Detection Conditions" (page 45). Specify the multifeed detection range, if needed, by referring to "Detecting Multifeeds" (page 108).  YES When scanning media like this, disable Multifeed Detection.  NO Fan the document before loading.  YES Fan the document three or four times to remove static electricity from the paper.  NO Reduce the number of sheets of the document stack.  NO Correctly install the consumables (\*1). For how to install the consumables, refer to "Chapter 7 Consumables" (on page 123).  YES Clean the dirty consumables (\*1). For how to clean the consumables, refer to "6.2 Cleaning the ADF" (on page 117). Chapter 8 Troubleshooting flowchart
graph TD
    A["Is any of the consumables (*1) worn out?"] --> B{YES}
    B -->|Yes| C["Check the consumables counters. Replace the consumables, if needed. For information on how to replace the consumables, refer to "Chapter 7 Consumables" (on page 123)."]
    B -->|No| D["If you cannot solve the problem after taking the measures above, check the items shown in "8.4 Before Contacting Your Dealer or Scanner Service Provider" (on page 152), and then contact the dealer where you purchased the scanner or an authorized FUJITSU scanner service provider."]
Chapter 8 Troubleshooting
Pickup errors occur frequently.
flowchart
graph TD
    A["Does the document satisfy the requirements described in Precautions in "Paper Quality" (page 42)?"] -->|YES| B["Did you fan the document before loading it on the ADF Paper Chute?"]
    A -->|NO| C["Use documents that satisfy the requirements. For information about the document requirements, refer to "2.2 ADF-Loaded Documents" (on page 42)."]
    B -->|YES| D["Are all the consumables (*1) installed correctly?"]
    B -->|NO| E["Fan the document before loading, or reduce the number of sheets of the document to load."]
    C -->|YES| F["Correctly install the consumables. For how to install the consumables (*1), refer to "Chapter 7 Consumables" (on page 123)."]
    C -->|NO| G["Is any of the consumables (*1) dirty?"]
    C -->|YES| H["Clean the dirty consumables. For how to clean the consumables (*1), refer to "6.2 Cleaning the ADF" (on page 117)."]
    D -->|YES| I["Is any of the consumables (*1) worn out?"]
    D -->|NO| J["Check the consumables counters. Replace the consumables, if needed. For how to replace the consumables, refer to "Chapter 7 Consumables" (on page 123)."]
    E --> K["If you cannot solve the problem after taking the measures above, check the items shown in "8.4 Before Contacting Your Dealer or Scanner Service Provider" (on page 152), and then contact the dealer where you purchased the scanner or an authorized FUJITSU scanner service provider."]
    F --> L["Is any of the consumables (*1) dirty?"]
    F --> M["Check the consumables counters. Replace the consumables, if needed. For how to replace the consumables, refer to "Chapter 7 Consumables" (on page 123)."]
    G --> N["Is any of the consumables (*1) dirty?"]
    G --> O["Check the consumables counters. Replace the consumables, if needed. For how to replace the consumables, refer to "Chapter 7 Consumables" (on page 123)."]
    H --> P["Is any of the consumables (*1) dirty?"]
    H --> Q["Check the consumables counters. Replace the consumables, if needed. For how to replace the consumables, refer to "Chapter 7 Consumables" (on page 123)."]
Chapter 8 Troubleshooting
Paper jams occur frequently.
flowchart
graph TD
    A["Does the document satisfy the requirements described in Precautions in "Paper Quality" (page 42)?"] -->|YES| B["Is there any debris inside the ADF?"]
    A -->|NO| C["Use documents that satisfy the requirements. For information about the document requirements, refer to "2.2 ADF-Loaded Documents" (on page 42)."]
    B -->|YES| D["Clean the ADF or remove the debris from the ADF. For how to clean the inside of the ADF, refer to "6.2 Cleaning the ADF" (on page 117)."]
    B -->|NO| E["Are all the consumables (*1) installed correctly?"]
    C -->|YES| F["Correctly install the consumables (*1). For how to install the consumables, refer to "Chapter 7 Consumables" (on page 123)."]
    C -->|NO| G["Is any of the consumables (*1) dirty?"]
    G -->|YES| H["Clean the dirty consumables (*1). For how to clean the consumables, refer to "6.2 Cleaning the ADF" (on page 117)."]
    G -->|NO| I["Is any of the consumables (*1) worn out?"]
    H -->|YES| J["Replace the consumables (*1), if needed. For how to replace the consumables, refer to "Chapter 7 Consumables" (on page 123)."]
    H -->|NO| K["If you cannot solve the problem after taking the measures above, check the items shown in "8.4 Before Contacting Your Dealer or Scanner Service Provider" (on page 152), and then contact the dealer where you purchased the scanner or an authorized FUJITSU scanner service provider."]
Chapter 8 Troubleshooting
Scanned images are elongated when scanned from the ADF.
flowchart
graph TD
    A["Are the rollers dirty?"] --> B{Does the document satisfy the requirements described in Precautions in "Paper Quality" (page 42)?}
    B -->|NO| C["Does the document satisfy the requirements described in Precautions in "Paper Quality" (page 42)?"]
    B -->|YES| D["Does the document satisfy the requirements described in Precautions in "Paper Quality" (page 42)?"]
    D --> E["Is any of the consumables (*1) worn out?"]
    E --> F["Did you adjust the scan scale?"]
    F --> G{Did you adjust the scan scale?}
    G -->|NO| H["Check the consumables counters. Replace the consumables, if needed. For how to replace the consumables, refer to "Chapter 7 Consumables" (on page 123)."]
    G -->|YES| I["In the [Device Setting"] menu in the Software Operation Panel, adjust the scan scale in the feeding direction. For how to adjust the scan scale, refer to "Adjusting_the_Starting_Position_for_Scanning["Offset/Vertical Magnification Adjustment"]" (page 169).]
    H --> J["If you cannot solve the problem after taking the measures above, check the items shown in "8.4 Before Contacting Your Dealer or Scanner Service Provider" (on page 152), and then contact the dealer where you purchased the scanner or an authorized FUJITSU scanner service provider."]
    I --> K["If you cannot solve the problem after taking the measures above, check the items shown in "8.4 Before Contacting Your Dealer or Scanner Service Provider" (on page 152), and then contact the dealer where you purchased the scanner or an authorized FUJITSU scanner service provider."]
Chapter 8 Troubleshooting
There is a shadow on leading edge of scanned image.
Did you adjust the offset (starting position for scanning the document)?  In the [Device Setting] menu in the Software Operation Panel, adjust the scan scale in the vertical scanning direction. For how to adjust the scan scale, refer to "Adjusting the Starting Position for Scanning [Offset/Vertical Magnification Adjustment]" (page 169).  If you cannot solve the problem after taking the measures above, check the items shown in "8.4 Before Contacting Your Dealer or Scanner Service Provider" (on page 152), and then contact the dealer where you purchased the scanner or an authorized FUJITSU scanner service provider.Chapter 8 Troubleshooting
The scanner is not recognized by your computer when Kofax VRS is used.
Is the interface cable connected properly between the scanner and the computer?   Connect the interface cable correctly. For how to connect cables, refer to "Chapter 3 Connecting the Cables" in the Getting Started." Connection via SCSI/USB Connector 1: Is "Fujitsu fi-6670" or "Fujitsu fi-6770" selected in Scanner Configuration Utility (\*1)? Connection via SCSI/USB Connector 2: Is "Fujitsu fi-6670A" or "Fujitsu fi-6770A" selected in Scanner Configuration Utility (\*1)?  Connection via SCSI/USB Connector 1: Select Fujitsu fi-6670 or Fujitsu fi-6770 in Scanner Configuration Utility. If they are not found in the list of scanners, then uninstall Kofax VRS, and then install VRS (fi-6670, fi-6770) with the [INSTALL(Custom)] menu in the SETUP DVD-ROM. Connection via SCSI/USB Connector 2: Select Fujitsu fi-6670A or Fujitsu fi-6770A in Scanner Configuration Utility. If they are not found in the list of scanners, then uninstall Kofax VRS, and then install VRS (fi-6670A, fi-6770A) with the [INSTALL(Custom)] menu in the SETUP DVD-ROM. For how to install Kofax VRS, refer to "VRS NOTE" included in the SETUP DVD-ROM.   Set the SCSI ID to a number other than 9. Is the scanner's SCSI ID set to "9"? (for the case the connection is via SCSI/USB Connector 2)  If you cannot solve the problem after taking the measures above, check the items shown in "8.4 Before Contacting Your Dealer or Scanner Service Provider" (on page 152), and then contact the dealer where you purchased the scanner or an authorized FUJITSU scanner service provider. \*1: To start the Scanner Configuration Utility, select [start] [All Programs] [Kofax VRS] [Scanner Configuration Utility].8.4 Before Contacting Your Dealer or Scanner Service Provider
Check the following items before contacting the dealer where you bought the scanner or an authorized FUJITSU scanner service provider. General Details| Item Findings | |
| Scanner model name Example: fi-6670 | For the scanner model names, refer to "8.5 Checking Labels on the Scanner" (on page 154). |
| Serial No. | Example: 000001 For the serial numbers, refer to "8.5 Checking Labels on the Scanner" (on page 154). |
| Production date | Example: 2008-05 (May 2008) For the production date, refer to "8.5 Checking Labels on the Scanner" (on page 154). |
| Date of purchase | |
| Symptom | |
| Frequency of trouble | |
| Do you have warranty for this product? | |
| Name of option used Example: fi-667PR | For the options, refer to "A.4 Scanner Options" (on page 195). |
| Item Findings | |
| OS version (Windows) | |
| Displayed error message | |
| Type of interface | Example: SCSI interface |
| Type of interface controller Example: | Adaptec's SCSI Card AHA-2940AU |
| Item Findings | |
| Document type | |
| Main purpose of use | |
| Last cleaning date | |
| Last consumables replacement date | |
| Operator panel status |
| Item Findings | |
| Scanner driver and its version | |
| Interface controller | Example: Adaptec's SCSI Card AHA-2940AU |
| OS version (Windows) | |
| Application software | Example: ScandAll PRO, Adobe Acrobat |
| Scan type | Example: Front Side, Back Side, Duplex |
| Resolution | Example: 600 dpi, 75 dpi |
| Image mode | Example: Color, Grayscale, Binary (black&white) |
| Item Findings | |
| Can both the photo-graph showing the original document conditions and the scanned image be sent by e-mail or fax? |
8.5 Checking Labels on the Scanner
This section describes how to check the labels on the scanner.Positions of Labels on the Scanner
The following shows where the two labels are located on the scanner. ADF Type:  Flatbed Type:  Label A (example): Indicates scanner information.  Label B (example): Indicates various standards that the scanner conforms with. Chapter 9 Operational Settings
This chapter explains how settings are made for the scanner using the Software Operation Panel. Here, Windows Vista screen samples are used to explain the operations. The screens and operations may differ slightly if the OS that you are using is other than Windows vista. 9.1 Starting Up the Software Operation Panel 156 9.2 Configurable Items 157 9.3 Settings Related to Consumables and Useful Life Counters... 165 9.4 Settings Related to Scanning 169 9.5 Settings Related to Multifeed Detection 180 9.6 Settings Related to Wait Time 186 9.7 Settings Related to Power ON/OFF Control 1889.1 Starting Up the Software Operation Panel
The Software Operation Panel (SOP) is installed together with the scanner drivers (TWAIN and ISIS). With this application, you can configure various settings for operating the scanner and for managing its consumables. 1 Confirm if the scanner is connected correctly to your computer, then power on the scanner. For how to turn on the scanner, refer to "1.4 Turning the Scanner ON and OFF" (on page 31). 2 Select the [start] menu [All Programs] [Scanner Utility for Microsoft Windows] [Software Operation Panel].  ⇒ The [FUJITSU Software Operation Panel] dialog box appears. 9.2 Configurable Items
Using the Software Operation Panel, you can configure the following settings for the scanner that is connected to a computer.Device Setting
1 Start up the Software Operation Panel. Refer to "9.1 Starting Up the Software Operation Panel" (on page 156). 2 From the tree listing on the left, select [Device Setting].  Chapter 9 Operational Settings| Item | Explanation | Selectable Parameters | Default | Connection via SCSI/USB Connector 1 | Connection via SCSI/USB Connector 2 |
| Page Counter (Consumables counters) | For evaluating the consumable replacement cycle. Use this function to reset the counters after replacing the consumables. | After cleaning/Brake Roller/Pick Roller 0 | pages Yes Yes | ||
| Remaining Ink (only when the imprinter option for fi-6670/fi-6670A is installed) | Shown only when the imprinter option for fi-6670/fi-6670A is installed. | ||||
| Power saving Specify the waiting time before entering the Power saving mode. | Setting range: 15 to 55 min. (in steps of 5 min.) | 15 min. Yes | Yes | ||
| Offset Adjust the starting position for the document scanning. | Unit: For connection via SCSI/USB Connector 1: ADF (Front), ADF (Back) (fi-6670/fi-6670A/fi-6770/fi-6770A only) Flat Bed (Flatbed type only) For connection via SCSI/USB Connector 2: ADF (Back), Flat Bed (fi-6770/fi-6770A only) Main/Sub: -2 mm to 3 mm (in steps of 0.5 mm) | Main/Sub: 0 mm | YesYes | ||
| Vertical magnification Adjustment | Adjust the magnification in the feeding direction on the scanning side specified for [Unit]. | Unit: ADF, Flat Bed (Flatbed type only) Setting range: -3.1 to 3.1% (in steps of 0.1%) | 0% | Yes Yes | |
Device Setting 2
1 Start up the Software Operation Panel. Refer to "9.1 Starting Up the Software Operation Panel" (on page 156). 2 From the tree listing on the left, select [Device Setting 2].  Clicking a desired item on the tree listing one the list shows its related parameters on the right.Chapter 9 Operational Settings
Selecting each item displays detailed settings (parameters) in the right part of the dialog box.| Item | Explanation | Selectable Parameters | Default | Connection via SCSI/USB Connector 1 | Connection via SCSI/USB Connector 2 |
| Yes: ConfigurableNo: Not configurable | |||||
| Multifeed Select the method to detect multi-feeds. Check either of overlapping or document length, or both.Can also be specified from the scanner driver's setting dialog box.Note the setting with the scanner driver is given a priority. | None/Check Overlapping [Ultrasonic]/Check Length/Check Overlapping and LengthSelectable length (to be detected as length difference): 10, 15 or 20 mm | Check Overlapping [Ultrasonic] | Yes Yes | ||
| Page Edge Filler (ADF)Page Edge Filler (FB) | Fill the specified width of the end sections on the scanned image with white or black color.When the backing (background) color is white, the end sections are filled with white; and when the background color is black, filled with black.Can also be specified from the scanner driver's setting dialog box.Note the setting with a larger value is given a priority.The setting here is not applied when Kofax VRS is used. | ADF:Top/Left/Right: 0 to 15 mmBottom: -7 to 7 mm (in increments of 1 mm)FB:Top/Bottom/Left/Right: 0 to 15 mm (A: Image area, B: Filled area, A+B: Output area) (A: Image area, B: Filled area, A+B: Output area) | Top/Bottom/ Left/Right: 0 mm | Yes No | |
| Dropout color Drop out a preselected color for the scanned image (binary black & white/grayscale mode only).Can also be specified from the scanner driver's setting dialog box.Note the setting with the scanner driver is given a priority. | Red/Green/Blue/White | Green | Yes | No | |
| Item | Explanation | Selectable Parameters | Default | Connection via SCSI/USB Connector 1 | Connection via SCSI/USB Connector 2 |
| Yes: ConfigurableNo: Not configurable | |||||
| Pre-pick To give a | higher priority to processing speed, select [Yes], if not, select [No].Can also be specified from the scanner driver's setting dialog box.Note the setting with the scanner driver is given a priority. | Yes/No | Yes | Yes | No |
| Document check area specification for Multifeed Detection | Selected range: Check this item when limiting the range of detecting multifeeds. You can determine if multifeed detection is enabled or disabled for the specified area. | Check or do not check "Selected range" | Do not check | Yes Yes | |
| Enable/Disable (when "Selected range" is checked) | Disable | ||||
| Start: Specify the start point of the check area in length (mm) from the top edge of the document. | 0 to 510 mm (in increments of 2 mm) 0 mm | ||||
| End: Specify the end point of the check area in length (mm) from the top edge of the document. | 0 to 510 mm (in increments of 2 mm) 0 mm | ||||
| Intelligent Multi-feed Function | Bypass multifeed detection by remembering the pattern (size and location) of glued paper on the document.Note that you need to select "Check Overlapping" beforehand by referring to "Multifeed Detection" (on page 180). | Manual Mode/Auto Mode 1/Auto Mode 2 | Manual Mode | Yes Yes | |
| Item | Explanation | Selectable Parameters | Default | Connection via SCSI/USB Connector 1 | Connection via SCSI/USB Connector 2 |
| Yes: ConfigurableNo: Not configurable | |||||
| Cleaning Cycle Displays the time to clean the consumables. When the number of sheets scanned exceeds the value of this counter, the background color of the counter turns yellow and a cleaning instruction is prompted from the scanner driver.The cleaning instruction is not displayed when Kofax VRS is used. | 1,000 to 255,000 sheets (in increments of 1,000)Show cleaning instructions: Check/Do not check | 10,000 sheetsDo not check | Yes Yes | ||
| Useful life counter | When the value of the page counter (consumables counter)(refer to "9.3 Settings Related to Consumables and Useful Life Counters" (on page 165)) exceeds a value specified here, the background color of the counter turns yellow, and a replacing instruction is displayed from the scanner driver. | 10,000 to 2,550,000 sheets (in increments of 10,000) for each consumable | 200,000 sheets | Yes Yes | |
| SCSI Bus Width Specify the data transfer width when the connection is via SCSI Connector 2 on the CGA board. | 16 bit (Wide)/8 bit | 16 bit (Wide) | No | Yes | |
| AutoCrop Boundary | Select whether to round up or down the fractional part of scanned image data. | Round Up/Round Down Round Down Yes No | |||
| Item | Explanation | Selectable Parameters | Default | Connection via SCSI/USB Connector 1 | Connection via SCSI/USB Connector 2 |
| Yes: ConfigurableNo: Not configurable | |||||
| Manual-feed timeout | Specify the waiting time to disable manual feeding. | Disable/EnableWaiting time setting when this option is enabled:For connection via SCSI/USB Connector 1:5, 10, 20, 30, 40, 50, 60, 70, 80, 90, 100, 110, 120, 180, 240, 300, 360, 420, 480, 540, 600, 900, 1200, 1500, 1800, 1999 (in seconds)For connection via SCSI/USB Connector 2:5, 10, 20, 30 (in seconds) | Disable Yes Yes | ||
| Power SW Control | Specify whether or not to enable power switch by using the [Power] button on the Operator Panel. | Enable power switch/Disable power switch | Enable power switch | YesYes | |
| Scan Setting for Document with Tab | For a document that includes index sheets or a document with index stickers (or tabs) attached at its bottom edge, you can specify whether or not to include the index portion (or tab) images during scanning with Auto Paper Size Detection setting. When "Document with tab" is selected, the tab (index) image is included in the document page image.Scanning speed with this setting, however, slows down to a certain degree.Once this setting is enabled, the the [Scan Setting for Document in Dark Background Color] option will automatically be disabled. | For connection via SCSI/USB Connector 1:Document with tab/Document without tab/Non-rectangular documentFor connection via SCSI/USB Connector 2:Document with tab/Document without tab | Document without tab | YesYes | |
| Item | Explanation | Selectable Parameters | Default | Connection via SCSI/USB Connector 1 | Connection via SCSI/USB Connector 2 |
| Yes: ConfigurableNo: Not configurable | |||||
| Scan Setting for Document in Dark Background Color | Specify whether or not to detect the edge of document in a dark background color during scanning. You can specify a density of background color so the edge will be detected correctly.Once this option is enabled, the settings for scanning documents with tabs will automatically be disabled. | Disable/EnableDensity of background color: 1 to 5 levels | Disable No | Y | e |
| Overcrop/Under-crop | Adjust the output image scanned by enabling the Automatic Page Size Detection option. | Overcrop: 0 mm to 3 mm (in increments of 1 mm)Undercrop: -3 mm to 0 mm (in increments of 1 mm) | 0 mm No | Y | e |
| Pick Pressure Specify the pick pressure for feeding documents. | Low/Mid/High Mid Yes Yes | ||||
9.3 Settings Related to Consumables and Useful Life Counters
Confirming and Resetting the Counters
■Confirming the counters
1 Start up the Software Operation Panel. Refer to "9.1 Starting Up the Software Operation Panel" (on page 156). 2 From the tree listing on the left, select [Device Setting].  In this dialog box, you can confirm the following items:| Item Description | |
| Total Page Count (ADF) | Total sheets scanned using the ADF |
| Total Page Count (FB) | Total sheets scanned using the Flatbed |
| After cleaning Total sheets scanned after last cleaning | |
| Brake Roller Number of sheets scanned since last replacement of Brake Rollers | |
| Pick Roller Number of sheets scanned since last replacement of Pick Rollers | |
| Remaining Ink Remaining ink in the imprinter's (sold separately) print cartridge. (Displayed only when the imprinter option is mounted.) | |
■ Resetting the counters
Reset the consumables counter(s) every time you replace the consumable(s). Follow the procedure below. 1 Click the [Clear] button beside the replaced consumable.  2 Click the [OK] button on the confirmation message displayed. ⇒ The counter is reset to 0. The remaining ink indication (percentage) is reset to 100. 3 In the Software Operation Panel, click the [OK] button. ■Replacing and Cleaning Instructions
The following may sometimes appear while using the scanner: Replacing instruction:  Cleaning instruction:  According to the instruction displayed, clean the scanner or replace the consumables. When you click the [Ignore] button, the cleaning instruction disappears and the scanning continues. You may be able to continue the scanning for a while, however, it is recommended that you replace the consumable(s) as soon as possible. To stop the scanning and replace the consumable(s) right away, click the [Cancel] button. For how to replace the consumables, refer to the following sections: Pick Roller; see "7.2 Replacing the Pick Rollers" (on page 125). Brake Roller; see "7.3 Replacing the Brake Roller" (on page 127). For how to clean the scanner, refer to "Chapter 6 Daily Care" (on page 114). Chapter 9 Operational SettingsCycle for Cleaning the Scanner [Cleaning Cycle]
You can specify the cycle for cleaning the scanner. If the value of the page counter (consumables counter) exceeds a value specified here, the background color of the counter will turn yellow. You can also specify whether or not to receive a cleaning instruction (on page 166). 1 Start up the Software Operation Panel. Refer to "9.1 Starting Up the Software Operation Panel" (on page 156). 2 From the tree listing on the left, select [Device Setting 2] [Cleaning Cycle].  3 Specify a value to determine when to clean the scanner. The specifiable value is from 1,000 to 255,000 in increments of 1,000. You can specify whether or not to receive a cleaning instruction.  The cleaning instruction does not appear when Kofax VRS is used. Chapter 9 Operational SettingsCycle for Replacing the Consumables [Useful life counter]
You can change the cycle for replacing the consumables. If the value of the page counter (consumables counter) exceeds a value specified here, the background color of the counter will turn yellow, and a replacing instruction (on page 166) will appear. 1 Start up the Software Operation Panel. Refer to "9.1 Starting Up the Software Operation Panel" (on page 156). 2 From the tree listing on the left, select [Device Setting 2] [Useful life counter].  3 Specify a value for the life cycle for replacing each consumable (Pick Roller and Brake Roller). You can specify a value ranging from 10,000 to 255,000 in increments of 10,000.9.4 Settings Related to Scanning
Adjusting the Starting Position for Scanning [Offset/Vertical Magnification Adjustment]
When the position of the scanned image is not correct or the image looks elongated in a vertical direction, use the following procedure to adjust the offset and the scan scale for correction.  The factory default settings are appropriate, so normally there is no need to make any adjustment. 1 Start up the Software Operation Panel. Refer to "9.1 Starting Up the Software Operation Panel" (on page 156). 2 From the tree listing on the left, select [Device Setting] and then click the [Offset] button.  3 Adjust the offset/scan scale as necessary. | Offset Setting | Description |
| Unit Select [ADF (front)] or [ADF (back)] (fi-6670/fi-6670A/fi-6770/fi-6770A only), or [Flat Bed] (flatbed type only) as the target of offset adjustment.When the connection is via SCSI/USB Connector 2, the offset for scanning with the ADF is adjustable for the back-side pages only. | |
| Main Adjusts the horizontal (widthwise) offset.The setting range is from -2 mm to +3 mm in steps of 0.5 mm. | |
| Sub Adjusts the vertical (lengthwise) offset.The setting range is from -2 mm to +3 mm in steps of 0.5 mm. | |
| Vertical magnification Adjustment | Description |
| Unit Select [ADF] | or [Flatbed] (flatbed type only) as the target of vertical magnification adjustment. |
| Vertical (lengthwise) magnification adjustment | Adjusts the vertical (lengthwise) magnification. The setting range is from -3.1% to 3.1% in steps of 0.1%. |
Eliminating Shadows or Stripes on the Scanned Image Edge [Page Edge Filler]
Depending on the type of document you scan, some shadow of the document sheet edge may be reflected onto its scanned image, and may turn out to be black thin lines on the image. If this is the case, you can improve the output image by using the "Page Edge Filler" function. This function fills the edge portion of the image so that it looks clean. 1 Start up the Software Operation Panel. Refer to "9.1 Starting Up the Software Operation Panel" (on page 156). 2 From the tree listing on the left, select [Device Setting 2] → [Paper Edge Filter (ADF)] or [Page Edge Filler (FB)].  3 Specify the length for each margin; top, bottom, right, and left, to fill it. ADF
T: Top = 0 to 15 mm B: Bottom= -7 to 7 mm R: Right = 0 to 15 mm L: Left = 0 to 15 mmFB
T: Top = 0 to 15 mm B: Bottom=0 to 15 mm R: Right = 0 to 15 mm L: Left = 0 to 15 mm (in 1 mm units) The specified area is filled with white when the backing (or the background of document) is white, and with black when the backing is black.  Note that if the target range of the Page Edge Filler is too wide, some characters in the vicinity of the boundary may be cut out.  \- Unless otherwise specified, the background color is white. You can also change it to "Black background" using the scanner driver. If you are using the FUJITSU TWAIN 32 scanner driver, do the following to change the backing color to black: Select the [Option] button, and then select [Black background] from [Automatic Size and Skew detection] on the [Rotation] tab. \- This setting can also be specified from the scanner driver's setting dialog box. Note the setting with a larger value is given a priority. \- This setting is not applied when Kofax VRS is used. Chapter 9 Operational SettingsScanning with Particular Color(s) Dropped Out [Dropout color]
By using the "Dropout Color" function, you can scan documents with the specified color removed from the light's three primary colors, i.e., red, green, and blue. (This function is available for the binary black and white setting as well as the grayscale setting.) For example, when you scan a document containing black text with a green background, you can output an image of black text only. 1 Start up the Software Operation Panel. Refer to "9.1 Starting Up the Software Operation Panel" (on page 156). 2 From the tree listing on the left, select [Device Setting 2] [Dropout color].  3 Select a color to drop out. Red, Green, Blue: Red, green, or blue is dropped out. White: No color is dropped out.  The Software Operation Panel allows you to select colors of red, green, and blue only. If you want to drop out other colors, configure settings in the scanner driver. For how to configure settings using the scanner driver, refer to "Excluding Color(s) from Images (Dropout Color)" (on page 79).  This setting can also be specified from the scanner driver's setting dialog box. Note the setting with the scanner driver is given a priority. Chapter 9 Operational SettingsShorting the Scanning Intervals [Pre-Pick]
In the case of consecutive scanning, you can direct the scanner to previously pick the document to be scanned next. This operation is called Pre-Pick. By enabling "Pre-Pick," the time interval between the scanning of two separate documents can be shortened. 1 Start up the Software Operation Panel. Refer to "9.1 Starting Up the Software Operation Panel" (on page 156). 2 From the tree listing on the left, select [Device Setting 2] [Pre-Pick].  3 Configure settings for pre-picking. Select [Yes] to enable Pre-pick, and select [No] to disable it.  - While Pre-Pick is enabled, if you cancel the scanning in process, you will have to eject all the pre-picked document sheets and reload them. - This setting can also be specified from the scanner driver's setting dialog box. Note the setting with the scanner driver is given a priority. Chapter 9 Operational SettingsCropping the Image Boundary [AutoCrop Boundary]
Some fractional data may be generated in scanned images in the process of scanning when [Auto Page Size Detection] is on. You can specify whether to include or exclude such fractional data by specifying [AutoCrop Boundary]. 1 Start up the Software Operation Panel. Refer to "9.1 Starting Up the Software Operation Panel" (on page 156). 2 From the tree listing on the left, select [Device Setting 2] [AutoCrop Boundary].  3 Select whether to include or exclude the fractional data. Select "Round Up" to prevent any exclusion of fractional data from scanned images, and select "Round Down" to cut it off.  - When scanning a document with text just across its bottom edge while "Round Down" is selected, some pixel data there may be lost. - Selecting "Round Up" can prevent data loss, but it may generate black lines near the bottom edge, instead. - For how to specify Auto Paper Size Detection, refer to "Automatically Correcting Skewed Document Images" (on page 87).  This setting is not applied when Kofax VRS is used.Configuring the Data Transfer Width [SCSI Bus Width]
You can configure the width of data transfer when your computer is connected to the scanner via SCSI Connector 2 on the CGA Board. 1 Start up the Software Operation Panel. Refer to "9.1 Starting Up the Software Operation Panel" (on page 156). 2 From the tree listing on the left, select [Device Setting 2] → [SCSI Bus Width].  3 Select [16 bit(Wide)] or [8 bit].  Select [8 bit] if using any SCSI card or SCSI cable that does not support Ultra Wide SCSI.Scan Setting for Documents with Tabs or Non-Rectangular Documents [Scan Setting for Documents with Tab (Automatic Paper Size Detection)]
When configuring settings to scan a non-rectangular document with a tab (index) or tab (index) sticker at the its bottom, you can scan and include such a tab or tab sticker in the scanned image when [Automatic Paper Size Detection] is selected. 1 Start up the Software Operation Panel. Refer to "9.1 Starting Up the Software Operation Panel" (on page 156). 2 From the tree listing on the left, select [Device Setting 2] → [Scan Setting for Documents with Tab (Automatic Paper Size Detection)]. Chapter 9 Operational Settings
3 Select [Non-rectangular document], [Document with tab], or [Document without tab].| Item Description | |
| Non-rectangular document | Scan extra 120 mm from the detected bottom edge of the document. |
| Document with tab Scan | extra 20 mm from the detected bottom edge of the document. |
| Document without tab | Terminates scanning at the time the bottom edge of the document is detected. |
Scan Setting for The Document Whose One Side Is in Dark Background Color [Scan Setting for Document in Dark Background Color]
You can specify whether or not to detect the edge of document in a dark background color during scanning. You can specify a density of background color so the edge will be detected correctly. If this option is enabled, the settings for scanning documents with tabs will automatically be disabled. 1 Start up the Software Operation Panel. Refer to "9.1 Starting Up the Software Operation Panel" (on page 156). 2 From the tree listing on the left, select [Device Setting 2] → [Scan Setting for Document in Dark Background Color] → [Enable]. 3 Specify the density of background color.
 - Increasing the density level may cause incorrect edge detection due to some dust in the paper feeding path. - You cannot enable this setting together with [Scan Setting for Documents with Tab (Automatic Paper Size Detection)]. If you enable this setting, the setting for [Scan Setting for Documents with Tab (Automatic Paper Size Detection)] will automatically be disabled.Adjusting the Scanned Document Output Images [Overcrop/Undercrop]
You can adjust the size of the scanned document output image detected with the [Automatic Paper Size Detection] option. 1 Start up the Software Operation Panel. Refer to "9.1 Starting Up the Software Operation Panel" (on page 156). 2 From the tree listing on the left, select [Device Setting 2] [Overcrop/Undercrop]. Chapter 9 Operational Settings
3 Use the slider control to adjust the scanned document output image.| Item Description |
| Overcrop Crops the scanned document image a little larger than the actual size, leaving black background margins outside the image so that the data on the edge of the image will not be lost.The specifiable range is from 0 mm to 3 mm in increments of 1 mm. |
| Undercrop Crops the scanned document image a little smaller than the actual size, leaving no black margins on the edge of the image.The specifiable range is from -3 mm to 0 mm in increments of 1 mm. |
| With the Overcrop option on; if the document you scanned is wide, the black margins outside the document may not be included in the scanned image. |
| The scanned document output image will not be adjusted if 0 mm has been selected using the slider control. |
Adjusting the Paper Picking Pressure [Pick Pressure]
Scanning a thick document at a regular paper picking pressure may force the Feed Rollers of the scanner to spin free without catching the document properly, causing scanning retries. To avoid this, you can use this option to adjust the pick pressure to scan such documents. 1 Start up the Software Operation Panel. Refer to "9.1 Starting Up the Software Operation Panel" (on page 156). 2 From the tree listing on the left, select [Device Setting 2] → [Pick Pressure]. 3 Specify the pick pressure for feeding your document.
 \- Scanning thin paper with [High] may cause a paper jam. \- Scanning thick paper with [Low] may not feed the paper properly, just making the Feed Rollers to repeat rotating freely.  - Specifying [High] strengthens the feeding force of the Feed Rollers, feeding hard-to-feed documents quickly. - The [High] option is effective for scanning relatively-thick documents. - Specifying [Low] can scan even thin, delicate paper. However, if you want to scan such thin document (if not recommended), you must test-scan using a dummy paper of the same paper quality beforehand to prove that the paper can be scanned properly. - The [Low] option is effective for scanning relatively-thin documents.9.5 Settings Related to Multifeed Detection
Multifeed Detection
A "multifeed" is a feeding error that occurs when two or more sheets in the ADF paper chute are fed simultaneously into the scanner. If you continue scanning document without knowing this multi-feed error, you could skip some of important data while scanning the document. This scanner has the Multifeed Detection function to prevent such troubles. With the Multifeed Detection enabled, the scanner indicates an error message and halts the scanning immediately at a multifeed error. Note that the Multifeed Detection is not available for the range about 30 mm from the leading edge of document. 1 Start up the Software Operation Panel. Refer to "9.1 Starting Up the Software Operation Panel" (on page 156). 2 From the tree listing on the left, select [Device Setting 2] [Multifeed].  3 Select one of the following detection methods.| Detection Method Description |
| None Does not detect multifeeds. |
| Detection Method Description | |
| Check Overlapping (Ultrasonic) | Detects multifeeds by checking for document overlapping.When this option is selected, the following two more detection options can be set:You can specify the multifeed detection range by the length from the leading edge of document. Go to "Specifying the Multifeed Detection Range [Document Check Area Specification for Multifeed Detection]" (on page 182).If two or more sheets of paper of the same size are stuck on the same position of the document, you can cancel the Multifeed Detection for that area. Go to "Bypassing Multifeed Detection for a Fixed Format" (on page 110). |
| Check Length Detects | multifeeds by monitoring the difference of the document length. |
| Check Overlapping and Length | Detects multifeeds when both [Check Overlapping(Ultrasonic)] and [Check Length] are selected. |
| Length Select 10, 15, | or 20 mm as the document length difference, which is to be considered as a Multifeed, when [Check Length] is selected. If the detected document length does not reach the selected length, it will be recognized just as an error, and thus will not be recognized as a multifeed. |
Specifying the Multifeed Detection Range [Document Check Area Specification for Multifeed Detection]
The following settings are available only when [Check Overlapping(Ultrasonic)] is selected. 1 From the tree listing on the left, select [Device Setting 2] → [Document check area specification for Multifeed Detection]. Then, select the [Selected range] checkbox.  2 Specify the detection range.| Detection Range Description | |
| Selected range Must be checked to specify the detection range. | |
| Mark this checkbox to enable the settings configured in this dialog box. Otherwise, let the checkbox unmarked.Clearing this check-box sets both the starting and ending positions to "0," making the whole range of the document to be checked for multifeeds. | |
| None Disables the | Multifeed Detection for the speci-fied range. |
| Enable Enables the | Multifeed Detection for the speci-fied range. |
| Start Specify the starting position of the detection range from the leading edge of the document. The configurable area is from 0 to 510 mm in 2 mm increments, where the starting position is less than the ending position. | |
| End Specify the ending position of the detection range from the leading edge of the document. The configurable area is from 0 to 510 mm in 2 mm increments, where the starting position is less than the ending position. | |
Setting A Non-Multifeed-Detection Range [Intelligent Multifeed Function]
You can bypass multifeed detection by letting the scanner remembering the pattern (size and location) of glued paper on the document. Note that you need to select "Check Overlapping" beforehand by referring to "Multifeed Detection" (on page 180). 1 Start up the Software Operation Panel. Refer to "9.1 Starting Up the Software Operation Panel" (on page 156). 2 From the tree listing on the left, select [Device Setting 2] [Intelligent Multifeed Function].  3 Select a desired operation mode, and then click the [OK] button.| Operation Mode | Description |
| Manual Mode The | scanner stops scanning each time a multi-feed error is detected. You can resume scanning after reloading the multifed document.The scanner does not remember the size and location of paper glued on the document. |
| Auto Mode 1 The | scanner remembers the size and location of paper glued on the document when a multi-feed error occurs and you reload the multifed document on the ADF Paper Chute.Multifeed Detection for this pattern is disabled from the next scanning on. |
| Auto Mode 2 The | scanner remembers the size of paper glued on the document when a multifeed error occurs and you reload the multifed document on the ADF Paper Chute.Multifeed Detection for this pattern is disabled from the next scanning on. |
9.6 Settings Related to Wait Time
Timeout for Manual Feeding [Manual-feed timeout]
In Manual Feeding mode where you manually load documents sheet by sheet, you can scan multiple batches of documents continuously as a single file when you load the second stack of document before the timeout time after loading the first batch. When the time has elapsed, the scanning terminates automatically, canceling manual feeding. You can cancel the Manual Feeding mode immediately by pressing the [Send to] button within the timeout period specified. 1 Start up the Software Operation Panel. Refer to "9.1 Starting Up the Software Operation Panel" (on page 156). 2 From the tree listing on the left, select [Device Setting 2] → [Manual-feed timeout].  3 Select whether to enable or disable [Manual feed timeout]. To enable the timeout setting, select the timeout period for manual feeding until loading the next document after the previous one.  When [Manual feed timeout] is enabled, the scanner waits for the document to be loaded within the specified timeout period, even if scanning starts with no document loaded in the ADF Paper Chute. Chapter 9 Operational SettingsSetting the Wait Time in Power Saving Mode [Power saving]
This scanner switches to power saving mode automatically to save power when it remains unused for a certain period of time. 1 Start up the Software Operation Panel. Refer to "9.1 Starting Up the Software Operation Panel" (on page 156). 2 From the tree listing on the left, select [Device Setting].  3 Use the slide control bar to set the waiting time before entering into power saving mode. You can specify the waiting time in the range of 15 to 55 minutes (in increments of 5 minutes).9.7 Settings Related to Power ON/OFF Control
Power ON/OFF Control
[Power SW Control]
This option is used to specify how to turn on/off the scanner. You can select whether or not to power the scanner on/off by using the [Power] button. When this is disabled, use the main power switch. 1 Start up the Software Operation Panel. Refer to "9.1 Starting Up the Software Operation Panel" (on page 156). 2 From the tree listing on the left, select [Device Setting 2] [Power SW Control].  3 Select to enable or disable power on/off using the [Power] button. Select [Enable power switch] to enable the [Power] button; [Disable power switch] to disable it.Appendix
This section provides the following information:
A.1 Basic Specification....190 A.2 Installation Specification....192 A.3 Outer Dimensions 193 A.4 Scanner Options....195 A.5 Uninstalling the Software .... 196TOP
Contents
Index
Introduction
Scanner Overview Loading Documents How to Use ScandAll PRO Scan Parameters Various Documents Daily Care Consumables Trouble-shooting Operational Settings Appendix Glossary A.1 Basic Specification| Item Specification Note | ||||||
| Scanner model fi-6670/fi-6670A fi-6770/fi-6770A fi-6750S -- | ||||||
| Scanner type ADF (automatic document feeder) | ADF+ flatbed ADF+ flatbed -- | |||||
| Image sensor Color CCD x 2 | Color CCD x 3(Front, Back, Flatbed) | Color CCD x 2(Front, Flatbed) | -- | |||
| Light source White cold cathode | fluorescent lamp x 2(Front, Back) | White cold cathode fluorescent lamp x 3(Front, Back, Flatbed) | White cold cathode fluorescent lamp x 2(Front, Flatbed) | -- | ||
| Scanning area Mini | mum | ADF A8 portrait (*1) | 127 to 209 g/m2(34 to 56.1 lb) | |||
| Maxi mum | ADF A3 or Double Letter -- | |||||
| Long page | 118.11 in. or 3 m | (*2) | ||||
| Flatbed | -- | 12.00 x 180.00 in. (304.8 x 457.2 mm) | -- | |||
| Paper weight | A4/Letter or smaller: 31 to 209 g/m2(8.3 to 56.1 lb)Size larger than A4/Letter: 52 to 209 g/m2(14.0 to 56.1 lb)A8: 127 to 209 g/m2(34 to 56.1 lb) | (*3) | ||||
| Scanning speed(A4/Letter, landscape) (*4) | Binary (monochrome) | Simplex: 90 sheets/min.; Duplex: 180 pages/min. | Simplex: 72 sheets/min. | at 200 dpi | ||
| Grayscale | ||||||
| Color | ||||||
| Binary (monochrome) | Simplex: 80 sheets/min.; Duplex: 160 pages/min. | Simplex: 72 sheets/min. | at 300 dpi | |||
| Grayscale | ||||||
| Color | ||||||
| Item | Specification | Note | |||
| Scanner model fi-6670/fi-6670A fi-6770/fi-6770A fi-6750S -- | |||||
| Capacity of ADF 200 sheets A4/Letter, | 80 g/m2(21 lb) (*5) | ||||
| Optical resolution 600 dpi -- | |||||
| Output resolution Binary (monochrome) 50 to 600 dpi Scalable in 1 dpi | increments | ||||
| Grayscale | 50 to 600 dpi Scalable in 1 dpi | increments | |||
| Color | 50 to 600 dpi Scalable in 1 dpi | increments | |||
| Grayscale level | 8 bits per color | 10 bits per color for internal processing | |||
| Halftone pattern | Dither/error diffusion | -- | |||
| Interface (*6) (*7) | USB2.0/1.1 (*8) | B type | |||
| Ultra SCSI | -- | Shielded 50-pin high-density type | |||
| Ultra Wide SCSI (fi-6670A/fi-6770A only) | -- | Shielded 68-pin high-density type | |||
| Other function | Hardware real-time JPEG compression | Grayscale/color | |||
A.2 Installation Specification
| Item Specification | ||||
| Scanner model fi-6670/fi-6670A fi-6770/fi-6770A | fi-6750S | |||
| Outer dimensions (width x depth x height) (*1) 641 x | 432 x 300 mm (*2)(25.2 x 17.0 x 11.8 in.) | 690 x 500 x 342 mm(27.2 x 19.7 x 13.5 in.) | ||
| Installation space (width x depth x height) (*3) | 1179 x 686 x 390 mm(46.4 x 27.0 x 15.4 in.) | 1030 x 700 x 640 mm(40.6 x 27.6 x 25.2 in.) | ||
| Weight 17 kg (37.5 lb) 35 kg (77.2 lb) | ||||
| Input power Voltage range | 100 to 240 Vac ±10% | |||
| Phase Single phase | ||||
| Frequency range 50/60 ± | 3 Hz | |||
| Power consumption Operating | 216 W or less | |||
| Power saving | fi-6670 : 6 W or lessfi-6670A : 9.1 W or less | fi-6770 : 6 W or lessfi-6770A : 9.1 W or less | fi-6750S : 6 W or less | |
| Ambient condition | Temperature | Operating: 5 to 35°C (41 to 95°F); Non-operating: -20 to 60°C (-4 to +140°F) | ||
| Humidity | Operating: 20 to 80%; Non-operating: 8 to 95% | |||
| Calorific value | Operating | 186 Kcal/Hr or less | ||
| Power saving | fi-6670 : 5.2 Kcal/Hr or lessfi-6670A : 7.8 Kcal/Hr or less | fi-6770 : 5.2 Kcal/Hr or lessfi-6770A : 7.8 Kcal/Hr or less | fi-6750S : 5.2 Kcal/Hr or less | |
| Shipping weight | 25 kg (55.1 lb) | 44 kg (97.0 lb) | ||
| Support warranty period | 5 years | |||
A.3 Outer Dimensions
The outer dimensions are as follows:ADF type
 (Unit: mm/inches) AppendixFlatbed type
 (Unit: mm/inches) TOP Contents Index Introduction Scanner Overview Loading Documents How to Use ScandAll PRO Scan Pa- rameters Various Documents Daily Care Consumables Trouble-shooting Operational Settings Appendix Glossary A.4 Scanner Options| Product Name | Model | P/N | Scanner | Description |
| Imprinter FI-667PR | PA03576-D101 | fi-6670 | fi-6670A | An imprinter option available for the ADF-type scanner model. Prints alphanumeric character string onto the back side of scanned document.Use of this imprinter prints user's name, date, and/or serial number for file management. |
| Black Document Pad | FI-575BK PA0 | 3338-D960 fi-6770 | fi-6770Afi-6750S | A quick-replacement-type document pad useful for scanning documents in black background when loading from the flatbed. |
| VRS option FI-677C | GA PA03576-K001 | fi-6670 | fi-6770 | An image processing hardware option for FUJITSU image scanner fi-series.Combined use of this with dedicated application "Kofax® VRS" achieves advanced image processing at a high speed.Built into the fi-6670A/fi-6770A as the standard feature. |
A.5 Uninstalling the Software
1 Start your computer.
 Be sure to log on as a user with "Administrator" privileges.2 Exit all applications.
3 Select the [start] menu [Control Panel] [Uninstall a program].
⇒ In the [Uninstall or change a program] window, you can view a list of installed applications.  Displays may vary depending on the operating system you are using. Follow the on-screen instructions on your desktop. Windows 2000: • [Uninstall a program] ⇔ [Add/Remove Applications] \- [Uninstall] or [Uninstall/Change] button [Add/Remove] button Windows XP: • [Uninstall a program] ⇔ [Add or Remove Programs] \- [Uninstall] or [Uninstall/Change] button [Change/Remove] button4 Select the target application as follows:
- To remove the FUJITSU TWAIN 32 scanner driver, select: [Scanner Utility for Microsoft Windows] • To remove ScandAll PRO, select: [Fujitsu ScandAll PRO] - To remove Scan to Microsoft SharePoint, select: [Scan to Microsoft SharePoint] - To remove the FUJITSU ISIS scanner driver, select: [Fujitsu ISIS Drivers] - To remove the Error Recovery Guide, select: [Error Recovery Guide for fi-6670(A)/fi-6770(A)/fi-6750S] - To remove the Software Operation Panel, select: [Software Operation Panel] (Installed automatically when the FUJITSU TWAIN32 and ISIS scanner drivers are installed.) • To remove the Kofax VRS, select: [Kofax VirtualReScan] • To remove the manuals, select: [fi-Scanner manuals fi-6670(A)/fi-6770(A)/fi-6750S] - To remove Quick Scan Pro™, select: [Quick Scan] • To remove Adobe Acrobat, select: [Adobe Acrobat Standard]  For how to uninstall Image Processing Software Option (Trial version), refer to "Image Processing Software Option User's Guide."5 Click the [Uninstall] or [Uninstall/Change] button.
6 When you see a confirmation message, click the [OK] button or the [Yes] button.
⇒ Upon clicking the button, uninstallation is started.Glossary
ADGL
A4 size Default settings Gamma Landscape A5 size Density Gray scale Landscape orientation A6 size Dither A7 size Document jam Halftone processing Linedrawing mode A8 size Dpi ADF (Automatic Document Feeder) Automatic separation Automatic size/skew detectionB Energy Star
Brake roller BrightnessCF
Canadian DOC Regulations CCD (Charged Coupling Device) Image Sensor Color balance Driver software Image emphasis Dropout color Duplex reading modeE
Eject rollers IPC preset mode Equipment Error Error diffusion ISIS (Image Scanner Inter- Feed rollers Filtering Flat bed FCC Feed rollers Filtering Flat bedH
|
Mirror image Image processing Interface Inversion (Reverse-image reading)0
ISIS (Image Scanner Interface Specification) face Specification)J
Jaggy images Job separation sheetL
M
Moire Patterns Multifeed detectionN
Noise removal OCR (optical character recognition) Operating temperature/humidity Operator Panel Optical sensor Outline extractionGlossary
PSTU
Pad ASSY (Pad Assembly) SCSI (Small Computer Photograph mode (White level follower OFF) System Interface) SCSI-ID Third Party Interface Pick roller Separation roller Threshold White level follower Pick start time Simplex reading mode TÜV White Reference Stripe Pixel (Picture Element) Smoothing TWAIN (Technology Without Portrait Storage temperature/humidity Portrait orientationR
Resolution Temporary Error Ultrasonic sensor Terminator USB (Universal Serial Bus) W Any Interesting Name) Numbers 11 x 17 inches GlossaryA
A4 size
A standard paper size. Paper size is 210 x 297 mm.A5 size
A standard paper size. Paper size is 148 x 210 mm.A6 size
A standard paper size. Paper size is 105 x 148 mm.A7 size
A standard paper size. Paper size is 74 x 105 mm.A8 size
A standard paper size. Paper size is 53 x 74 mm.ADF (Automatic Document Feeder)
A unit that allows the user to scan a number of pages consecutively. Fed documents are transported from the ADF paper chute (or hopper) to the Stacker. Actual scanning operation is executed by the mechanism inside of this unit.Automatic separation
An image processing method in which the scanner automatically detects difference between text and photos, and chooses the threshold accordingly. This function allows the scanner to switch between line mode and half tone mode in one pass.Automatic size/skew detection
A function that automatically detects the documents' page size and adjusts output data to the detected page size. Document skewing is automatically detected and corrected for the output image. GlossaryB
Brake roller
A roller that prevents two or more sheets of paper from being fed simultaneously into the ADF.Brightness
Refers to the brightness of scanned images in this manual.C
Canadian DOC Regulations
"A standard issued by Industry Canada, a department of the Canadian government, which sets out the technical requirements relative to the radiated and conducted radio noise emissions from digital apparatus."CCD (Charged Coupling Device) Image Sensor
A semiconductor device inside the scanner that registers light reflected from the original image and converts it into a digitized (electronic) form. CCD technology is the basis of high-quality image acquisition in scanners, cameras, and other specialized devices.Color balance
Balance of colors in images.D
Default settings
Pre-set values for optional menus.Density
Scale of color's depths in images. In this manual, refers to a measurement of the depth of the display.Dither
The process by which a group of dots is arranged to represent a shade of gray. The predetermined dot pattern simulates shades of gray. This scanning process offers the advantage of reduce memory requirements compared to multilevel gray.Glossary
Document jam
A warning that appears when document is jammed in the transport unit, or transportation is interrupted because the paper is slipping.Dpi
Dots per inch. Number of dots lined along one inch. A measurement of resolution normally used for scanners and printers. Higher dpi means better resolution.Driver software
In this manual, driver software refers to software that allows the scanning application software to communicate with the scanner.Dropout color
A color which is used in the document but does not appear in the read image.Duplex reading mode
A mode for scanning both sides of the document in one pass.E
Eject rollers
Rollers that transport documents from the ADF onto the Stacker.Energy Star
ENERGY STAR is an international standard for energy-efficient electronic equipment. It was created by the US Environment Protection Agency (EPA) in 1992. The standard program has now been adopted by several countries around the world.Equipment Error
An error that cannot be fixed by the operator. The operator should call the manufacturer for service.Error diffusion
High-quality halftone (pseudo-grayscale) image production based on black-and-white pixel binarization. A pixel's optical density and that of adjacent pixels are summed, with black pixels relocated in their order of density as they relate to adjacent pixels. The purpose of this technique is to minimize the average error between read and printed densities. Density data forGlossary
adjacent pixels is modified by diffusing errors on the objective pixel into several pixels, which are then binarized. This maintains high grayscale levels and resolution during reading, while suppressing more patterns by dotted halftone images such as newspaper photographs.F
FCC
Acronym for "The Federal Communications Commission", an independent United States government agency which is in charge of regulating interstate and international communications via radio, television, wire, satellite and cable. The Part 15 of the FCC regulations mentioned in this manual is designed to prevent harmful interferences on radio communication of radio receivers and other devices which radiate radio frequency energy, and provides for the certification of radio receivers. It also provides the certification of low power transmitters and the operation of certificated transmitters without a license.Feed rollers
Rollers that feed documents through the ADF.Filtering
A correction method that improves the read quality of handwritten documents. The read quality of images written in pencil or ball-pointed pen depends on the reflective light characteristics of the specific ink or lead used. Dropped pixels may produce outlines, gaps, or thin, barely connected lines due to uneven optical density. Filtering detects areas lighter than their surroundings and increases their density to improve image clarity.Flat bed
An input device of the scanner, where documents are placed and scanned. Generally used for scanning pages out of a book, or paper that is out of the feeding specification of the ADF. Also used to scan a small volume of documents by manual operation. GlossaryG
Gamma
A unit of changes of images' brightness. It is expressed as a function of the electric input power to devices (scanner, display, etc.) and an image's brightness. If the gamma rate is larger than 1, the brightness of an image increases and vice versa. In order to adjust the brightness of an image close to the original, generally the gamma value is set to 1.Gray scale
A method for realizing the gradation from black to white on the scanned image. For example, when scanning monochrome documents, the computer recognizes the documents as sets of black and white dots. In the Gray scale method, each dot contains data regarding density of black. The original gradation of the documents is realized as the gradation of the density data.BH
Halftone processing
Any method used to reproduce a photograph which includes a shade as an image composed of dots, namely, a binary image. Dithering and error diffusion processing are examples of halftone processing.|
Image emphasis
Density is decreased for lighter but not completely white areas adjacent to black areas. Weakening this emphasis eliminates spot noise or produces softened images.Image processing
An image is scanned with specified parameters.Interface
The connection that allows communication from the computer to the scanner.Inversion (Reverse-image reading)
In reverse-image reading, data is changed from black to white and vice versa.Glossary
IPC preset mode
While reading binary images, it is necessary to set the scanner according to the quality of the sheet to be read. In this mode, these settings can be performed in advance by corresponding each setting to a pattern number.ISIS (Image Scanner Interface Specification)
A standard of API (Application Program Interface) or protocol for imaging devices (scanners, digital cameras, etc.) developed by Pixel Translations, a division of Captiva Software. In order to use imaging devices designed on the ISIS standard, it is necessary to install the driver software of the same standard.J
Jaggy images
Images that have sharp projections or irregular shape on their edges.Job separation sheet
A sheet inserted between documents in a batch for separating different jobs.L
Landscape
A document is transported and read with the Short side parallel to the moving direction.Landscape orientation
A document is transported and scanned with the long side vertical to the moving direction.Letter size
A standard paper size used in the U.S.A. and other countries. Paper size is 8-1/2 x 11 inches.Linedrawing mode
Selecting linedrawing mode makes threshold and contrast settings effective but prevents brightness from being set. The specified threshold value determines whether black or white pixels are scanned. Line drawing mode is therefore appropriate for scanning text and line art images. GlossaryM
Mirror image
The read image is symmetrically flipped to produce a mirror image of the original detected in the main scanning direction.Moire Patterns
Recurrent patterns on scanned images caused by incorrect settings of angles.Multifeed detection
A scanner function which detects accidental feeding of multiple sheets into the ADF. This can be set as both enabled/disabled.N
Noise removal
Isolated noise from an image appearing as black spots in white areas and voids in black areas is removed to improve image quality. Common noise includes toner and fax particles. Noise reduction works via an algorithm that removes pixels up to 5 x 5 dots appart. A dot is 1/400 inch. A particle can be distinguished from a character as it is not connected to another dot within 5 pixels.0
OCR (optical character recognition)
Devices or technologies for identifying characters on documents and converting them into text data that can be manipulated. The documents are checked by light and the differences of light reflection are recognized as character shapes.Operating temperature/humidity
The temperature and humidity levels needed to assure the proper operation of the scanner.Operator Panel
A panel consists of indicators and buttons. The operator panel is used to control scanner operations such as, selecting features, and changing settings.Glossary
Optical sensor
A type of sensor for detecting multi feeding by light transmission. It also detects multi feeding by recognizing differences in length of documents.Outline extraction
The boundary between black and white areas is traced and the outline extracted for closed areas.P
Pad ASSY (Pad Assembly)
This part is used to separate a sheet of paper from a batch before feeding documents into the ADF. This assembly is made out of rubber.Photograph mode (White level follower OFF)
Selecting photograph mode makes brightness and contrast settings effective but prevents the threshold from being set. With photograph mode, the darkness of image corresponds to the black-pixel density, making it suitable in scanning images such as photographs having gradations.Pick roller
Roller(s) that picks the page from the batch of paper in the paper chute and feed it into the ADF.Pick start time
The period from the manual insertion of the document until picking starts after the document passes the hopper empty sensor.Pixel (Picture Element)
The tiny dots that make up a scanned image.Portrait
Orientation of documents or images. Documents/images are set or displayed vertically.Portrait orientation
A document is transported and read with the long side parallel to the moving direction.Glossary
R
Resolution
The measure of the details or grain of images displayed on a computer screen. As a metric of the resolution, dpi is customarily used.s
SCSI (Small Computer System Interface)
An abbreviation for "Small Computer System Interface". SCSI is a standard for interfaces, used to connect devices such as hard disks, scanners, etc. Up to seven devices can be connected through this interface (daisy chain). The data transfer rates are different between "Fast SCSI" (Max. 10MB/sec.) and "Wide SCSI" (Max. 20MB/sec.).SCSI-ID
Used to specify a particular SCSI device when the initiator selects a target or the target reconnects to the initiator.Separation roller
A roller that separates the sheets of paper from each other.Simplex reading mode
A mode for scanning only the front side of the document.Smoothing
A process that eliminates "jaggies" from slanted lines and curves. Irregular convexities are deleted and irregular concavities filled in. This is useful in OCR applications, for example.Storage temperature/humidity
The temperature and humidity levels necessary for proper storage of the scanner.T
Temporary Error
An error that can be fixed by the operator.Glossary
Terminator
Devices with a SCSI interface can be daisy-chained. A resistor that includes terminal circuits needs to be placed at both ends of the SCSI chain when devices are daisy-chained. If a device (such as a scanner) is the last device in a chain, leaving an interface connector unused, a Terminator therefore must be attached to provide those terminal circuits.Third Party Interface
Used to install optional board provided by Fujitsu or interface board manufactured by a third party.Threshold
A value used as a metric for judging a color as black or white. For scanning an image with gray gradation, this value must be defined. The threshold setting determines which pixels are converted to black and which will become white.TÜV
"An institution that controls products for conformity with various standards of security, usability and environmental matters."TWAIN (Technology Without Any Interesting Name)
A standard for API (Application Program Interface) or protocol for imaging devices (scanners, digital cameras, etc.) developed by TWAIN Working Group. In order to use devices that comply with this standard, it is necessary to install driver software based on the same standard.U
Ultrasonic sensor
A type of sensor for detecting multi feeding by ultrasonic sound. Scanners detect multi feeding by recognizing differences in the amount of ultrasonic waves that penetrates the documents.USB (Universal Serial Bus)
An abbreviation for "Universal Serial Bus". A standard for interfaces used to connect devices such as key boards, scanners, etc. Up to 127 devices can be connected through this interface. USB devices can be plugged/unplugged without turning off their power. Data transfer rates are different between the "Low speed mode" (1.5Mbps) and "High speed mode" (Max. 12Mbps). Glossary WWhite level follower
A function to correct the difference between white colors in unbleached paper (e.g. wood containing paper, etc.) and in scanned images.White Reference Stripe
The white part located in the ADF that defines the lightest area in an image, causing all other areas to be adjusted accordingly.Numbers
11 x 17 inches
A standard paper size used in the U.S.A. and other countries. Paper size is 11 x 17 inches. IndexIndex
A
ADF-Loaded Documents 42 Advanced Scanning.... 79B
Basic Flow of Scanning Documents 33 Basic Specification 189 Before Contacting Your Dealer or Scanner Service Provider....151C
Changing the ADF Position 48 Checking Labels on the Scanner.... 153 Cleaning Materials and Locations Requiring Cleaning.. 114 Cleaning the ADF 116 Cleaning the Flatbed (Flatbed Type Only).... 121 Configurable Items 156 Consumables.... 122 Consumables and the Replacement Cycles.... 123 Conventions....7 Customizing the Hardware Settings 105D
Daily Care....113E
Errors Indicated on the Operator Panel.... 131F
Features 21 FUJITSU ISIS Scanner Driver.... 67 FUJITSU TWAIN 32 Scanner Driver 64 Functions of the Operator Panels.... 28H
How to Use ScandAll PRO....51 How to Use This Manual 2|
Installation Specification.... 191 Introduction.... 3L
Launching ScandAll PRO....53 Loading Documents 38 Loading Documents on the ADF 39 Loading Documents on the Flatbed (Flatbed Type Only) 500
Options.... 194 Outer Dimensions.... 192 Overview of ScandAll PRO 52P
Paper Jams 129 Power ON/OFF Control 187 Power Save Mode 32Index
Power SW Control.... 187 Precautions....9R
Regulatory Information 5 Replacing the Brake Roller.... 126 Replacing the Pick Rollers.... 124S
Safety Information 11 Scan Parameters.... 56, 63 Scanner Overview 20 Scanner Parts and Their Functions.... 22 Scanning Approaches 57 Scanning Documents of Different Types or Sizes...... 75 Scanning with Batch Scan.... 61 Scanning with Scan.... 58 Selecting a Scanner Driver.... 54 Selecting a Scanner Model.... 55 Setting Post-Scan Operations and Handling 87 Settings Related to Consumables and Useful Life Counters 164 Settings Related to Multifeed Detection 179 Settings Related to Power ON/OFF Control.... 187 Settings Related to Scanning 168 Settings Related to Wait Time.... 185 Starting Up the Software Operation Panel 155 Summary 74T
Troubleshooting.... 128, 135 Turning the Scanner On and Off 31U
Uninstalling the Software.... 195V
Various Scans 73 fi-6670(A)/fi-6770(A)/fi-6750S Image Scanner Operator's Guide P3PC-2252-02ENZ0 Issue Date: June 2008 Issued by: PFU LIMITED - Copying of the contents of this manual in whole or in part and copying of the scanner applications is prohibited under the copyright. - The contents of this manual are subject to change without notice. - PFU LIMITED is not liable whatsoever for any damages resulting from use of this scanner and procedures described in this manual, profit due to defects, and any claims by a third party.- How to Use This Manual
- Common Notes:
- Introduction
- Scanner Models
- Manuals
- Trademarks
- Manufacturer
- Regulatory Information
- FCC Declaration
- Canadian DOC Regulations
- International ENERGY STAR® Program
- Use in High-Safety Applications
- Conventions
- Symbols Used In This Manual
- Naming Conventions in This Manual
- Scanners:
- Operating Systems and Software Products:
- Arrow Symbols in This Manual
- Screen Examples in This Manual
- Precautions
- Liability Note
- Use of Mercury
- Maintenance
- Warning Label
- Safety Information
- Warning Indications Used In This Manual
- Description
- Do not cover the scanner with something during its operation.
- Do not use the scanner where it gets wet.
- CAUTION
- Do not install the scanner on an unstable work table.
- Firmly insert the power plug.
- Do not block the ventilation ports.
- Do not place heavy objects or stand on the top of the scanner.
- Do not use the scanner immediately after moving it from a cold place into a warm room.
- Contents
- TOP
- Index
- Customizing the Hardware Settings .... 106
- Chapter 6 Daily Care 114
- Cleaning Materials and Locations
- Cleaning the ADF 117
- Cleaning the Flatbed (Flatbed Type Only) ....122
- Chapter 7 Consumables ...... 123
- Consumables and the Replacement
- Chapter 8 Troubleshooting.... 129
- Troubleshooting 136
- Before Contacting Your Dealer or Scanner
- Chapter 9 Operational Settings.... 155
- Appendix 189
- Chapter 1 Scanner Overview
- Features
- Features
- Realizes a high-speed scanning of 90 sheets (or 180 pages) per minute under JPEG compression (fi-6670/fi-6670A/fi-6770/fi-6770A only).
- Reduces the work loss caused by multifeeds.
- Provides the Intelligent Multifeed function.
- Mounts an adjustable ADF (Flatbed type only).
- Scanner Parts and Their Functions
- fi-6770/fi-6770A/fi-6750S (Flatbed Type)
- Model-Common Parts
- Functions of the Operator Panels
- Operator Panel
- fi-6670/fi-6670A (ADF Type)
- Check LED
- Function Number Display
- [Function] Button
- [Power] Button / Power LED
- [Scan/Stop] Button
- [Send to] Button
- Turning the Scanner ON and OFF
- Turning the Scanner ON
- Turning the Scanner OFF
- Power Save Mode
- Returning from Power Save Mode
- Basic Flows of Scanning Documents
- Connection via SCSI/USB Connector 1
- Turn the scanner ON.
- Load a target document on the scanner.
- Launch an application you want to use for scanning.
- Select a scanner driver to use.
- Select a scanner to use.
- Connection via SCSI/USB Connector 2
- Launch an application you want to use for scanning. The following steps show example windows when VCDemo is selected.
- Select a scanner to use.
- In the application, invoke a scanner driver.
- In the Scanner Properties dialog box, configure scan parameters.
- Perform a scan.
- Save the scanned document images to a file.
- Chapter 2 Loading Documents
- Loading Documents on the ADF
- ADF-Loaded Documents
- Sizes
- Paper Quality
- Paper Types
- Paper Thicknesses
- Maximum Document Loading Capacity
- Area Not to be Perforated
- Loading Documents with Tabs or Non-Rectangular Documents
- Multifeed Detection Conditions
- Detection By Document Overlapping
- Detection By Document Length
- Detection By Document Overlapping and Length
- Limiting the Background Color Area
- Job Separation Sheet
- Changing the ADF Position (Flatbed Type Only)
- Change the position of the ADF.
- Let the Stacker down.
- Loading Documents on the Flatbed (Flatbed Type Only)
- Chapter 3 How to Use ScandAll PRO
- Overview of ScandAll PRO
- ScandAll PRO mainly features:
- Launching ScandAll PRO
- Selecting a Scanner Driver
- Selecting a Scanner Model
- Scan Parameters
- Scanning Approaches
- Scanning with [Scan]
- Scanning with [Batch Scan]
- Scanning with [Scan]
- Click the [Scanner Setting] button.
- Configure the scan parameters.
- When you have completed the settings, click the [OK] button.
- Scanning with [Batch Scan]
- Creating and Editing Profiles
- Do the following as necessary:
- Scanning Documents
- Chapter 4 Scan Parameters
- FUJITSU TWAIN 32 Scanner Driver
- Resolution
- Scan Type
- Paper Size
- Image Mode
- [Scan] Button
- [Preview] Button
- [Close]/[OK] Button
- [Reset] Button
- [Help] Button
- [About] Button
- [Option] Button
- [Advance] Button
- [Config] Button
- FUJITSU ISIS Scanner Driver
- [Layout] Tab
- [Scan Area] Window
- [Gamma] Tab
- [Color Dropout] Tab
- Chapter 5 Various Documents
- Summary
- Scanning Documents of Different Types or Sizes
- Advanced Scanning
- Configuring Post-Scan Operations and Handling
- Customizing the Hardware Settings
- Scanning Documents of Different Types or Sizes
- Scanning Both Sides of A Document (fi-6670/fi-6670A/fi-6770/fi-6770A Only)
- Scanning A Large-Size Document or Book (Flatbed Type Only)
- Select [Flat Bed] under [Scan Type].
- Specify a desired paper size from [Paper Size], etc.
- Click the [OK] button.
- From ScandAll PRO, perform a scan.
- Scanning Documents of Different Widths
- To prevent images from being skewed, select [Automatic Page Size Detection] from the [Automatic Size and Skew Detection] drop-down list.
- Center all the document sheets as shown in the figure below.
- Scanning A Document Longer Than A3 Size
- Advanced Scanning
- Excluding Color(s) from Images (Dropout Color)
- Click the [Advance] button.
- Select a color you want to remove, from the [Dropout Color] drop-down list under [More].
- Skipping Blank Pages
- Removing Punch Holes from A Scanned Image
- Click the [Option] button.
- Click the [Rotation] tab, and then select [Automatic Page Size Detection] or [Black Background] under [Automatic Size and Skew Detection].
- Select [Fill with white] or [Background color] under [Hole punch removal].
- In the [TWAIN Driver (32)] dialog box, click the [OK] button.
- 8From ScandAll PRO, perform a scan.
- Scanning A Document from the ADF in Manual Loading Mode
- Duplex Scanning Using the ADF Virtual Duplex Function (fi-6750S Only)
- When selecting the "Scan" option
- When selecting the "Batch Scan" option
- When using a scanner driver
- From ScandAll PRO, perform a scan.
- Load the document face up on the ADF Paper Chute.
- In response to the message shown, click the [Yes] button.
- When the scanning is complete, the scanned document images are sorted automatically.
- Setting Post-Scan Operations and Handling
- Automatically Correcting Skewed Document Images
- Select the [Rotation] tab, and then select [Automatic Deskew] or [Automatic Page Size Detection] under [Automatic Size and Skew detection].
- Click the [OK] button.
- Setting Auto Correction for Document Page Orientations
- Saving Scanned Images in PDF Format
- Creating with ScandAll PRO
- Creating with Adobe Acrobat
- ■Creating with ScandAll PRO
- When scanning with the "Scan" option
- When scanning with the "Batch Scan" option
- ■Creating with Adobe Acrobat
- Select one of the following at [Scanner].
- Click the [Scanner Options] button.
- Select [Show Scanner's Native Interface] at [User Interface], and then click the [OK] button.
- Click the [Scan] button.
- Dividing Multipage Documents Using Patch Codes
- Dividing a Multipage Document Using Barcodes
- Click the [Setup] button.
- Insert the barcode-printed sheets wherever you want the file/folder to separate.
- Specify the created batch profile, and then perform a batch scan.
- Horizontally Splitting a Scanned Image into Two
- Outputting in Multi-Image Mode
- Select the [Enable Multi Image] checkbox.
- Setting Auto Detection for Content Colors (Color/Monochrome)
- Customizing the Hardware Settings
- Using the Scanner Buttons to Start A Scan Quickly
- Computer Settings
- Scanner Settings
- Detecting Multifeeds
- Bypassing Multifeed Detection for a Fixed Format
- Intelligent Multifeed Function
- Settings Before Using This Function
- ■With FUJITSU TWAIN 32 Scanner Driver
- ■With FUJITSU ISIS Scanner Driver
- Operating the Scanner
- 3
- Chapter 6 Daily Care
- Cleaning Materials and Locations Requiring Cleaning
- Cleaning the ADF
- Cleaning with a Cloth Moistened with Cleaner F1
- Brake Roller
- Pick Rollers
- Plastic Rollers
- Pick Arm
- Chute Roller
- Glasses/Sheet Guides/Ultrasonic Sensors
- Feed Rollers
- Close the ADF.
- Cleaning the Flatbed (Flatbed Type Only)
- Chapter 7 Consumables
- Consumables and the Replacement Cycles
- Replacing the Pick Rollers
- Attach new two Pick Rollers to the scanner.
- Attach the ADF Paper Chute.
- Close the ADF.
- Reset the pick roller counter.
- Replacing the Brake Roller
- Attach the Brake Roller to the scanner.
- 8Reset the brake roller counter.
- Chapter 8 Troubleshooting
- Paper Jams
- Close the ADF.
- Errors Indicated on the Operator Panel
- Temporary Errors
- Paper Feed Errors
- ■Cover Open and Print Errors
- Device Errors
- ■Motor and Optical System Errors
- ■ Overrun Errors
- Chip Errors
- Circuit Errors
- ■Errors in the Option (only when the imprinter option for fi-6670/fi-6670A is installed)
- ■Sensor Errors
- Troubleshooting
- Scanner cannot be turned on.
- Indication on Function Number Display goes out.
- Quality of scanned pictures or photos is not satisfactory when scanning in black and white.
- Quality of scanned text or lines is unsatisfactory.
- Images are distorted or blurred.
- Vertical lines appear in scanned images.
- Multifeed errors occur frequently.
- Pickup errors occur frequently.
- Paper jams occur frequently.
- Scanned images are elongated when scanned from the ADF.
- There is a shadow on leading edge of scanned image.
- The scanner is not recognized by your computer when Kofax VRS is used.
- Before Contacting Your Dealer or Scanner Service Provider
- Checking Labels on the Scanner
- Positions of Labels on the Scanner
- Chapter 9 Operational Settings
- Starting Up the Software Operation Panel
- Configurable Items
- Device Setting
- Device Setting 2
- Settings Related to Consumables and Useful Life Counters
- Confirming and Resetting the Counters
- ■Confirming the counters
- ■ Resetting the counters
- ■Replacing and Cleaning Instructions
- Cycle for Cleaning the Scanner [Cleaning Cycle]
- Cycle for Replacing the Consumables [Useful life counter]
- Settings Related to Scanning
- Adjusting the Starting Position for Scanning [Offset/Vertical Magnification Adjustment]
- Eliminating Shadows or Stripes on the Scanned Image Edge [Page Edge Filler]
- ADF
- FB
- Scanning with Particular Color(s) Dropped Out [Dropout color]
- Shorting the Scanning Intervals [Pre-Pick]
- Cropping the Image Boundary [AutoCrop Boundary]
- Configuring the Data Transfer Width [SCSI Bus Width]
- Scan Setting for Documents with Tabs or Non-Rectangular Documents [Scan Setting for Documents with Tab (Automatic Paper Size Detection)]
- Scan Setting for The Document Whose One Side Is in Dark Background Color [Scan Setting for Document in Dark Background Color]
- Specify the density of background color.
- Adjusting the Scanned Document Output Images [Overcrop/Undercrop]
- Adjusting the Paper Picking Pressure [Pick Pressure]
- Specify the pick pressure for feeding your document.
- Settings Related to Multifeed Detection
- Multifeed Detection
- Specifying the Multifeed Detection Range [Document Check Area Specification for Multifeed Detection]
- Setting A Non-Multifeed-Detection Range [Intelligent Multifeed Function]
- Settings Related to Wait Time
- Timeout for Manual Feeding [Manual-feed timeout]
- Setting the Wait Time in Power Saving Mode [Power saving]
- Settings Related to Power ON/OFF Control
- Power ON/OFF Control
- [Power SW Control]
- Appendix
- This section provides the following information:
- A.2 Installation Specification
- A.3 Outer Dimensions
- ADF type
- Flatbed type
- A.5 Uninstalling the Software
- Start your computer.
- Exit all applications.
- Select the [start] menu [Control Panel] [Uninstall a program].
- Select the target application as follows:
- Click the [Uninstall] or [Uninstall/Change] button.
- When you see a confirmation message, click the [OK] button or the [Yes] button.
- Glossary
- ADGL
- B Energy Star
- CF
- E
- H
- |
- 0
- J
- L
- M
- N
- PSTU
- R
- A
- A4 size
- A5 size
- A6 size
- A7 size
- A8 size
- ADF (Automatic Document Feeder)
- Automatic separation
- Automatic size/skew detection
- B
- Brightness
- C
- CCD (Charged Coupling Device) Image Sensor
- Color balance
- D
- Default settings
- Density
- Dither
- Document jam
- Dpi
- Driver software
- Dropout color
- Duplex reading mode
- Eject rollers
- Energy Star
- Equipment Error
- Error diffusion
- F
- FCC
- Filtering
- Flat bed
- G
- Gamma
- Gray scale
- Halftone processing
- Image emphasis
- Image processing
- Interface
- Inversion (Reverse-image reading)
- IPC preset mode
- ISIS (Image Scanner Interface Specification)
- Jaggy images
- Landscape
- Landscape orientation
- Letter size
- Linedrawing mode
- Mirror image
- Moire Patterns
- Noise removal
- OCR (optical character recognition)
- Operating temperature/humidity
- Optical sensor
- Outline extraction
- P
- Pad ASSY (Pad Assembly)
- Photograph mode (White level follower OFF)
- Pick roller
- Pick start time
- Pixel (Picture Element)
- Portrait
- Portrait orientation
- s
- SCSI (Small Computer System Interface)
- SCSI-ID
- Separation roller
- Simplex reading mode
- Smoothing
- Storage temperature/humidity
- T
- Temporary Error
- Terminator
- Third Party Interface
- Threshold
- TÜV
- TWAIN (Technology Without Any Interesting Name)
- U
- Ultrasonic sensor
- USB (Universal Serial Bus)
- White level follower
- White Reference Stripe
- Numbers
- x 17 inches
- V
Brand : FUJITSU SIEMENS
Model : Fi-6750S
Category : Scanner