
RR 508 - CD Player Karcher Audio - Free user manual and instructions
Find the device manual for free RR 508 Karcher Audio in PDF.


| Product Type | CD Player |
| Brand | Karcher Audio |
| Model | RR 508 |
| Dimensions (W x H x D) | 430 mm x 80 mm x 250 mm |
| Weight | 3 kg |
| Power Supply | AC 230 V / 50 Hz |
| Power Consumption | 15 W (max) |
| Disc Compatibility | CD, CD-R/RW |
| Playback Modes | Program, Repeat (1/All), Random Shuffle |
| Outputs | RCA Line Out, Headphone Jack (3.5mm) |
| Remote Control | Included (IR) |
| Display | Backlit LCD, Track/Time Display |
| Maintenance | Clean lens with CD lens cleaner; wipe exterior with dry cloth |
| Safety Class | Class II (Double Insulation) |
| Operating Temperature | 5°C to 35°C |
| Spare Parts Availability | Remote control, power cord (contact Karcher Audio service) |
| Repair Information | Refer to qualified service personnel; do not open |
Frequently Asked Questions - RR 508 Karcher Audio
User questions about RR 508 Karcher Audio
0 question about this device. Answer the ones you know or ask your own.
Ask a new question about this device
Download the instructions for your CD Player in PDF format for free! Find your manual RR 508 - Karcher Audio and take your electronic device back in hand. On this page are published all the documents necessary for the use of your device. RR 508 by Karcher Audio.
USER MANUAL RR 508 Karcher Audio
natural_image
Line drawing of a Karcher portable radio device with front panel and control buttons (no text or symbols on body)RR 508
Radio Recorder with CD/MP3-Player and USB | User Manual
Vorwort

Pick-Up 3-Beam Semiconductor Laser
Encoding
1-bit
D/A-Wandler
8-fach
Oversampling
KASSETTENTEIL
- Read Instructions - All the safety and operating instructions should be read before the appliance is operated.
- Retain Instructions - The safety and operating instructions should be retained for future reference.
- Heed Warnings - All warnings on the appliance and in the operating instructions should be adhered to.
- Water and Moisture – Do not use the apparatus near water (e.g. bath tub, sink, swimming pool) or in wet places or tropical climates. Do not place objects filled with liquids, such as vases, on top of the apparatus. Do not expose the apparatus to dripping or splashing.
- Setup – The apparatus should only be placed on a stable, flat surface. Do not let the apparatus fall down or expose it to shock.
- Wall or Ceiling Mounting - The appliance should be mounted to a wall or ceiling only as recommended by the manufacturer.
- Ventilation - The appliance should be situated so that its location or position does not interfere with its proper ventilation. For example, the appliance should not be situated on a bed, sofa, rug, or similar surface that may block the ventilation openings; or, placed in a built-in installation, such as a bookcase or cabinet that may impede the flow of air through the ventilation openings. Ensure a minimum distance of 5 cm around the apparatus for sufficient ventilation. Ensure that the ventilation is not impeded by covering the ventilation openings with items such as newspapers, table-cloths, curtains, etc.
- Heat - The appliance should be situated away from heat sources such as radiators, heat registers, stoves, or other appliances (including amplifiers) that produce heat.
- Power Sources - The appliance should be connected to a power supply only of the type described in the operating instructions or as marked on the appliance.
- Cables and Plugs – The mains plug shall remain readily operable. All cables should be routed so that they are not likely to be walked on or pinched by items placed upon or against them, paying particular attention to cords at plugs, convenience receptacles, and the point where they exit from the appliance.
- Cleaning - The appliance should be cleaned only as recommended by the manufacturer. Clean by wiping with a dry and clean cloth. Do not use chemical cleaners or detergents. Always pull the mains plug before cleaning the unit.
- Non-use Periods - The power cord of the appliance should be unplugged from the outlet when left unused for a long period of time.
- Object and Liquid Entry - Care should be taken so that objects do not fall and liquids are not spilled into the enclosure through openings.
- Damage Requiring Service - The appliance should be serviced by qualified service personnel when:
a) The power-supply cord or the plug has been damaged; or
b) Objects have fallen, or liquid has been spilled into the appliance; or
c) The appliance has been exposed to rain; or
d) The appliance does not appear to operate normally or exhibits a marked change in performance; or
e) The appliance has been dropped, or the enclosure damaged. - Servicing - The user should not attempt to service the appliance beyond that described in the operating instructions. All other servicing should be referred to qualified service personnel.
- Open Fire – Keep the apparatus away from open fires. Do not place naked flame sources, such as lighted candles on the apparatus.
- Thunderstorms – During a thunderstorm the mains plug should be unplugged.
- Safety Check – After servicing the technician should conduct a safety check in order to ensure that the apparatus is working properly and safely.
-
Batteries – Always place batteries in the correct polarization into electrical components. Danger of explosion if battery is incorrectly replaced. Replace only with the same or equivalent type. Do not mix old and new batteries. Take attention to the environmental aspects of battery disposal. Batteries shall not be exposed to excessive heat such as sunshine, fire or the like. Remove batteries before disposing of the product.
-
Headphones – Excessive sound pressure from earphones and headphones can cause hearing loss (headphones not included).
EN

CAUTION
RISK OF ELECTRO SHOCK
DO NOT OPEN

WARNING: To reduce the risk of fire or electric shock, do not expose this appliance to dripping or splashing.
WARNING: To reduce the risk of electric shock, do not remove cover (or back). No user serviceable parts inside. Refer servicing to qualified service personnel.

The lightning flash with arrowhead symbol within an equilateral triangle is intended to alert the user to the presence of uninsulated dangerous voltage within the product's enclosure that may be of sufficient magnitude to constitute a risk of electric shock to persons.

The exclamation point within an equilateral triangle is intended to alert the user to the presence of important operating and maintenance (servicing) instructions in the literature accompanying the appliance.

DO NOT STARE INTO BEAM – INVISIBLE LASER RADIATION

Batteries
Batteries may not be disposed of in regular house hold trash. Every consumer has the obligation to return batteries to special disposal locations.

Disposal of Used Electrical & Electronic Equipment
The meaning of the symbol on the product, its accessory or packaging indicates that this product shall not be treated as household waste. Please, dispose of this equipment at your applicable collection point for the recycling of electrical & electronic equipments waste. By ensuring the correct disposal of this product, you will help prevent potential hazards to the environment and to human health, which could otherwise be caused by unsuitable waste handling of this product. The recycling of materials will help conserve natural resources. For more detailed information about recycling of this product, please contact your local city office, your household waste disposal service or the shop where you purchased the product.
- Handling discs
• Always keep the CD compartment shut to prevent dust or dirt from getting into the CD mechanism.
- Do not touch the recorded surface.
- Do not stick paper or write on either side of the CD.
- Do not bend the CD.
- Only handle a disc on its outer edges.
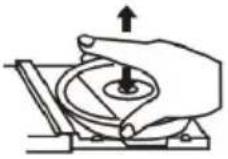
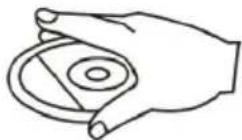

- Storing discs
• To avoid scratches/damages always put CDs back into their cases after use.
- Do not expose CDs to direct sunlight, dust, dirt, high temperatures, high humidity or water.
-
Cleaning discs
-
Use a soft cloth to wipe fingerprints and dust from the disc surface.
- Carefully move the cloth from the center of the disc to its edge:

natural_image
Simple line drawing of a rocket with exhaust smoke and flame (no text or symbols)Correct False

- Never use benzene, thinners, record cleaner fluid or antistatic spray to clean CDs.
- Compatibility
- Due to the numerous compression methods, some discs may not play.
Setting a safe volume level
• If you continually listen to loud music, your hearing gradually adapts to it and gives you the impression
• that the volume is lower.
• What seems normal to you can be already for long time too loud and unhealthy.
• To protect yourself from this, set the volume to a low level.
- Increase the volume slowly.
- Damage to your hearing can be extensive and cannot be reversed.
- If you notice a hearing problem, please consult a doctor.
Condensation:
- Condensation may occur when moving the device from a cold to a warm environment. If there is moisture inside the player, it may not operate properly.
- Don't turn on the device and wait about one hour for the moisture to evaporate.
Saving energy
- During nonuse of the unit it is advisable to turn off the player with the power switch.
• If the unit is not used for a long period of time, it should be unplugged from the AC socket.
Unpacking:
• Take out carefully the unit from the packing. Please keep the packing for further use.
- Carefully remove possible protection cardboards and slipcovers.
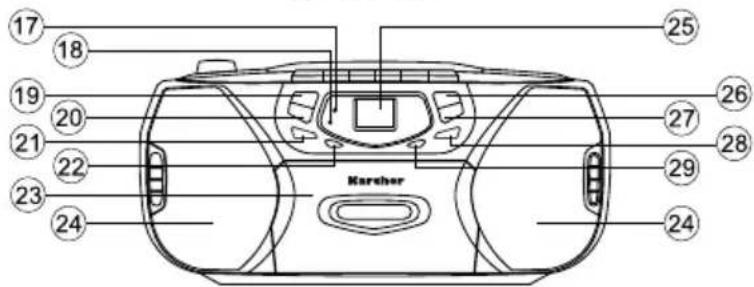
Location Of Controls
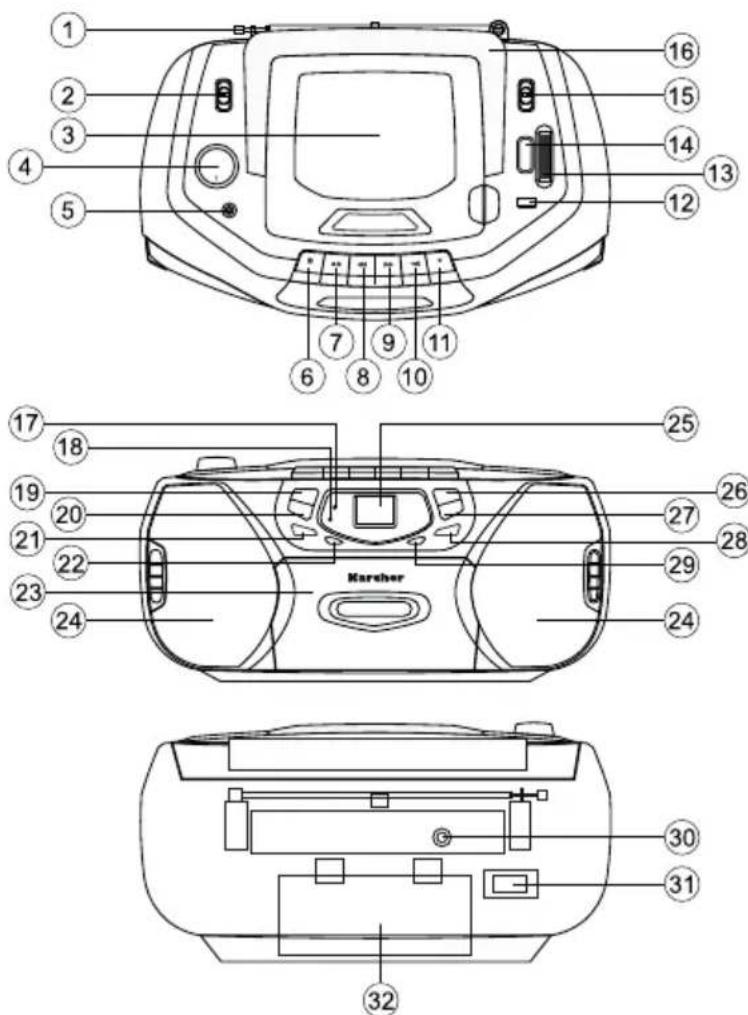
| 1. Telescopic Antenna | 17. Power Indicator |
| 2. Function Switch | 18. FM Stereo Indicator |
| 3. CD Door | 19. Skip / Search Previous Button |
| 4. Volume Control | 20. Skip / Search Forward Button |
| 5. Headphone Jack | 21. Folder Up Button |
| 6. Cassette Pause Button | 22. Program Button |
| 7. Cassette Stop/Eject Button | 23. Cassette Door |
| 8. Cassette Fast Forward Button | 24. Speakers |
| 9. Cassette Rewind Button | 25. LCD Display |
| 10. Cassette Play Button | 26. Play/Pause Button |
| 11. Cassette Record Button | 27. Stop Button |
| 12. USB Socket | 28. Mode Button |
| 13. Tuning Knob | 29. CD/USB Button |
| 14. Dial Pointer | 30. Audio-In Jack |
| 15. Band Switch | 31. AC Socket |
| 16. Handle | 32. Battery Compartment |
Control Operations And Functions
POWER SUPPLY
This unit is designed to operate on AC mains supply or 12V DC by using 8 pcs. UM2 batteries.
AC OPERATION
Insert one end of the AC power cord cord into AC SOCKET (31) of the set and the other end into an AC wall outlet. Take care that the power output of the wall outlet meets the requirement as indicated on the bottom of the unit.
Plugging the mains lead to AC SOCKET (31) will automatically disconnect the batteries.
DC OPERATION
Slide to open BATTERY COMPARTMENT (32) at back of unit and insert 8 pcs "UM2" batteries. Please make sure that they are inserted with correct polarity and close the battery door. Your unit is now ready for operation.
If you will not use the unit for a longer period of time take out the batteries in order to avoid damage.
Radio
USING THE RADIO
- Slide the FUNCTION SWITCH (2) to RADIO position. The POWER INDICATOR (17) will light up.
- Select the desired band position by BAND SWITCH (15).
- Select the desired radio station by using the TUNING KNOB (13).
FM BAND
- If FM is selected, ensure the telescopic antenna is fully extended.
- Turning the TUNING KNOB (13) until the desired station is located.
- If the station is broadcasting in stereo, the FM STEREO INDICATOR (18) will illuminate.
- To achieve optimum reception, adjust the position of the telescopic antenna.
AM BAND
For AM reception the product has built-in antenna. To achieve best reception, the product should be rotated until the stronger signal is obtained.
GENERAL
Once the required station has been located, adjust the VOLUME CONTROL (4) to the desire level.
PLAYING AUDIO CDs
- Set the FUNCTION SWITCH (2) to CD/USB/AUDIO-IN position.
- Press the CD/USB BUTTON (29) to select CD mode.
- Insert a CD disc in the CD compartment and close the CD DOOR (3), the unit will start reading the disc, it will show the total number of tracks of the entire disc after reading.
- Press the PLAY/PAUSE BUTTON (26) to start playing the disc.
- During playing, press the PLAY/PAUSE BUTTON (26) to temporarily pause playing. To resume, press the PLAY/PAUSE BUTTON (26) again.
PLAYING MP3 DISCS
- Set the FUNCTION SWITCH (2) to CD/USB/AUDIO-IN position.
- Press the CD/USB BUTTON (29) to select the CD mode, CD icon will appear on the LCD DISPLAY (25).
- Insert a MP3 disc into the CD Compartment and close the CD DOOR (3), the unit will start reading the disc, it will show the total number of songs of the entire disc after reading.
- Press the PLAY/PAUSE BUTTON (26) to start playing the disc.
- Press the FOLDER UP BUTTON (21) to select the folder you want to listen.
- During playing, press the PLAY/PAUSE BUTTON (26) to temporarily pause playing. To resume, press the PLAY/PAUSE BUTTON (26) again.
PLAYING MP3 FILES WITH USB
- Set the FUNCTION SWITCH (2) to CD/USB/AUDIO-IN position.
- Press the CD/USB BUTTON (29) to select the USB mode, USB icon will appear on the LCD DISPLAY (25).
- Plug your USB device into the USB SOCKET (12) on the unit, the unit will start reading the files in the USB device, it will show the total number of tracks of the device after reading.
- Press the PLAY/PAUSE BUTTON (26) to start playing the MP3 files.
- Press the FOLDER UP BUTTON (21) to select the folder you want to listen.
- During playing, press the PLAY/PAUSE BUTTON (26) to temporarily pause playing. To resume, press the PLAY/PAUSE BUTTON (26) again.
NOTE: The use of a USB-extension cable is limited to a cable length of max. 0.5m.
SKIP MODE
- During play or pause mode, press the SKIP FORWARD BUTTON (next) (20) to go to the next track.
- During play or pause mode, press the SKIP PREVIOUS BUTTON (back) (19) to go back to the beginning of the track. Press the SKIP PREVIOUS BUTTON (19) again will go back to the previous track.
REPEAT MODES AND RANDOM PLAY
Press the MODE BUTTON (28) to select different kinds of play mode with the following sequence.
For CD Disc: Repeat ▶ Repeat All ▶ Random ▶ Normal
For MP3 Disc: Repeat ▶ Repeat Album ▶ Repeat All ▶ Random ▶ Normal
PROGRAMMING
IN CASE OF PLAYING AUDIO CD
The programming should be done during STOP mode
- Press the PROGRAM BUTTON (22) the LCD DISPLAY (25) will show 01 and flash.
- Use the SKIP FORWARD (20) or SKIP PREVIOUS BUTTON (19) to select the desired track.
-
Press the PROGRAM BUTTON (22) again to store the selected track in the memory, the LCD DISPLAY (25) will show 02 and flash continuously.
-
Repeat steps 2 to 3 to store more tracks in the memory. You can store up to 20 tracks in the memory.
-
Press the PLAY/PAUSE BUTTON (26) to start playing the disc in the programmed order.
- To stop playing, press the STOP BUTTON (27).
- To cancel the programming list, press the STOP BUTTON (27) twice, open the CD DOOR (3) or select a different function TAPE/OFF or RADIO.
IN CASE OF PLAYING MP3 or CD
All procedure is same as Audio CD. But if you have directory in your disc or your USB Flash Memory drive, you have to select directory and track both.
Note:
Because of non-standardized format definition/production of MP3 format, playback quality & performance are not guaranteed. Also is it possible that due to the number of compression methods available not all discs and USB devices can be played back.
Manufacturer is not responsible for the playability of MP3 in any case due to recording conditions such as PC performance, writing software, media ability and etc. Manufacturer is also not liable for any loss of or damage to data.
Cassette Operation
INSERTION OF CASSETTE TAPE
Press STOP/EJECT BUTTON (7) to open the CASSETTE DOOR (23). Insert a good quality music recorded cassette tape (open part of cassette facing upwards) and firmly close the CASSETTE DOOR (23).
PLAYBACK
- Set the FUNCTION SWITCH (2) to TAPE (OFF) position.
- Insert a recorded tape into the cassette compartment.
- Press the PLAY BUTTON (10) firmly down until locked.
- Adjust the VOLUME CONTROL (4) to the desired listening level.
- Press the STOP/EJECT BUTTON (7) to stop the tape play.
- Press the PAUSE BUTTON (6) to stop the tape playing temporarily.
- Press the FAST FORWARD BUTTON (8) to forward the tape in high speed.
- Press the REWIND BUTTON (9) to rewind the tape in high speed.
- When the tape comes to an end, the tape will stop playing automatically.
- Set the FUNCTION SWITCH (2) to the RADIO position.
- Set the BAND SWITCH (15) to the desired band position.
- Select the desired broadcast station by rotating the TUNING KNOB (13).
- For FM reception, adjust the antenna appropriately to obtain best reception.
- Insert the tape into the CASSETTE COMPARTMENT.
- Press the PAUSE BUTTON (6).
- Press the RECORD BUTTON (11).
- Release the PAUSE BUTTON (6) to start recording.
- To stop recording, press STOP/EJECT BUTTON (7).
RECORDING FROM COMPACT DISCS
- Set the FUNCTION SWITCH (2) to the CD position.
- Load a CD into the CD compartment with label side upward. Close the CD Door (3) and the player will start playing the disc.
- Press the STOP BUTTON (27) to stop playing the disc.
- Insert the tape into the CASSETTE COMPARTMENT.
- Press the CASSETTE PAUSE BUTTON (6).
- Press the CASSETTE RECORD BUTTON (11).
- Release the CASSETTE PAUSE BUTTON (6) to start recording.
-
Press the CD PLAY BUTTON (26) to start playing.
-
To stop recording, press the CASSETTE STOP/EJECT BUTTON (7).
ERASURE
When you record over previously recorded tape, the original recording will be automatically erased and replaced by the newly recording materials.
Notes on cassette recording:
- The unit is equipped with Auto Recording Level System, so no volume adjustment is necessary during recording.
Note: While recording you may adjust the VOLUME control as you desire without affecting the recording operation. - When the tape comes to the end, recording will stop automatically.
Audio In Connection
- Insert one side of the audio cable (requires 3.5mm stereo plug, not supplied) into the line-out jack or phones jack on your MP3 player and the other side to the aux-in jack on the unit.
- Turn on the unit and slide the FUNCTION SELECTOR (2) to AUDIO IN position.
- Turn on your MP3 player and follow the playback instruction.
- To stop this function, simply turned off your MP3 player.
- To turn off the unit, slide the FUNCTION SELECTOR (2) to TAPE (OFF) position.
Headphones
A Stereo Phone Jack (3.5 mm) has been provided on the top of the cabinet, so that you can listen to the set without disturbing others. To use this jack, plug in low impedance headphones/earphones and adjust the VOLUME CONTROL to a comfortable listening level.
Note: When external headphones/earphones are connected, the sound from the unit of main speakers will be muted.
Caution: Listening at high power for a longer period of time could damage users' ears.
Specifications
Power Requirement 230V \~ 50Hz
DC 12V (8x 1.5V UM-2/ "C" SIZE)
Power Consumption 15W
Weight approx. 2.0 kg
Dimension approx. 318 (L) x 220 (D) x 161 (H) mm
Operation Temperature +5°C to +35°C
RECEIVER SECTION AM/FM
Receiving Bands AM 540 - 1600 kHz
FM 88 - 108 MHz
CD PLAYER
Pick up 3-Beam Semiconductor Laser
Encoding 1 Bit DA Converter
8
Time
Oversampling
CASSETTE SECTION
Biasing System DC bias, magnet erase
Frequency Response 125-6300 Hz
Wow and Flutter 0.35% WRMS (JIS)
AUDIO SECTION
Output Power 1.5W x 2 (RMS)
Speaker Impedance 8 ohms
Headphone Impedance 8 - 32 ohms
ACCESSORIES
Instruction Booklet 1
AC
Cord
1
Technical specifications and design may change without notice.
Karcher
www.karcher-products.de
- RR 508
- Vorwort
- CAUTION
- Batteries
- Disposal of Used Electrical & Electronic Equipment
- Setting a safe volume level
- Condensation:
- Saving energy
- Unpacking:
- Location Of Controls
- Control Operations And Functions
- POWER SUPPLY
- AC OPERATION
- DC OPERATION
- Radio
- USING THE RADIO
- FM BAND
- AM BAND
- GENERAL
- PLAYING AUDIO CDs
- PLAYING MP3 DISCS
- PLAYING MP3 FILES WITH USB
- SKIP MODE
- REPEAT MODES AND RANDOM PLAY
- PROGRAMMING
- IN CASE OF PLAYING AUDIO CD
- IN CASE OF PLAYING MP3 or CD
- Note:
- Cassette Operation
- INSERTION OF CASSETTE TAPE
- PLAYBACK
- RECORDING FROM COMPACT DISCS
- ERASURE
- Audio In Connection
- Headphones
- Specifications
- Karcher
Brand : Karcher Audio
Model : RR 508
Category : CD Player