
1155400015 - Bloc d'alimentation encastrable BRENNENSTUHL - Free user manual and instructions
Find the device manual for free 1155400015 BRENNENSTUHL in PDF.


User questions about 1155400015 BRENNENSTUHL
0 question about this device. Answer the ones you know or ask your own.
Ask a new question about this device
Download the instructions for your Bloc d'alimentation encastrable in PDF format for free! Find your manual 1155400015 - BRENNENSTUHL and take your electronic device back in hand. On this page are published all the documents necessary for the use of your device. 1155400015 by BRENNENSTUHL.
USER MANUAL 1155400015 BRENNENSTUHL
text_image
233Ω 50Ω 520Ω Electricity Meter 140 VDCEM 235
Operation and Safety Notes
ES
GB Operation and Safety Notes Page 19
text_image
Diagram of a wall-mounted power plug with labeled components including socket, socket, and cable connectionsPurchased Parts Package Page 21
Description of Parts....Page 21
Technical Data Page 22
Safety Notice......Page 23
Prior to Initial Use Page 24
Set Time/Date Page 25
Enter Electricity Tariffs......Page 25
Enter Overload Warning Value Page 27
Initial Operation
Putting the Power Strip into Service Page 28
Operation Page 28
Measuring Power Factor Page 29
Measure Power Consumption......Page 29
Display Maximum Power Consumption Page 29
Measure Energy Consumption Page 30
Display CO2-Emissions Page 30
Show Total Energy Costs Page 30
Display Energy Costs Tariff 1 Page 31
Display Energy Costs Tariff 2......Page 31
Restore Factory Settings Page 32
Cleaning and Care......Page 32
Disposal Page 32
Warranty and Service
Warranty Page 33
Declaration of Conformity......Page 33
Manufacturer......Page 33
text_image
Diagram of a wall-mounted electrical plug with labeled components including socket, socket, and socket terminal blocksPower Strip with Energy Cost Meter
- Introduction

Familiarize yourself with the product before putting it into service. Carefully read the following operating instructions and safety notices. Use the device only as described and only for the areas listed. Keep this manual. If you give place to a third party, make sure to transfer all of the documentation with the device.
○ Normal Use
The device is to be used as a multi-plug power strip for use in dry interior rooms. Additionally, the device has an integrated energy cost meter that is designed for measuring the energy use of electrical devices and calculating costs of electrical power and operations. Other uses of or modifications to the device are considered improper uses and bring with them considerable risk of accident. The manufacturer accepts no liability for any damages resulting from improper use. The device is not intended for commercial use.
○ Purchased Parts Package
1 x Multi-socket power strip with energy cost meter 1 x Owner's Manual
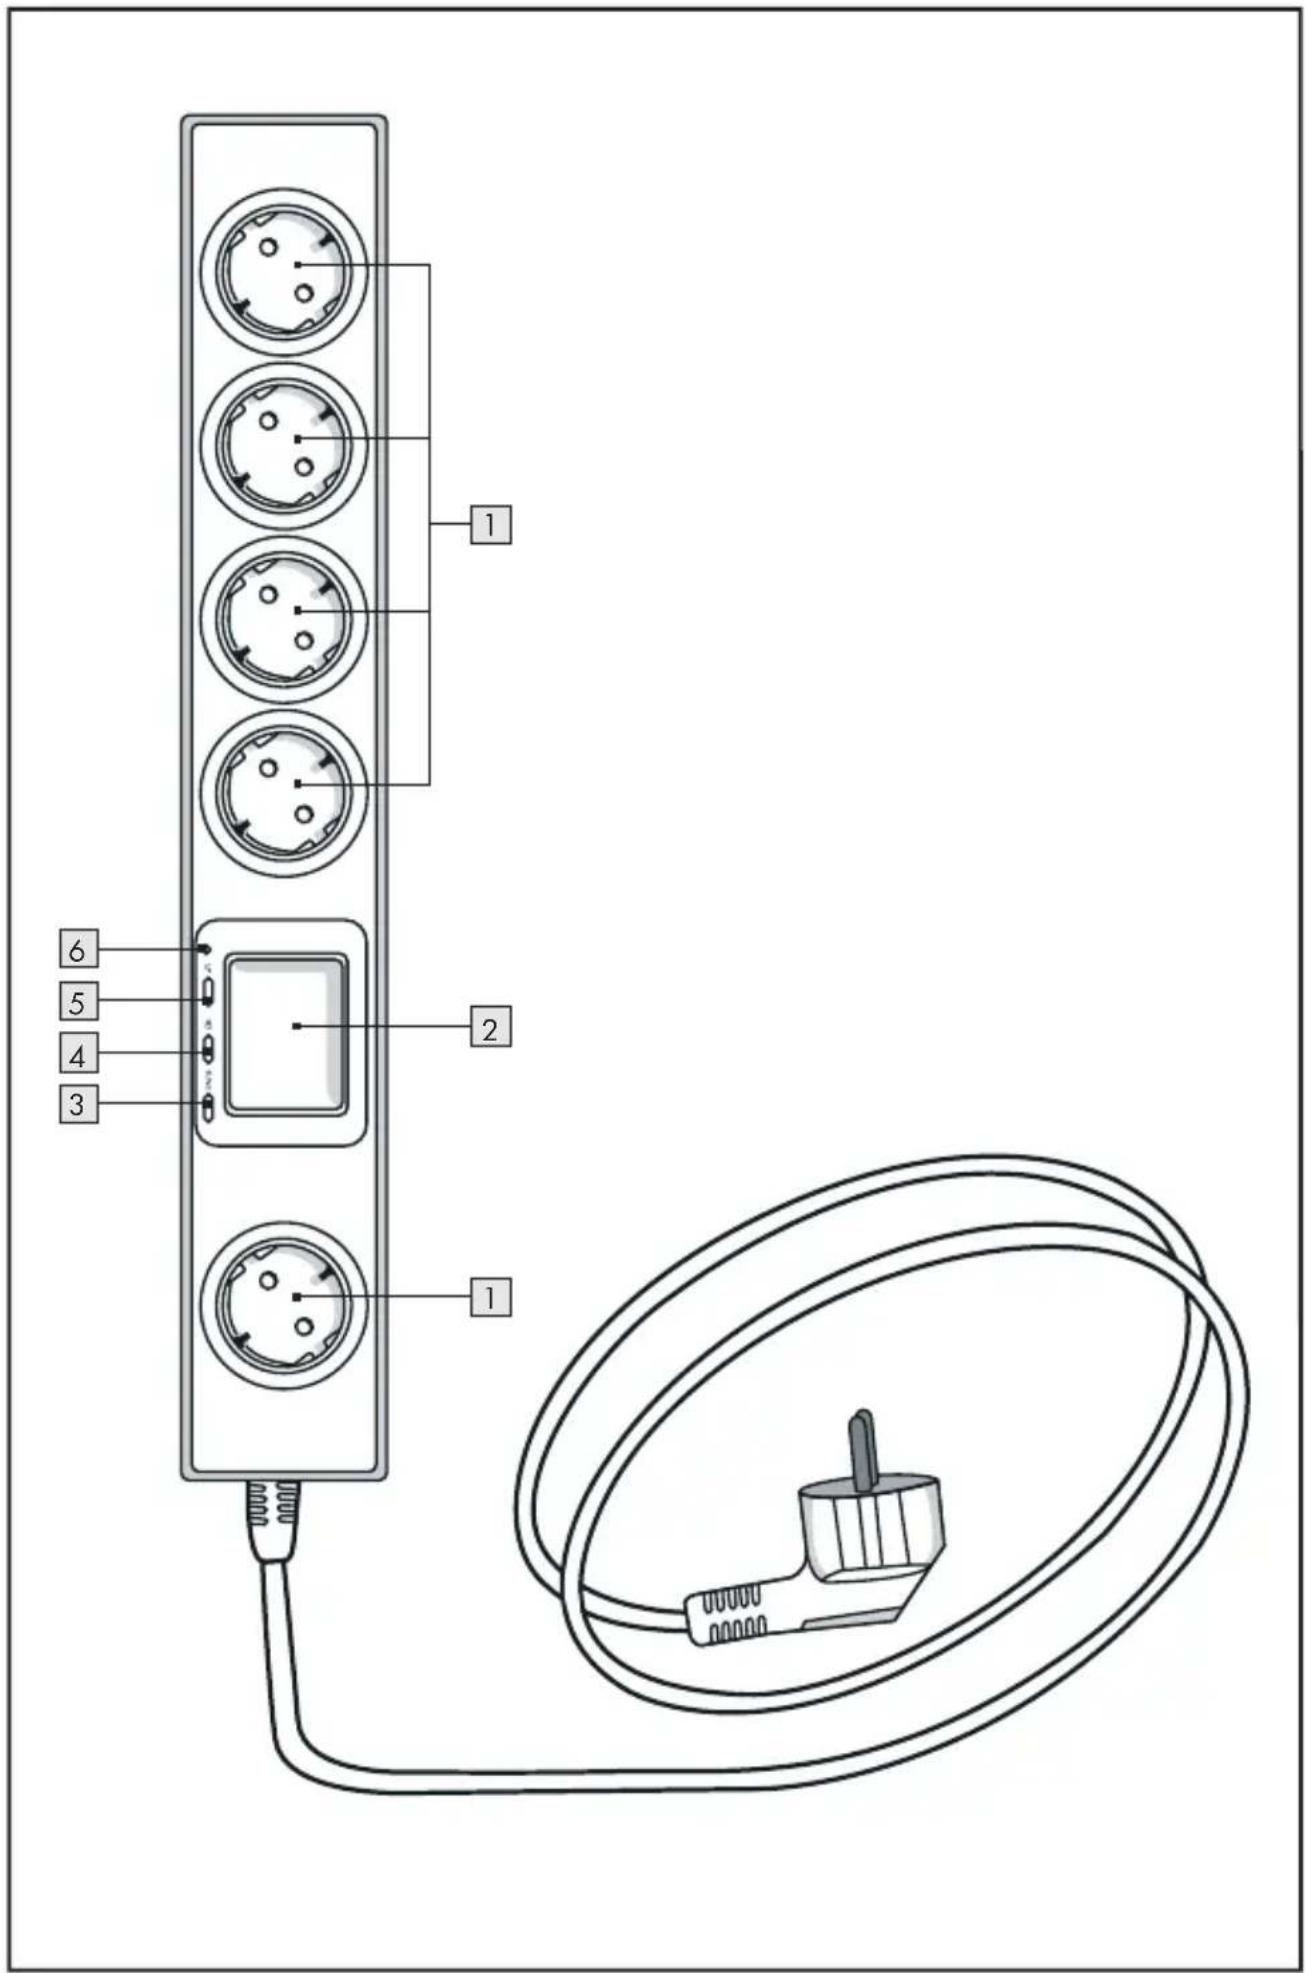
○ Description of Parts
1 Insertion device [plug]
2 LC-Display
3 FUNC-button ("function")
4 SET-button ("set")
5 UP-button ("up")
6 Reset-button ("re-set")
Displays
CLOCK Time
VOLTac Current in volts
AMP Current strength in amperes
WATT Power consumption in watts
WATT MAX Maximum power consumption in watts
Kwh Power consumption in kilowatt hours
SET "set"
COST/Kwh Cost per kilowatt hour
MAX OVERLOAD Max. Overload value
OVER LOAD WARNING Warning! Overload value exceeded
TOTAL PRICE Total price of energy used
TOTAL PRICE 1 Total price for energy used at rate 1
TOTAL PRICE 2 Total price for energy used at rate 2
CO2/Kg CO2-emissions in kilograms
MO, TU, WE, TH, FR, SA, SU Week-day display
POWER FACTOR Power factor
HZ Frequency in hertz
AM AM
PM PM
TOTAL ON TIME Total on time
○ Technical Data
Input voltage: 230 V \~, 50 Hz
Max. permissible load: 16 A, 3680 W
Display range in volts: 200 - 276 V\~ ± 1.5%
Display range in amperes: 0.0005 - 16 A ± 1.5%
Display range in watts: 0.1 - 3680 W ± 1.5%
Display range Kilowatt hour: 0.00 - 9,999.9 kWh
Display range power costs: 0.00 - 9,999
Display range line frequency: 45 - 65 Hz
Lower range limit for
Load display: 0.5 W
Clock display: ± 1 Minute per Month
Temperature range: -10 - +40 °C
Safety Notice
WARNING! Please read all safety notices and instructions. Failure to observe the safety notices and instructions can cause electric shock, fire and/or severe injuries.
KEEP ALL SAFETY NOTICES AND INSTRUCTIONS FOR FUTURE REFERENCE!
Avoid electric shock hazard! Extremely Dangerous!
- Prior to every use, check the power strip, power cost meter, accessories and the electrical devices to be tested for damage. Damaged electrical devices and crimped power cords or exposed wires increase the risk of a dangerous electrical shock.
- Do not use the device if the power cord or the plug of the product itself or the electrical devices to be tested are damaged.
CAUTION! Damaged power cords present a potentially lethal hazard of electrical shock.
• Completely unwind the power cord. Crimped power cords increase the risk of electric shock.
- The device's plug must fit in the electrical outlet. The electrical plug may not be modified in any way. Do not use a plug adapter with grounded electrical devices. Unaltered power plugs and correct electrical outlets reduce the risk of electrical shock.
- Avoid directly touching grounded surfaces, such as pipes, heating units, stoves and refrigerators. If your body is grounded, this increases the risk of electrical shock.
- Keep the device away from rain or moisture. If water gets into the device, this will increase the risk of electrical shock.
- Only use the device while wearing dry clothing and preferably shoes with rubber soles or on an insulating mat.
- Only perform measurements at voltages of over 25 V \~ in compliance with the relevant safety regulations for the attached electrical devices.
• Under no circumstances are you to open the housing of the device. The device, power cord and plug should be repaired immediately if they are damaged or do not function properly and only by a qualified technician.
- You should only allow a qualified technician to change a used rechargeable battery. Never replace a rechargeable battery yourself.
• Never use the device outdoors.
- Always unplug attached electrical devices from the socket 1 at the plug and never by pulling on the power cord.
- Pull the device's plug out of the electrical outlet when you are no longer using it.

Avoid injuries and damage to the product!
POTENTIALLY LETHAL RISK OF ACCIDENT FOR INFANTS AND CHILDREN! Never leave children unattended with packaging materials or the product. The packaging material presents an asphyxiation hazard and potentially lethal risk of electrical shock and/or strangulation. Children often underestimate dangers. Keep children away from the product.
CAUTION! DANGER OF EXPLOSION! Never use the device in a location where there is a high risk of explosion due to the presence of flammable liquids or gases. Never exceed maximum input voltage.
- Avoid strong vibrations.
- Do not expose the device to extreme temperatures, extreme sun light, humidity or moisture.
- Do not expose the device to any extreme variations in temperature. Use only when it has adjusted to the ambient temperature.
- Do not use the device in the vicinity of strong magnetic fields such as motors, transformers, etc.
- Do not lay the front side of the device flat on work benches or other work surfaces. This will prevent damage to the operating elements and the LC-display 2.
- Never connect multiple power strips in a row.
- Only use the device in buildings that are equipped in compliance with Installation Class II according to IEC664. Maximum peak voltage may not exceed 2.500 V\~. The main power supply for residential buildings normally belongs to Installation Class II.
• Always place the power strip so that you can easily reach the main power outlet.
● Prior to Initial Use
Note: This power strip has an integrated rechargeable battery. This allows you to make adjustments or retrieve values even if the power strip is not connected to an electrical outlet.
Note: If the power strip is not connected to the main power, the LC-display 2 will automatically switch to stand-by-mode after about 10 seconds if no buttons are pushed.
Note: The display combination of time (CLOCK), day of the week, current voltage (VOLTac) and line frequency Line frequency (Hz) is the standard display for the LC-displays 2.
Note: If you don't Press a button within 60 seconds, the LC-display 2 automatically returns to standard display.
○ Set Time / Date
Note: Time and date are stored even when the LC-display 2 is in stand-by-mode.
Press the FUNC-Button 3 until the CLOCK indicator appears in the LC-display 2.
Press the SET-Button 4 once. The week day display will blink and the SET indicator appears in the LC-display 2.
Press the UP-Button 5 until the day of the week appears in the LC-display 2.
Press the SET-Button 4 to confirm your entry. The time display will blink.
Press the UP-Button 5 until the desired value appears in the LC-display 2.
Press the SET-Button 4 to confirm your entry. The minutes display will blink.
Press the UP-Button 5, until the desired value appears in the LC-display 2.
Press the SET-Button 4 to confirm your entry. The LC-display 2 will automatically switch back to the standard display.
Press the UP-Button 5 to choose between the 12- and 24-hour clock formats.
Note: In the 12-hour clock format, AM and PM indicators will appear as selected in the LC-display 2.
○ Enter Electricity Tariffs
Note: You have the option of entering 2 electricity tariffs (electricity tariff 1, electricity tariff 2). This allows you to enter the day and night tariffs with their specific activation times.
Tip! You can learn your current electricity tariffs (price per kWh) from your electrical utility [electricity provider].
Note: At delivery, the electricity tariffs are set to 0.
Enter Electricity Tariff 1:
-
Press the FUNC-Button 3 until one of the following indicators appears in the LC-display 2: VOLTac, AMP, WATT
-
Press and hold the FUNC-Button 3 for about 2 seconds. The indicators COST/kWh and PRICE 1 will appear in the LC-display 2.
-
Press the SET-Button 4. The SET Indicator will appear in the LC-display 2. The first number will blink.
-
Press the UP-Button 5 until the current price per kWh appears in the tens place in front of the comma. Example: 10,00
-
Press the SET-Button 4. The second number will blink.
-
Press the UP-Button 5 until the current price in kWh appears in front of the comma. Example: 11,00
-
Press the SET-Button 4. The third number will blink.
-
Press the UP-Button 5 until, the current price per kWh appears in the tenths place after the comma. Example: 11,10
-
Press the SET-Button 4. The fourth number will blink.
10.PresstheUP-Button 5 until the current price per kWh appears in the hundredths place after the comma. Example: 11,11
11.PresstheSET-Button 4. The comma will blink.
-
Press the UP-Button 5 until the comma is in the desired place.
-
PresstheSET-Button 4 to set the active period for electricity tariff 1. The day-of-week display will blink.
Note: On initial activation or after a re-start, the display will blink -:-.
- PresstheUP-Button 5 until the desired weekday or combination of days appears in the LC-display 2.
The following settings are available:
Day of the week: Combinations:
MO - Monday MO TU WE TH FR - Monday through Friday
TU -Tuesday MO TU WE TH FR SA - Monday through Saturday
WE - Wednesday SA SU - Saturday and Sunday
TH - Thursday MO TU WE TH FR SA SU - Monday through Sunday
FR - Friday
SA - Saturday
SU - Sunday
-
Press the SET-Button 4, to confirm your entry. The hour display will blink.
-
Press the UP-Button 5, until you reach the desired value.
-
Press the SET-Button 4, to confirm your entry. The minute display will blink.
-
Press the UP-Button 5, until you reach the desired value.
-
Press the SET-Button 4, to confirm your entry.
Enter Electricity Tariff 2:
-
Press the FUNC-Button 3 until one of the following appears in the LC-Display 2: VOLTac, AMP, WATT
-
Press and hold the FUNC-Button 3 for about 2 seconds. The COST/kWh and PRICE 1 indicators will appear in the LC-display 2.
-
Press the FUNC-Button 3 until the COST/kWh and PRICE 2 indicators appear in the LC-Display 2.
-
Repeat steps 3 - 19 under "Enter Electricity Tariff 1" to enter the values for electricity tariff 2.
○ Enter Overload Warning Value
Note: On delivery the overload warning value is set at 16.00 amperes.
Note: The maximum overload value that can be set is 16.00 amperes.
-
Press the FUNC-Button 3, until one of the following indicators appears in the LC-display 2: VOLTac, AMP, WATT
-
Press and hold the FUNC-Button 3 for about 2 seconds. The COST/kWh and PRICE 1 indicators will appear in the LC-display 2.
-
Press the FUNC-Button 3, until the OVERLOAD, AMP and MAX indicators appear in the LC-display 2.
-
Press the SET-Button ^4 . The SET indicator will appear in the LC-display ^2 . The tens place in front of the comma will blink.
-
Press the UP-Button ^5 to select between the values 0 and 1. Example: 10,00
-
Press the SET-Button 4 to confirm your entry. The ones place in front of the comma will blink.
-
Press the UP-Button 5 to select from the values 0 - 6. Example: 15,00
-
Press the SET-Button ^4 to confirm your entry. The tenths place after the comma will blink.
-
Press the UP-Button5, until you reach the desired value. Example: 15,90
-
Press the SET-Button 4 to confirm your entry. The hundredths place after the comma will blink.
11.PresstheUP-Button 5 until you reach the desired value.
Example: 15,99 - Press the SET-Button4, to confirm your entry.
Note: As soon as the overload value you entered is exceeded by one of the electrical devices connected, the OVER LOAD WARNING indicator will blink. The button's functions are deactivated.
- Unplug the electrical device from the power strip and if necessary re-set the overload warning value.
- Initial Operation
○ Putting the Power Strip into Service
- Plug the power strip's mains plug into a correctly installed electrical outlet.
The LC-displ shows the time (CLOCK), day of the week, current voltage (VOLTac) as well as the current line frequency (Hz). This display combination is the standard display.
- Now you can plug the desired electrical devices into the sockets 1.
Operation
CAUTION! POTENTIALLY FATAL DANGER OF ELECTRICAL SHOCK!
Only perform measurements at voltages of over 25 V\~ in compliance with the relevant safety regulations for the attached electrical devices.
CAUTION! DANGER OF INJURY! Never exceed the maximum prescribed input voltage.
Note: The power factor shows how high the ratio between the real output and apparent output of an electrical device. The power factor can lie between 0 and 100. In the ideal case, the power factor will be equal to 100.
Note: You can still access the following functions when the power strip is no longer
connected to the main power supply or if the attached electrical device is no longer plugged in:
- Maximum power consumption (see "maximum power consumption")
- Energy consumption (see "measure energy consumption")
- CO2-emissions (see "display CO2-emissions")
- Total energy costs (see "display total energy costs energy consumption")
- Total time (see "display total costs [for] energy consumption")
- Energy costs electricity tariff 1 and 2 (see "display costs electricity tariff 1" "display energy costs electricity tariff 2")
○ Measuring Power Factor
- Press the FUNC-Button 3 until the AMP and POWER FACTOR indicators appear in the LC-display 2.
The LC-display will now show in amperes the power output required by the electrical devices connected. Additionally, the LC-display 2 indicates the power factor.
○ Measure Power Consumption
- Press the FUNC-Button 3 until the WATT and POWER FACTOR indicators appear in the LC-Display 2.
The LC-display now shows in watts the current output consumed by the electrical devices connected. Additionally, the LC-display 2 indicates the power factor.
○ Display Maximum Power Consumption
- Press the FUNC-Button 3 until the indicators WATT, MAX and POWER FAC-TOR appear in the LC-display 2.
The LC-display now shows in watts the maximum power consumption that was measured to date with the energy cost metering device. Additionally, the LC-display 2 shows the date and time at which the maximum power consumption was registered.
The LC-display also shows the power factor.
- Press and hold the FUNC-Button 3 for about 2 seconds long in order to set the counters for maximum power consumption, date and time back to 0.
○ Measure Energy Consumption
- Press the FUNC-Button 3 until the kWh and POWER FACTOR indicators appear in the LC-display 2.
The LC-display now shows the total energy consumption in kilowatt hours for all electrical devices connected.
Note: The measureable range lies between 0.00 und 9,999.99 kWh. If this value is exceed, the indicators ---- and OVER appear in the LC-display 2.
The LC-Display also shows the power factor.
- Press and hold the FUNC-Button 3 for around 2 seconds in order to re-set the counters for energy consumption to 0.
○ Display CO2-Emissions
- Press the FUNC-Button 3, until the indicators CO2/kg and POWER FACTOR appear in the LC-display 2.
The LC-Display now shows the total CO2-emissions in kilograms generated by the electrical devices connected.
Note: The LC-Display 2 will automatically switch back to the standard display after 60 seconds.
The LC-Display also shows the power factor.
○ Show Total Energy Costs
Note: Make sure that you have entered the values for electricity tariff 1 or electricity tariff 2 in the first field (see "Enter Electricity Tariff 1" or "Enter Electricity Tariff 2"). Otherwise, the energy cost measurement device cannot calculate the total costs.
Press the FUNC-Button 3 until the indicators TOTAL PRICE and TOTAL ON TIME are shown in the LC-display 2.
The LC-display now shows the total energy costs that were consumed by the electrical devices connected.
Note: The measureable range lies between 0.00 and 9,999. If this value is exceeded, the indicators ---- and OVER will appear in the LC-display 2.
The LC-display also shows the total time (hours / minutes) that the electrical devices connected in the power strip used energy.
- Press and hold the FUNC-Button 3 for around 2 seconds in order to re-set the counters for energy consumption and total time to 0.
○ Display Energy Costs Tariff 1
Note: Make sure that you have entered a value for electricity tariff 1 in the first field (see "Enter Electricity Tariff 1"). Otherwise the costs for electricity tariff 1 cannot be retrieved.
Press the FUNC-Button 3 until the indicators TOTAL PRICE 1 and TOTAL ON TIME are shown in the LC-display 2.
The LC-display now shows the total energy costs at electricity tariff 1 for energy that was used by the electrical devices connected.
The LC-display also shows the total time (hours / minutes) that the power strip and connected electrical devices consumed energy in electricity tariff 1.
- Press and hold the FUNC-Button 3 for around 2 seconds, in order to re-set the counters for energy costs at electricity tariff 1 and total time back to 0.
○ Display Energy Costs Tariff 2
Note: Make sure that you have entered a value for electricity tariff 2 in the first field (see "Enter Electricity Tariff 2"). Otherwise the costs for electricity tariff 2 cannot be retrieved.
Press the FUNC-Button 3 until the indicators TOTAL PRICE 2 and TOTAL ON TIME are shown in the LC-display 2.
The LC-display now shows the total energy costs at electricity tariff 2 for energy that was used by the electrical devices connected.
The LC-display also shows the total time (hours/minutes) that the power strip
and connected electrical devices consumed energy in electricity tariff 2.
- Press and hold the FUNC-Button 3 for around 2 seconds, in order to re-set the counters for energy costs at electricity tariff 2 and total time back to 0.
○ Restore Factory Settings
Note: Please note that all saved data are lost when you restore the factory settings on the device.
○ Using a sharp, pointed object (e.g. pencil), press the reset-button 6. All indicators will briefly appear in the LC-display 2. All values are restored to 0.
- Cleaning and Care
WARNING! POTENTIALLY LETHAL HAZARD FROM ELECTRICAL
SHOCK! Keep the device away from rain and moisture. If water gets into the device, the risk of electrical shock increases.
WARNING! POTENTIALLY LETHAL HAZARD FROM ELECTRICAL
SHOCK! Before any work on the product, unplug the power strip or any connected electrical device from the electrical outlet.
- Clean the product with a dry, lint-free cloth.
- Disposal
The package and the packing materials are made entirely of environmentally friendly materials. They can be disposed of in your local recycling containers.
Do not throw electrical devices in your household waste.
In compliance with European Guideline 2002 / 96 / EC on Used Electrical and Electronic Devices and implementation of this in national law, used electrical devices must be collected separately and recycled in an environmentally sound manner.
You can obtain the currently valid disposal procedures for used electrical and electronic devices from your municipal or city administration.
● Warranty and Service
○ Warranty
There is a 2-year warranty on this device from the date of purchase, applicable only on initial purchases and not transferrable. Please keep the purchase receipt as evidence. The scope of warranty only applies to defects of material or manufacture, not for regular wear and tear on components or improper use. The warranty is rendered null by any unauthorised repair or modification. Your legal rights are not restricted by this warranty.
Declaration of Conformity
The CE-certification stamp was applied in compliance with the following European Guidelines:
2006/95/EC Low Voltage Guideline 2004/108/EC EMV-Guideline
The declaration of conformity has been deposited with the manufacturer.