XK-System - Organ Hammond - Free user manual and instructions
Find the device manual for free XK-System Hammond in PDF.


User questions about XK-System Hammond
0 question about this device. Answer the ones you know or ask your own.
Ask a new question about this device
Download the instructions for your Organ in PDF format for free! Find your manual XK-System - Hammond and take your electronic device back in hand. On this page are published all the documents necessary for the use of your device. XK-System by Hammond.
USER MANUAL XK-System Hammond
text_image
6 5 4 3 2 1 3 2 1 5 4 3 2 1 4 3 2 1 3 2 1 2 1 7 6 5 4 3 2 1
HAMMONDHAM
Model XK-System
Thank you, and congratulations on your choice of a Hammond XK-System.
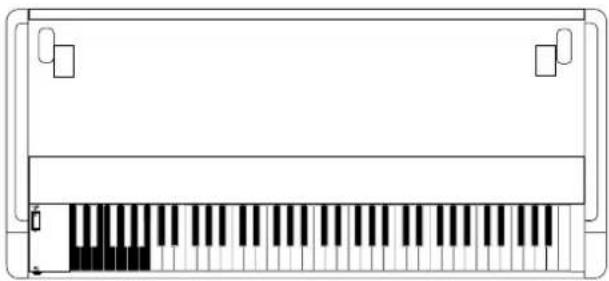
The XK-System is the lower keyboard unit (XLK-B3) and pedalboard (XPK-3) for Hammond XK-3.
In order to get the most out of this instrument for many years to come, first take the time to read this manual in full.
natural_image
Line drawing of a piano keyboard with no text or symbols
natural_image
Pure electrical circuit lines without any symbolsOwner's Manual
Read these instructions.
Keep these instructions.
Heed all warnings.
Follow all instructions.
Do not use this apparatus near water.
Clean only with dry cloth.
Do not block any ventilation openings. Install in accordance with the manufacturer's instructions.
Do not install near any heat sources such as radiators, heat registers, stoves or other apparatus (including amplifiers) that produce heat.
Do not defeat the safety purpose of the polarized or grounding-type plug. A polarized plug has two blades with one wider than the other. A grounding type plug has two blades and a third grounding prong. The wider blade or third prong is provided for your safety. If the provided plug does not fit into your outlet, consult an electrician for replacement of the obsolete outlet.
Protect the power cord from being walked on or pinched, particularly at plugs, convenience receptacles, and the point where they exit from the apparatus.
Only use attachments/accessories specified by the manufacturer.
Use only with the cart, stand, tripod, bracket, or table specified by the manufacturer, or sold with the apparatus. When cart is used: use caution when moving the cart/apparatus combination to avoid injury from tip-over.

text_image
PORTABLE CART WARNING S3125AUnplug this apparatus during lightning storms, or when unused for long periods of time.
Refer all servicing to qualified service personnel. Servicing is required when the apparatus has been damaged in any way, such as power-supply cord or plug is damaged, liquid has been spilled or objects have fallen into the apparatus, the apparatus has been exposed to rain or moisture, does not operate normally, or has been dropped.
Apparatus shall not be exposed to dripping or splashing and no objects filled with liquids, such as vases, shall be placed on the apparatus.
WARNING: To reduce the risk of fire or electric shock, do not expose this apparatus to rain or moisture.

WARNING : TO REDUCE THE RISK OF FIRE OR ELECTRIC SHOCK. DO NOT EXPOSE THIS APPLIANCE TO RAIN OR MOISTURE.

The lightning flash with arrowhead symbol within an equilateral triangle, indicates that dangerous voltage constituting a risk of electric shock is present within this unit.

The exclamation point within an equilateral triangle, indicates that there are important operating and maintenance instructions in the literature accompanying this unit.

CAUTION
This symbol indicates information that, if ignored or applied incorrectly, creates the possibility of death or serious personal injury.
Follow instructions:
All operation and user instructions should be followed.

Do Not Disassemble:
Do not disassemble this unit.
Servicing:

The user should not attempt to service the appliance beyond that is described in the Operation Instructions. All other servicing should be referred to qualified service personnel.

Location:
Using the unit in the following locations can result in a malfunction.
In direct sunlight
♦ Locations of extreme temperature or humidity
♦ Excessively dusty or dirty locations
♦ Locations of excessive vibration
- Close to magnetic fields

Damage Requiring Service:
The appliance should be serviced by qualified service personnel when:
- The power supply cord or the plug has been damaged; or
- Objects have fallen, or liquid has been spilled into the appliance; or
- The appliance has been exposed to rain; or
- The appliance does not appear to operate normally or exhibits a marked change in performance; or
- The appliance has been dropped, or the enclosure damaged.

Children:
If you let your children use this unit, please always watch and guide them and do not leave them alone.

Do Not Cause a Shock
Do not drop or cause a shock to this unit.

Object and Liquid Entry:
Care should be taken so that objects do not fall and liquids are not spilled into the enclosure through openings.

ATTENTION
This symbol indicates information that, if ignored or applied incorrectly, creates the possibility of personal injury or property damage.

Stack/Ride:
Do not stack heavy devices or get on this unit. Such may cause personal injuries or falling down.
Transfer:

Remove all the cables and AC adaptor when you transfer this unit, to avoid damages on the cables and AC adaptor, or an electric shock or fire.
Do Not Pull the Cord:
Be sure to grasp the plug when unplugging it from a wall outlet. Pulling on the power cord
can damage it, and create the danger of fire and electrical shock.

Hook Up:
Turn off all devices before hook up.
Follow all instructions and use only designated cables.

Movable Parts:
Make sure not to pinch your fingers when you assemble or disassemble this unit.

XLK-B3
text_image
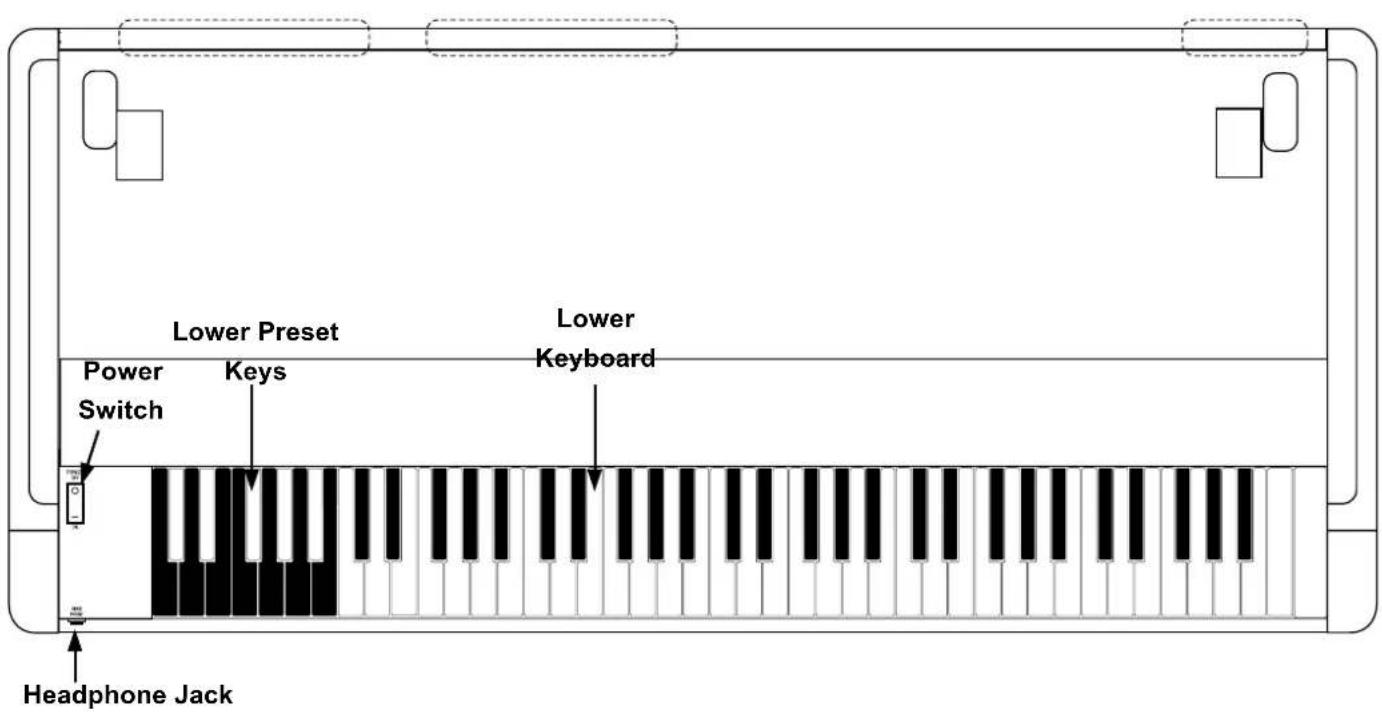
Lower Preset Power Switch Keys Lower Keyboard Headphone JackThe XLK-B3 cabinet functions as
• the Lower Keyboard and
the Lower Preset Keys.
• The System Power Switch and
- the Extension Headphone Jack are built in.
♦AC Cable

♦8-Pin Cable

♦MIDI Cable

Music Rack
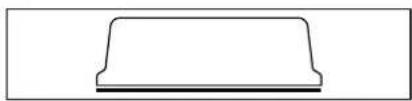
natural_image
Simple line drawing of a rectangular object with a curved top and horizontal base (no text or symbols)◆XPK-3
text_image
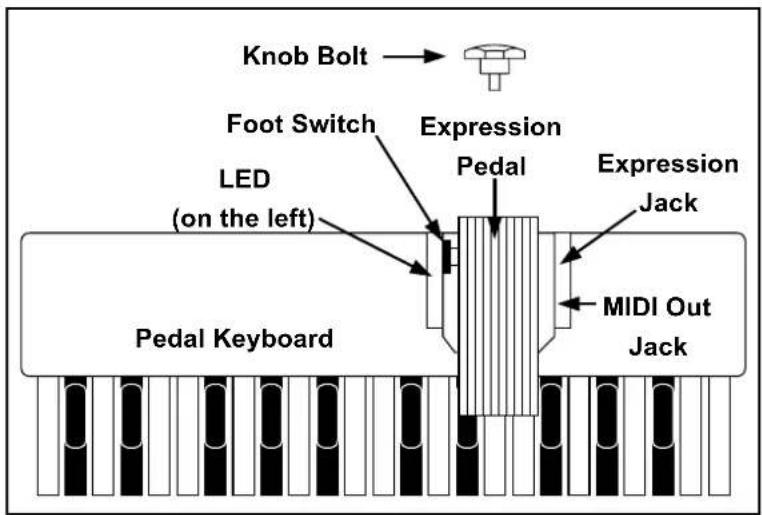
Knob Bolt → Foot Switch LED (on the left) Expression Pedal Expression Jack MIDI Out Jack Pedal Keyboard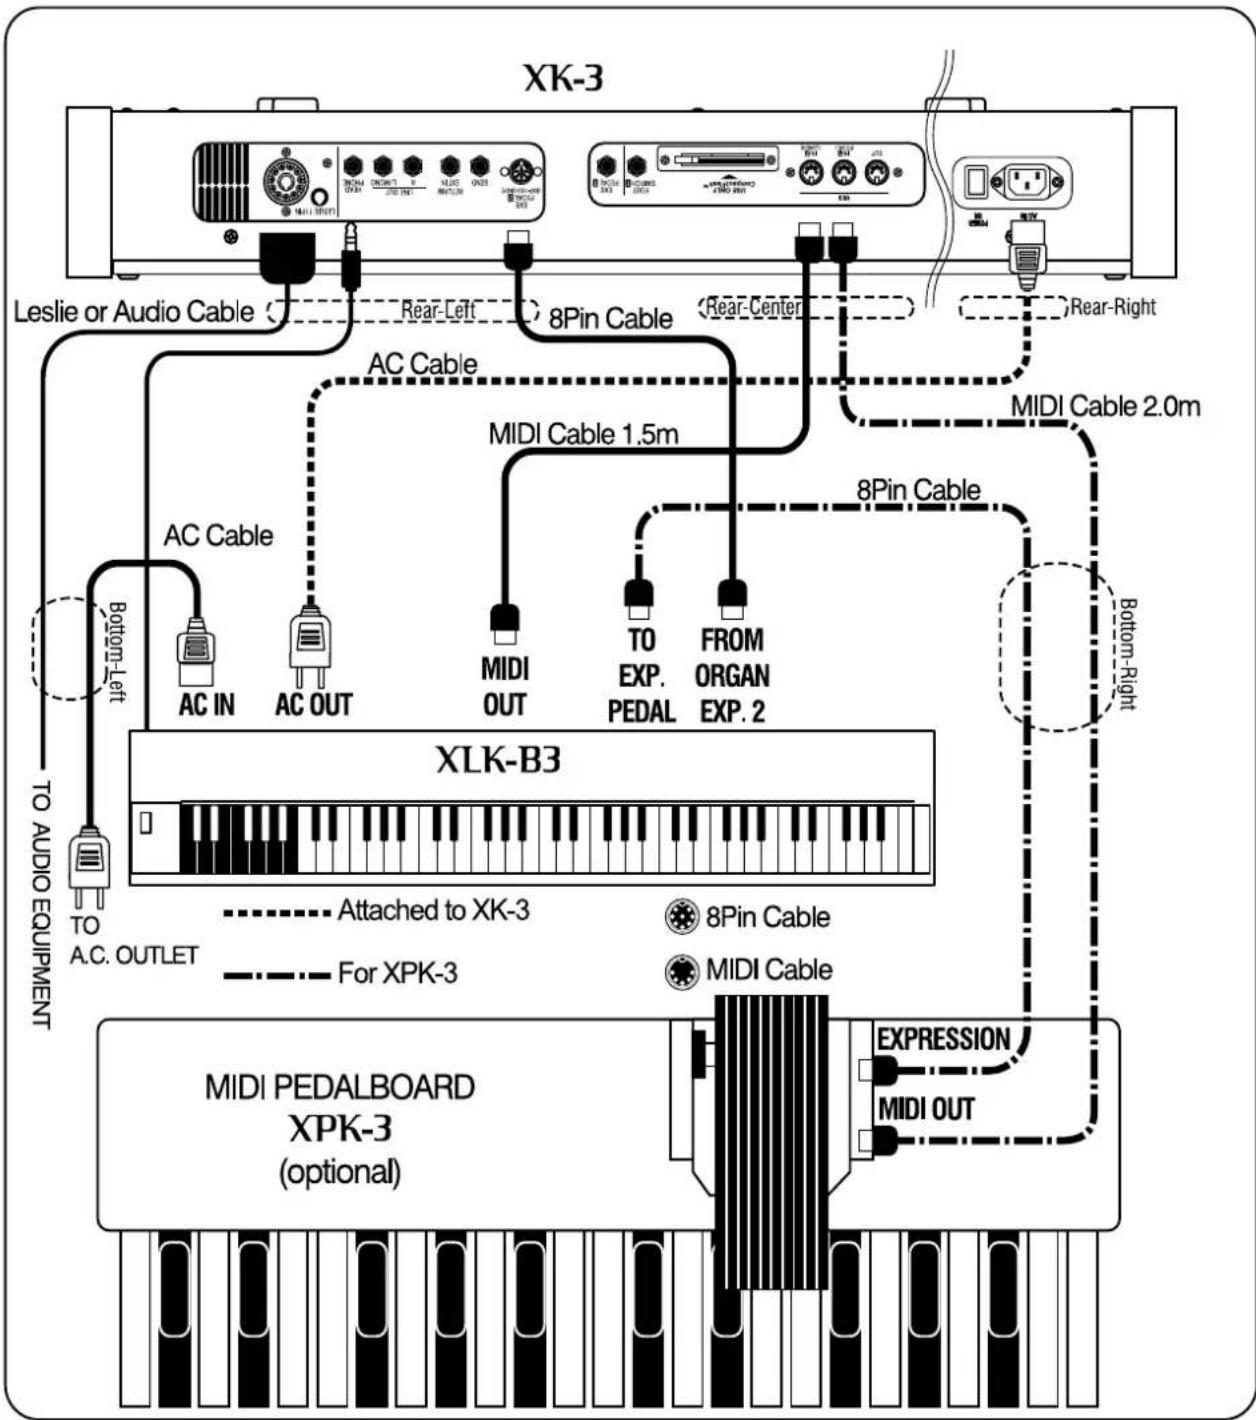
text_image
XK-3 Leslie or Audio Cable Rear-Left 8Pin Cable Rear-Center Rear-Right AC Cable MIDI Cable 1.5m MIDI Cable 2.0m AC Cable AC IN AC OUT MIDI OUT TO EXP. EXP. PEDAL FROM ORGAN EXP. 2 Bottom-Left TO AUDIO EQUIPMENT XLK-B3 Attached to XK-3 For XPK-3 8Pin Cable MIDI Cable MIDI PEDALBOARD XPK-3 (optional) EXPRESSION MIDI OUT
Do this assembly carefully to avoid pinching your fingers or dropping anything on your feet.
- Plug-in the cables of the XLK-B3 to the equipment before installing the XK-3. Pass the cables through the openings as indicated below.
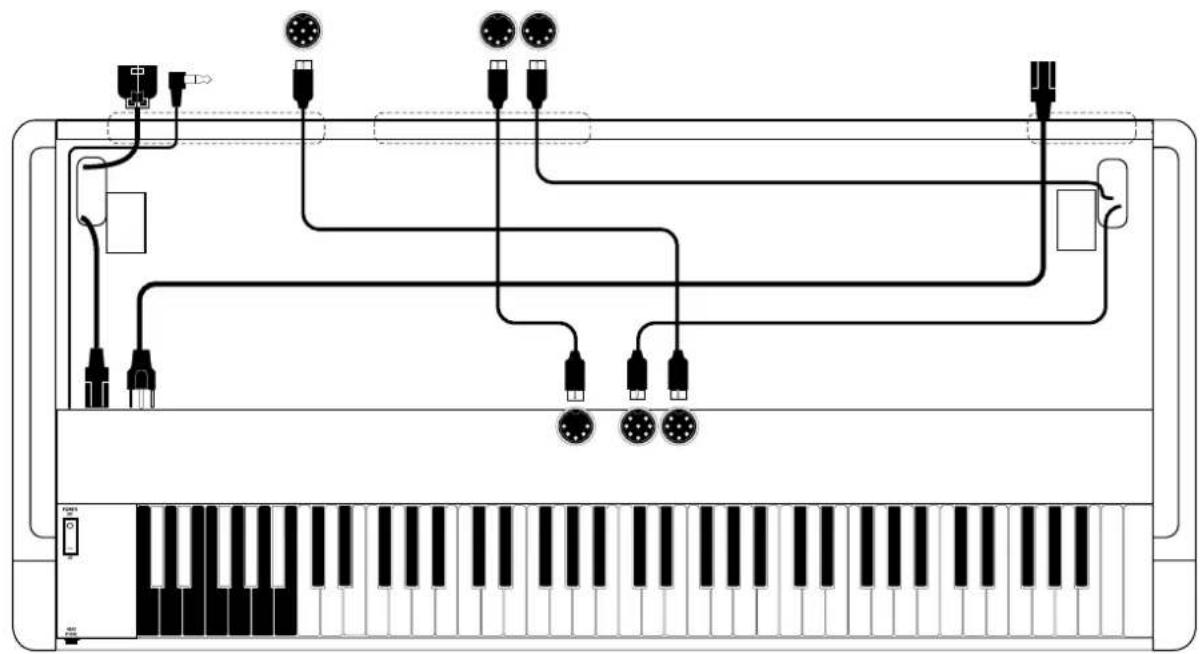
text_image
Diagram of an electronic device with labeled components including keys, connectors, and audio connectionsAlso, pass the audio cable (Leslie cable) through as well at this time.
- Install the XK-3 and plug in the cables to its rear jacks.

natural_image
Front view of a computer interface panel with ports and connectors (no visible text or labels)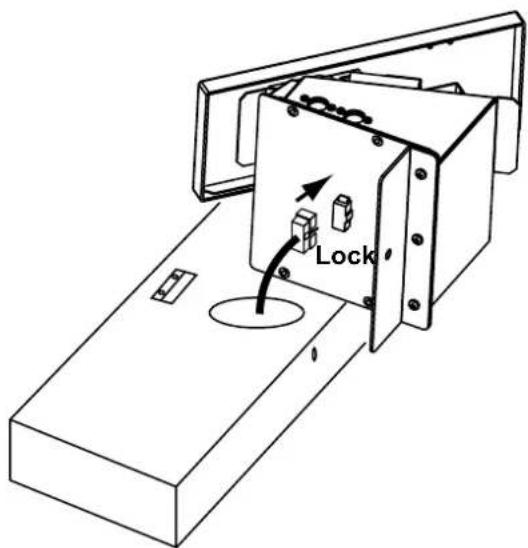
text_image
LockPlug in the key scan cable from the Pedal Keyboard to the Expression Pedal.
Note that the connector is polarized and only plugs in one way.
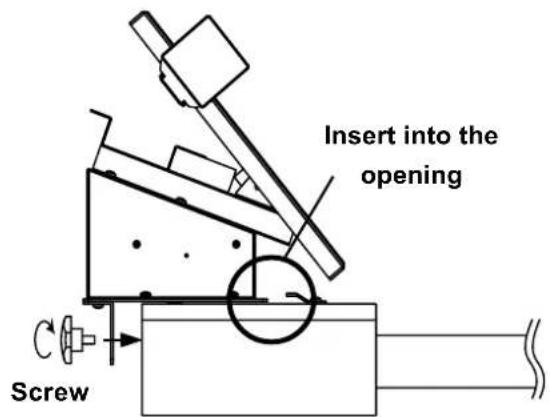
text_image
Insert into the opening ScrewMount the Expression Pedal on the Pedal Keyboard using the Screw (knob bolt).

text_image
8Pin Cable MIDI Cable EXPRESSION MIDI OUTPlug in the 8-Pin cable to the Expression jack and the MIDI cable to the MIDI out jack.
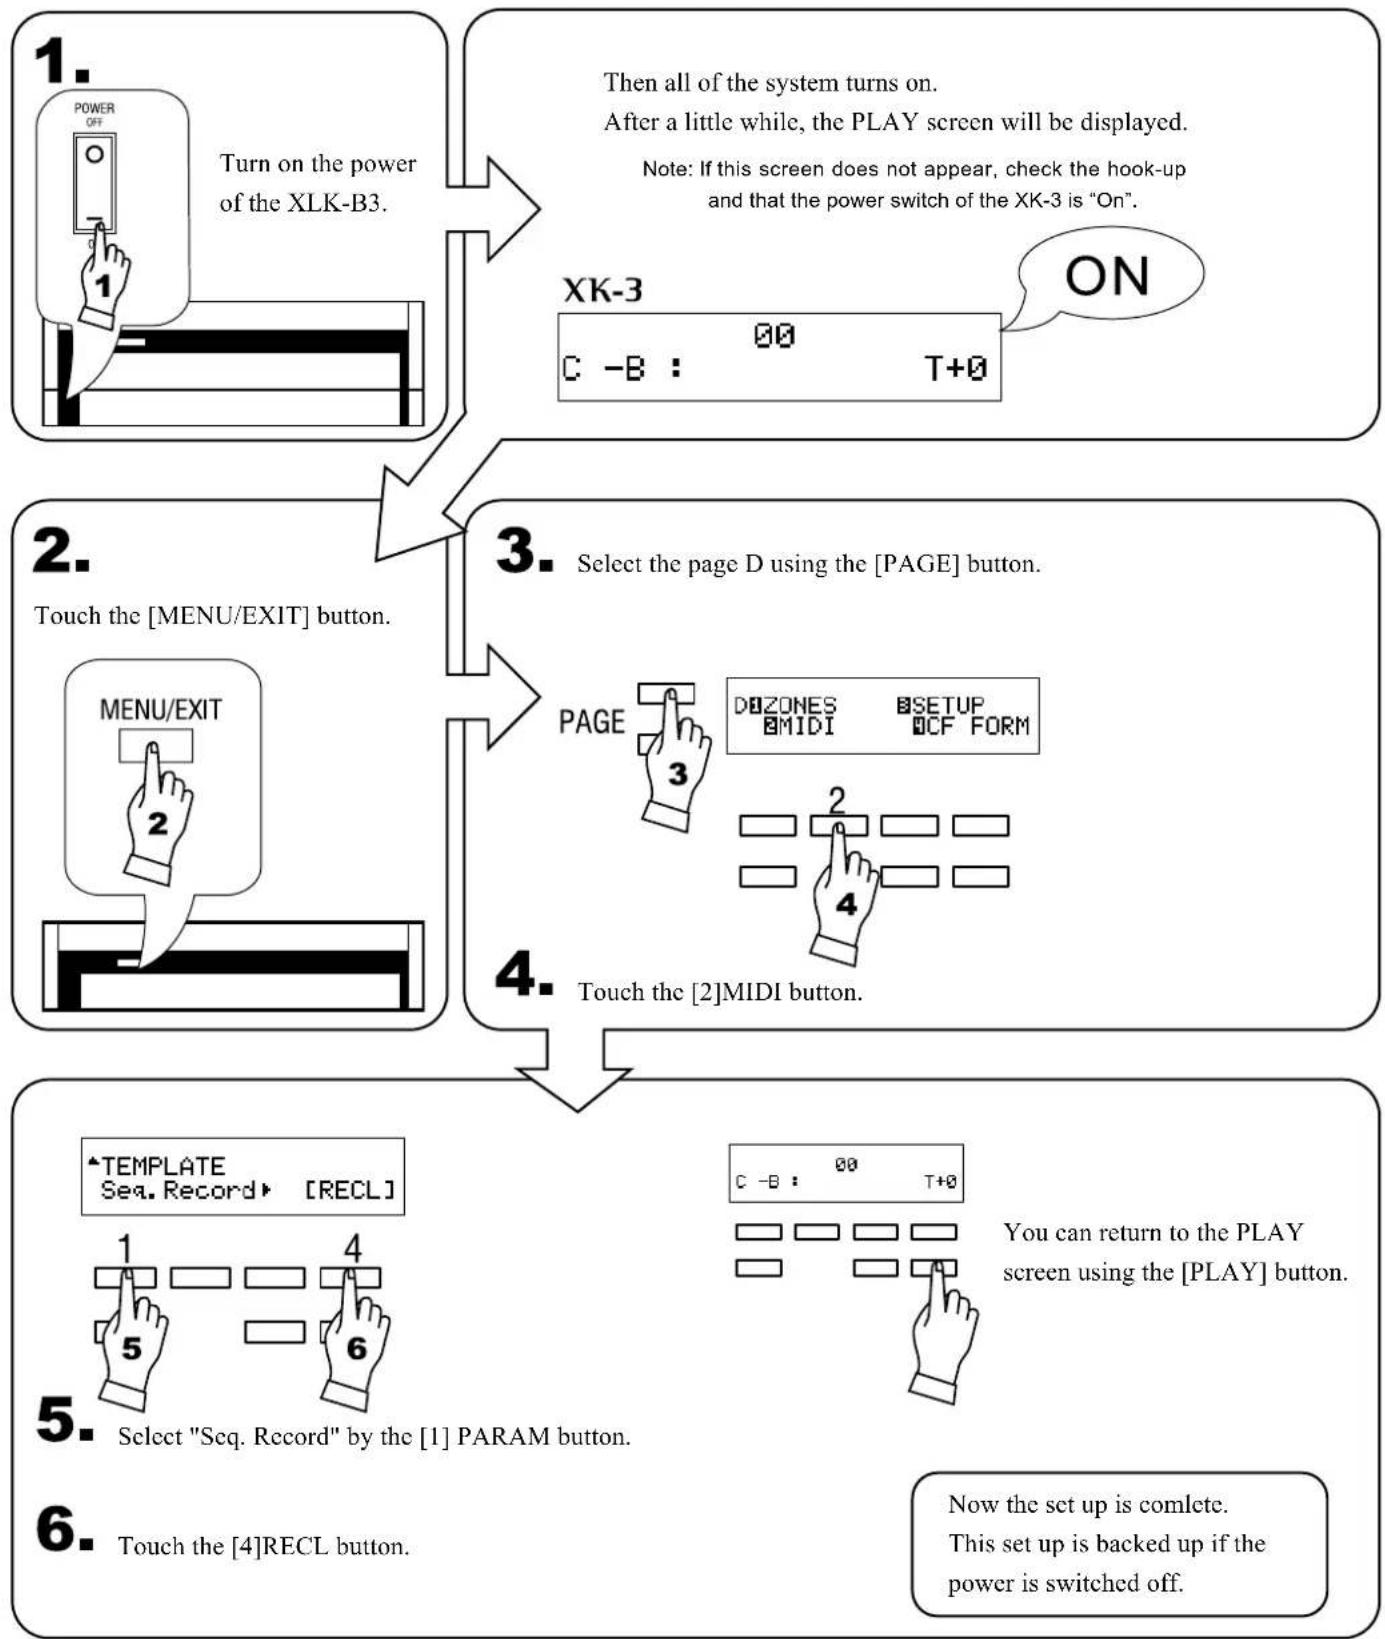
flowchart
graph TD
    A["1. Power OFF"] --> B["Turn on the power of the XLK-B3."]
    B --> C["Then all of the system turns on. After a little while, the PLAY screen will be displayed. Note: If this screen does not appear, check the hook-up and that the power switch of the XK-3 is "On"."]
    C --> D["XK-3: 00 T+0 ON"]
    E["2. Touch the [MENU/EXIT"] button.] --> F["3. Select the page D using the [PAGE"] button.]
    F --> G["4. Touch the [2"]MIDI button.]
    H["5. Select "Seq. Record" by the [1"] PARAM button.] --> I["6. Touch the [4"]RECL button.]
    I --> J["7. You can return to the PLAY screen using the [PLAY"] button.]
This procedure:
- sets the MIDI connection for the LOWER and the PEDAL keyboard.
- switches the [MANUAL BASS] to work on the LOWER keyboard.
• turns off [SPLIT] function.
PLAYING THE XLK-B3
When you hook up the XLK-B3 to the XK-3 and set up as shown on Page 6, the manual on the XK-3 operates as the UPPER part, and that of the XLK-B3 as the LOWER Part.
The XK-3 can recall the Combination Preset for the LOWER Part (including the PEDAL), independently of the UPPER Part in the same BANK.
◆RECALL THE LOWER PRESET
UPPER:UPPER: LOWER:OWER: LightsLights Blinks SlowlyBlinks Slowly
The XK-3 recalls all Parts (UPPER, LOWER and PEDAL) combined, when you touch the Preset Keys, as the factory default.
The Preset Keys on the XLK-B3 are used to recall the LOWER (and the PEDAL) Preset independently.
For example, when you touch the Preset Key [E] of XLK-B3 during the Combination Preset of the XK-3 is in "F-D", it recalls the LOWR and the PEDAL Parts "F-E", while the UPPER remains in "F-D".
In such a case, the Preset LED's on the XK-3 light on, indicating the UPPER Parts, while those for indicating the LOWER and the PEDAL Parts blink slowly.
Touchouch
To recall the LOWER/PEDAL Presets only from the XLK-B3 and not from the XK-3, turn off the "PRESET - LINK L/P" function in the PRESET FUNCTION screen which appears with [MENU / EXIT] - [2]PRESET - [PAGE UP] - [PARAM RIGHT].
For details, please read the "PRESET" section of "Setting the Parameters" in the XK-3 Owner's Guide.
then Slowlythen Slowly
You can memorize the setting for only the LOWER and the PEDAL Parts for the XK-3 in the same BANK.
Touch and Holdouch and
Ex: Record to the Preset Key [G]
Hold Touch and hold the [REC/JUMP] button of the XK-3, and then touch the Preset Key [G] of the XLK-B3.
The following message is displayed in the XK-3 for a certain length of time:
Recording Preset...
When the recording is completed, the LED on the Preset Key [G] quickly blinks for a while and then slows down. Now the recorded Preset Key is automatically selected. And the screen returns to the previous display.
Note: Preset Key [B] can not be memorized in this way.
Touchouch
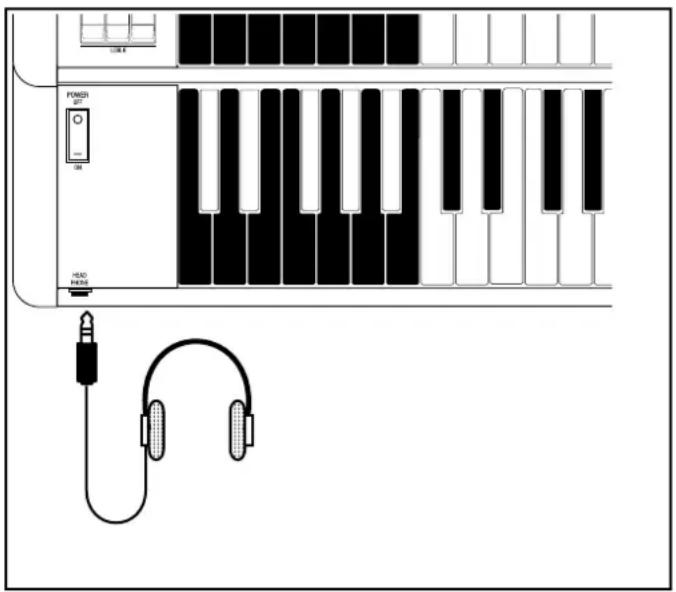
◆USING THE HEADPHONES
text_image
USB R POWER 207 108 H262 MHzTo use the headphones, connect the plug to the headphone jack. Sound is sent out from the LINE-OUT and the LESLIE 11-PIN, also when this jack is used.
The built-in LESLIE is only on L (the left), when the LESLIE SPEAKER is connected.
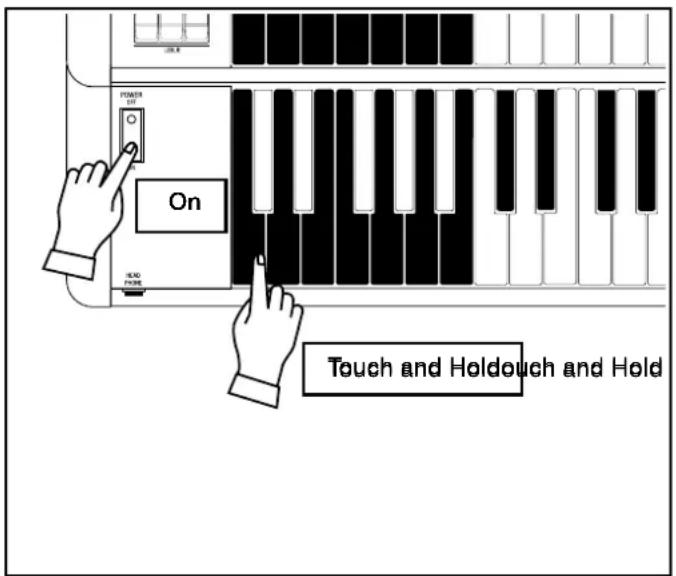
◆TRANSMITTING THE VELOCITY MESSAGES
text_image
ON Power On Hand Hand Touch and Holdouch and HoldThe XLK-B3 senses no velocity. The maximum value is transmitted in default. For sensing and sending the velocity, turn on the power pressing either of the Preset Keys on the left hand side of the XLK-B3.
Note: When the Velocity is On, the keys sound at a slightly deeper point in key travel.
Note: This function is not backed-up.
◆EXPRESSION PEDAL ASSIGNMENT
text_image
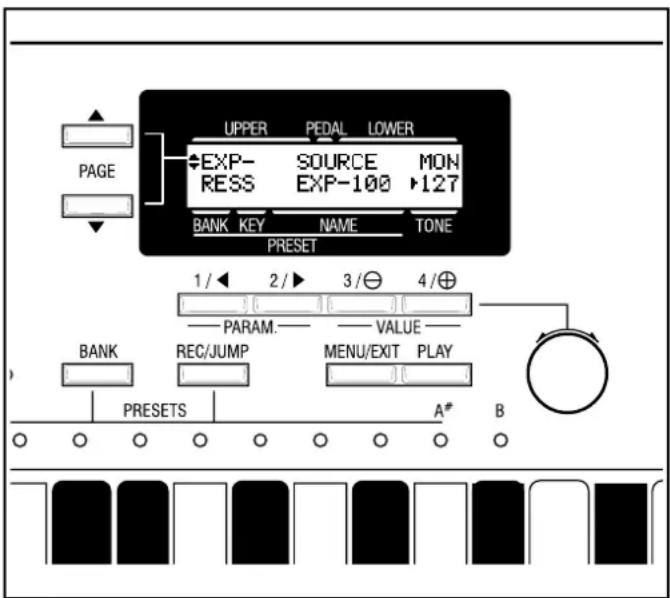
PAGE UPPER EXP- RESS SOURCE EXP-100 MON ▶127 BANK KEY NAME TONE PRESET 1/ 2/ 3/ 4/ PARAM. VALUE BANK REC/JUMP MENU/EXIT PLAY PRESETS A# BThe Expression Pedal is used for expressing the volume and adding intonation to make your music more expressive.
To enable the Expression Pedal on the XPK-3, select the "EXP-100" for the Expression - Source.
To come to this mode:
Touch the [MENU/EXIT] button and display the MENU and select PAGE A by the [PAGE] button, and then touch the [4] CONTROL button, touch [PAGE UP] 3 times.
For details, please read the “CONTROL” section of “Setting the Parameters” in the XK-3 Owner’s Manual.
◆FOOT SWITCH ASSIGNMENT
text_image
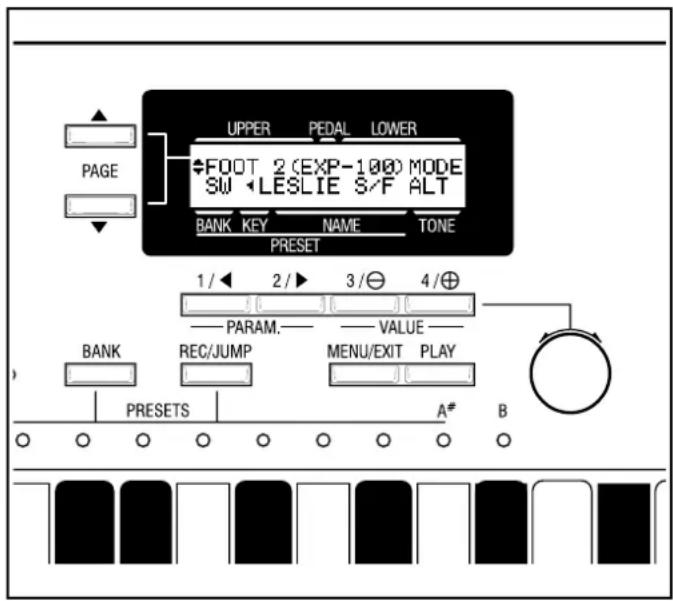
PAGE UPPER PEDAL LOWER +FOOT 2 (EXP-100) MODE SW < LESLIE S/F ALT BANK KEY NAME TONE PRESET 1/ 2/ 3/ 4/ PARAM. VALUE BANK REC/JUMP MENU/EXIT PLAY PRESETS A# BThe Foot Switch is used to operate and control the organ by your foot instead of pressing various switches by hand while playing. The initial factory assignment is “LESLIE FAST”.
To change the assignment of Foot Switch on XPK-3, use "FOOT 2(EXP-100) MODE".
To come to this mode:
Touch the [MENU/EXIT] button and display the MENU and select PAGE A by the [PAGE] button, and then touch the [4] CONTROL button, touch the [PAGE UP] button 4 times, and touch the [PARAM RIGHT] button 4 times.
For details, please read the “CONTROL” section of “Setting the Parameters” in the XK-3 Owner’s Manual.
◆REBOUND TIME
text_image
Rebound Time (x 1.22 milliseconds) 1 2 3 4 5 6 7 8 9 10 11 12 13 14 15 16◆MIDI CHANNEL
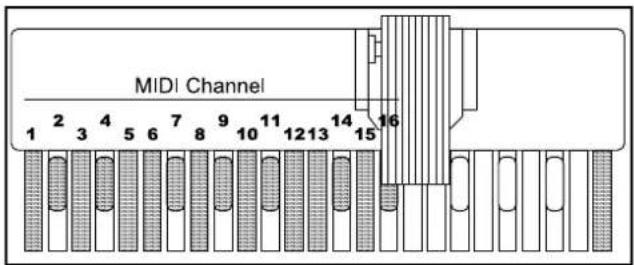
text_image
MIDI Channel 1 2 3 4 5 6 7 8 9 10 11 12 13 14 15 16◆LOAD DEFAULT VALUES
natural_image
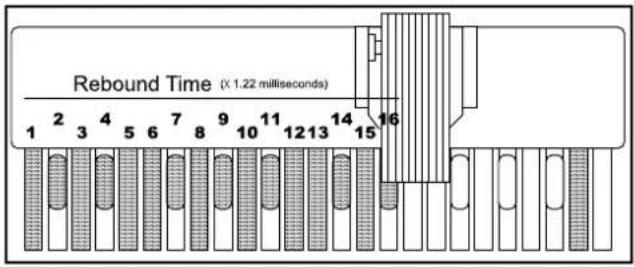
Pure technical line drawing of a mechanical component or bracket (no text or symbols)If you play pedals with a staccato action or the leaf spring used on the pedal keyboard may happen to change its characteristic, it may cause "key bounce" on the key when you release it.
You can avoid it by adjusting the "Rebound Time".
To change the value, turn on the power while pressing the highest B and the key corresponding to its value. (See the left figure.)
Then, the LED on the left of the Expression Pedal blinks slowly the number of times indicating the value.
The setting range is 1 to 16 times (x) 1.22 milliseconds. 4 times (x) 1.22 milliseconds is the default.
Note: Too long rebound time causes delay in the sound.
You can change the MIDI channel of the Pedal Keyboard for special purposes.
To change the MIDI channel, turn on the power while pressing the highest C and the key corresponding to its value. (See the left figure.)
Then, the LED on the left of the Expression Pedal blinks fast the number of times indicating the value.
The setting range is Channel 1 to 16. Channel 3 is default.
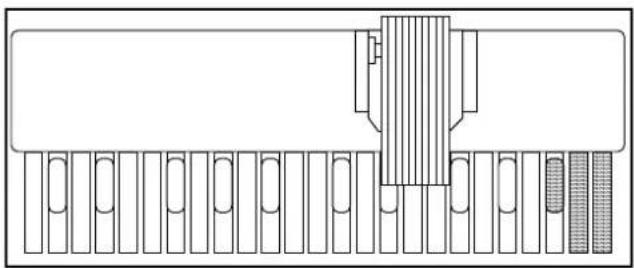
To reset the XPK-3 to the initial status, turn on the power while pressing the highest A#, B and C.
Then, the LED on the left side of the Expression Pedal blinks three times, indicating the reset procedure.
In such cases as follows:
◆ The XK-3 does not turn on when the XLK-B3 is switched on.
- The power switch of the XK-3 turned off. >>
Turn on the power switch of the XK-3.
- Check the LED on the rear of XLK-B3. The LED lights during it is operating.
◆ The Manual Bass does not function on the XLK-B3 manual.
- The setting of the XK-3 is not correct. >>
Set the MIDI template correctly in the XK-3 "MIDI" function screen. (Page 8)
[Hammond MIDI Keyboard]
Model: XLK-B3
MIDI Implementation Chart
Date: 11-Feb-2005
Version: 1.0
| Function | Transmitted Recognized | Remarks | ||
| Basic Channel | Default Changed | 2 X | X | |
| Mode | Default Messages Altered | 3 X ***** X | X X | |
| Note Number | : True Voice | 36 - 96 X ***** | ||
| Velocity | Note ON Note OFF | O *1 X X | X | *1 when turned on by pressing the Preset Key |
| After Touch | Key's Ch's | X X | X X | |
| Pitch Bender | X | X | ||
| Control Change | X | X | ||
| Program Change : True # | O 0 - 11 X ***** X | Preset Keys | ||
| System Exclusive | X | X | ||
| System Common : Tune | X X | X X | ||
| System Real Time : Commands | X X | X X | ||
| Aux Messages : Reset | X X O X | X X | ||
Mode 1: OMNI ON, POLY Mode 2: OMNI ON, MONO O: Yes
Mode 3: OMNI OFF, POLY Mode 4: OMNI OFF, MONO X: No
[Hammond MIDI Keyboard]
Model: XPK-3
MIDI Implementation Chart
Date: 23-Dec-2004
Version: 1.0
| Function | Transmitted Recognized | Remarks | ||
| Basic Channel | DefaultChanged | 31 - 16 | X | |
| Mode | DefaultMessagesAltered | 3X***** X | XX | |
| NoteNumber | : True Voice | 36 - 60 X***** | ||
| Velocity | Note ONNote OFF | XX | XX | |
| After Touch | Key'sCh's | XX | XX | |
| Pitch Bender | X | X | ||
| Control Change | X | X | ||
| ProgramChange | : True # | X***** X | X | |
| System Exclusive | X | X | ||
| System Common | : Song Position: Song Select: Tune | XX | XX | |
| System Real Time | : Clock: Commands | XX | XX | |
| Aux Messages | : Local On/Off: All Notes Off: Active Sense: Reset | XXOX | XXXX | |
Mode 1: OMNI ON, POLY Mode 2: OMNI ON, MONO O: Yes
Mode 3: OMNI OFF, POLY Mode 4: OMNI OFF, MONO X: No
XLK-B3
Keyboard
73 (61 + 12 Preset keys) Water Fall shape
Panel Controls
Power on/off
Terminals
MIDI out
AC input, output
Headphones,
Expression (From Organ, To Exp. Pedal)
Dimension
48 inch(W), 25 inch(D), 8 inch(H) (without music rack)
Weight
67 lbs
◆XPK-3
Keyboard
25 keys
Controls
Expression, Foot Switch
Terminals
MIDI out
Expression
Dimension
42 inch(W), 37 inch(D), 6 inch(H) (without expression pedal)
Weight
55 lbs
SERVICE
Hammond maintains a policy of continuously improving and upgrading its instruments and therefore reserves the right to change specifications without notice. Although every attempt has been made to insure the accuracy of the descriptive contents of this Manual, total accuracy cannot be guaranteed.
Should the owner require further assistance, inquiries should first be made to your Authorized Hammond Dealer. If you still need further assistance, contact Hammond at the following addresses:
In the United States contact:
HAMMOND SUZUKI USA, Inc.
733 Annoreno Dr.
Addison, IL 60101
UNITED STATES
Website:
www.hammondorganco.com
In Europe contact:
HAMMOND SUZUKI EUROPE
B.V.
IR. D.S. Tuynmanweg 4A
4131 PN Vianen
THE NETHERLANDS
E-mail: Info@hammondsuzuki.com
Website: www.hammondsuzuki.com
All other countries contact:
HAMMOND SUZUKI Ltd.
25-11, Ryoke 2 Chome
Hamamatsu 430-0852
(Shizuoka)
JAPAN
Website: www.suzuki-music.co.jp
Technical materials are available and can be obtained by mailing a request to the appropriate address listed above marked ATTENTION: SERVICE DEPARTMENT.
Manufacturer: