STUDIO 60 - Phone AUDIOLINE - Free user manual and instructions
Find the device manual for free STUDIO 60 AUDIOLINE in PDF.


User questions about STUDIO 60 AUDIOLINE
0 question about this device. Answer the ones you know or ask your own.
Ask a new question about this device
Download the instructions for your Phone in PDF format for free! Find your manual STUDIO 60 - AUDIOLINE and take your electronic device back in hand. On this page are published all the documents necessary for the use of your device. STUDIO 60 by AUDIOLINE.
USER MANUAL STUDIO 60 AUDIOLINE
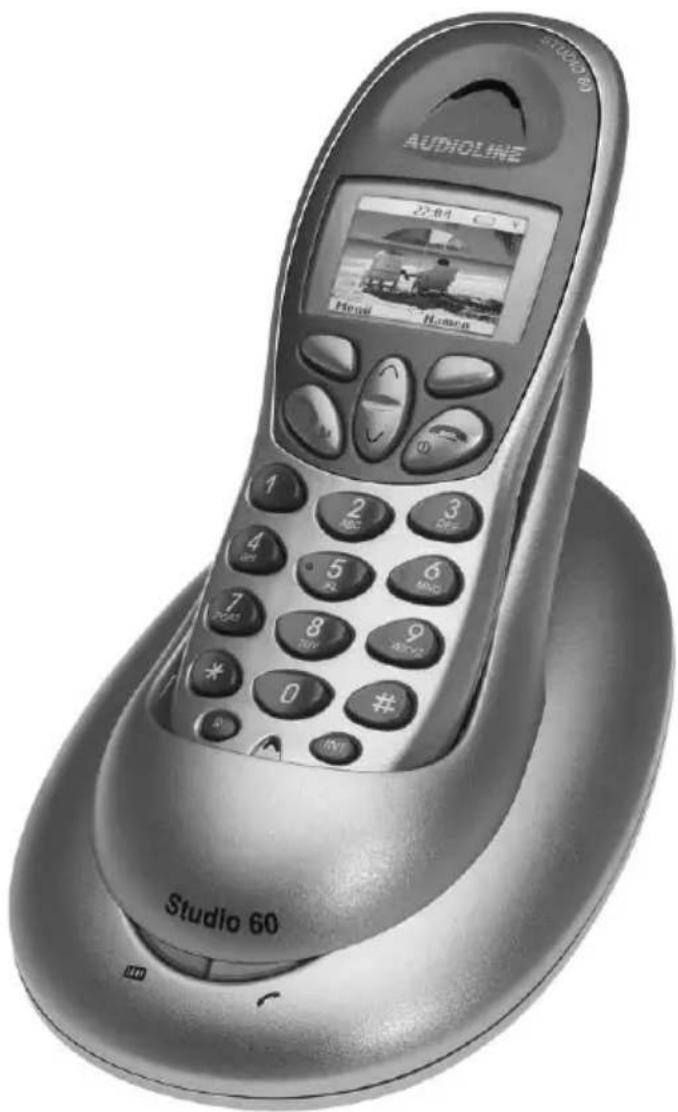
Schnurloses digitales DECT-Telefon Cordless digital DECT telephone
text_image
AUDIOLINE 22.04 Model Homen Studio 60Operating Instructions_47
9.1 Service Center 22
text_image
Diagram showing battery installation process with labeled components and directional arrows indicating movement- Inbetriebnahme -
1.2 Power failure 50
1.3 Installation location 50
1.4 Power supply 50
1.5 Rechargeable standard batteries 50
1.6 Charging the handset 51
1.7 Private branch exchanges 51
1.8 Disposing of old equipment 51
1.9 Notes on medical equipment 51
1.10 Temperature and ambient conditions 51
1.11 Cleaning and upkeep 51
2 Features 52
2.1 Telephone 52
3 Operating Elements 53
3.1 Handset 53
3.2 Base station 53
4 Starting Up 54
4.1 Safety notes 54
4.2 Checking the package contents 54
4.3 Connecting the base station 54
4.4 Inserting the standard batteries 54
4.5 Charging the standard batteries 55
4.6 Tone dialling - DTMF 55
5 Operation 56
5.1 Display 56
5.2 Navigation using the buttons 56
5.3 Making and ending calls 57
5.4 Taking a call 57
5.5 Taking two external calls 57
5.6 Hands-free 57
5.7 Dialling phone numbers stored in the phone book 58
5.8 Displaying the call timer 58
5.9 Adjusting the receiver volume 58
5.10 Redialling 58
5.11 Muting the handset 58
5.12 Switching the handset on /off 58
5.13 Locating the handset (paging) 58
5.14 Key lock 59
5.14.1 Activating the key lock function 59
5.14.2 Deactivating the key lock function 59
- Contents -
5.15 Notes on range 59
6 Private Branch Exchanges / T-Net 60
6.1 R button on private branch exchanges 60
6.2 R button with T-Net provided by Deutsche Telekom 60
6.3 Dialling pause 60
7 Menu Structure 61
8 Phone Book 63
8.1 Entering phone numbers in the phone book 63
8.1.1 Text entry 63
8.1.2 Notes on the phone book 63
8.2 Showing details of an entry 64
8.3 Modifying entries in the phone book 64
8.4 Deleting an entry from the phone book 64
8.5 Deleting all entries from the phone book 65
8.6 VIP call (ring melody assignment) 65
8.6.1 Assigning a ringing melody 65
8.6.2 Deactivating a ringing melody assignment 65
9 SMS Text Messages 66
9.1 Service centres 66
9.1.1 Entering the send/receive centre numbers 67
9.2 Writing and sending 67
9.3 Sending saved SMS messages 68
9.4 Reading and answering 68
9.5 SMS alert signal on/off 69
9.6 Setting the SMS alert signal (Morse, Discreet, Polyphonic) 69
9.7 Delete an SMS Message 69
9.8 Delete all SMS messages 70
9.9 SMS mailbox 70
9.9.1 Adding a mailbox/user 70
9.9.2 Displaying mailbox/user data 71
9.9.3 Sending an SMS message to a personal mailbox 71
9.9.4 Changing mailbox/user data 72
9.9.5 Deleting a mailbox/user 72
10 Calls Lists 73
10.1 Caller number display (CLIP function) 73
10.2 Received calls 73
10.2.1 Displaying and calling back 73
10.2.2 Delete entry 73
10.2.3 Save entry in the phone book 74
10.3 Missed calls 74
10.3.1 Displaying and calling back 75
- Contents -
10.3.2 Delete entry 75
10.3.3 Save entry in the phone book 75
10.4 Dialled calls (redialling) 76
10.4.1 Displaying and calling 76
10.4.2 Delete entry 76
10.4.3 Save entry in the phone book 76
10.4.4 Deleting a calls list 77
10.4.5 Delete all calls lists 77
11 Handset 78
11.1 Assigning a ringing melody (internal and external calls) 78
11.2 Setting the ring volume 78
11.3 Entering/Changing the name of the handset 78
11.4 Setting the language 79
11.5 Setting the menu colour 79
11.6 Activating the Auto Talk function 79
11.7 Activating the PABX access code (outside line) 80
12 Registering and Deregistering Handsets 81
12.1 Register handset 81
12.2 Deregister handset 81
12.3 Select base station 82
13 Multiple Handsets 83
13.1 Internal calls (intercom function) 83
13.2 Transferring external calls to another handset 84
13.3 Conference calls 84
14 Base Settings 85
14.1 Assigning a ringing melody to the base station 85
14.2 Setting the base station ring volume 85
14.3 Activating/Deactivating handset priority 85
14.4 Setting the recall time 86
14.5 Changing the system PIN 86
15 Time Settings 87
15.1 Setting the time and date 87
15.2 Setting the alarm tone 87
15.3 Entering the alarm time (ON/OFF) 87
16 Troubleshooting 88
17 Important Information 89
17.1 Technical data 89
17.2 Replacing the telephone connection cable 89
17.3 Guarantee 90
18 Declaration of Conformity 90
19 Important Notes on the Guarantee 91
1 General Information
Please read this operating instruction manual thoroughly.
In the case of any questions, please contact our Service Hotline 0180 5 00 13 88 (cost via Telekom at time of going to print: 12 ct/min). Under no circumstances open the device or complete any repair work yourself. In the case of claims under the terms of guarantee, contact your sales outlet.
We reserve the right to make technical and optical modifications to the product during the course of product improvement.
1.1 Intended use
This telephone has been developed for use in an analogue telephone network (PSTN) within Germany. However, due to the different services offered by the various telecommunication network providers, there is no guarantee that the equipment will function trouble-free on every telecommunication terminal connection. The telephone is prepared for connection to a TAE line socket with F/N coding and can be used together with other equipment such as facsimile unit, answering machine or modem. Only plug the telephone connection cable into the appropriate telephone line socket. Never change the plug on the connection cable.
1.2 Power failure
The telephone cannot be used to make calls in the event of a power failure. Always keep a cord connected telephone which operates without an external power supply available in the case of emergency situations.
1.3 Installation location
The installation location is a decisive factor to ensure trouble-free operation. The equipment must be set up in the vicinity of a 230 Volt power outlet.
Do not place the base station in the direct vicinity of other electronic equipment, such as microwave ovens or hi-fi systems, since they could cause mutual disturbance. Therefore, maintain a distance of at least one meter from other electronic equipment.
Place the base station on a level, non-slip surface. Normally, the footpads on the base station do not leave any marks on the surface where it is located. However, due the diverse types of paints and surfaces which come into question, it cannot be fully ruled out that the footpads will leave marks on the surface on which it is located.
1.4 Power supply
Only use the AUDIOLINE power adapter plug supplied because other power supplies could destroy the telephone. There is a risk of fatal injury if the power adapter plug is opened and not disconnected from the power supply.
1.5 Rechargeable standard batteries
Do not use other rechargeable standard batteries or power packs because they could cause a short circuit. When replacing batteries, only use those of the type AAA 1.2 V 750 mAh.
Do not throw rechargeable standard batteries into a fire or immerse them in water. Do not dispose of old or defective batteries in normal domestic waste.
The maximum standby and talk times specified apply to the rechargeable standard batteries supplied when used under optimum conditions. Ambient temperature,

- General Information -
charging cycles and other external factors, such as radio loading in the area of use, can affect operating times considerably. In addition, the charge capacity is reduced for technical reasons during use or when stored at extremely high or low temperatures.
1.6 Charging the handset
If the handset warms up during the charging process, this is normal and does not represent a danger. Do not charge the handset on an external charging unit as this could damage it.
1.7 Private branch exchanges
The telephone can also be connected to a private branch exchange. The dealer where you purchased the exchange can provide information as to whether the telephone will work properly with the exchange. Due to the wide variety of private branch exchanges available, there is no guarantee that the telephone will function correctly on all PBXs.
1.8 Disposing of old equipment
To dispose of your AUDIOLINE equipment, bring it to the local collection point provided by the public waste disposal authority (e.g. recycling center).
The adjacent symbol on the telephone signifies that this equipment must not be disposed of in domestic waste.

According to electric and electronic apparatus laws, old electric and electronic equipment must be sorted prior to disposal. You are contributing to environmental protection by adhering to these laws and not disposing of old equipment in domestic waste.
1.9 Notes on medical equipment
The telephone operates with a very low transmitting power. The current level of knowledge from research and technology indicates that such low transmitting power does not represent a risk to health. It has been shown, however, that portable telephones, when switched on, can affect medical equipment. Therefore, never use the telephone in the vicinity of medical equipment.
There is no evidence that DECT telephones affect heart pacemakers. However, due to the wide range of pacemakers in use, it cannot be completely ruled out.
DECT telephones can cause an unpleasant humming sound in hearing aids.
1.10 Temperature and ambient conditions
The telephone is designed for use in protected rooms with a temperature range from 10 °C to 30 °C. The base station should not be used in rooms exposed to moisture, such as bathrooms or laundries. Do not locate the device in the vicinity of sources of heat such as radiators, and never expose it to direct sunlight.
Do not use the handset in potentially explosive areas.
Prevent excessive exposure to smoke, dust, vibration, chemicals, humidity, heat or direct sunlight.
1.11 Cleaning and upkeep
Clean the housing surfaces with a dry, soft, fluff-free cloth. Never use cleaning agents or aggressive solvents. Apart from occasionally cleaning the housing, no other upkeep is necessary. The rubber footpads on the base station are not resistant to all cleaning agents. The manufacturer is not liable to any claims for damage to furniture or such.
2 Features
2.1 Telephone
•Digital DECT / GAP standard
- Up to 10 hours continuous conversation - up to 85 hours standby
- Send and receive SMS
• Voice scrambling for high level of security
•Tone dialling method (DTMF)
- Excellent display legibility through illuminated display
- Easy operation through graphical menu guidance
- Caller number display (CLIP function)
- Calls list with 50 memory segments for calls received/missed
•Redialling the last 20 call numbers
- Phone book with 150 memory segments, including names
- 24-hour clock with alarm function integrated in the handset
- Display call timer
- Can be extended by registering more GAP-compatible DECT handsets
- Multilink operation with up to four other handsets
- Internal calls possible between two handsets
- Conference facility between two handsets and an external caller
- Forward calls between handsets
•VIP call (melody assignment)
- Suitable for T-Net (Hook Recall) - PBX capable
- Muting function
•Key lock
•Hands-free function on handset
- Ringing melodies on the handsets and base station can be adjusted in many ways
DECT: Digital European Cordless Telephone = Standard for cordless telephones.
GAP: Generic Access Profile = Standard for the interoperation of handsets and base stations from other manufacturers.
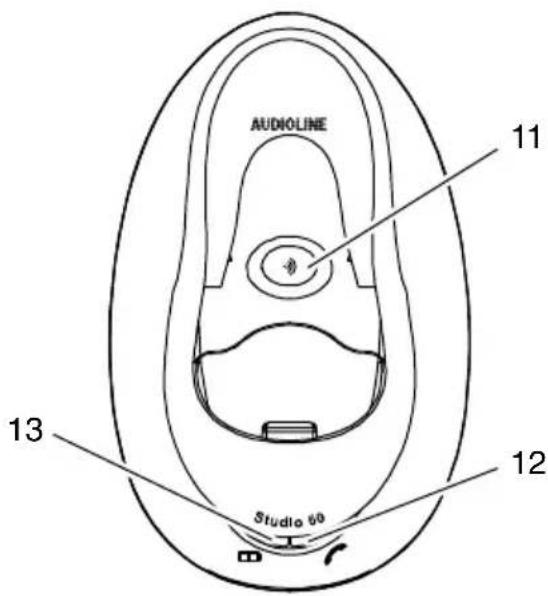
3 Operating Elements
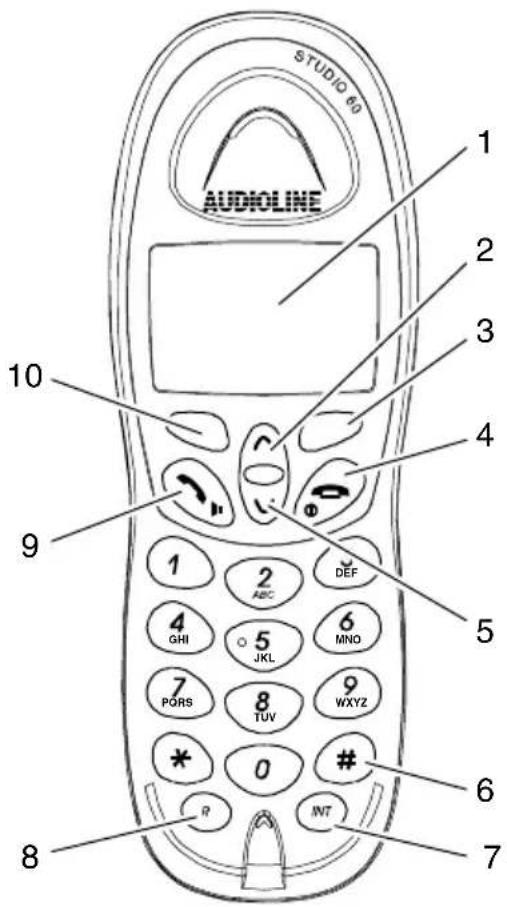
3.1 Handset
- Graphical colour display
- Dialled calls / Volume + / Menu navigation upwards
- Phone book
- End call / On / Off
- Missed calls / Volume - / Menu navigation downwards
- Key lock
- Internal and conference calls
- R button
- Take call / Hands-free call
- Menu button / Select button
text_image
STUDIO 60 AUDIOLINE 1 2 3 4 5 6 7 8 9 10 1 2 ABC DEF 4 GHI 5 JKL 6 MNO 7 PQRS 8 TUV 9 WXYZ * 0 # R INT3.2 Base station
- Paging button (locate handset)
- Call and power indicator LED
- Charge control lamp LED
text_image
AUDIOLINE 11 13 Studio 60 12- Starting Up -
4 Starting Up
4.1 Safety notes

Caution: It is essential to read the General Information at the beginning of this manual before starting up.
4.2 Checking the package contents
The package contains:
| a base station | a telephone connection cable |
| a handset two standard batteries | |
| a power adapter plug with cable an operating manual | |
4.3 Connecting the base station
Position the base station within reach of the telephone line socket and a power outlet. Only use the components supplied.
- Insert the small plug on the power adapter plug cable in the corresponding socket on the underside of the base station.
NOTE: The plug cannot be connected incorrectly because the plug and socket are designed in such a way to prevent reverse poling. The plugs must snap audibly into the base station sockets.
- Insert the small plug on the telephone connection cable in the corresponding socket on the underside of the base station.
- Feed both cables on the underside of the base station in the cable duct provided.
- Plug the power adapter plug in a properly installed 230 Volt power outlet. The power adapter plug from the base station must remain connected at all times.
- Connect the telephone connection cable supplied in telephone socket F.
4.4 Inserting the standard batteries
In order to insert the rechargeable standard batteries in the handset, press on the top edge of the battery compartment cover and slide it downwards. Only insert standard batteries. Pay attention the correct polarity. Close the battery compartment cover.

text_image
Diagram showing battery installation process with labeled components and directional arrows- Starting Up -
4.5 Charging the standard batteries
Place the handset, with its display facing the front, in the base station for at least 14 hours. The charging control lamp on the base station lights up. Failure to charge the standard batteries properly can lead to telephone malfunction.
The rechargeable standard batteries in the handset have a maximum standby time of 85 hours at room temperature. The maximum talk time is 10 hours.
The current battery charge status is indicated in the display:
| Full Half empty Weak Empty | |||
4.6 Tone dialling - DTMF
This telephone implements the tone dialling method - DTMF (Dual Tone Multi Frequency). Advantages of this modern dialling method include short connection times, remote control options for other equipment, such as an answering machine, and the use of other ISDN services.
5 Operation
5.1 Display
The display indicates all the important functions by means of various icons. It is equipped with an automatic back-lighting feature which lights up the display for approx. 30 seconds when any button is pressed.
5.2 Navigation using the buttons
All the functions can be accessed by means of a user friendly, graphical menu. Pay attention to the texts in the display which accompany the menu because they help you to navigate correctly and intuitively.
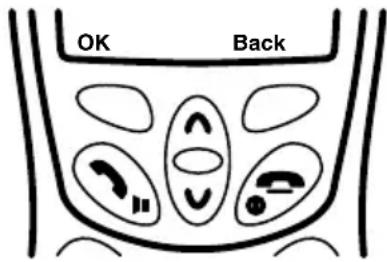
All descriptions in this operating manual assume that the handset is in Standby mode. A beach view and the name of the handset appear in the display (preset to "Studio 1") when it is in standby mode. Standby mode is activated by pressing the 🔒 button.
text_image
OK Back| Button Description | |
| The current function is displayed directly above the button in the left of the display according to the operating function. The function is selected after pressing the button. When in standby, the button opens the menu. | |
| The current function is displayed directly above the button in the right of the display according to the operating function. The function is selected after pressing the button. When in standby, the button opens the list of names in the phone book. | |
| Press | the button to scroll upwards in the menu. |
| Press | the button to scroll downwards in the menu. |
| Press the button to close the menu at any point and reset the handset to standby mode. | |
5.3 Making and ending calls
- Enter the phone number (max. 25 digits).
NOTE: Press the ○ button briefly to delete the last digit entered. Press and hold the ○ button to delete the entire phone number. The handset returns to standby mode.
- Press the ⏻ button and the required connection is established.
NOTE: Alternatively, press the ⏻ button first and then enter the required phone number. It is not possible to correct wrong digits individually, as described above, using this dialling procedure.
- To end a call, press the ⏻ button or place the handset in the base station.
5.4 Taking a call
Both the handset and base station ring. Take the handset from the base station, thus establishing the connection. The call LED on the base station flashes.
NOTE: If the Auto Talk option is deactivated, establish the connection by pressing the button on the handset.
5.5 Taking two external calls
You will hear acoustic signals (call waiting) if a second call is received while you are carrying out a telephone conversation. The number of the second caller appears in the display. It is possible to switch between the two callers by pressing the button sequence “R” “2” as required. One caller is put on hold while you converse with the other.
NOTE: In order to use the added value services provided by Deutsche Telekom, the recall time setting 300 ms has to be selected (refer to Chapter "14.4 Setting the recall time").

Caution: The caller number display and call waiting function are optional services offered by the telephone network provider. The caller number appears in the display if the service is offered by your telephone network provider. Contact your network provider for further information.
5.6 Hands-free
- Press the ⏻ button during a call. You can then hear the caller through the loudspeaker in the handset.
- Press the ⏻ button again to end hands-free mode.
5.7 Dialling phone numbers stored in the phone book
After phone numbers have been stored in the phone book (refer to “Entering phone numbers in the phone book”, Chapter 8.1), they can be called quickly and easily.
- Press the ○ button. The phone book entries appear in the display in alphabetical order.
- Use the ∪ or ∧ button to scroll to the required name in the phone book.
NOTE: To select an entry directly, press the corresponding button to enter the first letter of the name required. To select the name "Peters" directly, for example, press the button once.
- Press the ⏻ button and the selected phone number is dialled automatically.
5.8 Displaying the call timer
When a call is being made, the call time is indicated in minutes and seconds and the number of the person called appear in the display after about 15 seconds.
5.9 Adjusting the receiver volume
The volume of the receiver can be adjusted according to requirements.
Press the ⏠ or Ⓧ button during a call to set the volume to one of five levels.
5.10 Redialling
Refer to "Dialled numbers (redialling)", Chapter 10.4.
5.11 Muting the handset
By pressing the ○ button during a telephone call, the microphone in the handset is deactivated. "Secrecy" appears in the display. You can then talk to someone else without the caller being able to hear you. The loudspeaker in the handset remains switched on, so that you can continue to hear the caller.
Press the ○ button again to deactivate the muting function.
5.12 Switching the handset on /off
Press the ⏻ button for 2 seconds to switch the handset on and off. The display lights up or goes out accordingly.
5.13 Locating the handset (paging)
If you have mislaid your handset, you can locate it with the aid of the base station.
- Press the Paging button ⏻ on the base station. All the handsets registered on the base station ring.
- To stop the paging function, press the Paging button on the base station again or any button on the handset.
- Operation -
5.14 Key lock
If you carry the handset around a lot, you can lock the keypad so that buttons are not inadvertently activated. Calls can still be taken in the normal way even when the key lock function is activated.
5.14.1 Activating the key lock function
Press the # button on the handset for three seconds.
The "Keypad locked" message and 🔒 icon appear in the display.
5.14.2 Deactivating the key lock function
To deactivate the key lock, press the ○ button and then press the ○ button again as confirmation.
5.15 Notes on range
The handset has a range of approx. 50 meters in closed rooms and approx. 300 meters outdoors. In the case of a good connection to the base station, the ⚡ icon appears in the display.
NOTE: If the handset is moved too far from the base station, the ⚡ icon flashes and acoustic warning signals are issued. Move towards the base station, otherwise the call will be disconnected.
6 Private Branch Exchanges / T-Net
The Ⓗ button on the telephone is for use in private branch exchanges and when using T-Net functions provided by Deutsche Telekom.
6.1 R button on private branch exchanges
If the telephone is connected to a private branch exchange, all the functions associated with the Ⓞ button, such as transferring calls, automatic call back, etc., can be used. A private branch exchange requires a recall time of 100 ms (refer to Chapter 14.4). The dealer where you purchased the exchange can provide information as to whether the telephone will work properly with the exchange.
6.2 R button with T-Net provided by Deutsche Telekom
Your AUDIOLINE telephone supports the most important added value services provided by Deutsche Telekom (e.g. brokering, call waiting, three-way conferencing, etc.). T-Net operates with a recall time of 300 ms (refer to Chapter 14.4 for settings). Please contact Deutsche Telekom with regard to enabling the T-Net functions.
6.3 Dialling pause
In the case of private branch exchanges, it is necessary to dial a specific number (e.g. “9” or “0”) in order to obtain the dialling tone for an outside line. When using some older private branch exchanges, it takes a little time before the dialling tone becomes audible. With regard to these private branch exchanges in particular, it is possible to insert an automatic pause after the number for the outside line so that the number can be dialled in a continuous process without having to wait for the dialling tone.
After entering the number for the outside line and before continuing with the actual phone number, press the ⏰ button for approx. 2 seconds. "P" appears in the display. A pause of 3 seconds is inserted between the number for the outside line and the actual phone number.
NOTE: The pause can also be entered with the phone numbers in the phone book.
- Menu Structure -
7 Menu Structure
This section describes the menu structure of your telephone. When in standby, open the menu selection by pressing the 🔔 button. For reasons of clarity, all the levels of each menu item are not always depicted.
SMS Write Message Options Send to Search
| Save | ||
| Insert Symbol | ||
| User Name | ||
| Inbox Read Options Reply | ||
| Forward | ||
| Delete | ||
| Outbox Read Options Edit | ||
| Send to | ||
| Delete | ||
| User Name | ||
| Delete Messages Inbox | ||
| Outbox | ||
| All Messages | ||
| Settings Service Centres Receive Centre | ||
| Terminal Number | Sending Centre | |
| SMS Alert | ||
| Users | ||
Calls lists Received calls Options Delete
| Show Details | ||
| Save Number | ||
| Missed calls Options Delete | ||
| Show Details | ||
| Save Number | ||
| Dialled calls Options Delete | ||
| Show Details | ||
| Save Number | ||
| Delete calls list Received calls | ||
| Missed calls | ||
| Dialled calls | ||
| All calls | ||
- Menu Structure -
Handset Ringtone External Calls
| Ring Volume | Internal Calls | |
| Handset Name | ||
| Language | ||
| Menu Colour | ||
| Auto Talk | ||
| PABX Access Code |
Base settings Base Ringtone
| Base Volume | ||
| Handset Priority All Handsets | ||
| Select Handset Handset 1-5 Rings 2 | ||
| Recall Mode Rings 6 | Rings 4 | |
| System-PIN (default setting: 0000) | ||
Time settings Alarm On/Off On Once
| Set Alarm Tone Alarmtone 1-4 Off | On Daily | ||
| Set Date & Time Date Time | |||
Registration Register Handset
| Select Base | |
| De-register |
Registration Register Handset Base 1 System PIN (default setting: 0000)
| Base 2 | |
| Base 3 | |
| Base 4 |
Select Base Automatic
| Base 1 | |
| Base 2 | |
| Base 3 | |
| Base 4 |
De-register System PIN (default setting: 0000)
8 Phone Book
When in standby, press the ○ button to open the phone book menu. The phone book can be used to store a maximum of 150 phone numbers together with the associated names. A name can have a maximum of 16 characters. The maximum length of a phone number is 20 digits.
8.1 Entering phone numbers in the phone book
- Press the ○ button. The phone book opens in the display.
NOTE: To complete the first entry in the phone book, proceed with Step 4 at this point.
- Press the 🔓 button.
- Use the ∪ or ∧ buttons to select the "Add Entry" option in the display.
- Press the ○ button. The message "Name" appears in the display.
- Enter the name using the digit keys.
NOTE: Refer to 8.1.1 to enter text.
- Press the ○ button. The message "Number" appears in the display.
- Enter the relevant phone number using the digit keys.
- Press the ○ button. The entry is confirmed in the display.
- To store more phone numbers, repeat steps 3 to 9.
- Press the ○ button to reset the handset to standby mode.
8.1.1 Text entry
The digit keys are also labelled with letters for the entry of the respective letters. Letters and digits are entered by pressing the relevant key the respective number of times.
Example: To enter the name "Peter".
Press: 1 x button ⑦, 2 x button ③, 1 x button ⑧, 2 x button ③, 3 x button ⑦
• To enter a space, press ① once.
- To enter the same letter twice, press the relevant button until the letter appears then wait till the cursor automatically skips one position forward.
NOTE: Delete any incorrect entries with the ○ button.
Press the ⏠ or Ⓧ button to move the cursor to the left or right.
8.1.2 Notes on the phone book
- Always enter the area access code with the phone numbers so that the telephone can also assign incoming local calls to a phone book entry.
- If the memory capacity of 150 phone numbers is reached, a corresponding message appears when an attempt is made to store another number. In order to create space, existing entries must be deleted.
8.2 Showing details of an entry
- Press the ○ button. The phone book opens in the display.
- Use the ∪ or ∧ button to select the required entry in the display.
NOTE: To select an entry directly, press the corresponding button to enter the first letter of the name required. To select the name "Peter" directly, for example, press the 7 button once.
- Press the 🔓 button.
- Use the ∪ or ∧ buttons to select the "Show Details" option in the display.
- Press the ○ button. The name and phone number appear in the display.
- Press the ○ button to move back one menu level at a time.
8.3 Modifying entries in the phone book
- Press the ○ button. The phone book opens in the display.
- Use the ∪ or ∧ button to select the required entry in the display.
NOTE: To select an entry directly, press the corresponding button to enter the first letter of the name required. To select the name "Peter" directly, for example, press the 7 button once.
- Press the 🔓 button.
- Use the ∪ or ∧ buttons to select the "Edit Entry" option in the display.
- Press the ○ button.
The name appears in the display. Alter the name, if necessary, or continue with Step 6.
NOTE: For information on entering names, refer to Chapter 8.1.1.
- Press the ○ button.
The number appears in the display. Alter the number, if necessary, or continue with Step 7.
- Press the 🔔 button. The modification is confirmed in the display.
- Press the ○ button once to return to the phone book in order to edit further entries.
- Press the ○ button to move back one menu level at a time.
8.4 Deleting an entry from the phone book
- Press the ○ button. The phone book opens in the display.
- Use the ∪ or ∧ button to select the required entry in the display.
NOTE: To select an entry directly, press the corresponding button to enter the first letter of the name required. To select the name "Peter" directly, for example, press the 7 button once.
- Press the ○ button.
- Use the √ or ∧ buttons to select the "Delete Entry" option in the display.
- Press the ○ button. A request for confirmation to delete the entry appears in the display.
- Press the 🔔 button. Deletion is confirmed in the display.
- Press the ○ button to reset the handset to standby mode.
8.5 Deleting all entries from the phone book
- Press the ○ button. The phone book opens in the display.
- Press the ○ button.
- Use the √ or ∧ button to select the "Delete all phonebook" option in the display.
- Press the ○ button. A request for confirmation to delete the entries appears in the display.
- Press the ○ button. Deletion is confirmed in the display. New entries can be made in the phone book, if necessary.
- Press the ○ button to reset the handset to standby mode.
8.6 VIP call (ring melody assignment)
Phone book entries from callers who are particularly important can be assigned a specific ringing melody. You can then recognise who is calling simply from the ringing melody.
8.6.1 Assigning a ringing melody
- Press the ○ button. The phone book opens in the display.
- Use the ∪ or ∧ button to select the required entry in the display.
NOTE: To select an entry directly, press the corresponding button to enter the first letter of the name required. To select the name "Peter" directly, for example, press the ⑦ button once.
- Press the ○ button.
- Use the ∪ or ∧ button to select the "Ringtone" option in the display.
- Press the 🔔 button. Several melodies appear in the display for selection.
- Use the ∪ or ∧ button to select the melody required in the display.
- Press the ○ button. The assignment is confirmed in the display.
- Press the ○ button to move back one menu level at a time.
8.6.2 Deactivating a ringing melody assignment
- Press the ○ button. The phone book opens in the display.
- Use the ∪ or ∧ button to select the required entry in the display.
NOTE: To select an entry directly, press the corresponding button to enter the first letter of the name required. To select the name "Peter" directly, for example, press the 7 button once.
- Press the ○ button. Several options appear in the display.
- Use the ∪ or ∧ button to select the "Ringtone" option in the display.
- Press the ○ button. Several melody options appear in the display for selection as well as the "Off" option.
- Use the ∪ or ∧ button to select the "Off" option in the display.
- Press the ○ button. The assignment is confirmed in the display.
- Press the ○ button to move back one menu level at a time.
9 SMS Text Messages
General conditions
The popular method of communication using text messages (SMS) is also possible via the conventional telephone network. The telephone can be used to send and receive text messages (SMS). Certain conditions must be fulfilled to enable text messages to be sent and received.
- The telephone connection must have the CLIP function (Calling Line Identification Presentation) available. Contact your telephone network provider to ensure that the CLIP function has been enabled on your telephone connection. It is possible that a fee will be charged for the function and it may be necessary to apply for it to be activated by your telephone network provider (e.g. Deutsche Telekom, phone number 0800 33 01000).
- 0190 phone numbers must not have been disabled on your conventional telephone connection.
- Sending text messages is not currently possible in the case of call-by-call connections.
- In order to use the SMS services, it may be necessary for your telephone network provider to activate the facility.
- Charges are made for sending SMS texts.
- If the receiving phone in the conventional telephone network is not provided with an SMS service or it is simply not capable of handling text messages, the SMS message is automatically converted to a voice message, i.e. read out on the phone.
- The costs accounting is completed by the telephone network provider.
NOTE: Due the constant further developments in this field, the information provided here may have changed in the meantime. Up-to-date information is available on the respective Internet pages or from the telephone network provider.
9.1 Service centres
The distribution of all text messages is performed by an Service centre. The “Deutsche Telekom” and other telephone network providers offer this service. Your AUDIOLINE telephone is set up for operation (sending and receiving text messages) via the “Deutsche Telekom”.
SMS using Deutsche Telekom Service Center.
•The number for the Deutsche Telekom message centre is 0193 010.
- When using Deutsche Telekom, a simple registration is required. To do this, send your first SMS with the text ANMELD (register) to the number "8888".
- SMS from the Vodafone, E-Plus or O2 networks cannot be received by Deutsche Telekom. In this case, the SMS will be read out.
SMS using Anny Way Service Center
•The number for the Anny Way message centre is 0900 32 66 900.
- No registration is necessary when using Anny Way. Simply send any SMS and you will be automatically registered with Anny way.
- SMS from the D1 (T-Mobile) and E-Plus networks cannot be received by Anny Way. In this case, the SMS will be read out.
- SMS Text Messages -
Two call numbers for the SMS function must be programmed in the handset. One phone number for sending and one phone number for receiving text messages. If you want to use the services offered by another provider, the respective call number(s) must be programmed in the handset. Proceed as described in 9.1.1.
NOTE: The registering procedure for the various providers differs. Please contact the provider of your choice for the necessary call numbers of the centres and the procedure for enabling the SMS service.
9.1.1 Entering the send/receive centre numbers
- Press the ○ button.
- Use the ∪ or ∧ button to select the "SMS" option in the display.
- Press the 🔓 button.
- Use the ∪ or ∧ button to select the "Settings" option in the display.
- Press the ○ button.
- Use the ∪ or ∧ button to select the "Service Centres" option in the display.
- Press the ○ button.
- Use the ∪ or ∧ button to select the "Receive Centre" option in the display. Enter the phone number stipulated by the provider of your choice.
- Press the 🔓 button.
- Use the ⬇ or ⌘ button to select the "Sending Centre" option in the display. Enter the phone number stipulated by the provider of your choice.
- Press the ○ button.
- Press the ○ button to move back one menu level at a time.
9.2 Writing and sending
NOTE: It is not possible to send an SMS message from a PABX system. The “PABX Access Code” must be deactivated in order to send an SMS message (refer to Chapter 11.7).
- Press the 🔓 button.
- Use the ∪ or ∧ button to select the "SMS" option in the display.
- Press the ○ button.
- Use the ∪ or ∧ button to select the "Write Message" option in the display.
- Press the ○ button. Enter the text using the digit keys. A maximum of 160 characters are possible.
NOTE: Refer to 8.1.1 to enter text.
NOTE: To enter a symbol, press the ○ button while entering the text. Use the √ or ∧ button to select the "Insert Symbol" option in the display. Press the ○ button. Use the √ or ∧ button to select the required symbol. Press the ○ button. The text entry display reappears. Carry on entering your text.
- Press the ○ button.
- Use the ∪ or ∧ button to select the "Send to" option in the display.
- SMS Text Messages -
NOTE: If you want to send the text message later, select the "Save" option under Step 7. The text message is stored in the "Outbox" list.
-
Press the ○ button.
-
Enter the phone number of the receiving party. If the receiving party is stored in the phone book, press the ○ button. Use the √ or ⏻ button to select the required name and then press the ○ button. Continue with Step 10.
-
Press the ○ button. Sending of the message is confirmed in the display.
9.3 Sending saved SMS messages
-
Press the ○ button twice.
-
Use the ∪ or ∧ button to select the "Outbox" option in the display.
-
Press the ○ button.
-
Use the ∪ or ∧ button to select the required SMS message in the display.
-
Press the ○ button twice.
-
Use the ∪ or ∧ button to select the "Send to" option in the display.
-
Press the ○ button.
-
Enter the phone number of the receiving party and then press the ☐ button.
9.4 Reading and answering
When an SMS message is received, an acoustic signal is issued and the display indicates the receipt of a new message.
- Press the ○ button. The inbox list appears in the display. SMS messages which have not been read are marked by a star.
NOTE: If you want to reply to an SMS message which has already been read, press the ○ button twice, use the √ or ∧ button to select the "Inbox" option in the display and press the ○ button. Continue with Step 2.
-
Use the ∪ or ∧ button to select the required SMS message in the display.
-
Press the ○ button. The SMS message appears in the display.
-
Press the ○ button.
-
Use the ∪ or ∧ button to select the "Reply" option in the display. Select the "Forward" option to forward the SMS message to another phone. To forward the text message, proceed with Step 8.
-
Press the 🔔 button. Enter the text using the digit keys. A maximum of 160 characters are possible.
NOTE: Refer to 8.1.1 to enter text.
-
Press the ○ button.
-
Use the ∪ or ∧ button to select the "Send to" option in the display.
-
Press the ○ button.
-
Enter the phone number of the receiving party. If the receiving party is stored in the phone book, press the ○ button. Use the √ or ⏻ button to select the required name and then press the ○ button.
-
Press the ○ button. Sending of the message is confirmed in the display.
9.5 SMS alert signal on/off
- Press the ○ button.
- Use the ∪ or ∧ button to select the "SMS" option in the display.
- Press the ○ button.
- Use the ∪ or ∧ button to select the "Settings" option in the display.
- Press the ○ button.
- Use the ∪ or ∧ button to select the "SMS Alert" option in the display.
- Press the ○ button.
- Use the ∪ or ∧ button to select the "On" or "Off" option in the display.
- Press the ○ button.
- Press the ○ button to move back one menu level at a time.
9.6 Setting the SMS alert signal (Morse, Discreet, Polyphonic)
- Press the 🔓 button.
- Use the ∪ or ∧ button to select the "SMS" option in the display.
- Press the ○ button.
- Use the ∪ or ∧ button to select the "Settings" option in the display.
- Press the 🔓 button.
- Use the ∪ or ∧ button to select the "SMS Alert" option in the display.
- Press the ○ button.
- Use the √ or ∧ button to select the "Set Alert" option in the display.
- Press the ○ button.
- Use the ∪ or ∧ button to select the required signal tone in the display.
- Press the ○ button. The modification is confirmed in the display.
9.7 Delete an SMS Message
Individual SMS measges can be deleted from the "Inbox" and "Outbox" lists.
- Press the ○ button.
- Use the ∪ or ∧ button to select the "SMS" option in the display.
- Press the ○ button.
- Use the ∪ or ∧ button to select the "Inbox" or "Outbox" option in the display.
- Press the ○ button.
- Use the ∪ or ∧ button to select the required SMS message from the list.
- Press the ○ button.
- Press the 🔔 button and select the "Delete" option.
- Use the ∪ or ∧ button to select the "Delete" option in the display.
- Press the ○ button.
- Press the ○ button to confirm the function.
- Press the ○ button to move back one menu level at a time.
9.8 Delete all SMS messages
All the text messages in the "Inbox" and "Outbox" lists can be deleted in one process.
- Press the ○ button.
- Use the ∪ or ∧ button to select the "SMS" option in the display.
- Press the ○ button.
- Use the ∪ or ∧ button to select the "Delete Messages" option in the display.
- Press the ○ button.
- Use the ∪ or ∧ button to select the "All Messages" option in the display.
NOTE: If you only want to delete the messages in one of the lists, either "Inbox" or "Outbox", use the √ or ^ button to select the relevant option in the display.
- Press the ○ button. A confirmation request appears in the display.
- Press the ○ button. Deletion is confirmed in the display.
- Press the ○ button to move back one menu level at a time.
9.9 SMS mailbox
In addition to the general mailbox which already exists, it is possible to setup four further mailboxes and protect them by means of a password. Each mailbox is identified by a user name and a mailbox ID (extension number). This enables text messages to be received to which only you have access.
NOTE: SMS mailboxes can only be used if the telephone network provider offers the facility. Please request a configuration instruction manual on setting up mailbox operation from your telephone network provider.
9.9.1 Adding a mailbox/user
NOTE: Up to four users can be added.
- Press the ○ button.
- Use the ∪ or ∧ button to select the "SMS" option in the display.
- Press the ○ button.
- Use the ∪ or ∧ button to select the "Settings" option in the display.
- Press the 🔓 button.
- Use the √ or ∧ button to select the "Users" option in the display.
- Press the ○ button.
- Use the ∪ or ∧ button to select the "Add User" option in the display.
- Press the ○ button. Enter the user name using the digit keys.
- Press the ○ button. Enter a password with up to five characters using the digit keys.
- Press the ○ button. Enter the password again using the digit keys.
- Press the ○ button. The mailbox has been set up.
- Press the ○ button to move back one menu level at a time.
9.9.2 Displaying mailbox/user data
NOTE: In order to configure the mailbox operation with the telephone network provider, you need the mailbox ID (extension number). The general mailbox has the mailbox ID "0". When other users are registered, the lowest mailbox ID available is automatically assigned (1-4).
- Press the ○ button.
- Use the ∪ or ∧ button to select the "SMS" option in the display.
- Press the ○ button.
- Use the ∪ or ∧ button to select the "Settings" option in the display.
- Press the ○ button.
- Use the √ or ∧ button to select the "User" option in the display.
- Press the 🔓 button.
- Use the ∪ or ∧ button to select the required user in the display.
- Press the 🔔 button. Enter the relevant password.
- Press the 🔓 button.
- Use the √ or ∧ button to select the "Terminal Number" option in the display.
- Press the ○ button. The terminal number is displayed.
NOTE: The terminal number displayed under Step 12 corresponds to the mailbox ID of the telephone network provider.
- Press the ○ button to move back one menu level at a time.
9.9.3 Sending an SMS message to a personal mailbox
NOTE: SMS mailboxes can only be used if the telephone network provider offers the facility. Please request a configuration instruction manual on setting up mailbox operation from your telephone network provider.
In order to receive a text message in your personal mailbox, the sender must know your mailbox ID and append it to your phone number.
You can send an SMS message to the receiving party containing information on your personal mailbox.
This SMS provides your SMS partner with your SMS call number including the current mailbox ID and it can be stored in the phone book. If the mailbox ID is invalid, the SMS message will not be sent.
9.9.4 Changing mailbox/user data
- Press the ○ button.
- Use the ∪ or ∧ button to select the "SMS" option in the display.
- Press the ○ button.
- Use the ∪ or ∧ button to select the "Settings" option in the display.
- Press the ○ button.
- Use the ∪ or ∧ button to select the "Users" option in the display.
- Press the ○ button.
- Use the ∪ or ∧ button to select the required user in the display.
- Press the 🔔 button. Enter the relevant password.
- Press the ○ button.
- Use the √ or ∧ button to select one of the options to be changed.
- Press the ○ button. Change the setting.
- Press the ○ button. Other changes can now be made.
- Press the ○ button to move back one menu level at a time.
9.9.5 Deleting a mailbox/user
- Press the 🔓 button.
- Use the ∪ or ∧ button to select the "SMS" option in the display.
- Press the 🔓 button.
- Use the ∪ or ∧ button to select the "Settings" option in the display.
- Press the 🔓 button.
- Use the ∪ or ∧ button to select the "Users" option in the display.
- Press the 🔓 button.
- Use the ∪ or ∧ button to select the "Delete User" option in the display.
- Press the ○ button.
- Use the ∪ or ∧ button to select the required user.
- Press the ○ button. Enter the System PIN (default setting=0000).
- Press the ○ button.
- Press the ○ button to move back one menu level at a time.
10 Calls Lists
10.1 Caller number display (CLIP function)
The CLIP function enables you to view the number of a caller when a call is received. If this function is available with your telephone line, the number of the caller appears in the display when the phone rings. If the caller has deactivated the transfer of his phone number, the number is not displayed. If the caller's number is stored in the phone book, the name appears in the display instead of the phone number.
The “Received calls” and “Missed calls” lists have a common memory space for 50 phone numbers. If, for example, there are 32 calls stored in the “Received calls” list, 18 memory segments remain available for “Missed calls”. As soon as all 50 memory segments are occupied, the oldest entry is deleted.
NOTE: The caller number display function is an optional service offered by telephone network providers. The caller number appears in the display if the service is offered by your telephone network provider. The display of the date and time is not transferred by all telephone network providers. Contact your network provider for further information. Transfer of the phone number or the date and time is not always possible either in some private branch exchanges.
10.2 Received calls
The “Received calls” list contains all the calls taken on the phone.
10.2.1 Displaying and calling back
- Press the ○ button.
- Use the ∪ or ∧ button to select the "Calls Lists" option in the display.
- Press the 🔓 button.
- Use the ∪ or ∧ button to select the "Received calls" option in the display.
- Press the ○ button. The list of calls received appears in the display.
- To call back a received call, use the √ or ^ buttons to select the required number in the display.
- Press the ⏻ button. A connection is established.
10.2.2 Delete entry
- Press the ○ button.
- Use the ∪ or ∧ button to select the "Calls Lists" option in the display.
- Press the ○ button.
- Use the ∪ or ∧ button to select the "Received calls" option in the display.
- Press the ○ button. The list of calls received appears in the display.
- Use the ∪ or ∧ button to select the number required in the display.
- Press the ○ button.
- Use the ∪ or ∧ button to select the "Delete" option in the display.
- Calls Lists -
NOTE: In addition to the "Delete" option, the "Show Details" option is also available. If the "Show Details" option is selected, press the ○ button to display the name and phone number. Press the ○ button to return to the "Received calls" list.
9. Press the ○ button. Deletion is confirmed in the display.
10. The "Received calls" list reappears in the handset display.
11. To delete more entries, repeat steps 6 to 9.
12. Press the ○ button to move back one menu level at a time.
10.2.3 Save entry in the phone book
A phone number stored in the “Received calls” list can be transferred directly to the phone book.
- Press the 🔓 button.
- Use the ∪ or ∧ button to select the "Calls Lists" option in the display.
- Press the 🔓 button.
- Use the ∪ or ∧ button to select the "Received calls" option in the display.
- Press the ○ button. The list of calls received appears in the display.
- Use the ∪ or ∧ button to select the number required in the display.
- Press the ○ button.
- Use the ∪ or ∧ buttons to select the "Save Number" option in the display.
- Press the ○ button.
- Enter the name using the digit keys.
- Press the ○ button twice. The entry is confirmed in the display.
- Press the ○ button to move back one menu level at a time.
10.3 Missed calls
The “Missed calls” list contains all the calls not taken so that you will not miss any calls even if your are absent. There are three ways to access the “Missed calls” list:
- Press the ∪ button or
- If the display indicates that missed calls have been saved, press the ○ button or
•Proceed as described in 10.3.1.
10.3.1 Displaying and calling back
- Press the ○ button.
- Use the √ or ∧ button to select the "Calls Lists" option in the display.
- Press the ○ button.
- Use the ∪ or ∧ button to select the "Missed calls" option in the display.
- Press the ○ button. The list of calls missed appears in the display.
NOTE: New calls are identified by a star.
- To call back a missed call, use the √ or ^ buttons to select the required number in the display.
- Press the ⏻ button. A connection is established.
10.3.2 Delete entry
- Press the ⬤ button. The list of calls missed appears in the display.
- Use the ∪ or ∧ button to select the number required in the display.
- Press the 🔓 button.
- Use the ∪ or ∧ button to select the "Delete" option in the display.
NOTE: In addition to the "Delete" option, the "Show Details" option is also available. If the "Show Details" option is selected, press the 🔔 button to display the name and phone number. Press the 🔔 button to return to the "Missed calls" list.
- Press the ○ button. Deletion is confirmed in the display.
- Press the ○ button to reset the handset to standby mode.
10.3.3 Save entry in the phone book
A phone number stored in the “Missed calls” list can be transferred directly to the phone book.
- Press the ⬤ button. The list of calls missed appears in the display.
- Use the ∪ or ∧ button to select the number required in the display.
- Press the ○ button.
- Use the ∪ or ∧ buttons to select the "Save Number" option in the display.
- Press the ○ button. Enter the name using the digit keys.
- Press the ○ button twice. The entry is confirmed in the display.
- Press the ○ button to reset the handset to standby mode.
NOTE: When the number in the phone book is stored together with a name, the number no longer appears in the display but the name instead.
- Calls Lists -
10.4 Dialled calls (redialling)
The “Dialled calls” list contains all the phone numbers you have dialled.
10.4.1 Displaying and calling
- Press the ⏰ button. The list of dialled numbers appears in the display.
NOTE: If the number is stored in the phone book, the name associated with it also appears.
-
To redial a previously dialled number call, use the √ or ∧ buttons to select the required number in the display.
-
Press the ⏻ button. A connection is established.
10.4.2 Delete entry
- Press the ⬤ button. The list of dialled numbers appears in the display.
- Use the ∪ or ∧ button to select the number required in the display.
- Press the ○ button.
- Use the ∪ or ∧ button to select the "Delete" option in the display.
NOTE: In addition to the "Delete Entry" option, the "Show Details" option is also available. If the "Show Details" option is selected, press the ○ button to display the name and phone number. Press the ○ button to return to the "Missed calls" list.
- Press the ○ button. Deletion is confirmed in the display.
- Press the ○ button to move back one menu level at a time.
10.4.3 Save entry in the phone book
A phone number stored in the "Dialled calls" list can be transferred directly to the phone book.
- Press the ⬤ button. The list of dialled numbers appears in the display.
- Use the ∪ or ∧ button to select the number required in the display.
- Press the ○ button.
- Use the ∪ or ∧ buttons to select the "Save Number" option in the display.
- Press the ○ button. Enter the name using the digit keys.
- Press the 🔔 button twice. The entry is confirmed in the display.
- Press the ○ button to move back one menu level at a time.
NOTE: When the number in the phone book is stored together with a name, the number no longer appears in the display but the name instead.
- Calls Lists -
10.4.4 Deleting a calls list
It is possible to delete all the calls in one of the calls lists ("Received calls", "Missed calls" or "Dialled calls") you have selected.
NOTE: The procedure is described according to the example of the "Received calls" list. The procedure is identical for the "Missed calls" and "Dialled calls" lists.
- Press the ○ button.
- Use the ∪ or ∧ button to select the "Calls Lists" option in the display.
- Press the ○ button.
- Use the √ or ∧ button to select the "Delete Calls List" option in the display.
- Press the ○ button.
- Use the ∪ or ∧ button to select the "Received calls" option in the display.
- Press the ○ button.
- Press the ○ button. A request for confirmation to delete the calls list appears in the display.
NOTE: In the next step, all the entries are deleted, irrevocably, from the "Received calls" list. The deletion process is cancelled by pressing the ○ button.
-
Press the ○ button. Deletion is confirmed in the display.
-
Press the ○ button to move back one menu level at a time.
10.4.5 Delete all calls lists
It is possible to delete all the calls in all the calls lists ("Received calls", "Missed calls" or "Dialled calls").
- Press the 🔓 button.
- Use the ∪ or ∧ button to select the "Calls Lists" option in the display.
- Press the ○ button.
- Use the ∪ or ∧ button to select the "Delete Calls List" option in the display.
- Press the ○ button.
- Use the ∪ or ∧ button to select the "All Calls" option in the display.
- Press the ○ button. A request for confirmation to delete the entries appears in the display.
NOTE: In the next step, all the entries are deleted, irrevocably, from all the calls lists ("Received calls", "Missed calls" and "Dialled calls"). The deletion process is cancelled by pressing the ○ button.
- Press the ○ button. Deletion is confirmed in the display.
- Press the ○ button to move back one menu level at a time.
11 Handset
Various settings can be defined on the handset according to individual needs.
11.1 Assigning a ringing melody (internal and external calls)
Internal and external calls can be assigned different ringing melodies. The setting procedure is described according to the example of external calls.
- Press the 🔓 button.
- Use the ∪ or ∧ button to select the "Handset" option in the display.
- Press the 🔔 button. Several options appear in the display.
- Use the ∪ or ∧ button to select the "Ringtone" option.
- Press the 🔓 button.
- Use the ∪ or ∧ button to select the "External Calls" option.
- Press the 🔔 button. Several melodies appear in the display for selection.
- Use the ∪ or ∧ button to select the required melody.
- Press the ○ button. The assignment is confirmed in the display.
- Press the ○ button to move back one menu level at a time.
11.2 Setting the ring volume
- Press the ○ button.
- Use the ∪ or ∧ button to select the "Handset" option in the display.
- Press the 🔔 button. Several options appear in the display.
- Use the ∪ or ∧ button to select the "Ring Volume" option.
- Press the ○ button.
- Use the ∪ or ∧ button to select the required ring volume.
NOTE: If you select the "Ringer off" option, the 🎯 icon appears in the display.
-
Press the 🔔 button. The assignment is confirmed in the display.
-
Press the ○ button to move back one menu level at a time.
11.3 Entering/Changing the name of the handset
- Press the ○ button.
- Use the √ or ∧ button to select the "Handset" option in the display.
- Press the ○ button. Several options appear in the display.
- Use the ∪ or ∧ button to select the "Handset Name" option.
- Press the ○ button. The message "Name" appears in the display.
- Enter the required name (max. 8 characters). Delete any incorrect entries with the ○ button. Press the ∪ or ∧ button to move the cursor to the left or right.
- Press the ○ button. The assignment is confirmed in the display.
- Press the ○ button to move back one menu level at a time.
11.4 Setting the language
Display texts and messages can appear in the display in various languages.
- Press the ○ button.
- Use the ∪ or ∧ button to select the "Handset" option in the display.
- Press the ○ button. Several options appear in the display.
- Use the √ or ∧ button to select the "Language" option.
- Press the ○ button. Several languages appear in the display for selection.
- Use the ∪ or ∧ button to select the required language.
- Press the ○ button. The assignment is confirmed in the display.
- Press the ○ button to move back one menu level at a time.
11.5 Setting the menu colour
The background colours of the menu options can be adjusted.
- Press the 🔓 button.
- Use the √ or ∧ button to select the "Handset" option.
- Press the ○ button. Several options appear in the display.
- Use the √ or ∧ button to select the "Menu Colour" option.
- Press the 🔔 button. Several colours appear in the display for selection.
- Use the √ or ∧ button to select the required colour.
- Press the 🔔 button. The assignment is confirmed in the display.
- Press the ○ button to move back one menu level at a time.
11.6 Activating the Auto Talk function
When the Auto Talk function has been activated, calls can be taken simply by removing the handset from the base station. The Call button ⏻ need not be pressed in addition.
- Press the 🔓 button.
- Use the √ or ∧ button to select the "Handset" option.
- Press the ○ button. Several options appear in the display.
- Use the ∪ or ∧ button to select the "Auto Talk" option.
- Press the ○ button.
- Use the ∪ or ∧ button to select the "On" option.
- Press the ○ button. The assignment is confirmed in the display.
- Press the ○ button to move back one menu level at a time.
- Handset -
11.7 Activating the PABX access code (outside line)
In the case of some private branch exchanges, a certain number must be dialled first (e.g. "0" or "9") before a dialling tone for an outside line is received. The digit entered here is automatically dialled before the actual phone number selected from the phone book or calls list.
- Press the ○ button.
- Use the √ or ∧ button to select the "Handset" option.
- Press the ○ button. Several options appear in the display.
- Use the √ or ∧ button to select the "PABX Access Code" option.
- Press the 🔓 button.
- Use the ∪ or ∧ button to select the "Set Code" option.
- Press the ○ button. The message "Set Code" appears in the display.
- Enter the digit to be assigned (max. 4 different digits possible).
- Press the 🔔 button. The assignment is confirmed in the display.
-
Then select the "On" option.
-
Press the ○ button. The assignment is confirmed in the display.
-
If you want to deactivate the automatic access code, select the "Off" option and press the ○ button.
-
Press the ○ button to move back one menu level at a time.
12 Registering and Deregistering Handsets
12.1 Register handset
- Press the ○ button.
- Use the ∪ or ∧ button to select the "Registration" option in the display.
- Press the ○ button.
- Use the ∪ or ∧ button to select the "Register Handset" option in the display.
- Press the ○ button.
- Use the ∪ or ∧ button to select the "Base 1" option in the display.
NOTE: If the you want to register the handset on a new base station, select a base not marked by a star. If the base station is marked by a star, the memory location is occupied.
- Press the ○ button and enter the PIN.
- Press the ○ button. The message "Base Search" appears in the display.
- Press and hold the Paging button ⏻ on the base station (approx. 5 sec.) until you hear an acoustic signal. Registration is initiated.
NOTE: In order to register a DECT-GAP handset from another manufacturer, follow the instructions in the operating manual provided by the original manufacturer and then press the ⏻ button on the base station.
- Press the 🔔 button. The handset is now registered.
The handset is automatically assigned the lowest free internal number (1-5). The first handset registered has the internal number 1. The second has the internal number 2. When in standby mode, the internal number appears in the handset display following the handset name.
12.2 Deregister handset
NOTE: A handset can only be deregistered by another handset still registered. This means it is not possible to complete the deregistration using the handset which is to be deregistered.
- Press the ○ button.
- Use the ∪ or ∧ button to select the "Registration" option in the display.
- Press the ○ button.
- Use the ∪ or ∧ button to select the "De-register" option in the display.
- Press the ○ button. Enter the PIN.
- Press the ○ button. Select the handset to be deregistered.
- Press the 🔔 button twice. The handset is now deregistered.
- Registering and Deregistering Handsets -
12.3 Select base station
If your handset is registered on several base stations, it can be set to one specific base station or to the automatic search for the base station with the best reception. To deactivate the automatic search setting, the handset must be reset to a specific base station again.
- Press the ○ button.
- Use the ∪ or ∧ button to select the "Registration" option in the display.
- Press the ○ button.
- Use the ∪ or ∧ button to select the "Select Base" option in the display.
- Press the ○ button.
- Use the ∪ or ∧ button to select the required base station or "Automatic".
- Press the ○ button. The selection is confirmed.
13 Multiple Handsets
Up to four more handsets can be registered on the base station. Each handset can only be registered on one base station at any particular time. If you register the handset on a new base station, it is automatically deregistered from the old one.
NOTE: The standardised GAP Standard enables AUDIOLINE handsets and even those from other manufacturers to be integrated in the telephone system. In the same way, an AUDIOLINE handset can be registered on base stations from other manufacturers as long as they comply with the GAP Standard.
The following options are available if two handsets are used:
- Internal calls between the handsets (intercom),
- External calls can be transferred from the handset,
- Incoming external calls are received on all handsets.
NOTE: If one handset is currently using the outside line, no further external call is possible.
GAP: Generic Access Profile = Standard for the interoperation of handsets and base stations from other manufacturers.
13.1 Internal calls (intercom function)
As soon as several handsets are registered on a base station, they can be used for internal calls.
- Press the Ⓗ button and the internal number of the handset, e.g. Ⓗ 2.
- The call can be taken on the handset called.
NOTE: If an external call is received during an internal call, short acoustic signals are issued and the caller's number appears in the display, if available.
- End the internal call by pressing the 🔗 button.
- Press the ⏻ button to take an external call.
- Multiple Handsets -
13.2 Transferring external calls to another handset
If you have taken an external call on a handset, the call can be transferred to another handset. Press the Ⓗ button and then the internal number of the required handset.
NOTE: If the handset called does not answer, take the call back by pressing the Ⓗ button.
After the internal call has been taken by the handset called, the following options are available:
- Consultation / Brokering: You can talk to the party using the other handset and then return the external caller by pressing the Ⓗ button. You can switch between the external and internal parties as often as necessary.
- Transfer call: By pressing the 🔒 button on the first handset, the external call is transferred to the handset called.
13.3 Conference calls
An external call can be transferred to another internal handset for a conference call. This enables two handset users to confer with the external caller at the same time.
- Establish the required connection to the external caller.
- Press the Ⓗ button and then the internal number of the required, second handset.
- When the second, internal handset user has taken the call, press the Ⓞ button for 2 seconds and all three parties are connected in a conference call.
NOTE: During a conference call, press the Ⓗ button to put the external caller on hold. Press the # button to reactivate the conference function.
- The conference is terminated by one of the handset users ending the call.
14 Base Settings
This menu option relates to base station settings which can be changed, such as ringing melody, ring volume and system PIN.
14.1 Assigning a ringing melody to the base station
- Press the 🔓 button.
- Use the √ or ∧ button to select the "Base settings" option in the display.
- Press the 🔔 button. Several options appear in the display.
- Use the ∪ or ∧ button to select the "Base Ringtone" option.
- Press the ○ button. Several melodies appear in the display for selection.
- Use the ∪ or ∧ button to select the required melody.
- Press the ○ button. The assignment is confirmed in the display.
- Press the ○ button as often as necessary to reset the handset to standby mode.
14.2 Setting the base station ring volume
- Press the ○ button.
- Use the ∪ or ∧ button to select the "Base settings" option in the display.
- Press the 🔔 button. Several options appear in the display.
- Use the ∪ or ∧ button to select the "Base Volume" option.
- Press the ○ button.
- Use the ∪ or ∧ button to select the required ring volume.
- Press the ☐ button. The assignment is confirmed in the display.
- Press the ○ button as often as necessary to reset the handset to standby mode.
14.3 Activating/Deactivating handset priority
This function enables you to define whether all the registered handsets should ring in the event of an incoming call or one specific handset with priority should initially ring.
- Press the ○ button.
- Use the ∪ or ∧ button to select the "Base settings" option in the display.
- Press the 🔔 button. Several options appear in the display.
- Use the ∪ or ∧ button to select the "Handset Priority" option.
- Press the 🔔 button. Several options appear in the display.
- Select the "Select Handset" option.
- Press the 🔗 button. Select the required handset.
- Press the ○ button. Several options appear in the display. On selecting the "Rings 4" option, for example, the handset assigned priority rings four times before the other handsets start to ring.
- Select an option and press the ○ button. The assignment is confirmed in the display.
- Press the ○ button to move back one menu level at a time.
NOTE: If you want all the handsets to ring simultaneously, select the "All Handsets" option in Step 6, press the ○ button and exit from the setting.
- Base Station Settings -
14.4 Setting the recall time
Two recall times are available for selection, “Recall 1” (100 ms) or “Recall 2” (300 ms). A recall time of 100 ms is required for operation in private branch exchanges. The T-Net provided by Deutsche Telekom, for example, operates with a recall time of 300 ms.
- Press the ○ button.
- Use the ∪ or ∧ button to select the "Base settings" option in the display.
- Press the ○ button. Several options appear in the display.
- Use the ∪ or ∧ button to select the "Recall Mode" option.
- Press the ☐ button. Two recall times appear in the display for selection.
- Use the ∪ or ∧ button to select recall time "Recall 1" (100 ms) or "Recall 2" (300 ms).
- Press the ○ button. The assignment is confirmed in the display.
- Press the ○ button to move back one menu level at a time.
14.5 Changing the system PIN
- Press the ○ button.
- Use the ∪ or ∧ button to select the "Base settings" option in the display.
- Press the ○ button. Several options appear in the display.
- Use the ∪ or ∧ button to select the "System PIN" option.
- Press the 🔔 button. The message "Enter old PIN" appears in the display.
- Enter the old PIN (default setting: 0000). A “*” appears in the display instead of the number actually entered. If you enter an incorrect digit, delete it by pressing the ○ button.
- When the old PIN has been correctly entered, press the ○ button. The message "Enter new PIN" appears.
- Enter a new PIN (max. 8 digits possible).
- Press the 🔔 button. The message "Confirm new PIN" appears.
- Enter the new PIN once again.
- Press the ○ button. The assignment is confirmed in the display.
- Press the ○ button to move back one menu level at a time.
NOTE: If you forget your PIN code, it can only be reset with the aid of our Service Hotline. For information on our Service-Hotline, please refer to the back cover of the operating manual.
- Time Settings -
15 Time Settings
The 24-hour clock with integrated alarm function can be used to ensure you don't miss any appointments.
15.1 Setting the time and date
- Press the 🔓 button.
- Use the ∪ or ∧ button to select the "Time settings" option in the display.
- Press the 🔓 button.
- Use the ∪ or ∧ button to select the "Set Date and Time" option in the display.
- Press the ○ button. Enter the date using the digit keys.
- Press the 🔔 button. Enter the time using the digit keys.
- Press the ○ button. The data entered is stored.
- Press the ○ button to move back one menu level at a time.
NOTE: The time and date are cleared in the event of a power failure or disconnection from the power supply.
15.2 Setting the alarm tone
- Press the 🔓 button.
- Use the ∪ or ∧ button to select the "Time settings" option in the display.
- Press the 🔓 button.
- Use the ∪ or ∧ button to select the "Alarm" option in the display.
- Press the 🔓 button.
- Use the ∪ or ∧ button to select the "Set Alarm Tone" option in the display.
- Press the 🔓 button.
- Use the ∪ or ∧ button to select the required alarm tone.
- Press the ○ button. The alarm tone is stored.
15.3 Entering the alarm time (ON/OFF)
- Press the 🔓 button.
- Use the ∪ or ∧ button to select the "Time settings" option in the display.
- Press the ○ button.
- Use the ∪ or ∧ button to select the "Alarm" option in the display.
- Press the ○ button.
- Use the ∪ or ∧ button to select the "On/Off" option in the display.
- Press the ○ button.
- Use the ∪ or ∧ button to select "On Once", in which case the alarm occurs once, or "On Daily", whereby the alarm occurs at the same time each day.
- Press the ○ button. Enter the time for the alarm.
- Press the ○ button. The data entered is stored.
NOTE: After entering the alarm time, the alarm function is activated. The 📋 icon appears in the display beside the time.
To deactivate the alarm function, select the "Off" option in Step 8.
- Press the ○ button to move back one menu level at a time.
- Troubleshooting -
16 Troubleshooting
Should problems arise with the telephone, refer to the following information. In the case of technical problems, contact our Hotline, tel. 0180 5 00 13 88 (Telekom costs at time of going to print: 12 ct/min).
In the case of claims under the terms of guarantee, contact your sales outlet. There is a 2 year period of guarantee.
| Faults | Corrective measures |
| Nothing appears in the display | - Handset is not switched on. - Batteries are empty or defective. |
| The caller's number is not displayed despite CLIP function | - Caller has not enabled the number transfer by the telephone network provider. |
| No connection to base station possible | - Check that the handset has been registered on the base station with the correct PIN. |
| No telephone calls possible | - The telephone line is not connected properly or is defective. Only use the telephone connection cable supplied. - Test whether the telephone connection is in order by using another telephone. - The power adaptor plug is not plugged in or there is a complete power failure. - Batteries are empty or defective. - The handset is too far from the base station. |
| Connection is disturbed or cut off | - The handset is too far from the base station. - The base station is in an unsuitable location. |
| The charging control lamp does not light up | - Place the handset correctly in the base station, clean the contact surfaces on the handset and the base station with a soft, dry cloth. |
| The battery icon flashes in the display after a few hours | - Place the handset in the base station for 14 hours. If this does not help, replace the rechargeable standard batteries. |
| Display is dark - Caused by | direct sunlight, allow handset to cool down. |
| SMS message cannot be sent | - Check the SMS centres have been entered correctly. Ask your telephone network provider. - Your telephone is integrated in a PABX system. - Request the telephone network provider to activate the SMS services. |
- Important Information -
17 Important Information
17.1 Technical data
| Feature | Value |
| Standard DECT-GAP | |
| Power supply Base station, 220/230 V, 50 Hz | |
| Range (outdoors/indoors) 300 m / 50 m | |
| Standby Up to 85 h | |
| Max. talk time Up to 10 h | |
| Rechargeable standard batteries 2 x AAA (1.2V / 750 mAh) | |
| Dialling method Tone dialling method (DTMF) | |
| Permissible ambient temperature 10°C to 30°C | |
| Permissible relative humidity 20% to 75% | |
| Recall times 100 ms or 300 ms | |
DECT: Digital European Cordless Telephone = Standard for cordless telephones.
GAP: Generic Access Profile = Standard for the interoperation of handsets and base stations from other manufacturers.
17.2 Replacing the telephone connection cable
If you need to replace the telephone cable, ensure to purchase a corresponding one from your dealer which has an identical pin assignment (see below).
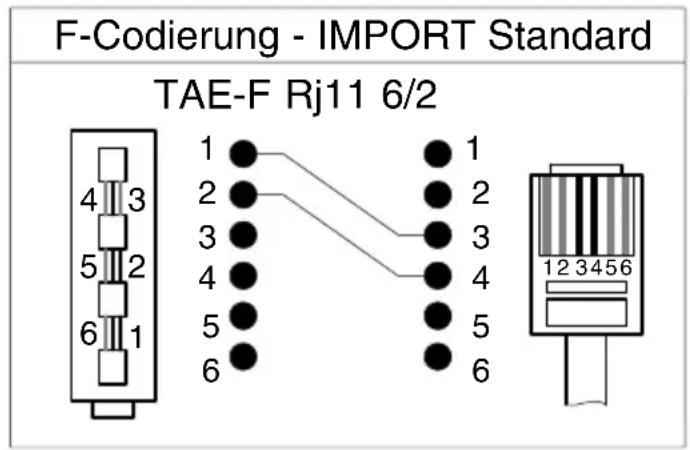
text_image
F-Codierung - IMPORT Standard TAE-F Rj11 6/2- Important Information -
17.3 Guarantee
AUDIOLINE equipment is produced and tested according to the latest production methods. The implementation of carefully chosen materials and highly developed technologies ensure trouble-free functioning and a long service life. The terms of guarantee do not apply where the cause of equipment malfunction is the fault of the telephone network operator or any interposed private branch extension system. The terms of guarantee do not apply to the standard batteries or power packs used in the products. The period of guarantee is 24 months from the date of purchase.
All deficiencies resulting from material or production faults which occur during the period of guarantee will be eliminated free of charge. Rights to claims under the terms of guarantee are annulled following intervention by the purchaser or third parties. Damage caused as a result of improper handling or operation, incorrect positioning or storing, improper connection or installation, Acts of God or other external influence are not covered by the terms of guarantee. In the case of complaints, we reserve the right to repair or replace defect parts or provide a replacement device. Replacement parts or devices become our property. Rights to compensation in the case of damage are excluded where there is no evidence of intent or gross negligence by the manufacturer.
If your device shows signs of defect during the period of guarantee, please return it to the sales outlet in which you purchased the AUDIOLINE device together with the purchase receipt. All rights to claims under the terms of guarantee in accordance with this agreement must be asserted exclusively with regard to your sales outlet. Two years after the purchase and transfer of our products, claims under the terms of guarantee can no longer be asserted.
18 Declaration of Conformity
This device fulfils the requirements stipulated in the EU directive:
1999/5/EU directive on radio equipment and telecommunications terminal equipment and the mutual recognition of their conformity. Conformity with the above mentioned directive is confirmed by the CE symbol on the device.
To view the complete Declaration of Conformity, please refer to the free download available on our web site www.audioline.de.
CE
19 Important Notes on the Guarantee
The period of guarantee for the AUDIOLINE product begins on the date of purchase. Rights to claims under the terms of guarantee relate to deficiencies resulting from material or production faults. Rights to claims under the terms of guarantee are annulled following intervention by the purchaser or third parties. Damage caused as a result of improper handling or operation, normal wear and tear, incorrect positioning or storing, improper connection or installation, Acts of God or other external influence are not covered by the terms of guarantee.
CLAIMS UNDER THE TERMS OF GUARANTEE MAY ONLY BE ASSERTED TO THE RETAILER WHERE THE EQUIPMENT WAS PURCHASED, WHEREBY THE PURCHASE RECEIPT MUST ALSO BE SUBMITTED.
TO PREVENT UNNECESSARY LONG DELAYS, PLEASE DO NOT SEND EQUIPMENT UNDER COMPLAINT TO OUR OFFICE ADDRESS.
IN THE CASE OF QUESTIONS CONCERNING OPERATION OR THE TERMS OF GUARANTEE, PLEASE REFER TO THE OPERATING MANUAL OR CONTACT OUR HOTLINE:
0180 500 13 88 (Telekom cost at time of going to print: 12 ct/min)
AUDIOLINE GmbH
Neuss
Service Hotline 0180 500 13 88
(Telekom cost at time of going to print: 12 ct/min)
Internet: www.audioline.de - E-mail: info@audioline.de