Barista A3 - Coffee machine ECM - Free user manual and instructions
Find the device manual for free Barista A3 ECM in PDF.


User questions about Barista A3 ECM
0 question about this device. Answer the ones you know or ask your own.
Ask a new question about this device
Download the instructions for your Coffee machine in PDF format for free! Find your manual Barista A3 - ECM and take your electronic device back in hand. On this page are published all the documents necessary for the use of your device. Barista A3 by ECM.
USER MANUAL Barista A3 ECM
natural_image
Exterior view of a modern espresso machine with two dual levers and matching cups on a metal tray (no visible text or symbols)
text_image
ESPRESSO COFFEE MACHINES ECM MANUFACTURE HEIDELBERG · GERMANYBarista A2 & Barista A3
With the Barista A2/Barista A3, you have purchased an espresso coffee machine of the highest quality. We thank you for your choice and wish you a lot of pleasure preparing perfect espresso and cappuccino with your espresso coffee machine. Please read the instruction manual carefully before using your new machine. If you have any further questions or if you require any further information, please contact your local specialised dealer before starting up the espresso coffee machine. Please keep the instruction manual within reach for future reference.

text_image
ESPRESSO COFFEE MACHINES ECM MANUFACTURE HEIDELBERG·GERMANYECM Espresso Coffee Machines
Manufacture GmbH
Dilsberger Str. 68
D - 69151 Neckargemünd / Heidelberg
12 EMPFOHLENES ZUBEHÖR....15
1 PRODUCT DELIVERY....16
2 GENERAL ADVICE....16
2.1 General safety notes....16
2.2 Proper use 16
3 MACHINE DESCRIPTION....17
3.1 Machine parts....17
3.2 Control panel 17
3.3 Technical data 17
4 MACHINE INSTALLATION 18
4.1 Preparation for installation....18
4.2 Electrical connection....18
4.3 Water supply connection....18
5 FIRST USE 19
5.1 First use....19
5.2 Programming of the dosage....19
5.3 Activation of the pre-infusion ....20
5.4 Deactivating the pre-infusion....20
6 USE OF THE MACHINE....20
6.1 Preparation of the machine ....20
6.2 Preparing coffee 21
6.3 Dispensing of hot water....21
DEUTSCH
6.4 Dispensing of steam 21
7 CLEANING AND MAINTENANCE 22
7.1 General cleaning 22
7.2 Automatic group cleaning and degreasing of the brew groups....22
7.3 Draining the boiler....23
7.4 Small technical maintenance 23
8 TRANSPORT AND WAREHOUSING 24
8.1 Packing....24
8.2 Transport 24
8.3 Warehousing 25
9 DISPOSAL....25
10 CE CONFORMITY....25
11 TROUBLESHOOTING....25
12 RECOMMENDED ACCESSORIES....26
1 LIEFERUMFANG
natural_image
Close-up of a mechanical component with a threaded bolt and coiled hose (no visible text or symbols)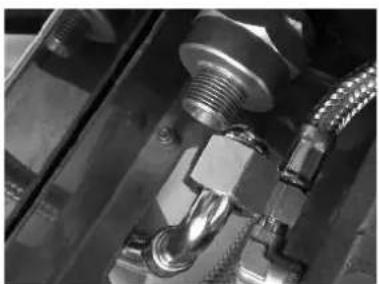
natural_image
Close-up of mechanical components with threaded and threaded parts (no visible text or symbols)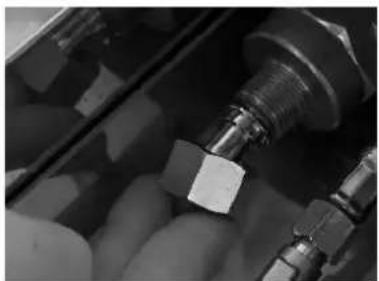
natural_image
Close-up of mechanical components including a threaded bolt and flange assembly (no visible text or symbols)
Wichtig
natural_image
Close-up of a black rectangular object with a white textured surface, resting on a dark base (no visible text or symbols)
natural_image
Close-up of a mechanical component with no visible text or symbols
Wichtig
text_image
P 1 1 2 2 Dnatural_image
Close-up of a mechanical component with threaded base and flange (no visible text or symbols)natural_image
Close-up of mechanical components including a black valve and metallic housing (no visible text or symbols)text_image
P 1 1 2 2 D
Vorsicht!
text_image
Boiler drainage OpenEMC: 89/336/CEE, 93/68/CEE, 92/31/CEE
PED: 97/23/CE
12 EMPFOHLENES ZUBEHÖR
natural_image
Metallic stainless steel bucket with a black handle and circular logo (no visible text or symbols)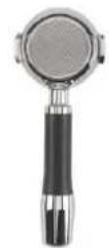
natural_image
Close-up of a metallic cylindrical mechanical component with a central V-shaped groove and two circular cutouts (no text or symbols visible)natural_image
Three metallic cylindrical objects with rounded ends, no visible text or symbols1 Porta filter with cup - 1 spout
2 Porta filters with coffee filter - 2 spouts (Barista A2)
3 Porta filters with coffee filter - 2 spouts (Barista A3)
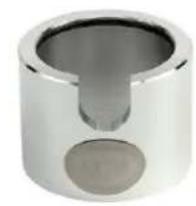
1 Blind filter
2 Drip-grids to raise the espresso cups (Barista A2)
3 Drip-grids to raise the espresso cups (Barista A3)
1 Flexible hose for fresh water supply:3/8 " for connection waterpipe, 150 cm
1 Drainage hose, 150 cm
2 GENERAL ADVICE
2.1 General safety notes


- Make sure that the local main supply voltage corresponds to the information given on the type plate on the front panel of the espresso machine.
- Carry out the installation of the machine according to the instruction in chapter 4.
- Plug the machine into a grounded socket only and do not leave it unattended.
- Do not roll or bend the power cord.
- Do not use an extension cord/ do not use a multiple socket.
- Place the machine on an even and stable surface. You can regulate the height of the machine by adjusting the feet of the machine.
- Never place the machine on hot surfaces.
- Never immerse the machine in water; do not operate the machine with wet hands
- The machine should only be used by experienced adult persons.
- The machine is not intended for use by persons (including children) with reduced physical, sensory or mental capabilities, or lack of experience and knowledge, unless they have been given supervision or instruction concerning use of the appliance by a person responsible for their safety.
• Children should be supervised to ensure that they do not play with the appliance. - Do not expose the machine to inclement weather (frost, snow, rain) and do not use it outdoors.
- Keep the packing out of reach of children.
- Only use original spare parts.
- Do not operate the machine with carbonated water, but with soft potable water.
- Do not operate the machine without water.
If you have any further questions or if you require any further information, please contact your specialised dealer before starting up the espresso coffee machine.
Our machines comply with the relevant safety regulations.
Any repairs or changes of single components must be carried out by an authorised specialty dealer. If the supply cord is damaged, it must be replaced by the manufacturer, its' service agent or similarly qualified persons in order to avoid a hazard.
In case of non-observance, the manufacturer does not assume liability and is not liable for recourse.
Ask for authorised service points outside of Europe.

Important
When necessary, make use of a water softener / water filter cartridge in order to reach an adequate hardness degree. If these measures are insufficient, a prophylactic descaling of the machine is possible. Contact your specialised dealer before undertaking this measure.
2.2 Proper use
The Barista A2/Barista A3 may be used for the preparation of coffee, hot water and steam only. Use of the machine other than for the aforementioned purpose is strictly prohibited. The manufacturer cannot be held responsible for damages due to unsuitable use of the machine and is not liable for recourse.
3 MACHINE DESCRIPTION
3.1 Machine parts
text_image
1 4 4 6 8 8 10 9 2 5 3 7Barista A2
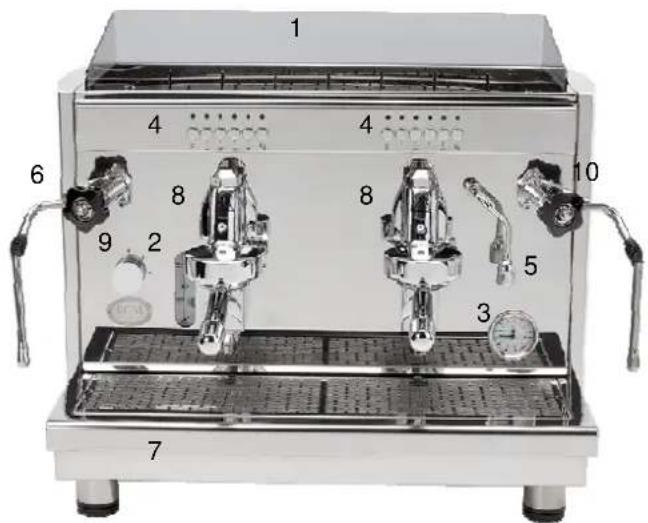
1 Cup heating tray
2 Water level indicator boiler
3 Boiler / pump pressure gauge
4 Control panel
5 Hot water dispenser
6 Steam lever valve with steam wand left
7 Drip tray (drip-grids, not pictured)
8 Brew groups
9 On / Off switch 0/1/2
0= Off/ 1=Pump/ 2=Pump + Heater
10 Steam lever valve with steam wand right

Caution!
Danger of injury: The following parts are hot or may become hot:
• area around the steam and hot water wands
• steam and hot water wands
- porta filter
- brew groups
• body (upper part and side frames)
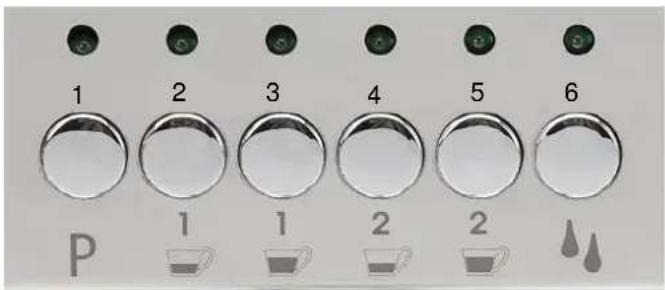
3.2 Control panel
All lamps are illuminated when the machine is operational. After having pressed a button, only that respective lamp will be illuminated.
text_image
1 2 3 4 5 6 P 1 1 2 2 水滴Automatic programming of doses and quantity of cups:
1 Programming button / manual
2 Single espresso
3 1 large cup
4 Double espresso
5 2 large cups
6 Hot water
3.3 Technical data
Barista A2
Voltages: 2 phases, 230 V each (different voltages available upon request)
Power: 4.000 W
Water tank: 14.0 L
Measurements: W x D x H / 730 mm x 537 mm x 520 mm
Barista A3
Voltages: 2 phases, 230 V each (different voltages available upon request)
Power: 5.000 W
Water tank: 21.0 L
Measurements: W x D x H / 940 mm x 537 mm x 520 mm
4 MACHINE INSTALLATION

The installation is to be carried out exclusively by qualified specialists, according to the following instructions and in compliance with valid laws.
The following chapters deal with the preparation of the machine, its electrical connection, water supply connection and drainage connection.
4.1 Preparation for installation

- Place the machine on an even and stable surface. You can regulate the height by adjusting the feet of the machine.
- Never place the machine on hot surfaces.
4.2 Electrical connection

- The electrical connection has to be conducted by authorised specialty dealers.
4.3 Water supply connection

Important
Make sure that the water supply installation is connected to a potable water supply with an operating pressure with max 3 bars. In case of an operating pressure of more than 1.5 bars, use a pressure regulator.
Please note that often the pressure of the water supply varies. If the water supply pressure temporarily exceeds 1.5 bars, use a pressure regulator. Furthermore, a shut-off valve should be used. This valve should be located where it is easily reached, so that the water supply can be interrupted at any time.
Water connection 3/8"
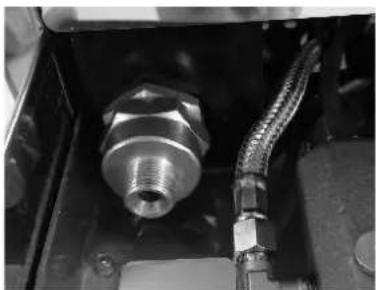
natural_image
Close-up of a mechanical component with a threaded bolt and coiled cable (no visible text or symbols)Connecting the metal hose
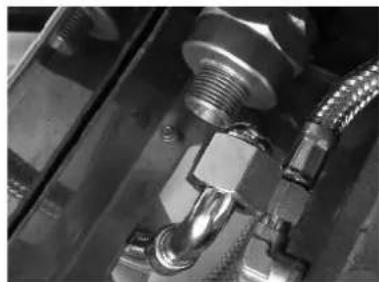
natural_image
Close-up of a mechanical assembly with threaded connector and tubing (no visible text or symbols)Connection (wrench size 20)
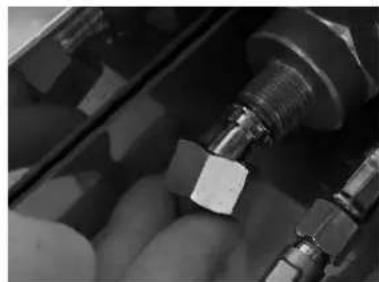
natural_image
Close-up of mechanical components with a metallic fitting and threaded shaft (no visible text or symbols)
Important
Rotary pumps require pre-pressure. For this reason, they should always be connected to a fixed water supply and not be used with an external, pressure-less water container. This could damage the pump.
4.4 Installation of the water drainage
The hose for the waste water is inserted into the appropriate L-connector at the bottom of the machine and the already installed syphon drainage. Then the L-connector is screwed together with the drainage funnel. Please make sure that the drainage hose is positioned in a manner that no water can accumulate in it.
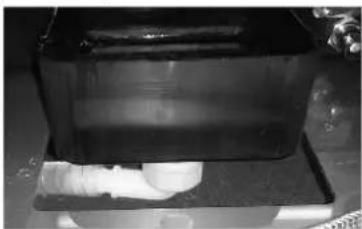
natural_image
Close-up of a black rectangular object with a white cylindrical object on top, resting on a dark surface (no visible text or symbols)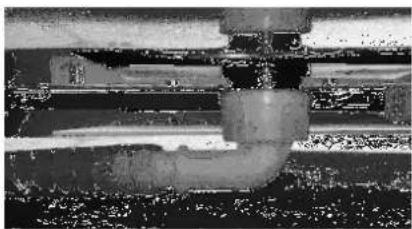
natural_image
Close-up of a mechanical component with no visible text or symbols
Important
- Connecting the machine to a fixed water connection and installing the pressure regulator has to be carried out by authorized service personnel.
- In order to avoid a premature calcification of your machine, we recommend to install a water softening system.
5 FIRST USE
5.1 First use
Read the instruction manual carefully prior to operating the machine.

Prior to starting the machine, check if:
• The steam and hot water valves are closed.
• The machine is switched off. (On/Off dial in position 0.)
Now you can start up your machine:
Switch the rotary dial to position 1, so that the boiler is filled. The boiler is filled as soon as the pump stops. Now switch the rotary dial to position 2. This makes sure that the machine is filled with water only when heated up. Press the P-buttons of each brew group to release water.
Caution!
The heating element can burn if the machine is heated up without being filled with water (rotary dial at position 2).
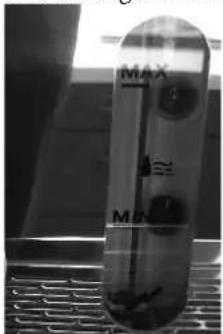
text_image
MAX ≈3 MAX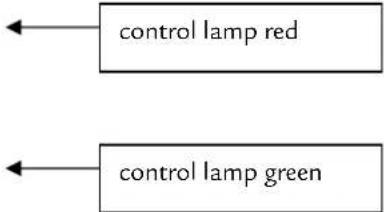
flowchart
graph TD
    A["control lamp red"] --> B
    C["control lamp green"] --> D
control lamp red = The water level is too low and the pump fills the boiler control lamp green = The machine is switched on
5.2 Programming of the dosage
To program the doses, proceed as follows:
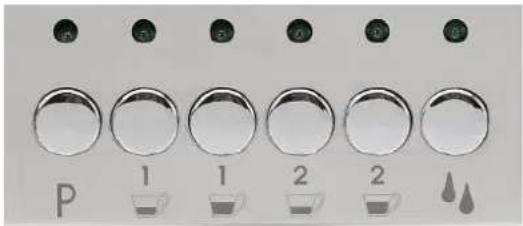
Choose a porta filter and fill it with the desired quantity of ground coffee for the button you would like to program (e.g. filter 1 cup for porta filter 1 cup: 7g coffee, button no. 1). Place a cup under the porta filter.
text_image
P 1 1 2 2 DPlease note: When the left control panel is programmed, all other control panels are automatically programmed/overwritten synchronously. If you would like to program the control panels individually, it is mandatory to start programming with the left control panel and then proceed to the next.
1 Press the P-button until the lamp above the button flashes.
2 Choose the button you would like to program and press it for a short time. Coffee is released into the cup.
3 As soon as the desired quantity of coffee is reached, press the button again. Thus, the dose for the chosen button has been programmed.
4 The button for hot water is programmed in the same manner as the coffee buttons.

- Please note that the doses can vary if different quantities of coffee are used for coffee preparation or if the imposed pressure on the coffee is different while tamping.
- Every button can be re-programmed at any time.
5.3 Activation of the pre-infusion
During pre-infusion, the coffee grounds are dampened prior to the espresso extraction and slowly well up. This makes the coffee puck more stable and keeps it from being destroyed by the high brewing pressure. Furthermore, the oils and aromas are able to develop prior to extraction.
Please follow below steps to activate the pre-infusion:
Only the left brew group is used to set up pre-infusion.
1 The machine is turned off.
2 Depress button 2 (1 espresso) and switch the machine on. The lamp of that button becomes illuminated. Release the button.
3 Turn the machine off.
4 When the machine is then switched on again, the pre-infusion on all brew groups is activated on buttons 2 (1 espresso) and 3 (large cup) only. No provisions for a pre-infusion have been made for buttons 4 and 5.
5.4 Deactivating the pre-infusion
Please follow below steps to deactivate the pre-infusion:
Only the left brew group is used to deactivate pre-infusion.
1 The machine is turned off.
2 Depress button 3 (1 large cup) and switch the machine on. That button becomes illuminated. Release the button.
3 Switch the machine off.
4 When the machine is then switched on again, the pre-infusion on all_ brew groups is deactivated.
6 USE OF THE MACHINE
6.1 Preparation of the machine
The switched off machine is to be placed in operation as follows:
1 Make sure that there is water pressure in the supply hose.
2 Turn the machine on (power switch in position "2").
3 Wait until the pressure gauge indicates approx. 1.0-1.25 bar.
4 Depending on the ambient temperature, the heating-up phase is approx. 45 minutes.
5 The machine is now ready for use.
6 Before preparing the first coffee, clamp the porta filter into the brew group and press the desired button of the control panel. Release some water from the brew group. This way, the porta filter has an optimum temperature.
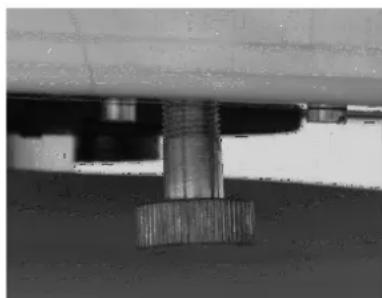
7 The regulation of the pump pressure takes place via the adjustment screw at the bottom of the machine (Pic. 1). In order to read the current pump pressure, insert the porta filter with blind filter into any of the brew groups and press the P-button. The current pump pressure can be read from the gauge. Stop the water flow by pressing the P-button once again. Now start the adjustment of the pump pressure and repeat point 7 until the desired pressure has been reached. The pump pressure changes with the change in the plumbing pressure.
natural_image
Close-up of a mechanical component with threaded base and flange (no visible text or symbols)Pic.1, adjustment screw for the pump pressure

It is recommended to leave the porta filter in the brew group, keeping it warm for optimum temperature for coffee dispersion.
6.2 Preparing coffee
Use the porta filter with 1 spout and the corresponding filter (1 cup) for the preparation of 1 cup. Use the porta filter with 2 spouts and the big filter (2 cups) for the preparation of 2 cups.
1 For espresso, i.e. Café Crème, fill the finely ground coffee into the corresponding filter. (approx. 7 – 8g per cup).

Please make sure that the filter is inserted firmly into the porta filter.
2 Somewhat compress the ground coffee with a tamper, without applying too much pressure.
3 Clamp the porta filter firmly into the brew group.
4 Place the cup under the spout of the porta filter. (For the preparation of 2 cups, put 1 cup under each spout.)
5 Press the button with the programmed dose of coffee you would like to brew. As soon as the programmed dose is reached, the filling stops automatically and the remaining water is released into the drip tray. Remaining pressure / water is released through the lower portion of the brew group.

- Only freshly ground coffee allows for an optimal coffee result. Therefore, use a professional coffee grinder. In our assortment you will find several professional coffee grinders.
• We recommend to use a stainless steel tamper with a diameter of 58 mm for optimum tamping.
6.3 Dispensing of hot water
1 Place an adequate water container (with a heat-insulated handle) under the hot water dispenser.
2 Press the hot water button on any of the control panels in order to release a pre-programmed amount of hot water and the release will stop automatically. The release of hot water can be stopped ahead of time by pressing the hot water button again.

Caution!
Place the nozzle of the dispenser into the water container in order to avoid injuries due to hot water sprayings.
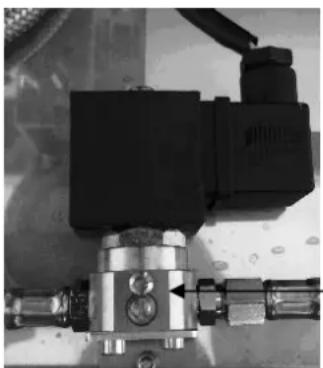
The cold water mixing valve allows for an individual adjustment of the hot water temperature (pic). It is located at the middle part of the machine, below the drip tray.
natural_image
Close-up of a mechanical component with metallic and black components (no visible text or symbols)adjustment screw
6.4 Dispensing of steam
The Barista A2/Barista A3 makes it possible to generate large amounts of steam in order to heat or froth beverages, e.g. milk or punch. It is a professional espresso coffee machine with an enormous steam volume. Therefore, within a few seconds you can prepare milk froth. Please pay attention to the instructions below. Do not bring the milk to a boil, otherwise frothing milk will not be possible.
1 Important: In order to get the best result when frothing milk, open the steam lever for approx. 5 seconds to release the condensation water in the pipe and to release dry steam.
2 Immerse the steam nozzle (at the end of the steam dispenser) into the liquid.
3 Re-open the steam handle.
4 Heat and/or froth the liquid.
5 After frothing or heating, release the steam into the drip tray to keep the holes of the steam nozzle clean.

Risk of injury
Always keep the steam nozzle underneath the surface of the liquid while heating or frothing in order to avoid sprayings.

Important
After every application clean the steam nozzle and the steam dispenser with a non-abrasive, damp cloth. This removes possible liquid residues.

Risk of injury
Avoid skin contact with the steam dispenser while cleaning!
7 CLEANING AND MAINTENANCE
A regular and accurate care is very important for the performance, the longevity and the safety of your machine.

Caution!
Always switch the machine off and let it cool down to room temperature before cleaning.
7.1 General cleaning
Daily cleaning:
Porta filter, filters, drip-tray, grid and plate of the drip tray, measuring spoon and tamper require daily cleaning. Use warm water and/or a food safe detergent for cleaning.
Clean the shower screen and the group gasket in the lower part of the group and remove visible dirt without dissassembling the parts.
Cleaning as necessary:
Clean the steam and hot water valve after every use.
Clean the body when the machine is switched off and cool.

Use a soft, damp cloth for cleaning.
Never use abrasive or chloric detergents!
7.2 Automatic group cleaning and degreasing of the brew groups
A brew group cleaner (in powder or tablet form) is available at your specialized dealer. The cleaning is carried out using the blind filter included with delivery.
1 Heat up the machine.
2 Insert the blind filter into the porta filter.
3 Fill the blind filter with the group cleaning powder or with one tablet.
4 Clamp the porta filter into the brew group.
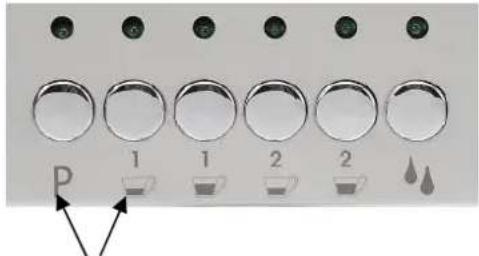
5 Start the brew group cleaning mode by simultaneously pressing the P-button and button no. 1 on the key pad of the respective brew group. The cleaning mode commences, a flashing light appears on the control panel which blinks on and off in several intervals. The cleaning program stops automatically after five cleaning cycles (the pump runs for 15 seconds, turns off for 20 seconds, runs for 15 seconds, etc.).
6 Remove the porta filter with the blind filter and rinse it with fresh water. Then clamp it back into the brew group.
7 Start the cleaning cycle again without using detergent and repeat step no. 5.
8 Afterwards, unclamp the porta filter, take out the blind filter and reinsert the coffee filter into the porta filter.
Clamp the porta filter back into the brew group.
text_image
P 1 1 2 2 S S S S
Caution!
Beware of hot water sprayings while cleaning the brew group.
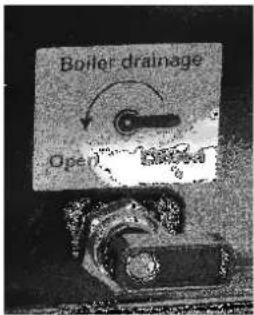
7.3 Draining the boiler
1 Turn the machine off and let it cool down.
2 Remove the drip tray.
3 Open the hot water valve (caution: hot water may spray).
4 The water is released through the collection container through the drainage hose.
5 The boiler is empty once no more water is shown in the water level indicator.
6 Close the hot water valve.
7.4 Small technical maintenance
text_image
Boiler drainage Open(If you have any questions, please contact your specialised dealer.)
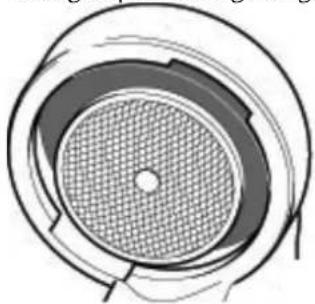
Replacing the group gasket and the shower screen (Group gasket (item no. C449900229) and shower screen (item no. C519900103) must be changed at the same time)
1 Switch the machine off and let it cool to room temperature.
Follow the steps as indicated below:
1 Brew group in the beginning.
natural_image
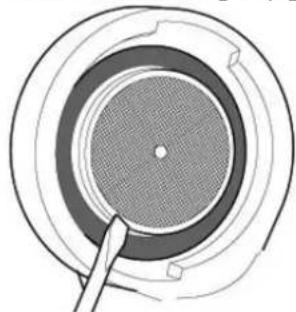
Cross-sectional diagram of a mechanical component with concentric rings and internal mesh pattern (no text or symbols)2 Use a flat screwdriver to pry out the shower screen and the group gasket.
natural_image
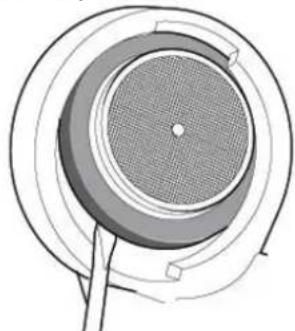
Cross-sectional diagram of a mechanical component with concentric layers and a central pin (no text or symbols)3 The shower screen and the gasket are now nearly removed.
natural_image
Diagram of a circular device with a mesh grille and a central hub, showing internal components (no text or symbols)4 Remove the shower screen and the gasket completely.
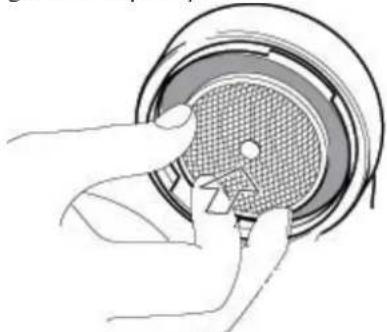
natural_image
Illustration of hands installing or adjusting a circular component with a mesh pattern (no text or symbols)5 Keep the new spare parts ready at hand (the rounded side of the group facing upwards to the brew group).
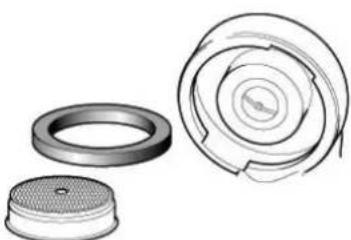
natural_image
Technical illustration of a mechanical component with three views: top, side, and front (no text or symbols)6 Clean the brew group with a brush. Lock the shower screen firmly into the gasket.
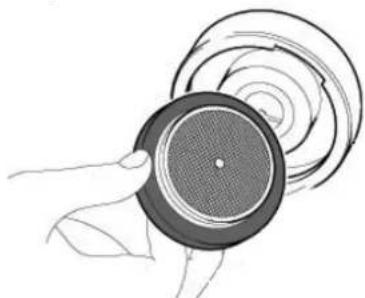
natural_image
Illustration of a hand holding a circular device with concentric rings (no text or symbols)7Insert the shower screen into the brew group.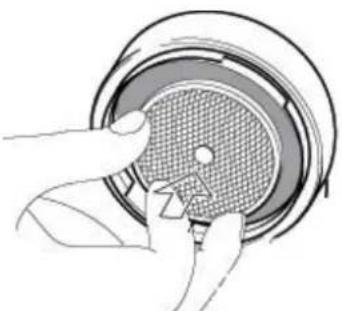 | 8Take the porta filter without filter.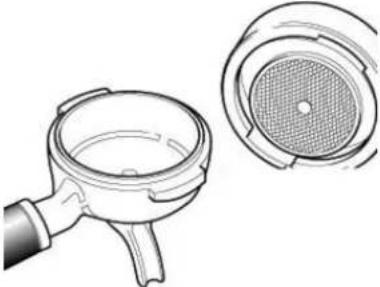 | 9Clamp the porta filter into the brew group.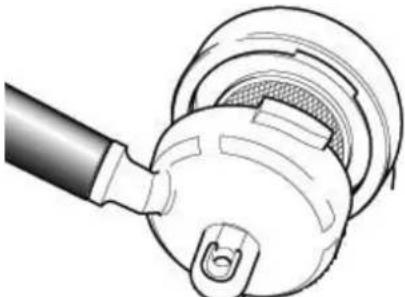 |
10Then, move the porta filter until the shower screen is locked firmly into the gasket.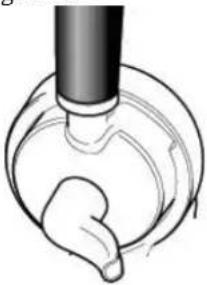 | 11Now you can easily lock the porta filter into place.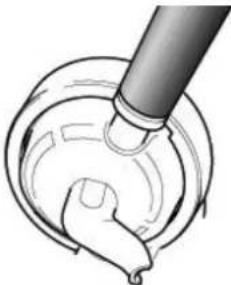 | 12The brew group is ready for use.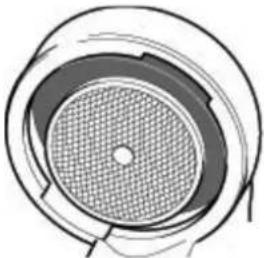 |
The machine can be used again.
The steam nozzle is blocked
Clean the holes of the steam nozzle carefully with a needle or with a paper clip.
For this purpose, the steam nozzle may be unscrewed as well.

Important
Do not lose the small gasket between the steam nozzle and the thread! Item no. P6002.1
Afterwards replace the steam nozzle.
8 TRANSPORT AND WAREHOUSING
8.1 Packing
The Barista A2/Barista A3 is delivered in a special carton and protected by a plastic cover and foam. Shipping on pallet only!

Caution!
Keep packing material out of the reach of children!

Important
Keep packing and packing material for possible transport! Do not throw it away!
8.2 Transport

- Transport the machine only upright, if possible on a pallet.
- Do not tilt or turn the machine over.
- Do not stack units on top of each other.
- Do not place other heavy items on the packing.
8.3 Warehousing

- Keep the machine packed in a dry place.
- Do not expose the machine to the cold. Danger of damage.
- Do not stack units on top of each other.
- Do not place other heavy items on the packing.
9 DISPOSAL

The product complies with the following EU Directives:
Machine: 98/37/CE
Low Voltage: 73/23/CEE/, 93/68/CEE
EMC: 89/336/CEE, 93/68/CEE, 92/31/CEE
PED: 97/23/EC
EN-Directives: EN 60335-1, EN 60335-2-75, EN 55014-1, EN 61000-3, EN 61000-4, EN 55104-2, EN50366
11 TROUBLESHOOTING
If the machine will not be used for a long period of time, it is recommended to
.. clean the brew groups (see instructions on 7.2). Afterwards, please do not clamp the porta filter back into the group.
.. empty the boiler. Reg. 7.3
12 RECOMMENDED ACCESSORIES
- Blind filter for brew group cleaning (included with delivery)
- Detergent for brew group cleaning with blind filter (available at your specialised dealer, item no. PAV9001034 or 89450).
- Descaling powder for regular prophylactic descaling of the machine (available at your specialised dealer, item no. PAV9001040)
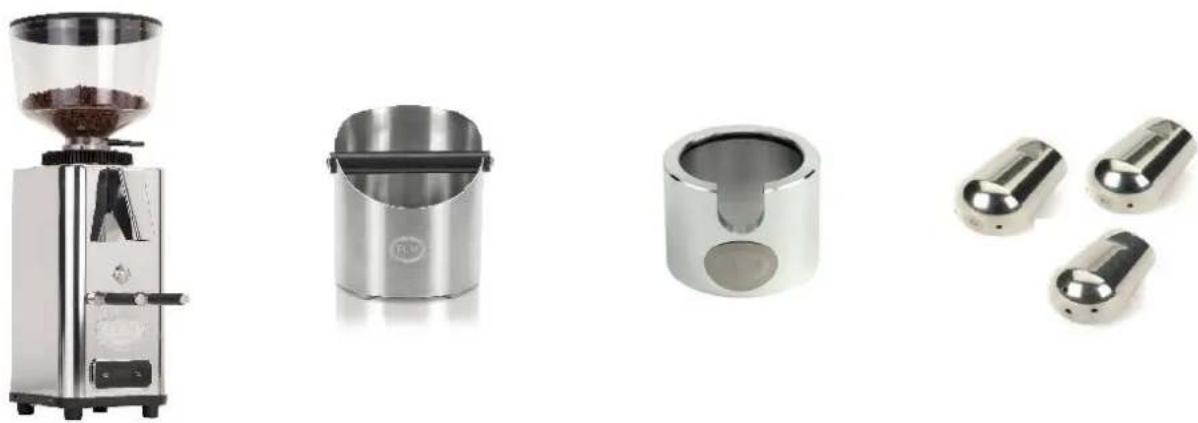
For a perfect coffee-result, a good espresso coffee machine and coffee grinder are as important as a good coffee. Our professional espresso coffee machines and grinders are the best basis to achieve this result.
The knock-out box perfectly complements your espresso coffee machine and your grinder.
natural_image
Product display of a coffee maker with various kitchen utensils and accessories (no visible text or labels)S-Automatik 64 Knock-box Tamper station Steam nozzle assortment
Notizen/Notes