
EKC 40 - Coffee maker Rommelsbacher - Free user manual and instructions
Find the device manual for free EKC 40 Rommelsbacher in PDF.


| Product Type | Espresso & Cappuccino Maker |
| Brand | Rommelsbacher |
| Model | EKC 40 |
| Capacity (Espresso) | 3 or 6 cups (approx. 150 ml or 300 ml water) |
| Capacity (Cappuccino) | 3 cups (approx. 150 ml water + 190 ml milk) |
| Max Water Fill | 300 ml (MAX mark) |
| Milk Frothing | Via cappuccino nozzle with reset button |
| Power Base | With illuminated ON-switch and cable storage |
| Safety Features | Safety valve (triggers at ~4 bar), automatic shut-off |
| Materials | Stainless steel handle, plastic components |
| Filter System | Funnel filter (for 6 or 3 cups), filter insert (for 3 cups), disk filter |
| Nozzles Included | Espresso nozzle and cappuccino nozzle (interchangeable) |
| Cleaning | Hand wash only; do not immerse water container or power base |
| Descaling | With citric acid or vinegar |
| Spare Parts Available | Gasket set (F13.15), cappuccino nozzle (F13.16), espresso nozzle (F13.17) |
| Power Supply | 100-240 V, 50/60 Hz (typical, verify rating label) |
| Weight | Approx. 1.5 kg (estimated) |
| Dimensions (approx.) | 25 x 20 x 30 cm (estimated) |
Frequently Asked Questions - EKC 40 Rommelsbacher
User questions about EKC 40 Rommelsbacher
0 question about this device. Answer the ones you know or ask your own.
Ask a new question about this device
Download the instructions for your Coffee maker in PDF format for free! Find your manual EKC 40 - Rommelsbacher and take your electronic device back in hand. On this page are published all the documents necessary for the use of your device. EKC 40 by Rommelsbacher.
USER MANUAL EKC 40 Rommelsbacher
natural_image
Abstract geometric pattern with interlocking curved lines inside a circle (no text or symbols)ROMMELSBACHER
EKC 400/EEKC 400/E Espresso & Cappuccino Kocher
Beschreibung
natural_image
Line drawing of a mechanical component with a cylindrical body and handle (no text or symbols)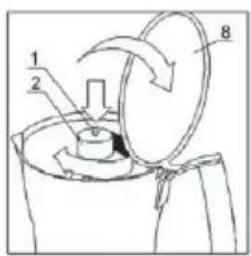
natural_image
Technical line drawing of a mechanical device with a handle and labeled component (no text or symbols present)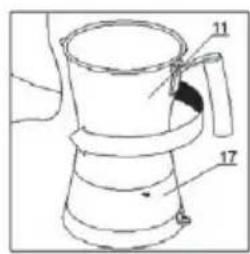
natural_image
Line drawing of a mechanical device with a handle and labeled part (no text or symbols present)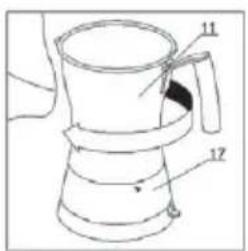
TIPS
We are glad that you have decided in favour of this superior Espresso & Cappuccino Maker and thank you for your confidence. This appliance allows you to prepare optionally 3 or 6 cups of espresso, as well as 3 cups of cappuccino, in a professional way. To make sure you will take much pleasure in your new appliance, please be sure to read through the following information attentively and observe it. Thank you very much.
Important notes
Before using the appliance, please read through the instruction manual carefully and save it for all future users, too.
Only use the appliance for the application described therein. Never operate it without water and only in combination with the power base provided for it. Do not use other power bases!
Never immerse the water container with the power point (17) and the power base (19) in water. Also make sure that no water or steam can infiltrate from below. Therefore, never clean it under running water.
For your safety
- Make sure the mains voltage is identical with the details on the rating label. Only connect the appliance to alternating current.
- Never place the appliance on electric hot plates or open gas flames!
- The Cappuccino Maker gets hot in use. Therefore, be aware of the risk of burns when touching the appliance. Touch it on the handle only!
- Do not open the lid until the cooking process has been completed and the pilot lamp gone out.
- During the cooking process the jug must not be removed from the power base. Press the ON-switch just briefly, and do not keep it pressed continuously during the cooking process or after automatic switch-off.
- The power cable must not contact any hot surfaces of the appliance.
- Children are not aware of the dangers that may arise in handling electrical appliances.
Therefore, never let children use electrical appliances without supervision.
- A lways unplug the appliance after use to ensure safe switch-off. Do not „park“ the jug on the connected power base.
- A lways operate the appliance under supervision. Improper use will void all warranty claims.
- In case the appliance, the power cable or the rubber gasket is damaged, remove the plug from the wall outlet immediately.
- Our electrical appliances comply with the relevant safety regulations. Repairs may only be carried out by authorised specialist shops. Improper repairs may result in considerable dangers for the user.
Initial use
For a start, please clean all accessory parts with warm water. Do not immerse the water container (17) or the power base (19) in water in the process.
On initial use, it is recommended, for hygienic reasons, that you should prepare one batch of espresso and then discard it.
The appliance comes delivered with the power cable (20) wound up inside the cable storage on the power base's (19) underside. You may take it out depending on the length that is needed.
Take care that the cable runs through the opening provided in the power base to guarantee an even surface for standing.
Only operate the appliance on a stable and even surface and make sure that the cable does not hang over the surface's edge.
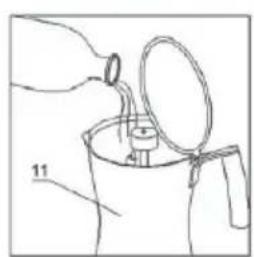
Fill water container with water only. On no account must it be filled with coffee, milk or other liquids. When filling it please take care that no water is dropped on the power base (19) or the underside of the water container (17).
Caution:
If water container is overfilled, boiling cappuccino/espresso may be ejected!
Preparing CAPPUCCINO (3 cups)
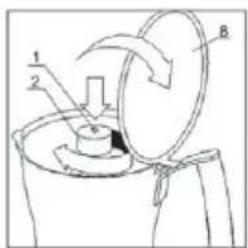
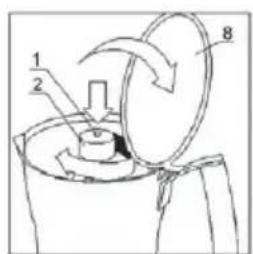
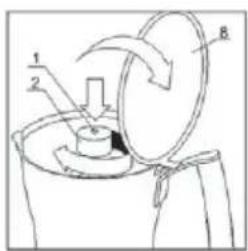
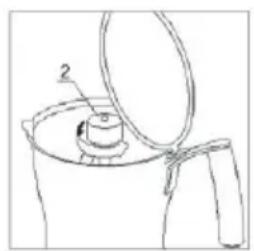
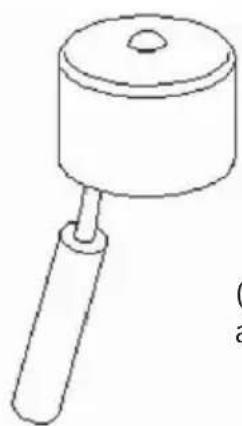
Important: Initially, fix the cappuccino nozzle (see drawing) onto the pipe (4) inside the jug's upper vessel (11) by screwing it on clockwise till tight. Then slightly press down the small reset button (2) on top of the cappuccino nozzle. Attention: The reset button must be movable; should it get stuck, make sure to clean nozzle with hot water for a start.
The following instructions are based on the typical cappuccino involving a 1:3 mixing ratio of espresso and milk. You may vary it to your personal taste, but bear in mind not to exceed the maximum filling quantity of 500 ml.
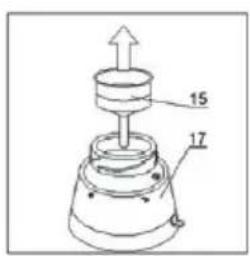
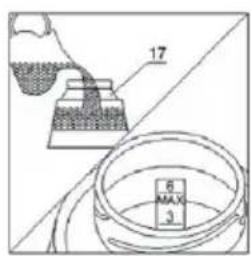
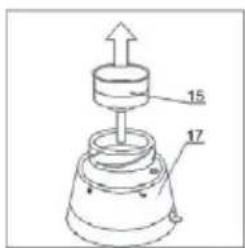
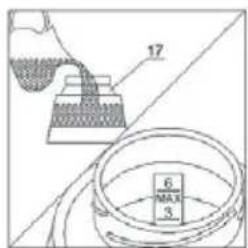
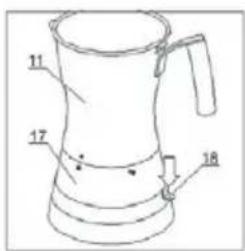
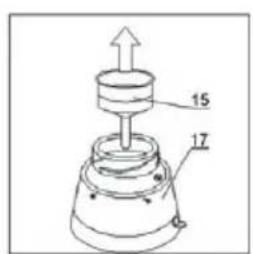
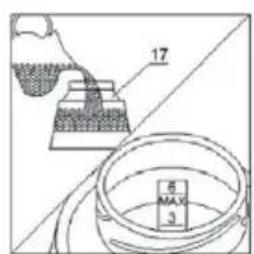
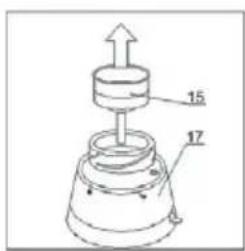
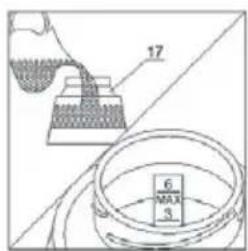
1) Unscrew the appliance, but do not hold it on the handle in the process. Remove the funnel filter. Fill water container (17) with cold, clean water up to the „3“ mark (approx. 150 ml).
Never fill it over the MAX mark! Danger of scalding by escaping steam!!!
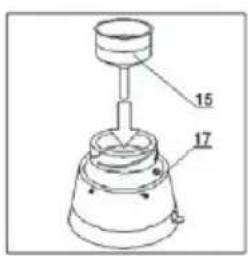
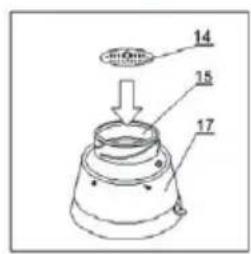
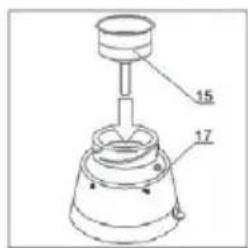
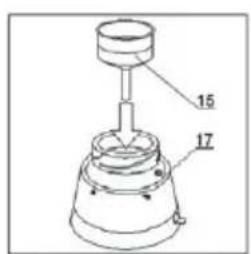
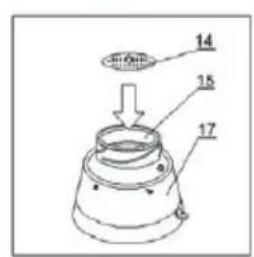
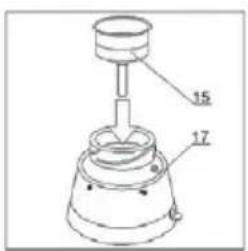
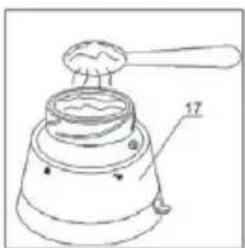
2) At first, place the funnel filter (15) in the water container (17). Then additionally insert the 3-cup filter insert (14) in the funnel filter (15).
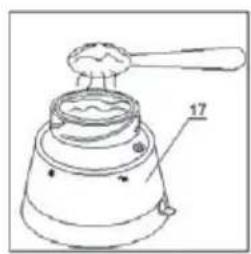
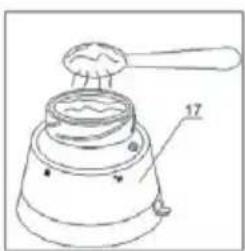
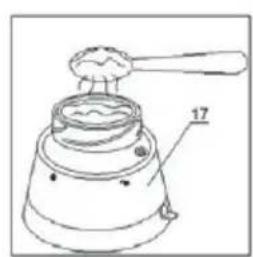
3) Fill the funnel filter brimful, but loosely, with ground espresso powder (no ordinary coffee powder!!)
Just smooth out the filling and on no account should you press it into the filter! Remove any excess coffee from the edge for the seal to close properly.
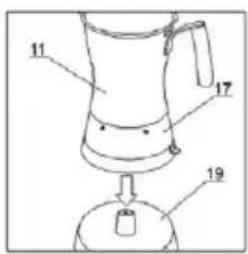
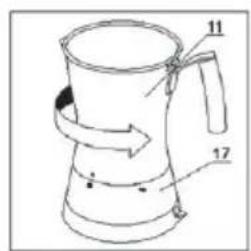
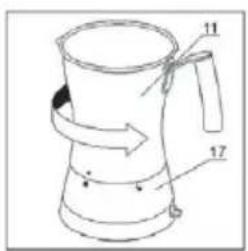
4) Tightly connect the coffee container (11) with the water container (17) (turning it clockwise by just 1/4 due to the practical quick lock) to prevent steam from escaping. Do not hold the appliance on the handle in doing so! Make sure the upper vessel is not put on tilted but straight and tightly closed.
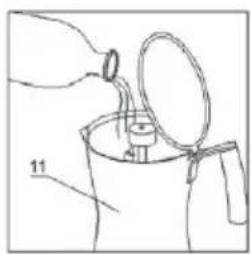
Then fill the upper vessel (11) of the jug with cold milk (preferably low-fat type). The ideal filling quantity is 190 ml, which means filling it as far as the lower edge of the spout (3).
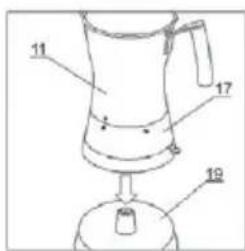
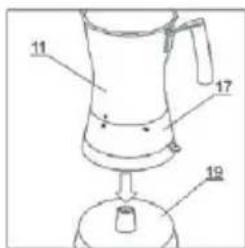
5) Place the jug on the power base (19) and close the lid. Then connect the plug to the power outlet.
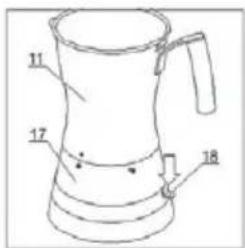
6) By pressing down the ON-switch (18), the Cappuccino Maker is turned on. The pilot lamp integrated in the switch comes on, indicating operation.
7) Do not open the cover (8) until the cooking process is finished.
8) When the cappuccino has brewed, the ON-switch resumes its initial position again. The pilot lamp extinguishes and the appliance switches off automatically (takes approx. 4-5 min. for 3 cups).
9) Remove the appliance from its power base and pour the coffee in well preheated cappuccino cups. In case any milk froth was left inside the jug, slide it into the cups using a spoon.
10) Caution: Only touch the Cappuccino Maker on its heat-insulated handle!
11) It you desire to prepare another batch of cappuccino or espresso, allow the appliance to cool first before you start another brewing process!
natural_image
Line drawing of a laboratory flask with a pipette and labeled component (no text or symbols)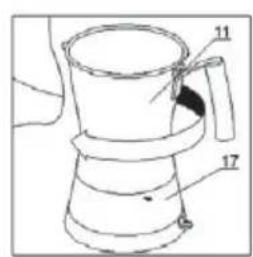
natural_image
Line drawing of a hand pouring liquid into a container with a lid, labeled '11' (no text or symbols on the diagram itself)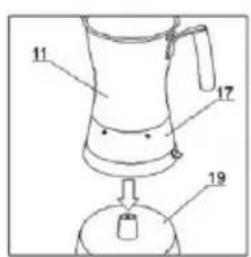
Preparing ESPRESSO (3 or 6 cups)
Important: Initially, fix the espresso nozzle (see drawing) onto the pipe (4) inside the jug's upper vessel (11) by screwing it on clockwise till tight.
1) Unscrew the appliance, but do not hold it on the handle in the process. Remove the funnel filter. Fill water container (17) with cold, clean water up to the „3“ mark (approx. 150 ml - for 3 cups of espresso) or „6“ MAX (approx. 300 ml for 6 cups of espresso). Never fill it over the MAX mark! Danger of scalding by escaping steam!!!
2) At first, place the funnel filter (15) in the water container (17). If you want to prepare just 3 cups of espresso, additionally place the 3-cup filter insert (14) inside the funnel filter (15).
3) Fill the funnel filter brimful, but loosely, with ground espresso powder (no ordinary coffee powder!!)
Just smooth out the filling and on no account should you press it into the filter! Remove any excess coffee from the edge to make the seal close properly.
4) Tightly connect the coffee container (11) with the water container (17) (turning it clockwise by just 1/4 due to the practical quick lock) to prevent steam from escaping. Do not hold the appliance on the handle in doing so! Make sure the upper vessel is not put on tilted but straight and tightly closed.
5) Place the jug on the power base (19) and close the lid. Then connect the plug to the power outlet.
6) By pressing down the ON-switch (18), the Espresso Maker is turned on. The pilot lamp integrated in the switch comes on, indicating operation.
7) Do not open the cover (8) until the cooking process is finished.
8) When the espresso has brewed, the ON-switch resumes its initial position again. The pilot lamp extinguishes and the appliance switches off automatically.
9) Remove the appliance from its power base and pour the coffee in well preheated espresso cups. In case any milk froth was left inside the jug, slide it into the cups by using a spoon.
10) Caution: Only touch the Cappuccino Maker on its heat-insulated handle!
11) It you desire to prepare another batch of cappuccino or espresso, allow the appliance to cool first before you start another brewing process!
natural_image
Line drawing of a mechanical device with a handle and labeled part (no text or symbols)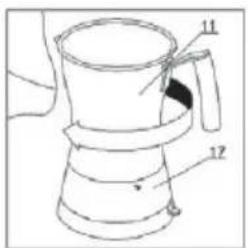
TIPS
- Perfect espresso is served and enjoyed in well preheated espresso cups!
- Since the coffee is served directly from the appliance, slightly sway the jug for uniformity of the espresso before pouring it out.
- To those favouring especially „hot“ cappuccino we recommend slightly preheating the milk before filling it into the appliance.
Cleaning and maintenance
- Prior to cleaning the unit, always unplug the appliance from the mains and allow it to cool.
- Then clean the accessory parts in hot water (perhaps by adding some washing up liquid).
To clean any badly accessible spots, we recommend using a small soft bottle-brush.
- Never immerse the water container (17) or the power base (19) in water!
- Make sure the parts that have come in contact with milk are cleaned with particular care! Those should be soaked in hot water and thoroughly rinsed after use of the appliance.
- It is common occurrence for some residues of water and coffee powder to remain inside the water container.
- Do not use abrasives or cleaning sprays. Do not clean it in the automatic dishwasher!
- Always let the appliance dry completely; we therefore recommend storing the appliance unscrewed.
- Regularly check the holes in the filters. If those should be blocked, clean them using a pin.
- Periodically check the funnel and the gasket. Replace them if they show any signs of wear or deterioration. Only use original spare parts, which are available as accessory kits in specialist shops, or from us directly, under the following item numbers:
Gasket set (disk filter and rubber gasket) F13.15
Cappuccino nozzle F13.16
Espresso nozzle F13.17
- If scale deposits should form in the water container (17), we recommend a mild descaling procedure with citric acid or vinegar.
- OUR TIP: Loose soiling in the water container (17) can be easily removed by filling half of it with warm water, connecting it firmly with the top (11) and shaking it well. To clean the appliance you may also operate it with nothing but water, which is a perfect cleaning method for nozzles, filter and pipe.
natural_image
Line drawing of a teapot with lid and handle, no text or symbols present
natural_image
Simple line drawing of a faucet with a valve and two cups (no text or symbols)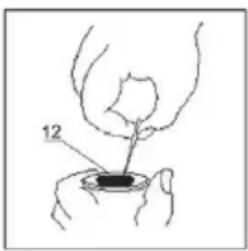
natural_image
Simple line drawing of a hand holding a small object with a label '12' pointing to it (no text or symbols on the object itself)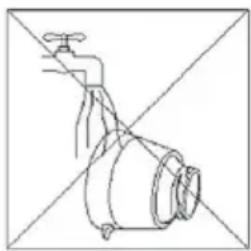
natural_image
Line drawing of a hand holding a valve against a diagonal line (no text or symbols)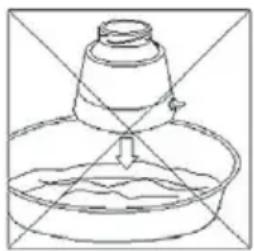
natural_image
Simple line drawing of a container with a side outlet and an arrow indicating flow or direction (no text or symbols)Troubles and Solving Methods
| Trouble Reason Solving Method | ||
| Brewing process takes a very long time or is inter-rupted automatically. | The coffee used is not the right type.Disk filter, filter insert, funnel filter or spout, or the pipe, is blocked.Coffee powder has been pressed too hard into the filter.The reset button on the cappuccino nozzle is blocked. | Only use ground espresso powder, no ordinary coffee powder.Clean the parts with particular care as described under ,Cleaning and Maintenance'.Fill the coffee powder loosely into the filter.Thoroughly clean the nozzle until the reset button is movable again. |
| Coffee leaks from the edges of the water container. | Disk filter is blocked.Gasket is burned or torn.The maximum filling quantity has been exceeded. | Clean the disk filter as per instruction.Replace the gasket.Observe the filling quantities as indicated in the manual. |
SUGGESTED RECIPES
CAFFÈ LATTE Double amount of espresso in a large cup of hot milk, covered with little or no froth.
CAFFÈ MOCA One third of espresso, one third of boiled milk and one third of cocoa, served in a high glass; you may also prepare this drink with 1-2 tablespoons of chocolate syrup and more milk.
CAFFÈ CORRETTO The espresso is ,corrected' by adding a dash of grappa, brandy or liqueur to your taste.
MACCHIATO Fill the espresso into a high glass with a 'mouthful' of boiled milk, covering it with a lot of milk froth.
Enjoy your
Espresso & Cappuccino Maker
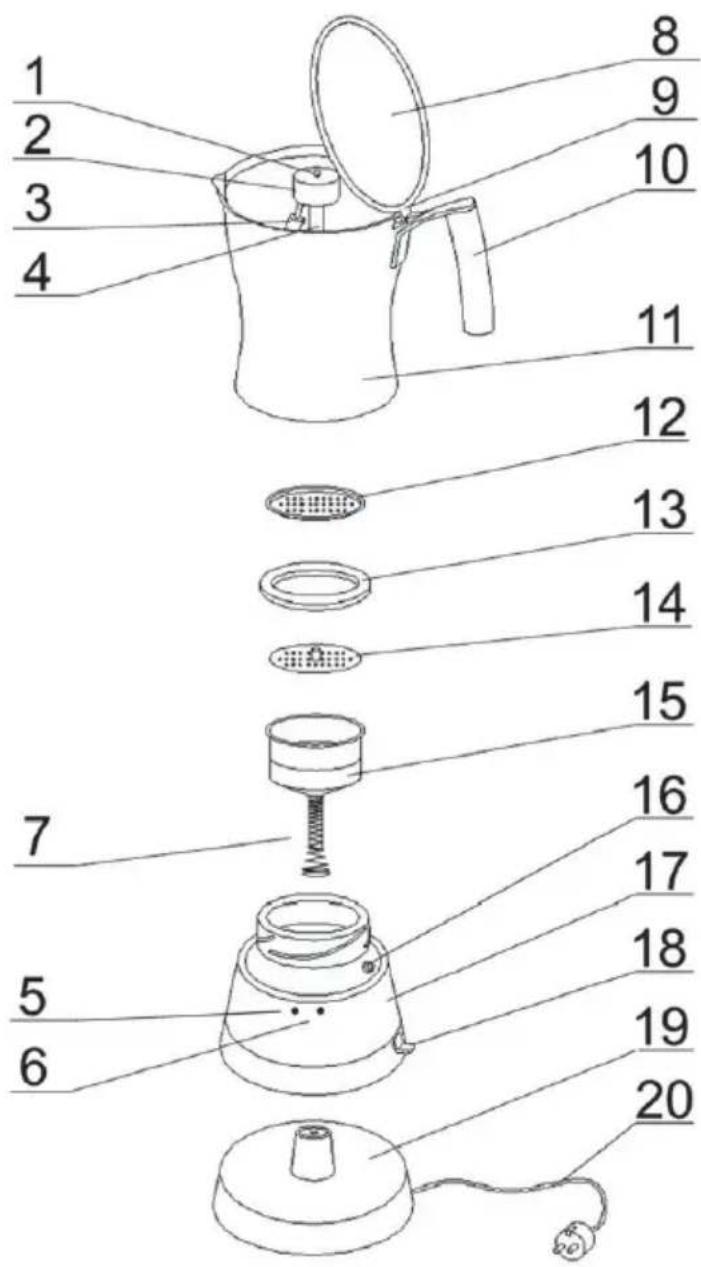
Description
1 Reset button
2 Valve with
3 Spout
4 Stainless steel pipe
5 Lock mark
6 Unlock mark
7 Spring
8 Cover
9 Cover grip
10 Stainless steel handle
11 Upper vessel (coffee container)
12 Disk filter
13 Rubber gasket
14 Filter insert (for 3 cups)
15 Funnel filter (for 6 or 3 cups)
16 Safety valve
(triggers as of approx. 4 bar)
17 Water container
(with electrical connection)
18 Illuminated ON-switch
19 Power base (with cable storage)
20 Power cable
natural_image
Simple line drawing of a cylindrical object with a handle and circular top (no text or symbols)(with reset button and spout)
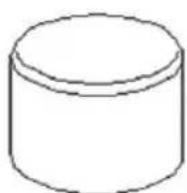
Espresso nozzleCappuccino nozzle
Brand : Rommelsbacher
Model : EKC 40
Category : Coffee maker