
MMS 4205 - Mp3 player AEG - Free user manual and instructions
Find the device manual for free MMS 4205 AEG in PDF.

| Product Type | MP3 Player |
| Model | MMS 4205 |
| Brand | AEG |
| Dimensions (L x W x H) | 44 x 55 x 11 mm |
| Power Supply | 1 x AAA 1.5V battery (not included) |
| Battery Life | Up to 8 hours (depending on battery type) |
| Internal Memory | 256 MB Flash |
| Expandable Memory | SD/MMC card up to 1 GB |
| Supported Audio Formats | MP3, WMA |
| Bit Rate Support | 32-320 kbps |
| Recording Sampling Frequency | 8 kHz |
| PC Interface | USB 2.0 |
| Operating System Compatibility | Windows 98 SE/ME/2000/XP/Server 2003 |
| Playback Modes | Normal, Repeat 1, Repeat All, Random, A-B Repeat |
| Equalizer Presets | Normal, Pop, Rock, Classic, Jazz, Bass Boost |
| Voice Recording | Yes, via built-in microphone |
| Key Lock | Yes, slide switch |
| Earphone Jack | 3.5 mm stereo |
| Safety | Keep away from heat, moisture; do not immerse in water |
| Environmental Note | Do not dispose with household waste; use collection points |
| Guarantee | 24 months from purchase date |
Frequently Asked Questions - MMS 4205 AEG
User questions about MMS 4205 AEG
0 question about this device. Answer the ones you know or ask your own.
Ask a new question about this device
Download the instructions for your Mp3 player in PDF format for free! Find your manual MMS 4205 - AEG and take your electronic device back in hand. On this page are published all the documents necessary for the use of your device. MMS 4205 by AEG.
USER MANUAL MMS 4205 AEG
Overview of the Components ......Page 3
Instruction Manual......Page 16
Technical Data Page 25
Guarantee Page 25
Overview of the Components
D-47906 Kempen/Germany
Thank you for purchasing this MP3 player.
Maybe you are already familiar with how to use a similar product; still, we kindly ask you to take the time to read these instructions. This operation manual is intended for you to familiarise yourself with the many functions of the device and to ensure that you obtain the best results from the product which you have purchased.
Safety is important
To guarantee your safety and the safety of others please be sure to read the safety instructions with care before using this product.
Keep this information in a safe place for later reference.
Copyright
Please observe that the music you intend to record may by copyrighted. The reproduction and distribution of music fi les without permission of the originator infringes upon copyright. Violations of this act may render you liable to criminal prosecution. In case of doubt, seek advice before recording.
Note: The appearance of your MP3 player may differ from the model shown in this manual.
General Notes on Safety
Please read all safety information before operation.
- Read the operation instructions carefully before operating this device and store the manual inclusive of the warranty, receipt of purchase and possibly the box including the interior packaging in a safe place.
- Use the device exclusively for private and for the intended purposes only. This device is not intended for commercial operation.
- Keep the device away from heat, direct exposure to sunlight, humidity (do not immerse in fluids) and sharp edges.
- Do not operate the device with wet hands.
- Prior to disposing of the device, remove the batteries and return to a battery collection point.
Maintenance
- The inside of this device does not hold any parts which require maintenance by the user.
- Consult your dealer if you are in any doubt with regard to the installation, the operation or the safety of this device.
Overview of the Components
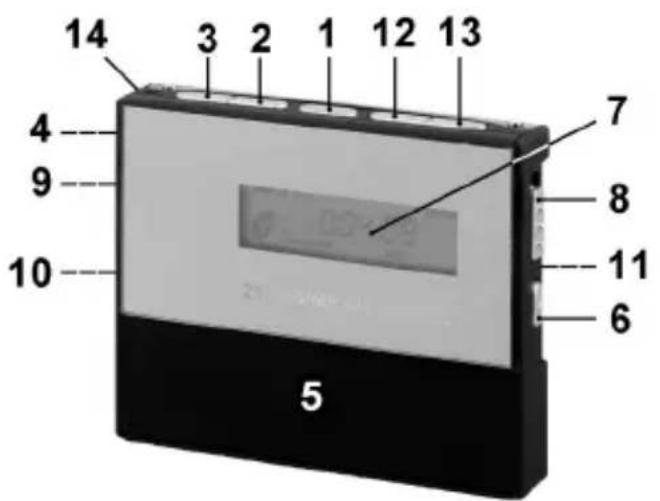
Fig. 1
1 ▶II PLAY (Play/Pause/Stop/Power on/off) button
2 ▶ NEXT/VOL+ Volume control (forward search)
3 ◀ LAST/VOL- Volume control (reverse search)
4 Microphone
5 Battery compartment
6 A-B key (repeat A-B passage/dictation function)
7 LCD Display
8 Key lock
9 📋 Headphones connection
10 USB connection
11 SD/MMC card slot
12 EQ key (equalizer)
13 MODE key ( playback mode)
14 Eyelet
Display (Fig. 2) Fig. 3
1 Equalizer settings 1 Strain relief
2 display (external memory) 2 Release
3 Function display 3 String
4 Playback mode 4 3.5 mm Stereo jack plug
5 Display key lock
6 Battery charge indicator
7 Volume display
8 Number of current track
9 Playing time
10 ▶ PLAY function display
11 II PAUSE function display
12 Format display of the current piece of music
First ...
Read these instructions prior to using the device.
Carefully remove the device from its packaging.
Content of packaging
The packaging should contain the following:
- MP3 player
- Stereo ear phones.
- USB connection cable.
• Operation manual. - Windows 98SE CD driver.
Inserting the battery (battery not included)
- Open the battery compartment (5) to the bottom of the device by sliding the battery cover toward ▼ (open).
- Place 1 Micro battery, type R03 "AAA" 1.5V in the compartment. Observe the correct polarity (see bottom of compartment)! If the device is not used for a longer period of time, remove the battery to prevent the battery from leaking acid fluid.
- Close the battery compartment.
Attention:
- Batteries must not be disposed of as regular household waste. Please return used batteries to the respective collection points or to the retailer.
- Never throw batteries into an open fire.
How to Install the Driver
Minimum system requirements:
- Pentium 133 MHz or more
- Microsoft ® Windows ™ 98 SE/ME/2000/XP/Server 2003
- RAM 20 MB
- USB Port (2.0)
If your computer runs on Windows 2000 or a more recent system, your MP3 player does not require any particular software or drivers. However, the device does require the latest service pack version to be installed. In the event of problems try to install the current Microsoft service pack for the respective operating system. For this, go to:
http://www.microsoft.com.
Important: Windows 98SE users must install the driver prior to hooking up the device with the PC. The PC may have to be restarted.
- Place the supplied CD driver into the CD-ROM drive of your PC.
- Click on 'Driver'.
- Follow the instructions on how to install.
Connecting the MP3 player with your PC
- Connect the MP3 player using the USB connection cable, with your PC.
- Insert the smaller USB connection into the USB jack (10) of the MP3 player and the other end into a vacant USB connection of your PC.
- Once the connection has been successfully established the display will read "USB".
- The MP3 player is displayed as a removable medium and can be used as such.
- To store and export files, proceed as stated in the operating software of your PC.
- Once the files have been transferred, first unlog the MP3 player from your PC. Proceed as stated in the operating software of your PC to safely remove the hardware.
Note:
- Never remove the MP3 player from the PC during data transfer. This even applies if the data transfer should come to a halt. To separate the MP3 player from the PC, follow the notes of your PC software to safely separate hardware, i.e. the removable medium.
- The exchange of data between the external storage device (SD/MMC) and the internal storage device (MP3 player) is not possible. If you nonetheless wish to transfer fi les from e.g. the internal memory to the SD/MMC card fi rst save your fi les on your PC. Then copy the fi les onto the SD/MMC card.
- We can not be held responsible for the loss of files as a result of improper operation.
- The device is not DRM-compatible.
- If an SD/MMC was installed on the PC before connection, this also appears as a removable medium on the PC.
How to operate the MP3 player
Switching the MP3 player on
To switch on the MP3 player hold the ▶II button (1) down; the display briefly shows "HELLO".
Switching the MP3 player off
- Keep the ▶II key pressed down until „▶ PLAY“ or „II PAUSE“ disappears from the display.
- Keep the key pressed down again until the word „-OFF-“ appears in the display.
Note: The MP3 player switches itself off automatically if not operated for a shorter period of time while in stop or pause mode.
When the MP3 player is switched on again and the ▶II button (1) is pressed, the device begins to play back the first piece of music.
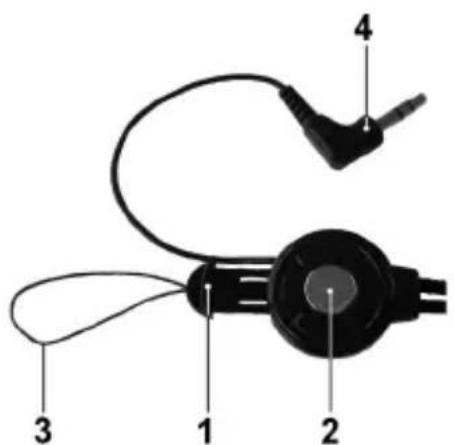
Earphones (Fig. 3)
- Release the strain relief (1) of the earphones by pressing the centre of the release (2).
- Guide the string (3) of the strain relief through the eyelet (14) (Fig. 1) of the MP3 player.
- Connect the strain relief (1) with the earphones again until it catches with a "click".
- Then connect the 3.5 mm Stereo jack plug (4) with the 📄 earphones connection (9) (Fig.1).
Playing a music fi le
- Turn the MP3 player on and wait until the current track number (8) has come to a standstill in the display.
- Press the ▶II button (1) to start playback (display reads ▶ PLAY).
- Playing of the files stored on the device starts.
- Briefly press the ▶II button (1) to pause playback (display reads II PAUSE).
- Briefly press the ▶II button (1) again to continue playback from the same point.
Note: If an SD/MMC card is installed, the device automatically switches over to the card memory (☐ appears in the display).
Volume control
- To increase the volume, press and hold the “▶ NEXT/VOL+” button (2) until the desired volume has been set. The volume level is indicated by a volume bar on the display.
- To decrease the volume, press and hold the “◀ LAST/VOL-” button (3) until the desired volume has been set. The volume level is indicated by a volume bar on the display.
Attention: Listening at high volumes can harm your ears.
Skip to previous/next fi le
LAST/VOL- (3): Press once briefy = Skips to the previous track.
Press twice briefl y = Plays one track before that, etc.
▶ NEXT/VOL+ (2): Use this button to skip to the next track, or the track after the next.
Stop playback
While a piece of music is being played back, keep the ▶II key (1) pressed down until “▶ PLAY” or „II PAUSE” disappears from the display. The device is now in stop mode.
Key lock
The key lock inhibits the operation of all buttons on the MP3 player. This prevents you from accidentally activating buttons while using the MP3 player when you are out.
- In order to activate the keylock, push the switch (8) in the direction of the closed lock symbol. The lock symbol appears in the display.
- In order to cancel the keylock, push the switch in the direction of the open lock symbol. The lock symbol in the display goes off.
Playback mode
Your MP3 player features a number of repeat and random modes for playback. These are the available playback modes:
• A-B (Repeat Passage)
Passages within a music file can be selected and repeated.
- During playback press the A-B button (6) in the desired piece of music when the starting point is reached from where the music should be repeated (display reads A-).
- Press the A-B button (6) when the point is reached at which the repeat should end (display reads A-B). The device is now in the A-B mode and begins with repeat playback.
- Press the A-B button (6) again to deactivate the A-B mode.
- REP (Repeat 1)
The selected track is repeated until repeat is stopped or the playback mode is changed.
- ALL (Repeat all)
All tracks of the MP3 player are played in the sequence as saved and then repeated until playback is stopped or the playback mode is changed.
- RND (Random play)
Every track is played in a random order. Playback stops when all tracks have been played.
• NORMAL
Tracks are played in the order as saved.
The currently selected playback mode (4) is shown in the bottom of the display (7). If the display does not indicate any play mode then “NORMAL” playback mode has been selected.
- In order to select a playback mode, press the MODE key (13) repeatedly until the desired setting appears in the display.
Equalizer (EQ)
Your MP3 player features equalizer pre-settings which adjust playback to the respective type of audio input.
The 6 settings are:
• POP
- ROC (Rock)
- CLA (classic)
• JAZ (Jazz)
- STR (boosted base)
• NORMAL (no equalizer function)
The currently selected equalizer setting (Fig. 2/8) is shown at the bottom of the display (7). If no equalizer setting is indicated, then the “NORMAL” setting (no equalizer function) is activated.
- In order to change the equalizer setting, press the EQ key (12) repeatedly until the desired setting appears in the display.
Changing between MP3 and Voice Mode
If the device is in stop mode you can change between the MP3 mode and the voice mode by brief y pressing the A-B key (6).
Dictation Function
With the in-built microphone it is possible to make speech recordings.
- In stop mode, keep the A-B key (6) pressed down. The number of stored voice recordings appears briefly in the display (Fig. 2/8), together with the length of recording time still available.
- In order to stop recording, press the A-B key (6).
- To play back the recording, press the A-B key (6) briefly in stop mode in order to change to the voice mode, and continue as described under „Playing Back a File“.
Note: Voice recordings can only be deleted by means of your PC and not on the device itself.
Note:
Whenever you are recording please ensure that the microphone is pointing in the direction of the sound source and is not blocked by objects, hands etc.
Installing a SD/MMC card (not included)
The MP3 player is MMC/SD memory card-compatible (up to 1 GB).
- Press the SD/MMC card into the opening provided (11) until it clicks into place. appears in the display.
- To play a SD/MMC card, please proceed as described under "Playing a Music File".
Please note the following with respect to SD/MMC cards:
Note: If an SD/MMC card is installed, the device automatically switches over to the card memory (☐ appears in the display).
- Only the music tracks available on the selected storage device are played back. For example, after playing back the music tracks on the SD/MMC card, the device does not change automatically to the in-built flash memory (see next paragraph).
Moving between the internal flash memory and the SD/MMC card
With the device in stop mode, keep the EQ key (12) pressed down to switch between the internal storage device (SEL FLASH appears briefly in the display) and the installed memory card (SEL Sd-C appears briefly in the display).
Notes on how to insert the SD/MMC card:
The card is inserted into the slit in such a way that no part of the card protrudes out. Do not use excessive force to insert the card, so as not to damage the SD/MMC card or the built-in card slot.
If the MP3 player can not read the SD/MMC card, it may have to be reformatted to FAT. In order to format the SD/MMC cards, please proceed as described in the operating software of your PC.
Note: When using a SD/MMC card in the MP3 player the power consumption increases. Problems may occur when you attempt to switch on the MP3 player with an installed SD/MMC card. If this is the case, insert a new battery. To save on battery power, remove the SD/MMC card when not in use.
Removing a SD/MMC card
Ensure that the MP3 player is switched off. Press the SD/MMC card again in order to remove it.
Troubleshooting
Before requesting a service for this player, please check the following table for possible causes. A few simple checks or changes may remedy the problem and restore the correct operability of the device.
| The MP3 player does not work. | Check the capacity and the polarity of the battery. |
| Ensure that the locking function is not activated. | |
| Ensure that the copied fi les are not protected. | |
| Music fi les do not play. | Ensure that the MP3/WMA memory contains fi les. |
| Check if the copied fi les are protected. | |
| Please ensure that it is not a DRM-protected fi le. | |
| Mass storage device is not located following hook-up with PC. | Check if the USB device (MP3 player) is installed and correctly hooked up. |
| When working under Windows 98 SE ensure that the driver of the supplied CD has been installed. | |
| Restart your computer. | |
| No sound. | Ensure that the copied fi les are not protected. |
| Check if the earphones are correctly hooked up with the MP3 player. | |
| Check whether the loudspeakers are correctly switched on/connected with the MP3 player. | |
| Check if the volume is set to low. | |
| Please ensure that it is not a DRM-protected fi le. |
Technical Data
Model MMS 4205
Power
Power supply: 1x 1,5V AAA (R03) Micro Batterie
Battery life: 8 hours, depending on battery type or brand used.
General
Dimension: 44 (L) x 55 (W) x 11 (D) mm
PC Interface: USB Version 2.0
Internal Flash memory: 256MB
Digital music format: MP3, WMA
Playable bit rates: 32 - 320 kBit/s
Recording sampling frequency: 8 kHz
This device has been tested according to all relevant current CE guidelines, such as electromagnetic compatibility and low voltage directives, and has been constructed in accordance with the latest safety regulations.
Subject to technical changes without prior notice!
Guarantee
The device supplied by our Company is covered by a 24 month guarantee starting on the date of purchase (receipt).
During the life of the guarantee any fault of the device or its accessories ascribable to material or manufacturing defects will be eliminated free of charge by repairing or, at our discretion, by replacing it. The guarantee services do not entail an extension of the life of the guarantee nor do they give rise to any right to a new guarantee!
Proof of the guarantee is provided by the proof of purchase. Without proof of purchase no free replacement or repair will be carried out.
If you wish to make a claim under the guarantee please return the entire machine in the original packaging to your dealer together with the receipt.
Defects to consumables or parts subject to wearing as well as cleaning, maintenance or the replacement of said parts are not covered by the guarantee and hence are to be paid!
The guarantee lapses in case of unauthorized tampering.
After the expiry of the guarantee
After the expiry of the guarantee repairs can be carried by the competent dealer or repair service against the payment of the ensuing costs.
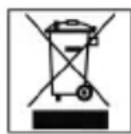
Meaning of the "Dustbin" Symbol
Protect our environment: do not dispose of electrical equipment in the domestic waste.
Please return any electrical equipment that you will no longer use to the collection points provided for their disposal.
This helps avoid the potential effects of incorrect disposal on the environment and human health.
This will contribute to the recycling and other forms of reutilisation of electrical and electronic equipment.
Information concerning where the equipment can be disposed of can be obtained from your local authority.
GARANTIE-KARTE
- Overview of the Components
- Safety is important
- Copyright
- General Notes on Safety
- Please read all safety information before operation.
- Maintenance
- Fig. 1
- Display (Fig. 2) Fig. 3
- First ...
- Content of packaging
- Inserting the battery (battery not included)
- Attention:
- How to Install the Driver
- Minimum system requirements:
- Connecting the MP3 player with your PC
- Note:
- How to operate the MP3 player
- Switching the MP3 player on
- Switching the MP3 player off
- Earphones (Fig. 3)
- Playing a music fi le
- Volume control
- Skip to previous/next fi le
- Stop playback
- Key lock
- Playback mode
- • A-B (Repeat Passage)
- - REP (Repeat 1)
- - ALL (Repeat all)
- - RND (Random play)
- • NORMAL
- Equalizer (EQ)
- Changing between MP3 and Voice Mode
- Dictation Function
- Note: Voice recordings can only be deleted by means of your PC and not on the device itself.
- Installing a SD/MMC card (not included)
- Please note the following with respect to SD/MMC cards:
- Moving between the internal flash memory and the SD/MMC card
- Notes on how to insert the SD/MMC card:
- Removing a SD/MMC card
- Troubleshooting
- Technical Data
- Power
- General
- Guarantee
- After the expiry of the guarantee
- Meaning of the "Dustbin" Symbol
- GARANTIE-KARTE
Brand : AEG
Model : MMS 4205
Category : Mp3 player