
MMS 4210 - Mp3 player AEG - Free user manual and instructions
Find the device manual for free MMS 4210 AEG in PDF.

| Product Type | MP3 Player with Multimedia Playback |
| Brand & Model | AEG MMS 4210 |
| Dimensions (W x H x D) | 48 x 76 x 14 mm |
| Internal Memory | 2 GB Flash |
| Expansion Slot | MINI SD card (up to 1 GB, not included) |
| Display | TFT Display |
| Audio Formats Supported | MP3, WMA, WAV |
| Video Formats Supported | AVI (220x176 pixels) via conversion |
| Photo Formats Supported | JPEG |
| Text Formats Supported | TXT |
| PC Interface | USB 2.0 |
| Power Supply | Built-in Lithium Polymer Battery; AC/DC adapter input AC 110-240 V, 50 Hz, output DC 5 V / 500 mA |
| Battery Charging Time | Approx. 1.5 hours |
| Headphone Jack | 3.5 mm stereo |
| Built-in Microphone | Yes, for voice recording |
| Built-in Speaker | Yes |
| Key Lock | Yes (ON/LOCK/OFF switch) |
| Playback Modes | Once, Repeat 1, Folder Once, Folder Repeat, All Once, All Repeat, Intro; Shuffle/Order |
| Equalizer Presets | Normal, 3D, Rock, Pop, Classic, Bass, Jazz, User EQ |
| Additional Functions | Voice recording, A-B repeat, Tetris game, text viewer, photo viewer, lyric support (.lrc) |
| DRM Support | Yes, DRM-protected files via Windows Media Player 9.0+ |
| Guarantee | 24 months from date of purchase |
| Safety Notices | Read safety instructions before use. Keep away from heat, moisture, sharp edges. Do not immerse in fluids. Use only for private purposes. |
| Maintenance | No user-serviceable parts inside. For maintenance, contact qualified customer service. |
| Spare Parts & Repairability | Spare parts not specified; repairs should be done by qualified personnel. Guarantee void if tampered. |
Frequently Asked Questions - MMS 4210 AEG
User questions about MMS 4210 AEG
0 question about this device. Answer the ones you know or ask your own.
Ask a new question about this device
Download the instructions for your Mp3 player in PDF format for free! Find your manual MMS 4210 - AEG and take your electronic device back in hand. On this page are published all the documents necessary for the use of your device. MMS 4210 by AEG.
USER MANUAL MMS 4210 AEG
Instruction Manual/Guarantee
Multimedia MP3 Player / 2.0 USB
Multimedia MP3 Player / 2.0 USB
MMS 4210
DEUTSCH
Inhalt
Overview of the Components ...... Page 3
Instruction Manual...... Page 14
Technical Data Page 21
Guarantee Page 21
Overview of the Components
Abb. 1 / Fig. 1
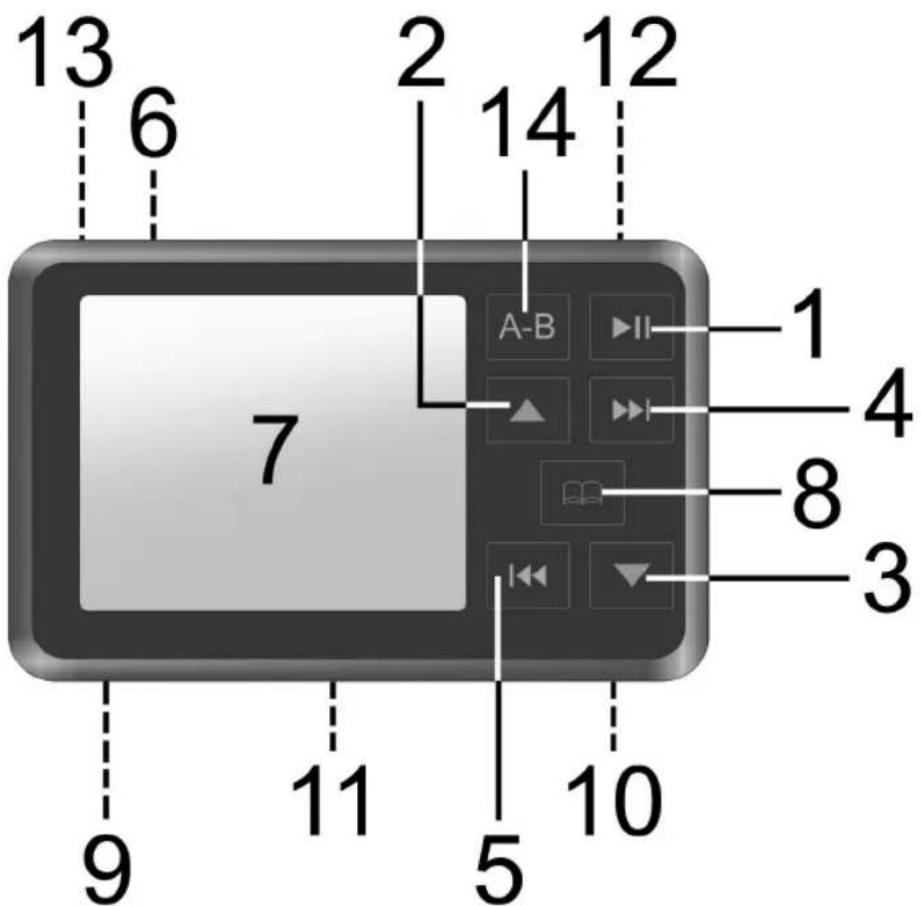
Abb. 2 / Fig. 2
Einführung
Abb. 3
D-47906 Kempen/Germany

Thank you for purchasing this MP3 player.
Maybe you are already familiar with how to use a similar product; still, we kindly ask you to take the time to read these instructions. This operation manual is intended for you to familiarise yourself with the many functions of the device and to ensure that you obtain the best results from the product which you have purchased.
Safety is important
To guarantee your safety and the safety of others please be sure to read the safety instructions with care before using this product.
Keep this information in a safe place for later reference.
Copyright
Please observe that the music you intend to record may by copyrighted. The reproduction and distribution of music files without permission of the originator infringes upon copyright. Violations of this act may render you liable to criminal prosecution. In case of doubt, seek advice before recording.
i NOTE:
The appearance of your MP3 player may differ from the model shown in this manual.
General Notes on Safety
Please read all safety information before operation.
- Read the operation instructions carefully before operating this device and store the manual inclusive of the warranty, receipt of purchase and possibly the box including the interior packaging in a safe place. If you give this device to other people, please also pass on the operating instructions.
- Use the device exclusively for private and for the intended purposes only. This device is not intended for commercial operation.
- Keep the device away from heat, direct exposure to sunlight, humidity (do not immerse in fluids) and sharp edges.
- Do not operate the device with wet hands.
- Do not operate the device in a humid or sultry environment.
- To avoid an electrical shock do not expose this device to drops of water or splash water.
Maintenance
- The inside of this device does not hold any parts which require maintenance by the user.
- For maintenance, please refer to a qualified customer services point.
- Consult your dealer if you are in any doubt with regard to the installation, the operation or the safety of this device.
Symbols in these Instructions for Use
Important information for your safety is specially marked. It is essential to comply with these instructions in order to avoid accidents and prevent damage to the machine:
WARNING:
This warns you of dangers to your health and indicates possible injury risks.
CAUTION:
This refers to possible hazards to the machine or other objects.
i NOTE: This highlights tips and information.
Overview of the Components
Fig.1
1 ▶II (Play/Pause/Stop / Power on/off) button
2 ▲" Volume control (menu navigation)
3 „▼“ Volume control (menu navigation)
4 ▶▶▶I button (forward search / menu navigation)
5 ◀◀ button (reverse search / menu navigation)
6 ON/LOCK/OFF switch (Power on/off / Key lock)
7 TFT Display
8 "button (Menu)
9 Headphones connection
10 USB connection
11 MINI SD card slot
12 MIC Microphone
13 Loudspeaker
14 A-B button (Repeat A - B passage)
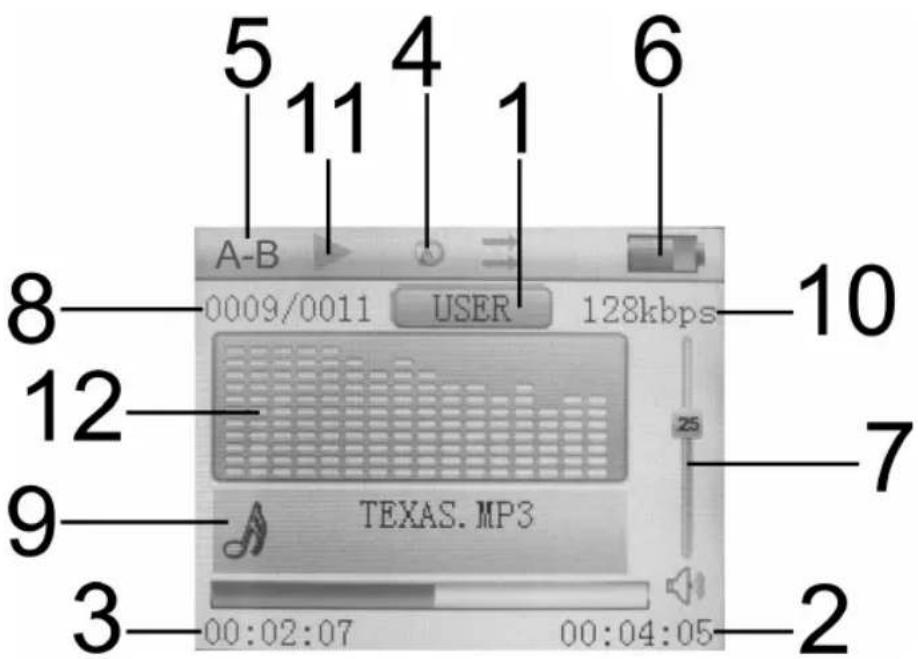
Display (Fig.2)
1 Equalizer settings
2 Minutes display (total)
3 Minutes display (current)
4 Playback mode
5 A-B Playback mode
6 Battery charge indicator
7 Volume display
8 Current/total track number
9 Music title
10 Current bit rate
11 Status display
12 Spectrum display
First ...
Read these instructions prior to using the device. Carefully remove the device from its packaging.
Content of packaging
The packaging should contain the following:
- MP3 player
- Stereo ear phones
- USB connection cable
• Operation manual
• Windows 98 SE CD driver - Conversion software
- Mains adapter
How to Install the Driver
Minimum system requirements:
- Pentium 133 MHz or more
• Microsoft ® Windows ™ 98 SE/ME/2000/XP - RAM 20 MB
- USB Port (2.0)
If your computer runs on Windows 2000 or a more recent system, your MP3 player does not require any particular software or drivers. However, the device does require the latest service pack version to be installed. In the event of problems try to install the current Microsoft service pack for the respective operating system. For this, go to:
http://www.microsoft.com
i NOTE:
Important: Windows 98SE users must install the driver prior to hooking up the device with the PC. The PC may have to be restarted. WIN 98 fi rst edition is not supported.
- Place the supplied CD driver into the CD-ROM drive of your PC.
- Click on 'Driver'.
- Follow the instructions on how to install.
Connecting the MP3 player with your PC
- Connect the MP3 player using the USB connection cable, with your PC.
- Insert the smaller USB connection into the USB jack (10) of the MP3 player and the other end into a vacant USB connection of your PC.
- Once the connection has been successfully established the display will read "7".
- The MP3 player is displayed as a removable medium and can be used as such.
- To store and export files, proceed as stated in the operating software of your PC.
- Once the fi les have been transferred, fi rst unlog the MP3 player from your PC. Proceed as stated in the operating software of your PC to safely remove the hardware.
i NOTE:
- Never remove the MP3 player from the PC during data transfer. This even applies if the data transfer should come to a halt. To separate the MP3 player from the PC, follow the notes of your PC software to safely separate hardware, i.e. the removable medium.
- Data transfer between external memory (MINI SD) and internal memory (MP3 Player) could cause a malfunction. If you nonetheless wish to transfer fi les from e.g. the internal memory to the MINI SD card fi rst save your fi les on your PC. Then copy the fi les onto the MINI SD card.
- We can not be held responsible for the loss of files as a result of improper operation.
- If an MINI SD was installed on the PC before connection, this also appears as a removable medium on the PC.
Charging the Battery
The device is operated by the integrated lithium polymer battery. In order to recharge the battery, connect the device to your computer by means of the USB connection cable, or use the AC/DC adapter of the accessory.
- If the battery is charged via the PC the position of the ON/LOCK/OFF switch (6) has no effect on the charging process. The charging process is indicated by the battery status indicator.
- If charging takes place via the mains adapter, the device switches on. The charging process is indicated by the battery status indicator. The control lamp on the mains adapter lights up in red during charging.
i NOTE:
- When the battery is charged with the mains adapter the device can be charged and operated at the same time if the ON/LOCK/OFF switch (6) is turned on.
- If only one bar is visible in the battery status display (6), the charge status of the battery is low and the battery needs recharging.
- The battery charging time is approx. 1,5 hours, depending on the charge status.
- The battery operating time depends on the operating parameters (e.g. volume).
- The battery is fully charged a) when the battery charge indicator (6) shows that it is full. b) when the control lamp on the mains adapter changes from red to green.
- The PC must be switched on during charging in order for the battery to be charged.
How to operate the MP3 player
Switching the MP3 player on
In order to switch on the MP3 player, turn the ON/LOCK/OFF switch (6) to ON and then keep the ▶II key (1) pressed down. After a few seconds the letters "AEG" appear briefly in the display. The length of time for which the display remains on depends on the quantity of data. The menu then appears in the display (7).
Switching the MP3 player off
- While a track is playing, hold the ▶II button (1) down until the display shows "GoodBye".
- Then move the ON/LOCK/OFF switch (6) to OFF.
i NOTE:
- The MP3 player switches itself off automatically if not operated for a shorter period of time while in stop or pause mode (see „Power Off Time“).
- If the „Power save” option is activated in the menu the display switches off after the set time in order to save electricity (see „Display“).
- During the charging process the device cannot be switched off due to the automatic charging connection.
Headphones connection (9)
If you want to listen on headphones you should use headphones with a 3.5 mm jack plug inserted into the ,headphone socket. The loudspeaker is switched off.
Playing a music fi le
- Switch on the MP3 player.
- Select the "Music" option in the menu. Press the "button (8) to confirm your choice.
- Playing of the files stored on the device starts.
- Briefly press the ▶II button (1) to pause playback (II appears in the display).
- Brief y press the▶II button (1) again to continue playback from the same point.
Volume control
- To increase the volume, press and hold the „▲” button (2) until the desired volume has been set. The volume level is indicated by a volume bar (7) on the display.
- To decrease the volume, press and hold the „▼” button (3) until the desired volume has been set. The volume level is indicated by a volume bar (7) on the display.

WARNING:
Listening at high volumes can harm your ears.
Skip to previous/next fi le
(5):
press 1 x = Skips to the previous track
press 2 x = Plays one track before that, etc. Press and hold the button to activate track search (the sound is muted).
▶▶| (4):
Use this button to skip to the next track, or the track after the next. Press and hold the button to activate track search (the sound is muted).
Key lock
The key lock inhibits the operation of all buttons on the MP3 player. This prevents you from accidentally activating buttons while using the MP3 player when you are out.
- In order to activate the key lock push the ON/LOCK/OFF switch (6) to LOCK.
- To deactivate the lock function push the ON/LOCK/OFF switch (6) to ON.
i NOTE:
There is no indication in the display that the key lock is activated. This also applies if you want to switch on the device with the key lock activated.
A-B (Repeat Passage)
Passages within a music file can be selected and repeated
- During playback press the A-B button (14) in the desired piece of music when the starting point is reached from where the music should be repeated (A - appears in the display).
- Press the A-B button (14) when the point is reached at which the repeat should end (A - B appears in the display). The device is now in the A-B mode and begins with repeat playback.
- Press the A-B button (14) again to deactivate the A-B mode.
Converting video fi les to AVI format
In order to play back video fi les on the device they fi rst have to be converted to AVI fi les with the conversion program.
-
Copy the "AV Converter" folder from the CD-ROM to your PC. Then install the program by double clicking on the Setup.exe file. The installation assistant will guide you through the installation.
-
Double click on the application file to start the program.
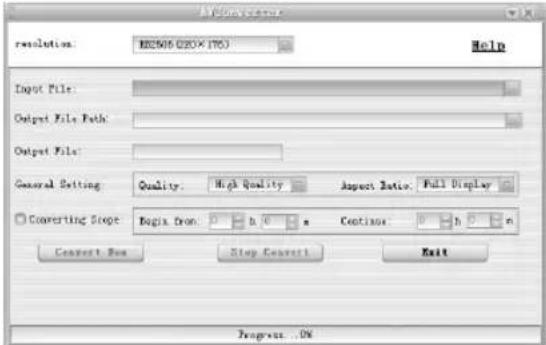
Fig. 3
- Select the file to be converted by clicking on the "symbol" on the right in the "Input File:" line.
i NOTE:
The program converts MPEG, AVI, MPG, WMV to AVI.
- Then select the storage location by clicking on the "symbol on the right in the Output File Path:" line.
- General Setting: In the „Quality“ line you can select the conversion quality of the video.
• High Quality: High quality = large space requirement
- Normal: Normal quality = medium space requirement
• High Compress: High compression = low space requirement
In the line „Aspect Ratio“ you can select the width-to-height ratio: Full Display (whole screen), 4:3 and 16:9 (wide-screen).
- In the „Resolution“ line you can set the resolution.
i NOTE: The device supports the resolution 220x176.
- Now click on the „Convert Now“ fi eld to start the conversion.
- The converted AVI file can now be copied to the device by means of a USB cable. Select "Video" mode in the menu to play this back.
i NOTE:
If you do not want to convert the entire file you can enter the desired starting/continuation times in the line „Begin from“ and „Continue“.
Main Menu
- To call up the main menu, keep the "button (8) pressed for approximately 2 seconds.
Navigating in the Menu
- Press the „▶▶I“ (right) or „I◀◀” (left) button (4/5) in the main menu to select the desired mode. The menu image of the selected mode appears in the display with a dark backing.
- Press (8) to confirm your selection and change to the corresponding submenu.
- Press the „▲“ or „▼“ button (2/3) in the submenu to select the desired mode. Press the “button (8) to confirm your selection.
- You return to the previous menu with the „I ◀◀◀” button (5).
i NOTE:
Press the , button (8) briefly to call up a list of the files in the respective mode. Besides all existing folders are indicated too.
Music
In order to select MP3 mode.
i NOTE:
If there are no files stored in the device „Warning: No File!" appears in the display.
Video
In order to select the video (AVI) mode.
i NOTE:
- If there are no fi les stored in the device „Warning: No File!" appears in the display.
- The device only supports AVI fi les (see „Converting video fi les to AVI format“).
Photo
In order to select the images (JPEG) mode.
i NOTE:
If there are no files stored in the device „Warning: No File!" appears in the display.
Text
It is possible to store brief notes and important information on the device.
i NOTE:
Only files in .txt format are supported.
- Copy the .txt files to the device using a USB cable.
- Select the "Text" mode in the main menu and press the "button (8) to select it."
- Select the desired file with the „▲“/„▼” buttons (2/3) and press the „■” button (8).
- With the „▶▶I“/„I◀◀” buttons (4/5) you can scroll forwards or backwards through longer notes.
- Press the "button (8) briefly to call up a list of the files."
i NOTE:
- If there are no fi les stored in the device „Warning: No File!" appears in the display.
- With the „▲“/„▼“ buttons (2/3) you can scroll through the note line by line.
Record (Microphone)
It is possible to make voice recordings using the built-in microphone.
- In the main menu select the "Record" mode and press the "key (8). Press the A-B button (14) to begin recording.
- With the A-B key (14) it is possible to stop the recording. Press the A-B key (14) again to resume recording.
- In order to stop recording, keep the A-B key (14) pressed down.
- To play back the recording please proceed as described under „Navigation (Directory)“.
i NOTE:
- To delete the recording again, please proceed as described under "Deleting a File" (see page 19).
- Whenever you make a recording, please ensure that the microphone is facing the direction of the sound source and is not blocked by objects, hands etc.
Navigation (Directory)
Via the navigator menu you can directly access all stored fi les/folders and play them back.
- Select the "Navigation" mode in the main menu and press the "key (8).
- Scroll forwards and backwards with the „▲“/„▼" buttons (2/3).
- Press the , "key (8) to jump to a selected folder. With the ,I◀◀" button (5) you can change to the next highest folder.
- Select the file with the „▲”/„▼“ buttons (2/3) and press the “button (8) to start playback.
Game (Tetris)
In this game you have to form a continuous wall by rotating bricks consisting of four parts. A complete row is then removed. Once the bricks have reached the top edge of the screen the game is over.
- The game is started with the „▶II“ button (1). This button can also be used to briefly interrupt the game. Then press the „▶II“ button again to continue the game.
- The brick is rotated with the „I ◀◀◀" button (5).
- Move the brick with the „ ▲“/„▼” buttons (2/3).
- Press the „▶▶I“ button (4) to accelerate the brick briefly.
- Press the „button (8) to „drop“ the brick.
Keep the "button (8) pressed down to finish the game.
Settings
i NOTE:
In order to store the settings switch the device off by pressing and hold the „▶II“ button (1).
Your MP3 player features a number of repeat and random modes for playback. These are the available playback modes:
- Once
The selected piece of music is played back. - Repeat 1 The selected track is repeated until repeat is stopped or the playback mode is changed.
- Folder Once
The pieces of music in the selected folder are played back. - Folder Repeat The pieces of music in the selected folder are repeated until playback is stopped or the playback mode is modified.
- All Once
Tracks are played in the order as saved. - All Repeat All tracks of the MP3 player are played in the sequence as saved and then repeated until playback is stopped or the playback mode is changed.
- Intro (Preview)
All tracks are played back for 10 seconds.
Play Mode
- Order
The pieces of music are played back as selected under the „Repeat Mode“ setting. - Shuffle
Every track is played in a random order.
The currently selected play mode (4) is indicated to the top of the display (7).
EQ Select (Equalizer)
Your MP3 player features equalizer pre-settings which adjust playback to the respective type of audio input.
The settings are:
• Normal (no equalizer function)
· 3D
• Rock
• Pop
- Classic
- Bass
- Jazz
- User EQ
The currently selected equalizer setting (1) is not shown in the display (7).
User EQ Set
Here you can make your own personal equalizer settings (User EQ).
- Select the individual frequencies with the „▶▶I“/„I◀◀” buttons (4/5).
- Adjust the settings with the „▲“/„▼“ buttons (2/3).
- Then select the "Yes" field to store the settings. Confirm with the "Button (8).
Submenu „Record“
In the „Record“ submenu you can select the following settings: „Rec Quality“, „Rec Volume“.
Rec Quality
Here you can select the quality of the sound recording.
High quality = high space requirement Normal quality = normal space requirement
Rec Volume
Here you can select the volume of the sound recording.
Submenu „Display“
In the „Display“ submenu you can select from the following settings: „BLight Time“, „Lum“, „BLight Mode“.
BLight Time (Illumination Time)
Here you can set how long the display should remain on until the energy saving mode is activated: 5 Seconds, 10 Seconds, 15 Seconds, 20 Seconds, 30 Seconds, Always On.
Lum
Here you can set the brightness of the display.
BLight Mode
Here you can set whether the display is dimmed or switched off after the preset time selected under „BLight Time“.
Normal = the display brightness is dimmed Energy saving mode = the display is switched off
Submenu „System“
In the „System“ submenu you can select from the following settings: „About“, „Upgrade“, „Default Set“.
About
Ver: Information on the software version used.
Date: Compilation date of the software version used.
FlashMem (internal memory):
Information on the size of storage space.
Card Mem (external memory):
Information on the size of storage space.
Upgrade
If the MP3 player operates without any problems, a fi rmware upgrade is not necessary!

CAUTION:
A fi rmware upgrade should only be carried out by qualified customer service personnel. Otherwise the guarantee cover will no longer apply.
Default Set
Here you can reset the device to the factory settings. All settings that you have carried out will then be lost.
Switch-off Time
Setting for switching the device off automatically.
Here you can choose between the settings: Off, 10 Minutes, 15
Minutes, 30 Minutes, 60 Minutes and 120 Minutes.
Language
For setting the language of the display.
Deleting a fi le
- Select the „Navigation“ mode in the main menu and confirm with the „button” button (8).
- Select the fi le you would like to delete with the „▲“/„▼" buttons (2/3).
- Press the A-B button (14) to confirm („File delete warning! Yes No“ appears in the display).
- Select the „Yes“ fi eld with the „▶▶I“/„I◀◀◀” buttons (4/5). Confir rm with the “button (8) („Warning, Deleting fi le!“ appears in the display).
- In order not to delete the piece of music select the „No“ fi eld and press the „” button (8).

NOTE: It is not possible to delete entire folders.
Installing a MINI SD card (not supplied)
The MP3 player is MINI SD memory card-compatible (up to 1 GB).
- Press the MINI SD card into the opening provided (11) until it clicks into place.
- Select the „Navigation“ mode in the main menu and confirm with the “button” button (8).
- Press the „I ◀◀◀ button (5). The selection menu appears in the display where you can choose between the „Inside Memory“ and the „SD Card“.
- Select "SD Card" with the ", ▲"/,▼" buttons (2/3) and confirm with the "button (8).
- To play a MINI SD card, please proceed as described under "Navigation (Directory)".
i NOTE:
Only the fi les located on the MINI SD Card are displayed/ played back. In order to call up the fi les from the internal memory once more, select „Inside Memory“ in the selection menu.
Notes on how to insert the MINI SD card:
- The card is inserted into the slot as such that it slightly protrudes. Do not use excessive force to insert the card, so as not to damage the MINI SD card or the built-in card slot.
- If the MP3 player can not read the MINI SD card, it may have to be reformatted to FAT.
i NOTE:
When using a MINI SD card in the MP3 player the power consumption increases. Problems may occur when you attempt to switch on the MP3 player with an installed MINI SD card. If this should be the case, please recharge the battery. In order to save battery power, remove the MINI SD card when it is not being used.
Removing a MINI SD card
Ensure that the MP3 player is switched off. Press the MINI SD card again in order to remove it.
Lyric fi les
The device supports song texts that can be downloaded from the Internet or compiled with special software. Both fi les, the music fi le and the corresponding lyric fi le, should be located in the same directory. The lyric fi le must have the same name as the song fi le. However, the fi le extension of the song text is „lrc“. The lyric fi le is shown in the display instead of the spectrum display (12).
Recording and replaying DRM-licensed fi les
i NOTE:
The use of Digital Rights Management (DRM) determines which rights to a fi le, e.g. a song, the user purchases. It is thus possible to specify how often or how long a piece of music can be used and whether it may be transferred to a portable player. For this purpose the fi le is encrypted. The user requires a licence to be able to use the fi le.
This player is DRM-compatible and thus enables the replay of licence protected music downloads.
Further information on DRM can be obtained through the Windows Media Player - website (http://www.microsoft.com/windows/windowsmedia/forpros/drm/default.mspx) or from your online music download provider.
DRM-protected files can be transferred to your Audio-Player with the Windows Media Player (from version 9.0).
- Connect the player to the PC.
- Install the latest version of the Windows Media Player on your PC.
- Purchase the desired title from an online music download provider of your choice.
- Download the desired pieces of music by following the instructions of the chosen provider. We recommend the folder "My Files\My Music" as storage location.
-
Open the Windows Media Player, e.g. Windows Media Player 10 (Fig. 4 to Fig. 6).
-
From the menu bar choose the "Tools" menu and here the menu option "Options".

Fig. 4
- In the menu window choose the tab "Devices".
- Select the unit "Portable Device" and confirm your selection with "OK".
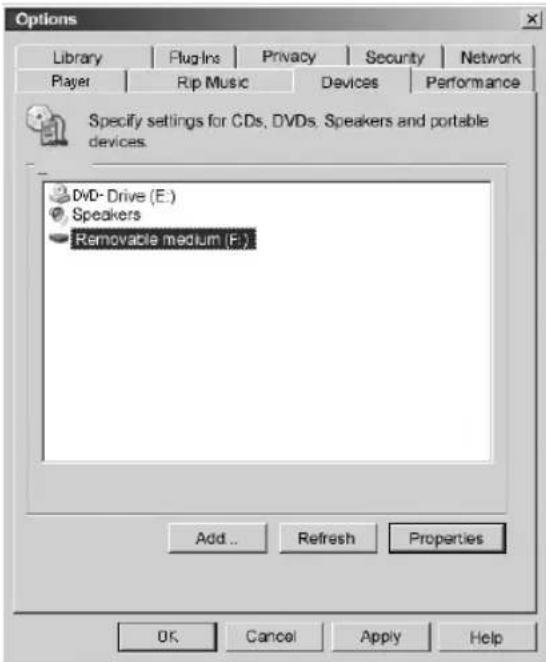
Fig. 5
- In the Windows Media Player choose the menu option "Synch", followed by "Edit Playlist".
- Click on the music pieces to be transferred to the player and confirm your selection with "OK".
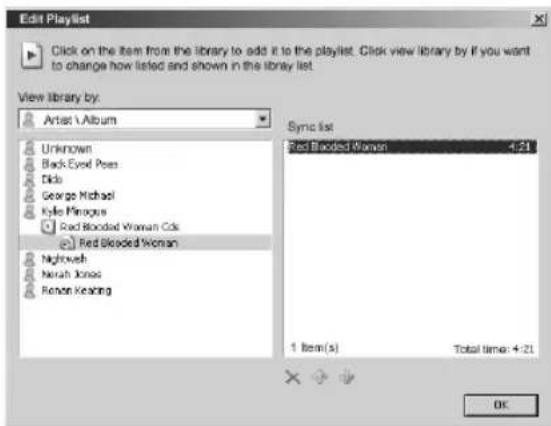
Fig. 6
- Select "Start Synch". After the synchronizing process is finished the music is available on your player.
Troubleshooting
Before requesting a service for this player, please check the following table for possible causes. A few simple checks or changes may remedy the problem and restore the correct operability of the device.
| The MP3 player does not work. | Please ensure that the POWER ON/ LOCK/OFF switch is turned to ON. Then hold down the ▶II key (1). The device switches on after a few seconds. |
| Ensure that the locking function is not activated. | |
| Ensure that the copied fi les are not protected. | |
| Integrated battery empty. Recharge the battery as described. | |
| Music fi les do not play. | Ensure that the MP3/WMA memory contains fi les. |
| Check if the copied fi les are protected. | |
| Mass storage device is not located following hook-up with PC. | Check if the USB device (MP3 player) is installed and correctly hooked up. |
| When working under Windows 98SE ensure that the driver of the supplied CD has been installed. | |
| Restart your computer. | |
| No sound. Ensure that the copied fi les are not protected. | |
| The device cannot be operated any more (hangs up). | Move the ON/LOCK/OFF switch (6) to OFF, in order to reset the device. |
Technical Data
Model ....MMS 4210
Power supply
Battery....Integrated lithium polymer battery
AC/DC adapter.... Input: AC 110-240 V, 50 Hz
Output: DC 5 V / 500 mA
General
Dimensions....48(B) x 76(H) x 14(D) mm
PC Interface.... USB Version 2.0
Internal Flash memory....2 GB
Digital music format....MP3, WMA, WAV
Digital video format ......AVI (220 x 176 Pixel)
This device has been tested according to all relevant current CE guidelines, such as electromagnetic compatibility and low voltage directives, and has been constructed in accordance with the latest safety regulations.
Subject to technical changes without prior notice!
Guarantee
The device supplied by our Company is covered by a 24 month guarantee starting on the date of purchase (receipt).
During the life of the guarantee any fault of the device or its accessories ascribable to material or manufacturing defects will be eliminated free of charge by repairing or, at our discretion, by replacing it. The guarantee services do not entail an extension of the life of the guarantee nor do they give rise to any right to a new guarantee!
Proof of the guarantee is provided by the proof of purchase. Without proof of purchase no free replacement or repair will be carried out.
If you wish to make a claim under the guarantee please return the entire machine in the original packaging to your dealer together with the receipt.
Defects to consumables or parts subject to wearing as well as cleaning, maintenance or the replacement of said parts are not covered by the guarantee and hence are to be paid!
The guarantee lapses in case of unauthorized tampering.
After the expiry of the guarantee
After the expiry of the guarantee repairs can be carried by the competent dealer or repair service against the payment of the ensuing costs.

Meaning of the "Dustbin" Symbol
Protect our environment: do not dispose of electrical equipment in the domestic waste.
Please return any electrical equipment that you will no longer use to the collection points provided for their disposal.
This helps avoid the potential effects of incorrect disposal on the environment and human health.
This will contribute to the recycling and other forms of reutilisation of electrical and electronic equipment.
Information concerning where the equipment can be disposed of can be obtained from your local authority.
Menu Overview
ENGLISH
| Main Menu | |||
| Music* (Page 17) | |||
| Video* (Page 17) | |||
| Photo* (Page 17) | |||
| Text* (Page 17) | |||
| Record* (Page 17) | |||
| Navigation * (Page 17) | |||
| Game* (Page 18) | Submenu | ||
| Settings* (Page 18) Music Repeat Mode Once | RepeatFolderFolderAllAllIntro | 1OnceRepeatOnceRepeatOrderNormalD00EQSetQuality+12345OnmSave | |
| Play | ModeShuffle | ||
| EQ | Select3RPClassicBassJazzUser | ||
| User | EQ | ||
| Record Rec Quality High Quality | General | ||
| Rec | Volume++ | ||
| Display | BLight Time | 5 s | 101523Always |
| L | u4321 | ||
| BLight Mode Normal | Power | ||
| Power Off Time | System | AboutUpgradeDefault | Set |
| Off | 10153060120 | MinuteMinuteMinuteMinuteMinuteMinute | |
| Language | |||
* For more detailed explanations please see the corresponding section. 22
H5179NE
GARANTIE-KARTE
- Multimedia MP3 Player / 2.0 USB
- DEUTSCH
- Inhalt
- Overview of the Components
- Einführung
- Safety is important
- Copyright
- i NOTE:
- General Notes on Safety
- Please read all safety information before operation.
- Maintenance
- Symbols in these Instructions for Use
- WARNING:
- CAUTION:
- Fig.1
- Display (Fig.2)
- First ...
- Content of packaging
- How to Install the Driver
- Minimum system requirements:
- Connecting the MP3 player with your PC
- Charging the Battery
- How to operate the MP3 player
- Switching the MP3 player on
- Switching the MP3 player off
- Headphones connection (9)
- Playing a music fi le
- Volume control
- Skip to previous/next fi le
- Key lock
- A-B (Repeat Passage)
- Converting video fi les to AVI format
- Main Menu
- Navigating in the Menu
- Music
- Video
- Photo
- Text
- Record (Microphone)
- Navigation (Directory)
- Game (Tetris)
- Settings
- Play Mode
- EQ Select (Equalizer)
- User EQ Set
- Submenu „Record“
- Rec Quality
- Rec Volume
- Submenu „Display“
- BLight Time (Illumination Time)
- Lum
- BLight Mode
- Submenu „System“
- About
- Upgrade
- Default Set
- Switch-off Time
- Language
- Deleting a fi le
- Installing a MINI SD card (not supplied)
- Notes on how to insert the MINI SD card:
- Removing a MINI SD card
- Lyric fi les
- Recording and replaying DRM-licensed fi les
- Troubleshooting
- Technical Data
- Power supply
- General
- Guarantee
- After the expiry of the guarantee
- Meaning of the "Dustbin" Symbol
- GARANTIE-KARTE
Brand : AEG
Model : MMS 4210
Category : Mp3 player