RN110 - Car hands-free kit Rodek - Free user manual and instructions
Find the device manual for free RN110 Rodek in PDF.


User questions about RN110 Rodek
0 question about this device. Answer the ones you know or ask your own.
Ask a new question about this device
Download the instructions for your Car hands-free kit in PDF format for free! Find your manual RN110 - Rodek and take your electronic device back in hand. On this page are published all the documents necessary for the use of your device. RN110 by Rodek.
USER MANUAL RN110 Rodek
natural_image
Abstract metallic logo design with blue and silver geometric shapes (no text or symbols)nucleus
SERIES
natural_image
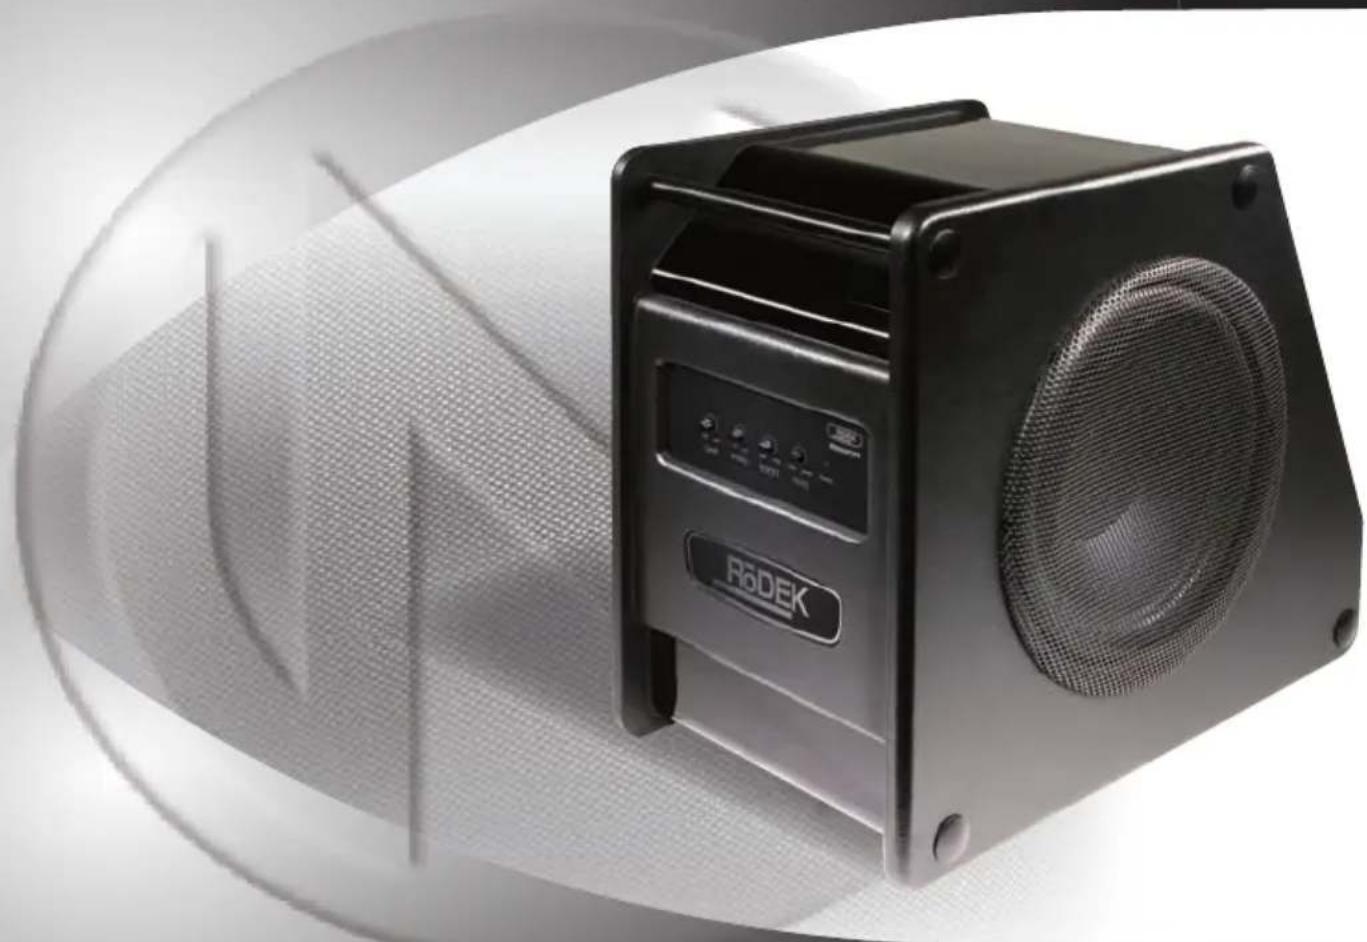
Black RoDEK audio amplifier device with visible sound grille and control buttons (no text or symbols on body)10" ACTIVE SUBWOOFER
INHALT
natural_image
Black RoDEK audio amplifier device with visible sound grille and control buttons (no readable text beyond branding)and thank you for choosing this RODEK car audio active subwoofer RN110A. To maximize the performance of your complete car audio system, it is recommended that you acquaint yourself thoroughly with the capabilities and features of this product. Therefore read this manual carefully, before attempting the installation of the RODEK RN110A and retain the manual and your purchasing/installation receipts for future reference.
Before you attempt the installation of your RODEK active subwoofer, it is recommended to map out the complete audio system and the respective wiring required. Please note that - because of possible interference problems with the existing car electrics and electronics - especially the routing of the signal cables and the chassis ground connection will have a profound impact on the performance of the overall system. Secondly, the correct mounting location needs your attention too (proper cooling of the amp module!). Use only quality installation material and if you have only little or no experience with complex car audio installations, we strongly recommend you to consult your nearest authorized RODEK dealer/installer.
2. INPUTS · OUTPUTS · CONTROLS
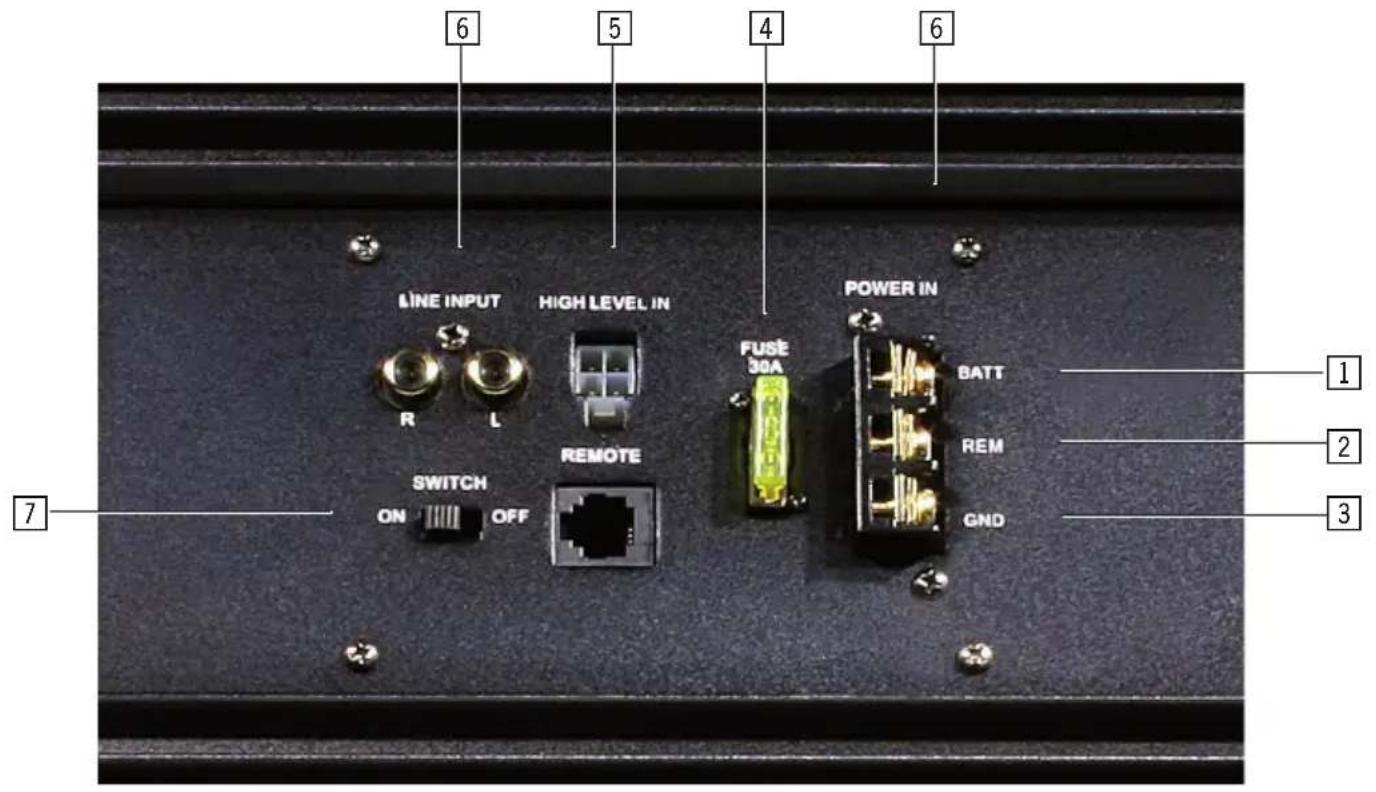
1 “+12V” POWER INPUT TERMINAL
Power input terminal to connect the active sub to the positive +12V power wire connected to the car battery.
2 "REMOTE" INPUT TERMINAL
Terminal to connect the active sub to the amp (remote) turn-on / turn-off lead of the head unit.
3 "GND" POWER INPUT TERMINAL
Power input terminal to connect the amplifier to the negative or ground wire connected to the chassis of the vehicle
4 FUSE HOLDER
Fuse holder equipped with a 30A ATC fuse, to protect the internal amp electronics of the active sub.
5 HIGH LEVEL INPUT
Port to connect the high level input adapter to headunits that only offer loudspeaker outputs, but no RCA line-level outputs.
6 RCA LINE LEVEL INPUT
RCA input to connect the active sub to the line-out of the head-unit (sub-out).
7 AUTO-SENSE SWITCH
If your headunit does not have a "REM" output, you can automatically turn on/off the amp-modul with the signal of the "HIGH LEVEL" input. Therefore please set the "SWITCH" to "ON".
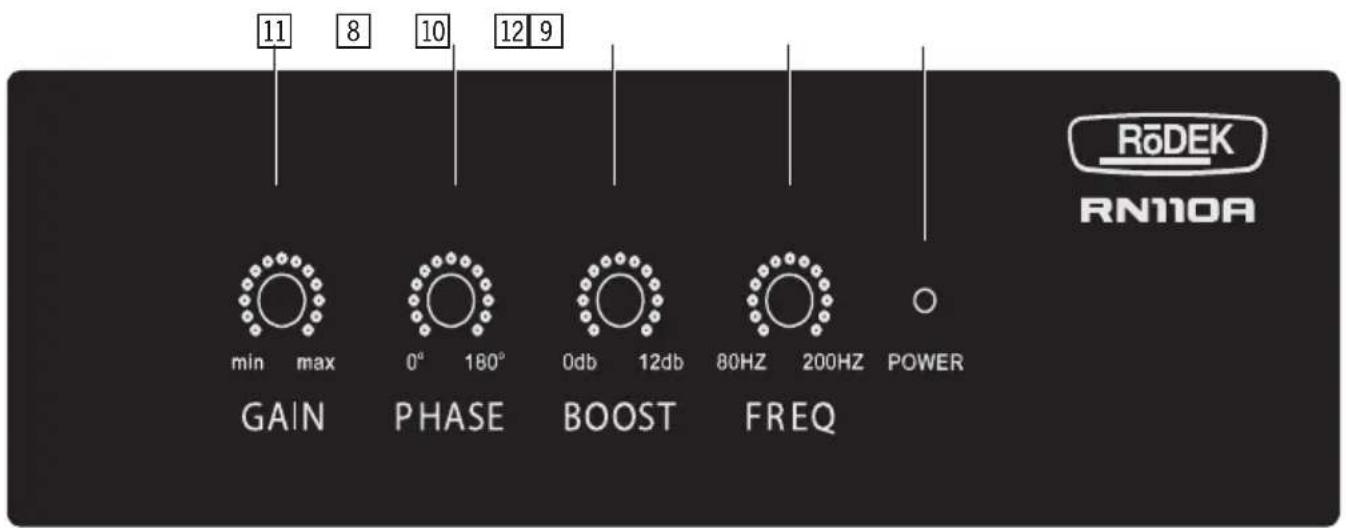
8 PHASE SHIFT CONTROL
Phase control potentiometer for the relative phase adjustment of the active sub, to match the acoustical phase of the bass output with other speakers installed in the vehicle.
9 BASS BOOST CONTROL
"BASS BOOST" control potentiometer to add more output in the 60Hz region.
Crossover control potentiometer to adjust the lowpass frequency of the electronic crossover with 12dB/oct. between 80 to 200Hz.
11 INPUT GAIN CONTROL
Input level gain control potentiometer, allowing to match the output voltage of the head-unit's RCA line-outs to the amp-module input of the active sub.
12 POWER / PROTECTION LED
Blue LED signalling correct operation of the amp module, red (“protection”) LED, signaling general malfunction of the amp-module, i.e. overheating, shortcut a.s.o.
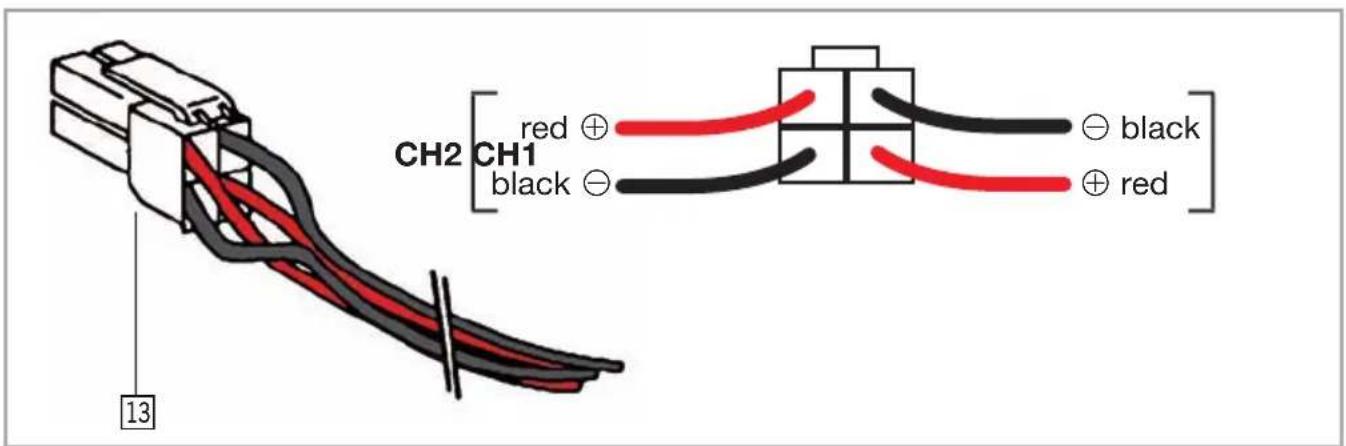
13 HIGH LEVEL PLUG
Plug to connect the loudspeaker outputs of a headunit to the amp module, if the headunit has no dedicated RCA Line-outs.
INPUTS AND CONTROLS OF BACKSIDE
text_image
LINE INPUT HIGH LEVEL IN FUSE 30A POWER IN BATT REM GND SWITCH ON OFF 6 5 4 6 1 2 3 7CONTROLS OF FRONTSIDE
text_image
11 8 10 12 9 min max 0° 180° 0db 12db 80HZ 200HZ POWER GAIN PHASE BOOST FREQ RōDEK RN110AHIGH-LEVEL INPUT ADAPTER
text_image
CH2 CH1 red ⊕ black black ⊖ red 133. MOUNTING
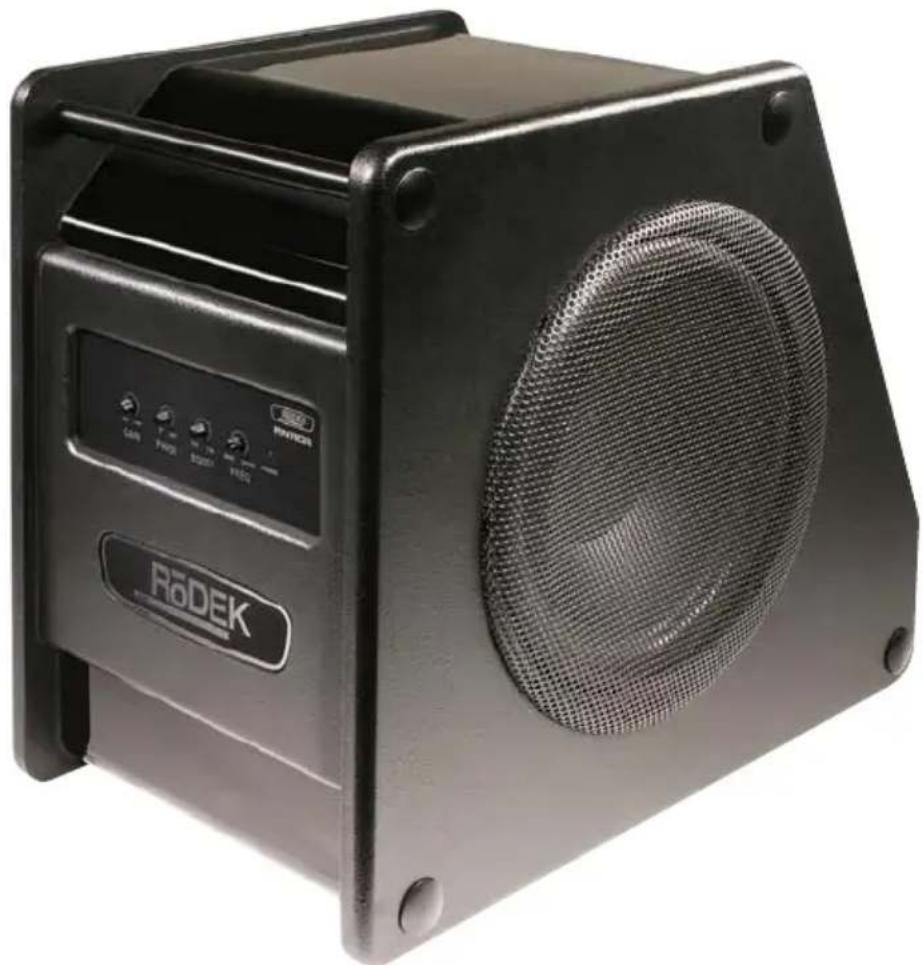
The mounting location for your active subwoofer should be carefully selected, preferably in the trunk compartment of your car! In the interest of passive driver and passenger safety, the RN110A should be securely mounted, and precautions must be taken to allow sufficient cooling. The amp module can get quite hot during operation. Note that the crossover controls must remain accessible after installation is completed.
natural_image
Black RoDEK audio amplifier device with visible speaker grille and control buttons (no readable text beyond branding)4. ELECTRICAL WIRING
IMPORTANT! Disconnect the positive power terminal ("+12V") or remove the main fuse near the car battery before you start any wiring work!
The power supply of the car audio system must be disconnected until the entire wiring installation is completed.
Use rubber grommets when running cables through any metal or sharp plastic panels, to prevent accidental shorting or shearing. Make sure the cables do not interfere with normal operation of the vehicle. Especially the music signal cables (RCA interconnects) should be kept far away from any potential sources of electrical interference i.e. electronic vehicle management systems (engine computers, relays etc.) fuel pumps, wiring harnesses etc.
4.1 CONNECTION OF POWER CABLES
Run the positive power cable ("+12 V") directly from the positive terminal of the car battery to the amp-module. Make sure the power cable makes good contact to the battery; i.e. use an appropriate battery clamp that accepts big gauge power cables! For protection of your car audio system and your entire car against electrical fire hazards from a shortcircuit of the main power cable with chassis ground, you must insert a main fuse (holder) within the first 30cm of the battery. The fuse type/value should be matching the limitations of your main power cable and the requirements of your car audio system. For example 60 A fuse when using the 20 mm² power cable. Now you route the ground cable to the amp-module. It is best to keep the ground cable ("-12V") as short as possible, i.e. to find a chassis contact very close to the amplifier. The ground power cable must have the same cross-section as the positive power cable. It is recommended to use a corrosion-resistant gold-plated power ring or a massive ground clamp between the ground cable and the chassis ground point.
Keep in mind that audible interferences and problems originating in the power supply of the amplifier are mostly based on a bad ground contact.
4.2 RCA INTERCONNECTS / REMOTE LEAD
Carefully run the RCA audio signal interconnect(s) and the remote switching cable from the head-unit to the amplifier. The audio signal cables should be routed completely separate from the power cables. Use only double or triple shielded quality cables!
Connect the remote wire lead to the remote output of the headunit and to the remote input terminal of the amplifier. Finally connect the RCA interconnect cable(s) to the respective outputs on the head-unit and the RCA inputs of the amp-module.
4.3 HIGH LEVEL INPUT
If your headunit does not have RCA outputs, you can use the "HIGH LEVEL INPUT".
To use this, connect the "HIGH LEVEL INPUT" to the loudspeaker outputs of your headunit or parallel to the rear speakers in your car.
If your headunit does not support a remote output, you can use the automatic turn on/off function. This function is controlled by the audio signal itself. Therefore please set the "SWITCH" to "ON".
5. CROSSOVER SETTINGS
5.1 ADJUSTMENT OF LOWPASS FILTER
To drive the active subwoofer system, the integrated electronic crossover always operates in lowpass mode. The RN110A features a variable lowpass filter from 80Hz to 200Hz.
You can set an appropriate lowpass crossover frequency.
For this purpose, open the input gain control – the knob should point to "noon" – so you can hear the subwoofer playing. Ideally, the low-pass cut-off frequency should be set between 80 to 200 Hz – and this setting has to be entirely determined by ear. Try to find lowpass crossover frequency setting that gives you a "full-bodied" bass reproduction with enough impact in the upper bass range.
Note: If the lowpass crossover frequency is set too low, the sound will have a tendency to sound extremely soft and lowend heavy!
5.2 ADJUSTMENT OF INPUT SENSITIVITY
To reach a maximum noise-free dynamic headroom from each individual head unit/active subwoofer combination, it is important to set the respective input gain controls correctly. The input level settings determine the actual signal-to-noise ratio, and they are also responsible for obtaining the maximum distortion-free SPL (sound pressure level) from your specific setup.
Turn-on your head-unit and set the volume control to approximately 3/4 of full volume, while playing a dynamic track from a CD. Slowly increase the GAIN adjustment control of the input of the RN110A.
Turn up the GAIN control knob until you can just about hear distorted bass sounds.
5.3 ADJUSTMENT OF PHASE SWITCH
The phase function of your RODEK RN110A can be set with the corresponding knob. The phase-shift control enables you to match the acoustical phase relations of subwoofer and the speaker system playing in the front doors, either a component or a coaxial system.
The target is that both speaker systems, normally separated by aprox. 3m of distance are playing acoustically "in-phase" at the driver's seat location. A good match of the acoustical phase between subwoofer and the system in the front doors will give you the impression of bass sounds coming from a place in front of you.
The second advantage is, that the upper bass region - i.e. where the sound waves radiated by the subwoofer and the kickbass or front door mounted component system is crossing over – will sound considerably more precise and tight. This phase adjustment
can only be determined by ear, there is no rule of thumb to find a good match, and you will definitely need somebody to help you. To judge the effect of the phase-shift adjustment, you must sit in the driver's seat, and somebody must adjust the phase shift control until the sound reproduction in the bass region is best.
5.4 BASS BOOST CONTROL
With the BASS BOOST control potentiometer you can add more output in the 60Hz region. Please note, that this is a matter of taste. If you are not sure, leave this potentiometer fully closed, i.e. rotated counter-clockwise.
6. TECHNICAL SPECIFICATIONS RN110A
| Powered 10" trunk box subwoofer with passive cone |
| Frequency response: 20 – 200Hz (in-car, -3dB) |
| 200W RMS x 1 @ 4 ohms (> 0.1% THD / 14.4V) |
| 350W MAX. x 1 @ 4 ohms (< 1.0% THD / 14.4V) |
| Full MOS-FET class-D amplification circuitry |
| Variable lowpass filter, 80 – 200Hz with 12dB/oct. |
| Variable phase-shift 0 – 180° |
| Variable bass boost: +8dB @ 60 Hz |
| Variable input sensitivity RCA: 0.2 – 4V |
| Variable input sensitivity High-Level: 1.0 – 16V |
| High-Level inputs with automatic turn-on |
| Remote low pass level remote control |
| Signal to noise ratio: > 85dB |
| Dimensions WxHxD: 275 x 377 x 435mm |
| Net Weight: 11.9kg |
If at any time in the future you should need to dispose this product please note that waste electrical products should not be disposed of with household waste. Please recycle where facilities exist. Check with your Local Authority or retailer for recycling advice. (Waste Electrical and Electronic Equipment Directive)
7. WARRANTY CONDITIONS
Dear customer,
RODEK warrants this 10" active subwoofer system and it's parts to be free of defects in materials and workmanship for two years from the date of purchase at retail, contingent upon being properly installed and approved by an authorized RODEK dealer.
RODEK Inc. will at its own discretion repair or replace any mechanically defective active subwoofer during this warranty period.
Should your RODEK active sub – or parts of it – require warranty service, please return it to the retailer from whom it was purchased. Should you have difficulty in finding an authorized RODEK service center, details are available from the national distributor in the country of purchase.
Abuse of this active subwoofer system due to excessive input gain, improper installation, amplifier clipping or physical damage is not covered under warranty.
7.1 WARRANTY LIMITATIONS
This warranty does not cover any damage due to:
- Unauthorized or unapproved installation, incorrect audio or mains connection(s).
- Exposure to excessive humidity, fluids, sun rays or excessive dirt or dust.
- Mechanical defects due to accidents, abuse or unauthorized repair attempts and modifications not explicitly authorized by the manufacturer.
This warranty is limited to the repair or the replacement of the defective product at the manufacturer's option and does not include any other form of damage, whether incidental, consequential or otherwise. The warranty does not cover any transport costs or damages caused by transport or shipment of the product.
RN110A 10" ACTIVE SUBWOOFER
Date of purchase:
Your name:
Your address:
City:
State:
ZIP or postal code:
Country:
e26 030037
Dealer's address & stamp
Exclusive distributor for Europe and Asia