HM-RC-SEC4 - Remote control EQ-3 - Free user manual and instructions
Find the device manual for free HM-RC-SEC4 EQ-3 in PDF.


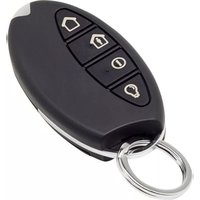
| Product Type | Wireless Remote Control (Alarm Function) |
| Brand | eQ-3 |
| Model | HM-RC-SEC4 (also HM-RC-Sec4-3) |
| Dimensions (W x H x D) | 38 x 75 x 14 mm |
| Weight (incl. battery) | 38 g |
| Power Supply | 1 x 1.5 V LR03/Micro/AAA battery |
| Battery Life | > 3 years (based on 10 uses per day) |
| Radio Frequency | 868.3 MHz |
| Typical Open Area Range | 200 m |
| Degree of Protection | IP20 |
| Ambient Temperature | -10 °C to +55 °C |
| Housing Color | Graphite Black |
| Main Functions | Control of Homematic alarm functions via CCU: internal arming, external arming, disarming, and light control (single On/Off button) |
| Buttons | 4 buttons: button pair 1 (internal/external arm), button 4 (disarm), button 3 (light) |
| Compatibility | Homematic CCU (central control unit) only; not compatible with HM-Sec-Cen or HM-Sec-Cen-B |
| Teach-in | Direct to devices or via CCU; button pair for BP1, individual for buttons 3 and 4 |
| LED Indicator | Multi-color LED for status: green (success), red (error/failure), orange (teach-in), etc. |
| Reset | Factory reset by holding teach-in button for 5+5 seconds |
| Duty Cycle | < 1% per hour (36 s/h), legally regulated |
| Maintenance | Battery replacement only; clean with soft dry cloth; no user-serviceable parts inside |
| Safety | Do not open; keep away from children; dispose batteries properly |
| Spare Parts | Battery (LR03/AAA) |
| General Information | Part of Homematic system; uses bidirectional BidCoS protocol; CE compliant; manufactured by eQ-3 AG, Germany |
Frequently Asked Questions - HM-RC-SEC4 EQ-3
User questions about HM-RC-SEC4 EQ-3
0 question about this device. Answer the ones you know or ask your own.
Ask a new question about this device
Download the instructions for your Remote control in PDF format for free! Find your manual HM-RC-SEC4 - EQ-3 and take your electronic device back in hand. On this page are published all the documents necessary for the use of your device. HM-RC-SEC4 by EQ-3.
USER MANUAL HM-RC-SEC4 EQ-3
Printed in Hong Kong
natural_image
Diagram of a circular device with two ports and directional arrows, no text or symbols presentnatural_image
Diagram of a battery pack inside an oval frame, showing internal components and polarity indicators (no text or labels)natural_image
Simple line drawing of a circular object with a horizontal bar and arrowhead, no text or symbols present.natural_image
Simple line drawing of a circular object with a horizontal bar and arrow, no text or symbols present.1x HomeMatic Remote Control
1x Key ring
1x 1.5 V LR03/micro/AAA battery
1x Operating manual
Documentation © 2015 eQ-3 AG, Germany
All rights reserved. Translation of the original version in German. This manual may not be reproduced in any format, either in whole or in part, nor may it be duplicated or edited by electronic, mechanical or chemical means, without the written consent of the publisher.
Typographical and printing errors cannot be excluded. However, the information contained in this manual is reviewed on a regular basis and any necessary corrections will be implemented in the next edition. We accept no liability for technical or typographical errors or the consequences thereof.
All trademarks and industrial property rights are acknowledged.
Printed in Hong Kong.
Changes may be made without prior notice as a result of technical advances.
132674
V 1.1 (11/2016)
Table of Contents
1 Information concerning these instructions . . . 37
2 Hazard information 37
3 Function 39
4 General system information on Homematic . 44
5 General information on radio operation ..... 44
6 Start-up. 45
6.1 Inserting and replacing batteries ..... 45
6.1.1 Inserting batteries....45
6.1.2 Replacing batteries 46
6.1.3 Behaviour after replacing batteries ..... 47
6.2 Teaching in 48
6.2.1 Teaching directly in to Homematic devices .. 48
6.2.2 Teaching in to a Homematic central control unit 51
7 Operation 56
8 Resetting to the as-delivered condition ..... 59
9 Errors and information indicated by the device LED 61
9.1 Flashing codes and error messages ..... 61
9.2 Command not confirmed ..... 64
9.3 Duty cycle exceeded 65
10 Maintenance and cleaning 66
11 Technical data 66
1 Information concerning these instructions
Read these instructions carefully before beginning operation with your Homematic components. Keep the instructions handy for later consultation! Please hand-over the operating manual as well when you hand-over the device to other persons for use.
Symbols used:

Attention! This indicates a hazard.

Note. This section contains additional important information!
2 Hazard information

We do not assume any liability for damage to property or personal injury caused by improper use or the failure to observe the safety instructions. In such cases any claim under warranty is extinguished! For consequential damages, we assume no liability!

Do not open the device. It does not contain any parts that can be maintained by the user. In the event of an error, please return the device to our service department.

For safety and licensing reasons (CE), unauthorized change and/or modification of the product is not permitted.

The device may only be operated in dry and dust-free environment and must be protected from the effects of moisture, vibrations, solar or other methods of heat radiation, excessive cold and mechanical loads.

The device is not a toy; do not allow children to play with it. Do not leave packaging material lying around. Plastic films/bags, pieces of polystyrene, etc. can be dangerous in the hands of a child.

Using the device for any purpose other than that described in this operating manual does not fall within the scope of intended use and shall invalidate any warranty or liability.
3 Function
The Homematic wireless wireless remote control provides a convenient way of controlling taught-in Homematic devices using four buttons. There are three different versions of the Homematic wireless wireless remote control, so you can choose one that suits your exact needs:
• Universal (HM-RC-4-3):
Use this wireless remote control to control Home-matic actuators (in order to turn lights on or off, for example).
• Alarm function (HM-RC-Sec4-3):
Use this wireless remote control to control alarm functions of the CCU. Via the WebUI user interface, you can connect the remote control with other Homematic devices, such as motion detectors or window sensors and individually configure alarm functions via CCU programs („If-then-connections“).
• KeyMatic (HM-RC-Key4-3):
Use this wireless remote control to control your Homematic wireless door lock actuator KeyMatic, in order to open, lock and unlock doors and switch lights on or off.
Controls:
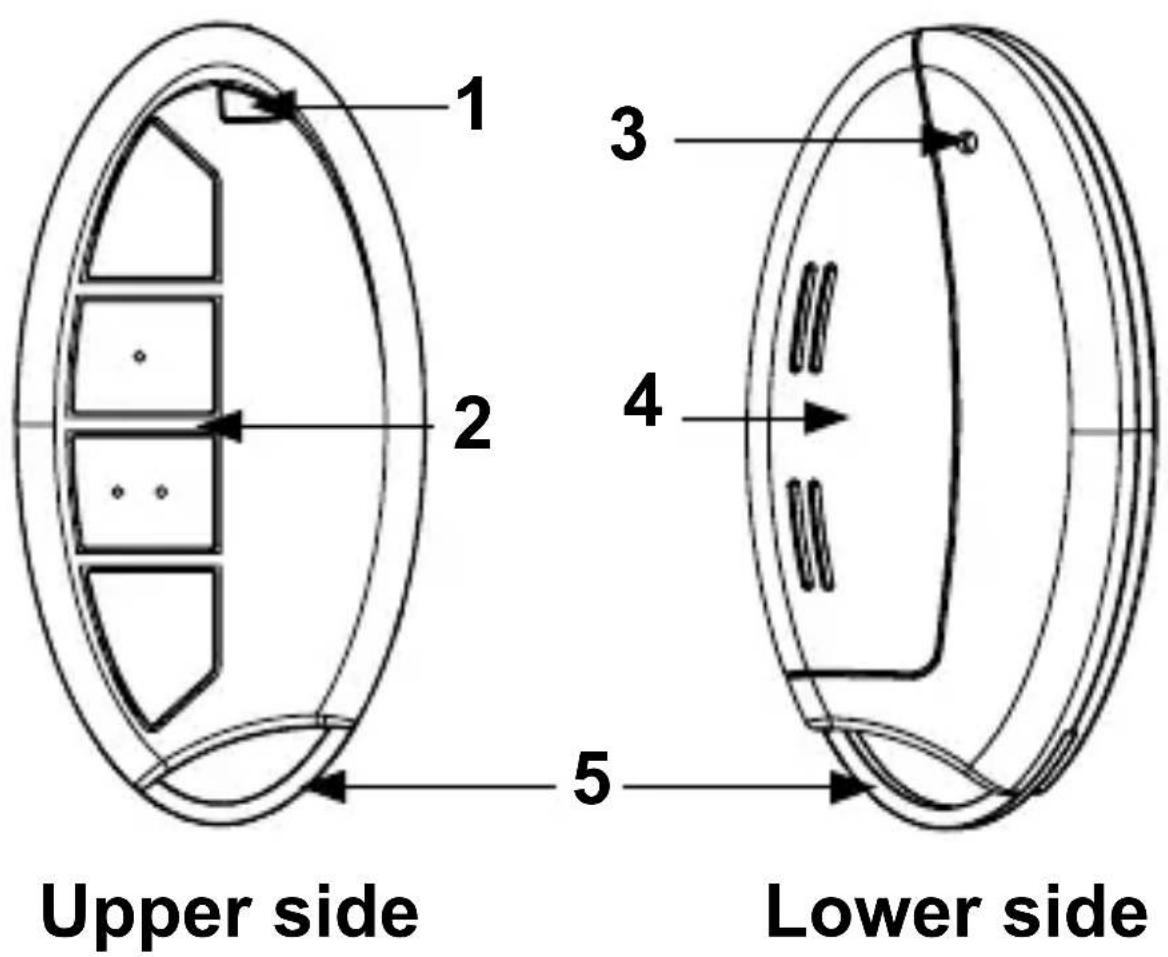
(1) Device LED
(2) Control buttons
(3) Battery cover
(4) Teach-in button
(5) Key ring
The various wireless remote control have the following control buttons:
Universal (HM-RC-4-3):

(2) On button (button pair 1)
(1) Off button (button pair 1)
(4) On button (button pair 2)
(3) Off button (button pair 2)
Alarm function (HM-RC-Sec4-3):

(2) External arming button (button pair 1)
(1) Internal arming button (button pair 1)
(4) Disarming button (single button)
(3) Light button (single „On/Off“ button) 1
1 This button switches over the taught-in device. Pressing it once switches the actuator „On“. Pressing it again switches the actuator „Off“.
KeyMatic (HM-RC-Key4-3):

(2) Lock button (button pair 1)
(1) Unlock button (button pair 1)
(4) Open door button (single button)
(3) Light button (single „On/Off“ button) 1
1 This button switches over the taught-in device. Pressing it once switches the actuator „On“. Pressing it again switches the actuator „Off“.
4 General system information on Homematic
This device is a part of the Homematic home control system and works with the bidirectional BidCoS ® wireless protocol. All devices are delivered in a standard configuration. The functionality of the device can also be configured with a programming device and software. Further resulting functionality and the additional functions provided in the Homematic system combined with other components are described in the Homematic WebUI Manual. All current technical documents and updates are provided under www.homematic.com.
5 General information on radio operation
The radio transmission is on a non-exclusive transmission path which means that there is a possibility of interference occurring. Other interfering sources can be caused by switching operations, electrical motors or defective electrical devices.

The range of transmission within buildings can greatly deviate from open air distances. Be
sides the transmitting power and the reception characteristics of the receiver, environmental influences such as humidity in the vicinity and local structures also play an important role.
Hereby eQ-3 AG, declares that this device conforms with the essential requirements and other relevant regulations of Directive 1999/5/EC. The full declaration of conformity is provided under www.homematic.com.
6 Start-up
6.1 Inserting and replacing batteries
6.1.1 Inserting batteries
To start up the device, proceed as follows:
- Open the battery compartment
at the rear by pushing the battery compartment co-ver away from the device. You will need to apply some pressure to do this.

natural_image
Diagram of a circular device with internal components and two upward arrows, no text or symbols present• This will open the catch; you can then swing open
the battery compartment cover. The cover will stay connected to the housing.

natural_image
Diagram of a battery pack inside an oval frame, showing internal components and polarity indicators (no text or labels)- Place an LR03/AAA/micro
battery into the battery compartment, using the polarity markings to ensure the polarity is correct.
- Close the battery compartment by swinging the battery compartment cover back on. Push the cover towards the centre of the housing (applying a little pressure) until it latches into place.
6.1.2 Replacing batteries
If you press a button on the wireless remote control and the flashing code indicating empty batteries is displayed (5 x red flashes), or the device being controlled does not respond, replace the used battery with a new LR03/AAA/micro battery, as described in the previous section. You must observe the correct battery polarity.

Never recharge standard batteries. Do not throw the batteries into a fire. Do not expose batteries to excessive heat. Do not short-circuit batteries. Doing so will present a risk of explosion.
Instructions for disposal:


Used batteries should not be disposed of with regular domestic waste! Instead, take them to your local battery disposal point.
6.1.3 Behaviour after replacing batteries
Once the battery has been inserted, the wireless remote control will first perform a self-test/restart (approx. 2 seconds). The LED will flash red, orange and green briefly (LED test display). Initialisation will then be carried out.

If the battery voltage is low, the button query will still be activated and the wireless remote control made ready for operation, provided that the voltage value permits it. Depending on the particular load, it may be possible to send transmissions again repeatedly, once the battery has been allowed a brief recovery period. If you are using weak batteries, the device may perform a restart automatically when you press a button. The device LED will then briefly flash red, green and orange, and follow this with 5 brief red flashes to indicate that the battery is weak.
If the battery is too weak for the device to continue being used, the 5 brief red flashes take place directly after the button is pressed. In this case, you will have to replace the battery with a new one.
6.2 Teaching in

Please read this entire section before starting the teach-in procedure!
To integrate the wireless remote control into your Homematic system and enable it to communicate with other Homematic devices, you must teach it in first. You can teach the wireless remote control directly in to other Homematic devices or to the Homematic central control unit.
6.2.1 Teaching directly in to Homematic devices
If you would like to teach the wireless remote control in to one or more Homematic devices, you must put the devices to be linked into teach-in mode and select the required teach-in channel.

Teaching in the universal wireless remote control involves teaching in buttons 1 and 2 as well as 3 and 4 as pairs of buttons (BP 1 and BP 2).
This means that when you press button 2 and button 1, this automatically teaches in the functions „On“ and „Off“ respectively. The same applies to buttons 4 and 3.

Teaching in alarm control unit and KeyMatic wireless remote controls involves teaching in buttons 1 and 2 as a button pair (BP 1). Buttons 3 and 4 are taught in individually, one after the other.
To do this, proceed as follows:
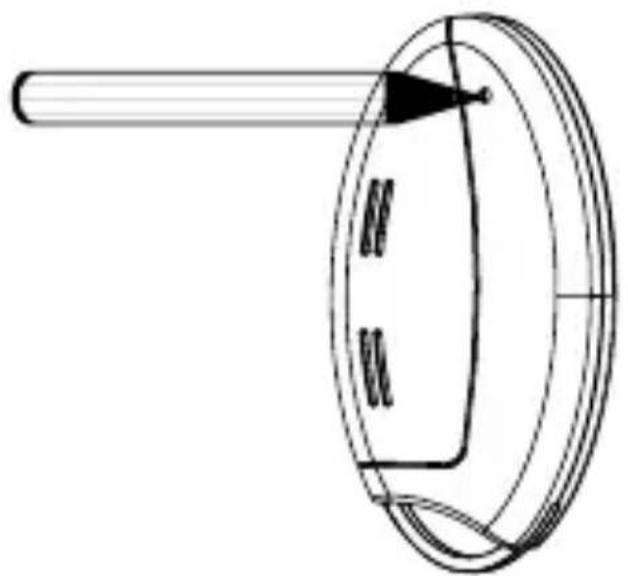
- The teach-in button is located on the rear of the wireless remote control. Press the teach-in button briefly using a pointed object.

natural_image
Simple line drawing of a mechanical component with a rod and circular housing (no text or symbols)- The wireless remote control will now be in configuration mode. The device LED will flash green to indicate this. (To exit configuration mode, briefly press the teach-in button again.)
- To enter teach-in mode, press the wireless remote control control button in to which you wish to teach a function. The device LED will flash orange slowly. (Provided the device to be taught in is not yet in teach-in mode, you can cancel teach-in mode on the wireless remote control by pressing the teach-in button again briefly. The device LED will then light up red.)
- Now put the device in to which you wish to teach the wireless remote control into teach-in mode by following the relevant operating manual instructions.
- If both devices are in teach-in mode, the LED will flash orange quickly to indicate this.
When the teach-in process is complete, the LED will light up green for 1 second to indicate that the process has been successful.
If the device LED lights up red for 2 seconds, this indicates that the teach-in process was not successful.
You must carry out the process again if this happens.

If no teach-in operations are carried out, teach-in mode will be exited automatically after 20 seconds.

If the wireless remote control has already been taught in to a central control unit and is thus blocked for direct teach-in, it can still be put into configuration mode as described above, but the device LED will light up red for 2 seconds when a control button is pressed. Direct teach-in is no longer possible for other devices.

During teach-in, please make sure you maintain a distance of at least 50 cm between the devices.
6.2.2 Teaching in to a Homematic central control unit
Your device can be conveniently
- controlled, configured,
- linked directly to other devices or
- used in central control unit programs using a software-based method.
For this purpose, it needs to be taught in to the Homematic central control unit first. New devices are taught in to the central control unit using the Homematic „WebUI“ user interface.

As soon as a component has been taught in to a central control unit, it can only be connected to other components via this unit.

Each component can only be taught in to one central control unit.

During teach-in, please make sure you maintain a distance of at least 50 cm between the devices and the central control unit.
To teach your device in to the central control unit, proceed as follows:
- Open the „WebUI“ user interface in your browser. Click the „Teach in devices“ button on the right-hand side of the screen.
- To activate teach-in mode, click „BidCoS-RF teach-in mode“.
- Teach-in mode remains activated for 60 seconds. An information box shows how much teach-in time remains.
- Within this teach-in time, you can also switch the Homematic wireless remote control to configuration mode by pressing its teach-in button briefly using a pointed object.
natural_image
Pure technical line drawing of a mechanical component with no text or symbols- The wireless remote control will now be in configuration mode. The device LED will flash green to indicate this.
- After a short time, the newly taught-in device will appear in the inbox of your software interface. The button „Inbox (x new devices)“ indicates how many new devices have been taught in successfully.
- If required, you can teach in additional devices by repeating the steps described above for each device.
- Now configure the newly taught-in devices in the inbox as described in the next section („Configuring newly taught-in devices“).
Configuring newly taught-in devices:
Once you have taught your device in to the Homematic central control unit, it will be moved to the inbox.
Here, you must configure the device and its associated channels in order to make them available for operating and configuration tasks. Give the device a name and assign it to a room. You can also make individual parameter settings.
Now you can use the „WebUI“ user interface to control your device, configure it, link it directly to other devices, or use it in central control unit programs. Please refer to the „WebUI“ operating manual for more details (you can find this in the „Downloads“ area of the website www.homematic.com).
Overview of flashing codes during the teach-in process:
| LED flashing codes Meaning | |
| 1 s green LED Teach-in successful. | |
| 2 s red LED Teach-in failed. Try again. | |
| Slow orange flashing Only | the wireless remote control is in teach-in mode. Switch the device to be taught in to teach-in mode as well. |
| Fast orange flashing followed by 1 s green or 2 s red light (depending on whether process was successful) | Both devices are in teach-in mode; teach-in process taking place. |
| Wireless remote control in configuration mode (slow green flashing) and red light if button is pressed | Wireless remote control already taught in to central control unit and therefore blocked for direct teach-in (see „Teaching directly in to Homematic devices“ section). |
7 Operation
After teach-in has been performed, several operator functions are available for use:
Universal (HM-RC-4-3):
Once you have taught the wireless remote control in to one or more receivers individually, you can control these easily using two pairs of buttons (BP 1 and BP 2). The buttons in the pair represent a single unit for the device you wish to control using the wireless remote control.
For example, you can use the first button pair (BP 1) to switch a lighting actuator on or off, and use the second button pair (BP 2) to move shutter actuators up or down.

Alarm function (HM-RC-Sec4-3):
Once you have taught-in the wireless remote control to your Homematic CCU, you can control the alarm functions easily using a button pair (BP 1) and two individual buttons (B 4 and B 3). The buttons in the pair represent a single unit for the device you wish to control using the wireless remote control.
You can use the button pair (BP 1) to arm the alarm functions if you are either in the house (internal) or not in the house (external). You can use the individual buttons (B 4 and B 3) to disarm the alarm functions unit and switch the light on or off.

The remote control can not be used in connection with the Homematic Wireless Alarm Control Unit (HM-Sec-Cen or HM-Sec-Cen-B).

Once you have taught the wireless remote control in to your Homematic wireless door lock actuator KeyMatic, you can control the actuator easily using a button pair (BP 1) and two individual buttons (B 4 and B 3). The buttons in the pair represent a single unit for the device you wish to control using the wireless remote control.
You can use the button pair (BP 1) to lock or unlock your house door. You can use the individual buttons (B 4 and B 3) to open the door and switch the light on or off.

8 Resetting to the as-delivered condition

You can reset the wireless remote control to its as-delivered condition. If you do this, you will lose all your settings.
To reset the wireless remote control to its as-delivered condition, proceed as follows:
- Press and hold the teach-in button for at least 5 seconds. The wireless remote control's LED will start to flash red slowly.


To cancel the reset process, press the teach-in button again briefly or wait for 20 seconds. In both cases, the slow red flashing and the reset process will stop.
- To reset the wireless remote control, now press and hold the teach-in button for at least another 5 seconds. With the button held down, the LED will now start to flash red faster.
- When you release the teach-in button, this will complete the reset process.
- The red LED will stop flashing and the wireless remote control will perform a restart.
- Following the LED test display (red, green, orange flashing - see Section 6.1.3 „Behaviour after replacing batteries“), the wireless remote control will be reset and ready for operation.
Possible error messages:

The errors listed below can only occur if you have taught the wireless remote control in to a central control unit.
If the LED does not start to flash once the button has been held down for 5 seconds but lights up continuously instead, this means the wireless remote control
cannot be reset as it is taught in to the central control unit. In this case, the wireless remote control has been blocked for manual resetting. To reset the wireless remote control, you need to use the „WebUI“ user interface.
9 Errors and information indicated by the device LED
9.1 Flashing codes and error messages

This information applies to operation with and without a central control unit.
| Flashing code | Meaning Solution | |
| 1 x red, green and orange flash | LED test display | Once the test display has stopped, you can continue. |
| 5 x short red flashes | Battery almost empty | Replace the battery (Section 6.1.2). |
| 1 x long, 2 x short red lashes | The wireless remote control is defective | Please contact your specialist dealer. |
| 1 x long and 1 x short red ash | Duty Cycle See Section 9.3 „Duty cycle exceeded“. | |
| Slow green ashing | Configuration mode (device waiting for wireless) | Wait until the configuration data has been sent. |
| Slow orange ashing | Teach-in mode (device waiting for wireless partner) | Switch the device to be taught in to teach-in mode. |
| Fast orange ashing | Configuration or teach-in mode (data being received) | Wait until the process is complete. |
| LED flashing red slowly | Stage before resetting to fac-tory settings | Device is waiting for teach-in button to be pressed and held in order to carry out a reset, or for a short button press to cancel the pro-cess. |
| Orange flashing with short button press or but-ton pressed and held | LED lights up orange throughout the dura-tion of wireless transmission.Once wireless transmission is successfully complete, the LED lights up green for 1 s.If transmission was not suc- cessful, it lights up red for 2 s. | If transmission was not suc- cessful, please try again. |
| 1 s lighting up green | All actuators have confirmed the (most recent) bidirectional command.. | You can continue with operation. |
| 2 s lighting up red | At least one actuator has not confirmed the (most recent) bidirectional command. | Please try again. |
9.2 Command not confirmed
If a receiver (at least one in cases where multiple devices have been taught in) does not confirm a command, the device LED lights up red at the end of the transmission process. This behaviour may be caused by the following:
• The receiver cannot be accessed.
- The receiver is unable to execute the command (load failure, mechanical blockade, etc.).
• The receiver is defective.
9.3 Duty cycle exceeded
The duty cycle is a legally regulated limit of the transmission time of devices in the 868 MHz range. The aim of this regulation is to safeguard the operation of all devices working in the 868 MHz range.
In the 868 MHz frequency range we use, the maximum transmission time of any device is 1% of an hour (i.e. 36 seconds in an hour). Devices must cease transmission when they reach the 1% limit until this time restriction comes to an end. Homematic devices are designed and produced with 100% conformity to this regulation.
During normal operation, the duty cycle is not usually reached. However, repeated and wireless-intensive teach-in processes mean that it may be reached in isolated instances during start-up or initial installation of a system. If the duty cycle is exceeded, this is indicated by one long and one short red flash of the device LED, and may manifest itself in the device temporarily working incorrectly. The device will start working correctly again after a short period (max. 1 hour).
10 Maintenance and cleaning

The product is maintenance-free besides possibly requiring a battery change. Maintenance or repairs are only to be done by trained professionals.
Clean the product using a soft, clean, dry and lint-free cloth. To remote heavier contamination, make the cloth damp with lukewarm water. Cleaning agents that contain solvents are not to be used because it can harm the plastic housing and the labels.
11 Technical data
Device short name: HM-RC-4-3,
HM-RC-Key4-3,
HM-RC-Sec4-3
Radio frequency: 868.3 MHz
Typ. open area RF range: 200 m
Receiver category: SRD category 2
Duty Cycle: < 1 % per h
Supply voltage: 1 x 1.5 V LR03/micro/AAA
Current consumption: 100 mA max.
Battery life: > 3 years (based on a
usage rate of 10 times per day)
Degree of protection: IP20
Housing colours: Graphite black
Dimensions (W x H x D): 38 x 75 x 14 mm
Weight: 38 g (incl. battery)
Ambient temperature: -10 to +55 °C
Subject to technical changes.
Instructions for disposal

Do not dispose off the device as part of household garbage! Electronic devices are to be disposed off in accordance with the guidelines concerning electrical and electronic devices via the local collecting point for old electronic devices.
Information about conformity

The CE sign is a free trading sign addressed exclusively to the authorities and does not include any warranty of any properties.

For technical support, please contact your specialist dealer.
Manufacturer's authorised representative:
eQ-3 AG
Maiburger Straße 29
26789 Leer / GERMANY
www.eQ-3.de


- Table of Contents
- Information concerning these instructions
- Symbols used:
- Hazard information
- Function
- • Universal (HM-RC-4-3):
- • Alarm function (HM-RC-Sec4-3):
- • KeyMatic (HM-RC-Key4-3):
- Controls:
- Universal (HM-RC-4-3):
- Alarm function (HM-RC-Sec4-3):
- KeyMatic (HM-RC-Key4-3):
- General system information on Homematic
- General information on radio operation
- Start-up
- Inserting and replacing batteries
- Inserting batteries
- Replacing batteries
- Instructions for disposal:
- Behaviour after replacing batteries
- Teaching in
- Teaching directly in to Homematic devices
- Teaching in to a Homematic central control unit
- Configuring newly taught-in devices:
- Operation
- Resetting to the as-delivered condition
- Possible error messages:
- Errors and information indicated by the device LED
- Flashing codes and error messages
- Command not confirmed
- Duty cycle exceeded
- Maintenance and cleaning
- Technical data
- Subject to technical changes.
- Instructions for disposal
- Information about conformity
Brand : EQ-3
Model : HM-RC-SEC4
Category : Remote control