
SR 4329 CD IPOD - Pregnant AEG - Free user manual and instructions
Find the device manual for free SR 4329 CD IPOD AEG in PDF.

| Product Type | Portable CD/MP3 player with iPod dock and radio |
| Power Supply | AC 230 V ~ 50 Hz or 8 x C size batteries (not included) |
| Power Consumption | 18 W |
| Net Weight | 2.8 kg |
| Radio Frequency Range | FM 88–108 MHz; AM 540–1600 kHz |
| CD Formats Supported | Audio CD, MP3 CD |
| USB Playback | Yes (USB socket for mass storage devices) |
| SD/MMC Playback | Yes (SD/MMC socket) |
| iPod Dock | Yes (charges iPod when mains connected) |
| Auxiliary Input | 3.5 mm AUX IN socket |
| Headphone Output | 3.5 mm stereo jack (PHONES) |
| Remote Control | Infrared remote (range 5 m, batteries required) |
| Display | LCD display |
| Audio Features | BBS (bass boost), repeat/random modes |
| Protection Class | II |
| Cleaning Instructions | Disconnect from mains; clean with soft damp cloth, no detergents |
| Safety Features | Class 1 laser, safety switches; do not open housing |
| Repairs | Only by qualified personnel; damaged mains lead replaced by manufacturer or service center |
| Environmental Compliance | CE marked; WEEE symbol – do not dispose as household waste |
Frequently Asked Questions - SR 4329 CD IPOD AEG
User questions about SR 4329 CD IPOD AEG
0 question about this device. Answer the ones you know or ask your own.
Ask a new question about this device
Download the instructions for your Pregnant in PDF format for free! Find your manual SR 4329 CD IPOD - AEG and take your electronic device back in hand. On this page are published all the documents necessary for the use of your device. SR 4329 CD IPOD by AEG.
USER MANUAL SR 4329 CD IPOD AEG
natural_image
Black AEG portable electronic device with a smartphone displaying app icons, no visible text or symbols on the device itself.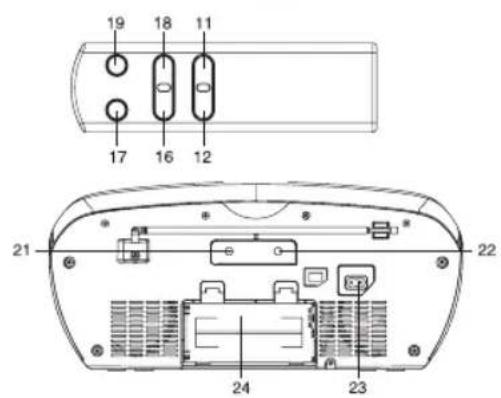
General Safety Instructions
Read the operating instructions carefully before putting the appliance into operation and keep the instructions including the warranty, the receipt and, if possible, the box with the internal packing. If you give this device to other people, please also pass on the operating instructions.
- To avoid the risk of fire or an electric shock, you should not expose the device to rain or moisture. Consequently, do not use the device in the immediate vicinity of water - for example near a bath tub, a swimming pool or in a damp cellar.
• Use the device only for the intended purpose. - Only connect the device at a properly installed plug socket. Pay attention that the specified voltage corresponds to the voltage of the plug socket.
- When using external mains supply, pay attention to the correct polarity and voltage. Always place the batteries in the correct direction.
- Assemble the device in such a way that the available ventilation openings are not covered.
- Never open the housing of the device. Incorrect repairs can constitute a considerable risk for the user. Should the device become damaged, in particular the mains supply cable, do not operate the device any longer, but rather have it repaired by an expert. Check the mains supply cable regularly for damage.
- For safety reasons a broken or damaged mains lead may only be replaced by an equivalent lead from the manufacturer, our customer service department or a similar qualified person.
- If the device is not used for a longer period, remove the plug connector from the plug socket or take out the batteries.
These symbols may be found on the machine and are intended to indicate the following:
The lightning symbol should advise the user of parts in the inside of the device which carry dangerously high voltage levels.

The symbol with an exclamation mark should advise the user of important operation or maintenance instructions in the accompanying documentation.

Devices bearing this symbol work with a "class 1 laser" for tracing the CD. The built-in safety Switches should prevent the user being exposed to dangerous laser light, which is invisible to the human eye, when the CD compartment is opened.
Under no circumstances should these safety switches be bypassed or manipulated, as this could result in a danger of exposure to the laser light.
Children and Frail Individuals
- In order to ensure your children's safety, please keep all packaging (plastic bags, boxes, polystyrene etc.) out of their reach.

WARNING!
Caution! Do not allow small children to play with the foil as there is a danger of suffocation!
- This device is not intended to be used by individuals (including children) who have restricted physical, sensory or mental abilities and/or insufficient knowledge and/or experience, unless they are supervised by an individual who is responsible for their safety or have received instructions on how to use the device.
• Children should be supervised at all times in order to ensure that they do not play with the device.
Symbols in these Instructions for Use
Important information for your safety is specially marked. It is essential to comply with these instructions in order to avoid accidents and prevent damage to the machine:

WARNING:
This warns you of dangers to your health and indicates possible injury risks.

CAUTION:
This refers to possible hazards to the machine or other objects.

NOTE:
This highlights tips and information.
Special safety information
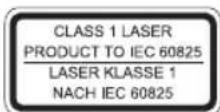
This device works with a class 1 laser.
Location of Controls
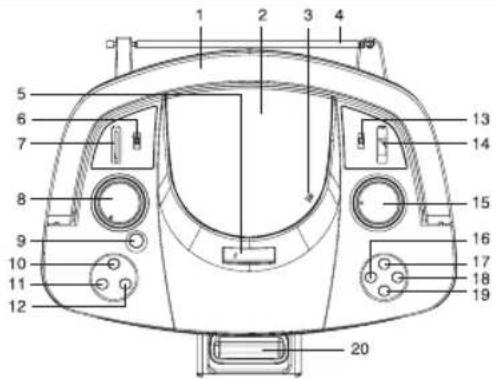
1 Handle
2 CD compartment lid
3 CD open (OPEN/CLOSE)
4 Telescopic aerial
5 LCD display
6 Function (MEDIA/iPod/TUNER/AUX)
7 SD/MMC socket (SD/MMC)
8 Volume control (VOLUME+/-)
9 POWER ON/OFF ( )
10 BBS button
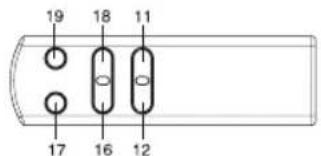
11 STOP/USB/CARD button
12 Play/Pause button ▶II
13 Band (AM/FM/FM ST.)
14 USB socket (USB)
15 Tuning control (TUNING)
16 SKIP-/FOLDER-button (<)
17 CD Mode button (MODE)
18 SKIP+/FOLDER+ button
19 CD Program button (PROG.)
20 iPod socket
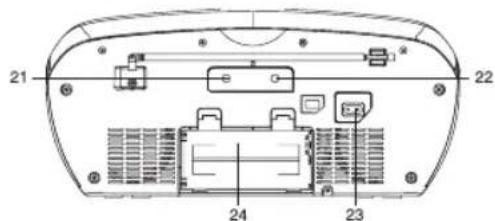
21 AUX socket (AUX IN)
22 Stereo headphones socket (PHONES)
23 AC IN socket (AC\~IN)
24 Battery Compartment
First Use of the Device/ Introduction
- Before the first use of the device, read the user manual carefully.
- Select a proper place for the device such as a dry, and even non slip area where you can easily operate the device.
• Make sure the device is vented sufficiently. - If still in place, remove the protection foil from the display.
Power supply
- Insert the mains plug into a properly installed socket with 230V, 50Hz. Connect the device with plug connector by inserting its plug into the AC IN jack (23) of the device.
• Make sure the grid voltage corresponds to the figures on the rating plate.
Using on batteries
Open the lid of the battery compartment on the rear and insert eight (size C) batteries, not supplied, with the + and - marks correctly aligned.
Then close the lid.
To switch from AC power supply to battery power supply, disconnect the AC cord from the AC inlet.

Notes on batteries
- When a mains cable is connected the batteries are automatically switched off.
- Never recharge the batteries, apply heat to them or take them apart.
- Remove dead batteries.
- If liquid leaks from the batteries, wipe thoroughly to remove.

ATTENTION:
- Different battery types or new and used batteries must not be used together.
- Batteries must not be disposed of in the garbage. Please bring used batteries to competent collection centers or back to the dealer.

WARNING:
Never expose batteries to high temperatures or direct sunlight or throw batteries into fire for danger of explosion!
Headphone jack (22)
For headphone operation, use a headphone with a 3.5mm audio jack plug, connecting it to the PHONES jack. The speakers will be muted.
General Operation
Switch device on/off (9)
By pressing the POWER ON/OFF button, you can put the device into off mode. Pressing the button again will switch the device on.
Volume (8)
By turning the volume control wheel you can adjust the desired volume.
Infrared Remote Control
For wireless control within a distance of 5m. If the distance decreases you should change the batteries. For proper operation mind a clear view between the remote control and the sensor on the device.
BBS (10)
Amplifies or reduces basses. To activate or deactivate the feature respectively, press the BBS button.
CD Operation
- Set function to MEDIA.
- Open the disc compartment and place a disc with the printed side up. The total number of tracks is displayed.
- It will automatically start play. The number of the track being played is displayed.
- Turn volume button to adjust the sound.
(1■) - STOP playback.
(12) Y!H Pause playback. You can pause and playback. Press again to continue play-back.
(1B)
Press 1 x = Restart of the song from the beginning.
Press 2 x = Skip to the previous song. Press 3 x = Skip to the song before the previous song, etc. Press and hold during playback to search in reverse through the song.
▶▶ (18)
Press to skip to the next song and the following songs. Press and hold during playback to search forward through the song.
MODE (17)
When playing a MP3 disc which includes one or more folders, keep in stop state, press MODE
button (17) until "FO1" flashes on the display, press ◀(16) or (▶) button to select the desired folder, press ▶ play/pause button (12) to playback.
REPEAT
While CD disc is playing press the MODE button (17).
1x: Repeat indicator will be shown on the display, the selected song will be playing repeatedly.
2x: Repeat indicator “ALL” will be shown on the display, all tracks will be playing repeatedly.
3x: Repeat indicator "RND" will be shown on the display, tracks will be playing randomly.
4x: Repeat indicator will disappear, and repeat mode is cancelled.
While MP3 disc (which must have one or more folders) is playing press the MODE button (17).
1x: Repeat indicator will be shown on the display, the selected song will be playing repeatedly.
2x: Repeat indicator "FOLDER" will be shown on the display, the selected folder will be playing repeatedly.
3x: Repeat indicator "ALL" will be shown on the display, all tracks will be playing repeatedly.
4x: Repeat indicator "RND" will be shown on the display, tracks will be playing randomly.
5x: Repeat indicator will disappear, and repeat mode is cancelled.
Programmed play
- In stop state, press the PROG. button (19).
- You can see the memory preset number "Po1" and "PROG" flashes on the display.
- Use the (16) or (18) button to select the desired track and then press the PROG. button (19) again.
-
Select the next track with the 16) or ▶18) button and press the PROG. button (19) again. Repeat the procedure until all the desired tracks are selected. Press the ▶/11 button (12), the playback starts. Press this button to pause briefly the play back.
-
Press once the ■ button (11) to the playback while retaining the program.
-
To delete the program, long press the ■button (11).
i NOTE:
- Do not use irregular shaped CDs (example: heart-shaped, octagonal ones). It may result in malfunctions.
- Do not place more than one disc in the disc compartment.
- Do not try to open the disc compartment during playing.
- Do not touch the lens. Doing so may cause malfunctions.
- Playback of CDs produced by the user can not be guaranteed due to the large variety of software and CD media available.
USB Operation
- Connect the USB to the USB socket directly.
- Press the POWER ON/OFF button (9) to turn the unit on.
- In stop state, press the ■button (11) to select the USB mode.
- The total number of tracks will appear in the display, then playback will begin automatically and the number of the track being played is displayed.
(1■) - STOP playback.
▶/II (12) - Pause playback. You can pause and playback. Press again to continue playback.
◀◀(16)
Press 1 x = Restart of the song from the beginning. Press 2 x = Skip to the previous song. Press 3 x = Skip to the song before the previous song, etc. Press and hold during playback to search in reverse through the song.
▶▶I (18)
Press to skip to the next song and the following songs. Press and hold during playback to search forward through the song.
MODE (17)
When playing a MP3 disc which includes one or more folders, keep in stop state, press MODE button (17) until "FO1" flashes on the display, press ◀(16) or (▶) button to select the desired folder, press ▶ play/pause button (12) to playback.
REPEAT
While CD disc is playing press the MODE button (17).
1x: Repeat indicator "will be shown on the display, the selected song will be playing repeatedly.
2x: Repeat indicator "ALL" will be shown on the display, all tracks will be playing repeatedly.
3x: Repeat indicator "RND" will be shown on the display, tracks will be playing randomly.
4x: Repeat indicator will disappear, and repeat mode is cancelled.
While MP3 disc (which must have one or more folders) is playing press the MODE button (17).
1x: Repeat indicator "will be shown on the display, the selected song will be playing repeatedly.
2x: Repeat indicator "C FOLDER" will be shown on the display, the selected folder will be playing repeatedly.
3x: Repeat indicator "CALL" will be shown on the display, all tracks will be playing repeatedly.
4x: Repeat indicator "RND" will be shown on the display, tracks will be playing randomly.
5x: Repeat indicator will disappear, and repeat mode is cancelled.
CARD Operation
Please follow the same operation as for USB operation.
Radio Operation
- Press the POWER ON/OFF button (9) to switch the device on.
- Select a band with BAND selector (13).
$$ \begin{array}{l} \text { FM (MHz) = Very High Frequency, } \ \text { AM (KHz) = Medium Wave. } \end{array} $$
- Tune to a station with TUNING (15).
- Turn VOLUME (8) to adjust the sound.
FM/FM ST
Sets the FM sound to stereo or monaural. FM ST: Reception is stereo.
FM: When an FM stereo broadcast contains noise, set to FM. Noise is reduced, although reception is monaural.
For better reception - Extend the FM antenna and orient it for the best reception.
For receiving-AM programs, an antenna is included in the device. The device can be oriented to the signal by turning it. In this frequency band, programs are broadcast only in mono mode.
i NOTE:
If the unit picks up noise from other electrical
Music Playback from iPod
(iPod not supplied)
- Connect your iPod to the iPod dock (20).
- Press the POWER ON/OFF button (9) to turn the device on.
- Press the button (12) to start music play-back.
- Follow your iPod manual for further use of the controls.

ION:
Return to radio mode before disconnecting your iPod from this device to avoid damages to your iPod.
Description of iPod Controls
▶/II (12)
You can pause and continue music playback. Press again to continue playback.
◀◀ (16)
Press 1 x = Restart of the song from the beginning. Press 2 x = Skip to the previous song.
Press 3 x = Skip to the song before the presvi- ous song, etc. Press and hold during playback to search in reverse through the song.
▶▶I (18)
Press to skip to the next song and the following songs. Press and hold during playback to search forward through the song.
iPod Charging
After connecting your iPod to the iPod dock the iPod battery is charged. The device must be connected to mains power supply and must be powered on.
i NOTE:
Not all iPod generations support the charge mode.
AUX IN Socket (21)
Connect any analog playback source like MP3-player, CD player, etc. Playback takes place via the speakers of this device.
- Connect the external device via 3.5mm audio jack (not included in delivery) to the AUX IN socket.
- Set the volume level with the volume control (8) and listen to music playback from the external device via the speakers of this device.
- You will find further instructions in the manual of your external sound source.
i NOTE:
Set the volume of the external device to a reasonable level.
Cleaning
- Before cleaning disconnect from mains power supply.
- Clean the device with a soft damp cloth without detergents.
- Do not submerge the device in water.
Technical Specifications
Model: SR 4329 CD
Power Supply: AC 230V\~50Hz
Power consumption: 18W
Protection class: ...... II
Net weight: 2.8Kg
Radio:
Frequency Range: FM 88 \~ 108MHz ..... AM 540 \~ 1600 KHz
Technical modifications reserved!
This device complies with all current CE directives, such as electromagnetic compatibility and low voltage directive and is manufactured according to the latest safety regulations.
Meaning of the "Wheelie Bin" Symbol
Take care of our environment, do not dispose of electrical appliances via the household waste.
Dispose of obsolete or defective electrical appliances via municipal collection points.
Please help to avoid potential environmental and health impacts through improper waste disposal.
You contribute to recycling and other forms of utilization of old electric and electronic appliances.
Your municipality provides you with information about collecting points.
"Made for iPod" means that an electronic accessory has been designed to connect specifically to iPod and has been certified by the developer to meet Apple performance standards.
Apple is not responsible for the operation of this device or its compliance with safety and regulatory standards.


GARANTIE-KARTE
Guarantee card
SR 4329 CD
24 Monate Garantie gemäß Garantie-Erklärung • 24 months guarantee according to guarantee declaration

- General Safety Instructions
- Children and Frail Individuals
- WARNING!
- Symbols in these Instructions for Use
- WARNING:
- CAUTION:
- NOTE:
- Special safety information
- Location of Controls
- First Use of the Device/ Introduction
- Power supply
- Using on batteries
- Notes on batteries
- ATTENTION:
- Headphone jack (22)
- General Operation
- Switch device on/off (9)
- Volume (8)
- Infrared Remote Control
- BBS (10)
- CD Operation
- MODE (17)
- REPEAT
- Programmed play
- i NOTE:
- USB Operation
- CARD Operation
- Radio Operation
- FM/FM ST
- Music Playback from iPod
- (iPod not supplied)
- ION:
- Description of iPod Controls
- ▶/II (12)
- ◀◀ (16)
- ▶▶I (18)
- iPod Charging
- AUX IN Socket (21)
- Cleaning
- Technical Specifications
- Meaning of the "Wheelie Bin" Symbol
- GARANTIE-KARTE
- SR 4329 CD
Brand : AEG
Model : SR 4329 CD IPOD
Category : Pregnant