Confi DECT 1 - Phone AUDIOLINE - Free user manual and instructions
Find the device manual for free Confi DECT 1 AUDIOLINE in PDF.


User questions about Confi DECT 1 AUDIOLINE
0 question about this device. Answer the ones you know or ask your own.
Ask a new question about this device
Download the instructions for your Phone in PDF format for free! Find your manual Confi DECT 1 - AUDIOLINE and take your electronic device back in hand. On this page are published all the documents necessary for the use of your device. Confi DECT 1 by AUDIOLINE.
USER MANUAL Confi DECT 1 AUDIOLINE
natural_image
Black audio recording device with concentric circular waves and a small indicator light (no text or symbols visible)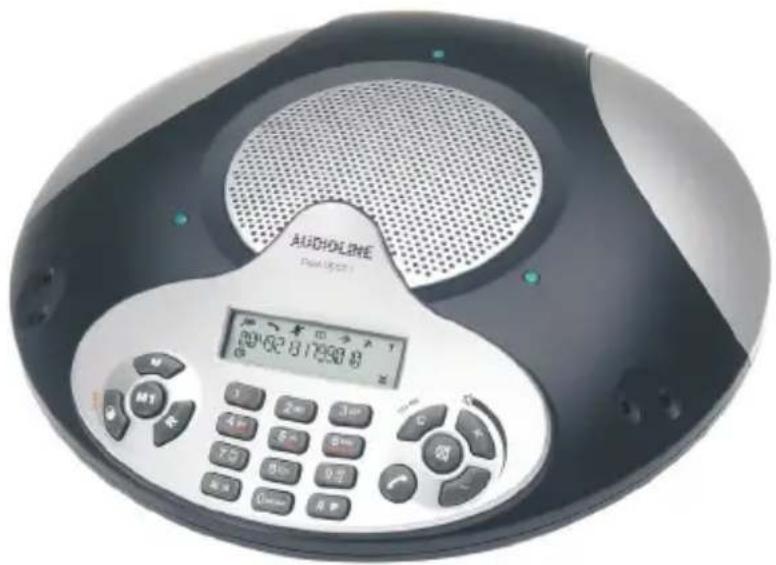
text_image
AUDHOLIME PAM 19201 04:62 8:17:98:8 M1 1 2m 3m 4m 5m 6m T0 90 9.2 8x 10mm 8FOperating Instructions ____ 23
natural_image
Line drawing of a cylindrical battery with a coiled cable extending from its side (no text or symbols)natural_image
Pure electrical circuit lines without any symbolstext_image
72 mm 37,5mm 75mm9.4 Garantie
Name: MANFRED ZINNOW
1 General Information....24
2 User controls 26
3 Setting up....27
3.1 Safety information 27
3.2 Check contents of pack 27
3.3 Connecting the base station....27
3.4 Fitting the battery in the mobile unit 27
3.5 Charging the battery 28
3.6 Use of the mobile unit with the power supply 28
4 Operation....29
4.1 The display 29
4.2 Position for the mobile unit 29
4.3 Receiving calls 30
4.4 Making calls....30
4.5 Adjusting the speech volume 30
4.6 Call duration display 30
4.7 Display of remaining talk time 30
4.8 Redial facility 31
4.9 Using the direct dial button M1 31
4.10 Dialling stored numbers from the phone book....31
4.11 Using the emergency call button 31
4.12 Muting the microphone in the handset 31
4.13 Displaying your own phone number during a call.... 32
4.14 Adjusting the ring tone volume 32
4.15 Recording conferences 32
4.16 Range information 32
4.17 Paging from the base station to the handset 32
5 Storing numbers....33
5.1 Entering numbers in the phone book 33
5.2 Storing a number on the direct dial button M1 33
5.3 Changing the emergency number 34
5.4 Entering your own phone number 34
6 T-NET mode / Private exchanges....35
6.1 "R" Button on private exchanges.... 35
6.2 "R" Button and the DEUTSCHE TELEKOM T-Net.... 35
6.3 Using Pause 35
7 Programming functions ......36
7.1 Setting the ring tone 36
7.2 Setting the flash time....36
7.3 Restoring factory settings.... 37
8 Troubleshooting ....38
9 Important information ....39
9.1 Technical data....39
9.2 Changing the telephone cable....39
9.3 Base station, wall mounting....40
9.4 Warranty....41
9.5 Declaration of conformity....42
1 General Information
Please read these operating instructions carefully. If you should have any questions, please contact our Service Department on the Hotline number 0180 5 00 13 88. Under no circumstances open the unit yourself and do not try to carry out your own repairs. For any claims under the warranty, please refer to your dealer.
Intended use - This telephone has been designed for use on an analogue telephone line (PSTN) within Germany. However, no guarantee can be accepted for trouble-free operation on all telecommunications terminal equipment connections due to the differences between the different telecommunications network operators. The telephone requires a TAE socket with F/N coding in common with other plug in units such as fax machines, answering machines or modems. Connect the telephone cable to the phone socket intended for the purpose only. Do not change the plug on the connecting cable.
Power failure - If the power should fail, it will not be possible to make calls using the telephone. Keep a cord-connected phone handy, which works without an external power supply, for possible emergencies.
Position - There must be a 230 Volt mains socket near to where the telephone is positioned. Do not set up the base station in the immediate vicinity of other electrical equipment such as microwaves or hi-fi systems, as this may result in mutual interference. The location has a decisive influence on the trouble-free operation of the telephone.
Place the base station on a flat and non-slip surface. The feet of the base station do not normally leave any marks on the surface. However, due to the large number of varnishes and surfaces in use, it may not be possible to prevent marks occurring on the surface due to the feet of the unit.
Do not use the telephone in areas where there is a risk of an explosion.
Excessive exposure to smoke, dust, vibrations, chemicals, moisture, heat or the direct rays of the sun must be avoided.
Power supplies - Use only the AUDIOLINE plug-in power supplies provided, as other power supplies could damage the telephone. There is a risk to life if the power supply is opened and not disconnected from the mains.
Rechargeable batteries - Do not use any other rechargeable batteries or battery packs. These could possibly cause a short circuit. When changing batteries, always use an original 7.2V 1800mAh battery. Do not throw batteries into the fire or immerse in water. Do not dispose of old or defective batteries with the normal household waste. The maximum standby and talk times quoted are applicable for the rechargeable battery supplied under optimum conditions. Ambient temperature, charging cycle and other external factors, such as the radio loading in the area of use, can considerably reduce the operating times. Furthermore, the charging capacity is reduced for technical reasons over the period of use or when stored at very high or low temperatures.
Charging the mobile unit - It is normal for the mobile unit to become warm when charging and is not dangerous. Do not use other manufacturer's charging equipment for charging the handset, as otherwise damage could occur.
Private exchanges - The telephone can also be connected to a private exchange. You can find out from the dealer from whom the equipment was purchased whether your telephone will work on your private exchange without any problems. Due to the large number of different private exchanges, it is not possible to guarantee this function.
Disposal - If the useful life of the battery or the complete equipment has expired, please dispose of these carefully in accordance with the statutory requirements and in a manner friendly to the environment.
- General information -
Information regarding medical equipment - The telephone works with a very low transmission power. This low transmission power prevents any risk to health according to the current state of research and technology. However, it has been shown that portable telephones can interfere with medical equipment when switched on. Therefore, please maintain a distance of at least one metre from medical equipment.
Temperature and ambient conditions - The telephone is designed for use in protected rooms with a temperature range of 10 °C to 30 °C. The base station must not be installed in damp rooms such as a bathroom or laundry room. Avoid proximity to sources of heat such as radiators and do not expose the unit to direct sunlight.
Cleaning and care - The surface of the case can be cleaned with a soft, dry, lint-free cloth. Never use cleaning agents, particularly aggressive solvents. No attention is necessary apart from cleaning the case occasionally. The rubber feet of the base station are not resistant to all cleaning agents. The manufacturer can therefore not accept any liability for possible damage to furniture or the like.
CE mark - The telephone complies with the basic requirements of the R&TTE Directive. This is confirmed by the CE mark.
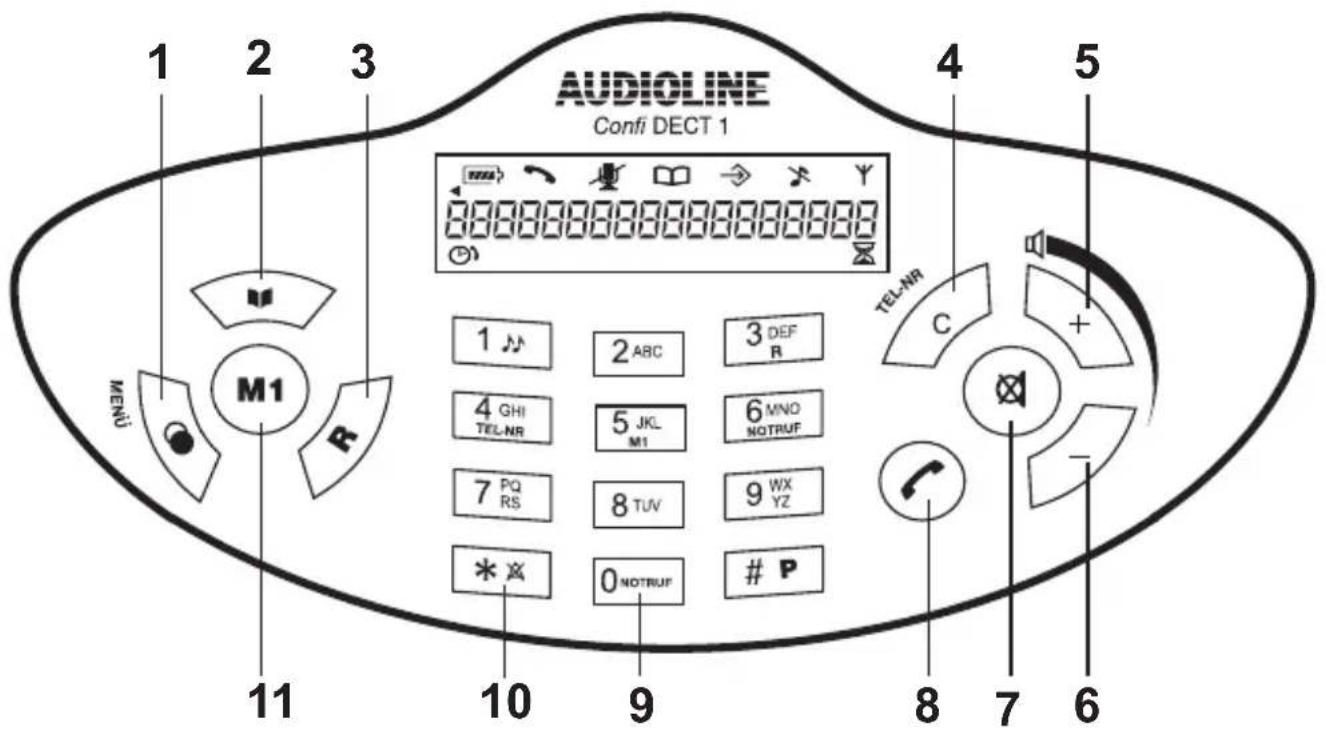
2 User controls
Mobile unit
text_image
AUDIOLINE Confi DECT 1 1 2 3 M1 MENU 1 2 ABC 3 DEF R 4 GHI TEL-NR 5 JKL M1 6 MNO NOTRUF 7 PQ RS 8 TUV 9 WX YZ * ※ 0 NOTRUF # P 11 10 9 8 7 61 Redial/Menu
2 Phone book
3 R Signal button
4 Delete key/Display own phone number
5 Volume louder
6 Volume softer
7 Mute button
8 Call button
9 Emergency call button
10 Switch off ring tone
11 Direct dial button M1
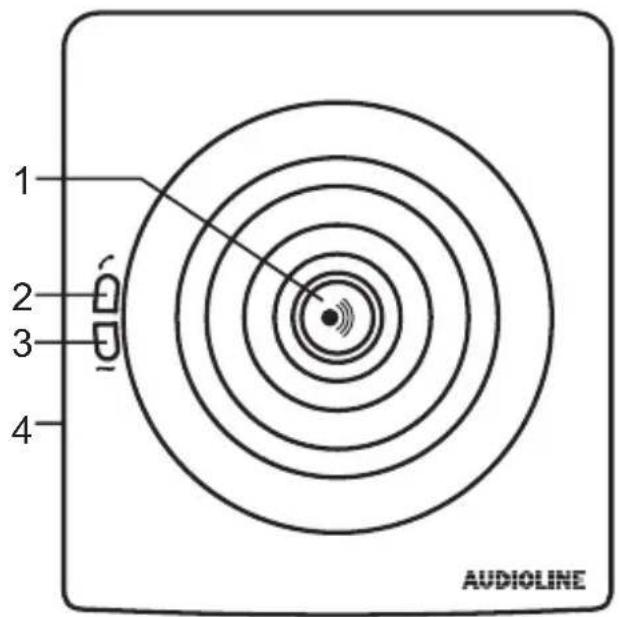
Base station
1 Paging button
2 Call indicator
3 Mains indicator
4 Audio output
text_image
1 2 3 4 AUDIOLINE3 Setting up
3.1 Safety information
NOTE: Before setting up, it is essential that you read the Safety Information at the beginning of this operating manual.
3.2 Check contents of pack
The following items are supplied:
| one base station with plug-in mains power supply | one telephone connecting cable |
| one mobile unit with plug-in mains power supply | one battery 7.2V, 1800mAh |
| one instruction manual |
3.3 Connecting the base station
Position the base station near to your telephone connection socket and to a mains socket.
-
Insert the small round plug of the power supply (7V, 400mA) without adapter into the socket on the rear of the base station and plug the power supply into a properly installed 230 V mains socket. The plug-in power supply for the base station must always be connected. For safety reasons, use only the plug-in mains power supply provided.
-
Connect the telephone cable supplied to the telephone socket and the telephone jack on the rear of the base station. Use only the new telephone cable provided.
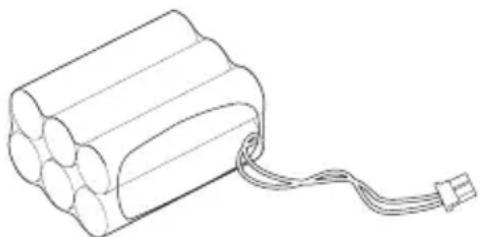
3.4 Fitting the battery in the mobile unit
-
To fit the rechargeable battery supplied into the mobile unit, open the battery compartment on the underside.
-
Connect the battery cable. The plug is provided with polarity protection so that it cannot be inserted the wrong way round.
-
Place the battery in the compartment and close the cover.
natural_image
Line drawing of a cylindrical battery with a coiled cable extending from its side (no text or symbols)Important note: If you want to use the mobile unit without a cable, the battery must be charged for at least 15 hours. See Chapter 3.5. The telephone may malfunction if the batteries are not properly charged.
3.5 Charging the battery
To charge the battery, connect the plug-in mains power supply (12V, 500mA) with the adapter to the mobile unit. The socket is situated on the back of the unit.
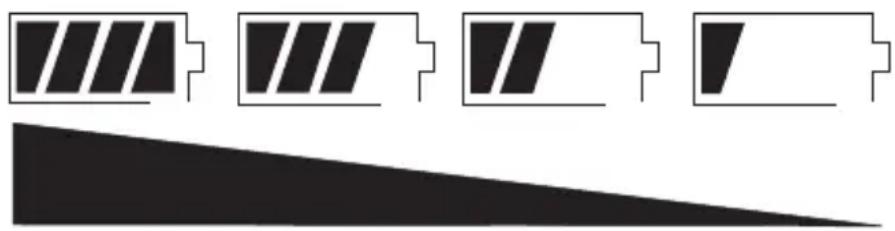
While the battery is being charged, the segments in the capacity display will flash one after the other □→□→□→□→□. When the battery is fully charged, the symbol will be seen in the display.
The rechargeable battery has a stand-by time of max. 80 hours at room temperature and a maximum talk time of up to 12 hours.
The current battery capacity is shown in the display:
natural_image
Pure electrical circuit lines without any symbolsIf the battery capacity is too low, the □ symbol will flash in the display. As a further warning, the three indicator lights at the top of the mobile unit will flash red while a call is being made.
Note: You will be given further information concerning the remaining talk time on the right-hand side of the display while a call is being made. This display shows you the remaining talk time in hours and minutes. When used with the power supply or during the charging process, you will not be given information regarding the remaining talk time.
3.6 Use of the mobile unit with the power supply
You can also use the mobile unit permanently connected to a power supply.
To do this, connect the plug-in mains power supply (12V, 500mA) with the adapter to the mobile unit. The socket is situated on the back of the unit.
- Operation -
4 Operation
4.1 The display
In normal operation, the display is able to show your own phone number. You can find out how to enter this number in Chapter 5.4. In addition, the main functions are shown in the display by means of various symbols.
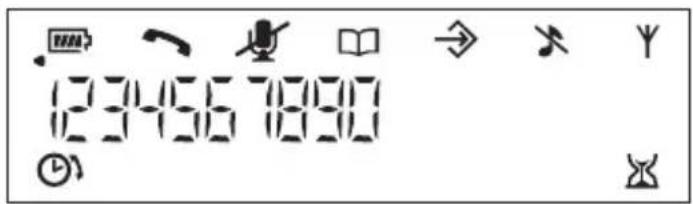
text_image
1234567890 | Constant: You are making a call.Flashing: You are receiving a call and the connection to the base station is in the process of being set up. |
 | Flashing: Please charge the mobile unit |
 | Constant: Indication of battery capacity Cycling through of the segments: The mobile unit is being charged. |
 | The microphones in the mobile unit are switched off (mute setting). |
 | Programming is activated. |
 | Phone numbers are being stored in or called up from the phonebook. |
| [980C] | The ring tone is switched off. Incoming calls are only signalled visually by means of the three indicator lights. |
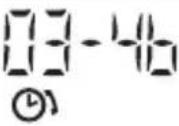 | Displays the current talk time in hours and minutes. |
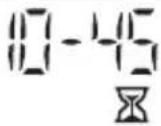 | Shows the remaining talk time with the current battery capacity in hours and minutes. |
| [SIGN] | Appears if the phone number entered is longer than 18 digits. |
| [SIGN] | Constant: The connection to the base station is satisfactory.Flashing: The base station is out of range or the base station is not connected. |
4.2 Position for the mobile unit
When positioning the mobile unit, make sure that all conference participants are roughly the same distance from the mobile unit. In this way, you will avoid the participants being heard by their partners at different volumes. Each participant must speak towards the mobile unit so that the best transmission can be guaranteed.
4.3 Receiving calls
When a call arrives, the ringing tone sounds on the mobile unit. The symbol will flash in the display. Press the call button on the handset and the connection will be made. The green call indicator on the base station will come on while a call is being made.
To end the call, press the call button ↗ on the mobile unit.
4.4 Making calls
- Enter the required telephone number with a maximum of 44 digits using the number pad. As the display is only capable of showing 18 digits, in the case of longer phone numbers only the last 18 digits are displayed.
Note: If you have entered a number incorrectly, you can delete the number by repeatedly pressing the C button. The number is completely deleted by pressing the C button for a long time.
- Press the call button and the required connection will be made.
Note: You can also get a dialling tone by first pressing the call button ↗. On entering the digits of your required phone number, your telephone will dial the number directly. With this method of making a call, it is not possible to correct individual digits in the number in the manner described above.
4.5 Adjusting the speech volume
You can adjust the volume of the persons you are speaking to in 16 steps by means of the + - buttons while a call is being made.
4.6 Call duration display
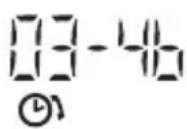
The call duration in minutes and seconds is shown on the left-hand side of the display during a call. Ten seconds after dialling, the display will switch from showing the number dialled to showing the duration of the call. The call duration will still be retained in the display for a few seconds after the call has been ended.
4.7 Display of remaining talk time
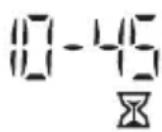
If you are using the mobile unit with the battery, you will be given information concerning the remaining talk time while a call is being made. This indication on the right-hand side of the display shows you the remaining talk time in hours and minutes. When used with the power supply or during the charging process, you will not be given information regarding the remaining talk time.
- Operation -
4.8 Redial facility
You can use the redial facility if the person called is engaged or does not reply.
-
Press the button and the last phone number dialled will be shown in the display. As the display is only capable of showing 18 digits, in the case of longer phone numbers only the last 18 digits are displayed.
-
Now press the call button and the telephone number displayed will be automatically dialled. If you do not want to dial the number, simply press the delete button C
4.9 Using the direct dial button M1
You can save an important telephone number on the direct dial button M1 and dial this directly with a single press of the button. You can find out how to save this number in Chapter 5.2.
- Press the direct dial button M1 and the stored phone number will be dialled immediately.
4.10 Dialling stored numbers from the phone book
After you have stored a few phone numbers, you can call these up very quickly and easily. You can find out how to store these numbers in Chapter 5.1.
- Press the phone book button .
- Now press the required storage location from 0 to 9.
- Now press the call button and the telephone number displayed will be automatically dialled.
4.11 Using the emergency call button
In an emergency, you can quickly dial an emergency number by pressing and holding the emergency call button. The Fire Brigade number 112 is pre-programmed as the emergency number. You can find out how you can change this number in Chapter 5.3.
- Press and hold the button for two seconds and the stored emergency number will be dialled immediately.
4.12 Muting the microphone in the handset
You can turn off the handset microphone during a call by using the 📄 button. It is thus possible to speak without the other person hearing you. The loudspeaker in the handset remains switched on and you can continue to hear the other person.
-
Press the ⚙ button once during a call. The 🔔 symbol will appear in the display and the three indicator lights on the mobile unit will illuminate red.
-
To switch the microphone on again, press the ⏻ button once more. The symbol will go off and you will be able to continue the call as normal.

4.13 Displaying your own phone number during a call
If you need to know which number the conference phone can be reached on while a call is being made, simply press the TEL-NR button. For it to be possible for the number to be displayed, this must, of course, have been entered previously. For further information, see 5.4.
4.14 Adjusting the ring tone volume
You can adjust the ring tone volume in 5 steps or switch off the ring tone completely with the + - buttons. When the ring tone is switched off, the symbol appears in the display and incoming calls are only signalled visually by means of the three indicator lights. You can find out how to change the ring tone in Chapter 7.1.
Note: To switch off the ring tone altogether, simply press and hold the ✱ button until the ⚫ symbol appears in the display.
4.15 Recording conferences
You can record conferences and telephone calls on a voice recorder, for example, using the audio output on the left-hand side of the base station. Connect the audio output to the input of your recorder. Please use a mini jack plug (mono).
4.16 Range information
The range of the handset is ca. 50 metres in closed rooms and ca. 300 metres outdoors. When there is a good contact with the base station, the Y symbol will appear in the display.
If you are too far away from the base station, the symbol will flash in the display and the three indicator lights will illuminate red. In this case, move nearer to the base station once more, as otherwise the call will be interrupted.
4.17 Paging from the base station to the handset
If you cannot remember where you have left the mobile unit, press the 🎨 button on the base station. You will hear audible signals for 30 seconds and thus be able to find the mobile unit again easily. You can cancel the audible signal prematurely by pressing any button on the mobile unit.
5 Storing numbers
The Confi DECT 1 conference phone stores one telephone number on the direct dial button M1 and ten important phone numbers in the phone book as well as one emergency number and the number of the telephone connection used.
5.1 Entering numbers in the phone book
Ten phone numbers, each with a length of up to 44 digits, can be stored in the phone book. The ten numbers 0 to 9 on the number pad are used as memory locations.
- First enter the required number that you want to store. The phone number will be shown in the display. If the phone number is longer than 18 digits, only the last 18 digits will be shown in the display.
- Press and hold the phone book button button for 2 seconds. The phone book symbol and the programming symbol will appear in the display.
- Now choose the required memory location between 0 and 9 on the number pad.
- To save, press the phone book button once more. You will hear a confirmation tone and the phone number will be stored. You can exit programming without saving by holding the C button pressed.
Note: Numbers already entered are deleted by overwriting with a new number.
5.2 Storing a number on the direct dial button M1
You can save an important telephone number on the direct dial button M1 and dial this directly with a single press of the button.
- Press the menu button MENÜ until the symbol appears in the display.
- Press the number 5 M1 on the number pad. The currently assigned phone number will appear in the display. The display will remain blank the first time the unit is programmed.
- Press the menu button MENÜ again and the number in the display will flash.
- Now delete any number that has already been entered by repeatedly pressing the C button.
- Now enter the new telephone number with a maximum of 30 digits.
- After you have entered the required number, confirm your selection with the menu button MENÜ. You can exit programming without saving by holding the G button pressed.
- To exit programming after saving, briefly press the button.
5.3 Changing the emergency number
In an emergency, you can quickly dial an emergency number by pressing and holding the emergency call button. The Fire Brigade number 112 is pre-programmed as the emergency number. If you want to store a different emergency number, proceed as follows:
- Press the menu button MENÜ until the ➔ symbol appears in the display.
- Press the number 6 NOTRUF on the number pad. The currently assigned emergency number will appear in the display. The number 112 will appear the first time the unit is programmed.
- Press the menu button MENÜ again and the number in the display will flash.
- Now delete the number that has already been entered by repeatedly pressing the C button.
- Now enter the new telephone number with a maximum of 30 digits.
- After you have entered the required emergency number, confirm your selection with the menu button MENÜ. You can exit programming without saving by holding the C button pressed.
- To exit programming after saving, briefly press the button.
5.4 Entering your own phone number
In normal operation, the display is able to show your own phone number. In this way, you can find out directly which telephone number the conference phone can be reached on. Your own phone number will also be displayed when you press the TEL-NR button while a call is being made.
- Press the menu button MENÜ until the ➔ symbol appears in the display.
- Press the number 4 TEL-NR on the number pad. The currently assigned phone number will appear in the display. The display will remain blank the first time the unit is programmed.
- Press the menu button MENÜ again briefly.
- Now delete any number that may already have been entered by repeatedly pressing the G button.
- Now enter the number of the telephone line to which the phone is connected.
- After you have entered the required number, confirm your selection with the menu button MENÜ. You can exit programming without saving by holding the button pressed.
- To exit programming, briefly press the button.
6 T-NET mode / Private exchanges
You can use the "R" signal button on your telephone on private exchanges and when using DEUTSCHE TELEKOM's T-Net functions.
6.1 "R" Button on private exchanges
If you have connected your telephone to a private exchange, you can use all the facilities such as call transfer, automatic recall, etc. The "R" signal button gives you access to these facilities. The FLASH time "100ms" will normally be required on a private exchange. (For adjusting, see 7.2). You can find out from the dealer from whom the equipment was purchased whether your telephone will work on your private exchange without any problems.
6.2 "R" Button and the DEUTSCHE TELEKOM T-Net
Your AUDIOLINE telephone supports the most important DEUTSCHE TELEKOM added value functions (e.g. brokering, call waiting, three-way conference, etc.). The T-Net works using the "FLASH 300ms" setting. (Adjustment, see 7.2). Please contact DEUTSCHE TELEKOM to gain access to T-Net functions.
6.3 Using Pause
With private exchanges, it is necessary to dial a certain number (e.g. "9" or "0") in order to obtain a dialling tone for an outside line on the extension. With some, older private exchanges, it takes some time before the dialling tone can be heard. Especially for these private exchanges, an automatic pause can be inserted after connecting to the outside line so that you can dial directly without waiting for the dialling tone.
Entering a pause when dialling manually
Press and hold the # P button between the number for the outside line and the actual telephone number until the P symbol appears in the display and then continue entering the phone number.
After connecting to an outside line your telephone will wait for 3 seconds before dialling the actual telephone number.
The pause can also be saved with numbers in the phone book.
7 Programming functions
For better clarity, some buttons on the number pad are inscribed with the programming functions that are available. Programming functions are selected using the menu button and the appropriate numbers.
7.1 Setting the ring tone
The mobile unit can respond with five different ring tones when a call comes through.
- Press the menu button MENÜ until the → symbol appears in the display.
- Press the number 1 🎯 on the number pad. The number of the currently selected ring tone will appear in the display.
- Press the menu button MENÜ again briefly and the number in the display will flash.
- Now select the required ring tone with the numbers 1 to 5. You will hear the corresponding tone with each selection.
- After you have found the right ring tone, confirm your selection with the menu button MENÜ. You can exit programming without saving by holding the button pressed.
- To exit programming, briefly press the button.
7.2 Setting the flash time
The telephone has flash times of 100ms, 300ms, 800ms and 1000ms (factory setting 100ms).
- Press the menu button MENÜ until the ➞ symbol appears in the display.
- Press the number 3 on the number pad. The currently assigned flash time will appear in the display.
- Press the menu button MENÜ again briefly and the flash time in the display will flash.
- Now select the required flash time with the numbers 1 to 4. 1 = 100; 2 = 300ms, 3 = 800ms; 4 = 1000ms
- After you have entered the required flash time, confirm your selection with the menu button MENÜ. You can exit programming without saving by holding the C button pressed.
- To exit programming, briefly press the button.
7.3 Restoring factory settings
The telephone is reset to the factory settings using this function.
Summary of factory settings
| Volume of mobile unit Medium | |
| Ring tone volume 3 | |
| Ring tone 1 | |
| Flash time 100ms | |
| Redial facility deleted | |
| Phone book deleted | |
| Direct dial button deleted | |
| Emergency number 112 |
-
Press the menu button MENÜ until the ➔ symbol appears in the display.
-
Press and hold the number 9 on the number pad until 888888888888888888888888888888888888888888888
-
Confirm your selection with the menu button. You can exit programming without saving by holding the button pressed.
- Troubleshooting -
8 Troubleshooting
If you have problems with your telephone, please check the following points first. For technical problems, you can also contact our hotline on Tel. 0180 5 00 13 88. For any claims under the warranty, please refer to your dealer. The warranty period is 2 years.
| No calls possible The telephone line is not correctly connected or is faulty.Use only the telephone cable provided.Test whether your telephone connection is in order by using another telephone.The base station power supply is not plugged in or there is a total power failure.The battery pack is flat or defective. Test the mobile unit in power supply mode.You are too far away from the base station. | |
| Connection is cut off or drops out | You have moved the mobile unit too far away from the base station.Incorrect position for the base station. |
| The system no longer responds or is in an undefined state. | Reset all functions to the factory settings. Before doing so, briefly remove the power supply from the socket.Factory settings see Chapter 7.3. |
| The battery symbol flashes in the display after a few hours. | Charge the mobile unit for 15 hours.If this does not help, replace the battery pack. |
| Display dark Caused by direct sunlight, allow the mobile unit to cool down. | |
9 Important information
9.1 Technical data
| Standard DECT | |
| Channel number 1880 to 1990 MHz | |
| Audio bandwidth 200 to 3800Hz | |
| Volume 90 dBspl | |
| Power supply, base station 220/230V, 50 Hz => 7VDC, 400mA | |
| Power supply, mobile unit 220/230V, 50 Hz => 12VDC, 500mA | |
| Rechargeable battery pack 1 x 7.2V/ 1800mAh, battery pack | |
| Range Indoors up to 50 m | |
| Range Outdoors up to 300 m | |
| Standby up to 80 hours | |
| Max. call duration up to 12 hours | |
| Dialling method MF | |
| Permissible ambient temperature 10°C to 30°C | |
| Permissible relative humidity 20 to 75% | |
| Signal button function 100ms, 300ms, 800ms, 1000ms | |
9.2 Changing the telephone cable
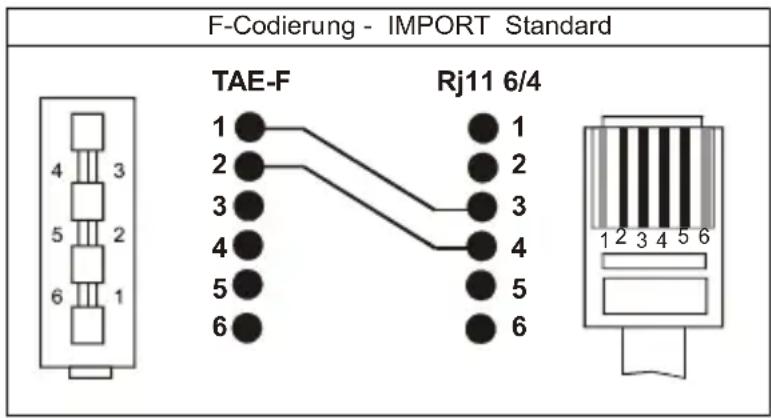
If you have to replace your telephone cable, you can locate the appropriate cable at your dealer's with the help of the following diagram.
text_image
F-Codierung - IMPORT Standard TAE-F Rj11 6/4 1 2 3 4 5 6 1 2 3 4 5 6 1 2 3 4 5 6- Important information -
9.3 Base station, wall mounting
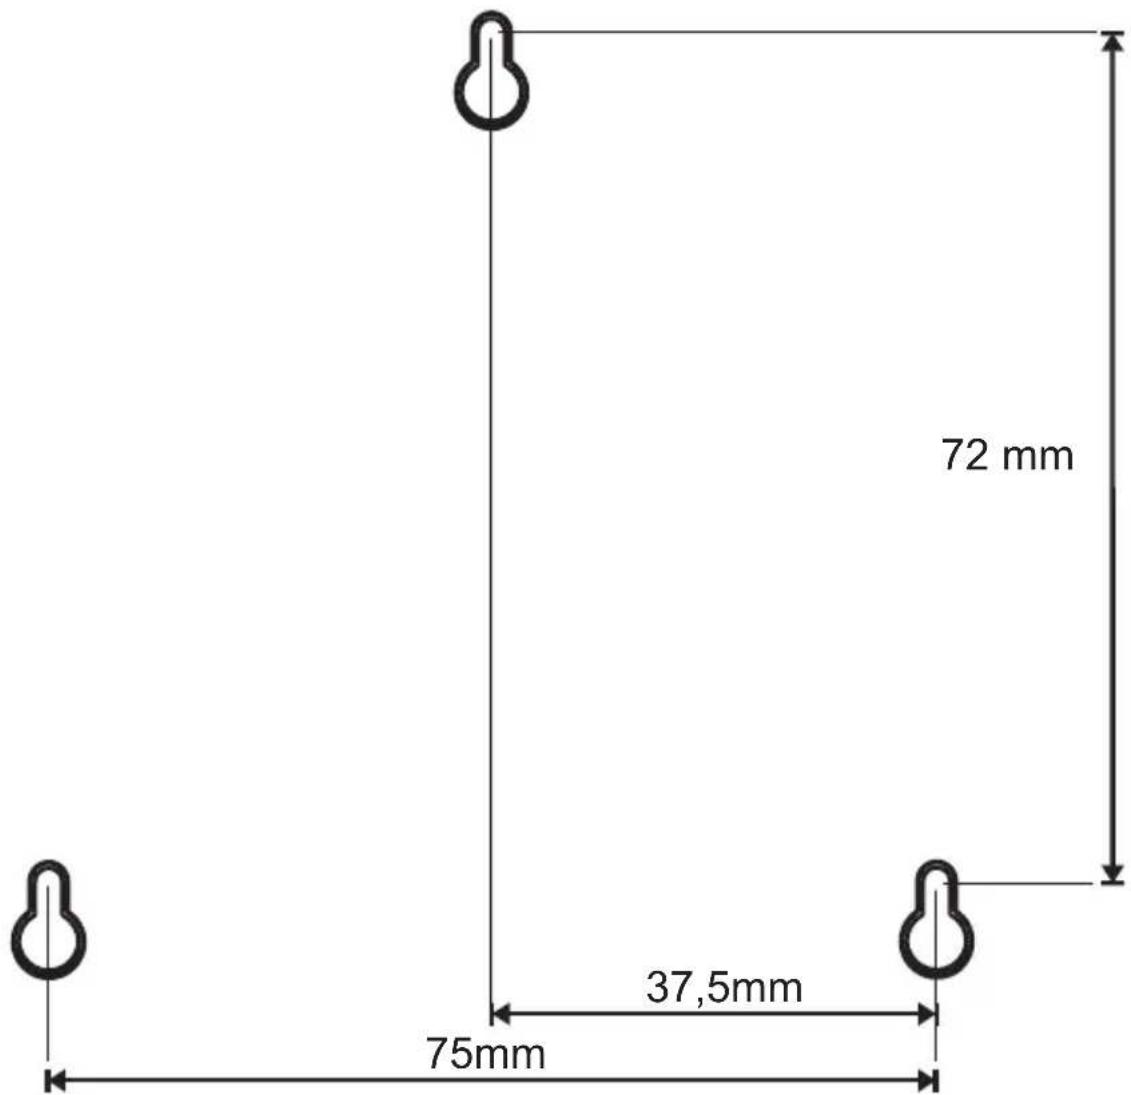
The base station can be fixed to a wall. Use the three screws and wall plugs for fixing to the wall. Drill three holes according to the drilling template and leave the screws protruding ca. 3 mm from the wall. Now place the base station over the screws and push down slightly.
text_image
72 mm 37,5mm 75mm9.4 Warranty
AUDIOLINE units are manufactured and tested in accordance with the most up-to-date manufacturing procedures. Selected materials and highly developed technologies ensure trouble-free operation and long life. If, however, your unit should develop a fault within the warranty period, please contact the shop where you bought your AUDIOLINE unit, taking with you your purchase receipt. The warranty period is 24 months calculated from the day of purchase. This warranty is not applicable to the batteries or battery packs used in the various products.
Warranty conditions:
All defects, which are the result of material or manufacturing faults, will be rectified free of charge within the warranty period. Claims under the warranty shall not be considered if the equipment has been tampered with by the purchaser or third parties. Damage, which results from improper handling or use, incorrect positioning or storage, inappropriate connection or Installation and through Act of God or other external influences are not covered by the warranty. In the case of complaints, we reserve the right to repair or to replace the defective parts or to exchange the unit. Parts or units that have been exchanged shall become our property. Claims for damages shall not be entertained unless they relate to intention or gross negligence on the part of the manufacturer. In accordance with these conditions, all claims under the warranty shall be made exclusively to your dealer. Rights under the warranty can no longer be enforced after the expiry of two years from the purchase and handing over of our products.
9.5 Declaration of conformity
WE AUDIOLINE GmbH
OF Hellersbergstr. 2a
D-41460 Neuss
DECLARE UNDER OUR SOLE RESPONSIBILITY AS EU DISTRIBUTOR THAT THE PRODUCT
MODEL: Confi DECT 1
DESCRIPTION: DECT standard cordless telephone
IS IN CONFORMITY WITH THE BASIC REQUIREMENTS OF DIRECTIVE: 1999/5/EC
AUTHORISED SIGNATORY:
Signature:
Name: MANFRED ZINNOW
Position in the company: MANAGING DIRECTOR:
Date of issue: 14.01.2004

text_image
MYPICAL NO DIRECTORA copy of this declaration will be retained for 10 years after cessation of production.
SUPPLIER: AUDIOLINE GmbH, Hellersbergstr. 2a,
D-41460
Neuss
PRODUCT: Confi DECT 1
This product has been developed for use on an analogue telephone line (PSTN) within Germany. However, no guarantee can be accepted for trouble-free operation on all telecommunications terminal equipment connections due to the differences between the different telecommunications network operators.