DECT 7500micro - Phone AUDIOLINE - Free user manual and instructions
Find the device manual for free DECT 7500micro AUDIOLINE in PDF.


User questions about DECT 7500micro AUDIOLINE
0 question about this device. Answer the ones you know or ask your own.
Ask a new question about this device
Download the instructions for your Phone in PDF format for free! Find your manual DECT 7500micro - AUDIOLINE and take your electronic device back in hand. On this page are published all the documents necessary for the use of your device. DECT 7500micro by AUDIOLINE.
USER MANUAL DECT 7500micro AUDIOLINE
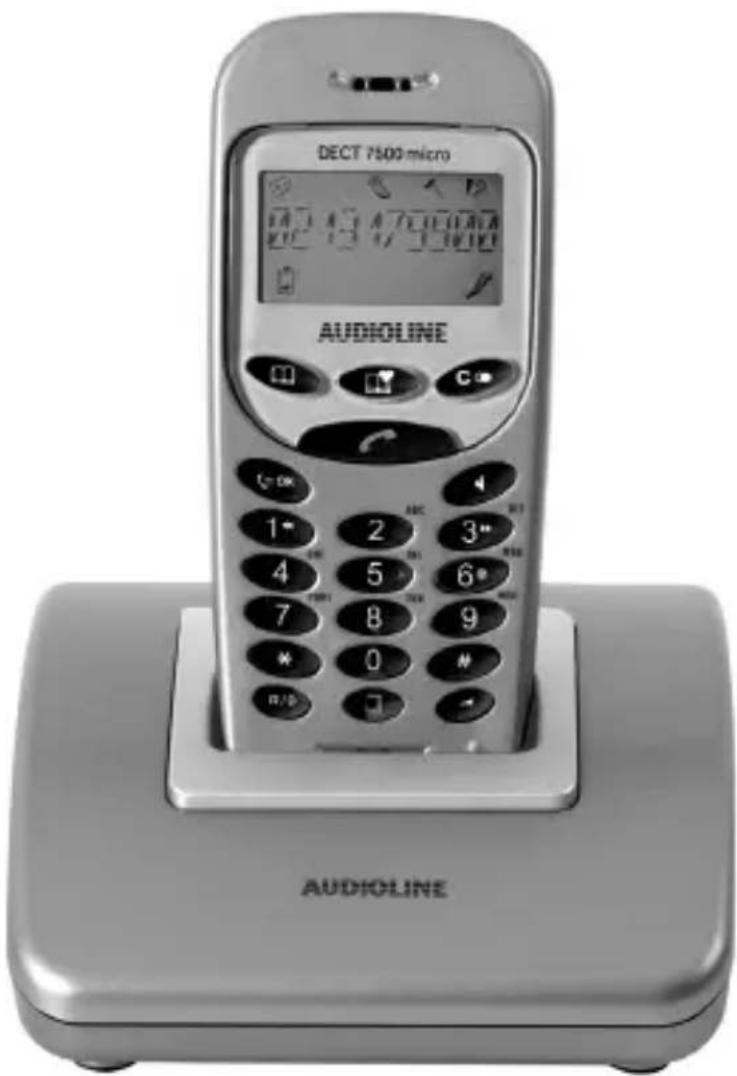
Schnurloses digitales DECT-Telefon Cordless digital DECT telephone
text_image
DECT 7500 micro 20:13:47:00:00 AUDIOLINE AUDIOLINEUser Instructions 33
natural_image
Simple line drawing of a rectangular frame with a small inset showing a label 'E.O.' (no text or symbols present)Name: MANFRED ZINNOW
3.2 Check contents of pack 38
3.3 Connecting the base station 38
3.4 Fitting the accupack.... 39
3.5 Charging the accupack 39
3.6 Fitting the belt clip.... 39
4 Operation.... 40
4.1 The display 40
4.2 Receiving calls.... 41
4.3 Making calls.... 41
4.4 Adjusting the receiver volume 41
4.5 Handsfree 42
4.6 Call hold 42
4.7 Call duration display 42
4.8 Range information 42
4.9 Redial.... 43
4.10 Paging from the base station to the handset 43
5 The phone books 44
5.1 Entering numbers in a phone book.... 44
5.2 Dialling numbers stored in the phone book 46
5.3 Changing numbers stored in the phone book...... 46
5.4 Deleting numbers stored in the phone book 47
6 Caller display (CLID)......48
6.1 The caller list.... 49
6.2 Saving a number from the caller list to the phone book 50
6.3 Deleting individual numbers from the caller list .... 50
- Contents -
7 Private exchanges / T-NET 51
7.1 “R” button on private exchanges 51
7.2 "R" button and the DEUTSCHE TELEKOM T-Net .....51
7.3 Inserting an automatic pause 51
8 Special functions....52
8.1 Setting up ringing tones and adjusting the ringer volume....53
8.2 Further programming functions 54
9 Multiple handsets 55
9.1 Calling internally....55
9.2 Connecting external calls to another handset 56
9.3 Additional Base Stations 56
9.4 Logging handsets on and off 57
9.4.1 Logging on of AUDIOLINE DECT7500/7501micro handsets 57
9.4.2 Logging off handsets....57
9.4.3 Logging on of AUDIOLINE DECT7500/7501micro handsets to other DECT-GAP base stations 58
9.4.4 Logging off DECT7500/7501micro handsets from other DECT-GAP base stations....58
9.4.5 Logging on of other DECT-GAP handsets....58
10 Rectifying faults....59
11 Important information 60
11.1 Technical data....60
11.2 Changing the telephone cable 60
11.3 Warranty....61
11.4 Declaration of conformity 62
- General Information -
1 General information
Please read these operating instructions carefully. If you have any questions, get in touch with our Service Dept. by calling our Service Hotline at 0180 5 00 13 88. Under no circumstances should you open the device or attempt to repair the device yourself. Please contact your dealer in case of any warranty claims.
Intended use - This telephone is designed for use connected to an analogue telephone line (PSTN) in Germany. However, due to differences in the services provided by the various telecommunications providers, we cannot guarantee that the telephone will work properly when connected to all telecommunications terminal lines. The telephone is prepared for connection to a TAE phone jack with F/N coding and can be used together with other equipment such as a fax, answering machine, or a modem. Plug the connecting phone cable only into the telephone plug socket provided for this purpose. Do not replace the plug of the connecting phone cable.
Power failures - Telephone calls cannot be made during power failures. Keep a cord telephone that is not equipped with an external power supply available in case of emergency.
Rechargeable accupacks - Use only rechargeable accupacks as supplied. The use of other rechargeable batteries or accupacks may cause a short-circuit. When changing the accupack, use only type 2,4V 400mAh - Ni-Mh. Do not throw accupacks in the fire or immerse them in water. Do not dispose of old or defective accupacks with normal domestic waste.
The maximum standby and talk times quoted are applicable for the rechargeable batteries or battery packs under optimum conditions. Ambient temperature, charging cycle and other external factors, such as the radio loading in the area of use, can considerably reduce the operating times. Furthermore, the charging capacity is reduced for technical reasons during use or when stored at very high or low temperatures.
Charging the handset - If the handset becomes warm when charging, this is quite normal and no cause for alarm. Only charge the handset on the base station. The use of other chargers may cause lasting damage.
Transformer plug - Use only the AUDIOLINE transformer plug supplied, other transformer plugs can destroy your telephone. Opening the power supply plug while it is plugged into the supply mains could lead to personal injury and death.
- General Information -
Private branch exchanges -The telephone can also be connected to a private branch exchange. The dealer where you purchased the private branch exchange will tell you if your telephone will work properly on your PBX. Due to the great variety of private branch exchanges, we cannot guarantee that the phone will work properly on all PBXs.
Location of the base station - The base station must be located within reach of a 230Volt supply socket. To avoid interference problems, do not place the base station in the immediate proximity of other electronic equipment such as a microwave oven or hi-fi system. The location of the base station can significantly influence the proper function of the telephone.
Place the base station on a level, non-slip surface. The feet of the base station will not normally mark the surface on which it stands. However, the wide range of surface finishes in use renders it impossible to exclude marking of any surface. Do not use the handset in areas where there is a danger of explosion.
Avoid excessive exposure to smoke, dust, vibration, chemicals, humidity, high temperature or direct sunlight.
Note for medical products - The telephone works with very low transmitted power. Present knowledge and research indicate that, at this low power level, there is no possible danger to health. It has, however, been shown that portable telephones, when switched on, can affect medical equipment. Maintain a distance of at least one metre from medical equipment.
Disposal - If the accupacks or the complete system have reached the end of their useful life, please dispose of them in an environmentally friendly manner and as required by law.
Temperature and ambient conditions - The telephone is designed for indoor use and an operating temperature range of 10 °C to 30 °C. The base station must not be installed in humid areas such as bath or wash rooms. Avoid proximity to sources of heat such as radiators and do not expose the unit to direct sunlight.
Cleaning and care - The outer surfaces of the unit can be cleaned with a soft, dry, lint-free cloth. Never use cleaning agents or aggressive solvents. Apart from occasionally cleaning the outer surfaces, no further care is required. The rubber feet of the base station are not resistant to all cleaning agents. The manufacturer cannot, therefore, be held responsible for damage to furniture etc.
CE marking - The telephone is compliant with the essential requirements of the R&TTE Directive. This is certified by the CE marking.
- Operational elements -
2 Operational elements
text_image
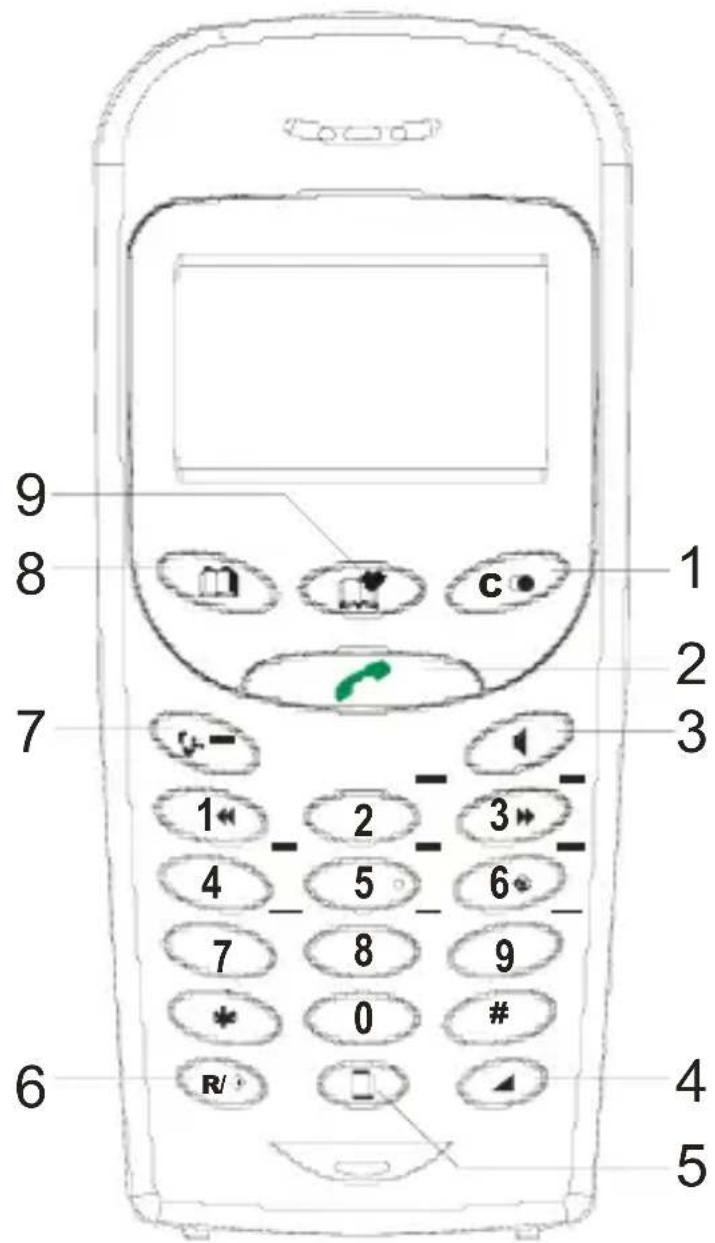
9 8 7 1 2 3 6 4 5 6 7 8 9 0 # R/ 5 41 Redial/Delete
2 Call button
3 Handsfree button
4 Receiver volume
5 Caller list (CLID)
6 R signal button/Programming
7 Confirmation button/Internal calls
8 Phone book, general
9 Phone book, friends
- Commissioning -
3 Commissioning
3.1 Safety information
NOTE! Before commissioning, it is essential that you read the safety information at the beginning of this manual.
3.2 Check contents of pack
The following items are supplied:
| one base station one power supply | |
| one handset with belt clip one accupack | |
| one telephone connecting cable one | Operating Manual |
3.3 Connecting the base station
Position the base station near to your telephone socket and a mains socket. Your telephone works using the TTD dialling system (Touch Tone Dialling).
- Insert the power supply plug into the

socket on the rear side of the
base station and insert the plug-in mains power supply into a properly installed 230V mains socket. The base station plug-in mains power supply must be connected at all times. For safety reasons, use only the plug-in mains power supply supplied.
- Connect the telephone cable supplied to the telephone socket and the
phone jack 📞 on the rear side of the base station. Use only the new telephone cable supplied.
- Commissioning -
3.4 Fitting the accupack
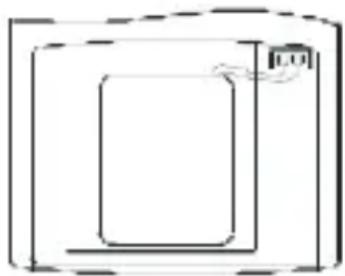
To fit the accupack supplied into the handset, press on the top edge of the accu compartment cover and slide it downwards. Now insert the accupack supplied and close the accu cover.
natural_image
Simple line drawing of a rectangular frame with a small icon on the top right corner (no text or symbols)Important information: Place the handset with the display to the front on the base and charging station for at least 16 hours. If the accupack is not correctly charged, the telephone may not work properly. While the handset is being charged, the
battery capacity symbol will flash in the display.
3.5 Charging the accupack
The rechargeable accupack in your handset have a standby time of max. 6 days at room temperature and a maximum talk time over 8 hours. To charge the accupack, place the handset in the base station. The current capacity will be shown in the display.

full

Less than 30 minutes
No display accupack is discharged
Note: The accupack must be charged for at least 16 hours before being used for the first time. Exactly like your car battery, the rechargeable accupack is unavoidably subject to a certain ageing. However, you can have an influence on this ageing process by “training” the accupack to a certain extent. In regular use of the phone, if you cyclically charge and fully discharge the accupack by using the
telephone until the symbol appears in the display, a demand is placed on the accupack and they will repay you by giving maximum performance and a long life. Extended charging and extended discharging on the other hand will both degrade the capacity and shorten the life of the accupack.
3.6 Fitting the belt clip
Slide the belt clip into the grooves until it audibly clicks home.
- Operation -
4 Operation
4.1 The display
 | On: Batteries are charged.1/4 on: Capacity less than 30 minutes.Off: Battery capacity exhausted.Flashing: Handset being charged. |
 | On: New call in the caller list. |
 | On: You are using the general phone book.Flashing: You are receiving a call and the caller is stored in this phone book. |
 | On: You are making a call.Flashing: Incoming call or the answering machine is running. |
 | On: An external call is being held or an internal call made (with multiple handsets only). |
 | On: You are using the family/friends phone book.Flashing: You are receiving a call and the caller is stored in this phone book. |
 | On: When you are within range of the base station.Flashing: You are out of range. |
- Operation -
4.2 Receiving calls
When a call comes through, the ringing tone will sound on the handset. The symbol 📞 will flash in the display. Press the call button on the handset and the connection will be made. To end the call, replace the handset in the base station or press the call button on the handset.

Note: If the telephone handset stands on the base station, press the call button first.
4.3 Making calls
- Enter the required telephone number using the keypad. The numbers pressed will be shown in the display.
- Press the call button and the required connection will be made.
Note: If you have entered a wrong number, you can delete the phone number by repeatedly pressing the button. The number can be deleted completely by prolonged pressing of the button.
You can also press the call button first and thus obtain a dialling tone. By entering the digits of the phone number you require your telephone will dial the number directly. When making a call in this way, it is not possible to correct individual digits of the phone number as described above.
4.4 Adjusting the receiver volume
If you want to change the receiver volume on the handset you have four volume steps available.
Press several times the button to change the receiver volume. The selected volume is indicated in the display.
- Operation -
4.5 Handsfree
While a call is being made, press the handsfree button. You will now hear the other party over the loudspeaker in the handset.
Pressing the button for the first time = switch on loudspeaker
Pressing the button for the second time = increase or decrease volume
Pressing the button for the third time = switch off handsfree facility
The last volume setting will automatically be used the next time the loudspeaker is switched on.
4.6 Call hold
If you want to carry on a conversation during a call without the other party hearing you, you can put the call on hold by using the OK button. The other party will hear music during this time. The call can be resumed by pressing the OK button once more.
Note: When multiple handsets are used, the OK button calls up also the other handsets. For more on this see Chapter 10.
4.7 Call duration display
The call duration is shown in the display in minutes and seconds during a call. The display switches from showing the number dialled to showing the call duration 10 seconds after dialling. The call duration still remains showing in the display for a few seconds after the call has been ended.
4.8 Range information
The range of the handset is about 50 metres in enclosed areas and about 300
metres in the open air. When there is good contact with the base station, the symbol will come on in the display. If you are too far away from the base station the symbol will flash.
- Operation -
4.9 Redial
Use the redial facility when the party called is engaged or does not reply. Your telephone will store the last five numbers dialled.
| 1. Press the button and the last number dialled will be shown in the display. | |
| 2. Further redial numbers can now selected using the (1) and (3) buttons. | |
3. Now press the call button  and the phone number displayed will be dialled automatically. and the phone number displayed will be dialled automatically. |
If you want to delete a number from the redial list, select the required number and then press the Ⓧ (⑥) button.
Redial numbers can also be stored in the phone book. For more on this see Chapter 5.1.
4.10 Paging from the base station to the handset
If you cannot remember where you have left the handset, press the paging button on the base station for two seconds. You will now hear signal tones from the handset and thus be easily able to find it again. The signal tones can be cancelled by pressing any button on the handset or the paging button on the base station.
- The phone books -
5 The phone books
Your telephone has two independent phone books, each with 10 storage locations. In this way, numbers saved can be sorted by friends, associates, family members or business people.

General phone book

text_image
Family/friends phone bookDifferent call tones are associated with each of the two phone books so that you can tell who is calling you as soon as the phone rings.
Note: The association of different call tones to the phone books will only work after the second ring and if your telephone connection has caller display (CLID) and the party has enabled this service for his connection. Furthermore, all numbers must be stored along with their dialling codes to enable the number recognition to work. More information can be found in Chapter 6.
5.1 Entering numbers in a phone book
| 1. | Enter the required telephone number with a maximum of 25 digits. |
| 2. | Now press the button for the required phone book or . |
| 3. | After a signal tone, now enter the associated name (max. 10 letters) using the number pad. You will find information on entering names on the next page. |
| 4. | Confirm the entry with the OK button and the number will be saved. |
You can cancel the procedure at any time by pressing and holding the C button.
Note: A redial number can also be saved directly in one of the phone books. Select the required redial number and continue to save the number from step 2 above.
If a calling achieves you during storing, the input is aborted and must be repeated.
- The phone books -
How to enter names
The number keys are also inscribed with letters for entering the name. By repeatedly pressing the appropriate button, upper case letters as well as numbers can be entered.
To enter a space, press the ① button once.
To enter the same letter twice, press the appropriate letter and wait for a second before pressing the button again.
Incorrect entries can be deleted with the C ⊙ button.
Example: You wish to enter the name "Peter".
Press: 1 x button 7, 2 x button 3, 1 x button 8, 2 x button 3, 3 x button 7
Overview
| Button 1 space, -, 1 | |
| Button 2 A, B, C,2 | |
| Button 3 D, E, F, 3 | |
| Button 4 G, H, I, 4 | |
| Button 5 J, K, L, 5 | |
| Button 6 M, N, O, 6 | |
| Button 7 P, Q, R, S, 7 | |
| Button 8 T, U, V, 8 | |
| Button 9 W, X, Y, Z, 9 | |
| Button 0 0 |
- The phone books -
5.2 Dialling numbers stored in the phone book
After you have stored a few telephone numbers you can call these very quickly and easily.
| 1. Press the button for the required phone book will now show the first name in alphabetical order. | |
| 2. You can now search for a name using the (1) and (3) buttons. | |
| 3. You can switch between displaying the name and the associated telephone number using the OK button. | |
| 4. You can exit the phone book by pressing either of the two phone book buttons. | |
5. Press the call button  and the displayed phone number will be dialled automatically. and the displayed phone number will be dialled automatically. |
5.3 Changing numbers stored in the phone book
| 1. Press the button for the required phone book or The display will now show the first name in alphabetical order. | |
| 2. You can now select a name using the (1) and (3) buttons. | |
| 3. Now press the OK button and the number will appear in the display. | |
| 4. By repeatedly pressing the C button you can now delete the individual digits of the number. | |
| 5. Then re-enter the changed phone number and confirm with the OK button. |
You can cancel the procedure at any time without making a change by pressing and holding the C button.
Note: It is not possible to change the name associated with a phone number already stored. If the name is also to be changed, delete the number with the incorrect name and then save the phone number completely afresh.
- The phone books -
5.4 Deleting numbers stored in the phone book
1. Press the button for the required phone book  or or  display will now show the first name in alphabetical order. display will now show the first name in alphabetical order. | |
2. You can now select the required name using the   and and  (3) buttons. (3) buttons. | |
3. To delete the number, now press the buttons  OK a OK a  (4THW) one after the other. (4THW) one after the other. | |
| 4. Confirm the deletion with the 📞 OK button or exit the procedure by pressing and holding the C button. |
- Caller display (CLID) -
6 Caller display (CLID)
Using caller display, you can see with incoming calls who is calling you. If this function is available on your line, the display shows you the caller's telephone number as soon as the telephone rings.
If you have stored this telephone number in your phone book, the name is shown instead of the number after a short time and the phone will ring with a different tone after the second ring.
All calls are saved in a caller list so that you will not miss any calls even in your absence. A total of 10 numbers can be stored in the list. When the list is full, the oldest number is always deleted from the list.
If new numbers are stored in the list during your absence, the display shows the

symbol.

Note!
Caller display is an optional service from your telephone provider. Your telephone will show the number in the display if your telephone provider offers this service. Indication of the date and time of day is not transmitted by all telephone providers. Please ask your telephone provider for more information. Furthermore, transmission of the caller's number and/or the date and time of day is not possible with some private exchanges.
- Caller display (CLID) -
6.1 The caller list
To view the numbers on the caller list in the display, please proceed as follows:
1. Press the  button and the last number received will be shown in the display. If the caller list is empty you will hear signal tones. button and the last number received will be shown in the display. If the caller list is empty you will hear signal tones. | |
2. Further numbers in the caller list can now be selected using the  (3) button. You use the ◀◀(1) button to page back through the list. If there are no more numbers available you will hear a signal tone. (3) button. You use the ◀◀(1) button to page back through the list. If there are no more numbers available you will hear a signal tone. | |
| 3. If the number displayed is longer than 10 digits, the first 10 digits will be shown first and then the last 10 digits. | |
4. Additional functions can be called up using the  OK button. After pressing the button for the first time the display will show the caller's phone number if this is already stored in the phone book. OK button. After pressing the button for the first time the display will show the caller's phone number if this is already stored in the phone book. | |
5. If you want to call a number in the caller list straight back, simply press the call button  and the number will be dialled immediately. and the number will be dialled immediately. | |
6. You can exit the caller list by pressing the  button. button. |
- Caller display (CLID) -
6.2 Saving a number from the caller list to the phone book
A telephone number stored in the caller list can be saved directly to the phone book.
1. Press the  button and the last number received will be shown in the display. button and the last number received will be shown in the display. | |
| 2. Now select the number from the caller list that you want to save in the phone book using the ◀◀(1) and ▶▶(3) buttons. | |
3. Press the button for the required phone book  or or  . . | |
| 4. Now enter the associated name (max. 10 letters) using the number pad. | |
| 5. Confirm again with the 🔔OK button and the number will be saved in the phone book. |
By pressing the C button you can leave the input mode at any time.
6.3 Deleting individual numbers from the caller list
1. Press the  button and the last number received will be shown in the display. button and the last number received will be shown in the display. | |
| 2. Now select the number from the caller list that you want to delete using the ◀◀ (1) and ▶▶ (3) buttons. | |
| 3. Press the ✗ (6) button once and the number will be deleted. |
You can repeat this procedure up to the complete deleting of the list.
- Private exchanges/T-NET -
7 Private exchanges / T-NET
You can use the "R" signal button on your telephone on private exchanges and when using DEUTSCHE TELEKOM's T-Net functions.
7.1 "R" button on private exchanges
If you have connected your telephone to a private exchange, you can use all the facilities such as call transfer, automatic recall, etc. The “R” signal button gives you access to these facilities. The FLASH time “84ms” will be required on a private exchange. (Adjustment, see 8.2). You can find out from the dealer from whom the equipment was purchased whether your telephone will work on your private exchange without any problems.
7.2 "R" button and the DEUTSCHE TELEKOM T-Net
Your telephone supports the most important DEUTSCHE TELEKOM added value functions (e.g. brokering, call waiting, three-way conference, etc.). The T-Net works using the "FLASH 270ms" setting (adjustment, see 8.2). Please contact DEUTSCHE TELEKOM to gain access to T-Net functions.
7.3 Inserting an automatic pause
With some private exchanges, it is necessary to dial a certain number (e.g. "9" or "0") in order, after a short pause, to obtain a dialling tone for an outside line on the extension. After being set up for your exchange, your telephone will automatically insert a pause of ca. 3 seconds after each first digit for obtaining an outside line.
Note: If you have not connected your telephone to a private exchange you should always turn this function off.
You can find out in Chapter 8.2 how to activate the automatic pause.
- Special functions -
8 Special functions
All further programming functions can be accessed via a user-friendly menu. Here is a short general guide to finding your way about the menu.
| Programming is started with the R/⇨ button. |
You can find the required menu with the ◀◀ (1) and ▶▶ (3) buttons. The 3 available menus are indicated by symbols:= Setting up ringing tones and adjusting the ringer volume = Logging on handsets (see Chapter 10)= Further programming functions = Logging on handsets (see Chapter 10)= Further programming functions |
| The flashing menu is opened with the 📊 OK. |
| Where you are in the menu and how many functions there are available in the menu are shown by the first two numbers: 1/5 = this menu has five functions and you are in the first function. |
| Using the buttons ◀◀ (1) and ▶▶ (3) you can again select the required function and then confirm with the 📊 OK button. |
| The values can be changed using the number pad or with the ◀◀ (1) and ▶▶ (3) buttons. |
| Each time a confirmation is given with the 📊 OK button you move on to the next function in the menu. |
| You can exit programming with the R/⇨ button. |
| Any save process is automatically cancelled if no entry is made within 20 seconds. |
- Special functions -
8.1 Setting up ringing tones and adjusting the ringer volume
The following functions are available in this menu:
1/4 Ringer volume adjustable in four steps
2/4 Select ring tone
3/4 Select ring tone for the general phone book
4/4 Select ring tone for the family/friends phone book


| PROGRAMMING STEP INDICATION IN | DISPLAY |
| 1. Press . R/→ | The symbol flashes |
| 2. Confirm with . OK | 1/4 +++ (factory setting) |
| 3. You can now set the required volume in four steps using the ◆◀(1) and ▶▶(3) buttons. | 1/4 + or ++ or +++ or ++++ |
| 4. Confirm with . OK | 2/4 Birdie (factory setting) |
| 5. You can now select the required ring tone using the ◆◀(1) and ▶▶(3) buttons. | 2/4 Birdie or Music etc. |
| 6. Confirm with . OK | 3/4 Music (factory setting) |
| 7. You can now select the required ring tone for the general phone book using the ◆◀(1) and ▶▶(3) buttons. | 3/4 Birdie or Music etc. |
| 8. Confirm with . OK | 4/4 Starry (factory setting) |
| 9. You can now select the required ring tone for the family/friends phone book using the ◆◀(1) and ▶▶(3) buttons. | 4/4 Birdie or Music etc. |
| 10. Confirm with . OK | 1/4 +++ (factory setting) |
| 11. Exit programming with the R/→ button. |
- Special functions -
8.2 Further programming functions
The following functions are available in this menu:
1/3 Enter network type
2/3 Change FLASH time
3/3 Insert automatic pause
| Programming steps Indication in the display | |
| 1. Press the button followed by two presses of the ▶(3) button. | The  symbol flashes symbol flashes |
| 2. Confirm with . OK | 1/5 3 – B – C- or D |
| 3. You can now set the required network type between A and D with the ◀(1) and ▶(3) buttons. | 1/3 AThe standard setting here is A and is designed for the public telephone network. If there should be problems with the volume when connected to private exchanges, try the other settings B, C and D. |
| 4. Confirm with . OK | 2/3 current FLASH time, e.g. *** |
| 5. The required FLASH time of 84ms (private exchanges) or 270ms (T-NET) can be set here with the ◀(1) and ▶(3) buttons. | 2/3 ***84ms = ***270ms = ***** |
| 6. Confirm with . OK | 3/3 automatic pause e.g. NO |
| 7. You can now set whether the automatic pause is to be used with the ◀(1) and ▶(3) buttons.Further information in Chapter 7.3. | 3/3NOYES |
| 8. Confirm with . OK | 1/3A – B – C- or D |
| 9. Exit programming with the R/→ button. | |
- Multiple handsets -
9 Multiple handsets
Up to three additional handsets can be logged on to your base station. You can obtain these additional handsets from your dealer under the designation AUDIOLINE DECT 7501micro.
When using several handsets, you have access to the following facilities:
- Internal calls between handsets.
- External calls can be transferred between handsets.
- Incoming external calls are signalled at all handsets.
Note: Handsets made by other manufacturers can also be integrated into the telephone system using the internationally normalised GAP Standard. In the same way, you can use your handset on other manufacturer's base stations as long as these devices work using the GAP Standard. You can find out how to log on from the other manufacturer's operating instructions and from this manual.
Note: If another handset is already using the external line, it is not possible to make a further external call.
9.1 Calling internally
You can make internal telephone calls as soon as you connect multiple handsets to a base station.
To do this, press the OK button. All further handsets that are connected to the base station will now ring simultaneously. The call is accepted at any of the
handsets by pressing the call button
- Multiple handsets -
9.2 Connecting external calls to another handset
If you have accepted an external call on one handset, you can transfer the external call to another handset. To do this, press the OK button. After the internal call has been accepted at another handset you have the following alternatives:
A. Consultation / Brokering: You can talk to the internal party and revert to the external caller by pressing the OK button. You can swap between the external and internal calls as often as you wish.
B. Transfer the call: The external call is transferred to the receiving handset by pressing the call button on the first handset.
You can also transfer the external call directly to a handset without consultation by pressing the OK button followed immediately by the call button.
9.3 Additional Base Stations
You can increase the range of the handsets by using two base stations. To make use of this effect, a telephone connection must be made to both base stations. Depending upon the application, you can assign the same telephone number to each base station or you can give each base station a different number. Ensure that the ranges of all base stations overlap one another. If a handset is logged onto the base stations the handset is automatically transferred to the nearest base station.
Calls in progress can not be transferred from one base station to another.
- Multiple handsets -
9.4 Logging handsets on and off
9.4.1 Logging on of AUDIOLINE DECT7500/7501micro handsets
Prepare base station DECT 7500micro
Separate the plug of the power supply unit for some seconds. After reconnection you log on the telephone handset as follows within 20 seconds:
Logging on handset
| Programming steps Indication in the display | |
| 1. Press the R/→ button followed by one press of the ▶(3) button. | The  symbol flashes symbol flashes |
| 2. Confirm with the button. | 1/1 0 0 0 0 |
| 3. Now enter the PIN code 1 1 1 1 of the DECT7500micro base station. | 1/1 1 1 1 1 |
| 4. Confirm with . | |
| 5. After a few seconds the handset will be logged on. |
9.4.2 Logging off handsets
| Programming steps Indication in the display | |
| 1. Press the button. | The  symbol flashes symbol flashes |
| 2. Now enter the code 9 4 using the number pad. | Symbol  |
| 3. Now enter the PIN code using the number pad (factory setting 1111). | 1/1 1 1 1 1 |
| 4. Confirm with OK and after a few seconds the handset will be logged off. |
- Multiple handsets -
9.4.3 Logging on of AUDIOLINE DECT7500/7501 micro handsets to other DECT-GAP base stations
| Programming steps Indication in the display | |
1. Press the  button followed by one press of the ▶(3) button. button followed by one press of the ▶(3) button. | The  symbol flashes symbol flashes |
| 2. Confirm with the button. | 1/1 0 0 0 0 |
| 3. Now prepare the base station for logging on. For further information on this subject, please refer to the Operating Manual provided by the third-party manufacturer. | |
| 4. Now enter the PIN code of the base station. The PIN code used by the base station can be found by referring to the Operating Manual provided by the third-party manufacturer. | 1/1 XXXX |
| 5. Confirm with . | |
| 6. After a few seconds the handset will be logged on. |
9.4.4 Logging off DECT7500/7501micro handsets from other DECT-GAP base stations
You can find out to how to log off a DECT7500/7501micro handset from a third-party base station by referring to the Operating Manual for the base station concerned.
9.4.5 Logging on of other DECT-GAP handsets
In order to announce a other DECT-GAP telephone handset, you execute the point "Prepare base station DECT7500micro" under 9.4.1 and follow then the notes in the operating instruction of the foreign manufacturer. Use for the log-on the PIN code 1111.
- Rectifying faults -
10 Rectifying faults
If you have problems with your telephone, please first check the following information. In the case of technical problems you can also contact our Hotline on Tel. 0180 5 00 13 88. In the case of warranty claims, please contact your dealer. The warranty period is 2 years.
| No calls possible The phone | line is not connected correctly or is faulty.Use only the telephone cable provided.Check whether your telephone connection is in working order by using another telephone.The mains power supply has not been plugged in or there is a complete loss of power.The rechargeable accupack is flat or defective.You are too far away from the base station. |
| Call cut off or breaks up You | are too far away from the base station.Base station in the wrong location. |
| The battery symbol does not flash during charging | Place the handset properly on the base station, clean the contact surfaces of the handset and the base station with a soft, dry cloth. |
| The batteries discharge very quickly. | Place the handset with the display to the front on the base and charging station for at least 16 hours. If this does not help, replace the rechargeable accupack. |
| Display dark Caused by direct sunlight. Allow the handset to cool down. | |
| Not possible to store numbers in the phone book | The phone book concerned is full. |
- Important information -
11 Important information
11.1 Technical data
| Standard DECT-GAP | |
| Power supply Base station 220/230V, 50 Hz | |
| Range Indoors up to 50m | |
| Range Outdoors up to 300m | |
| Standby up to 6 days | |
| Max. talk time over 8 hours | |
| Rechargeable accupack 2,4V 400mAh - Ni-Mh | |
| Dialling method TTD (Touch Tone Dialling) | |
| Permissible ambient temperature 10°C to 30°C | |
| Permissible relative humidity 20 to 75% | |
| Signal button function 84ms and 270ms | |
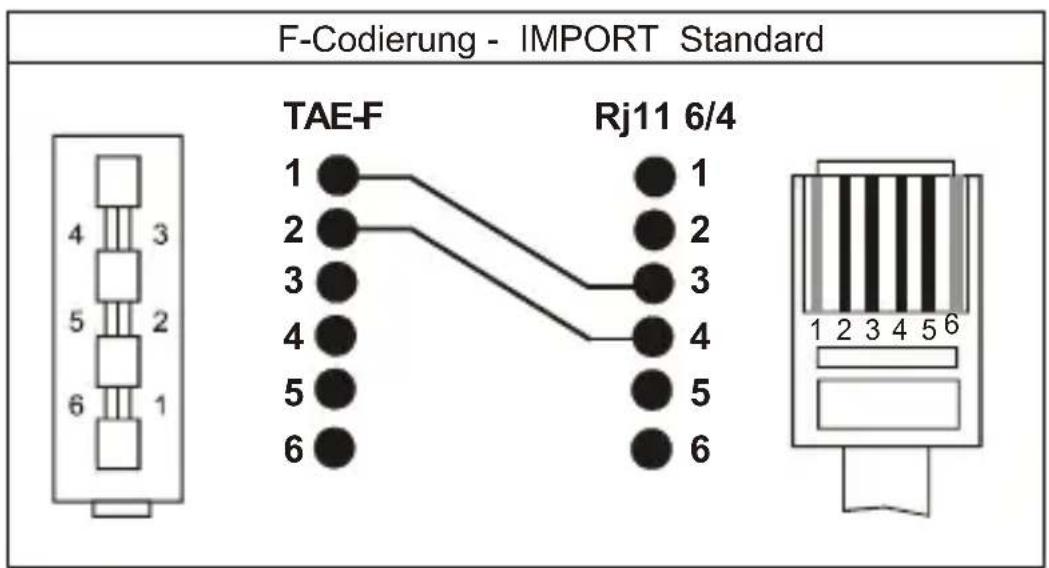
11.2 Changing the telephone cable
If you need to change your telephone cable, the following drawing will help your dealer provide the correct cable.
text_image
F-Codierung - IMPORT Standard TAE-F Rj11 6/4 1 2 3 4 5 6 1 2 3 4 5 6- Important information -
11.3 Warranty
AUDIOLINE equipment is manufactured and tested in accordance with the most up to date production methods. Selected materials and highly developed technology ensure trouble-free operation and long life. If your unit should develop a fault within the guarantee period, however, please contact the shop where you bought your AUDIOLINE equipment exclusively and have your purchase receipt available for inspection. The warranty period is 24 months from the day of purchase. This warranty is not applicable to the batteries or battery packs used in the various products.
Warranty conditions:
Within the guarantee period, all defects due to material or manufacturing faults will be repaired free of charge. The guarantee is invalidated if the equipment has been tampered with by the purchaser or third parties. Any damage caused by improper handling or operation, by incorrect positioning or storage, by improper connection or installation or by excessive force or other external influences is not covered by the guarantee. In the case of complaint, we reserve the right to repair or replace defective parts or to exchange the equipment. Exchanged parts or exchanged equipment become our property. Claims for compensation are excluded insofar as they do not relate to criminal intent or gross negligence on the part of the manufacturer. All guarantee claims according to these conditions must be raised exclusively with your dealer. Rights under the guarantee can no longer be enforced after the expiry of 24 months from purchase and delivery of our products. In the case of unnecessary or unjustified demands on the customer service department, we will levy our usual service charges for materials, time, postage and packing. Any complaints must be reported as soon as a problem is found. The guarantee is valid within the German Federal Republic.
- Important information -
11.4 Declaration of conformity
WE AUDIOLINE GmbH OF Hellersbergstr. 2a D-41460 Neuss
DECLARE UNDER OUR SOLE RESPONSIBILITY AS EU DISTRIBUTOR THAT THE PRODUCT
MODEL: DECT 7500micro
DESCRIPTION: CORDLESS DECT-STANDARD TELEPHONE
IS IN CONFORMITY WITH THE BASIC REQUIREMENTS OF DIRECTIVE: 1999/5/EC
AUTHORISED SIGNATORY:
Signature:
Name:
Position in the company: MANAGING DIRECTOR
Date of issue: 22.12.2002
text_image
Mudan EDZINNOW
A copy of this declaration will be retained for 10 years after cessation of production.

AUDIOLINE GmbH, Hellersbergstr. 2a
D-41460
Neuss
PRODUCT:
DECT7500micro
This product has been developed for use with an analogue telephone line (PSTN) within Germany. However, no guarantee can be accepted for trouble-free operation on all telecommunications terminal equipment connections due to the differences between the different telecommunications network operators.