DECT 8048-SOS - Phone AUDIOLINE - Free user manual and instructions
Find the device manual for free DECT 8048-SOS AUDIOLINE in PDF.


| Product Type | Cordless DECT telephone with alarm unit |
| Model | Audioline DECT 8048-SOS |
| Standard | DECT-GAP |
| Frequency Band | 1880–1990 MHz |
| Range (Indoor) | Up to 50 m |
| Range (Outdoor) | Up to 300 m |
| Handset Standby Time | Up to 100 hours (with supplied batteries) |
| Handset Talk Time | Up to 10 hours |
| Alarm Unit Standby Time | Up to 120 hours |
| Battery Type | 4 x AAA NiMH 1.2V 550mAh (supplied) |
| Power Supply | Base station: 230V AC via supplied adapter |
| Dialling Mode | Tone (DTMF) or Pulse |
| Phone Book Capacity | 30 entries with name and number |
| Caller ID (CLIP) | Yes, up to 30 calls stored |
| Handsfree Function | Yes, on handset |
| Alarm Unit Functions | One-touch alarm call to emergency number, contact person dialling, self-test, low battery alert |
| Intercom | Yes, between registered handsets and alarm unit |
| Display | Backlit LCD with icons |
| Key Lock | Yes, to prevent accidental key presses |
| Maintenance | Clean with soft, dry cloth; do not use solvents |
| Safety | Not for use near medical equipment; avoid moisture and extreme temperatures |
| Repairability / Spare Parts | Replacement batteries (AAA NiMH 550mAh) and power adapter available; consult service hotline |
| Certification | CE compliant (R&TTE Directive) |
| Warranty | 24 months from date of purchase |
Frequently Asked Questions - DECT 8048-SOS AUDIOLINE
User questions about DECT 8048-SOS AUDIOLINE
0 question about this device. Answer the ones you know or ask your own.
Ask a new question about this device
Download the instructions for your Phone in PDF format for free! Find your manual DECT 8048-SOS - AUDIOLINE and take your electronic device back in hand. On this page are published all the documents necessary for the use of your device. DECT 8048-SOS by AUDIOLINE.
USER MANUAL DECT 8048-SOS AUDIOLINE
natural_image
Two silver audio/video phone models, one with a speaker and the other with a keypad (no visible text or symbols on device body)text_image
Labeled diagram of a device with numbered parts for identification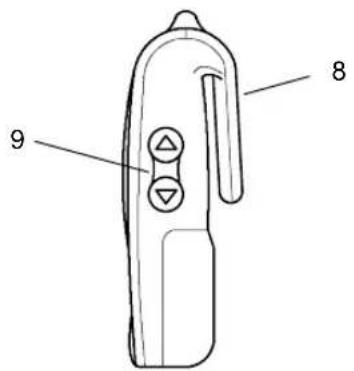
text_image
8 9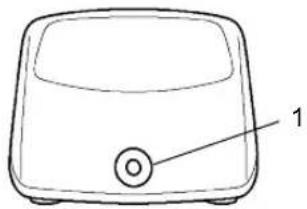
natural_image
Line drawing of a rectangular electronic device with a circular button and labeled part '1' (no text or symbols on the device itself)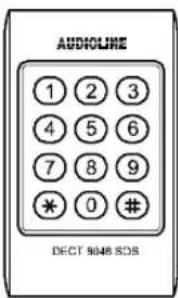
text_image
AUDIOLINE 1 2 3 4 5 6 7 8 9 * 0 # DECT 9048 SOS-Inbetriebnahme-
3Inbetriebnahme
natural_image
Technical line drawing of a mechanical component with two cylindrical parts inserted, showing internal structure and assembly (no text or symbols)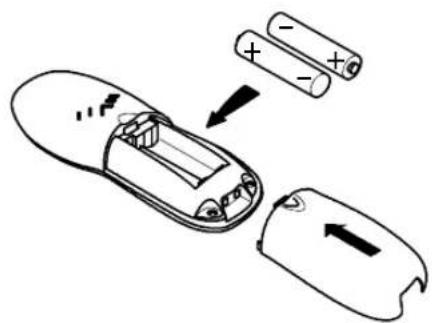
text_image
Diagram showing battery charging process with labeled components and directional arrows indicating charging direction
natural_image
Diagram of two batteries with positive and negative charge indicators, no text or symbols presentnatural_image
Line drawing of a portable electronic device with speaker, keypad, and sound waves (no text or symbols)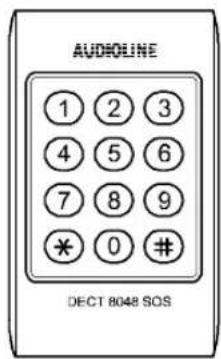
text_image
AUDIOLINE 1 2 3 4 5 6 7 8 9 * 0 # DECT 8048 SOSPROGRAMMIERHINWEISE
natural_image
Line drawing of a hand holding a small object, possibly a device or tool, with no visible text or symbols.1.2 Power failure 44
1.3 Installation location 44
1.4 Power supply 44
1.5 Rechargeable batteries 44
1.6 Charging the handset 45
1.7 Private branch exchanges 45
1.8 Disposing of old equipment 45
1.9 Note on medical equipment 45
1.10 Temperature and ambient conditions 45
1.11 Cleaning and upkeep 46
1.12 CE symbol 46
2 Operating Elements 47
2.1 Handset 47
2.2 Base station 47
2.3 Alarm unit 48
2.4 Charging unit for alarm unit 48
2.5 Programming unit 48
3 Starting Up 49
3.1 Safety notes 49
3.2 Checking the package contents 49
3.3 Connecting the base station 49
3.4 Inserting the rechargeable batteries 50
3.5 Charging the batteries 50
3.6 Tone dialling - DTMF 50
4 Operation 51
4.1 Display 51
4.2 Taking a call 51
4.3 Making a call 52
4.4 Handsfree 52
4.5 Internal calls (intercom function) 52
4.6 Connecting external calls to the other handset 52
4.7 Dialling phone numbers stored in the phone book 53
4.8 Displaying the call timer 53
-Contents-
4.9 Switching the handset on /off 53
4.10 Notes on range 53
4.11 Muting the microphone in the handset 53
4.12 Adjusting the receiver volume 54
4.13 Redialling 54
4.14 Key lock 54
4.15 Temporary tone dialling 55
4.16 Paging the handset from the base station 55
5 Phone Book 56
5.1 Entering phone numbers in the phone book 56
5.2 Modifying entries in the phone book 57
5.3 Deleting phone numbers stored in the phone book 57
6 Call Number Display CLIP 59
6.1 Caller list 59
6.2 Storing phone numbers from the caller list in the phone book 60
6.3 Deleting individual numbers from the caller list 60
6.4 Deleting the entire caller list 60
7 T-NET / Private Branch Exchanges 61
7.1 "R" button on private branch exchanges 61
7.2 R button with T-Net provided by DEUTSCHEN TELEKOM 61
7.3 Using the dialling pause 61
8 Advanced Functions 62
8.1 Setting the ringing melody on the handset 62
8.2 Setting the ringing tone volume on the handset 62
8.3 Setting the ringing melody on the base station 63
8.4 Setting the ringing tone volume on the base station 63
8.5 Answering calls automatically 63
8.6 Tone or Pulse dialling mode 64
8.7 Changing the display names 64
8.8 Switching warning tones on/off 64
18.9 Changing the PIN code 65
8.10 Setting the display language 65
8.11 Setting the Recall (flash) time 65
8.12 Restoring the default settings 66
8.13 Registering and deregistering handsets 66
8.13.1 Registering DECT8048 handsets 67
-Contents-
8.13.2 Registering other DECT-GAP telephones on the base station 67
8.13.3 Registering a handset on a DECT/GAP base station from another system or manufacturer 67
8.13.4 Deregistering handsets 67
8.14 Additional base stations 68
8.15 Menu structure 69
9 Alarm Unit 70
9.1 Telephoning / Alerting 70
9.2 Settings 71
9.3 Warning melodies 72
9.4 Programming 73
10 Troubleshooting 77
11 Important Information 78
11.1 Technical data 78
11.2 Replacing the telephone connection cable 78
11.3 Hearing aid compatibility 79
11.4 Guarantee 79
11.5 Declaration of Conformity/CE symbol 79
GB
-GenerallInformation-
1 GeneralInformation
Pleasereadthisoperatinginstructionmanualthoroughly.
In the case of any questions, please contact our Service Hotline 01805001388 (cost via Telekomatt time of going to print: 12ct/min). Undernocircumstances open the device or complete any repair work yourself. In the case of claims under the term so guarantee, contact your sales outlet.
Wereservetherighttomaketechnicalandvisualmodificationstotheproductduringthecourseofproduct improvement.
1.1 Intendeduse
Thistelephoneandthealarmunitincludedwithithavebeendevelopedforusewhenconnectedtoananalogue telephone network connection (PSTN) within Germany. However, due to the different services offered by the various telecommunicationnetworkproviders,thereisnoguaranteethattheequipmentwillfunctiontrouble-freeonevery telecommunicationterminalconnection.ThetelephoneispreparedforconnectiontoaTAElinesocketwithF/N codingandcanbeusedtogetherwithotherequipmentsuchasfacsimileunit,answeringmachineormodem.Only plugthetelephoneconnectioncableintotheappropriatetelephonelinesocket.Neverchangetheplugonthe connectioncable.
1.2 Powerfailure
Thetelephone cannot be used to make calls in the event of a power failure. Always keep acord connected telephone which operates without an external powers supply available in the case of emergencies situations.
1.3 Installation location
The installation location is a decisive factor to ensure trouble-free operation. The equipment must be set up in the vicinityofa230Voltpoweroutlet.
Do not place the base station in the direct vicinity of other electronic equipment, such as microwave ovens or hi-fi systems, since they could cause mutual disturbance. Therefore, maintain a distance of at least one meter from other electronicequipment.
Place the base station on a level, non-slip surface. Normally, the footpads on the base station do not leave any marks onthesurfacewhereitislocated. However, duethediversetypesofpaintsandsurfaceswhichcomeintoquestion, it cannotbefullyruledoutthatthefootpadswillleavemarksonthesurfaceonwhichitislocated.
1.4 Powersupply
OnlyusetheAUDIOLINEpoweradapterplugsuppliedbecauseotherpowersuppliescoulddestroythetelephone. Neveropenthepoweradapterplug!Thereariskoffatalinjury!
1.5 Rechargeable batteries
Donotuseotherrechargeablebatteriesorpowerpacksbecausetheycouldcauseashortcircuit. Whenreplacing batteries, onlyusethoseofthetypeAAA1.2V550mAh(NiMH).
Donotthrowrechargeablebatteriesintoafireorimmersetheminwater.
Donotdisposeofoldordefectivebatteriesinnormaldomesticwaste.

-GenerallInformation-
Themaximumstandbyandtalktimesspecifiedapplytotherechargeablebatteriessuppliedwhenusedunder optimumconditions.Ambienttemperature,chargingcyclesandotherexternalfactors,suchasradioloadinginthe areaofuse,canaffectoperatingtimesconsiderably.Inaddition,thechargecapacityisreducedfortechnicalreasons duringuseorwhenstoredatextremelyhighorlowtemperatures.
1.6Chargingthehandset
If the hand set warms up during the charging process, this is normal and does not represent an danger. Donot charge the hand set on an external charging unit as this could damage it.
1.7 Privatebranchexchanges
The telephone can also be connected to a private branch exchange. The dealer where you purchase the exchange can provide information as whether the telephone will work properly with the exchange. There is no guarantee that the equipment will function perfectly one every private branch exchange.
1.8 Disposing ofoldequipment
When your AUDIOLINE equipment has cometo the end of its operating life, dispose of it at the collecting point provided by your local, public wasted disposalservice (e.g. recycling center).
The adjacent symbol on your telephone indicates that the old equipment must not be disposed of in normal domestic waste.
According to the laws on electrical and electronic apparatus, ollectrical and electronic equipment must be sorted during disposal.

1.9 Noteonmedicalequipment
Thetelephoneoperateswithaverylowtransmittingpower. The current level of knowledge from research and technology indicates that such low transmitting power does not represent a risk to health. It has been shown, however, that portable telephones, when switched on, can affect medicale equipment. Therefore, never use the telephone in the vicinity of medicale equipment.
ThereisnoevidencethatDECTtelephonesaffectheartpacemakers. However, it cannot be ruled out that certain heartpacemakers will not be affected.
DECTtelephonescancauseanunpleasanthummingsoundinhearingaids.
1.10 Temperature and ambient conditions
The telephone is designed for use in indoor rooms with a temperature range from 10 °C to 30 °C. The base station should not be used in room sexposed to moisture, such as bathrooms or laundries. Donot locateth device in the vicinity of sources of heats such as radiators, and never expose it to direct sunlight.
Donotusethehandsetinpotentiallyexplosiveareas. Preventexcessiveexposureosmoke, dust, vibration, chemicals, moisture, heat and direct sunlight.
-GenerallInformation-
1.11 Cleaningandupkeep
Cleanthehousingsurfaceswithasoft,dry,fluff-freecloth.Neverusecleaningagentsoraggressivesolvents.Apart fromoccasionallycleaningthehousing,nootherupkeepisnecessary.Therubberfootpadsonthebasestationare notresistanttoallcleaningagents.Therefore,themanufacturerisnotliableforanydamagecausedtofurnitureetc.
1.12CEsymbol
The telephone fulfils the basic requirements stipulated in the R&TTE Directive. This is confirmed by the CE symbol.
-OperatingElements-
2OperatingElements
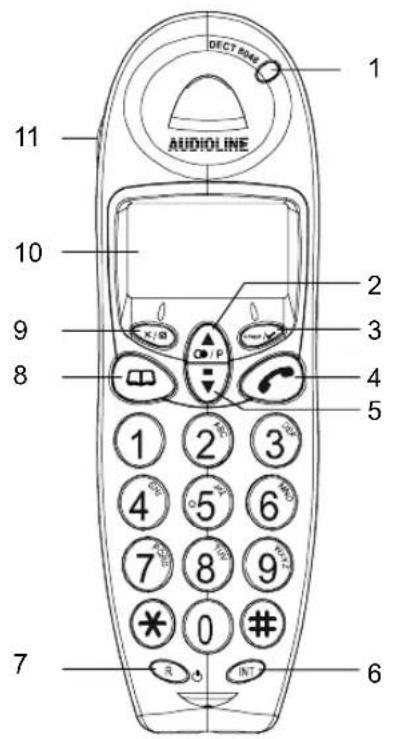
2.1Handset
- Callindicator
- Selection/Scrollingbutton/Rediallingbutton
- Menubutton
- Callbutton
5.Selection/Scrollingbutton/CallslistCLIP - Internalcall
7.Rbutton
8.Phonebook/Exitmenu
9.Muting/Deletebutton - Display
11.Handsfree
text_image
DECT RANK AUDIOLINE 1 11 10 9 8 2 3 4 5 1 2 3 4 5 6 7 8 9 * 0 # 62.2Basestation
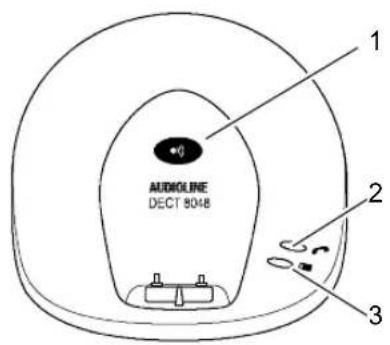
- Pagingbutton(locatehandset)
2.LED,callandpowerindicator - LED, chargecontrol indicator
text_image
AUDICLINE DECT 8048GB
-OperatingElements-
2.3Alarmunit
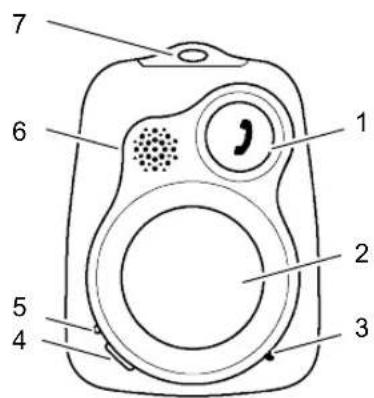
-
Speak Pressthebuttontodialthephonenumberofthe contactperson
-
Alarm Pressthebuttontodialthealarmnumber
-
Microphone
4.GreenLED Flashesregularly=Incomingcall Flashesevery10sec.1x=Equipmentswitchedon Constantlyonduringacall
5.RedLED Flashesregularly=Outofrange Flashesevery10sec.1x=Batteryisempty Constantlyon=Chargingprocess
- Loudspeaker
7.Eyeforneckband
8.Beltclip - Volumecontrol
2.4Chargingunitforalarmunit
- Chargecontrollamp
2.5 Programmingunit
GB
text_image
Diagram of a device with numbered parts labeled 1 through 7, likely for labeling or identification.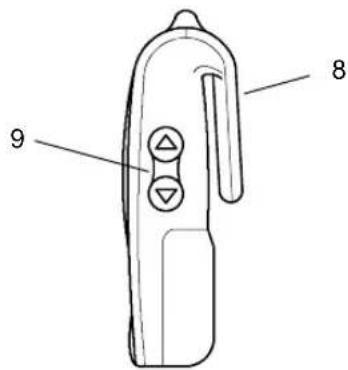
text_image
8 9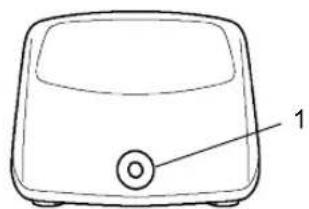
natural_image
Line drawing of a microwave oven with labeled component (no text or symbols beyond label)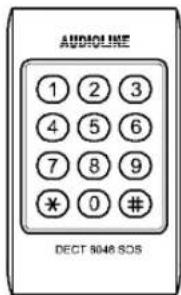
text_image
ARIDONE AUTOCONE 1 2 3 4 5 6 7 8 9 * 0 # DECT 9048 SOS- Starting Up -
3 S t a r t i n g U p
3.1 Safetynotes

Caution: It is essential to read the General Information Section 1 at the beginning of this manual before startingup.
3.2 Checking the package contents
Thepackagecontains:
| abasestation | atelephoneconnectioncable |
| ahandsetfourrechargeablebatteries | |
| achargingunitforthealarmunittwopoweradapterplugs | |
| analarmunitanoperatingmanual | |
| aprogrammingunitaneckbandforthealarmunit |
3.3 Connectingthebasestation
Positionthebasestationwithinreachofthetelephonelinesocketandapoweroutlet.Onlyusethecomponents supplied.
- Insert the small plug on the power adapter plug cable in the corresponding socket on there are side of the basestation.
Note: The plug cannot be connected incorrectly because the plug and socket are designed in such a way to prevent reversepoling. The plugsmustsnapaudibly into the basestation sockets.
- Insert the small plug on the telephone connection cable in the corresponding socket on the underside of the basestation.
- Plug the power adapter plugin properly installed 230 Voltpower outlet. The power adapter plug from the basestation must remain connected at all times.
- Connect the telephone connection cables supplied in telephones socket F.
- Starting Up -
3.4 Inserting there chargeable batteries
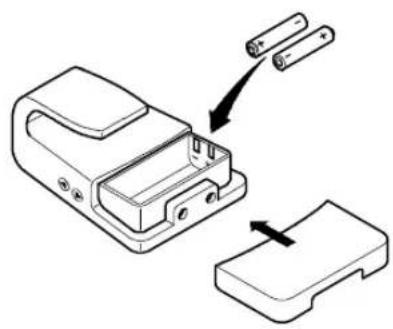
Inordertoinserttherechargeablebatteriesinthehandset, pressonthetopedgeofthebatterycompartmentcover andslideitdownwards. Onlyinsertstandardbatteries.Payattentionthecorrectpolarity.Closethebattery compartmentcover.
natural_image
Technical line drawing of a mechanical component with two cylindrical parts inserted, showing internal structure and assembly (no text or symbols)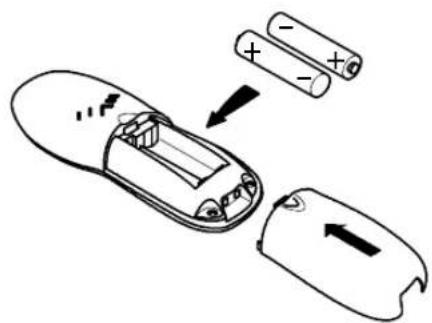
text_image
Diagram showing battery charging process with labeled components and directional arrows indicating charging direction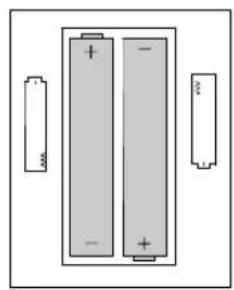
natural_image
Diagram of two batteries with positive and negative charge indicators, no text or symbols present3.5Chargingthebatteries
Place the handset, with its display facing the front, for at least 14 hours in the base station. The charging control lamp onthebasestationlightsup.Failuretofullychargethebatteriescanleadtotelephonemalfunction.
Therechargeablebatteriesinthehandsethaveamaximumstandbytimeof100hoursatroomtemperature. The maximumtalktimeis10hours.
The current battery charge status is indicated in the display:
| FullHalfemptyWeakEmpty | |||
3.6Tonedialling-DTMF
This telephone implements the tone dialling method - DTMF (Dual Tone Multi Frequency). Advantages of this modern dialling method include short connection times, remote control options for other equipment, such as an answering machine, and the use of other ISDN services.
-Operation-
4Operation
4.1 Display
Innormaloperation, the display show sthen a name of the handset. The preset name can be changed at any time. Refer to Section 8.7. Th e display also indicates all the important functions by means of various icons.
| Button | Description |
| On:Acalliscurrentlybeingmade. | |
| On:Handsfreemodehasbeenswitchedon. | |
| EXT | On:Anexternalcalliscurrentlybeingmade.Flashing:Anexternalcallhasbeenreceived. |
| INT | On:Aninternalcalliscurrentlybeingmade.Flashing:Aninternalcallhasbeenreceived. |
| On:Youhaveopenedthecallerlist(CLIP).Flashing:Newcallshavebeenstoredinthecallerlist(CLIP). | |
| On:Thisphonenumberinthecallerlisthasalreadybeencalledback. | |
| On:Thisphonenumberinthecallerlisthasnotbeencalledback. | |
| Flashing:Pleasechargethehandset.On:Displaysbatterycapacity.Runthroughthesegments:Thehandsetisbeingrecharged. | |
| On:Whenusingthephonebook. | |
| On:Immediatelyprogrammingmodehasbeenactivated. | |
| On:Thekeylockfunctionisswitchedon. | |
| On:Theconnectiontothebasestationisgood.Flashing:Thehandsetisoutofrangeofthebasestation. | |
| On:Thephonenumberisinexcessof12digits. |
GB
4.2 Takingacall
Whenacallisreceivedthehandset,basestationandalarmunitring.Duetothetelecommunicationconnection,the
handsettringsalittlelaterthanthebasestation.The EXT icon flashes in the display. Press the Call button 📞 on the handsetorthealarmunitandaconnectionismade. ThecallindicatorLEDonthebasestationflashesduringthe call.
-Operation-
Note: While the handset/alarm unit is ringing, the ▲ and ▼ buttons can be used to change the ringing volume. Toendthecall,replacehandsetinthebasestationorpresstheCallbutton ⏻.
Note: Information on the display of the phonenumbers is provided in Chapter 6.
4.3Makingacall
- Enter the phonenumbertobecalled, with max. 32 digits, using the digit keypad. Sincethedisplaycanonly show a maximum of 12 digits, only the last 12 digits are displayed in the case of longer phone numbers.
Note: If you have entered a wrong digit, press the entire phone number.
X/81 button to delete it. Press and hold the X/81 button to delete
- PresstheCallbutton 📋 andtherequiredconnectionisestablished.
Note: It is also possible to press the Call button
firsttoobtainthediallingtone.Enterthephonenumber
required. Thetelephonedialsthenumberdirectly. However, individualdigits cannot be deleted and corrected when using this method of dialling phonenumbers.
4.4 Handsfree
PresstheHandsfreebutton ▪ before dialling or during a call. You then hear the dialling tone or the caller via the loudspeakeronthehandset.
BypassingtheHandsfreebutton as necessary, it is possible to switch between normal and handsfree operation duringacall.
AlwaysendthecallbeingcarriedoutusingthehandsfreefunctionbypassingtheCallbutton
4.5 Internal calls (intercomfunction)
Assoonasecondhandsetoralarmunitisregisteredonabasestation, they can be used free of charge for internal calls.
Todothis, press the INT button and then the internal number, 1 or 2, of the required handset. The call is taken by pressing the Call button on thereceiving handset.
Note: If the other handset is being used for an external call, the control lamp on the receiver lights up on all the handsets. It is not possible to carry out a second external call.
GB
4.6 Connectingexternalcallstotheotherhandset
If you have taken an external call on a handset, the call can be transferred to the other handset or alarm unit. Todo this, press the INT button and then the internal number (1 or 2) of there required handset / alarm unit.
If the handset called does not answer, takes the callback by pressing the INT button.
-Operation-
Aftertheinternalcallhasbeentakenbythehandsetcalled,thefollowingoptionsareavailable:
A. Consultation/Brokering: You cantalkto the party using the other hand set and then return the external caller by pressing the INT button. You can switch between the external and internal parties as often as necessary.
B. Transfercall: PresstheCallbutton 📋 onthefirsthandset. The external callistransferred to the handset called.
4.7Diallingphonenumberstoredinthephonebook
Afterphonenumbershavebeenstored, theycanbecalledquicklyandeasily. Theproceduretostorephone numbersinthephonebookisdescribedinChapter5.1.
-
Pressthephonebookbutton 📄. The first stored phonenumber appears in the display. Further phone numbers appear according to the alphabetical order of the names assigned to them.
-
Use the ▲ and ▼ buttons to scroll through and select the entries stored in the phone book. To select a phonenumberalphabeticallythroughthename, enter the corresponding first letters of thename using the digit key son the phone.
3.PresstheCallbutton 📞 andthephonenumberdisplayedisautomaticallydialled.
4.8 Displaying the call timer
The duration of a call is displayed in minutes and seconds during the call. 15 seconds after dialling, the display of the numberdialledisreplacedbythecalltimer.Whenthecallisended,thetimerremainsinthedisplayforafew seconds.
4.9 Switching the handset on/off
Pressandholdthe R button until the handset is switched off. When the handset is switched off, no battery power is used. Nocallscanbereceived. Pressthe R buttononcetoswitchthehandsetonagainorplaceitbackinthe basestation. ThemessageBASE1appearsinthedisplayandthehandsetisswitchedonagain.
4.10 Notesonrange
Thehandsethasarangeofapprox.50metersinclosedroomsandapprox.300metersoutdoors.Whenthe connectiontothebasestationisgood,the 1) iconappearsinthedisplay.Ifthehandsetismovedtoofarfromthe basestation,the 1) icon flashes and acoustic warning signals are issued. Move nearer to the base station, otherwise the call will be disconnected. The acoustic warning signals can be deactivated as described in Chapter 8.8.
4.11 Mutingthemicrophoneinthehandset
Press the ✗ button to deactivate the handset microphone during a call. This means you can consult with someone, forexample, without the caller being able to hear. Theloudspeaker in the handset remain switched on, so that you can continueto hear the caller.
- Pressthe

buttonduringacall. ThemessageMUTEappearsinthedisplay.
-Operation-
- To switch the microphone back on, press the ✗ button again. The message MUTE disappears from the displayandthecallcanberesumedasnormal.
4.12Adjustingthereceivervolume
The volume of thereceiver can be adjusted according to requirements.
Use the ⚠ and ∨ buttons to adjust the volume of the caller during a call. The selected volume is indicated in the displaybyEARVOL1to5.
4.13Redialling
Redialling is used when the phone number called was engaged or not answered. The telephone stores the last five phonenumbersdialled.
- Pressthe ▲ buttonandthelastphonenumberdialledappearsinthedisplay.
- Pressthe ⚠ button to scroll back in the list phone numbers stored in the redialling list. Press the ∅ button to scrollforwardinthelist.
3.PresstheCallbutton 📞 andthephonenumberdisplayedisautomaticallydialled.
Note: If a phone number stored in the redialling list is also stored in the phone book, the name and not the number automatically appear in the display.
Deletingphonenumberfromtherediallinglist:
Proceedasfollowstodeleteanindividualphonenumberfromtherediallinglist:
- Pressthe ▲ button and use the buttons ▲ and ▼ to select the phone number to be deleted from the rediallinglist.
2.Pressthe X/80 buttonandDELETE?appearsinthedisplay. - ConfirmbypressingtheMenubutton and the phonenumber is deleted from the rediallinglist.
Deletingallnumbersfromtherediallinglist:
Proceedasfollowstodeleteallthephonenumbersfromtherediallinglist:
- Pressthe 🔒 button.
- Pressandholdthe X/81 buttonuntilDELETEALL?appearsinthedisplay.
- ConfirmbypressingtheMenubutton and all the phone number are deleted from the redialling list.
GB
4.14Keylock
If you carry the hand set around a lot, you can lock the key pads so that buttons are not in a advertently activated. Calls can still be taken in then a normal way even when the key lock function is activated.
Activatingthekeylock:
Pressthe Ⓚ button on the handset for 3 seconds. The 🔍 icon appears in the display.
-Operation-
Deactivatingthekeylock:
Todeactivatethekeylockfunction, pressthe ⓧ buttontwice.
Note: The keylock function can also be activated via the menu.
4.15 Temporarytonedialling
If your telephone can only be operated using the PULSE dialling mode (refer to Chapter 10.4), you can still make use of the advantages provided by the TONE dialling mode (e.g. remote access of an answering machine). During a call, you cantemporarily switch to TONE dialling mode bypassing the button. When the call is ended, the equipment switches back to PULSE dialling.
4.16 Paging the handset from the basestation
If you have forgotten where you have put your handset, press the 30 seconds, making it easy to find. Press any button on the handset or the acousticsignals before the 30 second shave expired.
- ) buttononthebasestation. Thehandsetringsfor
- ) buttononthebasestationstopthe
-PhoneBook-
5PhoneBook
The phonebook can be used to store a maximum of 30 phonenumber together with the associated names. The maximum length of a phonenumber is 20 digits.
5.1 Enteringphonenumbersinthephonebook
1.PresstheMenubutton 📋.ThemessagePHONEBOOKappearsinthedisplay.
2.Pressthe buttonagain.ADDENTRYappearsinthedisplay.
3. Confirmbypressing the Menubutton .NAMEappearsinthedisplay.
4. Entertheassociatedname(max.12letters)usingthekeypad.Informationonenteringnamesisprovidedinthenextsection.
5. ConfirmthenamebypassingtheMenubutton .NUMBERappearsinthedisplay.
6.Entertherelevantphonenumberusingthedigitkeys.
7. Confirmbypressing the Menubutton again.MELODY1-3appearsinthedisplay.
8. Selectthemelodyyouwishtoassigntothisphonenumberusingtheselectionbuttons and ▲ and ▼.
9. Confirmbypressing the Menubutton .ADDENTRYreappearsinthedisplay.
If you want to store more phonenumbers, continue with Step3. Press the button to exit from Entry mode.
Notesonthephonebook:
-Inaddition, one of the three reeringing melodies can be assigned to each phonenumber stored. In this way, you can tell who is callings simply from theeringing melody. This assignment only functions when your telephone connection and that of the caller implement the callernumber display (CLIP function).
Alwaysentertheareaaccesscodewiththephonenumberssothatthetelephonecanalsoassignincominglocalcallstoaphonebookentry.
-FurtherinformationoncallernumberdisplayisprovidedinChapter6.
- If thememorycapacity of 30 phonenumber is reached, the message "MEMORYFULL" appears when an attempt is madetostore another number. Phonebook entries will then have to be deleted in order creates space.
Explanationofenteringnames:
The digit keys are also labelled with letters for the entry of the respective letters. Pressing the respective key the necessary number of times enables capital letters and digitstobeentered.

Example: Toenterthename "Peter".
Press:digit7once,digit3twice,digit8once,digit3twice,digit7threetimes
-Toenteraspace, press1 once
-Toenterahyphen, press 1 twice.
-Toenterthesamelettertwiceoraletteronthesamebutton, presstheappropriatedletterandthenwaituntilthe cursorautomaticallyskipstothenextposition.
-Deleteanyincorrectentrieswiththe x/8 button.
-PhoneBook-
5.2 Modifying entries in the phonebook
1.PresstheMenubutton 📋.PHONEBOOKappearsinthedisplay.
2.Pressthe 📋 buttonagain.ADDENTRYappearsinthedisplay.
3.Pressthe 🔒 button.MODIFYENTRYappearsinthedisplay.
-
ConfirmbypressingtheMenubutton .Thestoredentriesthenappearinthedisplayinalalphabetical order.
-
Usethe ▲ and ▼ buttonstoselecttheentrytobemodified.
-
Confirm these selection by pressing the Menubutton flashes behind the last letter. Then a appears in the display. The cursor
-
Modifythenameusingthedigitkeys.InformationonenteringnamesisprovidedintheSection5.1.
-
After having completed there required modifications, confirm the input by pressing the Menubutton associated phonenumber appears in the display.
-
Modify the phonenumber using the digit keys. Press the digits in the phonenumber.
-
Afterhavingcompletedtherequiredmodifications, confirmtheinputbypassingtheMenubutton messageMELODYappearsinthedisplay.
-
Selectthemelodyyouwishtoassigntothisphonenumberusingtheselectionbuttons and ▲
-
Afterhavingcompletedtherequiredmodifications, confirmtheinputbypassingtheMenubutton messageMODIFYENTRYappearsinthedisplay.
-
If you want to modify more names and phonenumbers, continue with Step4. Press the from Programming mode. button to exit
5.3 Deleting phonenumbers stored in the phonebook
1.Pressthe button.PHONEBOOKappearsinthedisplay.
2.Pressthe buttonagain.ADDENTRYappearsinthedisplay.
3.Pressthe button.DELETEENTRYappearsinthedisplay.
-
ConfirmbypressingtheMenubutton
-
Use the ▲ and ▼ buttons to select the phone number to be deleted.
-
Afterhavingfoundthephonenumberrequired, confirmbypressingtheMenubutton appearsinthedisplay.
-
ConfirmbypressingtheMenubutton 📄️ againandthephonebookentryisdeleted. Themessage DELETEENTRYreappearsinthedisplay. The deletionprocessiscancelledbypassingandholding the 📄 button.
-PhoneBook-
- Whenthephonenumberisdeleted, themessageDELETEENTRYappears. If you want to delete more names and phonenumbers, continue with Step4. Press the button to exit from Delete mode.
6CallNumberDisplayCLIP
TheCLIPfunctionenablesyoutoviewthenumberofacallerwhenacallisreceived.Ifthisfunctionisavailablewithyourtelephoneline,thenumberofthecallerappearsinthedisplaywhenthephonerings.Ifthecallerhas suppressedtransmissionoftheirphonenumberorthephonenumbercannotbedisplayedfortechnicalreasons,the messageWITHHELDappearsinthedisplay.
If the caller's number is stored in the phonebook, then a name appears in the display instead of the phone number. In addition, any phone number stored in the phone book can be assigned one of the three reeringing melodies so that you know from them melody who is calling.
Incomingcallsarestoredinacallerlist. This enables youtoseewhhascalledinyourabsence. A total of 30 calls can bestoredinthelist. As soon as the list is full, the oldest phonenumber is deleted from the list. If new phone numbers have been stored in the caller list in your absence, the icon flashes in the display.
Note: The caller number display function is an optional service offered by telephone network providers. The caller numberappearsinthedisplayiftheserviceisofferedbyyourtelephonenetworkprovider.Thedisplayof thedateandtimeisnottransferredbyalltelephonenetworkproviders.Contactyournetworkproviderfor furtherinformation.Transferofthephonenumberorthedateandtimeisnotalwayspossibleeitherinsome privatebranchexchanges.
6.1 Callerlist
Proceedasfollowstoviewthephonenumbersinthecallerlistinthedisplay:
- Pressthe button and the last phone number received appears in the display. If the caller list is empty, themessageEMPTYAppearsinthedisplay.
- Use the ▲ and ▼ buttons to select other phone numbers from the caller list. If no further phone numbers are available, an acoustic signal is issued. Two display icons indicate whether the calls in the caller list weretakenornot.
=Thecallwasnottaken.
=Thecallwastaken.
Note: UsetheMenubutton tocallininformation.
-If the phonenumber is longer than 12 digits, theremaining digits are displayed.
-Displaysthephonenumberwhenthecaller'snameisstoredinthephonebook.
-Displaysthedateandtimeifthisdatawastransferredfromthecaller.
-Ifnofurtherdataisavailable,ADD?appearsinthedisplay.
-Pressthe buttonotreturntothelist.
- If you want to callback a phonenumber from the caller list directly, simply press the Call button number is dialled immediately.
4.Pressthe 📄 buttontoexitfromcallerlist.
andthe
-CallNumberDisplayCLIP-
6.2 Storingphonenumberfromthecallerlistinthephonebook
A phone number stored in the caller list can be transferred and saved directly in the phone book.
- Pressthe button and the last phonenumber received appears in the display.
- Usethe ▲ and ▼ buttons to select the number in the caller list to be saved in the phone book.
3.Pressthe 📋 buttonuntiltheADD?appearsinthedisplay. - ConfirmbypressingtheMenubutton .NAMEappearsinthedisplay.
- Entertheassociatedname(max.12letters) using the keypad.
6.PresstheMenubutton andthephonenumberappearsinthedisplayagain. - Confirmbypressing the Menubutton MELODY1-3appearsinthedisplay.
- Selectthemelodyyouwishtoassigntothisphonenumberusingtheselectionbuttons and △ and ▽.
- ConfirmbypressingtheMenubutton 📂 andthephonenumberisstoredinthephonebook.
Note: When the number in the phone book is stored together with a name, the phone number no longer appears inthedisplaybutthenameinstead.
6.3 Deleting individual numbers from the caller list
- Pressthe button and the last phonenumber received appears in the display.
- Usethe ▲ and ▼ buttons to select the number in the caller list to be deleted.
3.Pressthe x/81 button.ThemessageDELETE?reappearsinthedisplay. - ConfirmbypressingtheMenubutton andthephonenumberisdeletedfromthecallerlistorpress the buttontoexitDeletemode.
6.4 Deletingtheentirecallerlist
- Pressthe button and the last phonenumber received in the caller list appears in the display.
- Pressandholdthe X/18 buttonuntilDELETEALL?appearsinthedisplay.
- ConfirmbypressingtheMenubutton buttontoexitDeletemode.
-T-NET/PrivateBranchExchanges-
7T-NET/PrivateBranchExchanges
The "R" button on the telephone is for use in private branch exchanges and when using T-Net functions provided by DEUTSCHENTELEKOM.
7.1 "R" button on private branch exchanges
If the telephone is connected to a private branch exchange, all the functions, such as transferring calls, automatic call back, etc., can be used. The "R" button provides access to these facilities. A private branch exchange requires a RecallTimeof"100ms"(refertoSection8.11forthesettings).Thedealerwhereyoupurchasedtheexchangecan provideinformationastowhetherthetelephonewillworkproperlywiththeexchange.
7.2RbuttonwithT-NetprovidedbyDEUTSCHENTELEKOM
The AUDIOLINE telephones support sthemost important supplementary services provided by DEUTSCHEN TELEKOM (e.g.: brokering, callwaiting, three-way conference, etc.). T-Net operates with the "Recall 300ms" setting (refer to Section 8.11 for settings). Please contact DEUTSCHEN TELEKOM with regard to enabling the T-Net functions.
7.3 Usingthediallingpause
In the case of private branch exchanges, it is necessary to dial a specific number (e.g. "9" or "0") in order to obtain the dialling tone for an outside line on the phone. When using some older private branch exchanges, it takes a little time before the dialling tone becomes audible. Especially for such private branch exchanges, it is possible to insert an automaticpauseafterthenumberfortheoutsidelinesothatthenumbercanbedialledinacontinuousprocess withouthavingtowaitforthedialllingtone.
Enteringapausewhendiallingmanually:
PresstheRediallingbutton ⚠️ fortwosecondsbetweenenteringthenumberforanoutsidelineandtheactualphone number."P"appearsinthedisplaybetweenthenumberforanoutsidelineandtheactualphonenumber.After dialling the number for the outside line, the telephone then waits 3 seconds before dialling the actual phone number. Adiallingpausecanalsobeenteredandsavedwithphonenumberstoredinthephonebook.
-AdvancedFunctions-
8AdvancedFunctions
Alltheotherprogrammingfunctionscanbeaccessedbymeansofauserfriendlymenu.Ageneralreferencelistis providedbelowexplaininghowtonavigateinthemenu:
| Pressthe 📊 button to start the programming function. The ➔ icon lights up in the display during programming. |
| Press the ▲ and ▼ buttons to select the required level. |
| Pressthe 📊 buttontoopentherequiredlevel. |
| Use the ▲ and ▼ buttons to move to and select the required function, confirm selection bypassing the Menu button 📊. |
| Pressthe 📊 buttonomoveonelevelback. |
| Everyprogrammingprocessisautomaticallycancelledifthereisnoinputwithin15seconds. |
| Press and hold the 📊 button to exit from the programming function at any time without any modifications being accepted. |
AcompleteoverviewofthemenusisprovidedinSection8.15.
8.1 Settingtheringingmelodyonthehandset
There are three different entringing melodies available for selection on the handset with which the handset strings when a call is received. If the telephonesystem operates with more than one handset, you can set different entringing melodies for external and internal calls.
- PresstheMenubutton
- Use ▲ and ▼ to select the HANDSET menu and confirm by pressing √.
- Use ▲ and ▼ to select the required melody and confirm by pressing ∞.
-
Youcannowselectothermenufunctionsorpress 📄 toexitfromthemenu.
-
Use ▲ and ▼ to select EXT MELODY (ring tone for external calls) or INT MELODY (ring tone for internal calls/onlywithtwohandsets)andconfirmbypassing 📂.
8.2 Settingtheringingtonevolumeonthehandset

The volume of theeringingtone on the handset can be set to one of three levels. If you donot want to be disturbed, you can switch theeringingtone off completely. If theeringingtone is switched off, incoming calls are indicated by the basestation and in the handset display.
-
PresstheMenubutton
-
Use ▲ and ▼ to select the HANDSET menu and confirm by pressing 📂.
-AdvancedFunctions-
-
Use ▲ and ▼ to select EXT RING VOL (volume for external calls) or INT RING VOL (volume for internal calls/onlywithtwohandsets)andconfirmbypassing 📂.
-
Use ▲ and ▼ to select the required volume or switch off the ringing tone and confirm by pressing √.
-
Youcannowselectothermenufunctionsorpress 📄 toexitfromthemenu.
8.3 Settingtheringingmelodyonthebasestation
There are three different entringing melodies available for selection on the basestation with which the basestation then rings when acallis received.
-
PresstheMenubutton
-
Use ▲ and ▼ to select the SETUP menu and confirm by pressing 📁/√.
-
Use ▲ and ▼ to select the BASE MELODY function and confirm by pressing Ⓤ/√.
-
Use ▲ and ▼ to select the required melody and confirm by pressing √.
-
Youcannowselectothermenufunctionsorpress 📄 toexitfromthemenu.
8.4 Settingtheringingtonevolumeonthebasestation
The volume of the ringing tone on the base station can be set to one of three levels. If you do not want to be disturbed, you canswitchtheringtoneoffcompletely.
-
PresstheMenubutton
-
Use ▲ and ▼ to select the SETUP menu and confirm by pressing 📂.
-
Use ▲ and ▼ to select the BASE VOLUME function and confirm by pressing out/√.
-
Use ▲ and ▼ to select the required volume or switch off the ringing tone and confirm by pressing ☑.
-
Youcannowselectothermenufunctionsorpress 📄 toexitfromthemenu.
8.5 Answering calls automatically
Incomingcallscanbetakenautomaticallywhenthehandsetisremovedfromthebasestation.Ifyouonlywantto takecallsbypassingthe button,youcandeactivatetheautomaticansweringfunction.
-
PresstheMenubutton
-
Use ▲ and ▼ to select the HANDSET menu and confirm by pressing 📂.
-
Use ▲ and ▼ to select the AUTO ANSWER function and confirm by pressing 📋.
-
Use ▲ and ▼ to select ON or OFF and confirm by pressing 📄/√.
-
Youcannowselectothermenufunctionsorpress 📄 toexitfromthemenu.
-AdvancedFunctions-
8.6 Toneor Pulsediallingmode
This future-oriented feature enables the telephone to be connected and used on both analogue (pulse dialling) and digital(tonedialling)exchanges.Tonediallingissetatthefactory.
-
PresstheMenubutton
-
Use ▲ and ▼ to select the SETUP menu and confirm by pressing 📁/√.
-
Use ▲ and ▼ to select the DIAL MODE function and confirm by pressing √.
-
Use ▲ and ▼ to select the required dialling mode and confirm by pressing 📋.
-
Youcannowselectothermenufunctionsorpress 📄 toexitfromthemenu.
8.7Changingthedisplaynames
Innormaloperation, "DECT8048" appearsinthedisplay. Iftwohandsetsareregisteredonabasestation, itisuseful toassigneachhandsetwithauniquename. Thenumberbehindthenameindicatesthecallnumberviawhichthe handsetcanbecalledinternally.
-
PresstheMenubutton
-
Use ▲ and ▼ to select the HANDSET menu and confirm by pressing 📂.
-
Use ▲ and ▼ to select the NAME function and confirm by pressing 🐘/√.
4.Entertherequirednameusingthedigitkeys.Pressthe buttonasoftenasnecessarytodeleteletters alreadyentered.
-
Confirmbypressing
-
Youcannowselectothermenufunctionsorpress ☐ toexitfromthemenu.
8.8 Switching warningtones on/off
This function enables various warning to be activated or deactivated.
Key tone: A tone is issued each time a button on the handset is pressed. The key tone can switched on or off.
Warning tone for low battery charge: A warning tone reminds you to recharge the handset when the battery charge istoolow.
Range warning: If you have moved too far away from the base station, a warning tone reminds you that you are losingcontactwiththebasestation.
-
PresstheMenubutton
-
Use ▲ and ▼ to select the HANDSET menu and confirm by pressing 📋/√.
-
Use ▲ and ▼ to select the BEEP function and confirm by pressing 📂.
-
Use ▲ and ▼ to select KEYTONE, LOW BATTERY or OUT RANGE, confirm by pressing 📄.
-
Use ▲ and ▼ to activate or deactivate the selected warning tone and confirm by pressing 📂/√.
-
Youcannowselectothermenufunctionsorpress 📄 toexitfromthemenu.
-AdvancedFunctions-
8.9ChangingthePINcode
SomefunctionsofferedbythetelephonesystemareprotectedagainstunauthorisedusebyaPINcode. ThePIN codeiscomprisedoffourdigits. When delivered, the PINcode is "0000". ProceedingsfollowstochangethePINcode:
- PresstheMenubutton
- Use ▲ and ▼ to select the SETUP menu and confirm by pressing 📂.
- Use ▲ and ▼ to select the PIN CODE function and confirm by pressing max/√.
- Enter the current four-digit PIN code using the digit keys (default setting 0000) expressing ____.
5.Enterthenew,four-digitPINcodeusingthedigitkeysandconfirmtheentrybypassing
6.Enterthenew,four-digitPINcodeagaintoconfirmthePINandconfirmtheentrybypassing - Youcannowselectothermenufunctionsorpress 📄 toexitfromthemenu.
If the old PIN code is not entered correctly, the process is cancelled.
8.10 Settingthedisplaylanguage
ThedisplaytextscanbesettoGerman, Italian, English, French, Dk/Nor/Sve, SpanishandDutch.
- PresstheMenubutton
- Use ▲ and ▼ to select the HANDSET menu and confirm by pressing 📂.
- Use ▲ and ▼ to select the LANGUAGE function and confirm by pressing 📂.
- Use ▲ and ▼ to select the language required and confirm by pressing 📂.
- ThelanguageischangedafterashorttimeandthedisplayrevertstoStandbymode.
8.11 SettingtheRecall(flash)time
- PresstheMenubutton
- Use ▲ and ▼ to select the SETUP menu and confirm by pressing 📂/√.
- Use ▲ and ▼ to select the RECALL function and confirm by pressing 📄/√.
- Use ▲ and ▼ to select the flash time RECALL 1 (100ms) or RECALL 2 (300ms) and confirm by pressing 📂.
5.Pressthe 📄 buttontoexitfromEntrymode.
GB
-AdvancedFunctions-
8.12Restoringthedefaultsettings
Thisfunctionresetsthehandsetandbasestationsettingstotheirstatusonleavingthefactory. Thephonebook, callerlist(CLIP)andallphonenumbersintherediallinglistaredeleted.
Defaultsettings:
| Language:English | Nameofhandset:DECT8048 |
| Batterywarningtone:OnAutomaticanswering:On | |
| Rangewarningsignal:OnExternalringingmelody:3 | |
| Keytone:OnInternalringingmelody:1 | |
| Receivervolume:3Ringingvolume,handset:3 | |
| Pincode:0 0 0 0 Ringingmelody,basestation:2 | |
| Pause:3sec.Ringingvolume,basestation:3 | |
| Dialling method: DTMF/Tone | Recall (Flash) time: 100 ms |
- PresstheMenubutton
- Use ▲ and ▼ to select the SETUP menu and confirm by pressing 📂/√.
- Use ▲ and ▼ to select the DEFAULT function and confirm by pressing 📂.
- EnterthePINcode(defaultsetting0000)viathedigitkeysandconfirmbypassing CONFIRM?appears.
. Themessage - ConfirmbypressingtheMenubutton
- The default settings are restored after a short time. The display then indicates the equipment is ready to operate.
Note: If you forget the PIN code, you can reset the default settings without the PIN code.
- Removethebatteryfromthehandset.
- Pressandholdthe ⓧ button and insert the battery again. Press and hold the ⓧ button until DEFAULT appearsinthedisplay.
- Confirmbypressing 📊 andthedefaultfactorysettingsarereset.Theprocesscanbecancelledatany timebypassingthe 📋 button.
8.13 Registering and deregistering handsets
A further handset can be registered on the base station. The maximum number of registrations is 4 handsets or 3 handsets and 1 alarm unit.
-AdvancedFunctions-
8.13.1 Registering DECT8048 handsets
Note: Themaximumnumberofdevicesis4handsetsor3handsetsand1alarmunit.
- PressandholdthePagingbutton •) onthebasestationfor6secondsuntiltwoacousticsignalsareissued. Registerthenewhandsetonthebasestationwithin90seconds.
2.Pressthe buttononthehandset.
-
Use ▲ and ▼ to select the REGISTER menu and confirm by pressing 📄.
-
Use ▲ and ▼ to select the REG BASE menu and confirm by pressing 📂.
-
Enterthenumberofthebasestation(1-4)usingthedigitkeys.Ifthehandsetisalreadyconnectedtoa basestation,thecorrespondingnumberflashes.
-
Confirm your entry by pressing the button. A search then made for the base station.
-
Whenthebasestationisfound, enterthebasestationPIN(defaultsetting 0 0 0 0).
-
Confirm your entry by pressing the button and an acoustic signal is issued after a few seconds. The handset is now registered and can be used for internal and external calls.
-
The handsetisthenautomatically assigned an internal call number. Themain hand set already registered with the internal call number 1. These second hand set registered disassigned the internal call number 2. This internal call number appears in the display to other right of the name of the telephone.
8.13.2 RegisteringotherDECT-GAPtelephonesonthebasestation
Note: Themaximumnumberofdevicesis4handsetsor3handsetsand1alarmunit.
InordertoregisteraDECT-GAPhandset, followtheinstructionsonregisteringahandsetonthebasestationinthe operatingmanualprovidedbytheexternalmanufacturer. Thenpressthe buttononthebasestationofthe DECT8048 until an acoustic signal is issued. Use the PIN code to register (default setting: 0 0 0 0).
8.13.3 RegisteringahandsetonaDECT/GAPbasestationfromanothersystemormanufacturer
- Preparethebasestation Followtheinstructionsunder"Registeringadditionalhandsets"intheoperatingmanualofthebasestation towhichyouwanttoregistryourhandset.
- RegisteringtheDECT8048handset ProceedasdescribedabovefromStep2butusethePINcodeofthebasestationyouwanttoregisteron (instead of 0000).
8.13.4 Deregisteringhandsets
Ahandsetcanonlybederegisteredbyanotherhandsetstillregistered. Thismeansitisnotpossibletocompletethe deregistrationusingthehandsetwhichistobederegistered. Thealarmunitcanbederegisteredusingthehandset.
- Pressthe buttononthehandset.
-AdvancedFunctions-
- Use ▲ and ▼ to select the SETUP menu and confirm by pressing □.
- Use ▲ and ▼ to select the DEL HANDSET function and confirm by pressing Ⓥ/√.
- Now enter the PIN code of the base station (default setting 0000) and confirm by p
- Selectthenumberofthehandsettobederegistered, 1,2,3or4, and confirmbypassing 📋. Press the
button to cancel the process. An acoustic signal is issued after a few seconds in the case of successful deregistration. The handset is now deregistered and cannot longer be used for internal and external calls.
8.14 Additionalbasestations
Therangeofthehandsetcanbeincreasedbyusingseveralbasestations.Toimplementthefunction,allthebase stations must be connected to a telephone line connection. Depending on the intended use, each base station can beassignedthesametelephonenumberoreachcanbeassignedadifferentcallnumber.Payattentionthatallthe basestationsoverlapwithregardtotheirrange.Eachhandsetmustberegisteredoneachbasestation.Pleasetest therangeofthehandsetbeforestartingupanewbasestation.Ifahandsetisregisteredonthebasestationsand automatic dialling of the base station has been activated on the handset (further information is provided in this chapter),thehandsetisautomaticallytransferredtothenextbasestation.Callsinprogress,however,cannotbe transferredfromonebasestationontoanother.
Selectingabasestation
-
Pressthe buttononthehandset.
-
Use ▲ and ▼ to select the REGISTER menu and confirm by pressing 📋.
- Use ▲ and ▼ to select the SELECT BASE menu and confirm by pressing 📂.
- Thedisplaythenshowsallthebasestationstowwhichthehandsethasbeenregistered. Thenumberofthe base station currently active flashes. Use the digit keys to enter the number of the base station to which the handsetshouldbeswitched.Orpressthe ▲ and ▼ buttons to change the setting to AUTO. This option causesthehandsettoswitchtothenextbasestationautomaticallywhentheconnectiontothecurrent basestationistooweak.
- Confirmbypressingthe button.
-AdvancedFunctions-
8.15Menustructure
PHONEBOOKADDENTRY
| DELETEENTRY | |||
| MODIFYENTRY | |||
| SETUPBASEVOLUME | VOLUME1,2,3,OFF | ||
| BASEMELODYMELODY1,2,3 | |||
| DELHANDSETPIN?HANDSET? | |||
| PINCODE | PIN?NEWPIN?RETYPE | ||
| DIALMODETONE | |||
| PULSE | |||
| RECALLRECALL1 | |||
| RECALL2 | |||
| DEFAULT | PIN? | CONFIRM | |
| HANDSET | BEEP | KEYTONE | ON - OFF |
| LOWBATTERY | ON-OFF | ||
| RANGE | ON-OFF | ||
| INTRINGVOL | VOLUME1,2,3,OFF | ||
| EXTRINGVOL | VOLUME1,2,3,OFF | ||
| INTMELODY | MELODY1,2,3 | ||
| EXTMELODY | MELODY1,2,3 | ||
| AUTOANSWER | ON-OFF | ||
| NAME | ...... | ||
| LANGUAGE | DEUTSCH,ITALIANO,NEDERL,ENGLISH,FRANCAIS, DK/NOR/SVE,ESPANOL | ||
| KEYLOCK | ...... | ||
| REGISTER | SELECTBASEBASE1______ | ||
| REGBASE | BASE1 2 3 4 | ||
GB
-AlarmUnit-
9AlarmUnit
Thealarmunitisacordless,handsfreetelephonecomplyingwithDECTstandards.Itisalreadyregisteredonthe basestationwhendelivered.
Analarmcallisdialledatthepressofasinglebutton.
Pressanotherbuttontodialacontactpersonortakeanincomingcall.
Note: There are several appropriate special service call numbers available, such as the Red Cross, St. John's Ambulance Brigade etc. Ask your community services or use the unit for private alarm calls within your family, circle of friendsorneighbours. Please note that alarm calls are not free of charge.
The costs for using the special services are not included in the purchase price of the telephone.
Pleasealsonotethatthefunctionsidentifiedby*1)maynotbesupportedbythespecialservices.
9.1 Telephoning/Alerting
Pleaserememberthatthealarmunitmustalwaysbecharged.
| A | Takingacall/EndingacallPress ⏻ or ⏻ totakeorendacall.WhentheAutomaticAnswerfunctionisactivated (refertoV),thecallistakenonremovingtheunit fromthechargerandendedwhenreturnedtoit. | 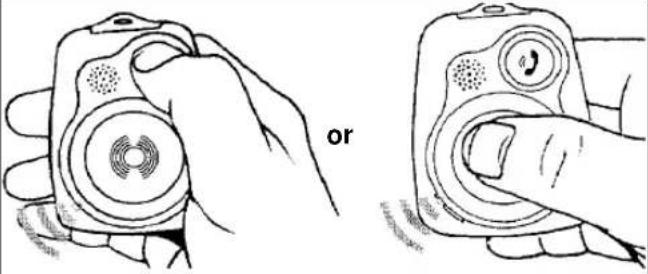 | |
| BCallingthecontactperson(alsorefertoQ)Press ⏻ todialthephonenumberoftherelation, friendorneighbourstored.Whenaconnectionismade,speakintothemicro-phone.Youcanthenhearthecallerthroughthe loudspeakerinthealarmunit. | 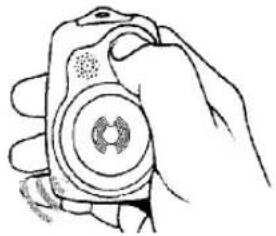 | ||
| -AlarmUnit- | |||
| CChangingthevolumePress 🔒 toadjustthevolumeduringacall. | 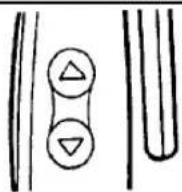 | ||
| DTriggeralarm(alsorefertoR)Press 🔒 todialthephonenumberofthespecial servicesexchange.Thespecialservicesexchange notifieslistedpersonsorsendsoneoftheservicesto providehelp,asnecessary. | 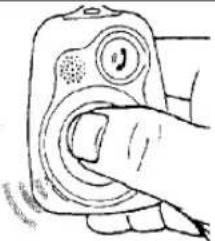 | ||
9.2Settings
Thealarmunitcanassigndifferentrringingmelodiestothevariousphonenumbers(contactperson, service exchange, self-testandlowbatterywarning). Thismeansyouknowwhoiscallingsimplyfromtheringingmelody.
| E | AdjustingtheringingmelodyandvolumePressandhold 🎨 untiltheredLEDlightsup.Press 🎨 again.Thecurrentmelodyisplayed.Press ▲▼ toselectoneofthefivemelodies.Press 🎨 tochangethevolumesetting.Press ▲▼ tosetthevolume.Pressandhold 🎨 tosavethesetting. | Result:Thismelodyringswhenacallisreceivedfromany number.Anacousticacknowledgementsignalisissued. |
| FSettingthemelodyforthecontactpersonPressandhold 🎨 untiltheredLEDlightsup.Press 🎨 again3times.Press ▲▼ toselectoneofthefivemelodies.Pressandhold 🎨 tosavethesetting. | Result:Thismelodyringswhenthecontactpersoncalls. | |
| GSettingthemelodyfortheservicesexchangePressandhold 🎨 untiltheredLEDlightsup.Press 🎨 again4times.Press ▲▼ toselectoneofthefivemelodies.Pressandhold 🎨 tosavethesetting. | Result:Thismelodyringswhentheexchangecalls.Anacousticacknowledgementsignalisissued. | |
GB
| -AlarmUnit- | ||
| HSettingtheself-testmelodyPressandhold 🎨 untiltheredLEDlightsup.Press 🎨 again5times.Press 🔊▼ toselectoneofthefivemelodies.Pressandhold ⏱ tosavethesetting. | Result:Thismelodyringswhentheself-testnumberis called.*1)Anacousticacknowledgementsignalisissued. | |
| ISettingthelowbatterywarningmelodyPressandhold 🎨 untiltheredLEDlightsup.Press 🎨 again6times.Press 🔊▼ toselectoneofthefivemelodies.Pressandhold ⏱ tosavethesetting. | Result:Thismelodyringswhenthelowbatterycharge warningiscalled.*1)Anacousticacknowledgementsignalisissued. | |
9.3 Warningmelodies
Youralarmunitprovidesvisualandacousticwarningswhenthebatteryvoltageistooloworyoumoveoutofrange.
| J | Lowbatterywarningduringacall:Oneacousticsignalperminuteisissuedwhenthe batterychargedropsbelowhalfofthefullcapacity duringacall. | 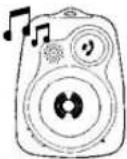 | |
| KLowbatterywarninginStandbymode:Oneacousticsignalperminuteisissuedwhenthe batterychargedropsbelowhalfofthefullcapacity in Standbymode.Inaddition,theredLEDflashes.Ifthebatterychargedropsbelowhalfofthefullca-pacity,analarmissenttotheservicesexchange.A messageisthensentfromthereindicatingthatthe batteriesmustberecharged. | *1) |  | |
| LRangewarning:Iftheunitismovedoutofrange,anacousticwarning signalisissuedandtheredLEDflashes.Move closertothebasestationtoretaintheconnection. | 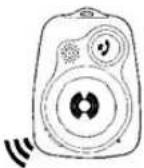 |  | |
-AlarmUnit-
9.4 Programming
Thealarmunitcanbeprogrammedaccordingtoindividualneeds. Themostusefulapplicationsaredescribedbelow.
| M | Transferallcalls,alarmsandtestcallstocontact person. | 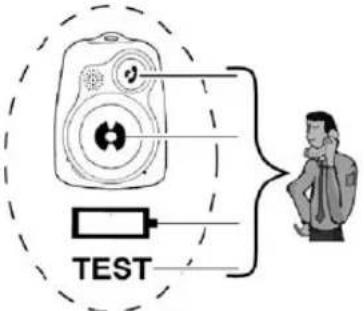 |
| NTransferallcalls,alarmsandtestcallstofourdiffer-entcontactperson. | 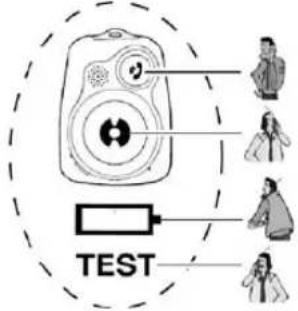 | |
| OTransfercallstoacontactpersonandalarmsand testcallstoanspecialservicesexchange. | 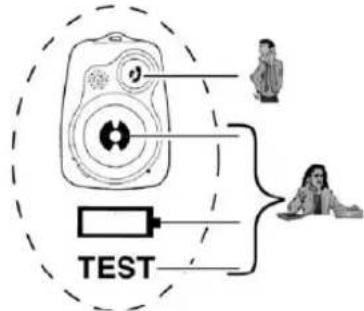 *1) *1) | |
-AlarmUnit-
Tousethefunctionsdescribedhere,youneed
•thehandset,
•thealarmunit
- and the DTMF programming unit, subsequently referred to as programming unit. DTMF=DualtoneMulti-Frequency
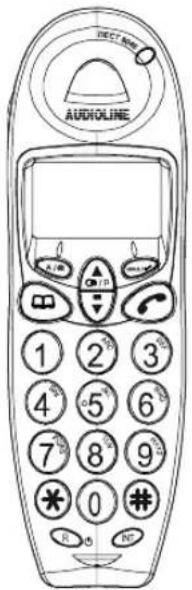
text_image
Audioline 1 2 3 4 5 6 7 8 9 * 0 # R 0 N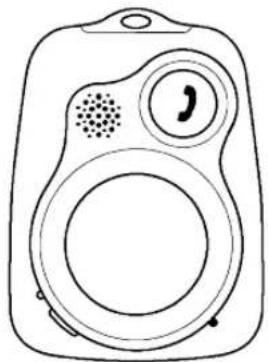
natural_image
Line drawing of a speaker with sound waves and a keypad (no text or symbols)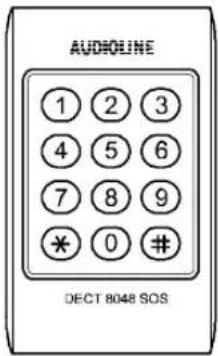
text_image
AUDIOLINE 1 2 3 4 5 6 7 8 9 * 0 # DECT 8048 SOSINFORMATIONONPROGRAMMING
- Press 📋 on the alarm unit to cancel a process during programming.
- Press ⏻ on the programming unit to confirm a setting.
- Press 📋 again to exit from Programming mode.
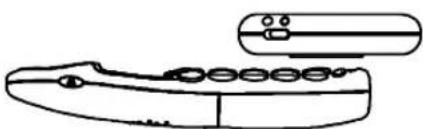
- Toprogramtheunit, hold the programming unit above the handset microphone. Otherwise, it may not receive the keytones properly.
natural_image
Simple line drawing of a computer mouse with an abacus on top (no text or symbols)Note: When programming, maintain a clearance of at least 1 m between the handset and alarm unit and lower the volumesettingofthealarmunit. Otherwise,interferencenoisecouldbeproducedwhichaffectsprogramming.
-AlarmUnit-
| PNot applicable | |
| QEntering the phonenumberofarelation, friendor neighbour(contactperson)Press Ⓗ and2onthehandset.Press ⏻ onthealarmunit.Press ✕ ✕ ontheprogrammingunit.Press1and ✕ ontheprogrammingunit.Enterthephonenumber.Press Ⓗ toconfirm. | Result:Pressthe ⏻ button.Thenumberoftherelation, friendorneighbourstoredisdalled.Speaktothepersoncontactedthroughtemicro-phone.Youcanthenhearthecallerthroughthe loudspeakerinthealarmunit. |
| REntering thenumberofanexchangePress Ⓗ and2onthehandset.Press ⏻ onthealarmunit.Press ✕ ✕ ontheprogrammingunit.Press2and ✕ ontheprogrammingunit.Enterthephonenumber.Press Ⓗ toconfirm. | Result:Pressthe ⏻ button.Thenumberstoredisdalled.Thespecialservicesexchangenotifieslistedpersonsorsendsoneofthespecialservicestoprovide help,asnecessary.Note: There are several appropriate special service call numbersavailable,suchastheRedCross,St.John's AmbulanceBrigadeetc.Enquireatyourcommunity services or use the unit as a private alarm unit within yourfamily,circleoffriendsorneighbours.Please note that alarm calls are not free of charge. The costsforusingthespecialservicesarenotincludedin thepurchasepriceofthetelephone. |
| SEntering anumberfortheself-testPress Ⓗ and2onthehandset.Press ⏻ onthealarmunit.Press ✕ ✕ ontheprogrammingunit.Press3and ✕ ontheprogrammingunit.Enterthephonenumber.Press Ⓗ toconfirm. | Result:Thisfunctionactivatesatelephoneself-testroutine.Inadditiontoenteringaphonenumber,atimeintervalcanalsobedefined.RefertoU:“Definingtheself-testcycle”Whenthetimeintervalhaselapsed,thesystemcalls thephonenumberthussignallingtothepersonassignedthenumberthatthesystemisoperatingcor-rectly.Ifthiscalldoesnotcomeregularly,eitherthe batteryisemptyorthetelephonesystemisnotwork-ingproperly.*1) |
| -AlarmUnit- | ||
| TEnte-inganumberforthelowbatterywarningPressINTand2onthehandset.Press1onthealarmunit.Press3**ontheprogrammingunit.Press4and5*ontheprogrammingunit.Enterthephonenumber.Press1toconfirm. | Result:Thisfunctionprovidestheoptionofautomatically diallingarelation,friend,neighbourorspecialservicesexchangewhenthebatterychargeistoolow.Thepersoncalledcanthenreact.Thecallsare madeatintervalsofoneminuteuntilthebatteryis empty.*1) | |
| UDefiningtheself-testcyclePressINTand2onthehandset.Press1onthealarmunit.Press3**ontheprogrammingunit.Press5and5*ontheprogrammingunit.Enterthecycleasathree-digitvalue(001-168hrs).Press1toconfirmtheentry. | Result:Afterthesetimeperiodhaselapsed,thetelephone systemcallstheself-testnumberindicatingthesystemisworkingcorrectly.Threecallsaremadeatintervalsofoneminute.*1) | |
| VAutoansweron/offPressINTand2onthehandset.Press1onthealarmunit.Press3**ontheprogrammingunit.Press6and5*ontheprogrammingunit.Enter1,AutoAnswer=on.Enter2,AutoAnswer=off.Press1toconfirm. | Resultwhencallisreceived:IftheAutoAnswerfunctionisactivated,aconnection isautomaticallymadewhentheunitisremovedfrom thecharger.IftheAutoAnswerfunctionisdeactivated,pressthe1buttontoestablishaconconnection. | |
| WRegisteringanewalarmunitPressandhold1onthealarmunituntilthegreen LEDflashes.Press•))onthebasestation.WhenthegreenLEDonthealarmunitnolonger flashes,registrationiscompleted. | Ifthealarmunitbecomesdefect,anewonemustbe registeredonthebasestationbeforeitisfullyfunctional. | |
-Troubleshooting-
10Troubleshooting
Shouldproblemsarisewith the telephone, referto the following information. In the case of technical problems, contactour Hotline, tel. 01805001388 (Telekom costs at time of going to print: 12ct/min). In the case of claims under the term so guarantee, contact your sales outlet. There is a year period of guarantee.
| Notelephonecallspossible | Thetelephonelineisnotconnectedproperlyorisdefective.Onlyusethetelephoneconnectioncablesupplied.Testwhetherthetelephoneconnectionisinorderbyusinganothertelephone.Thepoweradaptorplugisnotpluggedinorthereisacompletepowerfailure.There-chargeablestandardbatteriesareemptyordefective.Thehandsetistoofarfromthebasestation. |
| ConnectionisdisturbedorcutoffThehandsetistoofarfromthe | basestation.Thebasestationisinanunsuitablelocation. |
| DiallingnotpossibleIncorrectdiallingmodeisset(refertoSection8.6). | |
| Thesystemnolongerrespondsorisinanundefinedstate | Resetallthefunctionstotheirdefaultsettings.Beforedoingso,disconnectthepoweradapterplugbrieflyfromthepowersocket.Forinformationondefaultsettings,refertoSection8.12. |
| The charging control lamp does not light up | Place the handset correctly in the base station, clean thecontactsurfacesonthehandsetandthebasestationwithasoft,drycloth. |
| ThebatteryiconflashesinthedisplayafterafewhoursPlacethehandsetinthebasestationfor16hours.Ifthisdoesnothelp,replacetherechargeablebatteries. | |
| Di s p l a y i s d a r k | Causedbydirectsunlight,allowhandsettocooldown. |
-ImportantInformation-
11 Important Information
11.1 Technicaldata
| Standard | DECT-GAP |
| No.ofchannels1880to1990MHz | |
| PowersupplyBasestation,220/230V,50Hz | |
| RangeIndoorsupto50m | |
| RangeOutdoorsupto300m | |
| Standby,handsetUpto150hours | |
| Max.talktime,handsetUpto11hours | |
| Standby,alarmunitUpto120hours | |
| Rechargeablebatteries4x1.2V/550mAh,typeAAA(NiMH) | |
| DiallingmodeToneorPulse | |
| Permissible ambient temperature | 10°C to 30°C |
| Permissible relative humidity | 0 to 75% |
| Recallbuttonfunction | 100msor300ms |
11.2 Replacing the telephone connection cable
If the telephone connection cableneedstobereplaced, refertothediagram below for the cablerequired.
F-Code- IMPORT standard
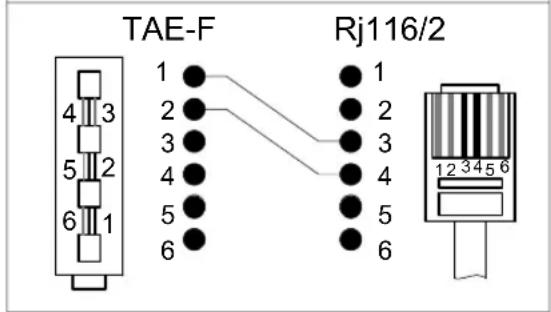
text_image
TAE-F Rj116/2 1 2 3 4 5 6 1 2 3 4 5 6 12 3 4 5 6-ImportantInformation-
11.3 Hearingaidcompatibility
Thetelephone is compatible with most popular hearing aids on them market. However, it cannot be guaranteed that all hearing aids will work perfectly.
Note: If your hearing aid is not compatible with the telephone and interference occurs, try the following solutions:
-Donotswitchthehearingaidto"T".
- Use the handsfree facility on the handset and set the volume as loud as possible.
-Holdthehandsetapprox.15cmfromthehearingaid.
11.4 Guarantee
AUDIOLINE equipment is produced and tested according to the latest production methods. The implementation of carefully chosen materials and highly developed technologies ensure trouble-free functioning and long service life. The term so guaranteed on apply where the cause of equipment malfunction is the fault of the telephone network operator or any interposed private branch extension system. The term so guaranteed on apply to the standard batteries or power packs used in the products. The period of guarantee is 24 months from the date of purchase.
Alldeficienciesresultingfrommaterialorproductionfaultswhichoccurduringtheperiodofguaranteewillbe eliminated free of charge. Rights to claims under the terms of guarantee are annulled following intervention by the purchaserorthirdparties.Damagecausedasaresultofimproperhandlingoroperation,incorrectpositioningor storing,improperconnectionorinstallation,ActsofGodorotherexternalinfluencearenotcoveredbythetermsof guarantee.Inthecaseofcomplaints,wereservetherighttorepairorreplacedefectpartsorprovideareplacement device.Replacementpartsordevicesbecomeourproperty.Rightstocompensationinthecaseofdamageare excludedwherethereisnoevidenceofintentorgrossnegligencebythemanufacturer.
If your devices show sign of defect during the period of guarantee, pleasereturnitto the sales outlet in which you purchased the AUDIOLINE device together with the purchase receipt. All rights to claims under the terms of guarantee in accordance with this agreement must be asserted exclusively with regard to yoursales outlet. Two years after the purchase and transfer of four products, claims under the term so guarantee can no longer be asserted.
11.5 Declaration of Conformity/CE symbol
ThetelephonefulfilsthebasicrequirementsstipulatedintheR&TTEDirective"1999/5/EC".ThisisconfirmedbytheCEsymbol.ToviewthecompleteDeclarationofConformity,pleaserefertothefreedownloadavailableonourweb sitewww.audioline.de.
CE
GB