
EBK 964 - Oven BOMANN - Free user manual and instructions
Find the device manual for free EBK 964 BOMANN in PDF.


| Product Type | Glass-ceramic hob (built-in) |
| Brand | Bomann |
| Model | EBK 964 |
| Number of Cooking Zones | 2 |
| Cooking Zone 1 (front/rear) | 200 mm, max. 1800 W |
| Cooking Zone 2 (front/rear) | 165 mm, max. 1200 W |
| Control Type | Touch buttons with digital display |
| Timer | 1 to 99 minutes, auto shut-off for selected zone or minute minder |
| Child Lock | Yes, touch button to lock/unlock |
| Residual Heat Indicator | Yes, shows "H" when zone is hot |
| Overheating Protection | Automatic shut-off if internal temperature exceeds limit |
| Automatic Shut-off | Yes, if no operation for a set time based on power level |
| Installation Type | Built-in, cut-out dimensions: 26.8 x 50.0 cm (L x W) |
| Unit Dimensions (H x L x W) | 5.5 x 28.8 x 52.0 cm |
| Net Weight | Approx. 4.7 kg |
| Power Supply | 220-240 V~, 50/60 Hz |
| Total Power Consumption | 3000 W |
| Electrical Connection | Separate supply line with 16 A circuit breaker (contact gap 3 mm) |
| Protection Class | I (assumed based on grounding requirement) |
| Cleaning Instructions | Allow to cool, use warm water and soft sponge or special glass ceramic cleaner; avoid abrasives and sharp objects |
| Warranty | 24 months (according to warranty declaration) |
Frequently Asked Questions - EBK 964 BOMANN
User questions about EBK 964 BOMANN
0 question about this device. Answer the ones you know or ask your own.
Ask a new question about this device
Download the instructions for your Oven in PDF format for free! Find your manual EBK 964 - BOMANN and take your electronic device back in hand. On this page are published all the documents necessary for the use of your device. EBK 964 by BOMANN.
USER MANUAL EBK 964 BOMANN
Installation Glass-ceramic hob
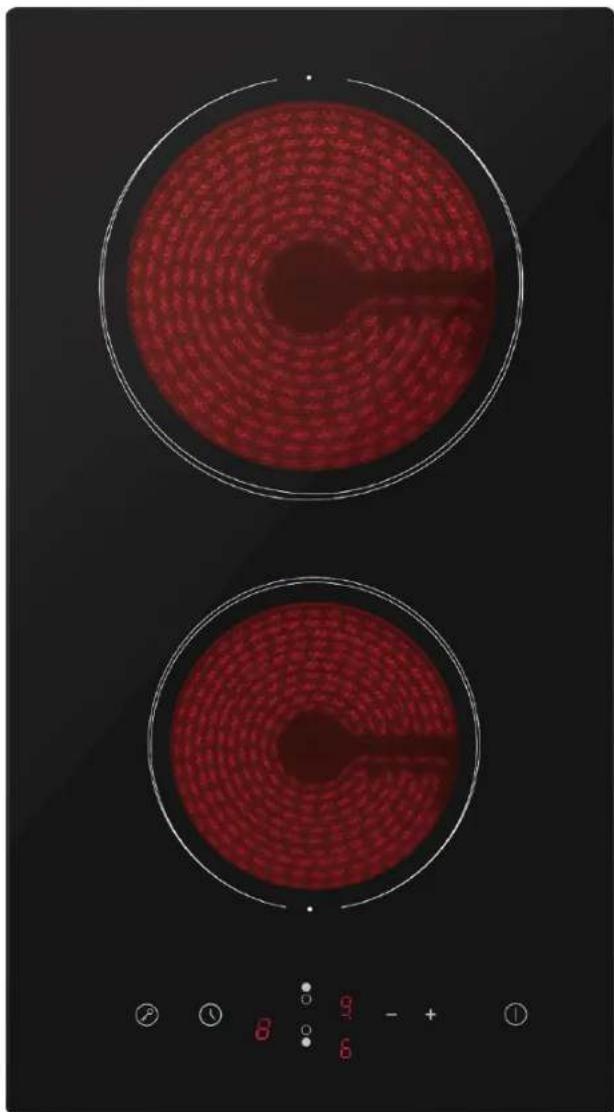
natural_image
Two red circular patterns on a black background, possibly electric stoves or screens, with no visible text or symbols.Inhalt
Einleitung....3
Installation / Einbau....6
Special safety Information for this Unit....12
Unpacking the Appliance....13
Device Description 13
Installation / Fitting....14
Electrical Connection....15
Startup / Operation....16
Cleaning....17
Repairs....18
Troubleshooting....18
Technical Data....18
Disposal 18
Einleitung
natural_image
Technical line drawing of a rectangular electronic component with mounting holes and a magnified inset showing internal components (no text or symbols)Thank you for choosing our product. We hope you will enjoy using the appliance.
Symbols in these Instructions for use
Important information for your safety is specially marked. It is essential to comply with these instructions in order to avoid accidents and prevent damage to the machine:
WARNING:
This warns you of dangers to your health and indicates possible injury risks.
CAUTION:
This refers to possible hazards to the machine or other objects.
i NOTE: This highlights tips and information.
General Notes
Read the operating instructions carefully before putting the appliance into operation and keep the instructions including the warranty and the receipt. If you give this device to other people, please also pass on the operating instructions.
• The appliance is designed exclusively for private use and for the envisaged purpose. This appliance is not fit for commercial use.
- The appliance is only to be used as described in the user manual. Do not use the appliance for any other purpose. Any other use is not intended and can result in damages or personal injuries.
- Operate the device only properly installed.
- Do not use the device outdoors. Protect it from direct sunlight and humidity.
- Switch the device off when not in use, for cleaning or in case of failure.
- Do not operate the machine without supervision.
• For safety reasons, alterations or modifications of the device are prohibited.
- In order to ensure your children's safety, please keep all packaging (plastic bags, boxes, poly-styrene etc.) out of their reach.
WARNING!
Don't let small children play with foils. There is danger of suffocation!
Special safety Information for this Unit
WARNING:
Risk of electric shock! Contact with live leads or components can be fatal!
• The appliance may not be used if the glass surface has cracks or is broken.
- The use of high-pressure cleaners or steam jet cleaners is prohibited. Ingress of liquids can lead to electric shock. Put the unit never under water.

WARNING: Hot surface! Risk of Burning!
- Do not touch the glass-ceramic surface during operation.
WARNING: Risk of Fire!
• Overheated fats and oils can ignite easily. Never walk away from fats and oil when heating them. If fat/oil ignites, NEVER extinguish it with water. Immediately cover with a lid or a plate. Turn off the hob and allow the cookware to cool down.
• The hob should not be used as a storage area.
- Do not operate the device with an external timer or a separate remote control system.
- Do not heat empty pots on the hob as this may lead to malfunctions or dangerous overheating.
• To prevent the risk of explosion, do not heat sealed food (for example, in tins) if unopened. -
Do not store any detergents or flammable materials near the appliance.
-
Make sure that with installing adequate air circulation is ensured and the ventilation slots are not blocked.
- Do not drop anything onto the glass surface. Fragile!
- Switch off the appliance after use. Do not only rely on automatic switch-off.
- This appliance can be used by children aged from 8 years and above and persons with reduced physical, sensory or mental capabilities or lack of experience and knowledge if they have been given supervision or instruction concerning use of the appliance in a safe way and understand the hazards involved.
- Keep the appliance out of reach of children less than 8 years.
• Children shall not play with the appliance. - Cleaning and user maintenance shall not be made by children unless they are older 8 years and supervised.
- Clean the hob regularly to keep the good functionality.
- Do not use harsh abrasive cleaners or sharp metal objects for cleaning the glass surface. The glass can be scratched or destroyed.
- Do not try to repair the appliance on your own. Always contact an authorized technician. To avoid the exposure to danger, always have faulty cable be replaced only by the manufacturer, by our customer service or by qualified person and with a cable of the same type.
Unpacking the Appliance
- Remove the appliance from its packaging.
- Remove all packaging materials such as films, filler material, cable clips and carton.
- To prevent hazards, check the appliance for any transport damage.
- In case of damage, do not put the device into operation. Contact your distributor.
i NOTE:
Production residue or dust may have collected on the appliance. We recommend cleaning the appliance according to chapter "Cleaning".
Device Description
i NOTE:
The listed performances can vary depending on material and/or size of the cookware.
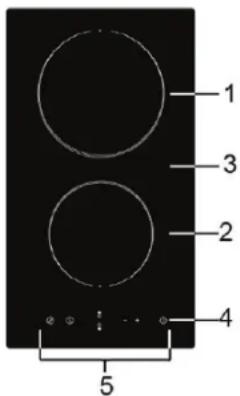
| 1 Cooking zone 1: 200 mm, max. 1800 W |
| 2 Cooking zone 2: 165 mm, max. 1200 W |
| 3 Glass ceramic plate |
| 4 On/off-button |
| 5 Control panel |
Control panel
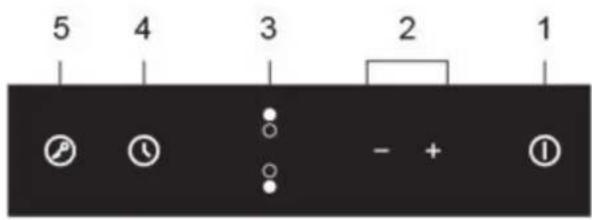
| 1 On/off-button | |
| 2 Power / timer control | |
| 3 Cooking zone selection buttons | |
| 4 Timer (Timer switch) | |
| 5 Child lock |
Scope of delivery
4 x mounting clips 4 x cross-head screws
Description of the functions
Overheating protection
A temperature sensor monitors the inside of the appliance. If the maximum temperature is exceeded, the appliance is automatically shut off to prevent damage.
Residual heat display
After shutting off the appliance, the display of the respective cooking zones shows the symbol "H" (Residual heat). This gives a warning not to touch the zone.
WARNING: Risk of burning!
Do not touch the cooking zones as long as the residual heat indicator is on.
i NOTE:
After having switched off the heating power, you may use the residual heat for different purposes, such as heating up or keeping food warm without having to switch on the heating power.
Automatic switch-off
The automatic switch-off is a protective function for your appliance. If a stovetop is in operation for a long period and if you do not enter anything on the control panel, the automatic switch-off will be activated. For the standard times of the different power settings, please refer to the following table:
| Power setting 1 2 3 4 5 6 7 8 9 | |||||||||
| Shut-off time (hours) 8 8 8 4 4 4 | 2 2 2 |
Child lock
The appliance is equipped with a child lock to prevent children from turning on the appliance accidentally.
Installation / Fitting
CAUTION:
• The stovetop has to be installed so that the heat can be dissipated. Air intake and outlet may not be blocked.
- The worktop, back walls, veneers, laminates, and adhesives used must be sufficiently heat-resistant (up to 100°C).
Conditions for the installation location
• The appliance may only be installed on one side next to higher kitchen furniture, appliances, or walls.
- The appliance should not be installed directly next to refrigerators or freezers. Due to the heat dissipation, the energy consumption of the cooling appliances will increase unnecessarily.
- At least 5 cm free space must remain under the entire cut-out for the appliance. Heat-sensitive objects (base cabinet, drawer, etc.) may not be located in this area. Possibly existing side-walls or drawer cabinets must be cut out, or disassembled accordingly.
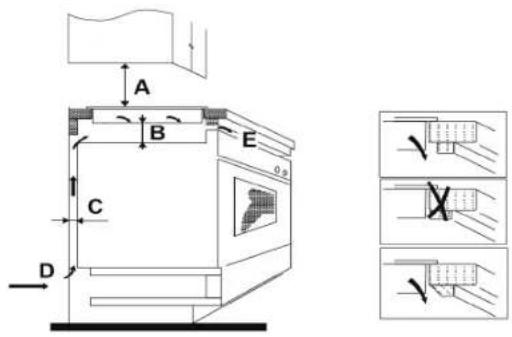
- When installing the device, ensure sufficient air circulation "Fig. 1".
Fig.1
A: 76 cm
B: 5 cm min.
C: 3 cm min.
D: Air intake
E: Air exit 1 cm
Preparing the worktop for installation of the hob
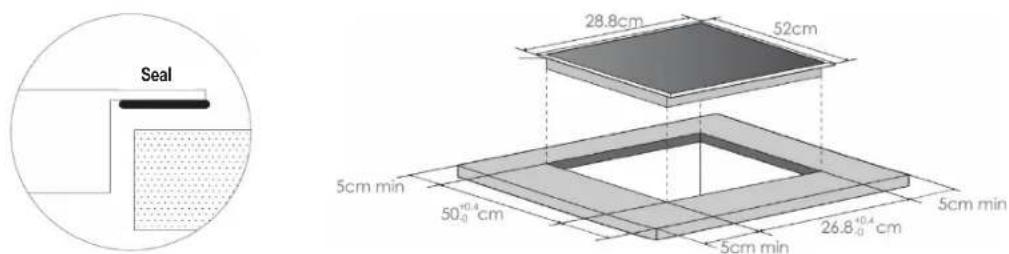
- The worktop must be at least 3 cm thick and at least 62 cm deep. It must lie horizontally and must be sealed off against overflowing liquids on the wall side.
• The hob must be framed by at least 5 cm of worktop.
• The cut surfaces (cutout edges) must be sealed with special varnish, silicone rubber, or cast raisin in order to prevent swelling caused by humidity.
• Clean the cutout area of the worktop.
Prepare the cutout of the worktop using the dimensional drawing in "Fig. 2".
i NOTE:
Prior to sawing, stick a wide adhesive tape onto the outer edge of the cut-out to prevent jigsaw marks on the worktop.
Attach the sealing to the bottom of the hob frame before installing the hob.
Fig.2
Installing the hob
- Check the hob sealing for any damage and for correct positioning on the hob.
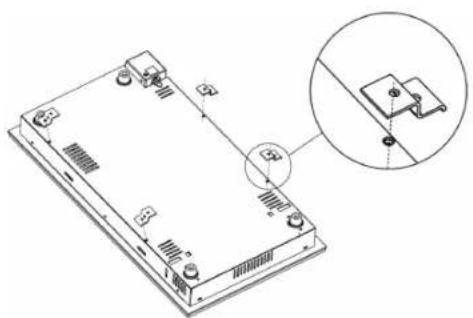
- Attach the hob to the worktop bottom using the four brackets and screws provided "Fig 3". For that place the hob with the glass side onto an even surface. Avoid scratches! Place a cushioned support beneath it. Position and adjust the brackets depending on the thickness of the worktop.
- Place the hob with the cable first into the prepared cutout of the worktop. The appliance must be inserted into the cut-out with the control panel towards the front. Ensure that the distances to the cut-out are the same on all four sides.
Fig.3
natural_image
Technical line drawing of a mechanical assembly with a magnified inset showing a component detail (no text or symbols)Electrical Connection
Connected wattage
The total power consumption of this device can be up to 3000 W.
With this connected load you need a separate supply line protected by a 16 A circuit breaker (contact gap 3 mm). Please consult your electrician.
Connection conditions

WARNING:
• The installation to the mains supply must conform to the local standards and regulations.
• Improper connection may cause to an electric shock!
• In no event the device should be connected to an extension cord, adapter plug or the like.
- Do not modify the plug provided with the appliance. If the plug does not fit properly to the outlet, let install a proper outlet by an authorized specialist.
- Ensure that your mains power corresponds with the specifications of the appliance. The specifications are printed on the rating label.
- Connect the mains cable to a properly installed and earthed wall outlet.
• Guide the mains cable in such a way that it does not get in contact with any hot components of the device. Do not lead it over sharp edges or.
Startup / Operation
General information about the operation
• The appliance is operated through the buttons on the control panel of the appliance.
- The buttons react to the slightest touch. You do not need to apply any pressure.
• The appliance reacts best when touching the buttons with the fingertips and with dry hands.
- Once a touch has been registered, a brief beep will sound.
- Ensure that the control panel is always clean and dry. Objects or a small liquid film can impair operation.
Selecting the right cookware
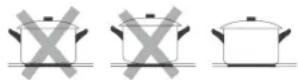 | Only use cookware with a completely even bottom. |
 | The bottom of the cookware should be of the same size as and be centered on the cooking zone. |
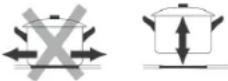 | To prevent scratches, do not slide the cookware across the cooking zone, but lift it. |
Turning the appliance on/off
Press the on/off button on the control panel to turn on the appliance. After turning it on, a beep will sound and all the displays will show "-" or "--". The appliance is now in standby mode.

NOTE:
• If you do not select a function within one minute, the appliance will switch off automatically.
• The cooking zone can be turned off at any time by pressing the on/off switch.
Turning a cooking zone on/off
- Place suitable cookware onto the cooking zone to be used. Ensure that the surface of the cooking zone and the bottom of the cookware are clean and dry.
- Select at the control panel the desired cooking zone by the cooking zone selection buttons. The power setting "0" is flashing.
- Set the desired heating setting from 1 to 9 with the (+) or (-) button. First the power setting "5" is displayed. By pressing the (+) or (-) button, the setting is changed continuously.
- To switch off a cooking zone, select the corresponding cooking zone by the selection button and press the buttons (-) until the power level "0" is indicated. You can also press the (+) and (-) buttons at the same time to reset the power to setting 0 and the cooking zone will be turned off.

NOTE:
The power settings can be changed at any time during cooking.
Using the timer to turn one cooking zone off
You can use the timer to automatically turn off one cooking zone after a set duration.
- Select the respective cooking zone that you would like to set the timer for. Set the desired power setting with the (+) or (-) button.
- Press the timer button. The minute indication flashes "10" and the timer can be set.
• Make an adjustment of between 1 and 99 minutes with the button (+) or (-). - With each push of the (+) or (-) button, the set time will change by one minute. By pressing the (+) or (-) button, the set time will be changed in 10-minute increments.
- After setting the timer, the minute indication flashes for a few seconds. A red dot next to the power level indicates that a timer is set for this cooking zone. The minute indication shows the remaining time.
i NOTE:
• Follow the operating sequence described above.
• The power setting of the cooking can be changed in timer mode without changing the time setting.
• The timer function is canceled with the switching off of the appliance.
• Following expiry of the set time, the cooking zone will switch off automatically. A beep will sound.
Using the timer as minute minder
i NOTE:
• The timer as a minute minder does not activate the automatic switch-off of a cooking zone. It is merely a reminder function during cooking.
The selection of a cooking zone is not required.
- Press the timer button. The minute indication flashes “-” and the timer can be set.
- The setting of the timer as a minute minder is done as described under "Using the timer to turn one cooking zone off".
- After expiry of the set time, a beep will sound for about 30 seconds and the display will show “--”.
Delete the timer settings
Select the timer via the timer button and press the button (-) until the minute indication shows "0". You can also press the (+) and (-) button at the same time to switch off the timer and the minute indication shows "--".
Turning on the child lock
i NOTE:
When the child lock is activated, all the buttons are disabled except for the on/off button. The appliance can only be operated again after it is unlocked.
To secure it against an accidental reactivation, the appliance is equipped with a locking function. If you press the child lock button, the appliance will be locked and the timer display will show "Lo".
Switching off the child lock
When the appliance is turned on, press the child lock button for a few seconds to cancel the lock.
Cleaning

WARNING:
- Allow the unit to cool sufficiently before cleaning or servicing.
- Never use high-pressure cleaners for cleaning. Ingress of liquids can reach the electrical components. Risk of electric shock! Hot steam may cause damage to the plastic parts.
- Never use flammable substances, such as paint thinner, kerosene, gasoline or acids for cleaning.
• The device must be dry before you take it in operation again.

CAUTION:
- Do not use a wire brush or any abrasive items.
- Do not use harsh abrasive cleaners or sharp metal objects for cleaning the glass surface. The glass can be scratched or destroyed.
Clean the hob after each use in order to prevent food residue from burning in.
| Contamination Cleaning method Cleaning materials | ||
| Light Hot water and rub dry. Cleaning sponge | ||
| Dirt has accumulated Hot water and rub dry with scrubbing sponge. Special cleaning sponge for glass ceramics | ||
| Rings and lime deposits | Apply vinegar to the area, rub it off with a soft towel;alternately use a special cleaner from your specialist dealer. | Special cleaner for glass ceramic |
| Sugar, molten aluminum or plastic | Remove with a glass ceramic scraper (a plastic product is preferred for protection). | Special cleaner for glass ceramics |
Repairs
A wrong or improperly performed repair brings danger to the user.
Repairs to electrical appliances must only be carried out by an qualified specialist. A damaged power cord must be changed only by a qualified electrician.
Troubleshooting
The design of the appliance ensures a trouble-free operation and a long lifetime. If a malfunction stills occurs, then check if these may be the result of an operating error.
| Error Possible cause Remedy | ||
| The cooking hob cannot be turned on. | The power supply has been interrupted. | - check the circuit breaker of the appliance.- Using another electrical appliance, check whether there is a problem with the power supply. |
| The buttons are no longer reacting. The child lock is active. - Unlock the control panel. | ||
| The buttons react very poorly during contact. | The button surface is damp.You are touching the button surface with your finger tips. | - Ensure that the area of the button is dry and - that you use the tip of your finger for the operation. |
| The glass surface is scratched. You are using rough, uneven cookware and/or an aggressive abrasive cleaner or sharp metal utensils. | - Only use cookware with an even bottom, see Selecting the right cookware.- See cleaning | |
| Some pans make cracking or clicking noises. | This may be caused by the construction of your cookware (layers of different metals vibrating differently). | This is normal for cookware and does not indicate a fault. |

NOTE:
Should you still have problems with your device after following the steps above, please contact your distributor or an authorized specialist.
Technical Data
Model: EBK 964
Power supply: 220 - 240 V\~, 50/60 Hz
Power consumption: 3000 W
Protection class:
Unit size H x L x W: 5.5 x 28.8 x 52.0 cm
Built-in size L x W: 26.8 x 50.0 cm
Net weight: approx. 4.7 kg
The right to make technical and design modifications in the course of continuous product development remains reserved.
This device has been tested according to all relevant current CE guidelines, such as electromagnetic compatibility and low voltage directives, and has been constructed in accordance with the latest safety regulations.
Disposal
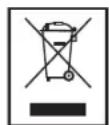
Meaning of the "Dustbin" Symbol
Protect our environment, do not dispose of electrical equipment in the domestic waste.
Please return any electrical equipment that you will no longer use to the collection points provided for their disposal.
This helps avoid the potential effects of incorrect disposal on the environment and human health.
This will contribute to the recycling and other forms of reutilisation of electrical and electronic equipment.
Information concerning where the equipment can be disposed of can be obtained from your local authority.
GARANTIEKARTE
warranty card • garantiekaart • carte de garantie • scheda di garanzia • tarjeta de garantía • cartão de garantia • garantikort • karta gwarancyjna • záruční list • kartica jamstva • carte de garanție • Гаранционна карта • záručný list • garancijski list • garanciajegy • garantíйнийформуляр • Гарантийный талон • tightCoverage ضمان
EBK 964
24 Monate Garantie gemäß Garantieerklärung · 24 months warranty according to warranty declaration · 24 maanden garantie volgens garantieverklaring · 24 mois de garantie selon la déclaration de garantie · 24 mesi di garanzia secondo la dichiarazione di garanzia · 24 meses de garantia de acuerdo con la declaración de garantia · 24 meses de garantia, de acordo com a declaração de garantia · 24 máneders garanti i henhold til garantibetingelsene · 24 miesiące gwarancji na podstawie oświadczenia gwarancyjnego · záruka 24 měsiců podle prohlásení o záruce · 24 mjesečno jamstvo u skladu s jamstvenom deklaracijom · 24 luni garanție conform declarației de garantie · 24 месеца гаранция в съответствие с гаранционната декларация · 24-mesačná záruka podľa vyhlásenia o záruke · 24-mesečna garancija, skladno z garancijsko izjava · 24 hónap garancia a garanciafeltételekben leírtak szerint · гаранția на 24 місяці відповідно заяви про гарантію · Гарантия 24 месяца согласно заявленным гарантийным правилам · حманان 24 شећа وَقَنْبَابِيُّ الصَّام.
Kaufdatum, Händlerstempel, Unterschrift - date of purchase, dealer stamp, signature - aankoopdatum, dealerstempel, handtekening - date d'achat, tampon du concessionnaire, signature - data di acquisto, timbro del rivenditore, firma - fecha de compra, sello del distribuidor, firma - data de compra, carimbo do distribuidor, assinatura - kjapsdato, forhandlerstempel, signatur - data zakupu, pieczęz sprzedawcy, podpis - datum zakoupení, razitko prodjeje, podpis - datum kupovine, zig trgovca, podpis - data de achizijze, štampila furnizorului, semnatura - Dáta na покупката, Печат на Продавача, Подпис - dátum nákupu, pečiatka obchodnika/predajcu, podpis - datum nakupa, zig trgovca, podpis - vásárlás dátuma, kereskedő belyegzőjé, aláírás - data придбання, печатка продавця, підпис - Дата приобретення, Штамп продавца, Подпись - тягів-діддів-діддів-діддів-діддів-діддів-діддів-діддів-діддів-діддів-діддів-діддів-діддів-діддів-діддів-дідді вида
BOMANN®
www.bomann.de
BOMANN®
C. Bomann GmbH
Internet: www.bomann.de
- Inhalt
- Einleitung
- Symbols in these Instructions for use
- WARNING:
- CAUTION:
- General Notes
- WARNING!
- Special safety Information for this Unit
- WARNING: Hot surface! Risk of Burning!
- WARNING: Risk of Fire!
- Unpacking the Appliance
- i NOTE:
- Device Description
- Scope of delivery
- Description of the functions
- Overheating protection
- Residual heat display
- WARNING: Risk of burning!
- Automatic switch-off
- Child lock
- Installation / Fitting
- Conditions for the installation location
- Preparing the worktop for installation of the hob
- Installing the hob
- Connected wattage
- Connection conditions
- Startup / Operation
- General information about the operation
- Selecting the right cookware
- Turning the appliance on/off
- NOTE:
- Turning a cooking zone on/off
- Using the timer to turn one cooking zone off
- Using the timer as minute minder
- Delete the timer settings
- Turning on the child lock
- Switching off the child lock
- Cleaning
- Repairs
- Troubleshooting
- Technical Data
- Disposal
- Meaning of the "Dustbin" Symbol
- GARANTIEKARTE
- EBK 964
- BOMANN®
Brand : BOMANN
Model : EBK 964
Category : Oven