
DMP 385 - CD Player DENVER - Free user manual and instructions
Find the device manual for free DMP 385 DENVER in PDF.


| Product Type | Portable CD Player |
| Brand | Denver |
| Model | DMP 385 |
| Dimensions | Approx. 140 x 130 x 25 mm |
| Weight | Approx. 200 g (without batteries) |
| Power Supply | 2 x AA batteries (not included) or DC 5V adapter (not included) |
| Playback Formats | CD, CD-R/RW, MP3 |
| Anti-Shock Protection | Yes, 60 seconds (MP3) / 10 seconds (CD) |
| Programmable Tracks | Up to 20 tracks |
| Repeat/Shuffle Modes | One, All, Random, Intro |
| Display | LCD with backlight |
| Output | Headphone jack (3.5mm) |
| Radio Function | FM tuner (optional, depending on version) |
| Maintenance | Clean lens with soft cloth; avoid moisture and dust |
| Safety | Do not disassemble; keep away from liquids; use only specified power |
| Spare Parts | Contact Denver service for accessories; not user-serviceable |
| Repairability | Designed for professional repair only; no user replaceable parts |
| General Information | For indoor use; operating temperature: 5°C to 35°C |
Frequently Asked Questions - DMP 385 DENVER
User questions about DMP 385 DENVER
0 question about this device. Answer the ones you know or ask your own.
Ask a new question about this device
Download the instructions for your CD Player in PDF format for free! Find your manual DMP 385 - DENVER and take your electronic device back in hand. On this page are published all the documents necessary for the use of your device. DMP 385 by DENVER.
USER MANUAL DMP 385 DENVER
natural_image
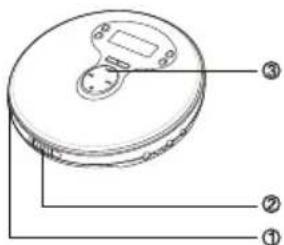
Line drawing of a circular electronic device with a central display and control knob (no text or symbols)480/160 SECONDS ANTI-SHOCK PORTABLE MP3/CD PLAYER
WARNING: TO REDUCE RISK OF FIRE OR ELECTRIC SHOCK, DO NOT EXPOSE THIS APPLIANCE TO RAIN OR MOISTURE.
SIZE:102mmx125mm
OPERATING INSTRUCTIONS
CATION
Use of controls or adjustments or performance of procedures other than those specified herein may result in hazardous radiation exposure.
This compact disc player is classified as a CLASS 1 LASER product.
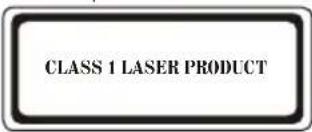
Invisible laser radiation when open and interlocks defeated. Avoid exposure to beam.

PRECAUTIONS
TO MAINTAIN GOOD PERFORMANCE Do not use the unit in places which are extremely hot, cold dusty or humid. In particular, do not use or keep the unit in following places.
- in a high humidity area such as a bathroom near a heater
- in an area exposed to direct sunlight(e.g.,inside a parked car, where it can become extremely hot)
- near sources of strong magnetism, such as televisions, speakers, or ,magnets
- where there is a lot of movement or vibration, such as on a car dashboard or an unstable shelf
For safety
- Do not attempt to disassemble this unit. Laser rays from the optical pickup are dangerous to the eyes
• Make sure that pins or other foreign objects do not get inside the player
• Take care not to drop the unit or subject it to strong shocks - To keep dust from the pickup lens, keep the disc compartment lid closed after use. Never touch the lens
- If you hear no sound when playing a disc, DO NOT turn the volume up high because the music could suddenly begin at high volume. To avoid hurting your ears or damaging the speakers, turn the volume control to the level before starting playback and slowly turn it up to the desired level
CAUTION
Listening to earphone stereo at full power for extended periods of time can result in hearing damage
Do not touch pickup lens
Note on condensation
If the unit is suddenly moved from a cold place to a warm one, it may cause in condensation on the pickup lens and malfunction or playback difficulties, then try playback again.
BATTERY USE
This CD player can use two types of AA size batteries:
- Non-rechargeable alkaline batteries
- Rechargeable Ni-Cad batteries
USING NON-RECHARGEABLE BATTERIE
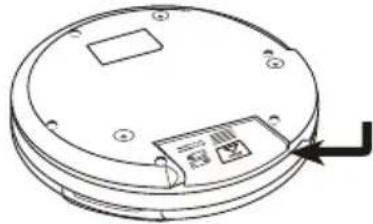
Open the battery compartment and insert two LR6 (size AA) alkaline batteries with the + and - marks correctly aligned.
natural_image
Technical line drawing of a circular device with a label and arrow indicator (no text or symbols)Battery replacement
The battery indicator in the display according to the remaining power of the batteries. Replace the batteries when flashing. If the unit remains in use after flashing, the operation will stop.
Note on dry cell batteries
- Do not mix the different types of batteries, or an old battery with a new one.
- To prevent the risk of electrolyte leakage or explosions, never recharge the batteries, apply heat to them, or take them apart.
- When not using the batteries, remove them to prevent needless battery wear.
- If liquid leaks from the batteries, wipe thoroughly to remove.
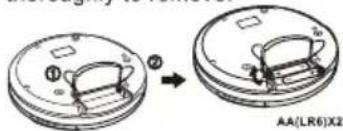
USING RECHARGEABLE BATTERIES
This unit can fully recharge the specified rechargeable batteries, in approximately 15 hours. Rechargeable batteries (not supplied) should be recharged before they are used for the first time because they are low in power or they have not been used for a long period (over 60 days).
① Open the battery compartment cover and insert 2 of the recommended rechargeable batteries, matching polarity.(1.2V, 1500mA) ALL BATTERIES MUST BE OF RECHARGEABLE NICKEL METAL HYDRIDE TYPE, OTHERWISE THE BATTERIES MAY EXPLODE OR LEAK.
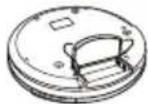
② Plug in the AC adaptor and press the STOP/CHARGE button to start charging. USE ONLY THE AC ADAPTOR SUPPLIED (OPTIONAL) WITH THE SET FOR CHARGE. DURING CHARGE THE "CHARGING" INDICATOR FLASH ON DISPLAY.
CHARGING
③ When "CHARGEFULL" indicator on display or after 15 hours, please unplug the AC adaptor.
CHARGE FULL
DO NOT CHARGE CONTINUOUSLY FOR 24 HOURS OR MORE. DOING SO CAN CAUSE THE PERFORMANCE OF THE RECHARGEABLE BATTERIES TO DETERIORATE.
How to use the rechargeable batteries
1 Insert one rechargeable battery into rechargeable battery sleeve as diagram shown so that negative polarity(-)position of battery is inserted into the rechargeable sleeve.
2 Open the battery compartment and insert 2xHR6 (AA) size rechargeable nickel-cadmium batteries (not supplied). Place rechargeable battery with sleeve included as shown in diagram (only one battery need with the sleeve, the sleeve must be at negative polarity(-), otherwise the battery can not be recharged).
3 Close the battery compartment.
4 plug one end of the supplied AC adapter into the DC4.5Vjack, then plug the other end of the AC power cord into a standard electrical outlet.
5 When charging is completed, disconnect the AC adapter plugs from the unit and the AC outlet.
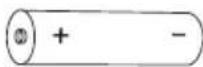
BATTERY SLEEVE
(The gap must be on the upper side condition)

(SLEEVE)
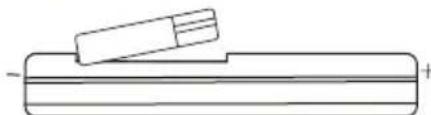
natural_image
Pure technical line drawing of a mechanical component without any text, numbers, or symbols(Back of CD player)
Notes for recharging batteries:
The battery is fully charged approximately 15 hours after the AC adapter is connected.
More time may be required for charging in cold temperatures,
but not more than 24 hours.
NOTE: AFTER 24 HOURS PLEASE UNPLUG THE AC ADAPTER.
With care rechargeable batteries can be recharged over 500 times.
NOTE: ONLY NI-CAD BATTERIES CAN BE CHARGE IN THIS UNIT.
DO NOT CHARGE CONTINUOUSLY FOR 24 HOURS OR MORE, DOING SO CAN CAUSE THE PERFORMANCE OF THE RECHARGEABLE BATTERY TO DETERIORATE.
NOTE: you may play DISC whilst charging the batteries.
① If the operating time decreases drastically even when rechargeable nickel-cadmium batteries are proper recharged, purchase a new set of rechargeable nickel-cadmium batteries.
② When charging for the first time or after a long time, playing time may be reduced. In this case, charge and discharge the batteries several times.
BEFORE PLAYBACK
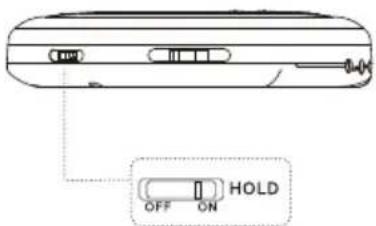
HOLD switch
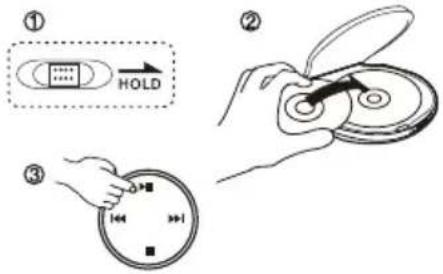
Release the HOLD switch to HOLD position before playback. When not using the unit, set the HOLD switch to the HOLD position, Accidentally pressed button will not function, If buttons are pressed when the HOLD switch is set to the HOLD position. "HOLD" light on the display.
Turn on and off
Turn the power on
If you use "DC" supply. only touch PLAY key one time to turn on the system. If you use "battery" supply. You must be hold PLAY key two second or more than to turn on the system.
Turning off the power
If no new operations are done within 60 second from the end of last operation, the power is turned off automatically.(Auto power off function) you can turn off the power before it is automatically turned off by pressing ■STOP
Standby mode
When an operation finishes, the unit goes into standby mode until the auto power off function automatically turns off the power. To enter standby mode, press ▶PLAY/PAUSE to start playback, then press ▶STOP
Adjusting the sound
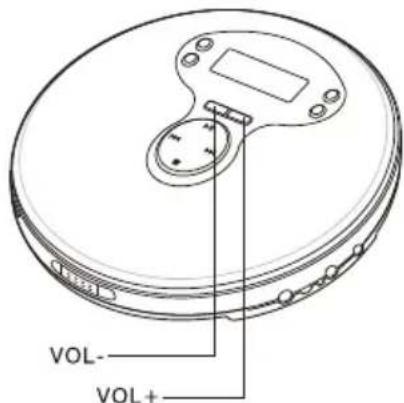
Volume
When pressVOL+ or VOL-, volume will be changed.
English-4
Inserting a disc
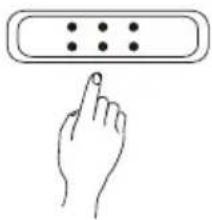
- Push the OPEN switch to open the disc compartment
- Place a disc in the center with the label side facing up.
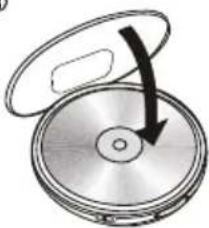
- Close the disc compartment.
①
natural_image
Hand pointing at a finger to a button (no text or symbols)To remove the disc
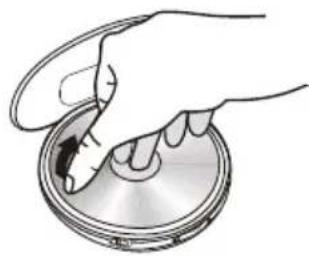
Pick up the disc, holding its edge, while pressing the pivot gently.
natural_image
Illustration of a hand holding a stethoscope over a circular device (no text or symbols visible)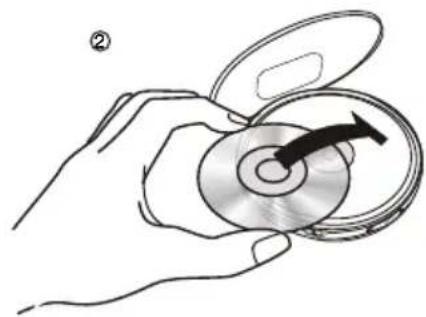
natural_image
Hand holding a CD or DVD disc with an arrow indicating rotation (no text or symbols)③
natural_image
Diagram of a CD or DVD disc with an open lid and arrow indicating rotation (no text or symbols)English-5
PLAYBACK
Connect the supplied headphone to the PHONE jack.
-
Release HOLD switch to HOLD position.
-
Place a disc.
-
Press ▶ PLAY/PAUSE
Playback starts from the first track.
- Playback mode: If you use DC supply, only touch PLAY key one time to playing disc. If you use battery supply. You must be hold PLAY key two second or more than to playing disc.
BASIC OPERATION
To stop: press ■ STOP ,press key two second to power off
To pause: press ▶ PLAY/PAUSE To resume, press it again.
To search for the beginning of a track:
Press ↔ or ▶
To locate a desired passage:
Keep or Pressed. Release the button until the start of desired passage.
To play a certain passage of the disc repeatedly:
-
press A-B, "A-'B" appears on the display.
-
Press A-B again to mark the end of the chosen passage "A-B" appears on the display. The selected passage is played repeatedly.
-
press A-B once more to return to normal playback.
CD DISC MODE KEY:

REPEAT ONE: " ☐1" light on display and will repeat the track you selected
REPEAT ALL: " ☐ ALL"light on display and will repeat entire tracks
INTR: "INTR" light on display The unit will play every tracks ten second.
RAND: "RAND" light on display, Plays every tracks in random order
ANTI SHOCK: "ESP " light o n display Press "ESP" once, the unit can change to
EQ: normal play. FLAT → POP → JAZZ ↑ R AND B←CLASSIC←ROCK
DISC: If no diSC, then "no diSC" is display.
PROGRAM:
- Press "MODE" in the state of stop. The screen will display flashing "00" and programme number "P-01"
- press the NEXT/PREV. key to select a song number.
- press the MODE key to register the song number.
- Repeat step 2 to 3 until memory is full (program memory is possible up to 64 songs)
- Press"PLAY" key to play program memory.
- To stop the program play, press the STOP key.
Support Disc & File:
CD-RW, CD-R, CD Disc playback
Multi-session Disc playback
MPEG 1(ISO/IEC 11172-3) Layer 1/2/3
All MPEG Bit Rates except 8kbps and free format
32/44.148KHz Sampling frequency
MPEG 2 Bit Rates except 8kbps and free format
16/22.02/24KHz Sampling frequency Single channel, Dual channel, Stereo and joint Stereo any combination of intensity Stereo & MS Stereo Joliet and Romeo format
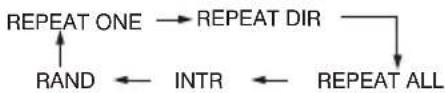
MP3 DISC MODE KEY:
flowchart
graph TD
    A["REPEAT ONE"] --> B["REPEAT DIR"]
    B --> C["REPEAT ALL"]
    D["RAND"] <--_E["INTR"] <--_F["INTR"]
REPEAT ONE: "
1" light on display and will repeat the track you selected.
REPEAT DIR: "
DIR "light on display current directory is played repeatedly repeat entire tracks.
REPEAT ALL: "
ALL"Repeat one directory. ALL tracks are played repeatedly.
INTR:
"INTR" light on display The unit will play every tracks ten second.
RAND: "RAND"light on
display plays ALL track are played without sequence. And after all files are played, system will stop altomatically
DIR SELECT: Press ESP/DIR key.
DISC: If no diSC, then "no
diSC" is display.
PROGRAM:
- Press "MODE" in the state of stop. The screen will display flashing "000" and programme number "P-01".
- press the NEXT/PREV. key to select a song number.
- press the MODE key to register the song number.
- Repeat step 2 to 3 until memory is full (program memory is possible up to 64 songs)
- Press "PLAY" key to play program memory.
- To stop the program play, press the STOP key
RESUME MEMORY FUNCTION
To use the resume function press STOP twice, then turn off the power as usual. Next time you start the CD player and press play it will start from the same point where it stopped last time. This function only works as long as the disc is not removed from the player. No bookmark function.
English-7
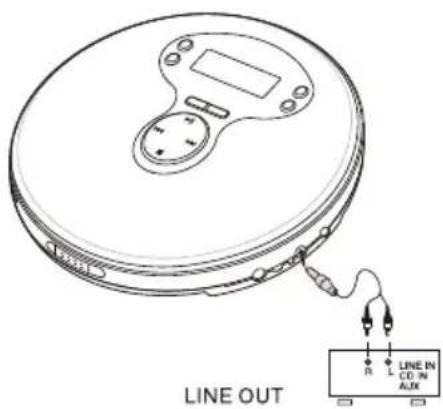
CONNECTION TO AN EXTERNAL UNIT
Use a commercially available connection cord which has a 3.5mm stereo plug at one and two phono plugs at the other end.
connect the stereo plug to the LINE OUT jack of the unit and connect the phono plugs to the analog input (AUX) terminals of the external unit.
NOTE
Turn off the power of both units before connection
DO NOT connect to the PHONES inputs of an amplifier (with a built-in phono equalizer amplifier)
MAINTENANCE
To clean the lens
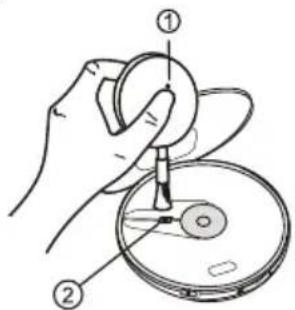
If the lens become dirty, the player will skip or not play, If this occurs, clean the lens in the following manner, To remove dust or dust particles, first use a camera lens blower/brush ① to blow a few times to loosen particles, then gently brush the lens ② clean finish by blowing the lens again.
Note
Take care not to get too much solution on the swab, which could flow into the unit and cause damage. Pressing too strongly with the swab could scratch or break the lens.
To clean the discs
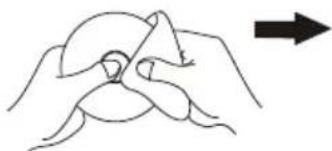
Before playing, wipe the disc from the center out with a cleaning cloth. After playing, store the disc in its case.
natural_image
Line drawing of two hands holding a circular object with a curved handle, no text or symbols presentEnglish-8
SPECIFICATIONS
| Tracking system | 1-beam laser |
| Laser pickup | Semiconductor laser |
| D/A conversion | 8-times over sampling digital filter +1- bit DAC |
| Frequency response | 20-20,000Hz |
| Outputs | PHONES: stereo jack (3.5mm) [3mW+3mW,32 ohms at 1 KHz] |
| Input | DC 4.5V for external power from AC adaptor: |
| Power | DC 3V from Alkaline batteries (2 x AA or LR6): Not included. |
| Dimensions | 142(ø) x 32(H) mm |
| Weight | 214 g(7.5oz) without batteries |
| Supplied accessory | Stereo earphones (1) |
The specifications and external appearance of this unit are subjected to change without notice.
Instructions on environment protection
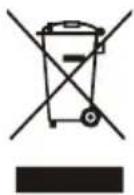
Do not dispose of this product in the usual household garbage at the end of its lifecycle; hand it over at a collection point for the recycling of electrical and electronic appliances. The symbol on the product, the instructions for use or the packing will inform about the methods for disposal.
The materials are recyclable as mentioned in this marking. By recycling, material recycling or other forms of re-utilization of old appliances, you are making an important contribution to protect our environment.
Please inquire at the community administration for the authorized disposal location.
DENVER®
ALL RIGHTS RESERVED COPY RIGHT DENVER ELECTRONICS A/S
www.denver-electronics.com
English-10


- OPERATING INSTRUCTIONS
- CATION
- PRECAUTIONS
- For safety
- CAUTION
- Note on condensation
- BATTERY USE
- USING NON-RECHARGEABLE BATTERIE
- Battery replacement
- Note on dry cell batteries
- USING RECHARGEABLE BATTERIES
- How to use the rechargeable batteries
- Notes for recharging batteries:
- NOTE: AFTER 24 HOURS PLEASE UNPLUG THE AC ADAPTER.
- NOTE: ONLY NI-CAD BATTERIES CAN BE CHARGE IN THIS UNIT.
- DO NOT CHARGE CONTINUOUSLY FOR 24 HOURS OR MORE, DOING SO CAN CAUSE THE PERFORMANCE OF THE RECHARGEABLE BATTERY TO DETERIORATE.
- BEFORE PLAYBACK
- HOLD switch
- Turn on and off
- Turn the power on
- Turning off the power
- Standby mode
- Adjusting the sound
- Volume
- Inserting a disc
- To remove the disc
- PLAYBACK
- BASIC OPERATION
- CD DISC MODE KEY:
- PROGRAM:
- Support Disc & File:
- MP3 DISC MODE KEY:
- RESUME MEMORY FUNCTION
- CONNECTION TO AN EXTERNAL UNIT
- NOTE
- MAINTENANCE
- To clean the lens
- To clean the discs
- Instructions on environment protection
- DENVER®
Brand : DENVER
Model : DMP 385
Category : CD Player