
TCU-205 - CD Player DENVER - Free user manual and instructions
Find the device manual for free TCU-205 DENVER in PDF.


| Product Type | CD Player |
| Brand | Denver |
| Model | TCU-205 |
| Dimensions (Approx.) | 430 x 100 x 250 mm |
| Weight (Approx.) | 2.5 kg |
| Power Supply | AC 100-240V, 50/60 Hz |
| Power Consumption | 15 W |
| Disc Compatibility | CD, CD-R, CD-RW |
| Playback Functions | Play, Pause, Stop, Skip Forward/Back, Repeat, Shuffle, Program |
| Output | Headphone jack (3.5 mm), RCA line out |
| Remote Control | Included |
| Display | LED screen |
| Care and Cleaning | Wipe with a soft, dry cloth. Do not use chemicals. |
| Safety | Keep away from moisture and heat sources. Use only in dry indoor environments. |
| Spare Parts | Remote control, power cord (available from Denver service center) |
| Repairability | Refer to authorized service center. Do not open the device. |
| General Information | Designed for home use. Plays standard audio CDs. |
Frequently Asked Questions - TCU-205 DENVER
User questions about TCU-205 DENVER
0 question about this device. Answer the ones you know or ask your own.
Ask a new question about this device
Download the instructions for your CD Player in PDF format for free! Find your manual TCU-205 - DENVER and take your electronic device back in hand. On this page are published all the documents necessary for the use of your device. TCU-205 by DENVER.
USER MANUAL TCU-205 DENVER
natural_image
Line drawing of a portable electronic device with front panel, buttons, and display (no text or symbols)Please read and follow these instructions before using your unit.
OVERVIEW OF THE PLAYER

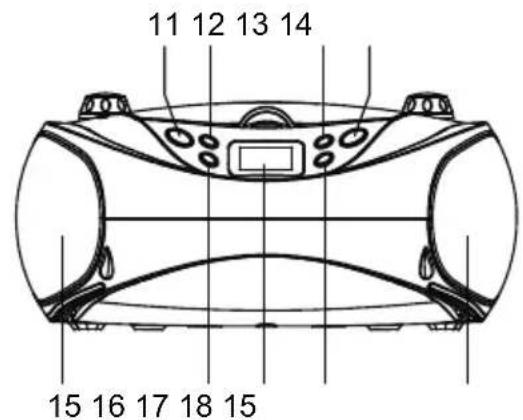


LOCATION OF CONTROLS
- FM TELESCOPIC ANTENNA
- CD DOOR
- CD DOOR OPEN AREA
- VOLUME CONTROL
- STANDBY INDICATOR
- FM ST. INDICATOR
- HANDLE
- USB PORT
- TUN+/- & NEXT/PREV CONTROL
-
BATTERY COMPARTMENT
-
SOURCE BUTTON
- PLAY/PAUSE/CH+ BUTTON
- MODE/PROG/MEM BUTTON
- POWER BUTTON
- SPEAKER
- STOP/CH- BUTTON
- LCD DISPLAY
- +10/ALBUM BUTTON
- DC IN JACK
- AUX IN JACK
POWER SUPPLY
BATTERY OPERATION
- Remove the battery compartment cover gently.
- Install 6 x 'C' size batteries (UM-2 or equivalent) while observing the correct polarities.
- Replace the battery compartment cover.
NOTE:
- The AC/DC adapter must be detached from the DC IN jack of the player for battery operation.
- Leaking batteries may damage the battery cabinet and the player as a whole, so they should be removed from the cabinet when becoming flat or when the player is not to be played on batteries for some time.
Plug the supplied adapter to the DC IN jack on the unit and to the main power.
NOTE: If not any audio signal inputs to the unit in about one hour, the unit will enter to standby mode automatically (except at FM radio mode).
FM RADIO
TUNING THE FM RADIO
- The standby indicator will light once connect the unit to the main power. Press the POWER button to turn the unit on (the standby indicator will be off).
- Press the SOURCE button repeatedly to switch the unit to the FM radio mode.
- To launch the auto-searching, Rotate and hold the TUN+/- & NEXT/PREV CONTROL several seconds and then release it.
- Rotate the TUN+/- & NEXT/PREV CONTROL to and fro shortly to tune the radio stations manually.
- Adjust the volume level to a comfortable listening level.
- Press the POWER button to turn off the unit.
NOTE:
- When FM (stereo) station is received, the FM ST. indicator will light on the top of the unit.
- The FM TELESCOPIC ANTENNA is directional. When you are receiving an FM broadcast, fully extend the TELESCOPIC ANTENNA and rotate it for the best reception.
STORING YOUR FAVORITE RADIO STATION
- Tune to your favorite station first; press the MODE/PROG/MEM button for storing the current station until memory cell number flashes on the screen.
- Use the STOP/CH- button or the PLAY/PAUSE/CH+ button to select the corresponding memory cell among P01-P20 for storing the station.
- Confirm your selection by pressing the MODE/PROG/MEM button.
- During radio playback, press the STOP/CH- button or the PLAY/PAUSE/CH+ button repeatedly to recall the preset stations.
HANDLING AND MAINTENANCE OF A DISC
Follow the instructions below to handle and maintain your disc in order that long time and trouble free performance can possibly be obtained:
- Ensure not to caress the rain bow side of the disc; handle the disc by the edge.
- Long time exposure to sunshine, high temperatures and humidity will damage the disc. And keep storage area clean.
- Avoid sticking labels on both sides of a disc. Writing with pointed articles on the disc should be strictly avoided.
- Clean the disc wiping the centre and then working out to the edge with a dry & soft cloth or a disc brush. Avoid any cleansing lotion or chemical eradicator.
- Store them in their cases when they are not to be used.

LOAD A DISC
- Open the CD door by the Door open area.
- Load a disc on the disc tray with the label side facing up.
- Close the CD door.
PLAY A DISC (CD/MP3)
- Press the POWER button to turn the unit on (the standby indicator will be off).
- Press the SOURCE button repeatedly to switch to CD mode.
- Follow the steps above to load a disc.
- The player begins reading disc immediately.
- When the disc is successfully read, the total number of the tracks shows in the LCD and playback follows with the first track. (If inserted a MP3 disc into the unit, the total number of the albums shows in the LCD first, then the total tracks number shows.)
- Press the PLAY/PAUSE/CH+ button once to halt music playback, press the button again resume the normal playback; press the STOP/CH- button to cease music playback.
EXTERNAL MEMORY MEDIA OPERATION (USB)
- Press the POWER button to turn the unit on (the standby indicator will be off).
- Insert an USB to the USB port.
- Press the SOURCE button repeatedly to switch to USB mode.
- When the inserted USB is detected and read, the first track will be played automatically.
- Press the PLAY/PAUSE/CH+ button to pause or resume the playback.
- Press the STOP/CH- button to cease the playback.
SKIP TRACKS AND SEARCH FOR A SPECIFIC POINT TO PLAY (CD/MP3/USB)
- Rotate the TUN+/- & NEXT/PREV CONTROL shortly in music play to skip to the next track or go back to beginning of the current track, rotate the TUN+/- & NEXT/PREV CONTROL twice continuously to skip to the previous track.(While operating, it is necessary to observe the silkscreen beside the TUN+/- & NEXT/PREV CONTROL for operating correctly.)
- Rotate and hold the TUN+/- & NEXT/PREV CONTROL in music play to search at quick rate for a specific point to play.
- Press the +10/ALBUM button once in play to skip to the track 10 tracks ahead, twice to skip to the track 20 tracks ahead. You can reach the last track of the disc using this button.
REPEAT PLAYBACK (CD/MP3/USB)
During playback, press the MODE/PROG/MEM button to repeat play a single track; press the button twice to repeat play all tracks; press the button three times to enter the introduction play mode; press the button four times to enter the random play mode; press the button five times to exit.
ALBUM SELECTING
- During MP3/USB playback, Press and hold the +10/ALBUM button till an album number "F..." flashes on the screen.
- Rotate the TUN+/- & NEXT/PREV CONTROL repeatedly until the number of your desired album flashes on the screen, release the TUN+/- & NEXT/PREV CONTROL.
- Press the +10/ALBUM button again to start the playback from the first track of the selected album.
PROGRAMMED PLAY (CD/MP3 DISC/USB)
- At stop mode, press the MODE/PROG/MEM button once, the program's icon shows with a program sequence indication "P01" first, then a track number flickers on the LCD with the program's icon.
- Select the first track to be programmed using the TUN+/- & NEXT/PREV CONTROL or +10/ALBUM button, and then press the MODE/PROG/MEM button again to store and advance to the next programming step (If there are several folders on the MP3 disc or USB, it is necessary to program folders first and then the tracks. The method of the folders programming is the same as the tracks programming.).
- Repeat the above steps to program more tracks. A maximum of 20 tracks for CD and 99 tracks for MP3/USB can be programmed in memory in a preferred order. If the memory is full, the screen will show "FUL" for indicating.
- Press the PLAY/PAUSE/CH+ button to begin programmed play in the preferred order after you are done with programming. The player stops automatically after all programmed tracks are played.
- You may press the STOP/CH- button to terminate programmed playback. In program stop mode, press the PLAY/PAUSE/CH+ button to begin the programmed playback with the programming order identical with the previous one done; press the STOP/CH- button again to clear the programming.
AUX IN
- Connect the AUX IN jack on the unit to an audio source, for example, MP3 player with an audio cable.
- Power on the unit following the corresponding instructions.
- Press the SOURCE button repeatedly to switch to AUX mode.
- Use the native controls on the connected audio device to begin playing music through the connected unit.
IMPORTANT SAFETY INSTRUCTIONS
- The apparatus shall not be exposed to dripping or splashing and that no objects filled with liquids, such as vases, shall be placed on the apparatus.
- When the AC/DC adapter is used as the disconnect device, the disconnect device shall remain readily operable. To be completely disconnected the power input, the AC/DC adapter shall be disconnected from the mains completely.
- No naked flame sources, such as lighted candles, should be placed on the apparatus.
- Minimum distances 2.0cm around the apparatus for sufficient ventilation. The ventilation should not be impeded by covering the ventilation openings with items, such as newspapers, table-cloths, curtains, etc.
- The use of apparatus is in tropical and/or moderate climates.
- Attention should be drawn to the environmental aspects of battery disposal.
- CAUTION: Danger of explosion if battery is incorrectly replaced. Replace only with the same or equivalent type.
- Battery shall not be exposed to excessive heat such as sunshine, fire or the like.
- The marking plate is located at the bottom of the apparatus.
ALL RIGHTS RESERVED, COPYRIGHT DENVER ELECTRONICS A/S
DENVER®
www.denver-electronics.com
CE
Electric and electronic equipment contains materials, components and substances that can be hazardous to your health and the environment, if the waste material (discarded electric and electronic equipment) is not handled correctly.
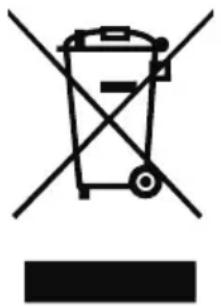
Electric and electronic equipment is marked with the crossed out trash can symbol, seen below. This symbol signifies that electric and electronic equipment should not be disposed of with other household waste, but should be disposed of separately.
All cities have established collection points, where electric and electronic equipment can either be submitted free of charge at recycling stations and other collection sites, or be collected from the households. Additional information is available at the technical department of your city.
natural_image
Symbol of a trash bin crossed with two crossed lines and a solid black rectangle below (no text or labels)Importer:
DENVER ELECTRONICS A/S
Stavneagervej 22, DK-8250 EGAA, DENMARK
www.facebook.com/denverelectronics


- OVERVIEW OF THE PLAYER
- LOCATION OF CONTROLS
- POWER SUPPLY
- BATTERY OPERATION
- NOTE:
- FM RADIO
- TUNING THE FM RADIO
- STORING YOUR FAVORITE RADIO STATION
- HANDLING AND MAINTENANCE OF A DISC
- LOAD A DISC
- PLAY A DISC (CD/MP3)
- EXTERNAL MEMORY MEDIA OPERATION (USB)
- SKIP TRACKS AND SEARCH FOR A SPECIFIC POINT TO PLAY (CD/MP3/USB)
- REPEAT PLAYBACK (CD/MP3/USB)
- ALBUM SELECTING
- PROGRAMMED PLAY (CD/MP3 DISC/USB)
- AUX IN
- IMPORTANT SAFETY INSTRUCTIONS
- DENVER®
- CE
Brand : DENVER
Model : TCU-205
Category : CD Player