
TCS-86 - CD Player DENVER - Free user manual and instructions
Find the device manual for free TCS-86 DENVER in PDF.


| Product Type | CD Player |
| Brand | Denver |
| Model | TCS-86 |
| Dimensions (approx.) | 135 x 135 x 28 mm |
| Weight (approx.) | 220 g (with batteries) |
| Power Supply | DC 3V (2x AA batteries) or AC adapter (5V, not included) |
| Playback Media | CD, CD-R, CD-RW |
| Playback Functions | Play, Pause, Stop, Skip, Repeat (All/One), Shuffle, Program |
| Anti-Skip Protection | Yes (60 seconds) |
| Output | 3.5mm headphone jack |
| Audio Output Power | 5 mW per channel |
| Frequency Response | 20 Hz – 20 kHz |
| Signal-to-Noise Ratio | > 85 dB |
| Battery Life (approx.) | 8 hours with alkaline batteries |
| Screen | LCD display (track number, time, icon) |
| Maintenance | Clean lens with a CD cleaning disc; wipe exterior with a dry cloth |
| Safety | Do not expose to moisture; avoid extreme temperatures |
| Spare Parts | Contact Denver support for replacement parts (battery cover, AC adapter) |
| Repairability | Not user-serviceable; refer to qualified technician |
Frequently Asked Questions - TCS-86 DENVER
User questions about TCS-86 DENVER
0 question about this device. Answer the ones you know or ask your own.
Ask a new question about this device
Download the instructions for your CD Player in PDF format for free! Find your manual TCS-86 - DENVER and take your electronic device back in hand. On this page are published all the documents necessary for the use of your device. TCS-86 by DENVER.
USER MANUAL TCS-86 DENVER
TO REDUCE THE RISK OF FIRE OR ELECTRIC SHOCK, DO NOT EXPOSE THIS APPLIANCE TO RAIN OR MOISTURE.
CAUTION
Use of controls or adjustments or performance of procedures other than those specified herein may result in hazardous radiation
exposure. This Compact Disc player is classified as
CLASS 1 LASER product.
CAUTION!
Invisible laser radiation when open and interlocks defeated. Avoid exposure to beam.

CAUTION
RISK OF ELECTRIC SHOCK DO NOT OPEN

CAUTION: TO REDUCE THE RISK OF ELECTRIC SHOCK, DO NOT REMOVE COVER (OR BACK). NO USER-SERVICEABLE PARTS INSIDE. REFER SERVICING TO QUALIFIED SERVICE PERSONNEL. This Caution Marking and Rating Label are located at the bottom enclosure of the unit.
DANGEROUS VOLTAGE:
The lightning flash with arrowhead symbol within an equilateral triangle is intended to alert the user to the presence of uninsulated dangerous voltage within the product's enclosure that may be of sufficient magnitude to constitute a risk of electric shock to persons.

ATTENTION:
The exclamation point within an equilateral triangle is intended to alert the user to the presence of important operating and maintenance (servicing) instructions in the literature accompanying the appliance.
LASER SAFETY: This unit employs a laser. only qualified service personnel should attempt to service this device due to possible eye injury. CAUTION: USE OF CONTROLS, ADJUSTMENTS OR PERFORMANCE, PROCEDURE HEREIN MAY RESULT IN HAZARDOUS RADIATION EXPOSURE.
- Do not damage the mains lead. When not in use, disconnect the mains lead from the outlet. Grasp the plug, not the mains lead, when disconnecting the unit.
- If water should enter the unit, electrical shock or a malfunction may result. Use in an area where there is low humidity and little dust.
- Do not disassemble or alter the unit in any way.
- Do not use the unit in areas where extremes in temperature occur (below 5^ C or exceeding 35^ C), or where it may be exposed to direct sunlight.
- Because of the CD player's extremely low noise and wide dynamic range, there is a tendency to turn the volume on the amplifier higher than necessary. Doing so may produce an excessively high output from the amplifier which can cause damage to your speakers. Please be careful in this regard.
- Sudden changes in the surrounding temperature can cause dew to form on the optical pickup lens Inside the unit. Under this condition the unit may be unable to operate properly. If this should occur, remove the disc and allow the player to adjust to the surrounding temperature.
- This unit must be operated in a horizontal position.
- Please use the original CD software, and any copy discs are not recommendable for use.
- The apparatus shall not be exposed to dripping or splashing and that no objects filled with liquids, such as vases, shall be placed on apparatus.
- To be completely disconnect the power input, the main plug shall be disconnected from the mains, as the disconnect devices is the plug.
- It should be easily accessed during intended use.
- Battery shall not be exposed to excessive heat such as sunshine, fire or the like.
- Minimum distances 10 cm around the apparatus for sufficient ventilations.
- The ventilation should not be impeded by covering the ventilation openings with items such as newspaper, table-cloths, curtains etc.
- No naked flame sources such as lighted candles should be placed on the apparatus.
- Attention should be drawn to the environmental aspects of battery disposal.
- The use of apparatus in moderate climates.
- Excessive sound pressure from earphones and headphones can cause hearing loss.
To prevent fire or shock hazard, do not expose this appliance to dripping or splashing. No objects filled with liquids, such as vases, shall be placed on the apparatus.
THIS UNIT SHOULD NOT BE ADJUSTED OR REPAIRED BY ANYONE EXCEPT PROPERLY QUALIFIED SERVICE PERSONNEL.
B CONTROLS
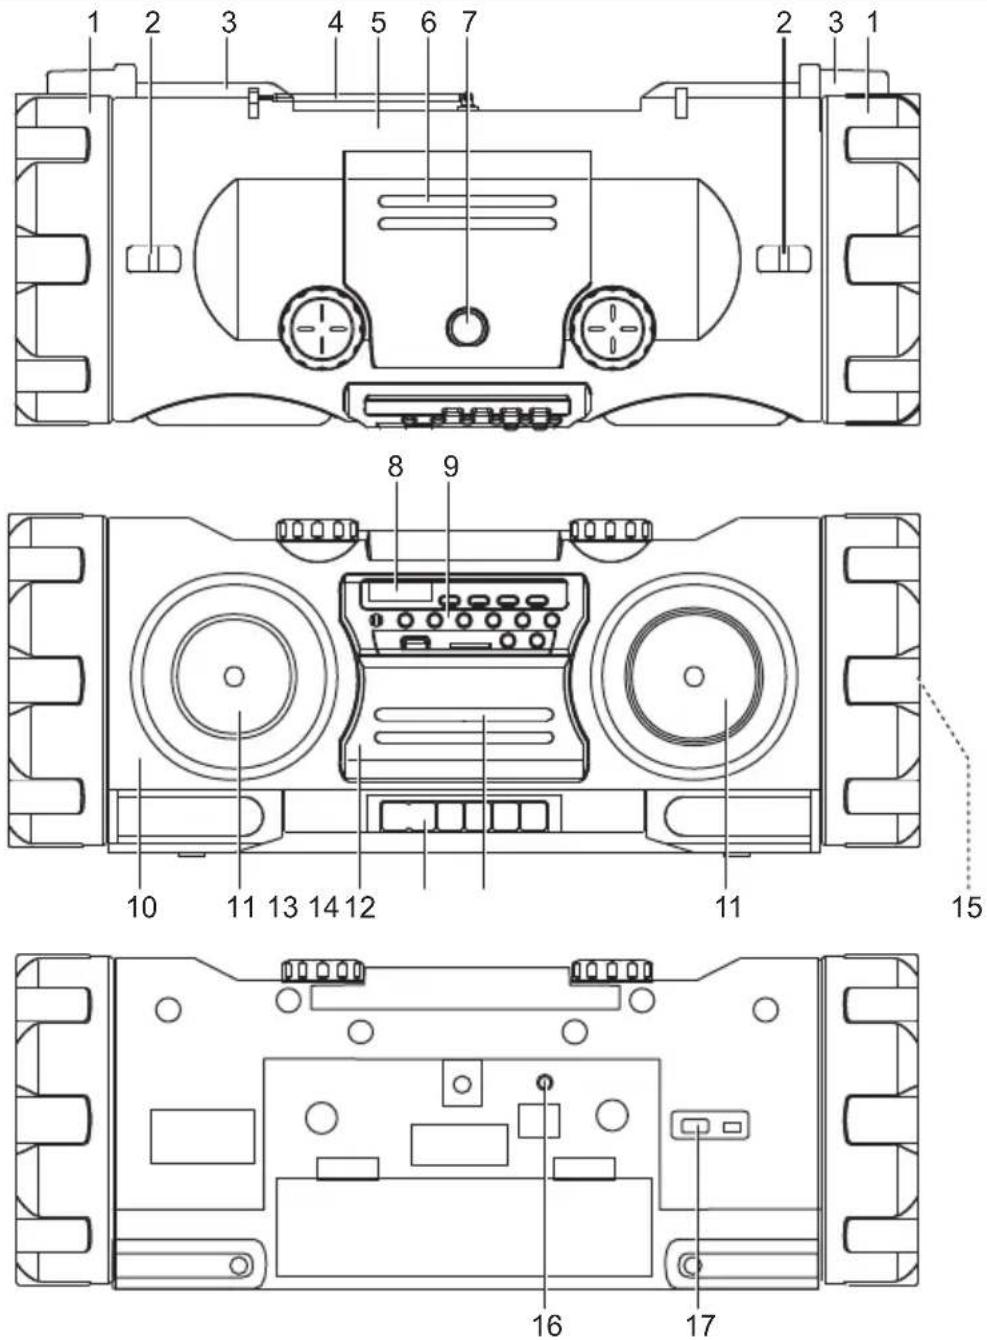
- RIGHT/LEFT COVER
- SHOULD STRAP HOOK
- BACK REVERBERANT TUBE
- ANTENNA (Telescopic)
- BACK COVER
- CD FRONT COVER
- CD OPEN
- LCD
- FUNCTION BUTTON
- FRONT COVER
- FRONT SPEAKER (RIGHT/LEFT)
- CASSETTE COVER
- CASSETTE BUTTON
- CASSETTE COMPARTMENT
- SPEAKER
- AUX IN
- AC IN
FUNCTION BUTTONS
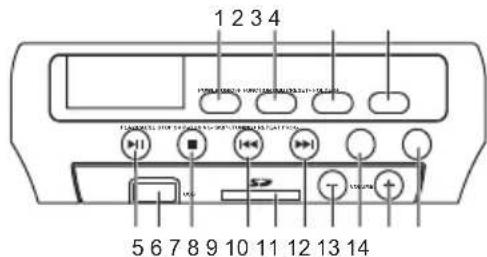
- POWER ON/OFF
- FUNCTION
- DBB
- PRESET+/FOLDER+
- PLAY/PAUSE
- USB SOCKET
-
STOP
-
SKIP-/TUNING-
- SD/MMC SOCKET
- SKIP+/TUNING+
- VOLUME-
- REPEAT
- VOLUME+
- PROG.
C PRECAUTIONS
Read the Operating Instructions carefully and completely before operating the unit. Be sure to keep the Operating Instructions for future reference. All warnings and cautions in the Operating Instructions and on the unit should be strictly followed, as well as the safety suggestions below.
Installation
- Water and moisture - Do not use this unit near water, such as near a bathtub, washbowl, kitchen sink, laundry tub, in a wet basement, swimming pool, or the like.
-
Heat - Do not use this unit near sources of heat, including heating vents, stoves, or other appliances that generate heat.
-
Mounting surface - Place the unit on a flat, even surface.
-
Ventilation - The unit should be situated with adequate space around it so that proper heat ventilation is assured.
Allow 10 cm(4 in.) clearance from the rear and the top of the unit and 5 cm (2 in.) from each side.
- Do not place the unit on a bed, rug, or similar surface that may block the ventilation openings.
-
Do not install the unit in a bookcase, cabinet, or airtight rack where ventilation may be impeded.
-
Objects and liquid entry - Take care that objects or liquids do not get inside the unit through the ventilation openings.
-
Condensation - Moisture may form on the CD Pickup lens when:
- The unit is moved from a cold spot to a warm spot
- the heating system has just been turned on
- the unit is used in a very humid room
- the unit is cooled by an air conditioner
When this unit has condensation inside, it may not function normally. Should this occur, leave the unit for a few hours, then try to operate again.
Electric Power
- Power sources - Use on batteries or AC power supply, as specified in the Operating Instructions and marked on the unit.
- AC power supply
- Never handle the AC power plug with wet hands, as this could result in fire or shock.
- Power cords should be firmly secured to avoid being bent, pinched, or walked upon. Pay particular attention to the cord from the unit to the power socket.
- Avoid overloading AC power plugs and extension cords beyond their capacity, as this could result in fire or shock.
- When not in use - Unplug the AC power supply from the AC outlet or remove all the batteries if the unit will not be used for several months or more. When the cord is plugged in, a small amount of current continues to flow to the unit, even when the power is turned off.
D POWER SUPPLY
IMPORTANT
Make sure that function is set to POWER OFF before connecting AC power supply or inserting batteries.
CAUTION
Use only the supplied AC power cord. Use with other cords may result in the risk of fire.
Using on batteries
Open the lid of the battery compartment on the rear and insert ten 1.5 V. "D" size batteries, not supplied, with the + and - marks correctly aligned then close the lid.
Make sure to disconnect the AC power cord when using the battery power supply.
The batteries need to be replaced when: The radio sound is distorted during operation.
Notes on batteries
- Do not mix different types of batteries or old batteries with new ones.
- Never recharge the batteries, apply heat to them or take them apart.
- Remove dead batteries.
If liquid leaks from the batteries, wipe thoroughly to remove.
E CD OPERATION
CD/MP3 OPERATION
- Press the POWER to turn on the unit. Press the FUNCTION to set the unit in the "CD" mode and the "CD" icon will be indicated on the LCD display.
- Open the disc compartment and place the disc, close the compartment and the disc will start playing automatically.
- Press PLAY/PAUSE to control PLAY/PAUSE mode, Press repeatedly, to shift between play and pause.
- Press VOLUME to adjust the sound level, press the DBB to switch the dynamic bass boost effect if you like.
- Press ▶ (SKIP+) to play next track, hold ▶ (SKIP+) to fast forward search the current track.
- Press ◀◀ (SKIP-) to play previous track, hold ◀◀ (SKIP-) to fast backward search the current track.
- Press PRESET+/FOLDER+ to select the desired folder.
- Press REPEAT to select the repeat mode when playing a CD disc. (REP → REP ALL → NORMAL)
- Press REPEAT to select the repeat mode when playing MP3 (REP → REP ALL → REP ALBUM → Normal).
- Press STOP key to stop playback.
REPEAT
REP means that a single selected track will be played repeatedly.
REP ALL means that all tracks will be played repeatedly.
REP ALBUM means that a selected folder will be played repeatedly while playing MP3.
PROGRAM
In STOP state, press PROGRAM, then operate repeatedly the following steps:
- Press skip + or skip - to select the first track to be programmed and press PROG again to store and advance to the next programming step.
- Repeat the steps above to program more tracks.
Total program memory is 99 tracks for MP3.
Total program memory is 20 tracks for CD. - Press PLAY/PAUSE button to begin programmed play in the preferred order after you are done with programming. The player stops automatically after all programmed tracks are played.
- Press STOP button to cancel the programming.
NOTES ON HANDLING AND MAINTENANCE OF DISC
Follow the below instructions to handle and maintain your disc in order that long time and trouble free performance can possibly be obtained.
- Do not use irregular shape CDs(example: heart-shaped, octagonal ones). It may result in malfunctions.
- Do not place more than one disc in the disc compartment.
- Do not try to open the disc compartment during play.
- Do not touch the lens. Doing so may cause malfunctions.
- Long time exposure to sunshine, high temperatures and humidity will damage the disc. And keep storage area clean.
- Avoid sticking labels on both sides of a disc. Writing with pointed articles on the disc should be strictly avoided.
- Clean the disc wiping the centre and then working out to the edge with a dry & soft cloth or a disc brush. Avoid any cleansing lotion or chemical eradicator.
- Store them in their cases when they are not to be used.
F USB OPERATION
- Press the FUNCTION to set the unit in "USB" mode and then the "USB" icon will be indicated on the LCD display.
- Insert USB key in the USB port compatible and the disc will start playing automatically.
- Press VOLUME to adjust the sound level, press the DBB to switch the dynamic bass boost effect if you like.
-
Press ▶ (SKIP+) to play next track, hold ▶ (SKIP+) to fast forward search the current track.
-
Press ◀◀ (SKIP-) to play previous track, hold ◀◀ (SKIP-) to fast backward search the current track.
- Press REPEAT to select the repeat mode (REP → REP ALL → REP ALBUM → Normal).
- Press PRESET+/FOLDER+ to select the desired folder.
- Press PROGRAM to start programing as above CD programing process, press STOP two times to delete all memory.
G CARD OPERATION
- Press the FUNCTION to set the unit in "CARD" mode the "CARD" be indicated on the LCD display.
- Insert CARD key in the CARD port compatible the disc will start playing automatically.
- Press VOLUME to adjust the sound level, press the DBB to switch the dynamic bass boost effect if you like.
- Press ▶ (SKIP+) to play next track, hold ▶ (SKIP+) to fast forward search the current track.
- Press ◀◀ (SKIP-) to play previous track, hold ◀◀ (SKIP-) to fast backward search the current track.
- Press REPEAT to select the repeat mode (REP → REP ALL → REP ALBUM → Normal).
- Press PRESET+/FOLDER+ to select the desired folder.
- Press PROGRAM to start programing as above CD programing process, press STOP two times to delete all memory.
H TUNER OPERATION
- Press the FUNCTION to set the unit in the FM (RADIO) mode.
- Press the ▶/◀◀ to tuning the station.
- For auto tuning, press and hold ▶ or ◀ button to scan the frequency, the tuner will automatically stop on the next strong station.
- Press PROGRAM to preset the station as your desired.
- Press and hold the PROGRAM to automatically preset station until the program memory is full.
- Press VOLUME to adjust the sound level, press the DBB to switch the dynamic bass boost effect if you like.
- Press the POWER to turn off the RADIO.
I AUX IN OPERATION
- Press the FUNCTION to set the unit in "AUX IN" mode and the "AUX" icon will be indicated on the LCD display.
- Connect external audio device including phones, MP3 players and tablets to the AUX IN jack. The audio device will play through the unit.
- Press VOLUME to adjust the sound level, press the DBB to switch the dynamic bass boost effect if you like.
Use Type 1 (normal) tapes only.
PLAYING BACK A CASSETTE
- Press the FUNCTION to set the unit in "CASSETTE" mode and the "CASS" icon will be indicated on the LCD display.
- Press ■/▲ STOP/EJECT to open the cassette holder and insert a tape with the exposed side down and the side to be played facing out.
- Press ◀ PLAY to start play. Press || PAUSE to pauses playing. To resume play, press again.
- Press ■/▲ STOP/EJECT to stops playing.
- Press ◀◀ F FWD/ ▶▶ REW to fast forwards/rewinds, and then to stop winding, press ■/▲ STOP/EJECT.
- Press VOLUME to adjust the sound level, press the DBB to switch the dynamic bass boost effect if you like.
K GENERAL
If an erroneous display or malfunction occurs, disconnect the AC cord and remove all the batteries to turn off the display. Then turn the power back on.
M SPECIFICATIONS
Tuner section
Frequency range: FM: 87.5-108 MHz
CD player section
Disc: Compact disc
Scanning method: Non-contact optical scanner (semiconductor laser)
General
Speaker: 78mm full-sound (2) 120mm woofer (1)
Power output: 2 x 3.5W + 18W (10%THD)
Power consumption: 25W
Power requirements: AC 230V, 50Hz DC 15V (1.5Vx10 D batteries)
Weight: 5Kg (excluding batteries)
Dimensions: 560(W)x208(H)x226(D) mm
Specifications and external appearance are subject to change without notice.

Electric and electronic equipment contains materials, components and substances that can be hazardous to your health and the environment, if the waste material (discarded electric and electronic equipment) is not handled correctly.
Electric and electronic equipment is marked with the crossed out trash can symbol, seen above. This symbol signifies that electric and electronic equipment should not be disposed of with other household waste, but should be disposed of separately.
All cities have established collection points, where electric and electronic equipment can either be submitted free of charge at recycling stations and other collection sites, or be collected from the households. Additional information is available at the technical department of your city.
ALL RIGHTS RESERVED, COPYRIGHT DENVER ELECTRONICS A/S
DENVER®
www.denver-electronics.com
Importer:
DENVER ELECTRONICS A/S
Stavneagervej 22
DK-8250 Egaa
Denmark
www.facebook.com/denverelectronics




- CAUTION
- CAUTION!
- DANGEROUS VOLTAGE:
- ATTENTION:
- B CONTROLS
- C PRECAUTIONS
- Installation
- Electric Power
- D POWER SUPPLY
- IMPORTANT
- Using on batteries
- Notes on batteries
- E CD OPERATION
- CD/MP3 OPERATION
- REPEAT
- PROGRAM
- NOTES ON HANDLING AND MAINTENANCE OF DISC
- F USB OPERATION
- G CARD OPERATION
- H TUNER OPERATION
- I AUX IN OPERATION
- PLAYING BACK A CASSETTE
- K GENERAL
- M SPECIFICATIONS
- Tuner section
- CD player section
- General
Brand : DENVER
Model : TCS-86
Category : CD Player