
Bar 20 - Coffee maker DELONGHI - Free user manual and instructions
Find the device manual for free Bar 20 DELONGHI in PDF.

| Product Type | Espresso coffee maker |
| Brand | DeLonghi |
| Model | Bar 20 |
| Functions | Espresso, Cappuccino, Steam, Hot water |
| Number of Cups | 1 or 2 |
| Filter Types | 1-cup filter, 2-cup filter, pod filter for 'serving illycaffè' |
| Water Tank | Removable (on some models) |
| Pump Pressure | 15 bar (typical) |
| Indicator Lights | OK (temperature), Steam-ready, ON/OFF |
| Steam Wand | Yes, with adjustable steam knob |
| Cappuccino Nozzle | Included (if equipped) |
| Anti-Cooling Adaptor | Yes for two cups |
| Automatic Coffee Press | Yes (if included) |
| Pressing Pad | Included (if included) |
| Safety Warnings | Do not immerse, use damp cloth, unplug when not in use |
| Cleaning | Use damp soft cloth; do not use solvents or abrasives |
| Descaling | Every 4-8 months with vinegar or descaling agent |
| First Use | Pre-wash circuit 5-6 times |
| Compatible Pods | 'serving illycaffè' pods |
| Power Supply | Minimum 10A, properly earthed |
Frequently Asked Questions - Bar 20 DELONGHI
User questions about Bar 20 DELONGHI
0 question about this device. Answer the ones you know or ask your own.
Ask a new question about this device
Download the instructions for your Coffee maker in PDF format for free! Find your manual Bar 20 - DELONGHI and take your electronic device back in hand. On this page are published all the documents necessary for the use of your device. Bar 20 by DELONGHI.
USER MANUAL Bar 20 DELONGHI
Read this instruction booklet carefully before installing and using the machine. In this way, you will obtain the best possible results and maximum operating safety.
SAFETY WARNINGS
Read the following instructions carefully!
- Before use, check that the power supply corresponds to the voltage shown on the serial number plate. Connect the appliance only to properly-earthed power outlet (minimum 10A).
- In case of incompatibility between the plug and your socket, have the socket replaced by a qualified electrician.
- The electrical safety of this appliance is only guaranteed when it is properly earthed according to current electrical safety regulations. The manufacturer declines all responsibility for any damage resulting from inadequate earthing of the appliance. If in doubt, consult a qualified electrician.
- Do not use the appliance without water.
- This appliance is designed to make coffee: be careful to avoid scalding when using the water and steam jets.
- Do not touch hot parts (steam nozzle, water, area around the filter-holder and filter).
- Do not remove the filter-holder when the appliance is producing steam or hot water.
- Do not leave water in the machine when the room temperature is 0^ C or below.
- After unpacking, check the appliance for damage. If in doubt, do not use the appliance; contact a qualified technician.
- Packaging materials (plastic bags, polystyrene foam, etc.) are a potential source of danger, and must be kept out of reach of children.
- The use of adaptors, multiple plugs and/or extension cords is not recommended. If these are absolutely necessary, use only single adaptors and multiple plugs and extension cords that conform to current safety regulations. Do not exceed the maximum power limit shown on the adaptor.
- This appliance is designed for domestic use only. Any other use of the appliance is considered improper and therefore dangerous.
- The manufacturer declines all responsibility for any damage resulting from improper, incorrect or careless use of the appliance.
- Do not touch the appliance with wet or damp hands or feet.
- Do not use the appliance in bathrooms.
- Do not pull the power cable or the appliance to remove the plug from socket.
- Do not leave the appliance exposed to atmospheric agents (rain, sun, frost, etc.).
- Do not allow the appliance to be used by children or irresponsible persons unless under supervision.
- Do not immerse the appliance in water.
- Before carrying out any cleaning or maintenance operations, always disconnect the appliance from the mains power supply by removing the plug.
- In case of failure or malfunction, switch off the appliance and do not attempt to effect repairs. Contact an authorized Service Centre and insist on original spare parts. Failure to observe the above points may affect the safety of the appliance.
- Remove the plug from the mains socket when the appliance is not in use. Do not leave the appliance switched on unnecessarily. Turn off the power switch when the appliance is not in use.
- Installation must be carried out according to manufacturer's instructions.
- The supply cable must not be replaced by the user, as this requires the use of special tools. If the supply cable is damaged, contact an authorized Service Centre.
- Remove the plug from the mains socket when the appliance is not in use. Do not leave the appliance switched on unnecessarily. Turn off the power switch when the appliance is not in use.
This appliance conforms to CEE Directive EN 55014 regarding the suppression of radio disturbance.
Materials and articles destined for use in contact with food products conform to the EEC directives 89/109.
Description of the appliance
1 Control panel
2 Steam control knob
3 Water tank (removable on some models)
4 Movable lid
5 Power cable
6 Steam and hot water spout
7 Cappuccino nozzle (if included)
8 Drip tray
9 Boiler outlet
10 Pressing pad (if included)
11 Measure / pressing pad
12 Filter cup
13 Filter-holding lever
14 1-cup filter
15 2-cup filter
16 Steam-ready indicator light
17 Automatic coffee press
18 "OK" indicator light
19 "ON/OFF" switch with indicator light
20 Steam switch
21 Coffee and water dispensing switch
22 2-cups adaptor
* Serving Illycaffè : a single serving (7 grams) of 100 % “arabic” coffee, pressurized to preserve the flavours, specially ground, measured out, tamped down and packed between two layers of special filter paper
‘serving illycaffè’ brand coffee pods may also be used for easier and faster coffee making. These not only give the correct measure of coffee, they also make cleaning easier. Other types of pod may not give such good results.
USING THE COFFEE-MAKER FOR THE FIRST TIME
Remove the packaging and take out the bag containing the accessories. When the appliance is new, the following accessories must be washed with lukewarm water and detergent then rinsed thoroughly. The internal circuit of the coffee-maker must then be pre-washed as follows:
Filling the tank
Raise the lid and pour fresh water into the tank (fig. 1). On the models with removable tank for easier filling, the tank can be extracted by pulling upwards (fig. 2). Make sure that the pipes are immersed when the tank is put back into place.
Pre-washing
a) Plug in at the power socket, remembering the safety instructions.
b) Press the ON/OFF button and coffee-dispensing button. The ON/OFF indicator light will come on (fig. 3). The pump will start to "load water". Wait until water starts to come out of the boiler outlet, then turn off the coffee-dispensing switch. After about 2 minutes, the "OK" light will come on (fig. 4). This means that the water (in the boiler) is at the correct temperature.
c) Press the dispensing switch again for 10-15 seconds, allowing water to fall from the boiler outlet (fig. 5), then turn off the switch.
d) To thoroughly pre-wash the circuit, perform the above operation at least five or six times.
At this point the machine is ready for normal use.
Fitting the filter cup
To fit the filter cup onto the machine, place the cup under the boiler outlet (fig. 6) then press upwards and turn to the right as far as it will go.
MAKING ESPRESSO COFFEE
- Always use fresh water and keep the tank clean.
- Before dispensing the coffee, always wait for the OK light to come on: this indicates that the water in the boiler has reached the ideal temperature for coffee-making.
- The coffee cups, filter cup and the filters should be heated before making the coffee. The accessories can be heated with hot tap water or in the following way:
- Turn on the machine by pressing the ON/OFF switch.
- Insert the 1- or 2-cup filter, or the ‘serving illycaffè’ pods filter (as required) in the filter holder and fig. 7 attach the filter holder to the machine as explained above. Place a coffee cup beneath the filter holder.
- Wait for the OK light to come on, press the coffee dispensing switch and let the hot water heat the accessories.
- Turn off the dispensing switch, remove and drain the filter cup, filter and coffee cups. You are advised to also perform this operation (hot water dispensing with no coffee in filter) if you want to make coffee after dispensing steam. In this case, performance of an “idle cycle” brings the machine to the ideal temperature for making perfect coffee.
For best results, you are advised to use well-roasted and suitably ground top quality coffee.
Your machine is equipped with an ‘anti-cooling’ adaptor allowing you to dispense the coffee into two cups. To attach this to the filter holder, just align the guide on the adaptor with the pin on the filter holder, push the adaptor up and turn it (see fig.8).
Method
- Turn on the machine by pressing the ON/OFF switch and wait for the OK light to come on.
- A few drops of water may fall from the boiler outlet: this is quite normal and is not a fault.
- Insert the 1- or 2-cup filter, or the ‘serving illycaffè’
- Pour 1-2 measures of ground coffee into the filter, spreading it evenly and pressing it. If the coffee is damp or ground very finely, press it only lightly. If the coffee is dryer, or more coarsely ground, press it slightly more (fig. 9). After pressing it, if necessary, add extra coffee to the rim.
- After filling the filter and pressing the coffee, put the automatic press in position as shown in fig. 10. Then attach the filter holder (with the automatic press on top of the grounds) as explained above. Remove any excess coffee from the rim of the filter.
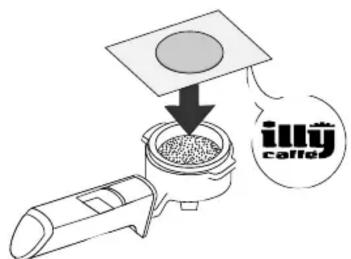
If you use ‘serving illycaffè’ coffee pods in your espresso machine, use the special filter; insert the coffee pod ensuring the name ‘illycaffè’ is facing down and the long side of the pod is parallel to the handle (see illustration).
Coffee pods must be stored, handled and placed in the filter holder with care to avoid any deformation.
• Fit the filter cup as described above (fig. 6).
- Place the pre-heated cup or cups on the drip tray, under the filter cup spouts. When the light comes on, press the dispensing switch and only release when the desired amount
of coffee has been dispensed (fig. 11).
- To release the filter cup, wait for a few seconds then turn the handle from right to left.
- To remove used coffee, keep the filter closed with the special lever built in to the handle; take off the automatic coffee press, grasping it by the special indents (take care not to scald yourself) (fig.12) and remove the coffee by tapping the overturned filter holder (fig.13).
Remove the used pod by lifting one corner. If the pod remains stuck to the upper part of the machine, loosen it by pushing the coffee dispenser button for a few seconds.
If the machine is not to be used for a long time, turn it off and empty the water tank.
A pre- wash should be performed, as described above, before using it the next time.
MAKING A GOOD CAPPUCCINO
- Prepare the coffee in the manner described in the previous paragraph, using cups that have a 250 ml. capacity.
- Use a metal container, preferably tall with a small diameter.
Only fill it 1/3 of the way up with milk to prevent it from boiling over.
- Press the steam switch. After about 3 minutes the “OK” light will come on, indicating that the machine is at the ideal temperature for steam production (fig. 14).
- Important! At this stage, a few drops of water may be emitted from the boiler outlet: this is completely normal, but be careful not to scald yourself.
- Immerse the steam spout in the bottom of the milk (fig. 15) and turn the steam knob anticlockwise. The amount of steam delivered by the spout can be adjusted by turning the knob.
- Lower the container so that the spout skims the surface of the milk and then give short bursts of steam at intervals, barely immersing the spout (fig. 16).
- If your coffee machine is equipped with a cap-puccino nozzle, immerse the nozzle into the milk down to the mark on the nozzle (fig. 17).
- Your cappuccino is ready. Add sugar to taste and, if you like, sprinkle with a little chocolate powder or cinnamon.
The first steam dispensed is mixed with water, so to get drier steam, wait for a few seconds with the steam adjustment knob open.
- Always unscrew and rinse the cappuccino nozzle immediately after use in order to prevent the milk from hardening on the pipes (fig. 18). From time to time, use a pin to clean the holes in the cappuccino nozzle.
After using the machine to produce steam, the boiler must be re-pressurized by pressing the delivery switch (12) and allowing water to flow from the nozzle for a few seconds.
DISPENSING STEAM
- Switch the machine on by pressing the ON/OFF switch.
- Press the steam switch. After about few minutes the “OK” light will come on, indicating that the machine is at the ideal temperature for steam production.
- Immerse the steam spout in the bottom of the milk and turn the steam knob anti-clockwise the amount of steam delivered by the spout can be adjusted by turning the knob.
When the liquid is hot, completely close the steam knob and turn off the steam switch.
DISPENSING HOT WATER
- Turn on the machine by pressing the ON/OFF switch and wait for the "OK" light to come on.
- Place a glass or cup under the steam spout.
- Press the dispensing switch while opening the steam lever.
- Hot water will be dispensed from the spout. When enough water has been delivered, close the lever and turn off the dispensing switch and "ON-OFF" switch.
CLEANING AND MAINTENANCE
- Before performing any cleaning or maintenance operation, always turn off the machine, pulling the plug out of the mains socket, and allow it to cool down.
- Do not use solvents, detergents or abrasives to clean the machine. Simply use a damp, soft cloth.
- Regularly clean the filter cup, filters, drip tray and water tank.
- Do not wash the machine: it is an electrical appliance.
DESCALING
You are advised to descale the machine every 4-8 months, or as required by the hardness of the water or frequency of use. We recommend descaling with water and vinegar as follows:
- Fill the tank with water, diluting 8 tablespoons of vinegar in it.
- Operate the machine as though making coffee until the tank has been emptied, then rinse.
- Repeat the operation with water only for 2-3 tanks, rinsing until there is no longer any smell of vinegar.
Descaling the machine can also be done by using the apposite descaling agents following the instructions on the box.
Brand : DELONGHI
Model : Bar 20
Category : Coffee maker