
BCO432 - Coffee maker DELONGHI - Free user manual and instructions
Find the device manual for free BCO432 DELONGHI in PDF.


| Product type | Combined espresso and drip coffee maker |
| Brand | DeLonghi |
| Model | BCO432 |
| Dimensions (L x D x H) | 38 x 32 x 36 cm |
| Weight | 7.5 kg |
| Power supply | 220-240 V ~ 50/60 Hz, 1450 W |
| Water tank capacity | 1.4 L (filter coffee) + 1.2 L (espresso) |
| Pump pressure | 15 bars |
| Types of coffee usable | Ground for espresso, ground coffee for filter |
| Main functions | Espresso, cappuccino, filter coffee preparation, steam function for milk |
| Anti-drip system | Yes, for the filter |
| Automatic shut-off | Yes, after 30 minutes of inactivity |
| Maintenance and cleaning | Regular descaling, rinsing of nozzles, cleaning of filter holder |
| Water filter | Yes, removable and replaceable |
| Safety | Safety valve for pressure, shut-off in case of overheating |
| Spare parts available | Filter holder, tank, steam nozzle, filter basket |
| Repairability | Repairability index of 7.2/10 |
| Included accessories | Measuring spoon, filter cup, cleaning brush |
| Warranty | 2 years (parts and labor) |
| Country of manufacture | China |
Frequently Asked Questions - BCO432 DELONGHI
User questions about BCO432 DELONGHI
0 question about this device. Answer the ones you know or ask your own.
Ask a new question about this device
Download the instructions for your Coffee maker in PDF format for free! Find your manual BCO432 - DELONGHI and take your electronic device back in hand. On this page are published all the documents necessary for the use of your device. BCO432 by DELONGHI.
USER MANUAL BCO432 DELONGHI
Instructions for use. Keep these instructions.
Visit www.delonghi.com
for a list of service centers near you.
ELECTRICAL CHARACTERISTICS
115 V~60 Hz 1500 W
COFFEE MAKER
COFFEE MAKER







1. IMPORTANT SAFEGUARDS
When using electrical appliances, basic safety precautions should always be followed, including the following:
- Read all instructions.
- Do not touch hot surfaces. Use handles and knobs.
- To protect against fire, electrical shock and personal injury, do not immerse cord, plug or appliance in water or other liquid.
- Never allow the appliance to be used by children.
- Unplug from the outlet when not in use and before cleaning. Allow to cool before fitting or taking off parts, and before cleaning the appliance.
- Do not operate with a damaged cord or plug, or after the appliance malfunctions, or has been damaged in any manner. Return the appliance to the nearest authorized service facility for examination, repair or adjustment.
- The use of accessory attachments or spare parts not recommended by the appliance manufacturer may result in fire, electrical shock or personal injury.
- Do not use outdoors.
- Do not let the cord hang over the edge of the table or counter, or touch hot surfaces.
- Do not place on or near a hot gas or electrical burner, or in a heated oven.
- Plug cord into the wall outlet. To disconnect, turn any control to "off", then remove plug from wall outlet.
- Do not use the appliance for other than the intended use. This appliance is to be utilized for domestic use only. Any other use is to be considered improper and, therefore, dangerous.
- For machines with glass carafe:
A. The carafe is an accessory to be used exclusively with this appliance. Never use it on a cooking surface. B. Do not set the hot container on a damp or cold surface. C. Do not use the carafe if it is cracked or the handle is not completely sturdy. D. Do not use abrasive detergents or sponges to clean.
WARNING: To reduce the risk of fire or electric shock, do not remove the cover. Don't attempt to repair or modify the machine, doing so will void the warranty. Repair should be done by authorized service personnel only!
SAVE THESE INSTRUCTIONS
THIS PRODUCT IS FOR HOUSEHOLD USE ONLY
2. SHORT CORD INSTRUCTIONS
- A short power cord is provided to reduce risks resulting from becoming entangled in or tripping over a longer cord.
- Longer, detachable power supply cords or extension cords are available and may be used if care is exercised in their use.
- If an extension cord is used, the marked electrical rating should be at least as great as the electrical rating of the appliance. If the appliance is provided with 3-wire, grounding type cord, the extension should be a GROUNDING TYPE 3-WIRE CORD. The longer cord should be arranged so that it will not drape over the counter-top or table top where it can be pulled on by children or tripped over.
- Your product is equipped with a polarized alternating current line plug (a plug having one blade wider than the other). This plug will fit into the power outlet only one way. This is a safety feature. If you are unable to insert the plug fully into the outlet, try reversing the plug. If the plug should still fail to fit, contact your electrician to replace your obsolete outlet. Do not defeat the safety purpose of the polarized plug.
Read this instruction booklet carefully before installing and using the appliance. This is the only way to ensure the best results and maximum safety for the user.
3. SAFETY WARNINGS
- This appliance is designed to "make coffee" and "hot drinks". Use with care to avoid scalds from the water and steam jets or through incorrect use.
- Never touch hot parts.
- After removing the packaging, make sure the product is complete. If in doubt, do not use the appliance and contact a De'Longhi customer service representative.
- The packing elements (plastic bags, polystyrene foam, etc.) should be kept out of reach of children as they are a safety hazard.
- This appliance is intended for domestic use only. Any other use is considered improper and thus dangerous.
- The manufacturer cannot be held responsible for any damage caused through incorrect, wrong or unreasonable use.
- Never touch the appliance with wet or damp hands.
- Never let children use the appliance without supervision.
- Never allow children to play with the appliance.
- Should the appliance break or not function correctly, turn it off and do not tamper with it. For all repairs, contact authorized service centers only and insist on the use of original spare parts.
Failure to respect the above could reduce the safety of the appliance.
- The power cord for this appliance must not be replaced by the user as this operation requires the use of special tools. In the event of damage, contact an authorized service center only to avoid all risks.
4. DESCRIPTION (page 3)
The terminology below will be used on subsequent pages.
4.1 Description of the appliance
A1. Espresso water tank lid A2. Espresso water tank A3. Antichlorine filter extraction handle A4. Antichlorine filter support A5. Filter-holder for drip coffee A6. Water fill compartment A7. Drip coffee warming plate A8. Espresso cup tray A9. Drip tray A10. Cappuccino maker (*Different depending on the model) A11. Cappuccino maker selection ring (Adjustable cappuccino system only) A12. Steam connection nozzle
A13. Steam dial for cappuccino A14. Espresso coffee ON/OFF switch
4.2 Description of control panel
B1. Espresso coffee/hot water button with integrated pilot lamp B2. Steam button with integrated pilot lamp B3. Espresso power light B4 Display B5 ON/OFF button for drip coffee with power light B6 AUTO button (automatic switch-on) for drip coffee with AUTO ON light B7 HOUR button B8 MIN button B9 "1-4" cups button with light
4.3 Description of the accessories
C1. Espresso coffee filter holder C2. One-cup or one-pod espresso coffee filter C3. Two-cup espresso coffee filter C4. Coffee measure with presser C5. Permanent gold tone filter C6. Jug for drip coffee C7. Water softener filter for espresso coffee water tank (*optional) C8. Antichlorine filter
4.4 Installation
- Place the appliance on a work surface away from water faucets and sinks.
- Check that the voltage of the outlet corresponds to the value indicated on the appliance rating plate. Connect the appliance to an efficiently grounded electrical socket with a minimum rating of 10A only. The manufacturer declines all liability for any accidents caused by the absence of an efficient ground system.
- If the plug fitted to the appliance does not match the electrical socket, have the outlet replaced with a suitable type by a qualified electrician.
- Never install the appliance in environments where the temperature may reach 0°C (32°F) or lower (the appliance may be damaged if the water freezes).
5. ANTICHLORINE FILTER
The filter eliminates the taste of chlorine in the water. To install the filter, proceed as follows:
- Release the filter support from its slot by pulling it upwards (fig. 1).
- Remove the Antichlorine filter from the plastic sachet and rinse it under a running tap (fig. 2).
- Open the filter support and carefully put the filter in place as shown in fig. 2.
- Close the filter container carefully (fig. 2), and reposition it in its slot, pushing it firmly downwards.
- The Antichlorine filter should be replaced after 80 cycles, and at least after every 6 months of operation.
6. FIRST USE
When using the appliance for the first time, all the accessories and the internal circuits must be washed as follows:
- DRIP COFFEE MAKER: Make at least two carafes of coffee without using ground coffee.
- ESPRESSO MAKER: Make at least four cappuccinos without using ground coffee and using water instead of milk.
7. PREPARATION OF DRIP COFFEE
7.1 Setting the clock
When the coffee machine is connected to the outlet for the first time, "AM 0:00" will flash on the display.
To set the time, proceed as follows:
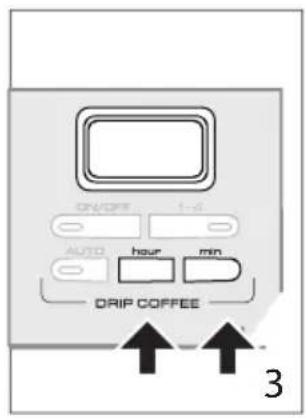
- Press the "hour" button (Fig. 3) for about 2 seconds until the number of hours on the display begins to increase.
- Before the display stops flashing (about 5 seconds), set the hour by pressing the "hour" button repeatedly.
- Set the minutes by pressing the "min" button (Fig. 3) repeatedly. (To speed up the operation, hold the button down.)
- After setting the time, wait 5 seconds. When the display stops flashing, the time set is stored.
To reset the time, press the HOUR button for about 2 seconds, and then follow the procedure as described starting from point 2.
Please note: In the event of a temporary power failure, the time set does not remain stored in the memory.
7.2 Programming the automatic start (AUTO BUTTON)
The appliance can be programmed to make drip coffee automatically. First, make sure that the time is set correctly.
To set the delayed start (i.e. the time you want the coffee to be made), proceed as follows:
- Press the AUTO button (Fig. 4) for about 2 seconds until 0:00 flashes on the display.
- Before the display stops flashing (about 5 seconds), set the desired hour by pressing the "hour" button repeatedly.
- Set the minutes by pressing the "min" button repeatedly.
- After 5 seconds, the display will stop flashing and the programmed time will be stored.
- After you have programmed the machine as described above, just press the AUTO button to have coffee made at the time set (the AUTO indicator light will illuminate).
Please note:
- If you want to change the start time after it has been set, press the AUTO button for about 2 seconds and then set a new time as described starting from point 2.
- Keep in mind that at the time set, the appliance will start to make drip coffee only. The espresso maker does not come on.
7.3 Length of warming time (Automatic shut-off time)
The appliance is factory-set to keep the coffee warm for two hours after startup.
However, this setting can be changed as follows:
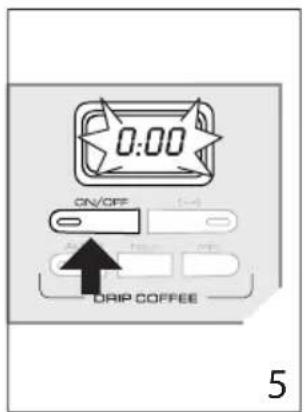
- Press the ON/OFF button (Fig. 5) for about 2 seconds until 0:00 flashes on the display.
- Modify the time by repeatedly pressing the HOUR button (and also the MIN button if required).
- After setting the time, wait 5 seconds. When the display stops flashing, the time will be stored.
Please note: If 0:00 is set, the appliance switches off. (You can set a time within 1 minute and 11 hours and 59 minutes).
7.4 "1-4" cups button
You can enhance the flavor of your coffee by pressing the "1-4" button after the "ON/OFF" button. This feature activates a unique brewing process, slowly releasing water into the filter basket; saturating coffee grounds a little at a time extracting the best flavor and aroma from your coffee.
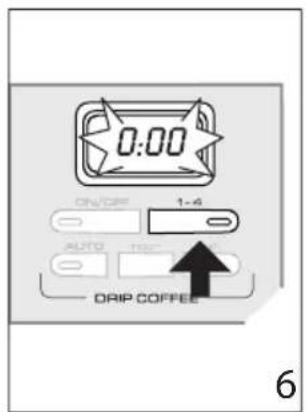
To activate, press the "1-4" button (fig. 6); the light on the button will illuminate.
Press the button again to turn the selection off.
Do not use this button if brewing an entire carafe of coffee.
You can select this function even when using the auto function.
7.5 Making drip coffee
- Open the filter-holder door, rotating it towards the right (fig. 7).
- Fill the carafe to the level indicator relative to number of cups of coffee you wish to prepare, taking care not to exceed the MAX level of 10 cups (fig. 8), otherwise, in order to not overfill the machine, the excess water will spill out from the back of the unit.
- Then pour the water into the water-fill compartment of the appliance (fig. 9).
- Position the gold tone filter into the filter-holder (fig. 10).
- Put the ground coffee in the filter using the measuring spoon supplied and level it off evenly (fig. 11). As a general rule, use a level measure of coffee (approx 7 grams) for every cup of coffee required (for example, 10 measures to obtain 10 cups).
- Close the filter-holder door and place the carafe, with cover in place, onto the warming plate.
- Press the ON/OFF button. The light on the button indicates that the drip coffee-maker is in operation.
- The coffee will begin to dispense after a short time.
It is perfectly normal for the appliance to emit steam while the coffee is percolating.
To keep the coffee hot after the percolation process has finished, place the carafe on the hot plate and leave the machine turned on (with the drip coffee light on): the coffee in the carafe will be kept at the right temperature.
- To turn off the machine press the ON/OFF switch.
8. ESPRESSO COFFEE
The first time you use the appliance, wash all accessories and rinse the internal circuits by proceeding as though you were making coffee until you have used at least two tanks of water. You can then proceed to make coffee.
8.1 Preheating the coffee unit
To make espresso coffee at the right temperature, the coffee maker should be preheated as follows:
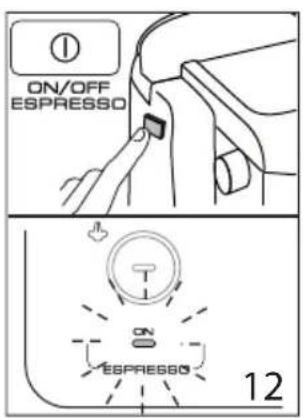
- Press the ON/OFF switch (fig. 12) to turn the appliance on. The power light (B3) comes on.
- Insert the filter to the filter holder (fig. 13). Make sure the filter is correctly inserted in the slot. Attach the filter holder with filter to the appliance (fig. 14) without adding pre-ground coffee. Use the smaller filter to make one coffee or the larger filter to make two coffees.
- Place a cup under the filter holder. Use the same cup as will be used to prepare the coffee in order to preheat it.
- Wait until the light comes on and immediately afterwards press the button (fig. 15). Continue delivering water until the light goes off, then interrupt delivery by pressing the same button and empty the cup.
(It is normal for a small and harmless puff of steam to be given off when removing the filter holder).
8.2 How to make espresso coffee using pre-ground coffee
- After preheating the appliance and filter holder as described in the previous paragraph, use the smaller filter to make one coffee or the larger filter to make two coffees.
- To make just one coffee, place one level measure of pre-ground coffee (about 7 g) in the filter (fig. 16). To prepare two coffees, place two loosely filled measures (about 6+6 g/2+2 tablespoons) of pre-ground coffee in the filter. Fill the filter a little at a time to prevent the pre-ground coffee from overflowing.
Important:
For correct operation, before filling with pre-ground coffee, make sure there are no coffee residues left in the filter from the last time you made coffee.
- Distribute the pre-ground coffee evenly and press lightly with the tamper (fig. 17).
Correct pressing of the pre-ground coffee is essential to obtain a good espresso. If pressing is excessive, coffee delivery will be slow and the froth will be dark. If pressing is too light, coffee delivery will be too rapid and the froth will be weak and light coloured.
- Remove any excess coffee from the rim of the filter holder and attach to the appliance. Turn as far as it will go (fig. 14) to avoid water leaking out.
- Place the cup or cups under the filter holder spouts (fig. 18). You are recommended to warm the cups before making coffee by rinsing them with a little hot water.
- Make sure the light is on (if off, wait until it comes on), then press the button (fig. 15). When the desired amount of coffee has been delivered, press the same button to interrupt the flow.
- To remove the filter holder, turn the handle from right to left.
Danger of burns!
To avoid splashes, never remove the filter holder while the appliance is delivering coffee.
- To dispose of the used coffee, block the filter in place using the lever incorporated in the handle, then empty the grounds by turning the filter holder upside down and tapping it firmly (fig. 19).
- To turn the appliance off, press the ON/OFF button on the left side of the machine.
How to prepare espresso coffee using pods
- Preheat the appliance as described in the section "PREHEATING THE COFFEE UNIT", making sure the filter holder is attached. This obtains a hotter coffee.

Please note:
Use pods conforming to the ESE standard, indicated on the pack by the following symbol.

The ESE standard is a system accepted by leading pod producers and enables espresso coffee to be prepared simply and cleanly.
- Place the small filter in the filter holder, making sure the filter is correctly inserted in the slot as shown in fig. 13.
- Insert the pod, centering it as far as possible on the filter (fig. 20). Always follow the instructions on the pod pack to position the pod on the filter correctly.
- Attach the filter holder to the appliance. Always turn as far as it will go (fig. 14).
- Proceed as in points 5, 6 and 7 in the previous section.
9. HOW TO MAKE CAPPUCCINO OR LATTE
- Prepare the espresso coffees as described in the previous sections, using sufficiently large cups.
- Press the button.
- In the meantime, fill a pitcher with about 3.5 oz/100 grams for each cappuccino or 6 oz/170 grams for each latte to be prepared. In choosing the size of the pitcher, bear in mind that the milk doubles or triples in volume.

Please note:
You are recommended to use skimmed or semi-skimmed milk at refrigerator temperature (about 5°C / 42°F).
- *Models with adjustable cappuccino only: Make sure the ring on the cappuccino maker is positioned downwards in the CAPPUCCINO position and place the pitcher containing the milk under the cappuccino maker.
- Wait until the light comes on (fig. 21). The light comes on to indicate that the boiler has reached the ideal temperature for steam production. As the boiler heats up, it is normal for a little water and steam to be given off into the drip tray.
- Remove the cappuccino maker by rotating it to the left (fig. 22). During this operation, avoid touching the boiler outlet as it is hot. Then place the container with the milk under the cappuccino maker.
- Dip the cappuccino maker into the milk for a few millimeters (fig. 23). Turn the steam dial to the 0° position (fig. 24). Steam is delivered from the cappuccino maker, giving the milk a creamy, frothy appearance. For a creamier froth, immerse the cappuccino maker in the milk and move the container with slow up/down movements.
- When the required temperature (the ideal is 60°C/140°F) and froth density is reached, interrupt steam delivery by
turning the steam dial to the OFF position and pressing the button.
- Pour the frothed milk into the cups containing the espresso coffee prepared previously. The cappuccino is ready. Sweeten to taste and, if desired, sprinkle the froth with a little cocoa powder.

Please note:
- To prepare more than one cappuccino, first make all the coffees, then at the end prepare the frothed milk for all the cappuccinos.
- To make coffee again after the milk has been frothed, cool down the boiler first or the coffee will be burnt. To cool the boiler, place a container under the boiler outlet, press the button (fig. 15) and deliver water until the light goes off. Press the button again and prepare the coffee as described in the previous paragraphs.
You are recommended to deliver steam for a maximum of 60 seconds and never to froth milk more than three times consecutively.
10. MAKING HOT MILK (WITHOUT FROTH) (MODELS WITH ADJUSTABLE CAPPUCCINO ONLY)
To make hot milk without froth, proceed as described in the above section, making sure the ring on the cappuccino maker is positioned upwards in the "HOT MILK" position.
11. CLEANING THE CAPPUCCINO MAKER AFTER USE

Important:
For hygiene reasons, the cappuccino maker should always be cleaned after use.
Proceed as follows:
- Deliver a little steam for a few seconds by turning the steam dial (fig. 24). This causes the cappuccino maker to discharge any milk left inside. Turn the appliance on again by pressing the ON/OFF button.
* Models with adjustable cappuccino maker:
- With one hand, hold the cappuccino maker spout firmly, with the other, release the cappuccino maker by turning it anticlockwise, then pull off downwards (fig. 25).
- Remove the steam connection nozzle from the spout by pulling it downwards.
- Wash the cappuccino maker and steam connection nozzle thoroughly with warm water.
- Move the ring upwards and make sure the two holes shown by the arrows in fig. 26 are not blocked. If necessary, clean with a pin.
* Models with cappuccino maker:
- With one hand, hold the cappuccino maker spout firmly, with the other, release the cappuccino maker by turning it anticlockwise, then pull off downwards (fig. 27).
- Remove the steam connection nozzle from the spout by pulling it downwards.
- Wash the cappuccino maker and steam connection nozzle thoroughly with warm water.
- Make sure the two holes shown by the arrows in fig. 28 are not blocked. If necessary, clean with a pin.
*All models:
- Put the steam connection nozzle back, pressing forcefully upwards to insert it onto the steam tube.
- Replace the cappuccino maker by pushing upwards and turning clockwise.
12. HOT WATER
- Press the ON/OFF switch (fig. 12) to turn the appliance on. The power light comes on.
- Wait until the light comes on.
- Place a recipient under the cappuccino maker.
- When the light comes on, press the button/ (fig. 15) and at the same time turn the steam dial to ON (fig. 24). Water comes out of the cappuccino maker.
- To interrupt hot water delivery, press the button again and turn the steam dial to OFF.
You should not deliver hot water for more than 60 seconds.
13. CLEANING

Danger!
- While cleaning, never immerse the coffee maker in water. It is an electrical appliance.
- Before cleaning the outside of the appliance, turn it off, unplug from the mains socket and allow to cool.
13.1 Espresso coffee filter cleaning and maintenance
About every 300 coffees or when the coffee is delivered from the filter holder a drop at a time or not at all, clean the pre-ground coffee filters and filter holder as follows:
- Remove the filter from the filter holder.
- Remove the filter cap (fig. 29) by unscrewing in the direction indicated by the arrow on the cap.
- Remove the frother from the container by pushing it from the cap end (fig. 30).
- Remove the gasket (fig. 30).
- Rinse all components and clean the metal filter thoroughly in hot water using a brush (fig. 31). Make sure the holes in the metal filter are not blocked. If necessary, clean with a pin (see fig. 31).
- Replace the filter and gasket on the plastic disk as shown in fig. 32. Make sure to insert the pin on the plastic disk into the hole in the gasket indicated by the arrow in fig. 32.
- Replace the assembly in the steel filter container (fig. 33), making sure the pin is inserted in the hole in the support (see arrow in fig. 33). • Finally, screw on the cap.
Failure to clean as described above invalidates the guarantee.


13.2 Cleaning the boiler outlet
About every 300 coffees, the espresso boiler outlet must be cleaned as follows:
• Make sure the appliance is not hot and that it is unplugged from the mains; - Use a screwdriver to release the screw fixing the espresso boiler outlet (fig. 34); - Remove the boiler outlet; • Clean the boiler with a damp cloth (fig. 34); - Clean the outlet thoroughly with hot water using a brush. Make sure the holes are not blocked. If necessary, clean with a pin (fig. 31). • Rinse under running water, brushing all the time. - Replace the boiler outlet, making sure it is correctly positioned on its gasket.
Failure to clean as described above invalidates the guarantee.
13.3 Other cleaning operations
- Do not use solvents or abrasive detergents to clean the coffee maker. Use a soft damp cloth only.
- Clean the filter holder, filters, drip tray and water tank regularly. To empty the drip tray, extract the cup tray grille, remove the water and clean the tray with a cloth: then reassemble the drip tray.

Danger!
While cleaning, never immerse the coffee maker in water. It is an electrical appliance.
14. DESCALING
14.1 Descaling the espresso coffee unit
We recommend descaling the coffee maker about every 200 coffees. We recommend using commercially available De'Longhi descaler.
Proceed as follows:
- Remove the water softener filter and fill the tank with the descaler solution, obtained by diluting the descaler with water following the instructions on the pack.
- Press the ON/OFF switch (fig. 12) to turn the appliance on. The power light comes on.
- Make sure the filter holder is not attached and position a recipient under the boiler outlet.
- Press the button and deliver about 1/4 of the solution in the tank, turning the steam dial at intervals to allow a little solution to flow out through the cappuccino maker spout. Then stop the flow by pressing the button again and leave the solution to act for about five minutes.
- Repeat point 4 a further 3 times until the tank is completely empty.
- To eliminate residues of solution and scale, rinse the tank well, fill with clean water (without descaler).
- Press the button (fig. 15) and deliver water until the tank is completely empty.
- Repeat operations 6 and 7 again.
Repair of damage to the coffee maker caused by scale is not covered by the guarantee unless descaling is performed regularly as described above.
14.2 Descaling the drip coffee unit
Over time, calcium in the water may cause obstructions, reducing the efficiency of the coffee maker. You are recommended to descale the coffee maker about every 40 coffees.
To descale, always use special commercially available descaling products for drip coffee makers.
- Dilute the product in the jug, following the instructions on the descaler pack;
- Remove the antichlorine filter and pour the descaler solution into the tank;
- Place the jug on the warming plate;
- Press the switch, percolate the equivalent of one cup and then switch off the appliance;
- Leave the solution to work for 15 minutes, then repeat operations 4 and 5.
- Turn the appliance on and deliver the water until the tank is completely empty.
- Rinse by operating the appliance with water only at least 3 times (3 complete tanks of water).
15. TECHNICAL CHARACTERISTICS
Voltage: 115V~60Hz
Power: 1500 W
Size LxDxH: 370 x 305 (or 400) x 325 mm
| Pressure: | 15 bar |
| “Espresso” boiler: | Stainless steel |
| “Espresso” water tank capacity: | 1,2 L |
| “Drip coffee” water tank capacity: | 1,4 L |
| Cable lenght: | 1200 mm |
| Weight: | 13,89Lb/6,3 kg |
16. TROUBLESHOOTING
Below is a list of some of the possible malfunctions.
If the problem cannot be resolved as described, contact Customer Services.
| PROBLEM POSSIBLE CAUSE SOLUTION | |||
| No espresso coffee is delivered No water in | the tank Fill the tank with water | ||
| The holes in the filter holder are blocked Clean | lean the filter holder spout holes | ||
| The espresso boiler outlet is blocked Clean | as described in the section “13.2 Cleaning the boiler outlet” | ||
| Scale/hard water deposits in the water circuit | Perform the descaling procedure as described in the section “8. espresso coffee” | ||
| The tank is not correctly in place and the valve on the bottom is not open | Press the tank down lightly to open the valve on the bottom | ||
| The espresso coffee drips from the edges of the filter holder rather than the holes | The filter holder is inserted incorrectly | Attach the filter holder correctly and rotate firmly as far as it will go | |
| The espresso boiler gasket has lost elasticity | Have the espresso boiler gasket replaced by Customer Services | ||
| The holes in the filter holder spouts are blocked | Clean the spout holes. | ||
| The pump is excessively noisy The water tank is empty Fill the tank | |||
| Press the tank down lightly to open the valve on the bottom | |||
| The espresso coffee is cold The espresso coffee OK light was not on when the coffee switch was pressed | Wait until the OK light comes on | ||
| No preheating was done Preheat as described in the section “8.1 Preheating the coffee unit” | |||
| The cups were not preheated Heat the cups by rinsing them in hot water or standing them on the cup warmer tray for at least 20 minutes | |||
| Scale/hard water deposits in the water circuit | Perform the descaling procedure as described in the section “8. espresso coffee” | ||
| The coffee froth is too light (delivered from the spout too fast) | The pre-ground coffee is not pressed down firmly enough | Press the pre-ground coffee down more firmly (fig. 18) | |
| There is not enough pre-ground coffee increase | lease the quantity of pre-ground coffee | ||
| The pre-ground coffee is too coarse Use only | pre-ground coffee for espresso coffee makers | ||
| The wrong type of pre-ground coffee is being used | Change the type of pre-ground coffee | ||
| The coffee froth is too dark (delivered from the spout too slowly) | The pre-ground coffee is pressed down too firmly | Press the coffee down less firmly (fig. 17) | |
| There is too much pre-ground coffee Reduce the quantity of pre-ground coffee | |||
| The espresso boiler outlet is blocked Clean | as described in the section “13.2 Cleaning the boiler outlet”. | ||
| The pre-ground coffee is too fine or damp | Use pre-ground coffee for espresso coffee makers only and make sure it is not too damp | ||
| The wrong type of pre-ground coffee is being used | Use a different type of pre-ground coffee | ||
| The filter holder cannot be attached to the appliance | Too much coffee has been placed in the filter | Use the measure supplied and make sure you are using the correct filter for the type of preparation | |
| No milk froth is formed when making cappuccino | Milk not cold enough Always use semi-skimmed milk at refrigerator temperature | ||
| Cappuccino maker dirty Thoroughly clean the holes in the cappuccino maker, in particular those indicated in fig. 26-28 | |||
| The drip or espresso coffee has an acid flavour | Inadequate rinsing after descaling Rinse the appliance as described in the section “‘14.1 Descaling the espresso coffee unit” or “14.2 Descaling the drip coffee unit” | ||
| The drip coffee takes longer to percolate | The drip coffee maker needs to be descaled | Perform the descaling procedure as described in the section “14.2 Descaling the drip coffee unit” | |

1. IMPORTANT SAFETY MEASURES
7.4 "1-4" cups button
- COFFEE MAKER
- IMPORTANT SAFEGUARDS
- SAVE THESE INSTRUCTIONS
- THIS PRODUCT IS FOR HOUSEHOLD USE ONLY
- SHORT CORD INSTRUCTIONS
- READ THIS INSTRUCTION BOOKLET CAREFULLY BEFORE INSTALLING AND USING THE APPLIANCE. THIS IS THE ONLY WAY TO ENSURE THE BEST RESULTS AND MAXIMUM SAFETY FOR THE USER
- SAFETY WARNINGS
- DESCRIPTION (PAGE 3)
- DESCRIPTION OF THE APPLIANCE
- DESCRIPTION OF CONTROL PANEL
- DESCRIPTION OF THE ACCESSORIES
- INSTALLATION
- ANTICHLORINE FILTER
- FIRST USE
- PREPARATION OF DRIP COFFEE
- SETTING THE CLOCK
- PROGRAMMING THE AUTOMATIC START (AUTO BUTTON)
- PLEASE NOTE
- LENGTH OF WARMING TIME (AUTOMATIC SHUT-OFF TIME)
- CUPS BUTTON
- MAKING DRIP COFFEE
- ESPRESSO COFFEE
- PREHEATING THE COFFEE UNIT
- HOW TO MAKE ESPRESSO COFFEE USING PRE-GROUND COFFEE
- IMPORTANT
- DANGER OF BURNS
- HOW TO PREPARE ESPRESSO COFFEE USING PODS
- HOW TO MAKE CAPPUCCINO OR LATTE
- MAKING HOT MILK (WITHOUT FROTH) (MODELS WITH ADJUSTABLE CAPPUCCINO ONLY)
- CLEANING THE CAPPUCCINO MAKER AFTER USE
- MODELS WITH ADJUSTABLE CAPPUCCINO MAKER
- MODELS WITH CAPPUCCINO MAKER
- ALL MODELS
- HOT WATER
- CLEANING
- DANGER
- ESPRESSO COFFEE FILTER CLEANING AND MAINTENANCE
- CLEANING THE BOILER OUTLET
- OTHER CLEANING OPERATIONS
- DESCALING
- DESCALING THE ESPRESSO COFFEE UNIT
- DESCALING THE DRIP COFFEE UNIT
- TECHNICAL CHARACTERISTICS
- TROUBLESHOOTING
- IMPORTANT SAFETY MEASURES
Brand : DELONGHI
Model : BCO432
Category : Coffee maker