
UR 1205 - Alarm Clock Karcher Audio - Free user manual and instructions
Find the device manual for free UR 1205 Karcher Audio in PDF.


| Product Type | Alarm clock radio with wake-up light |
| Brand | Karcher Audio |
| Model | UR 1205 |
| Power Source | AC 230V ~ 50 Hz (65W) |
| Battery Backup | 1 x CR2032 lithium battery (3V, not included) |
| Radio Frequency Range | FM 88 – 108 MHz |
| Alarm Types | Buzzer, Radio, Nature sounds |
| Wake-Up Light | Gradual increase over 20 minutes, intensity levels 1-20 |
| Light Bulb Type | E14 (medium screw), max 60W (halogen or standard, not included) |
| Number of Radio Presets | 10 FM stations |
| Sleep Timer | 10 to 90 minutes |
| Snooze Time | Approximately 9 minutes |
| Display | LED clock with dimmer (High/Low) |
| Line Input | 3.5 mm stereo jack (cable not included) |
| Clock Format | 12 Hr or 24 Hr selectable |
| Speaker | Built-in |
| Dimensions | Not specified in manual |
| Weight | Not specified in manual |
| Safety Certifications | CE compliant, disposal according to WEEE directive |
| Manual Languages | English, German (and others available online) |
Frequently Asked Questions - UR 1205 Karcher Audio
User questions about UR 1205 Karcher Audio
0 question about this device. Answer the ones you know or ask your own.
Ask a new question about this device
Download the instructions for your Alarm Clock in PDF format for free! Find your manual UR 1205 - Karcher Audio and take your electronic device back in hand. On this page are published all the documents necessary for the use of your device. UR 1205 by Karcher Audio.
USER MANUAL UR 1205 Karcher Audio
Clock Radio with Wake-Up-Light | User Manual
(No text)
(No text to output)
|
1
Vorwort
-
Read Instructions - All the safety and operating instructions should be read before the appliance is operated.
-
Retain Instructions - The safety and operating instructions should be retained for future reference.
-
Heed Warnings - All warnings on the appliance and in the operating instructions should be adhered to.
-
Water and Moisture – Do not use the apparatus near water (e.g. bath tub, sink, swimming pool) or in wet places or tropical climates. Do not place objects filled with liquids, such as vases, on top of the apparatus. Do not expose the apparatus to dripping or splashing.
-
Setup – The apparatus should only be placed on a stable, flat surface. Do not let the apparatus fall down or expose it to shock.
-
Wall or Ceiling Mounting - The appliance should be mounted to a wall or ceiling only as recommended by the manufacturer.
-
Ventilation - The appliance should be situated so that its location or position does not interfere with its proper ventilation. For example, the appliance should not be situated on a bed, sofa, rug, or similar surface that may block the ventilation openings; or, placed in a built-in installation, such as a bookcase or cabinet that may impede the flow of air through the ventilation openings. Ensure a minimum distance of 5 cm around the apparatus for sufficient ventilation. Ensure that the ventilation is not impeded by covering the ventilation openings with items such as newspapers, table-cloths, curtains, etc.
-
Heat - The appliance should be situated away from heat sources such as radiators, heat registers, stoves, or other appliances (including amplifiers) that produce heat.
-
Power Sources - The appliance should be connected to a power supply only of the type described in the operating instructions or as marked on the appliance.
-
Cables and Plugs – The mains plug shall remain readily operable. All cables should be routed so that they are not likely to be walked on or pinched by items placed upon or against them, paying particular attention to cords at plugs, convenience receptacles, and the point where they exit from the appliance.
-
Cleaning - The appliance should be cleaned only as recommended by the manufacturer. Clean by wiping with a dry and clean cloth. Do not use chemical cleaners or detergents. Always pull the mains plug before cleaning the unit.
-
Non-use Periods - The power cord of the appliance should be unplugged from the outlet when left unused for a long period of time.
-
Object and Liquid Entry - Care should be taken so that objects do not fall and liquids are not spilled into the enclosure through openings.
-
Damage Requiring Service - The appliance should be serviced by qualified service personnel when:
a) The power-supply cord or the plug has been damaged; or
b) Objects have fallen, or liquid has been spilled into the appliance; or
c) The appliance has been exposed to rain; or
d) The appliance does not appear to operate normally or exhibits a marked change in performance; or
e) The appliance has been dropped, or the enclosure damaged.
-
Servicing - The user should not attempt to service the appliance beyond that described in the operating instructions. All other servicing should be referred to qualified service personnel.
-
Open Fire – Keep the apparatus away from open fires. Do not place naked flame sources, such as lighted candles on the apparatus.
-
Thunderstorms – During a thunderstorm the mains plug should be unplugged.
-
Safety Check – After servicing the technician should conduct a safety check in order to
12 - EN
ensure that the apparatus is working properly and safely.
- Batteries – Always place batteries in the correct polarization into electrical components. Danger of explosion if battery is incorrectly replaced. Replace only with the same or equivalent type. Do not mix old and new batteries. Take attention to the environmental aspects of battery disposal. Batteries shall not be exposed to excessive heat such as sunshine, fire or the like. Remove batteries before disposing of the product.
- Headphones (if applicable) – Excessive sound pressure from earphones and headphones can cause hearing loss.

WARNING: To reduce the risk of fire or electric shock, do not expose this appliance to dripping or splashing.
WARNING: To reduce the risk of electric shock, do not remove cover (or back). No user serviceable parts inside. Refer servicing to qualified service personnel.

The lightning flash with arrowhead symbol within an equilateral triangle is intended to alert the user to the presence of uninsulated dangerous voltage within the product's enclosure that may be of sufficient magnitude to constitute a risk of electric shock to persons.

The exclamation point within an equilateral triangle is intended to alert the user to the presence of important operating and maintenance (servicing) instructions in the literature accompanying the appliance.

Batteries
Batteries may not be disposed of in regular house hold trash. Every consumer has the obligation to return batteries to special disposal locations.

Disposal of Used Electrical & Electronic Equipment
The meaning of the symbol on the product, its accessory or packaging indicates that this product shall not be treated as household waste. Please, dispose of this equipment at your applicable collection point for the recycling of electrical & electronic equipments waste. By ensuring the correct disposal of this product, you will help prevent potential hazards to the environment and to human health, which could otherwise be caused by unsuitable waste handling of this product. The recycling of materials will help conserve natural resources. For more detailed information about recycling of this product, please contact your local city office, your household waste disposal service or the shop where you purchased the product.


- Natural sound selector
- Memory Up
- Alarm 1 On/Set
- To set the Light intensity High
- To set the Light intensity Low
- Light ON/OFF
- Clock set / memory
- Snooze / Sleep
- Function
- ON/OFF
- Volume Down
- Volume Up
- Alarm 2 On/Set
-
Tune -
-
Tune +
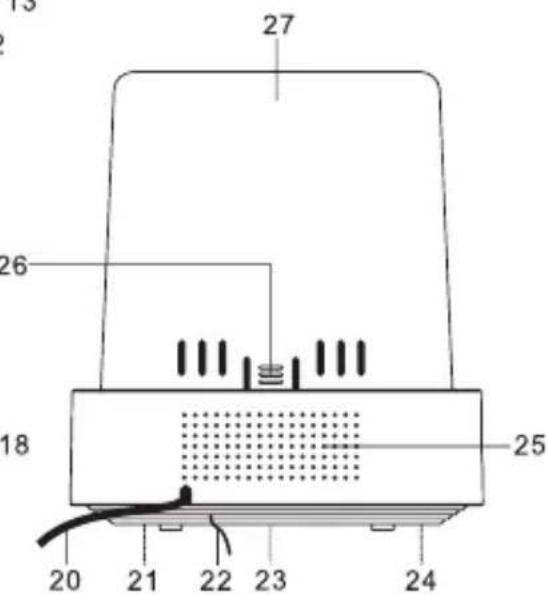
- Light bulb
- Light Bulb holder
- Line In
- Display
- AC Power Cord
- Rating label (rear of unit
- FM Antenna
- Battery compartment (rear of unit)
- Display High/Low dimmer
- Speaker
- Opening the Lamp shade
- Lamp shade
To install a bulb or replace a burned-out bulb, please note the followings:
- Press the Light ON/OFF button on the base unit to the OFF,
- Unplug the light from the power source. Do not unplug the light by pulling on cord directly.
- Gently turn the light bulb in counter-clockwise direction to unlock it, then unplug it from the light bulb holder.
WARNING: DO NOT ATTEMPT TO REPLACE BULB IMMEDIATELY AFTER IT HAS BURNT-OUT AS BULB AND LAMP COVER ARE HOT. BEFORE REPLACING THE BULB, TURN OFF THE LIGHT AND ENSURE THAT THE AC CORD IS UNPLUGGED.
- Insert one E14 (Medium screw) maximum 60 watts standard / light bulb on top of bulb holder. Gently turn this bulb leftward to look firmly into the lamp holder or gently turn it
right firmly to unlock it from the lamp holder. Make sure to use correct size and watts when replacing the bulb.
Note: Max 60 watts light bulb (E14 medium screw type for normal or halogen energy saving type - not included).
IF ENERGY SAVING BULB ARE USED, ONLY HALOGEN TYPE IS SUPPORTED.
WARNING: TO REDUCE THE RISK OF LIGHT BULB DAMAGE, BE CAREFUL NO TO GRIP THE LIGHT BULB TOO TIGHTLY.
Connect the AC plug into a household outlet AC source.
- Press the Light ON/OFF again to the ON as needed.
POWER CONNECTION
Plug the AC power cord to a householder outlet AC source. This unit is equipped with a battery back up system, it requires a 1pc 3V "CR2032" lithium battery (not included). Insert the battery in the battery compartment, making certain that the positive and negative (+ and -) battery terminals are attached to the corresponding terminals on the plate in the battery compartment. If an AC power failure occurs, the clock automatically switches to the battery power supply, the clock and timer memory continue running. When the AC power resumes, the clock switches back to AC again.
OPERATING INSTRUCTIONS
Setting Clock Time
With the OFF mode, press and hold the clock set / memory button; “12 Hr” will blink. Press the Tune + or Tune – button to set the unit to the “24 Hr” mode or “12 Hr” mode. Press the Clock set / memory button and the hours will blink. Press the Tune + or Tune – to set the current hour, then press the clock set / memory button again the minute digits will blink. Press the Tune + or Tune – to set the current minutes. When done and you press clock set/memory button once again and the display time will blink to indicate the current time is set.
Setting Alarm Time
When you set the alarm, you choose the light intensity level, the type of sound and the sound level. The alarm is set when the light ring round the ALARM button burns. The light intensity slowly increases to the chosen level during the last 20 minutes before the set alarm time.
*For example, if you set the alarm time on 8:30 am, the light will slowly increase to max level 20 started from 8:10 am.
To preview the alarm time, press the ALARM button once.
While the display is showing the alarm time and hold the ALARM button for 3 seconds and the hours will blink.
Press the Tune + or Tune - to set the alarm hour.
Press the ALARM button again; the minute digits will blink. Press the
Tune + or Tune – to set the alarm minutes.
Press the ALARM button and you can change the sound mode (Buzzer, Radio, Nature) for the alarm.
Press the Tune + or Tune - to choose different sound mode.
Press the ALARM button again; the volume digits will blink, press the Tune + or Tune – to set the alarm sound level.
Press the ALARM button again; the light digits will blink, press the Tune + or Tune – to set the alarm light level.
Then press the ALARM button when done.
To delay the alarm, press SNOOZE, it will come on again in approx. 9 minutes. You may repeat this cycle several times during the alarm cycle.
To stop the alarm, press ALARM button or ON/OFF button.
To stop the alarm from coming on the following day, hold the ALARM button to turn it off. The alarm icon or will disappear to indicate the alarm is disarmed.
Setting the light intensity level
- Use the light adjustment button 4 & 5 to set the light intensity level.
- The light intensity level between 1 to 20 for alarm function.
Listening to Radio
- Press the ON/OFF button to turn the unit on.
- Press the FUNCTION button to select the Radio mode.
- Use the Tune + or Tune – button to select the desired FM station. If you press and hold the Tune + or Tune – button for one second, then release, the unit will automatically scan to the next broadcasting station.
- Press the ON/OFF button to turn the radio OFF.
To set / recall the radio presets
- Press the ON/OFF button to turn the unit on.
- Press the FUNCTION button to select the Radio mode.
- Use the Tune + or Tune - button to select the desired FM station.
- Press the Clock set/memory button; "M02" will blink in the display.
- Press the Clock set/memory button again to set the preset.
- Repeat steps 3 through 5 to set more presets.
- The unit can preset 10 stations totally for FM.
- When "M01-M10" is blinking, press the Tune + or Tune - button to select the preset number.
- When recalling preset stations, press Memory Up to select the preset number.
Sleep operation
When listening to radio, press Snooze / Sleep button to enter sleep mode. You can just adjust the sleep timer from 90 mins to 10 mins by pressing the Snooze / Sleep button. The unit will automatically turn off after the selected time.
If holding the Snooze / Sleep button for 4 seconds, sleep mode will turn off.
Line in
The Line in Jack can be used to playback alternate audio signal sources on the unit speakers.
This Line in jack requires a 3.5 mm audio cable for input signal.
Note: The 3.5 mm audio cable is not included.
SPECIFICATIONS
Frequency range: FM 88 – 108 MHz
Battery backup: 3V (CR2032 Flat lithium battery x 1) not included.
Power Source: AC230V \~ 50 Hz (65W)
Technical specifications and design may change without notice.
1.
A.
Press the ALARM button once. While the display is showing the alarm time and you hold the ALARM button for 3 seconds and the hours will blink.

2.
A.
Press the ALARM button again; the minute digits will blink.

3.
A.
Press the ALARM botton and you can change the sound mode (Buzzer,radio,nature) for the alarm.

4.

flowchart
graph TD
    A["Press the ALARM button again; the volume digits will blink."] --> B["Press the Tune + or Tune - to set the ALARM sound level."]
    B --> C["End with a vehicle icon"]
5.


(No text)
(No text to output)
|
1
Karcher
www.karcher-products.de
Brand : Karcher Audio
Model : UR 1205
Category : Alarm Clock