
TMH-2800 - Hi-Fi System TELEFUNKEN - Free user manual and instructions
Find the device manual for free TMH-2800 TELEFUNKEN in PDF.


| Product Type | Hi-Fi System |
| Brand | Telefunken |
| Model | TMH-2800 |
| Main Functions | CD Player, FM/AM Radio, USB Playback, Bluetooth Streaming, AUX Input |
| Speaker Configuration | 2.0 Stereo System with Two Separate Speakers |
| Power Output | 40W RMS (2 x 20W) |
| Power Supply | AC 110-240V, 50/60Hz |
| Dimensions (Main Unit) | 200mm x 250mm x 100mm (W x H x D) |
| Dimensions (Speaker Each) | 150mm x 250mm x 180mm (W x H x D) |
| Weight (Total System) | Approx. 5.5 kg |
| Display Type | LCD Screen with Backlight |
| Remote Control | Included (Battery Type: CR2025) |
| Supported Disc Formats | CD, CD-R, CD-RW, MP3-CD |
| Radio Bands | FM (87.5-108 MHz), AM (530-1600 kHz) |
| USB Port | USB 2.0, Supports MP3/WMA Playback |
| Bluetooth Version | 4.2, Range up to 10m |
| Audio Inputs | 1 x AUX (3.5mm), 1 x RCA (L/R) |
| Audio Outputs | Headphone Jack (3.5mm) |
| Care and Cleaning | Wipe with a soft, dry cloth. Do not use solvents. |
| Safety Warnings | Do not expose to water, heat sources, or excessive dust. |
| Spare Parts Availability | Contact Telefunken service center for spare parts. |
Frequently Asked Questions - TMH-2800 TELEFUNKEN
User questions about TMH-2800 TELEFUNKEN
0 question about this device. Answer the ones you know or ask your own.
Ask a new question about this device
Download the instructions for your Hi-Fi System in PDF format for free! Find your manual TMH-2800 - TELEFUNKEN and take your electronic device back in hand. On this page are published all the documents necessary for the use of your device. TMH-2800 by TELEFUNKEN.
USER MANUAL TMH-2800 TELEFUNKEN
natural_image
Exterior view of a modern electronic device with front panels and control panel (no visible text or symbols)DVD/HI FI SYSTEM
INSTRUCTIONS FOR USE AND CARE
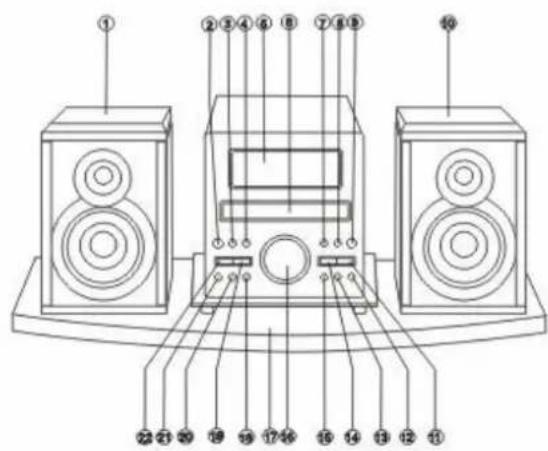
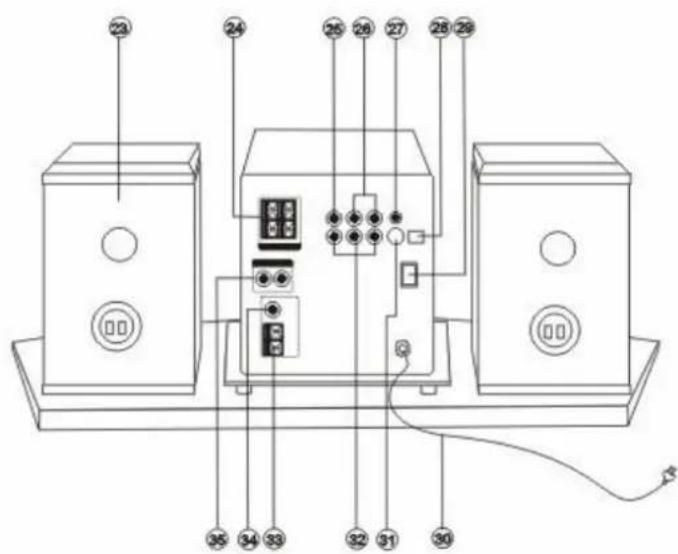
NAMES OF CONTROLS AND INDICATORS
- LEFT SPEAKER
- MULTI CONTROL
- REPEAT/STEREO BUTTON
- WOODEN STAND (OPTION)
- PROG./MEM. BUTTON
- VOLUME/BASS/TREBLE CONTROL
- PRESET EQ BUTTON
- SLEEPING TIME SETTING BUTTON
- VFD DISPLAY
- FUNCTION SELECTING BUTTON
- DVD DRAWER
- STANDBY BUTTON
- DVD SKIP BACKWARD/RADIO
- CLOCK SETTING BUTTON
PRESET STATION BACKWARD - RIGHT SPEAKER WIRE JACK
SELECTION BUTTON - SPEAKER OUTPUT JACK
- PLAY BUTTON
- VIDEO OUTPUT JACK
- DVD SKIP FORWARD / RADIO
- AUDIO OUTPUT JACK
PRESET STATION BACKWARD - COAXIAL OUTPUT JACK
SELECTION BUTTON - OPTICAL JACK
- RIGHT SPEAKER
- POWER ON/OFF CONTROL
- DVD FAST FORWARD/RADIO
- AC WIRE
OBVERSELY TUNE BUTTON - S-VIDEO JACK
- OPEN / CLOSE BUTTON
- Y, Cb, Cr OUTPUT JACK
- STOP BUTTON / BAND SWITCH
- MW ANTENNA JACK
- DVD FAST REWIND/RADIO
- FM ANTENNA JACK
INVERSELY TUNE BUTTON - AUX INPUT JACK
- REMOTE CONTROL SENSOR
NAMES OF CONTROLS AND INDICATORS
REMOTE CONTROL
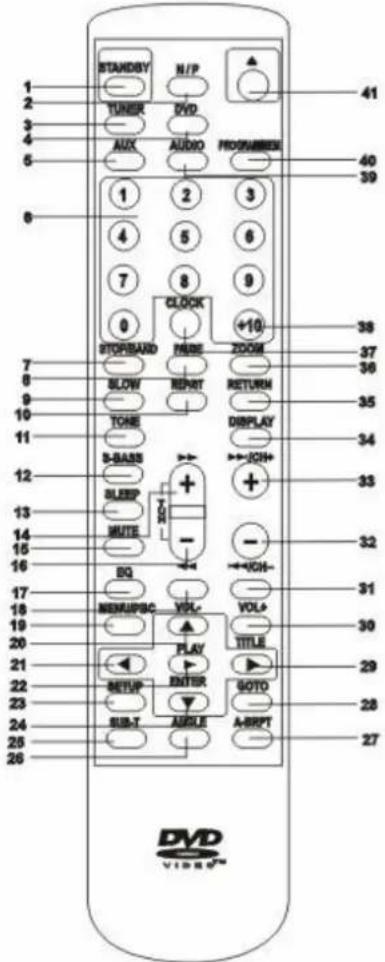
THE INSTRUCTIONS IN THIS MANUAL DESCRIBE
THE FUNCTIONS ON THE REMOTE CONTROL
-
STANDBY
-
NTSC/PAL
-
TUNER
-
DVD
-
AUXILIARY
-
NUMBER BUTTONS
-
STOP/BAND
-
PAUSE
-
SLOW
-
REPEAT/STEREO
-
TONE
-
S-BASS
-
SLEEP
-
FAST FORWARD/TUN+
-
MUTE
-
FAST REWIND/TUN-
-
EQUALIZER
-
VOLUME DOWN
-
MENU/PBC
-
DIRECTION UP
-
DIRECTION LEFT
-
PLAY/ENTER
-
SETUP
-
DIRECTION DOWN
-
SUB-TITLE
-
ANGLE
-
A-B REPEAT
-
GOTO
-
DIRECTION RIGHT
-
TITLE
-
VOLUME UP
-
SKIP BACKWARD/CH-
-
SKIP FORWARD/CH+
-
DISPLAY
-
RETURN
36.ZOOM
- CLOCK
38.+10 BUTTON
-
AUDIO
-
PROGRAM/MEMORY
-
OPEN/CLOSE
CONNECTION
Notes:
Before connecting the AC cord, please check that the rated voltage shown on the rear panel matches your local voltage.
➢ Connect the speakers, antennas, and all optional equipment first. Then connect the AC cord.
➢ Please look at the attached connection diagram for reference.
FM wire antenna connection
You can use the FM wire antenna or coaxial joint (75) antenna. For best reception, put the antenna as far away as possible from the unit, connection wire and AC cord. Adjust the direction of antenna for best reception when receiving FM station.
AM loop antenna connection
Open the AM antenna jack which lies at the back of the unit, then insert the antenna's leads into the jack and lock it well. Adjust the antenna's direction for best reception.
Speaker connection
Connect the speakers to the unit or subwoofer by the speaker wires, ensuring that the red wire goes to the red jack, and black wire to the black jack.
Connecting auxiliary equipment to the system
You can connect the audio left and right out terminals of auxiliary equipment to the AUX INPUT terminals at the rear of the unit.
TV connection
Use the video connection wire to connect a TV to the unit. Considering the various options, there are AUDIO, VIDEO, and S-VIDEO output jacks on the rear cabinet.
AC power cord connection
After all other connections have been made, connect the AC power cord of the system and subwoofer to the wall outlet.
AC POWER OPERATION
Before using the function of the remote control as well as the deck of the main unit, press the POWER button to activate the main power of the system.
Put through power
Press the STANDBY button to turn on the unit from STANDBY mode and the VFD starts to display the information.
Shut off power
Press the STANDBY button again to turn off the system (this means the system is in STANDBY mode). If clock has been set correctly, VFD will display the time.
WARNING:
If the system will be out of use for a long time, please use the POWER button on the back cabinet of the unit to shut off the main power. Don't turn the system on & off continuously, otherwise the system will be abnormal. For each turning on and turning off, the time interval should beyond a minute.
BASIC CONTROL OF SOUND
Before adjusting the sound effects, press the volume/bass/treble selecting button (TONE button) on the unit or remote control to select volume, bass or treble mode.
Volume control
Under the mode of volume, turning the MULTI CONTROL knob on the unit or pressing the VOL+ or the VOL- button on the remote control will adjust the volume.
Bass control
Under the mode of bass, turning the MULTI CONTROL knob on the unit or pressing the VOL+ or the VOL- button on the remote control will adjust the bass intensity.
Treble control
Under the mode of treble, turning the MULTI CONTROL knob on the unit or pressing the VOL+ or the VOL- knob on the remote control will adjust the treble intensity.
Strengthen bass effect
Press the S-BASS button on the remote control to get super bass effect; the VFD will display "S-BASS". Press the S-BASS button again to cancel the effect.
Preset equalizer selecting
This system possesses five built-in effects: "FLAT", "POP", "JAZZ", "CLASSIC" and "ROCK". Press the P-EQ button on the unit or press the EQ button on the remote control to select the effect that you want.
Mute
If you press the MUTE button on the remote control, the output sound disappears, however the disc will continue playing. Press the MUTE or VOL+ / VOL- button to return to sound playing.
RADIO OPERATION
This unit can receive both AM and FM radio stations. There are three modes for receiving broadcasts: manual selection, automatic selection and preset selection.
NOTE:
Before receiving radio broadcast, please check that the antenna for AM or FM has been correctly connected.
Radio station selection
- Press the FUNCTION button on the unit or the TUNER button on the remote control to select TUNER source.
- Press the ■ / BAND button to change the band between AM and FM.
- You can choose any of the following ways to select the radio station of your choice.
Manual Selection
Press the ▶▶/TUN+ button or the ◀◀/TUN- button, and the frequency will change little by little, until you find the station you want.
Automatic Selection
If you press the ▶▶/TU+ button or the ◀◀/TU- button for more than one second, the frequency will automatically be adjusted up or down, until a station is found.
Preset Selection (This can only be used after the radio station has been set)
Press the NUMBER buttons to select the radio station that you want to preset. Then, VFD will display the band and the frequency of the radio station that you have preset.
Preset radio station
- You can preset 16 band stations for AM and another 16 band stations for FM.
- Press the NUMBER buttons to choose the number firstly. The preset number will display on the screen.
- Tune to the radio station that you wish to store.
- Press the PROGRAM/MEM button and the word "MEM" will display on the VFD.
- Press the PROGRAM/MEM button again and you can store the frequency of the radio station; on the VFD the word "MEM" will disappear.
- Repeat the above steps 1-4 so that you can store every radio station you want in the preset numbers.
FM reception mode
If the broadcast is in stereo, the word "STEREO" will display on VFD. If FM is not received clearly in stereo mode or there is some noise, press the REP/ST button to select MONO mode. At that time, the reception will improve but it will not be in stereo mode. If you want to return to stereo mode, press the REP/ST button and the word "STEREO" will display on VFD again.
DVD OPERATION
Basic play
- Press the FUN button on the unit or DVD button on the remote control to select DVD function.
- Press the OPEN/CLOSE (on the remote control▲) button to open the disc tray.
- Place the disc on the disc tray.
- Press the PLAY/ENTER button. Playback will then commence.
How to select the track
If you want to play the second track or chapter, press the number "2" button directly, then press PLAY/ENTER button to play the second track or chapter.
How to pause playback (still playback)
- Press the PAUSE button during playback.
- Press the PLAY/ENTER button to resume normal playback.
How to remove the disc
- Press the OPEN/CLOSE button.
- Wait until the disc tray is completely open before removing any discs.
- After removing the discs, press the OPEN/CLOSE button to close the disc tray.
- For best care, return your disc to it's original case.
How to stop playback
If the STOP button is pressed once, the DVD player is stopped. At this point, press the PLAY/PAUSE button to re-start the disc from the same point.
If the STOP button is pressed twice, the disc will stop completely.
Fast Forward / Rewind
Press the ▶▶/TU+ or ◀◀/TU- button once, the disc will be played forward or backward at double (2x) speed. With each subsequent press, the disc will be played back at 4x, 8x, 16x, 32x speed. Press PLAY button again to return to normal play.
Skip Next / Previous
Press the ▶▶/CH+ or ◀◀/ CH- button to select the next track or the previous track.
Slow play
Press SLOW button when playing; with this function you can play the disc at 1/2, 1/4, 1/8, 1/16 of the normal speed. To return to normal speed, press the PLAY button again.
Zoom picture
This DVD player allows you to zoom in/out of a picture as well as shift the zoom point. Press ZOOM during normal play or slow motion, the DVD player magnifies in the center of the picture at 2x, 3x, 4x, 1/2, 1/3, 1/4 of the normal picture. In the ZOOM mode, you can use ▲/▼/◄buttons to move the picture for optimum viewing.
Repeat play
You can use the REP/ST button to repeat normal playback.
➢ Press the REP/ST button the first time to repeat playing the present chapter.
➢ Press the REP/ST button again to repeat playing the present title.
➢ Press the REP/ST button a third time to repeat playing the whole disc.
➢ Press the REP/ST button a forth time to cancel repeating playing and return to normal playing.
Note: With different discs, the REPEAT function may vary.
Repeat a specific section
You can repeat a certain section by using the A-B RPT button on the remote control. Firstly press the A-B RPT button at the beginning of the section you want, and press it again at the end of the section. The unit will repeat playback from A to B. If you want to cancel the repeat section, press the A-B RPT button once again.
Note: Some discs will not respond to the A-B REPEAT function.
Display
During playback, you can press the DISPLAY button on the remote control to show the various information available.
For DVD discs, the DISPLAY function button will allow you to view the following:
TITLE ELAPSED / TITLE REMAIN / CHAPTER ELAPSED / CHAPTER REMAIN / DISPLAY OFF
For VCD/CD discs, the DISPLAY function button will allow you to view the following:
SINGLE ELAPSED / SINGLE REMAIN / TOTAL ELAPSED / TOTAL REMAIN / DISPLAY OFF
GOTO function
If a DVD disc contains title numbers, you can locate a specific title by directly selecting a title number.
-
Press GOTO button during playback.
-
Press PLAY/ENTER button, make sure that the space next to TITLE is highlighted.
-
Press NUMBER button to select the title and chapter you want.
-
The disc will automatically play from the point you have selected.
NOTE:
By pressing▲/▼/◄/► you can shift the highlight between the TITLE and CHAPTERS.
In order to access the GOTO function on some discs, you must first press the PBC OFF.
To cancel GOTO function, press the GOTO button again.
Playing in a favourite order
Combine your favourite titles, chapters or tracks and play them in your favourite order.
How to set titles, chapters, or tracks in a favourite order
The program playback function will automatically playback titles, chapters or tracks in the order pre-programmed.
- Insert a disc, press the PROGRAM/MEM button in the STOP function. At this time, the menu will appear.
- Press PLAY/ENTER button, make sure the space next to TITLE is highlighted. Enter NUMBER button to select your favourite title and chapter.
- Press the ▲/▼/▲/▶ buttons to move the cursor to START, then press PLAY/ENTER button. The DVD player starts memory playback.
NOTE:
When the DVD player is turned off, or if the discs are removed, the programmed item will be cancelled.
➢ Depending on the disc, the program playback may not function.
If you press the STOP button once, the DVD player is stopped. At this point, press the PLAY button to re-start the disc from the same point.
If you press the STOP button twice, program playing will be cancelled.
Selecting the camera angles setting
This DVD player allows you to select from several different angles. Press the ANGLE button while playing back a scene recorded with multiple angles. You can only press the ANGLE button when the angle icon is flashing on the DVD display. Each time you press the ANGLE button, the angle will change. Press PLAY/ENTER button to confirm.
NOTE:
The angle function will not work on DVD discs that do not contain recorded multiple angles.
During still playback, you are able to change the camera angle. When you resume to normal playback, the camera angle changes to the new setting.
The angle icon indicator will illuminate while playing back a title that contains at least one scene recorded with multiple angles.
Selecting subtitles
This DVD player allows you to display the subtitles from those included on the disc on to your TV screen. Press the SUB-T button during playback, you then have the option to select a preferred subtitle from those included on the DVD disc. To turn off the subtitle function, press the SUB-T during playback until the subtitles disappear.
NOTE:
With some DVD's, you may not be able to turn off the subtitles and they will appear on screen automatically.
As you press the SUB-T button, the subtitles may not appear immediately during some screens.
If the subtitles continue to show on your TV even after the DVD has been turned off, please refer to the TV's close caption settings.
MP3 OPERATION
- To use this function you must view it through your television. Insert an MP3 CD, the DVD player will initialize the disc when the tray is closed and the directory (folder) will be shown in an MP3 MENU on screen.
- Press the ◀/▶ button twice to select and highlight the PLAY MODE. Then press the ▲/▼ button each way to select play mode options (repeat, shuffle, etc.) Then press the ◀/▶ button twice then the "down" key to select and highlight an MP3 file (song). Press the ENTER button to highlight your list of songs. Press "down" key to select and highlight.
- Press the PLAY button to play the MP3 file. Press ▶▶▶ or ◀ during playback to skip the tracks. If you need to return to the main directory (folder), press STOP.
NOTE:
The left column on the TV screen is a list showing the name of the folder. The right column on the TV screen is a list showing the name of the song and the sub-folder.
➢ Fast Forward▶▶ or ◀Fast Rewind are not available during MP3 playback.
“MP3” sign in front of a file name indicates that this is an MP3 file.
During MP3 playback, you cannot access to "PLAY MODE" folder or songs.
➢ You are allowed a maximum of 11 characters for each folder or song.
Customizing the function settings
This DVD player allows you to customize the performance to your personal preference.
Displaying the setup menu screen
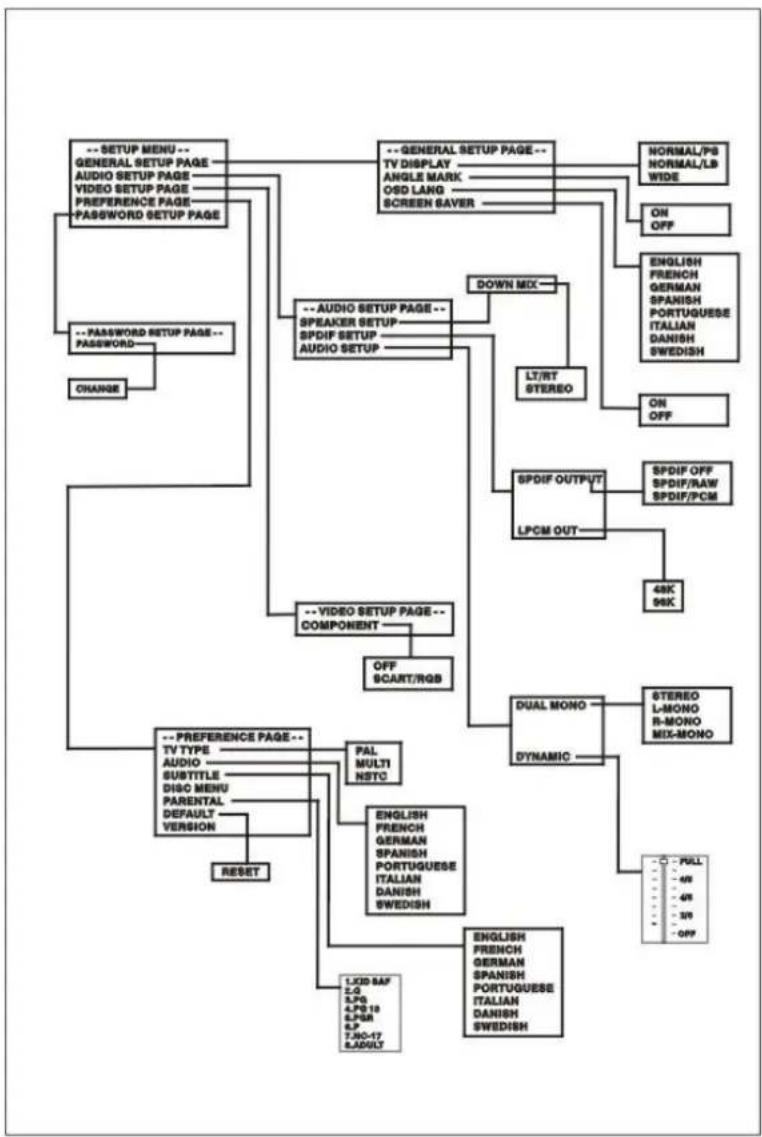
The SETUP MENU screen asks you to select a setting category from General Setup, Audio Setup, Video Setup, Preferences and Password Setup. The selected category will provide you with the setting details on-screen. Please look at the next page for more details.
- Press SETUP button.
- Press ▲/▼/◄/► to select category (highlight), then press PLAY.
- Press SETUP button again to normal playback.
NOTE:
➢ Preset password is 0000.
▶ Highlighted function will be expanded at bottom of the screen.
The SETUP MENU screen disappears if you press the SETUP button while it is displayed.
➢ Functions and menu may change without notice.
➢ Factory defaults.
You must press STOP to set up PREFERENCES.
OTHER OPERATION
Setting SLEEP function
Using the SLEEP timer you can program the system to turn off automatically after a certain period of time. You can use this function playing CD, VCD, DVD or radio. When you set the sleep time for the first time, press the SLEEP button repeatedly on the remote control to select the sleep time you want. The minute number will change as per the below sequence:
SLEEP 00 / SLEEP 10 / SLEEP 20 / SLEEP 30 / SLEEP 40 / SLEEP 50 / SLEEP 60 / SLEEP 70 / SLEEP 80 / SLEEP 90
If you want to change the preset sleep time, press the SLEEP button repeatedly to select another sleep time. The minute number will change as per the below sequence:
SLEEP 00 / SLEEP 10 / SLEEP 20 / SLEEP 30 / SLEEP 40 / SLEEP 50 / SLEEP 60 / SLEEP 70 / SLEEP 80 / SLEEP 90
After setting the desired sleep time, VFD will return to the normal state. When the setting of this function is finished, the system will switch off when the preset sleep time is reached.
Cancel Sleep Function
Repeatedly press the SLEEP button until the display "SLEEP 00" appears. Also, shutting the system off will cancel the sleep timer.
Setting clock
- Press the CLOCK button on the unit twice, then the hour number will flash.
- Set the hour number by pressing the ▶▶▶ / CH+ (on the remote control ▶▶▶) button or the ◀◀◀ / CH- (on the remote control ◀◀◀) button.
- Press the CLOCK button on the unit, then the minute number will flash.
- Set the minute number by pressing the ▶▶I / CH+ (on the remote control ▶▶I) button or the ◀◀/CH- (on the remote control ◀◀) button.
- Press the CLOCK button again, then the time has been set, and the second will be calculated from zero.
NOTE:
➢ You can set the clock while the unit is in STANDBY mode.
If an electricity blackout occurs or somebody cuts off the power supply, the clock will lose the preset time.
Troubleshooting
If breakdown occurs, please check the system according to this table and try and ascertain the possible problem. If you still can't solve the problem, please contact an authorized service agent to repair it as soon as possible.
| Problem | Possible | reason | Pos |
| No sound | Wrong connection or loose connection. System mute. | Check and correct all the connections. Cancel mute if active. | |
| Bad radio reception effect | Antenna not connected properly. AM annular antenna too close to the system. FM linear antenna not in a suitable place. | Connect the antenna properly. Change the position and direction of AM antenna. Unfold the FM antenna and move around until better reception received. | |
| Disc playing abnormal | Disc dirty or scratched. Clean or change disc. | ||
| Disc not playing | Disc placed upside down. | Turn the disc over with the label side facing up. | |
| Remote control not working | There is an obstruction between remote control and the sensor on the unit. Flat battery. Distance too far away from unit. | Clear away obstructions. Change batteries. Operate closer to unit. | |
| Can't operate system | External interference causing the CPU not to work. | Pull out the plug and insert again. | |
solution
NOTES:
- Please read this operation manual carefully before you operate this unit. Keep it in a safe place for future reference.
- When you want to cut off the electricity supply of the whole unit's power, press the POWER button on the rear panel of the unit. The STANDBY button can only make the unit standby, it can't switch off the unit.
- If you are not going to use your unit for a long period of time. Set the main POWER button on the back of the unit to "OFF", and take out the remote control battery to avoid any damage from battery leakage.
- Be cautious where the safety mark “⚠️” appears.
- If something is not operating correctly, please send to an authorized service agent to repair. Don't take it apart yourself.
-
Because of a sudden change in temperature or humidity, or when warm air comes into contact with any cold parts in the unit, condensation may form. When condensation forms inside, the unit may not function properly. Once condensation disappears, the unit will return to normal functioning. Placing the unit in a warm room will help to dry up condensation. This should take 1 to 2 hours, depending on environmental conditions. As condensation may also appear on the disc, it should be wiped from the center of the disc towards the outer side using a soft dry cloth.
-
It is dangerous to use warped or broken discs since lasers rotate at high speed. Never use discs repaired with plastic tape or glue, as it will lead to damage. After playing, if you hear strange noise or the unit flutters, e.g. the disc does not turn smoothly, stop playing immediately.
- Please remove the discs after use and put them into their original cases and store them in a vertical position. Tilting or piling may lead to warping.
- Please keep the discs away from direct sunlight, high temperature and humidity.
- Do not stick any labels on discs.
- Do not scratch the surface of discs.
MAINTENANCE
Cleaning the cabinet
Use a soft cloth slightly moistened with a mild detergent solution. Do not use a solution containing alcohol, spirits, ammonia or abrasives.
Cleaning discs
When a disc becomes dirty, clean it with a soft clean cloth. Wipe the disc from the centre outwards. Do not use solvents such as benzine, thinner, commercially available cleaners or antistatic spray as these can damage the disc.
Cleaning the heads and the tape paths
To ensure good recording and playback quality, clean the heads, the capstans, and pressure rollers after every 50 hours of tape operation. Use a cotton swab slightly moistened with cleaning fluid or alcohol. You can also clean the heads by playing a cleaning tape once.
WARNING:
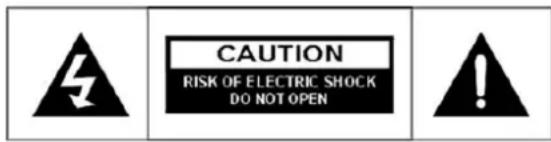
To prevent fire or shock hazard, do not expose this unit to rain or moisture. Do not remove cover, no user serviceable parts inside, refer servicing to qualified service personnel.
AUSTRALIA SALES / DISTRIBUTION SOLELY BY:
PRIMA AUSTRALASIA PTY LTD
P.O. BOX 326, BRAESIDE, 3195
VICTORIA AUSTRALIA
PHONE: (03) 8586 1000 / 1300 366 155
www.primaaustralasia.com.au
- NAMES OF CONTROLS AND INDICATORS
- REMOTE CONTROL
- CONNECTION
- Notes:
- FM wire antenna connection
- AM loop antenna connection
- Speaker connection
- Connecting auxiliary equipment to the system
- TV connection
- AC power cord connection
- AC POWER OPERATION
- Put through power
- Shut off power
- WARNING:
- BASIC CONTROL OF SOUND
- Volume control
- Bass control
- Treble control
- Strengthen bass effect
- Preset equalizer selecting
- Mute
- RADIO OPERATION
- NOTE:
- Radio station selection
- Manual Selection
- Automatic Selection
- Preset Selection (This can only be used after the radio station has been set)
- Preset radio station
- FM reception mode
- DVD OPERATION
- Basic play
- How to select the track
- How to pause playback (still playback)
- How to remove the disc
- How to stop playback
- Fast Forward / Rewind
- Skip Next / Previous
- Slow play
- Zoom picture
- Repeat play
- Repeat a specific section
- Display
- GOTO function
- Playing in a favourite order
- How to set titles, chapters, or tracks in a favourite order
- Selecting the camera angles setting
- Selecting subtitles
- MP3 OPERATION
- Customizing the function settings
- Displaying the setup menu screen
- OTHER OPERATION
- Setting SLEEP function
- Cancel Sleep Function
- Setting clock
- Troubleshooting
- MAINTENANCE
- Cleaning the cabinet
- Cleaning discs
- Cleaning the heads and the tape paths
- AUSTRALIA SALES / DISTRIBUTION SOLELY BY:
Brand : TELEFUNKEN
Model : TMH-2800
Category : Hi-Fi System