
TCD62 - Hi-Fi System TELEFUNKEN - Free user manual and instructions
Find the device manual for free TCD62 TELEFUNKEN in PDF.


| Product Type | Hi-Fi System |
| Brand | Telefunken |
| Model | TCD62 |
| Dimensions (W x H x D) | 43.7 cm x 21.4 cm x 24.4 cm |
| Weight (without batteries) | Approx. 4.16 kg |
| Power Supply (Main Unit) | AC 110-240V (selectable), 50/60 Hz; DC 12V (8 x D batteries) |
| Power Consumption | 22 W |
| Remote Control Battery | DC 3V (2 x AAA batteries) |
| Radio Frequency Bands | AM (522-1620 kHz or 520-1710 kHz) and FM (87.5-108 MHz) |
| Preset Stations | 10 AM + 10 FM |
| CD Playback | Compact Disc Digital Audio, 1-bit D/A converter, 8x oversampling |
| CD Programmable Tracks | Up to 21 tracks |
| Cassette Tape Compatibility | Normal tape only (not CrO2, Fe-Cr, or Metal) |
| Recording Sources | Built-in radio, built-in microphone, compact disc |
| Speaker Output Power | 2 x 2.5 W RMS (max); 500 W P.M.P.O. |
| Headphones Impedance | 8 – 32 ohms |
| Bass Boost | Yes, switchable on/off |
| Remote Control Range | Up to 3 meters, ±30° horizontally |
| Safety Features | Class 1 laser product; avoids exposure to moisture; ventilation required |
| Maintenance | Clean tape heads with alcohol or head cleaner; clean CD with soft cloth from center to edge |
| Spare Parts / Repairability | Contact authorized service center; refer to manual for service |
Frequently Asked Questions - TCD62 TELEFUNKEN
User questions about TCD62 TELEFUNKEN
0 question about this device. Answer the ones you know or ask your own.
Ask a new question about this device
Download the instructions for your Hi-Fi System in PDF format for free! Find your manual TCD62 - TELEFUNKEN and take your electronic device back in hand. On this page are published all the documents necessary for the use of your device. TCD62 by TELEFUNKEN.
USER MANUAL TCD62 TELEFUNKEN
natural_image
Line drawing of three identical electronic devices with front panels and control panel (no text or symbols)
MODEL TCD62
INSTRUCTIONS FOR USE AND CARE
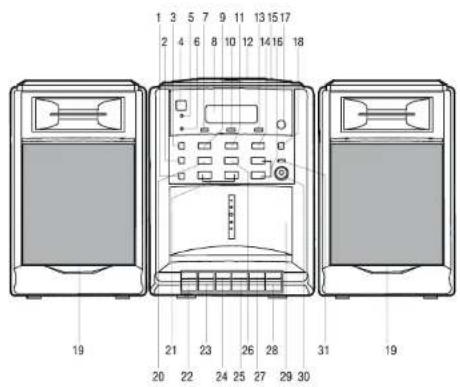
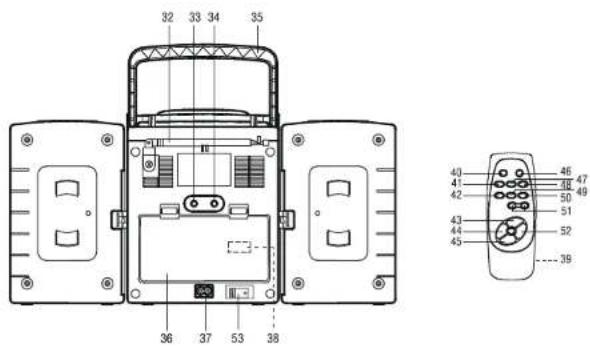
LOCATION OF CONTROLS
-
CD REPEAT/RADIO PRESET BUTTON
-
PROGRAM/STORE BUTTON
-
BASS BOOST ON/OFF BUTTON
-
POWER ON/OFF BUTTON
-
STAND-BY INDICATOR
-
BASS BOOST INDICATOR
-
CD INDICATOR
-
LCD DISPLAY
-
CD BUTTON
-
RADIO INDICATOR
-
RADIO BUTTON
-
CD DOOR
-
TAPE INDICATOR
-
TAPE BUTTON
-
CD DOOR OPEN/CLOSE AREA
-
VOLUME UP/DOWN CONTROL
-
REMOTE SENSOR
-
BAND BUTTON
-
SPEAKERS
-
CD STOP BUTTON
-
CD FORWARD/BACKWARD SKIP/SEARCH/RADIO TUNING UP/DOWN BUTTONS
-
RECORD BUTTON
-
PLAY BUTTON
-
REWIND BUTTON
-
FAST FORWARD BUTTON
-
CD PLAY/PAUSE BUTTON
-
STOP/EJECT BUTTON
-
PAUSE BUTTON
-
CASSETTE DECK
-
PHONE JACK
-
BUILT-IN CONDENSER MIC.
-
TELESCOPIC ANTENNA
-
SPEAKER JACK (R)
-
SPEAKER JACK (L)
-
HANDLE
-
BATTERY COMPARTMENT
-
AC SOCKET
-
AC VOLTAGE SELECTOR (FOR DUAL VOLTAGE VERSION ONLY) (OPTIONAL)
FOR REMOTE HANDSET
-
BATTERY COMPARTMENT
-
MUTE BUTTON
-
CD BUTTON
-
PROGRAM/STORE BUTTON
-
CD PLAY/PAUSE BUTTON
-
RADIO TUNING DOWN/CD
BACKWARD SKIP/SEARCH BUTTON
-
CD STOP BUTTON
-
POWER BUTTON
-
RADIO BUTTON
-
BAND BUTTON
-
CD REPEAT BUTTON
-
CD RANDOM BUTTON
-
VOLUME UP/DOWN BUTTON
-
RADIO TUNING UP/CD FORWARD
SKIP/SEARCH BUTTON
- MAIN POWER SWITCH
INTRODUCTION
Thank you for buying this product.
Please read through these operating instructions, so you will know how to operate your equipment properly. After you have finished reading the instructions, put them away in a safe place for future reference.
WARNING
To prevent fire or shock hazard, do not expose this appliance to rain or moisture. To avoid electrical shock, do not open the cabinet, refer servicing to qualified personnel only.
CAUTION
Use of controls or adjustments or performance of procedures other than those specified herein may result in hazardous radiation exposure.
DANGER
Invisible laser radiation when open and interlock failed or defeated. Avoid direct exposure to beam.
CLASS 1 LASER PRODUCT
LUOKAN 1 LASERLAITE
KLASS 1 LASERAPPARAT
This compact disc player is classified as a CLASS 1 LASER PRODUCT.
THE CLASS 1 LASER PRODUCT label is located on the rear exterior.
NOTE: The manufacturer is not responsible for any radio or TV interference caused by unauthorized modifications to this equipment. Such modifications could void the user's authority to operate the equipment.
SPEAKER CONNECTION
To attach speakers to the main unit, align the grooves of main unit and the speaker box, slide the speaker box downwards, push the speaker latch in a direction indicated on the lock to lock the Speaker box, then insert the plug of speaker wire into Speaker Jack (L&R) (33 & 34).
WARNING: Speaker must be plugged into Speaker Jack firmly before you switch on the power of main unit.
POWER SUPPLY
This unit is designed to be operated from two different types of power sources as listed below:
DC OPERATION
This set runs on 8 pcs "UM1" or "D" type batteries. For best performance, always use heavy duty alkaline batteries.
TO INSTALL BATTERIES
Remove the Battery Compartment (36) Cover by gently pushing downward and outward. Insert 8 pcs "UM1" or "D" type batteries. BE SURE TO PLACE THE BATTERIES AS PER THE ENGRAVED DIAGRAM INSIDE THE COMPARTMENT.
② Replace the cover.
INSERTING BATTERIES (WITH REMOTE)
Open the battery compartment lid by sliding it.
Install 2 "AAA/UM4" size batteries into the battery compartment, matching the polarity as shown in the battery compartment.
Close the battery compartment lid.
NOTE: Always remove batteries if the remote control is not going to be used for a month or more. Batteries left in the unit may leak and cause damage.
NOTE: Old batteries may swell and leak. To avoid damage to your instrument, remove the batteries when the unit is to be stored for long periods of time or if the batteries become exhausted.
NOTE: To use your set on battery power, you MUST remove the AC cord from both the wall outlet and the back of the set.
AC OPERATION
Plug the AC power cord into AC socket (37), and the other end of the cord into the standard household outlet. Please make sure the MAIN POWER SWITCH (53) must be switched to ON position, and then press POWER BUTTON (4) or (46) to turn on the unit.
NOTE : For dual voltage version, make sure that the AC Voltage Selector (38) is switched to your local voltage (optional).
NOTE : Switch the MAIN POWER SWITCH (53) to OFF position when the unit is not to be used for a long period of time.
TO PLAY THE RADIO
- Press the Radio Button (11) OR (47) to set the radio on (the Radio Indicator (10) will illuminate).
② Select desired wave band with the Band button (18) OR (48).
③ Tune to desired station by press CD FORWARD/BACKWARD SKIP/SEARCH/RADIO TUNING UP/DOWN BUTTONS (21) OR (44)/(52). Each time the button is pressed, the frequency changes.
To search for a station quickly, keep the CD FORWARD/BACKWARD SKIP/SEARCH/RADIO TUNING UP/DOWN BUTTONS (21) OR (44)/(52) until the station starts to change rapidly, then release the button and it will stop at the next strong station.
⑤ The built-in AM(MW) antenna and the antenna rod are directional. When receiving FM broadcast, extend the Telescopic Antenna (32) in full length. The strongest reception can be achieved by rotating the set for AM(MW) or Telescopic Antenna for FM.
⑥ Adjust the VOLUME UP/DOWN CONTROL (16) OR (51) to your listening preference.
⑦ To turn off the radio, press power on/off button.
PRESETTING STATIONS
UP TO 10 AM(MW) AND 10 FM STATIONS CAN BE STORED INTO THE PRESET MEMORIES.
- Press the Radio Button (11) OR (47) first, the Radio indicator (10) will illuminate.
② Press the Band Switch to select AM(MW) or FM band, and press the Tuning Down or Up Button to select a station.
③ Press the Program Button, "PROGRAM" will be flashing in the Display.
4 While "PROGRAM" is flashing, press the Radio Preset Button (1) (once or repeatedly) to choose a memory location. - Press the Program Button again to confirm. The station now broadcasting is stored into that preset memory.
⑥ Repeat the above steps 2 to 5 to store other 9 stations into memory. Each memory location (01-10) can store 2 stations, one for AM(MW), the other for FM.
TO LISTEN TO PRESET MEMORY STATIONS (after you have programmed them)
① Press the Radio Button (11) OR (47) to set the radio ON.
② Press the Band Button (18) OR (48) to select your desired wave band.
③ Press the Radio Preset Button (1) to select the memory location (01-10). You will receive the station you stored into that preset memory. Pressing the button several times will give you the different memory locations 1-10 where your desired stations were stored into the preset memories 1 to 10 (Example: Pressing the button 3 times will give you Preset Number 3, pressing the button 4 times will give you Preset Number 4). Word "PROGRAM" and Preset Number will be shown in the Display.
4 To shut off the radio, press the Power On/Off Button (4) OR (46) again.
CASSETTE OPERATION
FAST FORWARD (25) AND REWIND (24)
For fast forward or rewinding of the tape, press the Cassette Fast Forward Button or Cassette Rewind Button.
PAUSE (28)
The Cassette Pause Button is used to edit commercials or in case recording is temporarily interrupted. Since the deck motor is still running while the pause key is pressed, this pause feature should be used for a short time only.
AUTOMATIC STOP
This instrument has a built-in automatic stop function and the tape mechanism will stop playing or recording and shut off when it reaches the end of the tape.
MANUAL STOP (27)
The tape player can be stopped manually by pressing the Cassette Stop/Eject Button (27).
CASSETTES
CASSETTE TAPE SELECTION
Low quality tapes tend to break and stretch and a broken tape can easily become entangled in the drive mechanism, causing major damage. Stretched tapes will run at uneven speeds and will distort anything recorded on them.
- Use only quality brands of tapes.
Use of C-120 (120 minutes) cassette is not recommended. The extreme thinness of this tape may result in breakage or other failures.
This unit is not designed for CrO2, Fe-Cr or METAL tape use. Therefore, be sure to use name brand normal cassette tapes.
IMPORTANT NOTES CONCERNING CASSETTE TAPES
After a period of time, especially when inexpensive brands of tape are used, the sound during playback may become "muffled" or in extreme cases, almost inaudible.
This is most frequently NOT A FAULT OF THE MACHINE ITSELF but merely a deposit of oxide and other contaminating element on the tape head.
The easiest way to overcome the problem is by using a head-cleaning cassette.
Follow the instructions provided with the cleaner carefully and DO NOT OVER-USE as this may cause undue wear.
Don't attempt to scrape the contamination away with a sharp implement.
- Other common causes of troubles are:
① Tapes jamming – leading to uneven speed during playback.
② Tapes tangling – where the tape wraps itself around vital parts of the mechanism.
To reduce the chances of these problems occurring, you should take the following precautions:
- Check that there are no loose layers of tape visible through the cassette center window. Take-up these loose layers using a pencil or ballpoint pen before inserting the cassette into the machine.
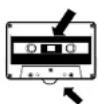
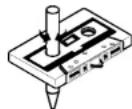
If the cassette feels tight while performing the operation, the tape may be jamming due to "ridges" in the winding of the tape (visible through the center window). These may be removed in most cases by fast winding the cassette from one end to the other and back again. Or the tape may be permanently damaged. Do not play damaged or worn out tapes, as this may cause your set to break.
NOTES FOR STORING CASSETTE TAPES
- Do not put a cassette near a magnetic field, such as a TV set, or speaker. Magnetic fields may reduce the tape sensitivity or even erase the recording.
Do not store cassette for any length of time in a hot, moist or dusty place.
TO PLAY CASSETTE TAPE
① Open the cassette door by pressing the Cassette Stop/Eject Button (27) (in some cases, you may have to press the Cassette Stop/Eject Button (27) twice since this button has combined functions).
② Insert the cassette, with the exposed tape facing downwards, into the tracks of the cassette door.
③ Close the cassette door.
4 Press the TAPE Button (14) to set the tape on (the TAPE Indicator (13) will illuminate).
⑤ Press down the Cassette Play Button (23).
⑥ Adjust the VOLUME UP/DOWN CONTROL (16) OR (51) to your listening preference.
7 To stop the tape manually, press the Cassette Stop/Eject Button (27).
⑧ To remove the cassette, press the Cassette Stop/Eject Button (27) again and the cassette door will open.
Unload the cassette tape, reverse it and return to cassette compartment if you want to play the other side of the cassette tape.
CAUTION:
The automatic stopping mechanism may not operate during playback of tape when the unit is using batteries and the battery level is low (weak batteries).
- Disconnect the AC power cord from the AC outlet and the unit if the unit is not going to be used for a long period of time (2 weeks or more).
- Do not leave any tape buttons down when the set is not in use, or else the pinch roller could be damaged.
TO RECORD FROM BUILT-IN RADIO
① Follow the instructions to play the radio.
② Load the cassette tape into the cassette compartment.
③ Locate the portion of the tape where you desire to start recording
■ Using the Rewind feature (or Fast Forward) to start at the beginning of the tape.
④ Tune into the station you want to record, press the Cassette Record Button (22) and Cassette Play Button (23) simultaneously. Both buttons should remain in their depressed positions when released.
⑤ You are now recording from the Built-in Radio and the recording process will automatically stop at the end of the tape.
⑥ To stop the recording manually, press the Cassette Stop/Eject Button (27).
NOTE: When you want to play the cassette tape after recording, press Cassette Stop/Eject Button (27) first, then press Rewind Button (24) to locate the desired portion of the tape, and finally press Cassette Play Button (23). Adjust VOLUME UP/DOWN CONTROL (16) OR (51) to your listening preference.
NOTE: Remember to pull out the power cord from the wall outlet and the unit if the unit is to be stored for a long time.
TO RECORD FROM BUILT-IN MICROPHONE (31)
- Press the TAPE Button (14) to set the tape on (the TAPE Indicator (13) will illuminate).
② Load a cassette tape suitable for recording into the cassette compartment.
③ Press the Cassette Record Button (22) & Play Button (23) at the same time.
④ Speak your message through the Built-in condenser microphone.
⑥ You are now recording from the Built-in condenser microphone and the recording process will automatically stop at the end of the tape.
⑥ To stop the recording manually, press the Cassette Stop/Eject Button (27).
TO RECORD FROM COMPACT DISC
① Load a cassette tape into the cassette compartment.
② Load the disc and close the CD Door (12).
- Press the CD Button (9) OR (41) to set the CD on (the CD Indicator (7) will illuminate).
4 Press the Cassette Pause Button (28).
⑤ Press the Cassette Record Button (22) and Play Button (23) for record stand-by.
⑥ Start the CD playing by pressing the CD Play/Pause Button (26) OR (43).
7 Release the Cassette Pause Button (28) when you wish to record.
⑧ Press the Cassette Stop/Eject Button (27) to stop the recording.
To hear what you recorded, go back to Tape mode, press Cassette Rewind Button (24) firstly and then Cassette Play Button (23).
CLEANING THE TAPE HEADS
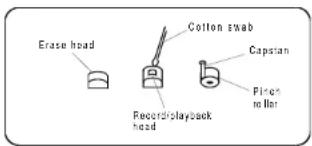
When the heads, capstan and pinch roller become dirty, this may result in muffled, distorted or reduced sound during playback and may even result in tape jams.
Remove the cassette tape and clean with a swab moistened with commercially sold head/pinch roller cleaner or alcohol. Wait approximately 10 seconds for the alcohol or cleaning fluid to dry before using.
Although built to withstand a certain amount of the effects from dust, soil and scratches, discs should be treated with care normally according to conventional analog discs.
Always protect a disc against scratches, soil and dust etc. It is recommended that the discs should be retained in the original case during non-use periods. If a disc is treated with reasonable care, the only maintenance likely to be needed to retain the excellent sound reproduction is wiping the disc with a cloth as indicated.
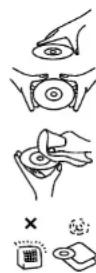
To handle a disc, use only one of the two manners illustrated. (Do not touch the rainbow - coloured side)
To wipe a disc, use only a soft cloth. Do not use benzene or thinner which will damage the disc. The disc should always be wiped in a straight line from the center to the edge. It should never be wiped in a circular motion.
Never place the disc on other equipment or near any heat source. Avoid positions where the disc would be subjected to direct sunlight for long periods.
LISTENING TO A COMPACT DISC
- Press the CD Button (9) OR (41) to set the CD on (the CD Indicator (7) will illuminate).
② Press the CD Door Open/Close area (15) to open the CD Door.
③ Load the DISC with the label toward you.
■ Do not touch the playback side.
■ Center the disc.
■ Place the disc with the label toward you.
■ Do not touch the lens.
4 Close the CD Door, the disc will rotate and the LCD Display (8) will show the disc's total number of tracks.
⑤ Press the CD Play/Pause Button (26) OR (43).
■ Pressing once the play starts from the first track.
■ Pressing again it will pause, press once more to resume playback.
To move backward and forward the desired track, use CD FORWARD/BACKWARD SKIP/SEARCH/RADIO TUNING UP/DOWN BUTTONS (21) OR (44)/(52) (◀◀ or ▶▶▶ to skip to the desired track during the playback.
■ Press the CD Forward Skip/Search Button(21) OR (52) (▶▶) to skip to the next track of the disc.
■ Press the CD Backward Skip/Search Button(21) OR (44) ( ) once to skip to the beginning of the track currently playing. Press the Backward Skip/Search Button (21) OR (44) ( ) twice or more to skip to previous tracks.
■ Press and hold the CD Backward (21) OR (44) or Forward (21) OR (52) Skip/Search Button (1◄◄ or ►►) during play to scan the disc at high speed. When the desired section of the disc is found, release the button to resume normal play.
TO PROGRAM PLAY
- Press the CD Stop Button (20) OR (45) during playback. The total tracks appears in the display.
② Press the CD Program/Store Button (2) or (42) and "PROGRAM" shows in LCD display. - Select the desired track by using CD FORWARD/BACKWARD SKIP/SEARCH/RADIO TUNING UP/DOWN BUTTONS ( ◀◀ or ▶▶)
"PROGRAM " will flash in the display.
4 Press CD Program/Store Button (2) or (42) again to store in memory. "PROGRAM" shows in LCD display, waiting for your next selection.
5 Repeat 3 to 4 steps to program other tracks. Total 21 tracks can be programmed. Press the CD Play/Pause Button (26) OR (43) to start the programmed play. "PROGRAM" shows in LCD display Programmed play will be stopped until "PROGRAM" disappears in the display by pressing the CD Stop Button (20) OR (45) once or more.
SINGLE TRACK (SONG) REPEAT
- Press the CD REPEAT/RADIO PRESET BUTTON (1) OR (49) once during playback, " REPEAT " will flash on and off.
② Press the CD FORWARD/BACKWARD SKIP/SEARCH/RADIO TUNING UP/DOWN BUTTONS ( ◀◀ or ▶) to search for the desired track.
③ The track will play continuously until "REPEAT" disappears in the display by pressing the CD Stop Button (20) OR (45) once or more.
ALL TRACKS REPEAT
- Press the CD REPEAT/RADIO PRESET BUTTON (1) OR (49) twice during playback, " REPEAT " will be steady on.
- All tracks will repeat continuously until “REPEAT” disappears in the display by pressing the CD Stop Button (20) OR (45) once or more.
LISTENING WITH HEADPHONE/EARPHONE
To listen with headphone/earphone, set the VOLUME UP/DOWN CONTROL (16) OR (51) to MIN position, plug the headphone into Phones Jack (30), adjust the VOLUME UP/DOWN CONTROL (16) OR (51) to your listening preference. When the headphone/earphone is plugged in, the speakers will be disconnected automatically.
CAUTION: Listening at high power for a long time could damage users' ears.
BASS BOOST
Use the Bass Boost button (3) to increase the bass output when listening with headphones/earphones or speakers.
REMOTE OPERATION (WITH REMOTE)
By using other buttons on the remote control, you can operate the system in almost the same way as with the buttons of the main unit.
MUTE BUTTON (40)
Pressing this button will shut off the audio output. Press this button once again or press Volume Up/Down button will resume normal audio output.
RANDOM BUTTON (50)
Press this button and all tracks on the disc will be played in random order. Press this button once again to resume to normal mode.
REMOTE CONTROL RANGE (WITH REMOTE)
Use the remote controller within an angle of 30^ at the left and right horizontally and over distances up to about 3 meters starting ahead.
SPECIFICATIONS
\* GENERAL
| Power requirement ...... AC | 110/220V (Selectable) or 120/220V (Selectable) or 120/230V (Selectable) or 127/220V (Selectable) or 110V or 230V or 220V or 240V(YOUR EXACT AC POWER CAN BE CHECKED FROM THE BACK PLATE OF UNIT.) |
DC 12V "UM1/D" x 8pcs
Remote Handset ...... DC 3V "UM4/AAA" X 2 pcs
Power consumption ..... 22 W
Weight .... Approx. 4.16 Kg (without batteries)
Dimensions .... Approx. 437mm(L) x 214mm(H) x 244mm(W)
Operation temperature ..... +5 °C \~ + 35 °C
\* RECEIVER SECTION
Receiving bands ...... AM/FM
Tuning range...... AM 522 - 1620 KHz
AM 520 - 1710 KHz
FM 87.5 - 108 MHz
(YOUR EXACT TUNING RANGE CAN BE
CHECKED FROM THE BACK PLATE OF UNIT)
\* CD PLAYER SECTION
Playback system .... Compact Disc Digital Audio System
DAC.... 1 bit D/A converter
With 8 times over sampling digital filter
Frequency response...... 20 – 20,000 Hz
\* CASSETTE SECTION
Recording system ...... Stereo
Biasing system ...... Magnetic erase
Frequency response ..... 125 – 6300 Hz
Wow and flutter 0.35% WRMS (JIS)
\* AUDIO SECTION
Power output ...... Maximum 2.5 Watts per channel
10% THD 1.8 Watts per channel
Speaker impedance .... 4 ohms
Headphones impedance ..... 8 – 32 ohms
ACCESSORIES
Remote control 1
Instruction booklet.... 1
AC cord.... 1
OUTPUT POWER.... 2.5W X 2 (RMS)
OUTPUT POWER.... 500W (P.M.P.O.)
CAUTION
- To avoid electric shock, this unit must not be exposed to dripping water or water splash.
● Minimum distances are required around the apparatus for sufficient ventilation. - The ventilation should not be impeded by covering the ventilation openings with items, such as newspapers, table-cloths, curtains, etc.
- No naked flame sources, such as lighted candles, should be placed on or near the apparatus.
- Avoid the use of apparatus in tropical and/or moderate climates.
- Please dispose used, damaged or faulty batteries in the appropriate battery collection container.
B43182

SOUTHERN AFRICA: SALES / DISTRIBUTION SOLELY BY:

NU WORLD IND.(PTY) LTD
P.O. BOX 8964, JMB 2000
SERVICE: MAXICARE (TOLL FREE No.) 0800 110 812
www.nuworld.co.za
AUSTRALIA: SALES / DISTRIBUTION SOLELY BY:

PRIMA AUSTRALASIA PTY LTD
P.O. BOX 326, BRAESIDE 3195 VIG. AUSTRALIA
VIC. AUSTRALIA TELEPHONE: (03
www.pharmouthparks.com.au
- LOCATION OF CONTROLS
- FOR REMOTE HANDSET
- INTRODUCTION
- WARNING
- CAUTION
- DANGER
- SPEAKER CONNECTION
- POWER SUPPLY
- DC OPERATION
- TO INSTALL BATTERIES
- ② Replace the cover.
- INSERTING BATTERIES (WITH REMOTE)
- AC OPERATION
- TO PLAY THE RADIO
- PRESETTING STATIONS
- TO LISTEN TO PRESET MEMORY STATIONS (after you have programmed them)
- CASSETTE OPERATION
- CASSETTES
- CASSETTE TAPE SELECTION
- IMPORTANT NOTES CONCERNING CASSETTE TAPES
- NOTES FOR STORING CASSETTE TAPES
- TO PLAY CASSETTE TAPE
- CAUTION:
- TO RECORD FROM BUILT-IN RADIO
- TO RECORD FROM BUILT-IN MICROPHONE (31)
- TO RECORD FROM COMPACT DISC
- CLEANING THE TAPE HEADS
- LISTENING TO A COMPACT DISC
- TO PROGRAM PLAY
- SINGLE TRACK (SONG) REPEAT
- ALL TRACKS REPEAT
- LISTENING WITH HEADPHONE/EARPHONE
- BASS BOOST
- REMOTE OPERATION (WITH REMOTE)
- MUTE BUTTON (40)
- RANDOM BUTTON (50)
- REMOTE CONTROL RANGE (WITH REMOTE)
- SPECIFICATIONS
- \* GENERAL
- \* RECEIVER SECTION
- \* CD PLAYER SECTION
- \* CASSETTE SECTION
- \* AUDIO SECTION
- ACCESSORIES
Brand : TELEFUNKEN
Model : TCD62
Category : Hi-Fi System