
TNE 1302 - Hi-Fi System TELEFUNKEN - Free user manual and instructions
Find the device manual for free TNE 1302 TELEFUNKEN in PDF.


| Product Type | Hi-Fi System (DVD 2-Channel Component System) |
| Brand | Telefunken |
| Model | TNE 1302 |
| Power Supply | ~240V / 50 Hz |
| Power Consumption | ≤ 100W |
| DVD Frequency Response | 20Hz - 20kHz (±3dB) |
| Video Output | 1 Vp-p |
| Super Bass Audio Output | 1.5V (100Hz) |
| Amplifier Rated Output Power | 25W x 2 (8Ω, 1kHz, distortion 10%) |
| Amplifier Distortion Restricted Output Power | 15W x 2 (8Ω, 1kHz, distortion 0.7%) |
| FM Frequency Range | 87.5 - 108 MHz |
| AM Frequency Range | 531 - 1602 kHz |
| Speaker Impedance | 8Ω |
| Speaker Sensitivity | 80 ± 4dB |
| Speaker Frequency Response | 80Hz - 16kHz |
| Dimensions (DVD Player) | 192(W) x 71(H) x 228.5(D) mm |
| Dimensions (Amplifier) | 192(W) x 64.5(H) x 233(D) mm |
| Dimensions (Speakers) | 130(W) x 155(H) x 210(D) mm |
| Remote Control Range | 6m |
| Preset Equalizer Modes | POPS, JAZZ, CLASSIC, ROCK |
| Radio Presets | 16 FM + 16 AM stations |
| Playable Disc Types | DVD, MP3, Picture CD |
| Audio Connections | AUX1, AUX2, Optical Digital Output, Headphone |
| Safety Features | Laser Class 1, Automatic shutdown, Power protection |
| Accessories Included | Remote control, Speaker cables, Video cable, Power cord, AM loop antenna, FM antenna, Instruction book |
Frequently Asked Questions - TNE 1302 TELEFUNKEN
User questions about TNE 1302 TELEFUNKEN
0 question about this device. Answer the ones you know or ask your own.
Ask a new question about this device
Download the instructions for your Hi-Fi System in PDF format for free! Find your manual TNE 1302 - TELEFUNKEN and take your electronic device back in hand. On this page are published all the documents necessary for the use of your device. TNE 1302 by TELEFUNKEN.
USER MANUAL TNE 1302 TELEFUNKEN
Operating Instructions
SYSTEM
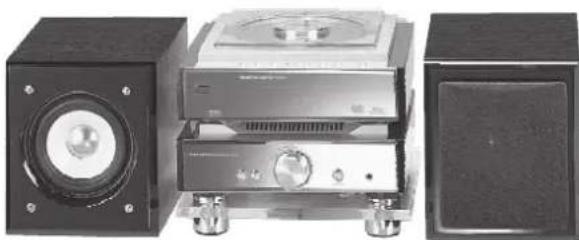
natural_image
Three electronic devices with speaker blocks and control knobs, no visible text or symbolsTable of Contents
Before Connection 2
For your safety 2
Precautions 2
Control Section 3
DVD Player 3
Amplifier 3
Remote control 4
Connection 5
Connecting to a TV set 5
Connecting the Speakers .... 5
Connect to AM antenna 5
Connecting Auxiliary Equipment 6
Connecting to a digital amplifier 6
Connecting the Control Cable 6
Connecting the AC Power Cord 6
Installation of Batteries 7
Turning the Power On and Off 7
Sound Quality/Field 7
Adjusting the volume 7
Preset equalizer 7
Adjusting the super bass 7
Control the Loudness 8
Changing the VFD Darkness 8
Listening to Radio Broadcasts 8
Tuning in a station 8
Presetting stations 8
To change the FM reception mode 9
Function Menu Setting List 9
General Setup Page 9
Audio Setup Page 9
Video Setup Page 10
Preference Page 10
Password Setup Page 10
Use the Discs ...... 11
Normal playing 11
Display the Playing Information 12
Program playing 12
Repeat playing 12
Fast playing 13
Skip select track 13
Search the playing time 13
Zoom play and level move function 14
Play picture CD disc 14
Advanced Operations 15
Select menu 15
Select angle 15
Select subtitle 15
Select language 15
Setting the Clock 16
Setting the Sleep Timer 16
Setting the Daily Timer 17
Protect the Disc 17
Troubleshooting 18
Specification 19
Accessories 20
Manufactured under license from Dolby Laboratories.
"Dolby", "Pro Logic" and the double-D symbol are trademarks of Dolby Laboratories.
Before Connection
Thank you for purchasing this DVD 2 channel component system, in order to fully utilize this system, please read this instruction book carefully before use it.
For your safety

CAUTION
RISK OF ELECTRIC SHOCK DO NOT OPEN

CAUTION:
TO REDUCE THE RISK OF ELECTRIC SHOCK, DO NOT REMOVE COVER. NO USER SERVICEABLE PARTS INSIDE, REFER SERVICING TO QUALIFIED SERVICE PERSONNEL.

This symbol indicates that dangerous voltage constituting a risk of electric shock is present within this unit.

This symbol indicates that there are important operating and maintenance instructions in the literature accompanying this unit.
Caution:
To prevent fire or shock hazard, do not expose this equipment to rain or moisture place.
Power Requirement
Because the power requirement of the electric products are different in various places, so before you use this product, make sure that the power requirement of the product is complied to the power that the native district supplies.
Laser Product
This product is equipped with low power laser equipment inside, for using safety, don't take apart any covers or try to take apart the product inside. Please contact the qualified personnel for repairing.
Caution:
This product is equipped with low power laser equipment inside, for your safety, don't open the laser radiation protective equipment. Don't look at the laser radiation district when the equipment is operating.
Precautions
Before operating this system, check if the voltage of this system is identical with the voltage of your local power supply.
- To prevent fire or shock hazard, do not expose this equipment to hot places, rain, moisture or dust.
♦Do not place this unit near strong magnetic field.
Do not place this unit in an unstable or sloped position. Keep this unit in a place with good ventilation.
Do not attempt to clean the unit with chemical, solvent, gas oil, paint and pesticide.
♦Do not drop metal objects into the system.
♦Do not handle the power cord with wet hands!
- When unplugging the system from the wall outlet, always pull the plug, not the power cord.
There are no user serviceable parts inside. In case of system failure, unplug the power cord and consult your dealer.
Control Section
DVD Player
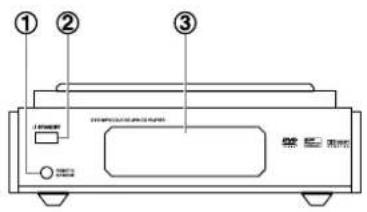
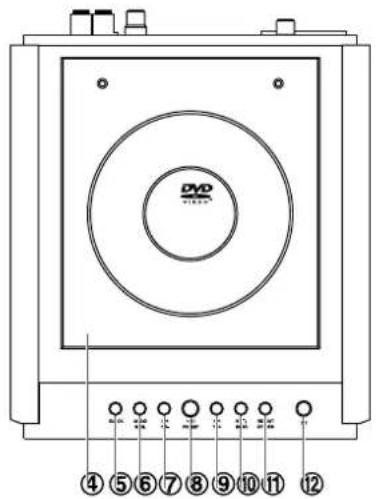
Amplifier
- Remote Sensor
- Standby Button
-
VFD Display Lens
-
Disc Door
- Clock Button
- Vocal Mode Select / Language Select Button Memory Button
- Previous Button Tuning Backward Button
- Play/Pause Button Preset Stations Button
- Next Button Tuning Forward Button
- Stop/Return Button Band Switch
- Repeat Button MONO/Stereo Select Button
-
Open/Close Button
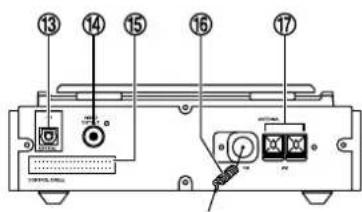
-
Optical Fibre Output Terminal
- Video Output Terminal
- Power Control Cable Socket
- FM Antenna
-
AM Antenna Socket
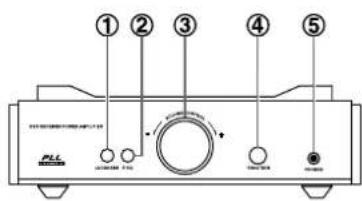
-
Loudness Button
- Preset Equalizer Button
- Volume Control Knob
- Function Select Button
- Headphone Jack
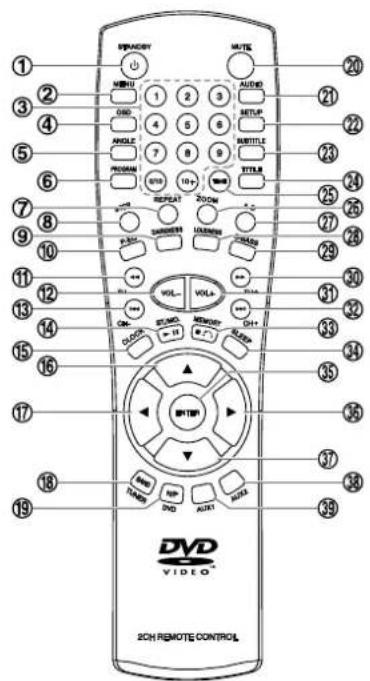
Remote control
- Standby Button
- PBC Button
Root Button - Number Buttons
- OSD Button
- Angle Select Button
- Program Button
- Repeat Button
- Step Button
- Darkness Button
- Preset Equalizer Button
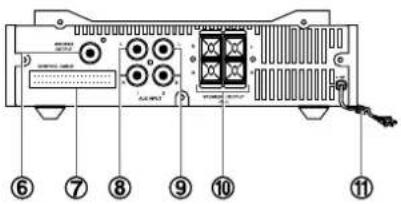
- Super Woofer Speaker Box Output Terminal
- Power Control Cable Socket
- AUX1 Input Terminals (L&R)
- AUX2 Input Terminals (L&R)
- Speaker Box Output Terminals (L&R)
-
AC Power Cord
-
Fast Reverse Button Tuning Backward Button
- Volume Down Button
- Previous Button Channel Select Backward Button
- Play/Pause Button MONO/Stereo Select Button
- Clock Button
- Direction Button ( ▲)
- Direction Button ()
- TUNER Function Button Band Switch
- PAL/NTSC Select Button DVD Function Button
- Mute Button
- Vocal Mode Select Button Language Select Button
- Function Setting Button
- Subtitle Button
- Title Button
- Time Search Button
- Zoom Button
- Repeat A-B Button
- Loudness Button
- Super Bass Button
- Fast Forward Button Tuning Forward Button
- Volume Up Button
- Next Button Channel Select Forward Button
- Stop/Return Button Memory Button
- Sleep Button Timer Button
- Confirm Button
- Direction Button ( ▶)
- Direction Button ( ) ▼
- AUX2 Function Button
- AUX1 Function Button
Connection
Caution: Turn off all of the unit power sources before connection.
Connecting to a TV set
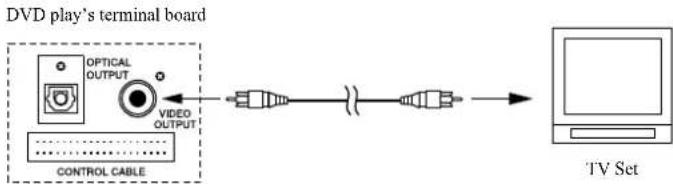
Connect the TV video input terminal to the DVD play's video output terminal with the video cable.
flowchart
graph LR
    A["VIDEO OUTPUT"] --> B["OPTICAL OUTPUT"]
    B --> C["CONTROL CABLE"]
    C --> D["TV Set"]
Connection precautions
Some setting may be necessary on the TV set.
* According to the TV's color system setting, press the PAL/NTSC select button (N/P) on the remote control to select PAL or NTSC video output mode.
* If the unit is connected to a wide screen TV, then set TV Displayed as is Wide in the General Setup Pagele item.
* If the unit is connected to a normal TV, then set TV Displayed as is Normal/PS or in Normal/LB in the General Setup Page item.
Connecting the Speakers
Connect the speaker cords between the terminals as shown below.
Connect the cords with a silver line to the (+) (L) (R) terminals and cords with a gold line to the (-) (G) terminals.
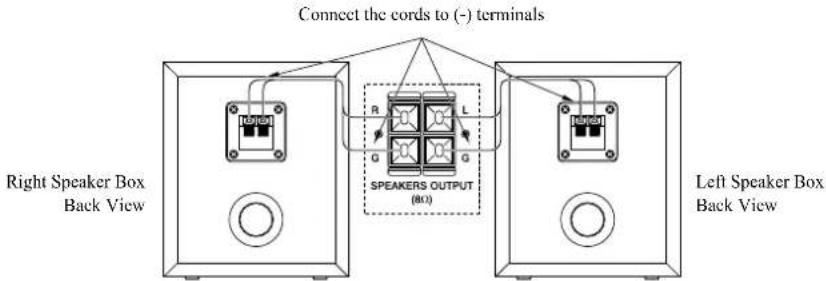
If you has the sub-woofer speaker, you can connect the woofer output terminal from the unit of the rear and the input terminal of the sub-woofer speaker rear with the speaker cord.
Connection precautions
- The unit's output has wide dynamic range, so the amplifier's volume should be moderated, if other speakers are used, they must be chosen correctly according to our speaker's specification, or the loud speaker will be damaged by the heavy volume.
- Before connect or cut short the unit's power, please turn the volume to minimum firstly or it may damage the loudspeaker.
Connect to AM antenna
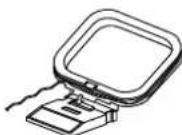
AM loop antenna
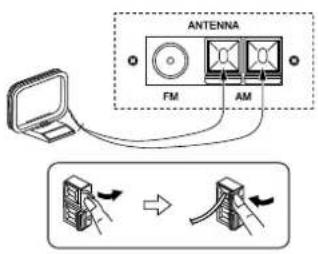
flowchart
graph TD
    A["Monitor"] --> B["Antenna"]
    B --> C["FM"]
    B --> D["AM"]
    C --> E["Router"]
    D --> E
    style A fill:#f9f,stroke:#333
    style B fill:#ccf,stroke:#333
    style C fill:#cfc,stroke:#333
    style D fill:#fcc,stroke:#333
a. Open the AM antenna terminals on the rear of the unit.
b. Attach the AM loop to its base by snapping the tabs on the loop into the slot in the base.
c. Close each of the terminals to securely after connecting the antenna.
Rotate AM ring shape antenna until the reception is acceptable. (Don't place the AM ring shape antenna on the unit's cover, as this will negatively affect the reception)
Connecting Auxiliary Equipment
Connect signal cords between the AUX input terminals on the amplifier and the output terminals of your auxiliary equipment. You can listen to this source.
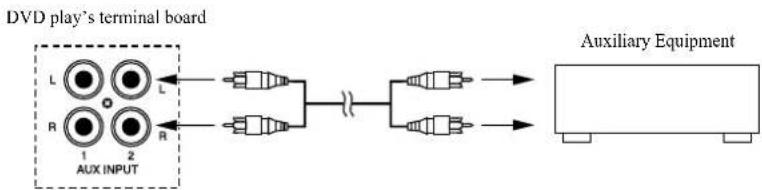
flowchart
graph LR
    A["1 L"] --> C["Switch"]
    B["2 R"] --> C
    C --> D["Auxiliary Equipment"]
    style A fill:#f9f,stroke:#333
    style B fill:#f9f,stroke:#333
    style C fill:#ccf,stroke:#333
    style D fill:#dfd,stroke:#333
Connecting to a digital amplifier
Use optical fibre cable to connect the DVD player's optical fibre output jack with other amplifier's optical fibre, input jack, for superior digital sound effects.
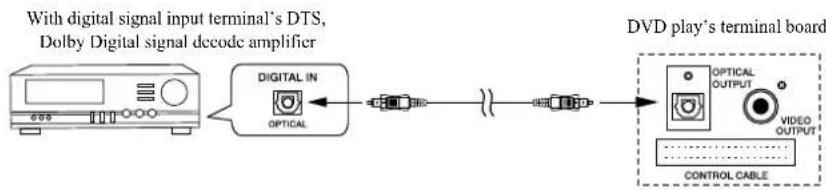
flowchart
graph LR
    A["With digital signal input terminal's DTS, Dolby Digital signal decode amplifier"] --> B["DIGITAL IN"]
    B --> C["OPTICAL"]
    C --> D["+"]
    D --> E["+"]
    E --> F["DVD play's terminal board"]
    F --> G["CONTROL CABLE"]
    G --> H["VIDEO OUTPUT"]
    H --> I["OPTICAL OUTPUT"]
Connecting the Control Cable
Connect signal line between the power control cable on the player's and the amplifier's of the back board.
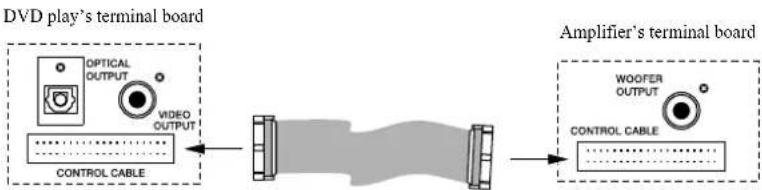
flowchart
graph LR
    A["Optical OUTPUT"] --> B["VIDEO OUTPUT"]
    B --> C["CONTROL CABLE"]
    D["Amplifier's terminal board"] --> E["WOOFER OUTPUT"]
    E --> F["CONTROL CABLE"]
Connecting the AC Power Cord
Insert the AC power cord into a wall outlet, and your system is at your command!
Caution: Be sure to unplug the power cord from the outlet when going out or if the system is not in use for an extended period of time.
Installation of Batteries
- Remove the battery compartment cover.
- Insert two batteries (size AA) correctly, so that the + and - polarities match the polarity diagrams in the battery compartment.
* When the batteries are exhausted, the remote control will no longer operate the system. Replace both batteries at the same time with new ones.
* Don't use an old battery with a new one.
* Don't use different types of batteries together.
* When the remote control is not used for a long period of time, remove the batteries to avoid damage caused by battery leakage and corrosion.
Turning the Power On and Off
All the operational functions will be available for selection once the unit is turned on (standby mode).
Turning the System On
Press the standby button (STANDBY) to turn the system on from standby mode.
Caution: Once the system has been turned on, it will always return to the last mode it was operated in.
Turning the System Off
Press the standby button (STANDBY) again to turn the system off (called Standby Mode), the clock will be displayed on the VFD.
Caution: Be sure to unplug the power cord from the outlet when going out or the system is not in use for an extended period of time.
Sound Quality/Field
Adjusting the volume
Rotate the multi control knob (- MULTI CONTROL +) clockwise or counter clockwise on the unit or press the volume up/down buttons (VOL +/-) on the remote control to increase or decrease the volume.
- Press the MUTE button on the remote control in playing mode, the sound will be eliminated, press the button again to resume sound. (Note: The mute function applies to amplifier unit only, it is not available for optical fiber output and coaxial output.)
- For private listening, you can connect a pair of headphones to the phones jack on the unit, no sound comes out of the speakers. (Note: Be sure to turn down the volume before connecting or putting on headphones.)
Preset equalizer
You can adjust the sound reproduced simply by choosing from different preset equalizations. Press the preset equalizer button (EQ) repeatedly to select cyclically one of the following different preset equalizations:

No display : Normal sound
POPS : Vocal sound is intensified
JAZZ : For jazz
CLASSIC : For classic
ROCK : For rock
Adjusting the super bass
You can reinforce the bass sound to maintain rich, full bass at low volume:
Press the super bass button (S-BASS) on the remote control to get the effect, the "BASS" will display on the VFD.
Press the button again to cancel the effect.
Control the Loudness
This unit has loudness function, it can automatically increase the bass sound effect at low volume (the higher volume, the smaller bass increase), which improves the output sound. You only need to press the loudness button (LOUDNESS) to obtain the loudness function when it is playing, “LOUDNESS” will be displayed on the VFD.
Changing the VFD Darkness
This unit has set several settings for you to adjust the VFD screen's brightness. You only need to press the VFD darkness select button (DARKNESS) on the remote control in standby mode, then choose the proper lighting to be used.
Listening to Radio Broadcasts
You can listen to FM and AM stations. Stations can be tuned in manually, automatically or from preset memory storage.
Caution: Before listening to the radio, please check that both the FM and AM antennas are correctly connected.
Tuning in a station
- Repeatedly press the function select button (FUNCTION) on the unit or directly press tuner function button (TUNER) on the remote control to select TUNER function.
- Press the band switch button (BAND) to select the band.
- Use one of the following methods to select a station.
◆Manual tuning
Press the tuning backward button (TU-) or tuning forward button (TU+) repeatedly to move from frequency to frequency until you find the station you want.
♦ Auto tuning
If you press and hold the tuning backward button (TU-) or tuning forward button (TU+) for one second or more, the frequency changes down, or up, automatically until a station is found.
♦Preset tuning (Possible only after presetting stations)
Press the preset stations button (PRESET) on the unit or channel select backward button (CH-) or channel select forward button (CH+) on the remote control one by one to select the preset number to select the desired preset number. Its band and frequency are displayed on the VFD.
Presetting stations
You can preset up to 16 FM stations and up to 16 AM stations.
- Tuning in the desired station.
- Press the memory button (MEM) on the unit or memory button (MEMORY) on the remote control, the "MEM" will flash on the VFD.
- Press the preset stations button (PRESET) on the unit or channel select backward button (CH-) or channel select forward button (CH+) on the remote control one by one to select the preset number to select the preset number, "MEM" will flash on the VFD display and will preset the number.
* PRESET To select cyclically one of the 16 preset number
* CH- Decreases the preset number by 1
* CH+ Increases the preset number by 1
-
Press the memory button (MEM) on the unit or memory button (MEMORY) on the remote control to store the station. After 1 second, the VFD returns to the broadcast frequency display.
-
Repeat above steps 1 to 4 for each station you want to store to memory with a preset number.
Note: If the system is unplugged or if a power failure occurs, the preset stations will not be erased.
To change the FM reception mode
When you turn into a FM stereo broadcast, STEREO will be displayed on the VFD and you can hear stereo effects. If FM stereo broadcast is hard to receive or noisy, you can select monaural mode. Reception improves, but you lose any stereo effect. Press the stereo/mono select button (STEREO) on the unit or stereo/mono select button (ST/MO) on the remote control so that the STEREO does not appear on the VFD display.
To restore the stereo effect, press the stereo/mono select button (STEREO) on the unit or stereo/mono select button (ST/MO) on the remote control so that STEREO will be displayed on the VFD display.
Function Menu Setting List
* You can make some permanent settings changes while the DVD is playing.
* If you want to set this unit's function, please press the function setting button (SETUP) on the remote control to display the DVD's function setting main menu, then use the direction buttons (▲,▼,◄,►) and confirm button (ENTER) on the remote control.
Caution: The content of this charter is for reference only.
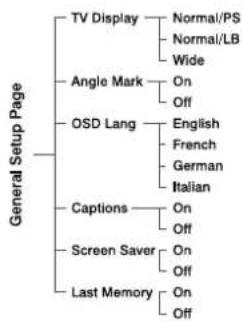
General Setup Page
flowchart
graph TD
    A["General Setup Page"] --> B["TV Display"]
    A --> C["Angle Mark"]
    A --> D["OSD Lang"]
    A --> E["Captions"]
    A --> F["Screen Saver"]
    A --> G["Last Memory"]
    B --> H["Normal/PS"]
    B --> I["Normal/LB"]
    B --> J["Wide"]
    C --> K["On"]
    C --> L["Off"]
    D --> M["English"]
    D --> N["French"]
    D --> O["German"]
    D --> P["Italian"]
    E --> Q["On"]
    E --> R["Off"]
    F --> S["On"]
    F --> T["Off"]
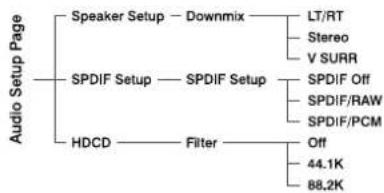
Audio Setup Page
flowchart
graph TD
    A["Speaker Setup"] --> B["Downmix"]
    C["SPDIF Setup"] --> D["SPDIF Setup"]
    E["HDCD"] --> F["Filter"]
    B --> G["LT/RT"]
    B --> H["Stereo"]
    B --> I["V SURR"]
    D --> J["SPDIF Off"]
    D --> K["SPDIF/RAW"]
    D --> L["SPDIF/PCM"]
    F --> M["Off"]
    F --> N["44.1K"]
    F --> O["88.2K"]
TV Display
This menu allows the user to select the aspect ratio of the TV to be connected.
Angle Mark
Available only when the disc is with angle marks, you can set the angle mark to show on TV screen or not.
OSD Lang
This menu allows the user to select the language for the on-screen.
Captions
Set the captions to display or close.
Screen Saver
Set the screen saver to activate or cancel.
Last Memory
Set the last memory state to on or off.
Speaker Setup
-Downmix
When the disc has Dodly Pro Logic stereo, you can choose LT/RT or Stereo or V.SURR mode to play this disc.
SPDIF Setup
- SPDIF Output
If close Optic or axis output, this system is only used for simulation mode. If set for Mnaual, you can choose output mode when playing different disc.
HDCD
When playing the HDCD disc, it can set the audio output width degree.
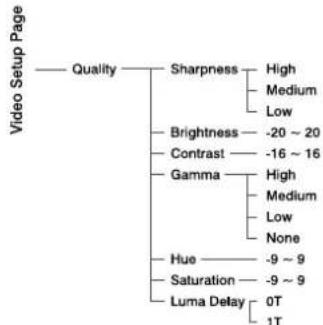
Video Setup Page
flowchart
graph TD
    A["Quality"] --> B["Sharpness"]
    A --> C["Brightness"]
    A --> D["Contrast"]
    A --> E["Gamma"]
    A --> F["Hue"]
    A --> G["Saturation"]
    A --> H["Luma Delay"]
    B --> I["High"]
    B --> J["Medium"]
    B --> K["Low"]
    C --> L["-20 ~ 20"]
    D --> M["-16 ~ 16"]
    E --> N["High"]
    E --> O["Medium"]
    E --> P["Low"]
    E --> Q["None"]
    F --> R["-9 ~ 9"]
    G --> S["-9 ~ 9"]
    H --> T["0T"]
    H --> U["1T"]
Quality
You can according to the color of picture, adjust it to be light or dark.
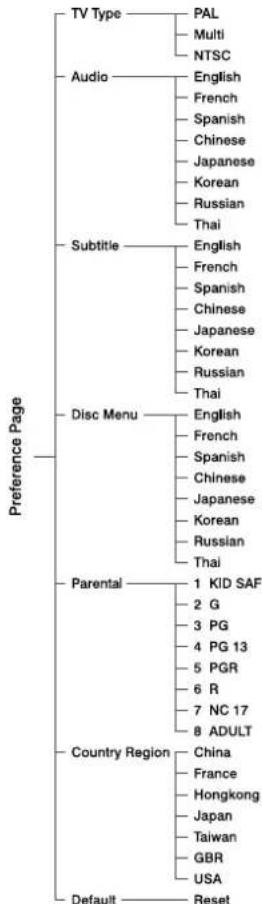
Preference Page
flowchart
graph TD
    A["TV Type"] --> B["PAL"]
    A --> C["Multi"]
    A --> D["NTSC"]
    E["Audio"] --> F["English"]
    E --> G["French"]
    E --> H["Spanish"]
    E --> I["Chinese"]
    E --> J["Japanese"]
    E --> K["Korean"]
    E --> L["Russian"]
    E --> M["Thai"]
    N["Subtitle"] --> O["English"]
    N --> P["French"]
    N --> Q["Spanish"]
    N --> R["Chinese"]
    N --> S["Japanese"]
    N --> T["Korean"]
    N --> U["Russian"]
    N --> V["Thai"]
    W["Disc Menu"] --> X["English"]
    W --> Y["French"]
    W --> Z["Spanish"]
    W --> AA["Chinese"]
    W --> AB["Japanese"]
    W --> AC["Korean"]
    W --> AD["Russian"]
    W --> AE["Thai"]
    AF["Parental"] --> AG["1 KID SAF"]
    AF --> AH["2 G"]
    AF --> AI["3 PG"]
    AF --> AJ["4 PG 13"]
    AF --> AK["5 PGR"]
    AF --> AL["6 R"]
    AF --> AM["7 NC 17"]
    AF --> AN["8 ADULT"]
    AO["Country Region"] --> AP["China"]
    AO --> AQ["France"]
    AO --> AR["Hongkong"]
    AO --> AS["Japan"]
    AO --> AT["Taiwan"]
    AO --> AU["GBR"]
    AO --> AV["USA"]
    AW["Default"] --> AX["Reset"]
Audio, Subtitle, Disc Menu
When disc has subtitle, audio, disc menu support. Playing type was default. You can setup language. If not, this function is invalidated.
Parental
Setup this system when playing disc which had age control, you can through this function.
Default
Restore to factory setting.
Password Setup Page
flowchart
graph TD
    A["Password Setup Page"] --> B["Password Mode"]
    A --> C["Password"]
    B --> D["On"]
    B --> E["Off"]
    C --> F["Change"]
    F --> G["(Production password: 136900)"]
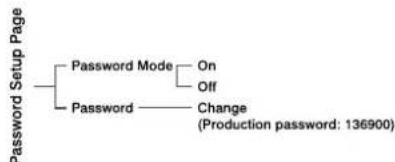
Password Mode
Select this item to set new password for this unit, follow the screen's indication and enter a password.
Password
The original password is 136900.
Use the Discs
Caution: While the disc is playing, do not attempt to open the door by hand. Press the open/close button (▲) on the unit instead.
Normal playing
- DVD Disc's normal playing
- Repeatly press the function select button (FUNCTION) on the unit or directly press the DVD function button (DVD) on the remote control to select DVD function.
- Press the open/close button ( ▲) on the unit to open the disc door and place the disc on the disc tray (with the printed side up).
-
Press the open/close button ( ▲) again on the unit to close the disc door, the unit will read the disc and play it automatically.
Note: In stop mode, please press the play/pause button (▶) to start play the disc. -
When the menu is displayed on the TV screen, you can use the direction buttons (▲,▼,◆) and confirm button (ENTER) on the remote control to select the desired menu and start playing it.
Note: First press the direction buttons (▲,▼,◀,▶) to select the menu, then press confirm button (ENTER) to enter the next menu.
-
Press the play/pause button (▶) to temporarily stop the playing and the picture will freeze on the TV screen, press the button again, it will continue to play.
-
Press the stop/return button ( ■/○) to stop playing, the unit will store the last playing time in the memory automatically, then press the play/pause button (▶■), the unit will resume to last memory time and continue playback automatically.
If you press the stop/return button (■/ twice to stop the disc playing.
- TV mode select: When DVD function is selected, press the PAL/NTSC select button (N/P) on the remote control, the TV Mode will change to NTSC or PAL to ensure normal playing.
Note:
* The disc's menu may not just be one layer, you can enter into every layer by repeatedly using step 4 above, until the program starts to play.
* The set will not play the disc, if “ERROR REGION” is displayed on the TV screen, indicating that this disc's regional code number doesn't match this set.
- General disc's normal playing (Except for DVD disc)
- Repeatly press the function select button (FUNCTION) on the unit or directly press the DVD function button (DVD) on the remote control to select DVD function.
- Press the open/close button ( ▲) on the unit to open the disc door and place the disc on the disc tray (with the printed side up).
-
Press the open/close button ( △) again on the unit to close the disc door, the unit will read the disc and play it automatically.
Note: In stop mode, please press the play/pause button (▶) to start playing the disc. -
You can use channel function when you play the disc, you can choose MONO (Mono Left, Mono Right), "STEREO" or "Mix-Mono" audio output by pressing vocal mode select button (AUDIO).
-
Press the play/pause button (▶) to temporarily stop the playing, press the button again, it will continue to play.
-
Press the stop/return button (■/○) to stop playing, this unit will store the last playing time in the memory automatically, then press the play/pause button (▶-■), the unit will resume to last memory time and continue playback automatically.
Press the stop/return button (■/○) twice to stop the disc playing.
- MP3 Disc's normal playing
- Place the MP3 disc on the disc tray properly, the unit will read the disc and the menu display on the TV screen.
- Press the program button (PROGRAM) on the remote control to choose one of the following methods to select a track playing.
* When the directory and track display on the TV screen, you can first press the direction buttons (▲,▼,→) on the remote control to move the cursor to illuminate the track then press the confirm button (ENTER) on the remote control to start playing it or press the number button (0/10,1-9) on the remote control to select the desired track playing in this directory.
Note: If there is more than one layer directory, you may need to repeat use the direction button (▲,▼,●) and confirm button (ENTER) to select a track playing.
If there is more than one page directory or track, you can use the next button (▶▶▶) or previous button (▶◀◀) to select the next or previous page menu.
* When the track display on the TV screen, you can press the number button (0/10,1-9) on the remote control to select the desired track in the disc then press the confirm button (ENTER) on the remote control to start playing it.
Note: Play will continue until playing final track when the selected track have been played.
- Press the stop/return button ( ■/_) to stop playing, this unit will remember last playing time inside memory automatically, then press the play/pause button (▶), this unit will resume to last memory time and continue playback automatically.
If you press the stop/return button (■/6) twice to stop the disc playing.
Display the Playing Information
While a general disc (except for DVD disc) is playing, repeatedly press the OSD button (OSD) on the remote control, the TV screen shows the information as:
Single Elapsed Time Single Remain Time Total Elapsed Time Total Remain-Time Display Off
- When playing DVD disc, repeatedly press the OSD button (OSD) on the remote control, the TV screen shows the information as:
Title Elapsed Time Title Remain Time Chapter-Elapsed Time Chapter Remain Time Display Off
Program playing
During programme play, 20 track can be stored maximum.
- Place the disc on the disc tray properly.
- In playing mode or stop mode, press the program button (PROGRAM) on the remote control to enter into the program's edit mode, the program menu will be displayed on TV screen.
- Press the number button (0/10, 1-9, 10+) on the remote control to input the sequence number you want to program playing. (Note: If you are using a DVD disc, first one is title and second one is chapter into the program's menu.)
- After the programming is finished, Press the direction buttons (▲,▼,◄) on the remote control to select "START" then press the confirm button (ENTER) on the remote control to start programme playing.
- Press the stop/return button (■/Ω) twice to cancel the programme playing and to stop. (When the program menu show on the TV screen, you can in order choose "STOP" and "EXIT" to exit the programme playing and play will continue to the final track.)
Repeat playing
You may repeat a track, by repeatedly press the repeat button (REPEAT), the screen shows orderly:
TRACK ALL Cancel Repeat
When you are using a DVD disc, this function can be used to repeatedly play a title, chapter or disc. Repeatedly press the repeat button (REPEAT), the screen will show the following:

- You can use this function to enjoy a certain part of a disc you like.
When it is playing, press the repeat A-B button (A-B) on the remote control at the beginning of the content that needs repeat playing. Press the repeat A-B button (A-B) again at the end of the content that needs repeat playing. Then the player will repeatedly play between A and B until you press the repeat A-B button (A-B) again to cancel the repeat paragraph the setting and turn to normal playing mode.

Fast playing
When playing a disc, you may play it forward fast or reverse it fast to find what you need.
Press the fast forward button (▶▶) on the remote control once by once to select one of the different speeds to fast forward or select normal speed to play. Each time you press the button, the screen shows as follows.

- Press the fast reverse button ( ◀◀◀) on the remote control repeatedly to select one of the different speeds to fast backward play or select normal speed to play. Each time you press the button, the screen shows as follows.

Note: During fast playing (including forward and reverse), press the play/pause button (▶▶▶) directly to resume normal playing.
Skip select track
- Press the next button (▶▶▶) once or more to skip to the beginning of the current chapter or previous chapter and play it from the beginning.
- Press the previous button ( ◀◀◀) once or more to skip back one or more chapters of the disc and play it from the beginning.
Search the playing time
You may directly enter a time, title or chapter number to search quickly on a disc. The unit will play from this point.
* This function is not available for Picture CD.
♦DVD disc
Press the time search button (TIME) on the remote control to search a title in a disc or search a chapter in a title. Press the number button (0/10,1-9) on the remote control to select the title number or chapter number.
Note: If the search time exceeds the total time on the disc or the item set falls short of the disc recorded, the “INPUT INVALID” will display on TV screen, indicating the operation is invalid or incorrect.
♦General disc (except for DVD disc)
Press the time search button (TIME) on the remote control to search a play point in a disc.
Press the number button (0/10,1-9) on the remote control to enter the time numbers to look for desired scene, the left two-digit numbers is minute and the right two-digit numbers is second.
Zoom play and level move function
* NOT for CD and MP3 playback.
This function can be used to enjoy a motion or motionless picture.
- Press the zoom button (ZOOM) on the remote control when playing, the screen shows the following:

- Press the direction buttons (▲,▼,◀,▶) to move the enlarged picture.
- To resume the picture, press the zoom button (ZOOM) until the screen shows "ZOOM OFF".
Play picture CD disc
- Place the picture CD disc on the disc tray properly, the unit will read the disc and the menu display on the TV screen.
Picture CD: The disc is recording in picture
- Press the program button (PROGRAM) on the remote control to choose one of the following methods to select a picture playing.
* When the directory and picture display on the TV screen, you can first press the direction buttons (▲,▼,◄) on the remote control to move the cursor to illuminate the picture (the picture will display on the TV screen) then press the confirm button (ENTER) on the remote control to start playing it or press the number button (0/10,1-9) on the remote control to select the desired picture playing in this directory.
Note: If there is more than one layer directory, you may need to repeat use the direction button (▲,▼,▲) and confirm button (ENTER) to enter the picture normal playing.
If there is more than one page directory or picture, you can use the next button (▶▶▶) or previous button (▶◀◀) to select the next or previous page menu.
* When the picture display on the TV screen, you can press the number button (0/10,1-9) on the remote control to select the desired picture in the disc then press the confirm button (ENTER) on the remote control to start playing it.
Note: Play will continue until playing final picture when the selected picture have been played.
- When playing, use the remote keys function to select different play mode. These play modes list as the following:
PROGRAM : Transition Effect
STOP (■): Thumbnail Mode
▶▶▶: Next Picture
■◀◀: Previous Picture
PLAY (▶): Picture Mode
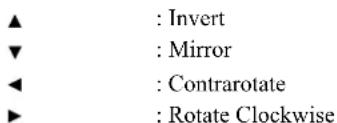
ZOOM : Switch Zoom Mode
▶: Zoom In
◀◀: Zoom Out
▲,▼,◄PAN IN Zoom Mode
Note: When playback the picture CD, press the stop/return button (■/○) to enter the "Thumbnail Mode", use the direction buttons (▲,▼,→) move the cursor to illuminate the "MENU" then press the confirm button (ENTER) to enter the "Remote Key Function" list.
- Press the root button (MENU) on the remote control to return to menu list screen.
- When playing, you may need use the open/close button ( ▲) on the unit to stop playing and open the disc tray.
Advanced Operations
Caution: The instruction of this chapter only suitable for DVD disc playing.
TITLE
The images or music of a DVD are divided into separate units, among which title is the biggest one. For an image in video-discs, title is movie; for a piece of music in audio discs, it is music.
Each title has a number that makes it easy to search.
CHAPTER
It is smaller than title among the units of a DVD. A title is made up of several chapters, and each chapter has a number for search, but some discs may not have numbered chapters.
Select menu
In the disc's normal playing mode, press the title button (TITLE) on the remote control, the system will stop playing and enter into the title menu's display mode, then you can use the direction buttons (▲,▼,◄,►) and confirm button (ENTER) on the remote control to select other tracks or title program.
- Some DVD disc's are recorded in more than one layer, if you press title button on the remote control in normal playing mode, it will only return to the title menu, at this time, you may need to repeatedly use the direction buttons (▲,▼,◀,▶) and confirm button (ENTER) on the remote control to enter into the normal playing. But if you press the root button (MENU) on the remote control, it can only return to the previous layer's root menu, then you can use the remote's direction buttons (▲,▼,◀,▶) and confirm button (ENTER) on the remote control to select the playing track or title program or return to the previous layer's menu.
Select angle
You can use this function to watch a DVD disc which was shot from different angles, at different view angles. For example: If a train is moving forward, you can display the train's front, left side window or right side window's picture and not cut out the train going forward.
If the DVD disc you are playing was recorded in four angles, then you can repeatedly press the angle select button (ANGLE) on the remote control to select one angle to watch.

Select subtitle
When you are playing a DVD disc that was recorded with several subtitles, you can repeatedly press the subtitle button (SUBTITLE) on the remote control to select one of the subtitle languages to display on the TV screen.
For example: The disc was recorded in Chinese, Japanese, English three subtitles in order, it's order will change as following:

Note: If the disc was recorded in Chinese, Japanese, English three subtitles and no subtitle function in order, then it's order will change as following:

Select language
When you are playing a DVD disc recorded with several languages, you can repeatedly press the language select button (AUDIO) to select one of these languages to play.
For example: The disc recorded Chinese, English, Japanese three languages, it's order will change as following:

Setting the Clock
The built-in clock shows the correct time in the display.
- Press the clock button (CLOCK) twice on the remote control, the hour indicator will blink.
- Set the hour by tuning backward button (TU-) or tuning forward button (TU+).
- Press the clock button (CLOCK) on the remote control, the minute indicator will blink.
- Set the minute by tuning backward button (TU-) or tuning forward button (TU+).
- Press the clock button (CLOCK) on the remote control, the built-in clock starts operating and the seconds start counting from 0.
Note:
* You can set the clock in standby mode.
* The operating time of every step shouldn't be longer than 3 seconds or it will return to the original display.
* If there is a power failure or the power system is turned off, the clock loses its setting.
* When DVD function is selected, please do not use the remote control to set the clock, otherwise, the DVD will fast forward or fast backward.
To confirm the clock time
If you press the clock button (CLOCK) on the remote control, the clock time is displayed. Wait for a second until the display returns to the original display.
Setting the Sleep Timer
Use the sleep timer to turn the system off after a certain number of minutes while it is playing. By setting the sleep timer, you can fall asleep to music and know that your system will turn off by itself rather than play all night.
- Play a disc or tune in to the desired station.
- If you set the sleep timer first, each time you press the sleep button (SLEEP) on the remote control, it changes the number of minutes shown on the VFD in this sequence:

If you change the sleep timer, each time you press the sleep button (SLEEP) on the remote control, it changes the number of minutes shown on the VFD in this sequence:

After setting the number of minutes for the sleep timer, the display will return to the display as before setting the sleep timer.
The system is now set to turn off after the number of minutes you set.
To confirm the sleep time
When the sleep button (SLEEP) on the remote control, the remaining sleep time is displayed. Wait for a second until the display returns to the original display.
To cancel the sleep timer setting
Repeatedly press the sleep button (SLEEP) on the remote control until the "00" displays on the VFD.
Resetting the clock or turning off the system also cancels the sleep timer.
Setting the Daily Timer
You can use the setting timer to switch the unit on automatically at a certain time everyday unless there has been a power failure. When the setting timer is on effect, the timer indicator will be displayed on the VFD. The clock must be correctly set for the timer.
- In standby mode, press the timer button (SLEEP) twice on the remote control, hour indicator will blink.
- Set the hour with the tuning backward button (TU-) or tuning forward button (TU+).
- Press the timer button (SLEEP) on the remote control, minute indicator will blink.
- Set the minutes with the tuning backward button (TU-) or tuning forward button (TU+).
- Press the timer button (SLEEP) on the remote control, the selected time is set. Then set the daily timer to "ON" (daily timer set is in effect) or "OFF" (daily timer set is to cancel) by pressing the tuning backward button (TU-) or tuning forward button (TU+).
Note:
* You can set the daily timer only in standby mode.
* The operating time of every step shouldn't longer than 3 seconds or it will return to time display.
* The sound source on the automatic opening mode is the same as the sound source the last time, the unit will switch on in the selected mode before it was switched off.
To confirm the daily time
If you press the timer button (SLEEP) on the remote control in standby mode, the daily time is displayed. Wait for a second until the display returns to the time display.
To cancel the daily timer setting
In standby mode, repeatedly press the timer button (SLEEP) on the remote control until the "ON" will display on the VFD, then you can set the daily timer to "OFF" by pressing the tuning backward button (TU-) or tuning forward button (TU+) (the daily timer will be cancelled).
Turning off the system also cancels the daily timer.
Protect the Disc
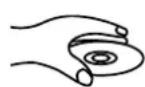
- To keep the disc clean, please don't touch the disc's surface when you are holding it. You should holding it by the edge.
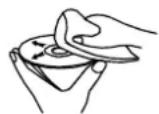
- If the disc is dirty, it will affect the sound quality. Please use a clean and soft cloth to wipe the disc from the inside to the outside. Don't wipe the disc in a circumference direction.
- Don't stick paper on the disc.
- Don't place the disc in direct sunshine or hot sources.
- After the disc is played, please put it into a box and keep properly. Don't stack the disc's together.
- Don't play the disc which has a flaw or deformation, in may cause damage to the unit.
- If necessary, use soft cloth to dip some diluted neutral liquor and wipe the finger prints etc. blot. Don't use recorder detergent or static proof liquor to clean the disc, also don't use gasoline or normal alcohol.
Troubleshooting
If you are having a problem with your system, check this list for a possible solution before calling for service.
If you can not solve the problem from the hints given here, or the system has been physically damaged, call a qualified person, such as your dealer, for service.
| Symptom | Possible Cause | Action |
| No sound is heard | Connections are incorrect, or looseTV or power amplifier operates incorrectlyThe amplifier's receiving signal position is wrongVolume setting to minimum | Check all connections and make correctionsCheck whether the operation is rightCheck the position of receive signalAdjust volume |
| No picture | Connections wrong or looseTV Operation and setting is wrong | Check all connections and correct itCheck whether operation and setting is right |
| Bad sound quality | Audio connects wrong | Check whether audio connections are right |
| Picture roll or without color | DVD Player doesn't match the TV system | Use PAL/NTSC select button to select suitable system |
| The disc does not play | No disc in the trayThe disc is upside downThe disc is dirty or scratchedThe unit is foggy inside | Place a discPlace the disc with the printed side upClean or replace the discTake out the disc, turn on the unit for about an hour |
| Poor radio reception | The antenna is disconnectedThe AM loop antenna is too close to the systemThe FM wire antenna is not properly extended and positioned | Reconnect the antenna securelyChange the position and direction of the AM loop AntennaExtend FM wire antenna to the best reception position |
| Unable to operate the remote control | The path between the remote control and the sensor of the unit is blockedThe batteries have lost their charge | Remove the obstructionReplace the batteries |
| Operations are disabled | The built-in microprocessor has malfunctioned due to external electrical interference | Unplug the system then plug it back in |
Specification
System
Power supply ....\~240V / 50 Hz
Rated working power consumption ....≤ 100W
AUX input sensitivity....≤ 350mV
Channel ≥ 40dB
Distortion 0.7%
DVD
Frequency response 20Hz-20kHz (±3dB)
Video output 1 V _p-p
Super Bass Audio output 1.5V (100Hz)
Horizontal definition ≥ 500 (TV)
Dimensions 192(W) x 71(H) x 228.5(D) mm
Amplifier
Rated output power (distortion = 10%)....25W x 2 (8Ω 1kHz)
Distortion restrict output power (distortion = 0.7%) ..... 15W x 2 (8Ω 1kHz)
Frequency response 20Hz-20kHz (+1/-3dB)
S/N Ratio ≥ 60dB
Loaded impedance 8Ω
Dimensions 192(W) x 64.5(H) x 233(D) mm
FM
FM Frequency range 87.5-108 MHz
FM Noise limit sensitivity ....≤ 20×V
FM S/N ≥ 46dB
AM Frequency range 531-1602 kHz
AM Noise limit sensitivity ....≤ 3.0∞V/m
AM S/N ≥ 40dB
Speaker
Impedance 8Ω
Input power 30W
Sensitivity 80 ± 4dB
Frequency response 80Hz-16kHz
Dimensions 130(W) x 155(H) x 210(D) mm
Remote
Distance 6m
Speaker box connect line 2
Video signal line .... 1
Power Connect line .... 1
Rack 1
Remote control .... 1
Instructions Book 1
Note: Design and specifications are subject to change without prior notice.
Solely Distributed By:

PRIMA AUSTRALASIA PTY LTD
P.O. Box 326 Braeside 3195
Victoria Australia
Phone: (03) 8586 1000 / 1300 366 155
www.primaaustralasia.com.au
- Operating Instructions
- Table of Contents
- Before Connection 2
- Control Section 3
- Connection 5
- Installation of Batteries 7
- Turning the Power On and Off 7
- Sound Quality/Field 7
- Listening to Radio Broadcasts 8
- Function Menu Setting List 9
- Use the Discs ...... 11
- Advanced Operations 15
- Setting the Clock 16
- Setting the Sleep Timer 16
- Setting the Daily Timer 17
- Protect the Disc 17
- Troubleshooting 18
- Specification 19
- Accessories 20
- Before Connection
- For your safety
- CAUTION
- CAUTION:
- Power Requirement
- Laser Product
- Precautions
- Control Section
- Remote control
- Connection
- Connecting to a TV set
- Connection precautions
- Connecting the Speakers
- Connect to AM antenna
- Connecting Auxiliary Equipment
- Connecting to a digital amplifier
- Connecting the Control Cable
- Connecting the AC Power Cord
- Installation of Batteries
- Turning the Power On and Off
- Turning the System On
- Turning the System Off
- Sound Quality/Field
- Adjusting the volume
- Preset equalizer
- Adjusting the super bass
- Control the Loudness
- Changing the VFD Darkness
- Listening to Radio Broadcasts
- Tuning in a station
- ◆Manual tuning
- ♦ Auto tuning
- ♦Preset tuning (Possible only after presetting stations)
- Presetting stations
- To change the FM reception mode
- Function Menu Setting List
- General Setup Page
- Audio Setup Page
- TV Display
- Angle Mark
- OSD Lang
- Captions
- Screen Saver
- Last Memory
- Speaker Setup
- -Downmix
- SPDIF Setup
- - SPDIF Output
- HDCD
- Quality
- Audio, Subtitle, Disc Menu
- Parental
- Default
- Password Mode
- Password
- Use the Discs
- Normal playing
- Note:
- - MP3 Disc's normal playing
- Display the Playing Information
- Program playing
- Repeat playing
- Fast playing
- Skip select track
- Search the playing time
- Zoom play and level move function
- Play picture CD disc
- Advanced Operations
- TITLE
- CHAPTER
- Select menu
- Select angle
- Select subtitle
- Select language
- Setting the Clock
- To confirm the clock time
- Setting the Sleep Timer
- To confirm the sleep time
- To cancel the sleep timer setting
- Setting the Daily Timer
- To confirm the daily time
- To cancel the daily timer setting
- Protect the Disc
- Troubleshooting
- Specification
- System
- DVD
- Amplifier
- FM
- Speaker
- Remote
Brand : TELEFUNKEN
Model : TNE 1302
Category : Hi-Fi System